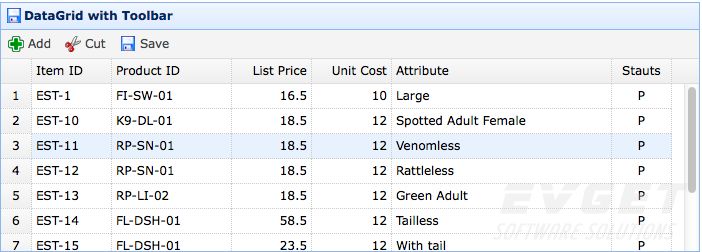
本教程中的示例说明了如何将工具栏添加到数据网格中,您可以在数据网格顶部的工具栏上放置按钮。

创建数据网格
|
1
2
3
4
5
6
7
8
9
10
11
12
13
14
15
16
17
|
<
table
id
=
"tt"
class
=
"easyui-datagrid"
style
=
"width:600px;height:250px"
url
=
"data/datagrid_data.json"
title
=
"DataGrid with Toolbar"
iconcls
=
"icon-save"
toolbar
=
"#tb"
>
<
thead
>
<
tr
>
<
th
field
=
"itemid"
width
=
"80"
>Item ID</
th
>
<
th
field
=
"productid"
width
=
"80"
>Product ID</
th
>
<
th
field
=
"listprice"
width
=
"80"
align
=
"right"
>List Price</
th
>
<
th
field
=
"unitcost"
width
=
"80"
align
=
"right"
>Unit Cost</
th
>
<
th
field
=
"attr1"
width
=
"150"
>Attribute</
th
>
<
th
field
=
"status"
width
=
"60"
align
=
"center"
>Stauts</
th
>
</
tr
>
</
thead
>
</
table
>
<
div
id
=
"tb"
>
<
a
href
=
"#"
class
=
"easyui-linkbutton"
iconcls
=
"icon-add"
plain
=
"true"
onclick
=
"javascript:alert('Add')"
>Add</
a
>
<
a
href
=
"#"
class
=
"easyui-linkbutton"
iconcls
=
"icon-cut"
plain
=
"true"
onclick
=
"javascript:alert('Cut')"
>Cut</
a
>
<
a
href
=
"#"
class
=
"easyui-linkbutton"
iconcls
=
"icon-save"
plain
=
"true"
onclick
=
"javascript:alert('Save')"
>Save</
a
>
</
div
>
|
您不需要编写任何JavaScript代码,只需通过“toolbar”属性添加工具栏到数据网格中即可。
下载该EasyUI示例:easyui-datagrid-demo.zip
有兴趣的朋友可以点击查看更多有关jQuery EasyUI的教程!


 6683
6683

 被折叠的 条评论
为什么被折叠?


