


shiro框架
1.shiro简介
Apache Shiro是Java的一个安全框架。功能强大,使用简单的Java安全框架,它为开发人员提供一个直观而全面的认证,授权,加密及会话管理的解决方案
2.shiro组成
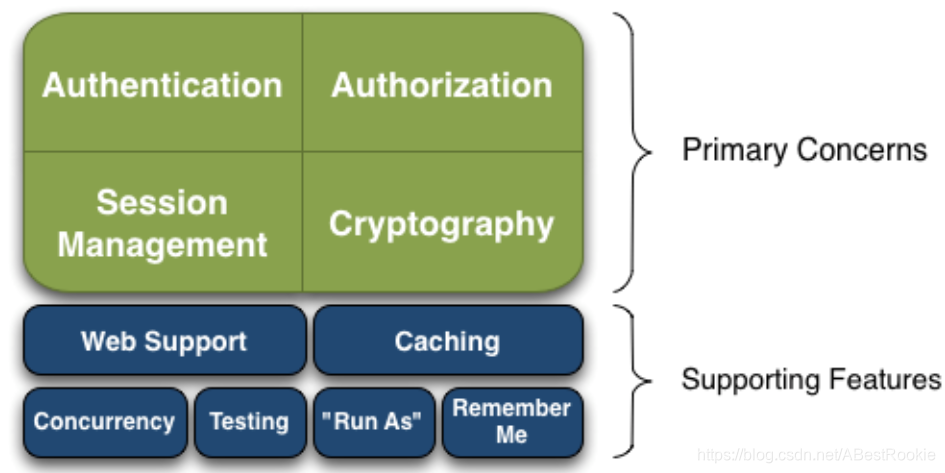 Authentication:身份认证/登录,验证用户是不是拥有相应的身份;
Authorization:授权,即权限验证,验证某个已认证的用户是否拥有某个权限;
Session Manager:会话管理,即用户登录后就是一次会话,在没有退出之前,它的所有信息都在会话中;
Cryptography:加密,保护数据的安全性,如密码加密存储到数据库,而不是明文存储;
3.shiro结构
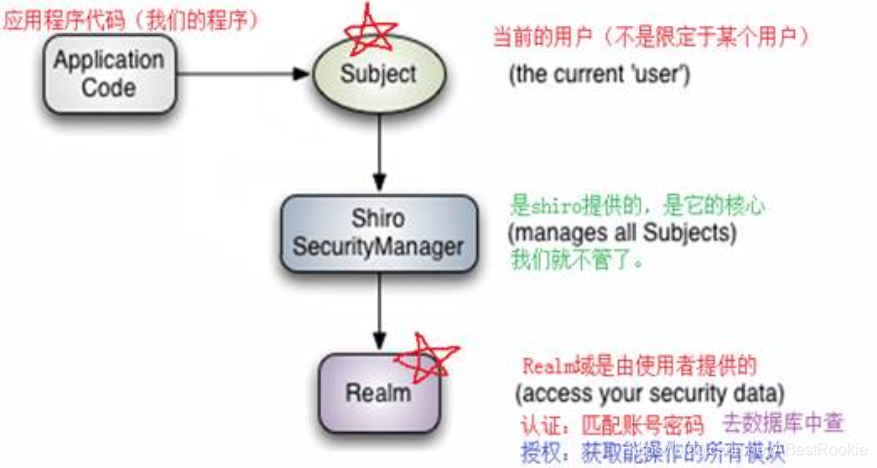
3.1shiro外部结构

Subject:主体
SecurityManager:安全管理器
Realm:域
流程:
1、应用代码通过Subject来进行认证和授权,而Subject又委托给SecurityManager;
2、我们需要给Shiro的SecurityManager注入Realm,从而让SecurityManager能得到合法的用户及其 权限进行判断。
3.2shiro内部结构
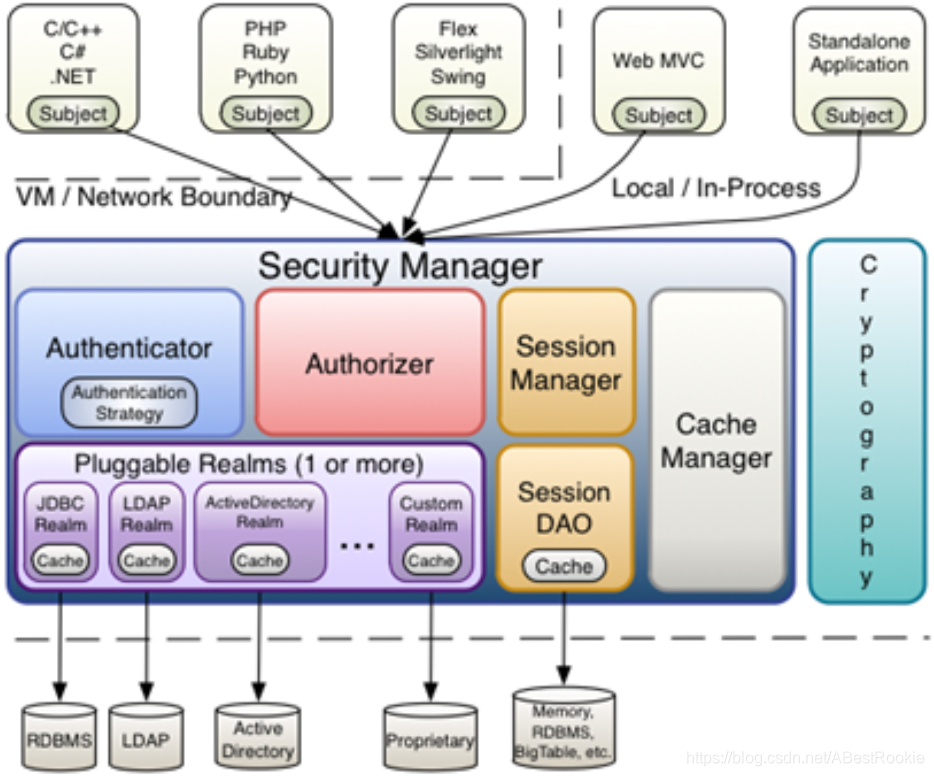
Subject:主体
SecurityManager:相当于SpringMVC中的DispatcherServlet,它管理着所有Subject、且负责进行认证和授权、及会话、缓存的管理。
Authenticator:认证器,负责主体认证的,这是一个扩展点,如果用户觉得Shiro默认的不好,可以自定义实现
Authrizer:授权器,或者访问控制器,用来决定主体是否有权限进行相应的操作
Realm:可以有1个或多个Realm,可以认为是安全实体数据源,即用于获取安全实体的
SessionManager:管理Session需要有人去管理它的生命周期
SessionDAO:数据访问对象,用于会话的CRUD
CacheManager:缓存控制器,来管理如用户、角色、权限等的缓存的
Cryptography:密码模块,Shiro提高了一些常见的加密组件用于如密码加密/解密的
4.shiro的认证和授权
1.认证。认证指的是匹配用户名和密码,让平台认识你。
2.授权。授权指的是当前认证的用户进入平台能操作什么。
4.1shiro登录方式
4.2 shiro中常用过滤器
1.**anon:**即Anonymous,匿名的,未认证(没有登录)的情况下也可以访问.
2.**perms:**即Permissions,权限,确定该用户的访问权限,没有该权限,则不能访问.
3.**authc:**即Authentication,认证,认证(登录)的情况下才可以访问.
内置10个过滤器:

4.3 shiro中的jsp标签

5 基于Shiro的用户认证
1 环境搭建
1.1 添加依赖
<dependency>
    <groupId>org.apache.shiro</groupId>
    <artifactId>shiro-spring</artifactId>
    <version>1.3.2</version>
</dependency>
<!--shiro核心包-->
<dependency>
    <groupId>org.apache.shiro</groupId>
    <artifactId>shiro-core</artifactId>
    <version>1.3.2</version>
</dependency>
1.2 web.xml配置
在web.xml中添加如下过滤器,注意filter-name的值是shiroFilter.
<!-- Shiro Security filter filter-name这个名字的值将来还会在spring中用到-->
 <filter>
   <filter-name>shiroFilter</filter-name>
   <filter-class>org.springframework.web.filter.DelegatingFilterProxy</filter-class>
   <init-param>
     <!--  过滤器的生命周期交给了spring管理-->
     <param-name>targetFilterLifecycle</param-name>
     <param-value>true</param-value>
   </init-param>
 </filter>
 <filter-mapping>
   <filter-name>shiroFilter</filter-name>
   <url-pattern>/*</url-pattern>
 </filter-mapping>
1.3 Spring整合shiro
resources下的spring文件夹创建配置文件applicationContext-shiro.xml
<?xml version="1.0" encoding="UTF-8"?>
<beans xmlns="http://www.springframework.org/schema/beans"
       xmlns:xsi="http://www.w3.org/2001/XMLSchema-instance" xmlns:aop="http://www.springframework.org/schema/aop"
       xsi:schemaLocation="
		http://www.springframework.org/schema/beans http://www.springframework.org/schema/beans/spring-beans.xsd
		http://www.springframework.org/schema/aop http://www.springframework.org/schema/aop/spring-aop.xsd">

<!-- filter-name这个名字的值来自于web.xml中filter的名字 -->
  <bean id="shiroFilter" class="org.apache.shiro.spring.web.ShiroFilterFactoryBean">
    <property name="securityManager" ref="securityManager"/>
    <!--登录页面 如果没有登录 访问项目的方法或页面 直接跳转到这个页面 -->
    <property name="loginUrl" value="/login.jsp"></property>
    <!--登录后 在访问没有经过授权的方法或页面时 直接跳转到这个页面 -->
    <property name="unauthorizedUrl" value="/unauthorized.jsp"></property>
    <property name="filterChainDefinitions">
      <!-- /**代表下面的多级目录也过滤 过滤器链 -->
      <value>
        /login.jsp = anon
        /css/** = anon
        /img/** = anon
        /plugins/** = anon
        /make/** = anon
        /favicon.ico= anon
        /login.do = anon
        /** = authc
      </value>
    </property>
  </bean>

<!-- 引用自定义的realm
  <bean id="saasRealm" class="cn.cf.realm.SaasRealm"/>
-->
  <bean id="securityManager" class="org.apache.shiro.web.mgt.DefaultWebSecurityManager">
   <!-- <property name="realm" ref="saasRealm"/>-->
  </bean>
  <!-- 安全管理器 -->
  <bean class="org.apache.shiro.spring.security.interceptor.AuthorizationAttributeSourceAdvisor">
     <property name="securityManager" ref="securityManager"/>
  </bean>

  <!-- 保证实现了Shiro内部lifecycle函数的bean执行 -->
  <bean id="lifecycleBeanPostProcessor" class="org.apache.shiro.spring.LifecycleBeanPostProcessor"/>

  <!-- 生成代理,通过代理进行控制 -->
  <bean class="org.springframework.aop.framework.autoproxy.DefaultAdvisorAutoProxyCreator"
     depends-on="lifecycleBeanPostProcessor">
    <property name="proxyTargetClass" value="true"/>
  </bean>

  <aop:aspectj-autoproxy proxy-target-class="true"/>
</beans>
2 完成shiro认证操作
1 修改LoginController登录方法
 @RequestMapping("/login")
   public String login(String email, String password) {
//     做非空判断
        if(StringUtils.isEmpty(email)||StringUtils.isEmpty(password)){
            request.setAttribute("error","邮箱或密码不能为空");
            return "forward:login.jsp";
        }
//        使用shiro的认证方式:1、创建令牌  2、获取主题  3、开始认证
        password = new Md5Hash(password, email, 2).toString();//把页面上输入的明文的密码转成密文的
        UsernamePasswordToken token = new UsernamePasswordToken(email,password);
        Subject subject = SecurityUtils.getSubject();
        try {
            subject.login(token);
        } catch (AuthenticationException e) {
//            e.printStackTrace();
            request.setAttribute("error","邮箱或者密码有误");
            return "forward:login.jsp";
        }
        User user = (User) subject.getPrincipal(); //从shiro中获取当前登录人
//        把当前登录人放入到session
        session.setAttribute("loginUser",user);
        List<Module> moduleList = moduleService.findModuleListByUser(user);
        session.setAttribute("modules",moduleList);
        return "home/main";
  }
2 自定义realm
继承一个父类AuthorizingRealm,实现父类的两个方法,一个关于认证,一个关于授权的
package cn.cf.realm;

import cn.cf.domain.system.Module;
import cn.cf.domain.system.User;
import cn.cf.service.system.UserService;
import org.apache.shiro.SecurityUtils;
import org.apache.shiro.authc.*;
import org.apache.shiro.authz.AuthorizationInfo;
import org.apache.shiro.authz.SimpleAuthorizationInfo;
import org.apache.shiro.realm.AuthorizingRealm;
import org.apache.shiro.subject.PrincipalCollection;
import org.springframework.beans.factory.annotation.Autowired;

import java.util.List;

public class SaasRealm extends AuthorizingRealm {

    @Autowired
    private UserService userService;

//    认证 ,在方法中完成email和password的校验
    @Override
    protected AuthenticationInfo doGetAuthenticationInfo(AuthenticationToken authenticationToken) throws AuthenticationException {
        System.out.println("+++++进入了认证方法AuthenticationInfo");
        UsernamePasswordToken token = (UsernamePasswordToken) authenticationToken;
        String email = token.getUsername();
        String password_page = new String(token.getPassword());
        User user = userService.findByEmail(email); //从数据库中查询
        if(user!=null){
//            匹配密码
            String password_db = user.getPassword();
            if(password_db.equals(password_page)){
                return new SimpleAuthenticationInfo(user,password_db,getName()); //Object principal, Object credentials 密码, String realmName 当前realm的类名
            }
        }
        return null; //没有用户
    }

//    授权
    @Override
    protected AuthorizationInfo doGetAuthorizationInfo(PrincipalCollection principalCollection) {

        return null;
    }

}
3 修改配置文件
Realm交给容器并且受securityManager的管理
    <!-- 引用自定义的realm-->
    <bean id="saasRealm" class="cn.cf.realm.SaaSRealm"/>

    <bean id="securityManager" class="org.apache.shiro.web.mgt.DefaultWebSecurityManager">
         <property name="realm" ref="saasRealm"/>
        <property name="cacheManager" ref="memoryCacheManager"/>
    </bean>
4 退出登录
修改原来的LoginController中的logout方法
    @RequestMapping(value = "/logout", name = "用户登出")
    public String logout() {
        SecurityUtils.getSubject().logout();   //登出
        return "forward:login.jsp";
    }
6 基于shiro的用户授权
1 Shiro授权方法
@Autowired
    private ModuleService moduleService;
//    授权
    @Override
    protected AuthorizationInfo doGetAuthorizationInfo(PrincipalCollection principalCollection) {
//        告诉shiro框架 当前登录人有哪些菜单权限
        System.out.println("------进入了授权方法AuthorizationInfo");
        SimpleAuthorizationInfo authorizationInfo = new SimpleAuthorizationInfo();

        User user = (User) principalCollection.getPrimaryPrincipal();
//        根据用户查询所拥有的菜单权限
        List<Module> moduleList = moduleService.findModuleListByUser(user);
        for (Module module : moduleList) {
           authorizationInfo.addStringPermission(module.getCpermission());
        }
        return authorizationInfo;
    }
2 授权设置
控制权限主要有两种方式,xml配置和注解
1 xml配置

2 注解使用

修改因权限不足抛出的异常
在访问方法时如果是因为权限原因也会显示500错误页面,现在要求:如果统一异常处理器中捕获的是UnauthorizedException异常,就跳转到unauthorized.jsp.
public class SaaSException implements HandlerExceptionResolver {
    @Override
    public ModelAndView resolveException(HttpServletRequest request, HttpServletResponse response, Object handler, Exception ex) {
//        需求:如果捕获的是UnauthorizedException异常,跳转到unauthorized.jsp
        ModelAndView mv = new ModelAndView();
        if(ex instanceof UnauthorizedException){  //如果捕获的是UnauthorizedException异常
//            跳转到unauthorized.jsp
            mv.setViewName("forward:/unauthorized.jsp"); //不通过视图解析器的
        }else{
            mv.setViewName("error");
        }
        mv.addObject("errorMsg",ex.getMessage());
        return mv;
    }
}
3 页面标签做细颗粒度的权限控制
1 引入标签库
<%@ taglib prefix="shiro" uri="http://shiro.apache.org/tags" %>
2 控制显示
使用shiro标签的shiro:hasPermission控制按钮的显隐

说明:当用户具备相应权限时,才会显示该按钮
4 自定义过滤器
说明:shiro现有的10个过滤器 现在模仿perms过滤器,自己重写一个过滤器.
<perms过滤器的源码>
package org.apache.shiro.web.filter.authz;

import java.io.IOException;
import javax.servlet.ServletRequest;
import javax.servlet.ServletResponse;

import org.apache.shiro.subject.Subject;

/**
 * Filter that allows access if the current user has the permissions specified by the mapped value, or denies access
 * if the user does not have all of the permissions specified.
 *
 * @since 0.9
 */
public class PermissionsAuthorizationFilter extends AuthorizationFilter {

    //TODO - complete JavaDoc

    public boolean isAccessAllowed(ServletRequest request, ServletResponse response, Object mappedValue) throws IOException {
//     /system/dept/list.do = perms["部门管理","删除部门"]
        Subject subject = getSubject(request, response);
        String[] perms = (String[]) mappedValue;
//          perms = ["部门管理","删除部门"]
        boolean isPermitted = true;
        if (perms != null && perms.length > 0) {
         //   perms数组有值
            if (perms.length == 1) {
               // 判断数组如果只有一个值时
                if (!subject.isPermitted(perms[0])) {
                    isPermitted = false;
                }
            } else {
                 // 判断数组的值超过一个时
                if (!subject.isPermittedAll(perms)) {
                    isPermitted = false;
                }
            }
        }
        return isPermitted;
    }
}
1 自定义过滤器
public class MyPermsFilter extends AuthorizationFilter {
   public MyPermsFilter() {
   }

   public boolean isAccessAllowed(ServletRequest request, ServletResponse response, Object mappedValue) throws IOException {
     Subject subject = this.getSubject(request, response);
     String[] perms = (String[])((String[])mappedValue);

 *//perms = ["部门管理","删除部门"]
  //有两个中任一个权限,即可访问
*     if (perms != null && perms.length > 0) {
       for (String perm : perms) {
         if (subject.isPermitted(perm)) {
           return true;
         }
       }
       return false;
          }

     return true;
   }
 }
2 交给Spring容器管理
<bean id="myPerms" class="cn.cf.filter.MyPermsFilter"/>
3 把过滤器交给shiro框架

4 使用自定义的过滤器
/system/dept/list.do = myPerms["部门管理","删除部门"]


 2万+
2万+


 被折叠的 条评论
为什么被折叠?
被折叠的 条评论
为什么被折叠?
 到【灌水乐园】发言


