SpringSecurity配置笔记–boot
文章目录
一、什么是SpringSecurity
Spring Security 最早不叫 Spring Security ,叫 Acegi Security,叫 Acegi Security 并不是说它和 Spring 就没有关系了,它依然是为 Spring 框架提供安全支持的。事实上,Java 领域的框架,很少有框架能够脱离 Spring 框架独立存在。Acegi Security 基于 Spring,可以帮助我们为项目建立丰富的角色与权限管理,但是最广为人诟病的则是它臃肿繁琐的配置,这一问题最终也遗传给了 Spring Security。
当 Acegi Security 投入 Spring 怀抱之后,先把这个名字改了,这就是大家所见到的 Spring Security 了,然后配置也得到了极大的简化。
但是和 Shiro 相比,人们对 Spring Security 的评价依然中重量级、配置繁琐。
二、有什么功能
对于一个权限管理框架而言,无论是 Shiro 还是 Spring Security,最最核心的功能,无非就是两方面:
认证
授权
通俗点说,认证就是我们常说的登录,授权就是权限鉴别,看看请求是否具备相应的权限。
Spring Security 支持多种不同的认证方式,这些认证方式有的是 Spring Security 自己提供的认证功能,有的是第三方标准组织制订的,主要有如下一些:
一些比较常见的认证方式:
HTTP BASIC authentication headers:基于IETF RFC 标准。
HTTP Digest authentication headers:基于IETF RFC 标准。
HTTP X.509 client certificate exchange:基于IETF RFC 标准。
LDAP:跨平台身份验证。
Form-based authentication:基于表单的身份验证。
Run-as authentication:用户用户临时以某一个身份登录。
OpenID authentication:去中心化认证。
除了这些常见的认证方式之外,一些比较冷门的认证方式,Spring Security 也提供了支持。
Jasig Central Authentication Service:单点登录。
Automatic “remember-me” authentication:记住我登录(允许一些非敏感操作)。
Anonymous authentication:匿名登录。
三、SpringSecurity的使用
使用默认配置的Security
1、引入依赖
<dependency>
    <groupId>org.springframework.boot</groupId>
    <artifactId>spring-boot-starter-security</artifactId>
</dependency>
2、默认什么都不配置(在yml中配置用户名和密码)
spring:
  security:
    user:
      name: user
      password: 552310
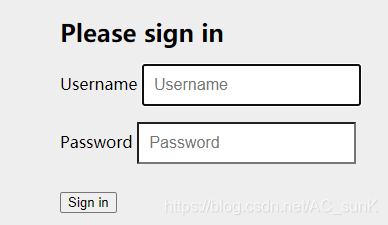
3、登陆效果

使用自定义配置(不使用数据库)
1、引入依赖
2、创建配置类并进行配置
@Configuration
public class WebSecurityConfig extends WebSecurityConfigurerAdapter {
    @Override
    protected void configure(HttpSecurity http) throws Exception {
        http.authorizeRequests()
                .antMatchers("/test/**").authenticated()
                .and()
                .formLogin()
                .loginProcessingUrl("/test/login")
                .successHandler(new AuthenticationSuccessHandler(){
                    @Override
                    public void onAuthenticationSuccess(HttpServletRequest httpServletRequest, HttpServletResponse httpServletResponse, Authentication authentication) throws IOException, ServletException {
                        httpServletResponse.setContentType("application/json;charset=utf-8");
                        PrintWriter out = httpServletResponse.getWriter();
                        out.write("{\"status\":\"success\",\"message\":\"登录成功!\"}");
                        out.flush();
                        out.close();
                    }
                })
                .failureHandler(new AuthenticationFailureHandler(){
                    @Override
                    public void onAuthenticationFailure(HttpServletRequest httpServletRequest, HttpServletResponse httpServletResponse, AuthenticationException e) throws IOException, ServletException {
                        httpServletResponse.setContentType("application/json;charset=utf-8");
                        PrintWriter out = httpServletResponse.getWriter();
                        out.write("{\"status\":\"error\",\"message\":\"账号或密码错误!\"}");
                        out.flush();
                        out.close();
                    }
                })
                .and()
                .csrf().disable();;
    }
}
3、登陆效果

使用数据库进行用户登陆验证
1、引入依赖
2、创建配置类
@Configuration
public class WebSecurityConfig extends WebSecurityConfigurerAdapter {

    @Autowired
	private UserService userService;

    @Bean
    public PasswordEncoder passwordEncoder(){
        return NoOpPasswordEncoder.getInstance();
	}

    @Override
    protected void configure(HttpSecurity http) throws Exception {
        http.authorizeRequests()
                .antMatchers("/test/**").authenticated()
                .and()
                .formLogin()
                .loginProcessingUrl("/test/login")
                .successHandler(new AuthenticationSuccessHandler(){
                    @Override
                    public void onAuthenticationSuccess(HttpServletRequest httpServletRequest, HttpServletResponse httpServletResponse, Authentication authentication) throws IOException, ServletException {
                        httpServletResponse.setContentType("application/json;charset=utf-8");
                        PrintWriter out = httpServletResponse.getWriter();
                        out.write("{\"status\":\"success\",\"message\":\"登录成功!\"}");
                        out.flush();
                        out.close();
                    }
                })
                .failureHandler(new AuthenticationFailureHandler(){
                    @Override
                    public void onAuthenticationFailure(HttpServletRequest httpServletRequest, HttpServletResponse httpServletResponse, AuthenticationException e) throws IOException, ServletException {
                        httpServletResponse.setContentType("application/json;charset=utf-8");
                        PrintWriter out = httpServletResponse.getWriter();
                        out.write("{\"status\":\"error\",\"message\":\"账号或密码错误!\"}");
                        out.flush();
                        out.close();
                    }
                })
                .and()
                .exceptionHandling()
                .authenticationEntryPoint((request, response, authException) -> {
                    response.setContentType("application/json;charset=utf-8");
                    response.setStatus(HttpServletResponse.SC_UNAUTHORIZED);
                    PrintWriter out = response.getWriter();
                    out.write("{\"status\":\"error\",\"message\":\"授权已过期,请重新登录。\"}");
                    out.flush();
                    out.close();
                })
                .accessDeniedHandler((request, response, authException) -> {
                    response.setContentType("application/json;charset=utf-8");
                    response.setStatus(HttpServletResponse.SC_FORBIDDEN);
                    PrintWriter out = response.getWriter();
                    out.write("{\"status\":\"error\",\"message\":\"您没有权限进行此操作!\"}");
                    out.flush();
                    out.close();
                })
                .and()
                .logout()
                .logoutUrl("/test/logout")
                .logoutSuccessHandler((request, response, authentication) -> {
                    response.setContentType("application/json;charset=utf-8");
                    PrintWriter out = response.getWriter();
                    out.write("{\"status\":\"success\",\"message\":\"注销成功!\"}");
                    out.flush();
                    out.close();
                })
                .and()
                .userDetailsService(userService)
                .csrf().disable();
    }

}
3、创建UserDetailService实现类
//接口
public interface UserService extends UserDetailsService{
    User getUserById(String uid);
    List<User> getUsers();
}

//接口实现类
@Service
public class UserServiceImpl implements UserService {

    @Autowired
	private UserMapper userMapper;

    @Override
    public User loadUserByUsername(String s) throws UsernameNotFoundException {
        User inputUser = new User();
        inputUser.setUsername(s);
        User user = userMapper.selectOne(inputUser);
        if (user == null) {
            throw new UsernameNotFoundException("找不到用户名为: " + s + "的用户");
        }
        return user;
	}

    @Override
    public User getUserById(String uid) {
        return userMapper.selectByPrimaryKey(uid);
	}

    @Override
    public List<User> getUsers() {
        return userMapper.selectAll();
    }

}

//实体类需要实现接口
public class User  implements UserDetails
4、登陆效果

四、SpringSecurity配置详解
| 配置段落 | 含义 |
|---|---|
| http .authorizeRequests() .antMatchers("/test/**") .authenticated() | authorizeRequests()方法返回一个配置类, antMatchers()在这个配置类上设置路径, authenticated()表示test路径下的所有资源都需要进行认证。 |
| .and() .formLogin() .loginProcessingUrl("/api/login") .successHandler( (request, response, authentication) -> { …逻辑 }) .failureHandler( (request, response, exception) -> { …逻辑 }) | and()方法使得上面一部分配置完成之后,返回到HttpSecurity方便进行下一项配置。 formLogin()会获取配置登陆的配置类, loginProcessingUrl()中配置的路径为登陆用户名和密码所提交的url, successHandler()和failureHandler()分别对应登陆成功和登陆失败后需要进行的操作。 |
| .and() .exceptionHandling() .authenticationEntryPoint( (request, response, authException) -> { …逻辑 }).accessDeniedHandler( (request, response, authException) -> { …逻辑 }) | exceptionHandling()方法返回出现异常时的配置类, authenticationEntryPoint()方法处理认证出现异常的情况, accessDeniedHandler()方法处理权限异常。 |
| .and() .logout() .logoutUrl("/test/logout") .logoutSuccessHandler( (request, response, authentication) -> { …逻辑 }) | logout()返回用户注销时的配置类, logoutUrl()设置注销时访问的Url, logoutSuccessHandler()处理注销成功之后的逻辑。 |
| .and() .userDetailsService(userService) .csrf() .disable(); | userDetailService()方法设置从数据库读取用户信息的类。 此类需要实现UserDetailsService接口并重写loadUserByUsername方法。 csrf().disable()关闭跨站请求伪造保护。 |
五、SpringSecurity配置类相关
1、配置类需要继承适配器

2、配置的三个方法
| 方法 | 作用 |
|---|---|
| configure(AuthenticationManagerBuilder auth) | 通过重载配置user-detail服务 |
| configure(WebSecurity web) | 通过重载配置Security的Filter链 |
| configure(HttpSecurity http) | 通过重载配置如何保护请求 |
3、了解用户是谁
1、通过给方法注入Authentication对象 通过对象的getPrincipal()获取
@GetMapping("/showuser")
public User showuser(Authentication auth){
    System.out.println(auth.getPrincipal());
    return (User)auth.getPrincipal();
}
2、在Controller方法上添加注解@AuthenticationPrincipal User user即可自动注入用户相关信息。


 940
940


 被折叠的 条评论
为什么被折叠?


