


线程的通信
例题:使用两个线程打印1-100。线程和线程2交替打印。
package demo02;
class Number implements Runnable{
    private int number = 1;
    @Override
    public void run() {
        while (true){
            synchronized (this) {
                notify();
                if (number <= 100){
                    System.out.println(Thread.currentThread().getName()+":"+number++);
                    try {
                        //使得调用如下wait方法得到线程进入阻塞状态
                        //一旦执行wait,会释放锁,这里和sleep不一样,sleep不会释放锁
                        wait();
                    } catch (InterruptedException e) {
                        e.printStackTrace();
                    }
                }else {
                    break;
                }
            }
        }
    }
}
public class Communication {
    public static void main(String[] args) {
        Number number = new Number();
        new Thread(number,"线程1").start();
        new Thread(number,"线程2").start();
    }
}
输出结果:

这里我们用了wait和notify两个方法进行线程通信,注意notify是按优先级唤醒某个线程,notifyAll是唤醒所有线程,在这里我们只有两个线程,一个线程执行notify和notifyAll效果是一样的。而调用wait方法得到线程进入阻塞状态,一旦执行wait,会释放锁,这里和sleep不一样,sleep不会释放锁。所以逻辑就很清晰了,线程1先进来拿到锁,唤醒2(这里其实刚开始2没有wait),然后打印1,1进入wait状态,释放锁,线程2拿到锁,进来,唤醒1,1没有锁也进不来,线程2打印2,然后进入wait,周而复始。
wait,notify,notifyAll三个方法只能够出现在同步代码块或同步方法中,用lock都不行
这三个方法的调用者,必须是同步代码块或同步方法中的同步监视器,也即锁,所以用lock实现锁不能用这三个方法
所以我们上述代码中的wait();也就是this.wait();,因为锁用了this,而this又可以省略,如果用了别的锁,则不能省略。
这三个方法,是定义在java.lang.Object中的,所以任意对象可以当锁,可以调用wait等方法。
sleep和wait的异同
一旦执行方法,都会使得当前的线程进入阻塞状态。
区别:
1、来自不同的类:sleep是Thread的静态类方法,wait是Object类的方法。
2、有没有释放锁(释放资源):sleep不出让系统资源;wait是进入线程等待池等待,出让系统资源,其他线程可以占用CPU。
3、sleep可以在任何需要的场景下调用,而wait方法必须在同步代码块或同步方法中使用。
4、一般wait不会加时间限制,因为如果wait线程的运行资源不够,再出来也没用,要等待其他线程调用notify/notifyAll唤醒等待池中的所有线程,才会进入就绪队列等待OS分配系统资源。sleep(milliseconds)可以用时间指定使它自动唤醒过来,如果时间不到只能调用interrupt()强行打断。
5、sleep必须捕获异常,而wait,notify和notifyAll不需要捕获异常。
经典例题:生产者/消费者问题

package demo02;

class Producer implements Runnable{
    private Clerk clerk;
    public Producer(){}
    public Producer(Clerk clerk){
        this.clerk = clerk;
    }
    @Override
    public void run() {
        System.out.println(Thread.currentThread().getName()+"开始生产产品……");
        while (true){
            try {
                Thread.sleep(1000);
            } catch (InterruptedException e) {
                e.printStackTrace();
            }
            clerk.produceProduct();
        }
    }
}
class Consumer implements Runnable{
    private Clerk clerk;
    public Consumer(){}
    public Consumer(Clerk clerk){
        this.clerk = clerk;
    }
    @Override
    public void run() {
        System.out.println(Thread.currentThread().getName()+"开始消费产品……");
        while (true){
            try {
                Thread.sleep(3000);
            } catch (InterruptedException e) {
                e.printStackTrace();
            }
            clerk.consumeProduct();
        }
    }
}
class Clerk{
    public Clerk(){}
    public Clerk(int productCount){
        this.productCount = productCount;
    }
    //已经有的产品数量
    private int productCount;
    //生产产品给到店员
    public synchronized void produceProduct() {//锁是Clerk的实例对象
        if(productCount < 20){
            productCount++;
            System.out.println(Thread.currentThread().getName()+":开始生产第"+productCount+"个产品");
            //只要有一个产品存在,就可以唤醒消费者来消费了
            notify();
        }else{
            try {
                wait();
            } catch (InterruptedException e) {
                e.printStackTrace();
            }
        }
    }
    //消费者从店员处消费产品
    public synchronized void consumeProduct() {//锁是Clerk的实例对象
        if(productCount > 0){
            System.out.println(Thread.currentThread().getName()+":开始消费第"+productCount+"个产品");
            productCount--;
            //只要消费了,就必小于20了,可以唤醒生产者生产了
            notify();
        }else{
            try {
                wait();
            } catch (InterruptedException e) {
                e.printStackTrace();
            }
        }
    }
}
public class Product {
    public static void main(String[] args) {
        Clerk clerk = new Clerk(0);
        Producer p1 = new Producer(clerk);
        Thread t1 = new Thread(p1,"生产者1");
        Consumer c1 = new Consumer(clerk);
        Consumer c2 = new Consumer(clerk);
        Thread t2 = new Thread(c1,"消费者1");
        Thread t3 = new Thread(c2,"消费者2");
        t1.start();
        t2.start();
        t3.start();
    }
}
执行结果:

JDK5.0新增线程创建方式
实现Callable接口


FutureTask同时实现Runnable接口和Future接口,所以可以放进Thread类构造器。
1.创建一个实现Callable的实现类。
2.覆写call方法,将此线程需要执行的操作写在call中,注意有返回值。
3.创建Callable接口实现类的对象。
4.将此Callable接口实现类的对象作为参数传递到FutureTask的构造器,创建FutureTask的对象。
5.将该FutureTask对象传入Thread构造器,创建Thread对象,并调用start方法。
如果对call返回值感兴趣,调用get方法获取返回值。
如何理解实现Callable接口的方式比实现Runnable接口方式更强大?
1.call可以有返回值。
2.call可以抛出异常,被外部捕获,获取异常的信息。
3.Callable支持泛型。
package demo02;
//实现Callable接口
import java.util.concurrent.Callable;
import java.util.concurrent.ExecutionException;
import java.util.concurrent.FutureTask;
class NumThread implements Callable{
@Override
public Object call() throws Exception {
int sum = 0;
for (int i = 1; i <= 10; i++) {
if(i % 2 == 0){
sum += i;
System.out.println(i);
}
}
return sum;
}
}
public class ThreadNew {
public static void main(String[] args) {
NumThread numThread = new NumThread();
FutureTask futureTask = new FutureTask(numThread);
//FutureTask实现了Runnable接口 所以可以放
new Thread(futureTask).start();
try {
//get方法的返回值即为FutureTask构造器参数Callable实现类重写的call方法的返回值。
//必须线程启动了之后才能get 要不然什么也get不到还无法结束程序
Object o = futureTask.get();
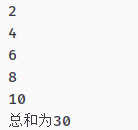
System.out.println("总和为"+o);
} catch (InterruptedException e) {
e.printStackTrace();
} catch (ExecutionException e) {
e.printStackTrace();
}
}
}
结果
使用泛型:
package demo02;

//实现Callable接口

import java.util.concurrent.Callable;
import java.util.concurrent.ExecutionException;
import java.util.concurrent.FutureTask;

class NumThread implements Callable<Integer>{
    @Override
    public Integer call() throws Exception {
        int sum = 0;
        for (int i = 1; i <= 10; i++) {
            if(i % 2 == 0){
                sum += i;
                System.out.println(i);
            }
        }
        return sum;
    }
}
public class ThreadNew {
    public static void main(String[] args) {
        NumThread numThread = new NumThread();
        FutureTask<Integer> futureTask = new FutureTask<Integer>(numThread);
        //FutureTask实现了Runnable接口 所以可以放
        new Thread(futureTask).start();
        try {
            //get方法的返回值即为FutureTask构造器参数Callable实现类重写的call方法的返回值。
            //必须线程启动了之后才能get 要不然什么也get不到还无法结束程序
            Integer o = futureTask.get();
            System.out.println("总和为"+o);
        } catch (InterruptedException e) {
            e.printStackTrace();
        } catch (ExecutionException e) {
            e.printStackTrace();
        }
    }
}
使用线程池


下面只看创建一个可重用固定线程数的线程池
java ExecutorService service = Executors.newFixedThreadPool(n);
我们声明的ExecutorService类的service有两个方法,一个是execute方法,适用于Runnable接口的实现类,一个是submit方法,适用于Callable接口实现类。执行了后,用shutdown方法结束线程池。
package demo02;

import java.util.concurrent.ExecutorService;
import java.util.concurrent.Executors;
class NumThread1 implements Runnable{
    @Override
    public void run() {
        for (int i = 1; i <= 20; i++) {
            if (i % 2 == 1) {
                System.out.println(Thread.currentThread().getName()+":"+i);
            }
        }
    }
}
class NumThread2 implements Runnable{
    @Override
    public void run() {
        for (int i = 1; i <= 20; i++) {
            if (i % 2 == 0) {
                System.out.println(Thread.currentThread().getName()+":"+i);
            }
        }
    }
}
public class ThreadPool {
    public static void main(String[] args) {
        ExecutorService service = Executors.newFixedThreadPool(10);
        service.execute(new NumThread2());
        service.execute(new NumThread1());
        service.shutdown();
    }
}
结果:

这个过程大致如下:
1.提供指定线程数量的线程池。
2.执行指定的线程的操作。需要提供实现Runnable接口或Callable接口的类的对象。
3.关闭线程池。
开发中一般都用线程池,因为有如下好处:
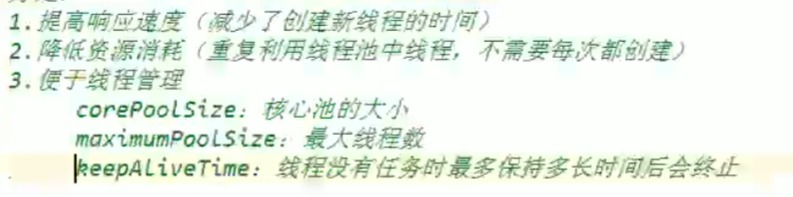
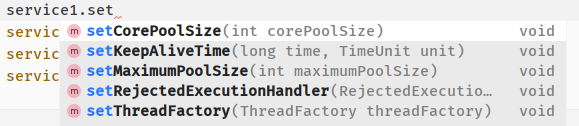
线程池的管理,因为ExecutorService是接口,我们没法设置属性,因为接口有属性也是常量,所以我们要找他的实现类,通过反射可以找到为ThreadPoolExecutor,此时我们把service强制转换为ThreadPoolExecutor类,就可以进行属性设置了

守护线程
java中的线程分为两种:守护线程(Daemon)和用户线程(User)。
任何线程都可以设置为守护线程和用户线程,通过方法Thread.setDaemon(bool on);true则把该线程设置为守护线程,反之则为用户线程。Thread.setDaemon()必须在Thread.start()之前调用,否则运行时会抛出异常。
两者的区别:
唯一的区别是判断虚拟机(JVM)何时离开,Daemon是为其他线程提供服务,如果全部的User Thread已经撤离,Daemon 没有可服务的线程,JVM撤离。也可以理解为守护线程是JVM自动创建的线程(但不一定),用户线程是程序创建的线程;比如JVM的垃圾回收线程是一个守护线程,当所有线程已经撤离,不再产生垃圾,守护线程自然就没事可干了,当垃圾回收线程是Java虚拟机上仅剩的线程时,Java虚拟机会自动离开。


 2212
2212


 被折叠的 条评论
为什么被折叠?
被折叠的 条评论
为什么被折叠?
 到【灌水乐园】发言


