


牙科口腔诊所小程序开发全解析:从核心功能到流量裂变的完整方案
摘要:
本文从实际场景出发,系统性拆解牙科类小程序的开发方案,包含 7 大核心功能模块设计、技术架构选型、诊所运营管理及流量裂变策略,为医疗健康类小程序的开发提供完整落地思路。
一、行业痛点与解决方案
(一)市场现状
- 数据洞察:2023 年口腔医疗市场规模突破 2000 亿元,35 岁以上人群龋齿率高达 90%,但传统诊所面临三大难题:
- 获客依赖线下地推,成本高达 200 - 500 元 / 人
- 患者就诊流程繁琐(平均耗时 2.5 小时)
- 复购率低(洁牙用户年复购率不足 30%)
(二)数字化破局
通过小程序实现四大升级:
线上流量精准获客(百度 / 抖音投放 ROI 提升 3 倍)
就诊全流程数字化(候诊时间缩短 60%)
私域用户深度运营(复购率提升至 45%)
供应链管理智能化(耗材损耗降低 20%)
二、核心功能模块设计(附技术方案)
(一) 智能预约系统(日活关键模块)
功能设计:
- 三维时间轴算法:动态展示医生 7 天内的可约时段(红 / 黄 / 绿标识饱和度)
- 急诊插队逻辑:急性牙痛患者自动触发短信通知最近 3 位医生
- 家庭账户体系:支持添加 5 位家庭成员,同步儿童换牙提醒
技术实现:
// 基于遗传算法的智能排班引擎
public class ScheduleOptimizer {
    // 输入参数:医生技能树、历史接诊量、紧急程度权重
    public List<TimeSlot> generateSlots(Doctor doctor, int urgencyLevel) {
        // 使用 NSGA - II 多目标优化算法
        // 初始化种群
        List<Chromosome> population = initializePopulation();
        for (int i = 0; i < MAX_GENERATIONS; i++) {
            // 计算适应度
            calculateFitness(population);
            // 选择操作
            List<Chromosome> newPopulation = selection(population);
            // 交叉操作
            crossover(newPopulation);
            // 变异操作
            mutation(newPopulation);
            population = newPopulation;
        }
        // 获取帕累托前沿解
        List<Chromosome> paretoFront = getParetoFront(population);
        // 将染色体转换为时间片
        List<TimeSlot> timeSlots = convertChromosomesToSlots(paretoFront);
        return timeSlots;
    }
}
(二)AR 牙齿健康模拟(差异化体验)
- 技术栈:ARKit + Unity3D 实时渲染
- 应用场景:
- 正畸效果预测:上传侧脸照生成 3D 颌面模型
- 龋齿风险可视化:用热力图显示智齿感染概率
- 数据反馈:某连锁诊所接入后咨询转化率提升 27%
(三)社交裂变引擎(低成本获客)
玩法设计:
| 活动类型 | 参与规则 | 奖励机制 |
|---|---|---|
| 老带新拼团 | 3 人成团种植牙 | 团长免麻醉费 |
| 签到打卡 | 连续 7 天刷牙打卡 | 赠送电动牙刷头 |
| 病例征集 | 上传正畸对比视频 | 瓜分万元奖金池 |
技术要点:
- 邀请关系链追踪:Redis HyperLogLog 统计二级裂变
import redis

r = redis.Redis(host='localhost', port=6379, db=0)

def track_invitation(sender_id, receiver_id):
    # 使用 HyperLogLog 记录邀请关系
    r.pfadd(f"invitation:{sender_id}", receiver_id)
    # 可以进一步设置邀请有效期等逻辑
r.setex(f"invitation:{sender_id}:{receiver_id}:valid", 60 * 60 * 24, 1) # 有效期 24 小时- 风控机制:设备指纹 + 行为分析识别羊毛党
import hashlib
import time

# 模拟获取设备指纹
def get_device_fingerprint(request):
    device_info = f"{request.META.get('HTTP_USER_AGENT')}{request.META.get('REMOTE_ADDR')}"
    return hashlib.sha256(device_info.encode()).hexdigest()

# 模拟行为分析
def analyze_user_behavior(user_id, device_fingerprint, request):
    # 记录用户行为时间戳
    current_time = time.time()
    behavior_log = {
        "user_id": user_id,
        "device_fingerprint": device_fingerprint,
        "timestamp": current_time,
        "action": request.path
    }
    # 这里可以将行为日志存储到数据库或消息队列进行后续分析
    # 简单示例:打印日志
    print(behavior_log)
    # 假设羊毛党行为特征:短时间内频繁访问特定页面
    if len([log for log in behavior_logs if log["user_id"] == user_id and log["action"] == "/specific_page" and current_time - log["timestamp"] < 60]) > 5:
        return True
    return False
三、诊所端管理系统设计
(一)智能 CRM 看板
患者标签体系:
- 消费能力(LTV 值分层)
- 敏感维度(价格 / 服务 / 距离)
- 风险标记(欠费 / 投诉历史)
(二)物联网集成方案
| 设备类型 | 对接方式 | 数据应用 |
|---|---|---|
| 口扫仪 | Bluetooth LE | 实时上传 3D 牙模 |
| 拍片机 | DICOM 协议 | AI 龋齿检测 |
| 消毒柜 | Modbus TCP | 灭菌周期预警 |
四、技术架构深度解析
(一)微服务拆分策略
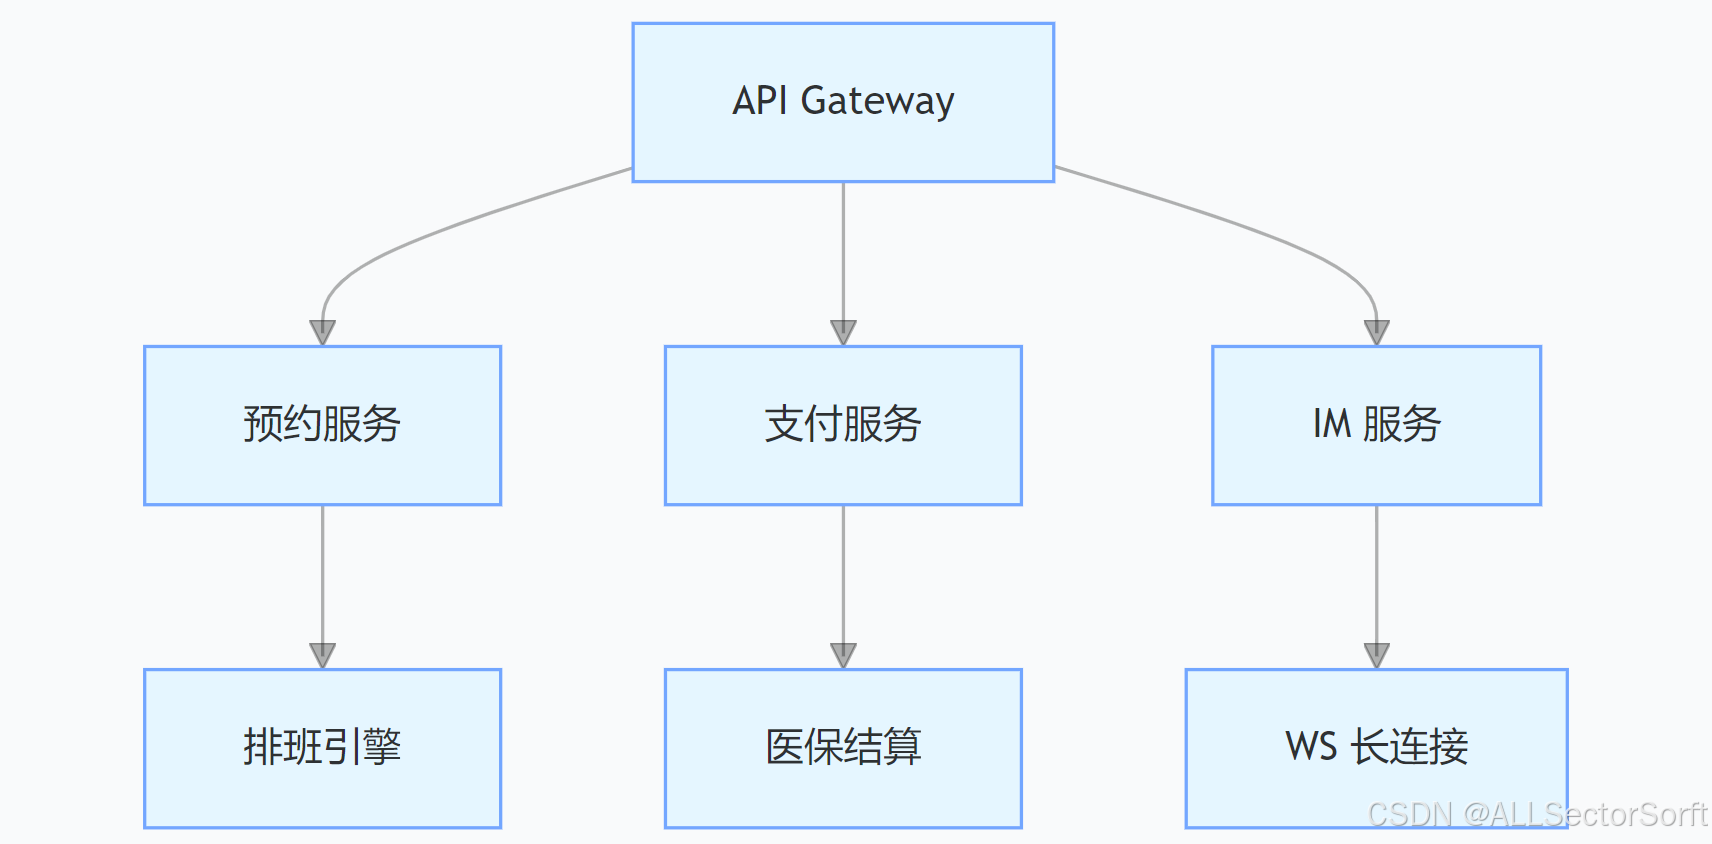
graph TD
    A[API Gateway] --> B[预约服务]
    A --> C[支付服务]
    A --> D[IM 服务]
    B --> E[排班引擎]
    C --> F[医保结算]
    D --> G[WS 长连接]
预约服务代码示例
@RestController
@RequestMapping("/appointment")
public class AppointmentController {
    @Autowired
    private AppointmentService appointmentService;

    @PostMapping("/book")
    public ResponseEntity<String> bookAppointment(@RequestBody AppointmentRequest request) {
        try {
            appointmentService.book(request);
            return ResponseEntity.ok("预约成功");
        } catch (Exception e) {
            return ResponseEntity.status(HttpStatus.INTERNAL_SERVER_ERROR).body("预约失败:" + e.getMessage());
        }
    }
}
@Service
public class AppointmentService {
@Autowired
private DoctorRepository doctorRepository;
@Autowired
private AppointmentRepository appointmentRepository;
public void book(AppointmentRequest request) {
Doctor doctor = doctorRepository.findById(request.getDoctorId()).orElseThrow(() -> new RuntimeException("医生不存在"));
// 检查医生时间是否冲突
if (isTimeConflict(doctor, request.getAppointmentTime())) {
throw new RuntimeException("时间冲突");
}
Appointment appointment = new Appointment();
appointment.setPatientId(request.getPatientId());
appointment.setDoctorId(request.getDoctorId());
appointment.setAppointmentTime(request.getAppointmentTime());
appointmentRepository.save(appointment);
}
private boolean isTimeConflict(Doctor doctor, LocalDateTime appointmentTime) {
List<Appointment> existingAppointments = appointmentRepository.findByDoctorIdAndAppointmentTime(doctor.getId(), appointmentTime);
return!existingAppointments.isEmpty();
}
}(二)高并发场景优化
- 预约秒杀方案:
- 采用 Redis + Lua 脚本库存扣减
-- 库存扣减 Lua 脚本
local key = KEYS[1]
local count = tonumber(ARGV[1])
local stock = tonumber(redis.call('GET', key))
if stock >= count then
    redis.call('DECRBY', key, count)
    return 1
else
    return 0
end- 本地缓存医生时间片状态
// 本地缓存示例,使用 Guava Cache
import com.google.common.cache.Cache;
import com.google.common.cache.CacheBuilder;

public class DoctorTimeSlotCache {
    private static final Cache<String, List<TimeSlot>> doctorTimeSlotCache = CacheBuilder.newBuilder()
          .maximumSize(1000)
          .expireAfterWrite(10, TimeUnit.MINUTES)
          .build();

    public static List<TimeSlot> getTimeSlots(String doctorId) {
        try {
            return doctorTimeSlotCache.get(doctorId, () -> {
                // 从数据库或其他数据源获取时间片数据
                return fetchTimeSlotsFromDB(doctorId);
            });
        } catch (ExecutionException e) {
            e.printStackTrace();
            return null;
        }
    }

    private static List<TimeSlot> fetchTimeSlotsFromDB(String doctorId) {
        // 模拟从数据库查询
        // 实际应用中需要连接数据库并执行 SQL 查询
        return new ArrayList<>();
    }
}- 排队叫号系统使用 Kafka 顺序消费
import org.apache.kafka.clients.consumer.ConsumerConfig;
import org.apache.kafka.clients.consumer.ConsumerRecord;
import org.apache.kafka.clients.consumer.ConsumerRecords;
import org.apache.kafka.clients.consumer.KafkaConsumer;
import org.apache.kafka.common.serialization.StringDeserializer;

import java.time.Duration;
import java.util.Collections;
import java.util.Properties;

public class QueueConsumer {
    public static void main(String[] args) {
        Properties props = new Properties();
        props.put(ConsumerConfig.BOOTSTRAP_SERVERS_CONFIG, "localhost:9092");
        props.put(ConsumerConfig.GROUP_ID_CONFIG, "queue-group");
        props.put(ConsumerConfig.KEY_DESERIALIZER_CLASS_CONFIG, StringDeserializer.class.getName());
        props.put(ConsumerConfig.VALUE_DESERIALIZER_CLASS_CONFIG, StringDeserializer.class.getName());
        props.put(ConsumerConfig.ISOLATION_LEVEL_CONFIG, "read_committed");
        props.put(ConsumerConfig.ENABLE_AUTO_COMMIT_CONFIG, "false");

        KafkaConsumer<String, String> consumer = new KafkaConsumer<>(props);
        consumer.subscribe(Collections.singletonList("queue-topic"));

        while (true) {
            ConsumerRecords<String, String> records = consumer.poll(Duration.ofMillis(100));
            for (ConsumerRecord<String, String> record : records) {
                // 处理排队叫号消息
                System.out.println("Received message: " + record.value());
            }
            consumer.commitSync();
        }
    }
}- 容灾设计:
- 华东 / 华南双活部署
- 诊疗核心业务降级预案(如预约失败自动补偿代金券)
@ControllerAdvice
public class GlobalExceptionHandler {
    @ExceptionHandler(AppointmentException.class)
    @ResponseBody
    public ResponseEntity<String> handleAppointmentException(AppointmentException e) {
        // 预约失败补偿逻辑
        String couponCode = generateCoupon();
        return ResponseEntity.ok("预约失败,已补偿代金券:" + couponCode);
    }

    private String generateCoupon() {
        // 生成代金券逻辑,例如调用优惠券服务 API
        return "COUPON_12345";
    }
}
五、合规与风控体系
(一)医疗数据安全
- 等保 2.0 三级认证要求:
- 患者面部特征数据本地化存储
- 问诊记录采用国密 SM4 加密
- 审计日志留存 180 天以上
import org.bouncycastle.crypto.CipherParameters;
import org.bouncycastle.crypto.engines.SM4Engine;
import org.bouncycastle.crypto.modes.CBCBlockCipher;
import org.bouncycastle.crypto.paddings.PaddedBufferedBlockCipher;
import org.bouncycastle.crypto.params.KeyParameter;
import org.bouncycastle.crypto.params.ParametersWithIV;

public class SM4Encryption {
    private static final byte[] key = "1234567890abcdef".getBytes();
    private static final byte[] iv = "fedcba0987654321".getBytes();

    public static byte[] encrypt(String plaintext) {
        try {
            SM4Engine engine = new SM4Engine();
            CipherParameters keyParam = new KeyParameter(key);
            CipherParameters ivParam = new ParametersWithIV(keyParam, iv);
            PaddedBufferedBlockCipher cipher = new PaddedBufferedBlockCipher(new CBCBlockCipher(engine));
            cipher.init(true, ivParam);
            byte[] input = plaintext.getBytes("UTF-8");
            byte[] encrypted = new byte[cipher.getOutputSize(input.length)];
            int len = cipher.processBytes(input, 0, input.length, encrypted, 0);
            cipher.doFinal(encrypted, len);
            return encrypted;
        } catch (Exception e) {
            e.printStackTrace();
            return null;
        }
    }

    public static String decrypt(byte[] encrypted) {
        try {
            SM4Engine engine = new SM4Engine();
            CipherParameters keyParam = new KeyParameter(key);
            CipherParameters ivParam = new ParametersWithIV(keyParam, iv);
            PaddedBufferedBlockCipher cipher = new PaddedBufferedBlockCipher(new CBCBlockCipher(engine));
            cipher.init(false, ivParam);
            byte[] decrypted = new byte[cipher.getOutputSize(encrypted.length)];
            int len = cipher.processBytes(encrypted, 0, encrypted.length, decrypted, 0);
            cipher.doFinal(decrypted, len);
            return new String(decrypted, "UTF-8");
        } catch (Exception e) {
            e.printStackTrace();
            return null;
        }
    }
}
(二)保险对接方案
- 医保支付:调用各地医保局「移动支付 SDK」
- 商业保险:与平安健康等平台 API 直连,实现:
- 种植牙分期付款
- 隐形正畸免息贷款
- 意外牙科险快速理赔
// 模拟与商业保险平台 API 对接获取种植牙分期付款信息
public class InsuranceAPI {
    public static InstallmentPlan getDentalImplantInstallmentPlan(int implantType) {
        // 构建 HTTP 请求
        String url = "https://insurance-platform.com/api/dental/implant/installment";
        HttpURLConnection connection = null;
        try {
            URL obj = new URL(url);
            connection = (HttpURLConnection) obj.openConnection();
            connection.setRequestMethod("POST");
            connection.setRequestProperty("Content-Type", "application/json");
            // 请求体包含种植牙类型等信息
            String requestBody = "{\"implantType\":" + implantType + "}";
            connection.setDoOutput(true);
            OutputStreamWriter writer = new OutputStreamWriter(connection.getOutputStream());
            writer.write(requestBody);
            writer.flush();
            writer.close();

            int responseCode = connection.getResponseCode();
            if (responseCode == HttpURLConnection.HTTP_OK) {
                BufferedReader in = new BufferedReader(new InputStreamReader(connection.getInputStream()));
                String inputLine;
                StringBuilder response = new StringBuilder();
                while ((inputLine = in.readLine()) != null) {
                    response.append(inputLine);
                }
                in.close();
                // 解析响应获取分期付款计划
                JSONObject jsonResponse = new JSONObject(response.toString());
                InstallmentPlan plan = new InstallmentPlan();
                plan.setMonths(jsonResponse.getInt("months"));
                plan.setInterestRate(jsonResponse.getDouble("interestRate"));
                return plan;
            } else {
                throw new RuntimeException("保险 API 调用失败,响应码:" + responseCode);
            }
        } catch (IOException e) {
            e.printStackTrace();
            return null;
        } finally {
            if (connection != null) {
                connection.disconnect();
            }
        }
    }
}
六、流量运营实战策略
(一)抖音本地推 ROI 提升技巧
-
内容矩阵:
- 科普类:《智齿要不要拔?3 个自测方法》
- 促销类:《儿童涂氟 9.9 元限时抢》
- 剧情类:《牙医的一天》职场 Vlog
-
投放策略:
- 使用 ADQ 批量创建相似人群包
- 评论区埋点「点击蓝链领 699 元新人礼包」
// 假设使用 JavaScript 进行评论区埋点
function addCommentLink() {
    const commentSection = document.querySelector('.comment-section');
    const link = document.createElement('a');
    link.href = 'https://your - miniapp.com/register?coupon=699';
(二)私域复购体系
- SOP 示例:
# 自动化消息触达
import pandas as pd
from datetime import datetime, timedelta


def send_reminder(user_df):
    current_date = datetime.now()
    for index, row in user_df.iterrows():
        last_service_date = datetime.strptime(row['last_service_date'], '%Y-%m-%d')
        if row['last_service'] == "洗牙":
            if (current_date - last_service_date) >= timedelta(days=180):
                coupon = "洁牙7折券"
                # 这里假设使用第三方短信服务发送消息,实际需接入对应SDK
                print(f"向用户{row['user_id']}发送洗牙提醒,附带优惠券{coupon}")
        elif row['has_implant']:
            implant_install_date = datetime.strptime(row['implant_install_date'], '%Y-%m-%d')
            if (current_date - implant_install_date) >= timedelta(days=365):
                # 同样假设消息发送方式,实际要根据所用工具调整
                print(f"向用户{row['user_id']}发送种植体年度护理提醒")
为了更有效地实现私域复购体系,我们可以进一步优化用户数据管理。创建一个函数用于更新用户服务记录,以便准确跟踪用户的服务历史,这对于精准推送复购信息至关重要。
def update_user_service_record(user_df, user_id, service_type):
    current_date = datetime.now().strftime('%Y-%m-%d')
    if service_type == "洗牙":
        user_df.loc[user_df['user_id'] == user_id, 'last_service'] = "洗牙"
        user_df.loc[user_df['user_id'] == user_id, 'last_service_date'] = current_date
    elif service_type == "种植牙":
        user_df.loc[user_df['user_id'] == user_id, 'has_implant'] = True
        user_df.loc[user_df['user_id'] == user_id, 'implant_install_date'] = current_date
    return user_df
同时,为了提高私域用户的活跃度和参与度,可以引入积分系统。用户每次消费或参与特定活动(如分享小程序、完成问卷调查等)都能获得积分,积分可用于兑换礼品或服务优惠券。以下是一个简单的积分计算和兑换逻辑示例:
def calculate_user_points(user_df, user_id, activity_type, points):
    user_df.loc[user_df['user_id'] == user_id, 'points'] += points
    # 记录积分获取活动详情
    activity_log = {
        'user_id': user_id,
        'activity_type': activity_type,
        'points': points,
        'activity_date': datetime.now().strftime('%Y-%m-%d')
    }
    # 这里假设将活动记录存储到一个列表中,实际应用可存入数据库
    activity_logs.append(activity_log)
    return user_df


def redeem_points(user_df, user_id, points_to_redeem, reward_type):
    user_points = user_df.loc[user_df['user_id'] == user_id, 'points'].values[0]
    if user_points >= points_to_redeem:
        user_df.loc[user_df['user_id'] == user_id, 'points'] -= points_to_redeem
        # 发放奖励,例如生成优惠券码
        if reward_type == "优惠券":
            coupon_code = generate_coupon_code()
            user_df.loc[user_df['user_id'] == user_id, 'coupon_code'] = coupon_code
            print(f"用户{user_id}成功使用{points_to_redeem}积分兑换优惠券,优惠券码:{coupon_code}")
        else:
            print(f"用户{user_id}成功使用{points_to_redeem}积分兑换{reward_type}")
    else:
        print(f"用户{user_id}积分不足,无法兑换")
    return user_df


def generate_coupon_code():
    import random
    import string
    characters = string.ascii_letters + string.digits
    coupon_code = ''.join(random.choice(characters) for i in range(8))
    return coupon_code


# 初始化活动记录列表
activity_logs = []
七、未来演进方向
(一)AI 辅助诊断:CNN 算法实现 X 光片龋齿自动标注
在实现 AI 辅助诊断方面,以 Python 和 TensorFlow 框架为例,构建一个简单的 CNN 模型用于 X 光片龋齿检测。首先,需要准备大量带有龋齿标注的 X 光片数据集,将其分为训练集、验证集和测试集。
import tensorflow as tf
from tensorflow.keras.models import Sequential
from tensorflow.keras.layers import Conv2D, MaxPooling2D, Flatten, Dense
import numpy as np
import os
from skimage.io import imread
from sklearn.model_selection import train_test_split


# 加载并预处理数据
def load_and_preprocess_data(data_dir):
    images = []
    labels = []
    for label in os.listdir(data_dir):
        label_dir = os.path.join(data_dir, label)
        for img_file in os.listdir(label_dir):
            img_path = os.path.join(label_dir, img_file)
            img = imread(img_path)
            img = np.array(img) / 255.0
            images.append(img)
            labels.append(int(label))
    images = np.array(images)
    labels = np.array(labels)
    return images, labels


data_dir = 'path/to/your/xray_data'
images, labels = load_and_preprocess_data(data_dir)
X_train, X_test, y_train, y_test = train_test_split(images, labels, test_size=0.2, random_state=42)
X_train, X_val, y_train, y_val = train_test_split(X_train, y_train, test_size=0.2, random_state=42)


# 构建CNN模型
model = Sequential([
    Conv2D(32, (3, 3), activation='relu', input_shape=(224, 224, 3)),
    MaxPooling2D((2, 2)),
    Conv2D(64, (3, 3), activation='relu'),
    MaxPooling2D((2, 2)),
    Flatten(),
    Dense(64, activation='relu'),
    Dense(2, activation='softmax')
])


model.compile(optimizer='adam',
              loss='sparse_categorical_crossentropy',
              metrics=['accuracy'])


# 训练模型
history = model.fit(X_train, y_train, epochs=10, validation_data=(X_val, y_val))


# 评估模型
test_loss, test_acc = model.evaluate(X_test, y_test)
print(f"测试准确率:{test_acc}")
此模型只是一个基础示例,实际应用中需要更复杂的架构调整、超参数优化以及大量的数据增强技术来提高模型的泛化能力和准确性。
(二) 智能硬件生态:
- 蓝牙牙刷数据同步(刷牙力度 / 时长监测)
为了实现蓝牙牙刷数据同步,我们可以使用 Python 的bleak库(适用于基于蓝牙低功耗的设备)来连接蓝牙牙刷并接收数据。以下是一个简单的示例代码,展示如何扫描蓝牙设备并尝试连接到特定的蓝牙牙刷设备(假设设备名称中包含 “Toothbrush”),并接收模拟的刷牙力度和时长数据。
import asyncio
from bleak import BleakScanner, BleakClient


async def run():
    devices = await BleakScanner.discover()
    for device in devices:
        if "Toothbrush" in device.name:
            async with BleakClient(device.address) as client:
                await client.connect()
                # 假设牙刷服务和特征UUID
                service_uuid = "0000180D-0000-1000-8000-00805F9B34FB"
                characteristic_uuid = "00002A37-0000-1000-8000-00805F9B34FB"
                def notification_handler(sender, data):
                    # 解析数据,假设数据格式为前两个字节是刷牙力度,后两个字节是时长(这里是模拟解析)
                    force = int.from_bytes(data[:2], byteorder='little')
                    duration = int.from_bytes(data[2:], byteorder='little')
                    print(f"刷牙力度:{force},刷牙时长:{duration}秒")


                await client.start_notify(characteristic_uuid, notification_handler)
                await asyncio.sleep(10)
                await client.stop_notify(characteristic_uuid)


if __name__ == "__main__":
    loop = asyncio.get_event_loop()
loop.run_until_complete(run())- 牙线消耗量预测自动补货
预测牙线消耗量可以使用时间序列分析方法,如 ARIMA 模型。假设我们已经收集了一段时间内用户的牙线购买记录(以月为单位),存储在一个 CSV 文件中,以下是使用 Python 的statsmodels库进行 ARIMA 模型训练和预测的示例代码。
import pandas as pd
import numpy as np
from statsmodels.tsa.arima.model import ARIMA
import matplotlib.pyplot as plt


# 加载数据
data = pd.read_csv('dental_floss_purchases.csv', parse_dates=['date'], index_col='date')


# 数据预处理,假设数据有缺失值,进行填充
data = data.fillna(method='ffill')


# 构建ARIMA模型,假设经过分析p=1,d=1,q=1比较合适
model = ARIMA(data['quantity'], order=(1, 1, 1))
model_fit = model.fit()


# 预测未来12个月的牙线消耗量
n_steps = 12
forecast = model_fit.get_forecast(steps=n_steps)
forecast_mean = forecast.predicted_mean
confidence_intervals = forecast.conf_int()


# 可视化预测结果
plt.plot(data.index, data['quantity'], label='实际数据')
plt.plot(pd.date_range(start=data.index[-1] + pd.Timedelta(days=1), periods=n_steps + 1, freq='M')[1:],
         forecast_mean, label='预测数据', linestyle='--')
plt.fill_between(confidence_intervals.index, confidence_intervals.iloc[:, 0], confidence_intervals.iloc[:, 1],
                 color='k', alpha=0.1)
plt.xlabel('日期')
plt.ylabel('牙线购买量')
plt.legend()
plt.show()


# 根据预测结果实现自动补货逻辑(这里只是示例,实际需对接电商或供应链系统)
for i, mean in enumerate(forecast_mean):
    if mean > 10:  # 假设当预测购买量大于10时触发补货
print(f"预测第{i + 1}个月牙线购买量为{mean},触发自动补货")(三)元宇宙诊疗:VR 远程会诊 + 数字孪生牙齿建模
在 VR 远程会诊方面,可采用 WebRTC 技术实现实时视频通信。结合 Three.js 库构建 VR 场景,医生和患者可以在虚拟空间中进行交流。以下是一个简单的 WebRTC 视频通信示例,使用 JavaScript 实现,展示如何建立点对点的视频通话。
<!DOCTYPE html>
<html lang="en">

<head>
    <meta charset="UTF - 8">
    <title>VR远程会诊</title>
</head>

<body>
    <video id="localVideo" autoplay muted></video>
    <video id="remoteVideo" autoplay></video>
    <script>
        const configuration = {
            iceServers: [
                {
                    urls: "stun:stun.l.google.com:19302"
                }
            ]
        };
        let peerConnection;
        const localVideo = document.getElementById('localVideo');
        const remoteVideo = document.getElementById('remoteVideo');


        async function startCall() {
            const stream = await navigator.mediaDevices.getUserMedia({ video: true, audio: true });
            localVideo.srcObject = stream;
            peerConnection = new RTCPeerConnection(configuration);
            stream.getTracks().forEach(track => peerConnection.addTrack(track, stream));
            peerConnection.ontrack = (event) => {
                remoteVideo.srcObject = event.streams[0];
            };
            const offer = await peerConnection.createOffer();
            await peerConnection.setLocalDescription(offer);
            // 这里需要将offer发送给对方,实际应用中通过信令服务器实现
            // 假设已经收到对方的answer
            const answer = { /* 模拟对方的answer */ };
            await peerConnection.setRemoteDescription(new RTCSessionDescription(answer));
        }


        startCall();
    </script>
</body>

</html>
对于数字孪生牙齿建模,利用 3D 扫描数据,通过 MeshLab 等工具进行处理后,在 Three.js 中加载并渲染牙齿模型,实现牙齿的数字孪生展示。以下是一个简单的 Three.js 加载 OBJ 格式牙齿模型的示例代码。
<!DOCTYPE html>
<html lang="en">

<head>
    <meta charset="UTF - 8">
    <title>数字孪生牙齿建模</title>
    <script src="https://cdnjs.cloudflare.com/ajax/libs/three.js/r128/three.min.js"></script>
    <script src="https://cdnjs.cloudflare.com/ajax/libs/three.js/r128/loaders/OBJLoader.js"></script>
</head>

<body>
    <div id="scene-container"></div>
    <script>
        const scene = new THREE.Scene();
        const camera = new THREE.PerspectiveCamera(75, window.innerWidth / window.innerHeight, 0.1, 1000);
        const renderer = new THREE.WebGLRenderer({ antialias: true });
        renderer.setSize(window.innerWidth, window.innerHeight);
        document.getElementById('scene-container').appendChild(renderer.domElement);
        const light = new THREE.AmbientLight(0x404040);
        scene.add(light);
        const loader = new THREE.OBJLoader();
        loader.load('tooth_model.obj', function (object) {
            scene.add(object);
        });
        camera.position.z = 5;


        function animate() {
            requestAnimationFrame(animate);
            renderer.render(scene, camera);
        }


        animate();
    </script>
</body>

</html>
通过这些技术的集成和拓展,牙科口腔诊所小程序将不断进化,为患者提供更加便捷、高效和个性化的医疗服务,同时帮助诊所提升运营效率和市场竞争力。
结语
医疗类小程序的本质是建立「专业信任感」,建议采用 MVP 策略快速迭代:
① 首期聚焦预约 + 商城(3 个月上线)
② 二期接入 AI 工具 + 保险(6 个月数据沉淀)
③ 三期拓展 IoT 生态(1 年形成竞争壁垒)
参考资料:
- 《口腔医疗互联网化白皮书 2023》
- 微信小程序医疗类目审核规范
- HL7 FHIR 医疗数据交互标准
代码仓库:GitHub 搜索 #dental - miniapp 获取基础框架
欢迎在评论区交流您的实战经验,关于「如何平衡医疗严谨性与互联网化体验」的讨论将置顶展示!


 被折叠的 条评论
为什么被折叠?
被折叠的 条评论
为什么被折叠?
 到【灌水乐园】发言


