


环境要求
使用Python,结合OpenCV和Dlib库,基于实时的网络摄像头视频流,实现驾驶员注意力状态检测和监测。
安装
该项目在Python 3.9上运行,需要以下库:
- numpy OpenCV(opencv-python)
- Dlib
- 和cmake
面部关键点的Dlib预测器已包含在“predictor”文件夹中。
- 重要提示:Dlib的需求和库安装
- Dlib是一个需要安装C/C++编译器和Cmake库的库。请按照此指南在您的计算机上正确安装dlib。
- 如果您的计算机已经具备安装dlib和cmake的所有先决条件,您可以使用存储库中提供的requirements.txt文件:

算法
这个脚本首先寻找驾驶员的面部,然后使用dlib库来预测68个面部关键点。所有面部关键点的枚举和位置可以在这里看到。
根据这些关键点,计算以下得分:
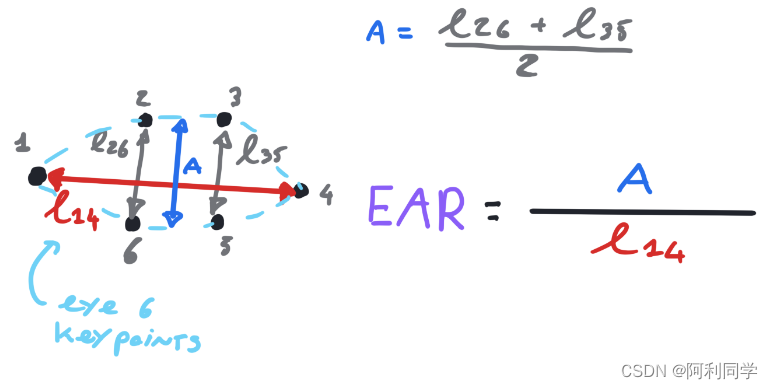
**EAR(眼睛纵横比):**标准化后的平均眼孔口径,用于判断眼睛的张开程度
**Gaze Score(注视得分):**眼睛中心和瞳孔之间的L2范数(欧几里得距离),用于判断驾驶员是否看向其他地方
**Head Pose(头部姿态):**驾驶员头部的滚转、俯仰和偏航角。这些角度用于判断驾驶员是否没有看向前方或头部姿态不正(可能是昏迷状态)
**PERCLOS(闭眼时间百分比):**一分钟内闭眼时间的百分比。在此情况下,采用0.2的阈值(一分钟的20%),并利用EAR得分来估计闭眼时间。
驾驶员状态可以分类为:
正常:不会打印任何信息。
疲劳:当PERCLOS得分> 0.2时,在屏幕上会打印一个警告信息。
**睡着了:**当眼睛闭合(EAR < closure_threshold)一段时间时,在屏幕上会打印一个警告信息。
**看向其他地方:**当注视得分高于某个阈值并持续一段时间时,在屏幕上会打印一个警告信息。
分心:当头部姿态得分高于某个阈值并持续一段时间时,在屏幕上会打印一个警告信息。
眼睛模型
眼睛纵横比(EAR)是一个标准化得分,有助于了解眼睛的张开程度。使用每只眼睛的dlib关键点(每个眼睛都有6个关键点),估计眼睛的长度和宽度,并使用这些数据计算EAR得分,如下图所示:
结果:
计算注视得分的处理方法有更新:
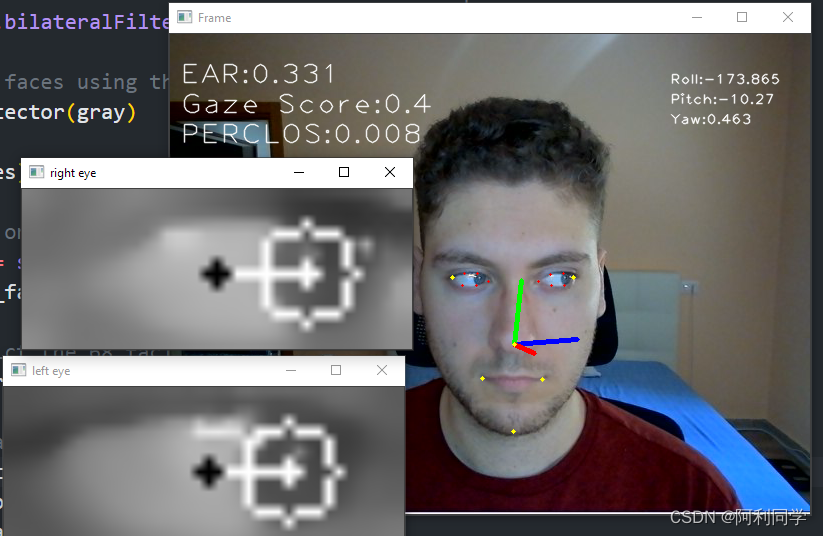
在第一个版本中,使用自适应阈值处理来帮助Hough变换检测瞳孔位置。在更新的版本中,经过双边滤波器去除一些噪声后,仅使用Hough变换,并且将眼睛的ROI区域大小缩小了。
使用方法和代码
class HeadPoseEstimator:

    def __init__(self, camera_matrix=None, dist_coeffs=None, show_axis: bool = False):
        """
        Head Pose estimator class that contains the get_pose method for computing the three euler angles
        (roll, pitch, yaw) of the head. It uses the image/frame, the dlib detected landmarks of the head and,
        optionally the camera parameters
        Parameters
        ----------
        camera_matrix: numpy array
            Camera matrix of the camera used to capture the image/frame
        dist_coeffs: numpy array
            Distortion coefficients of the camera used to capture the image/frame
        show_axis: bool
            If set to True, shows the head pose axis projected from the nose keypoint and the face landmarks points
            used for pose estimation (default is False)
        """

        self.show_axis = show_axis
        self.camera_matrix = camera_matrix
        self.dist_coeffs = dist_coeffs

    def get_pose(self, frame, landmarks):
        """
        Estimate head pose using the head pose estimator object instantiated attribute
        Parameters
        ----------
        frame: numpy array
            Image/frame captured by the camera
        landmarks: dlib.rectangle
            Dlib detected 68 landmarks of the head
        Returns
        --------
        - if successful: image_frame, roll, pitch, yaw (tuple)
        - if unsuccessful: None,None,None,None (tuple)
        """
        self.keypoints = landmarks  # dlib 68 landmarks
        self.frame = frame  # opencv image array

        self.axis = np.float32([[200, 0, 0],
                                [0, 200, 0],
                                [0, 0, 200]])
        # array that specify the length of the 3 projected axis from the nose

        if self.camera_matrix is None:
            # if no camera matrix is given, estimate camera parameters using picture size
            self.size = frame.shape
            self.focal_length = self.size[1]
            self.center = (self.size[1] / 2, self.size[0] / 2)
            self.camera_matrix = np.array(
                [[self.focal_length, 0, self.center[0]],
                 [0, self.focal_length, self.center[1]],
                 [0, 0, 1]], dtype="double"
            )

        if self.dist_coeffs is None:  # if no distorsion coefficients are given, assume no lens distortion
            self.dist_coeffs = np.zeros((4, 1))

        # 3D Head model world space points (generic human head)
        self.model_points = np.array([
            (0.0, 0.0, 0.0),  # Nose tip
            (0.0, -330.0, -65.0),  # Chin
            (-225.0, 170.0, -135.0),  # Left eye left corner
            (225.0, 170.0, -135.0),  # Right eye right corner
            (-150.0, -150.0, -125.0),  # Left Mouth corner
            (150.0, -150.0, -125.0)  # Right mouth corner

        ])
运行
python main.py
``
#驾驶状态检测
检测到闭眼睛就会警报

```bash
python main.py --ear_time_tresh 5
5秒闭眼则在屏幕显示
在这里插入图片描述

c6342c5953cb9418a38cf52.png)


 1529
1529


 被折叠的 条评论
为什么被折叠?
被折叠的 条评论
为什么被折叠?
 到【灌水乐园】发言


