


 本文详细介绍了如何在微信小程序中利用canvas2dAPI绘制规则电影院座位并实现选票功能。作者通过实例展示了如何设计座位布局、处理点击事件以及更新座位状态,重点在于坐标转换和图形计算技巧。
前言少叙
- 最近发现网络上的关于微信小程序canvas 2d API的详细使用和案例不是很多,并且很多案例都是旧的canvas API编写的,闲来无事,使用canvas 2d API绘制一个电影院选票的小案例,供自己学习,也供大家参考!
需求分析
-
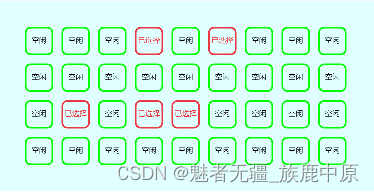
.电影院的座位是几排几列的,比如5排8列,代表一个座位,有的电影院的排列都是不规则的,我们这里不做更复杂的研究,只研究,规则的电影院座位排列,比如4排9列,所以第一步要绘制出来这个座位的排列,比如这样:我画的是圆角,大家可以发挥想象,任意画形状,主要把计算做好,啥都能画出来。

-
接下来就是点击座位号,改变座位的状态,人如果是选中就取消,如果是取消就是选中,比如这样:
-
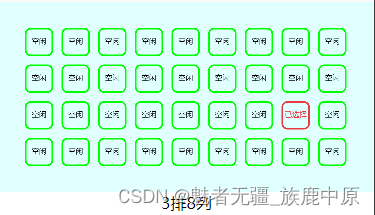
最后再加上一个显示当前选中的位置是几排几列,比如这样:
-
上代码
- 这是布局文件和样式文件
<view class="page-continear"> <canvas type="2d" id="myFilmSeatCanvas" class="my-canvas" bind:tap="onSeatClick" style="width:100%" /> <text>{{selectWayText}}</text> </view>
page {
  width: 100%;
  height: 100%;
  display: flex;
  align-items: center;
  flex-direction: column;
}

.page-continear {
  width: 100%;
  display: flex;
  flex-direction: column;
  align-items: center;
  justify-content: center;
}
.my-canvas{
  background: lightcyan;
  height: 380rpx;
}
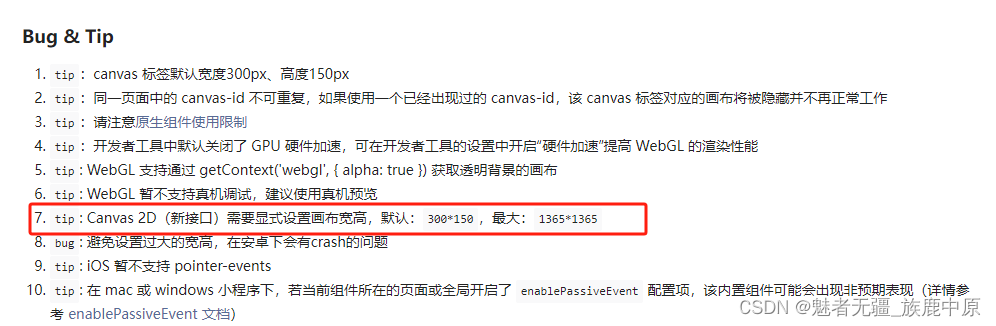
这里要注意的是,canvas的view控件,必须指定宽度和高度,否则就是默认的宽度和高度,官方文档有提示
- js代码部分
 data: {
    canvasContext: null,
    width: 0,
    height: 0,
    seatWidth: 80, //座位宽度
    seatHeight: 80, //座位高度
    seatPitch: 30, // 每排座位间距
    rowCount: 4, // 座位排数
    colCount: 9, // 座位列数
    round: 15, //弧度
    selectedSeats: [], // 已选择的座位
    margin: 80,//画布到屏幕的边距
    dpr: 0,
    selectWayText: ''
  },
	1.定义一些常量,注释的很清楚
	2.获取画布的对象
 var that = this;
    const query = wx.createSelectorQuery()
    query.select('#myFilmSeatCanvas')
      .fields({
        node: true,
        size: true
      })
      .exec((res) => {
        //console.log(res)
        const canvas = res[0].node
        const canvasContext = canvas.getContext('2d')
        //画布坐标系与屏幕坐标系的转换比例
        const dpr = wx.getSystemInfoSync().pixelRatio
        canvas.width = res[0].width * dpr
        canvas.height = res[0].height * dpr
        //开始绘画
        that.drawFilmSeat(canvasContext)
        that.setData({
          canvasContext: canvasContext,
          height: canvas.height,
          width: canvas.width,
          dpr: dpr,
        })
        console.log('画布宽高', canvas.width, canvas.height)
        console.log('像素比', dpr)
      })
3.这里重要强调一点的就是这段代码,他的意思是屏幕的坐标和画布的坐标的比例值,后面会用到
//画布坐标系与屏幕坐标系的转换比例
    const dpr = wx.getSystemInfoSync().pixelRatio
/**
   * 绘制座位
   * @param {canvas} cvt
   */
  drawFilmSeat: function (cvt) {
    var that = this;
    //定义一些常量
    const seatWidth = that.data.seatWidth //座位宽度
    const seatHeight = that.data.seatHeight; //座位高度
    const seatPitch = that.data.seatPitch // 每排座位间距
    const rowCount = that.data.rowCount // 座位排数
    const colCount = that.data.colCount // 座位列数
    const round = that.data.round //弧度
    const margin = that.data.margin //距离画布左边一级上边的间距
    const selectedSeats = that.data.selectedSeats //被选择的座位的数组
    // 清空画布
    cvt.clearRect(0, 0, that.data.width, that.data.height)
    //绘制座位图
    for (let i = 0; i < rowCount; i++) {
      for (let j = 0; j < colCount; j++) {
        //座位号
        const seatNum = i * colCount + j;
        const status = selectedSeats.includes(seatNum) ? '已选择' : '空闲'
        const fillColor = selectedSeats.includes(seatNum) ? '#eb3941' : '#0f0'; // 填充颜色
        const textColor = selectedSeats.includes(seatNum) ? '#eb3941' : '#000'; // 文字颜色
        //每排的矩形座位的x坐标=座位的宽度*列的索引+座位的间距*索引
        var x = seatWidth * j + seatPitch * j + margin
        //每排的矩形座位的y坐标=座位的高度*排的索引+座位的间距*索引
        var y = seatHeight * i + seatPitch * i + margin
        // 开始绘制带圆角的正方形
        cvt.beginPath()
        //正方形左上角的坐标
        cvt.moveTo(x + round, y)
        //添加圆角
        cvt.arcTo(x + seatWidth, y, x + seatWidth, y + seatHeight, round)
        cvt.arcTo(x + seatWidth, y + seatHeight, x, y + seatHeight, round)
        cvt.arcTo(x, y + seatHeight, x, y, round)
        cvt.arcTo(x, y, x + seatWidth, y, round)
        // 结束路径,形成一个闭合图形
        cvt.closePath();
        // 设置边框颜色
        cvt.strokeStyle = fillColor;
        //设置边框宽度
        cvt.lineWidth = 5;
        // 绘制图形
        cvt.stroke();
        //绘制文字
        cvt.fillStyle = textColor;
        cvt.font = '22px sans-serif'
        cvt.fillText(status, x + seatWidth / 2 - cvt.measureText(status).width / 2, y + seatWidth / 2 + 5);
      }
    }
  },
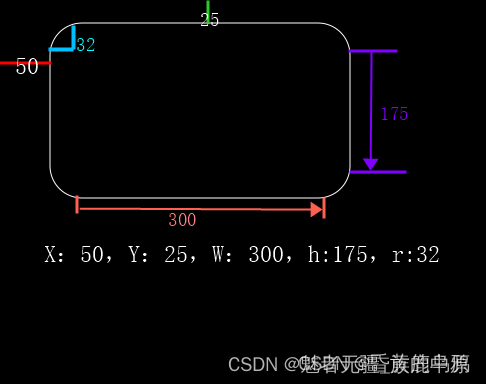
4.这里就是绘制座位的代码,使用双重for循环,分别绘制排和列,然后绘制带圆角的矩形,这里的带圆角的矩形绘制的关键代码是这一句,参考下图,理解起来容易一些,然后就是绘制完圆角的矩形,然后绘制文字,这个很简单
cvt.arcTo(x + seatWidth, y, x + seatWidth, y + seatHeight, round)
5.接下来就是画布点击事件的处理
/**
   * 座位的点击事件
   * @param {事件e} e
   */
  onSeatClick: function (e) {
    let ctv = this.data.canvasContext
    let seatPitch = this.data.seatPitch
    let seatWidth = this.data.seatWidth
    let seatHeight = this.data.seatHeight
    let colCount = this.data.colCount
    let rowCount = this.data.rowCount
    let selectedSeats = this.data.selectedSeats
    let margin = this.data.margin
    let width = this.data.width
    let height = this.data.height
    let dpr = this.data.dpr
    //console.log(e)
    //点击位置的x坐标(此处得到的坐标是屏幕的坐标,转换成画布的坐标)
    const x = e.detail.x * dpr
    //点击位置的y坐标
    const y = e.detail.y * dpr
    // 计算点击的座位号
    const seatNum = Math.floor((y - margin) / (seatHeight + seatPitch)) * colCount + Math.floor((x - margin) / (seatWidth + seatPitch));
    console.log("当前元素索引", seatNum)
    //判断点击位置是否在座位范围内
    if (seatNum >= 0 && seatNum <= colCount * rowCount) {
      if (selectedSeats.includes(seatNum)) { // 如果该座位已被选择,点击后取消选座
        selectedSeats.splice(selectedSeats.indexOf(seatNum), 1);
      } else { // 如果该座位未被选择,点击后选座
        selectedSeats.push(seatNum);
      }
      this.countSeatWay(seatNum, colCount)
      this.setData({
        selectedSeats: selectedSeats
      })
      ctv.clearRect(0, 0, width, height, ctv); // 清空画布,重新绘制座位状态
      this.drawFilmSeat(ctv)
    }
  },
5.这里重要的代码就是这段,点击画布拿到当前点击位置的坐标,这个坐标是屏幕的坐标,不是画布的坐标,需要乘以之前拿到的画布于屏幕的比例,才能与画布的相应位置匹配得上
//点击位置的x坐标(此处得到的坐标是屏幕的坐标,转换成画布的坐标)
    const x = e.detail.x * dpr
    //点击位置的y坐标
    const y = e.detail.y * dpr
6.最后这个就是点击显示点击为是几排几列的一个算法
/**
   * 根据座位索引计算当前点击位置是几排几列
   * @param {当前座位索引计} seatNum
   * @param {总共有多少列} colCount
   */
  countSeatWay: function (seatNum, colCount) {
    let rowNumber = Math.ceil((seatNum + 1) / colCount)
    let columNumber = (seatNum) % colCount;
    this.setData({
      selectWayText: `${rowNumber}排${columNumber+1}列`
    })
    console.log(`点击的当前位置是第${rowNumber}排第${columNumber+1}列`)
  }
7.到此结束,不瞒大家,这点代码我写了1.5个工作日,主要目的是为了熟悉cnavas 2d 的API,其次也理解了canvas绘制view,难点在于一些形状的计算上,一些公式一些数学知识和图形化的理解上!


 被折叠的 条评论
为什么被折叠?
被折叠的 条评论
为什么被折叠?
 到【灌水乐园】发言


