


01、简介
回顾什么是spring
Spring是一个开源框架,2003 年兴起的一个轻量级的Java 开发框架,作者:Rod Johnson。
Spring是为了解决企业级应用开发的复杂性而创建的,简化开发。
spring是如何简化开发的
为了降低Java开发的复杂性,Spring采用了以下4种关键策略:
-
基于pojo的轻量级和最小侵入性编程,所有东西都是bean
-
通过ioc,依赖注入(di)和面向接口实现松耦合
-
基于切面(aop)和惯例进行声明式编程
-
通过切面和模板减少样式代码,RedisTemplate,xxxTemplate;
是什么springboot
随着 Spring 不断的发展,涉及的领域越来越多,项目整合开发需要配合各种各样的文件,慢慢变得不那么易用简单,违背了最初的理念,甚至人称配置地狱。Spring Boot 正是在这样的一个背景下被抽象出来的开发框架,目的为了让大家更容易的使用 Spring 、更容易的集成各种常用的中间件、开源软件;
Spring Boot 基于 Spring 开发,Spirng Boot 本身并不提供 Spring 框架的核心特性以及扩展功能,只是用于快速、敏捷地开发新一代基于 Spring 框架的应用程序。也就是说,它并不是用来替代 Spring 的解决方案,而是和 Spring 框架紧密结合用于提升 Spring 开发者体验的工具。Spring Boot 以约定大于配置的核心思想,默认帮我们进行了很多设置,多数 Spring Boot 应用只需要很少的 Spring 配置。同时它集成了大量常用的第三方库配置(例如 Redis、MongoDB、Jpa、RabbitMQ、Quartz 等等),Spring Boot 应用中这些第三方库几乎可以零配置的开箱即用。
简单来说就是SpringBoot其实不是什么新的框架,它默认配置了很多框架的使用方式,就像maven整合了所有的jar包,spring boot整合了所有的框架 。
Spring Boot的主要优点:
-
为所有Spring开发者更快的入门
-
开箱即用,提供各种默认配置来简化项目配置
-
内嵌式容器简化Web项目
-
没有冗余代码生成和XML配置的要求
02、微服务
单体应用架构
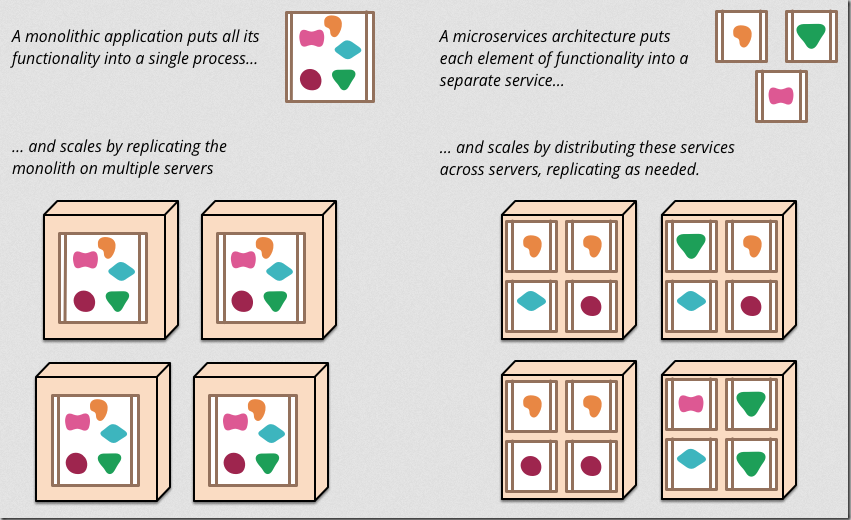
所谓单体应用架构 (all in one)是指,我们将一个应用的中的所有应用服务都封装在一个应用中。
无论是ERP、CRM或是其他什么系统,你都把数据库访问,web访问,等等各个功能放到一个war包内。
-
这样做的好处是,易于开发和测试;也十分方便部署;当需要扩展时,只需要将war复制多份,然后放到多个服务器上,再做个负载均衡就可以了。
-
单体应用架构的缺点是,哪怕我要修改一个非常小的地方,我都需要停掉整个服务,重新打包、部署这个应用war包。特别是对于一个大型应用,我们不可能吧所有内容都放在一个应用里面,我们如何维护、如何分工合作都是问题。
微服务架构
all in one的架构方式,我们把所有的功能单元放在一个应用里面。然后我们把整个应用部署到服务器上。如果负载能力不行,我们将整个应用进行水平复制,进行扩展,然后在负载均衡。
所谓微服务架构,就是打破之前all in one的架构方式,把每个功能元素独立出来。把独立出来的功能元素的动态组合,需要的功能元素才去拿来组合,需要多一些时可以整合多个功能元素。所以微服务架构是对功能元素进行复制,而没有对整个应用进行复制。
这样做的好处是:
-
节省了调用资源
-
每个功能元素的服务都是一个可替换的、可独立升级的软件代码
Martin Flower于2014年3月25日写的《Microservices》,详细的阐述了什么是微服务
原文地址:Microservices 翻译:https://www.cnblogs.com/liuning8023/p/4493156.html
如何构建一个微服务
一个大型系统的微服务架构,就像一个复杂交织的神经网络,每一个神经元就是一个功能元素,它们各自完成自己的功能,然后通过http相互请求调用。比如一个电商系统,查缓存、连数据库、浏览页面、结账、支付等服务都是一个个独立的功能服务,都被微化了,它们作为一个个微服务共同构建了一个庞大的系统。如果修改其中的一个功能,只需要更新升级其中一个功能服务单元即可。
但是这种庞大的系统架构给部署和运维带来很大的难度。于是,spring为我们带来了构建大型分布式微服务的全套、全程产品:
-
构建一个个功能独立的微服务应用单元,可以使用springboot,可以帮我们快速构建一个应用;
-
大型分布式网络服务的调用,这部分由spring cloud来完成,实现分布式;
-
在分布式中间,进行流式数据计算、批处理,我们有spring cloud data flow。
-
spring为我们想清楚了整个从开始构建应用到大型分布式应用全流程方案。
03、第一个springboot程序
Spring官方提供了非常方便的工具让我们快速构建应用
Spring Initializr:https://start.spring.io/
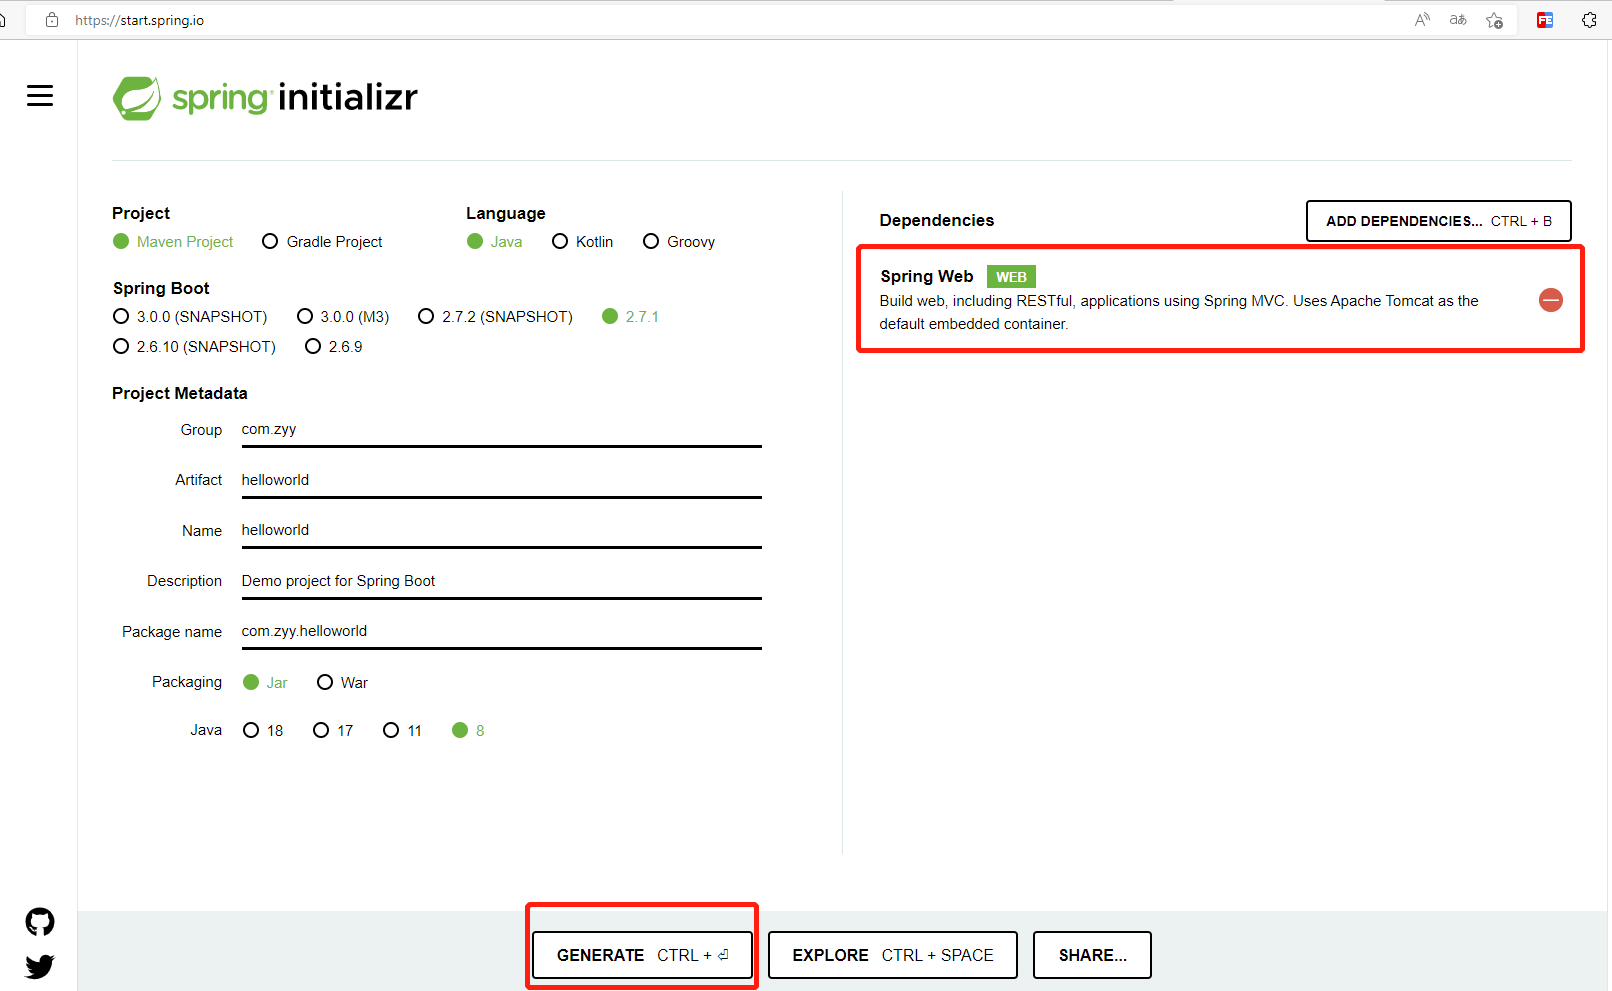
项目创建方式一:使用Spring Initializr的web页面创建项目
-
打开Spring Initializr网站
-
填写项目信息
-
按照上图,配置好,然后点击”Generate“按钮生成项目;下载此项目
-
解压项目包,并用IDEA以Maven项目导入,一路下一步即可,直到项目导入完毕
-
如果是第一次使用,可能速度会比较慢,包比较多、需要耐心等待一切就绪。
pom.xml分析
<?xml version="1.0" encoding="UTF-8"?>
<project xmlns="http://maven.apache.org/POM/4.0.0" xmlns:xsi="http://www.w3.org/2001/XMLSchema-instance"
		 xsi:schemaLocation="http://maven.apache.org/POM/4.0.0 https://maven.apache.org/xsd/maven-4.0.0.xsd">
	<modelVersion>4.0.0</modelVersion>
	<!--	父依赖 -->
	<parent>
		<groupId>org.springframework.boot</groupId>
		<artifactId>spring-boot-starter-parent</artifactId>
		<version>2.7.1</version>
		<relativePath/> <!-- lookup parent from repository -->
	</parent>
	<groupId>com.zyy</groupId>
	<artifactId>helloworld</artifactId>
	<version>0.0.1-SNAPSHOT</version>
	<name>helloworld</name>
	<description>Demo project for Spring Boot</description>
	<properties>
		<java.version>1.8</java.version>
	</properties>
	<dependencies>
		<!--	web	-->
		<dependency>
			<groupId>org.springframework.boot</groupId>
			<artifactId>spring-boot-starter-web</artifactId>
		</dependency>

		<!--	单元测试	-->
		<dependency>
			<groupId>org.springframework.boot</groupId>
			<artifactId>spring-boot-starter-test</artifactId>
			<scope>test</scope>
		</dependency>
	</dependencies>

	<build>
		<plugins>
			<!--	打包插件	-->
			<plugin>
				<groupId>org.springframework.boot</groupId>
				<artifactId>spring-boot-maven-plugin</artifactId>
			</plugin>
		</plugins>
	</build>

</project>
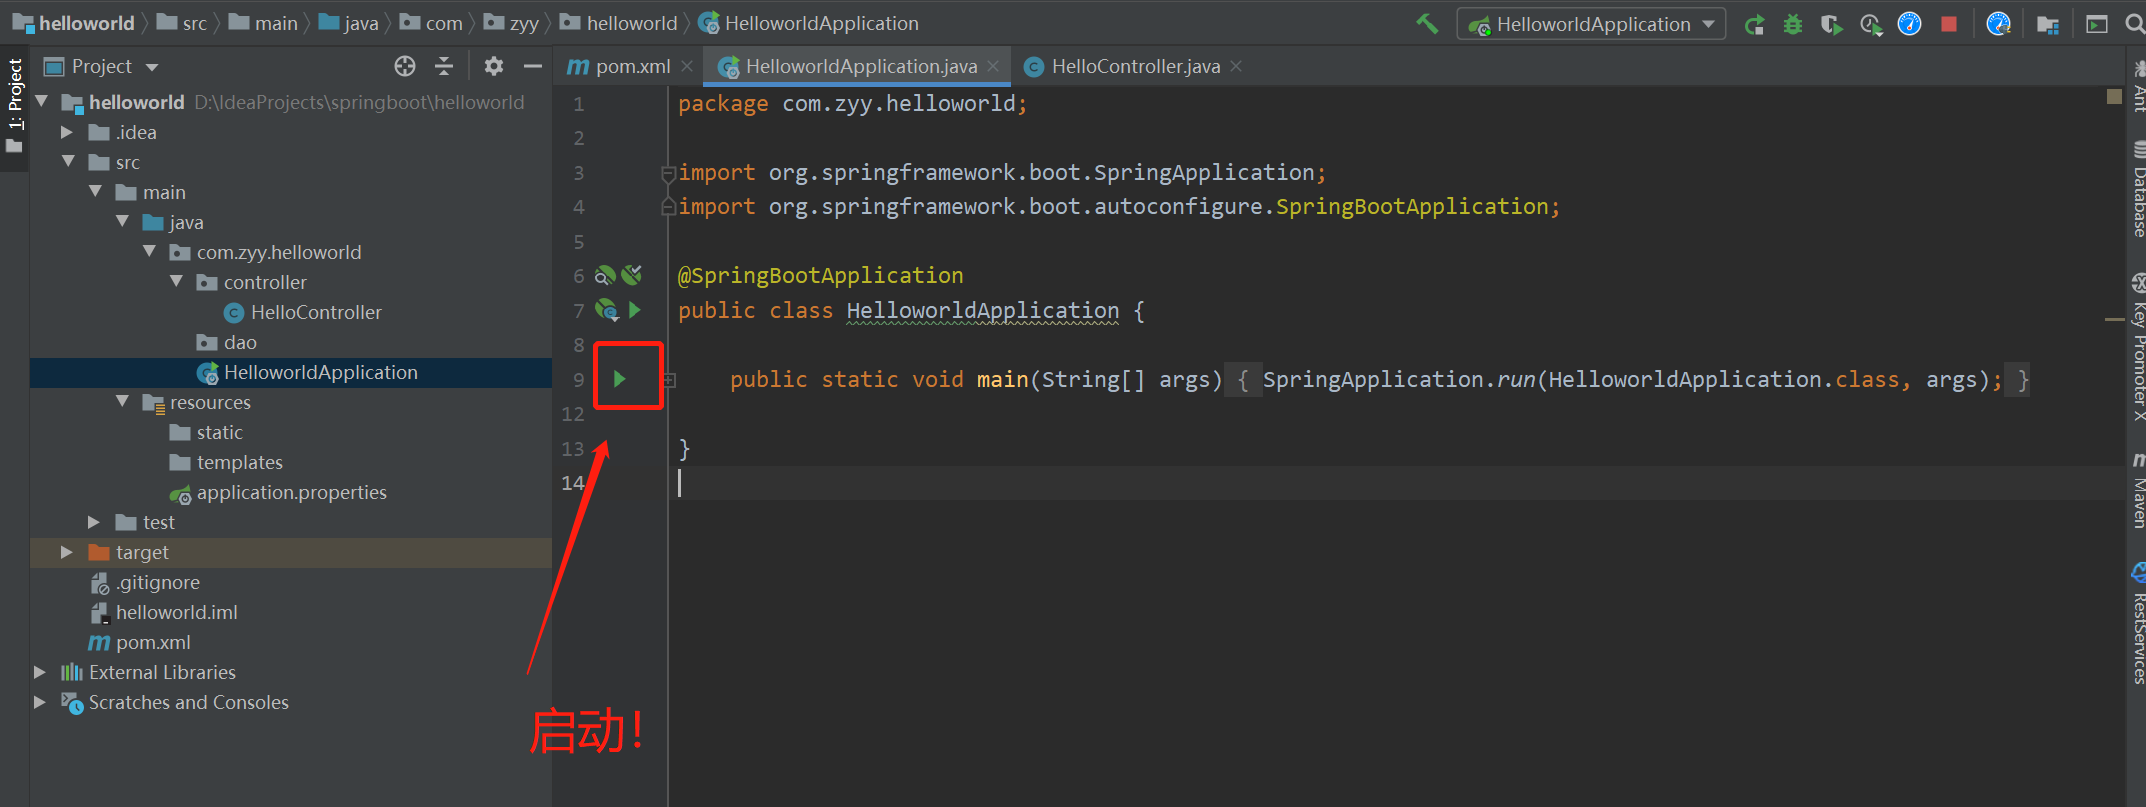
编写一个http接口
-
在主程序的同级目录下,新建一个controller包,一定要在同级目录下,否则识别不到
-
在包中新建一个HelloController类
package com.zyy.helloworld.controller;

import org.springframework.web.bind.annotation.RequestMapping;
import org.springframework.web.bind.annotation.RestController;

/**
 * @Description: 类描述
 * @Author: zyy
 * @Date: 2022/07/14 21:27
 */
@RestController
public class HelloController {

    @RequestMapping("/hello")
    public String hello() {
        return "hello world";
    }

}
回顾一下之前的,或者这样写
package com.zyy.controller; import org.springframework.stereotype.Controller; import org.springframework.web.bind.annotation.GetMapping; import org.springframework.web.bind.annotation.RequestMapping; import org.springframework.web.bind.annotation.ResponseBody; /** * @Description: 类描述 * @Author: zyy * @Date: 2022/07/14 21:54 */ @Controller @RequestMapping("/hello") public class HelloController { @GetMapping("/h1") @ResponseBody public String hello() { return "hello"; } } -
编写完毕后,从主程序启动项目,浏览器发起请求,看页面返回;控制台输出了 Tomcat 访问的端口号!

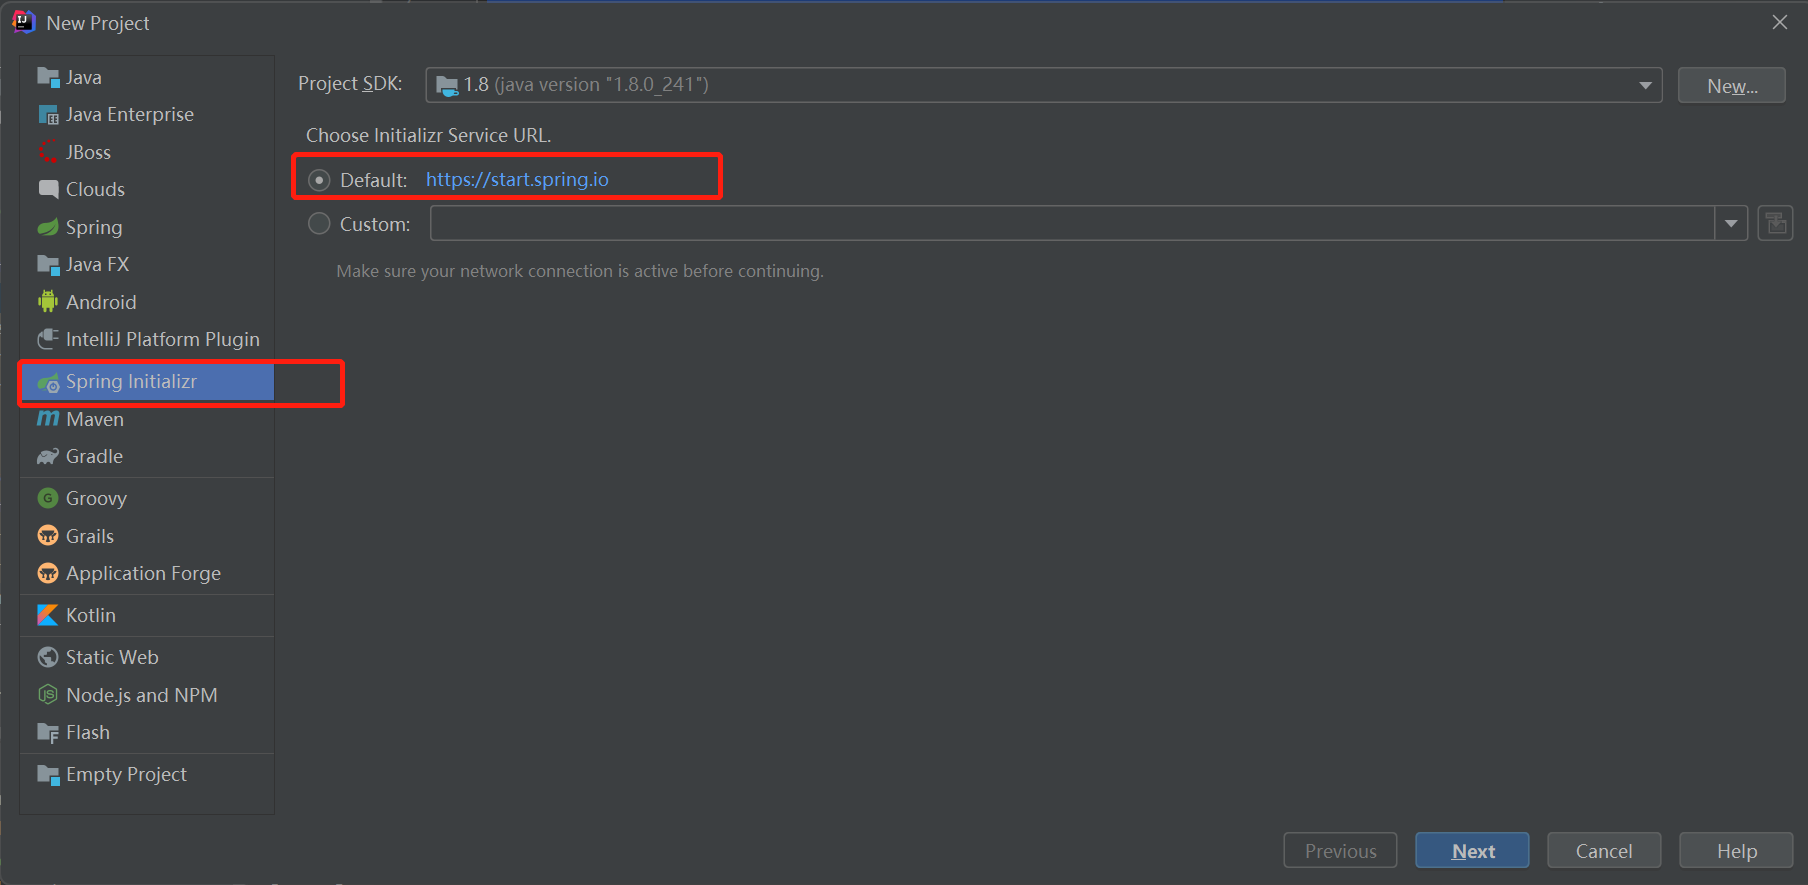
项目创建方式二:使用idea创建项目
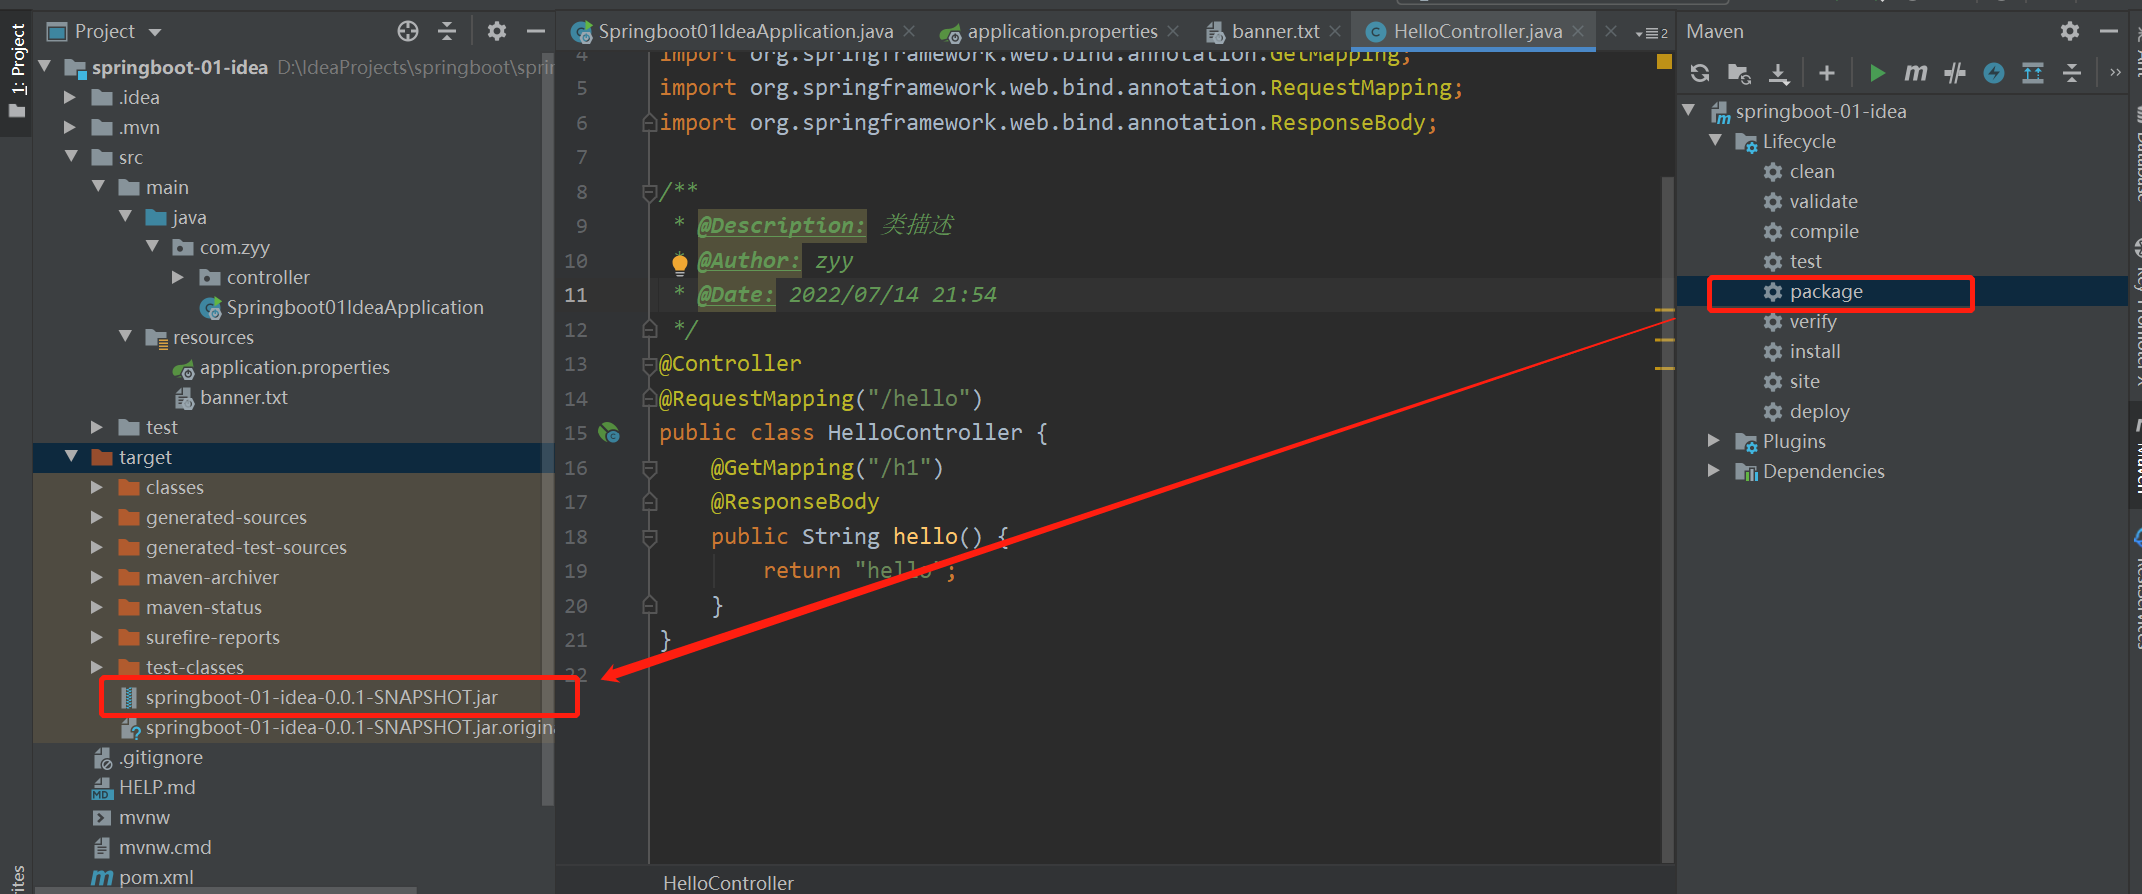
将项目打成jar包,点击maven的package
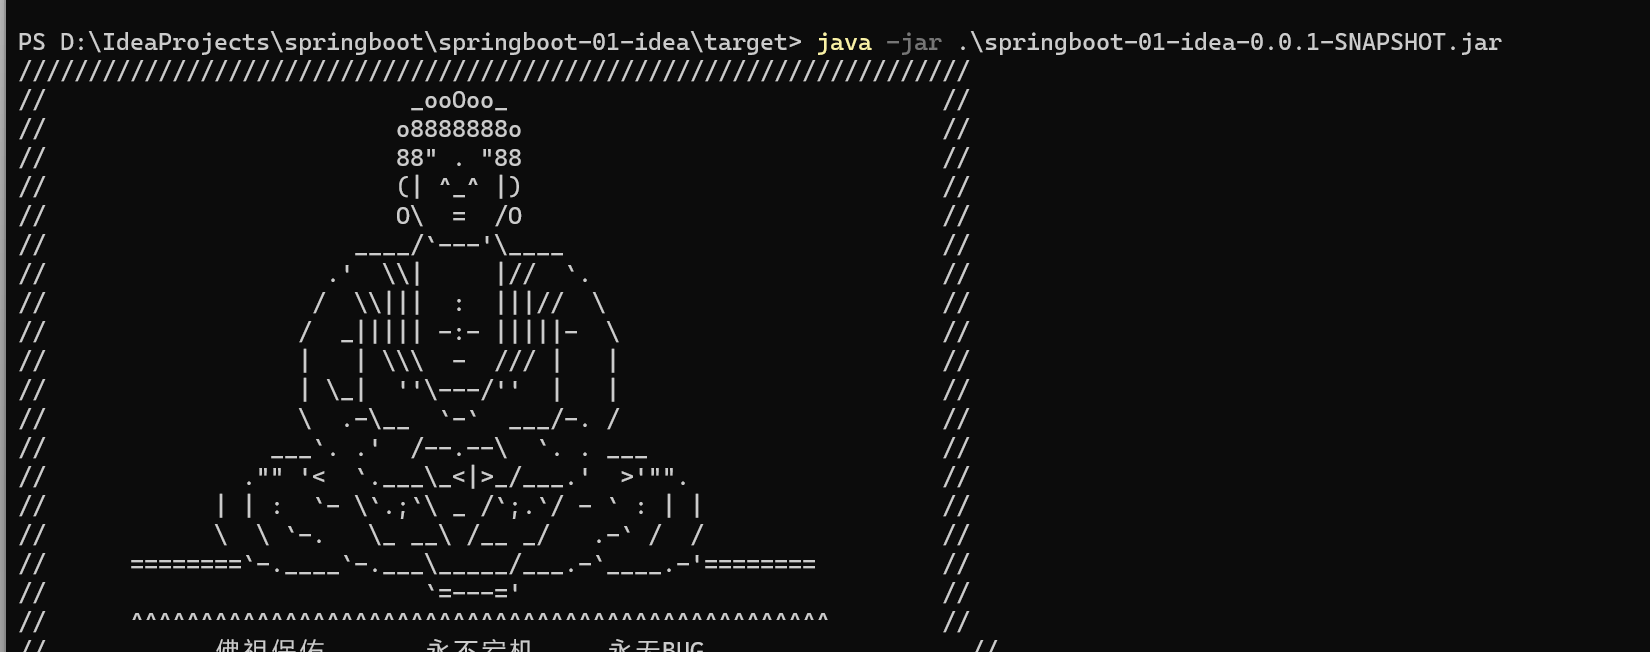
打开命令行输入java -jar .\springboot-01-idea-0.0.1-SNAPSHOT.jar也可启动服务
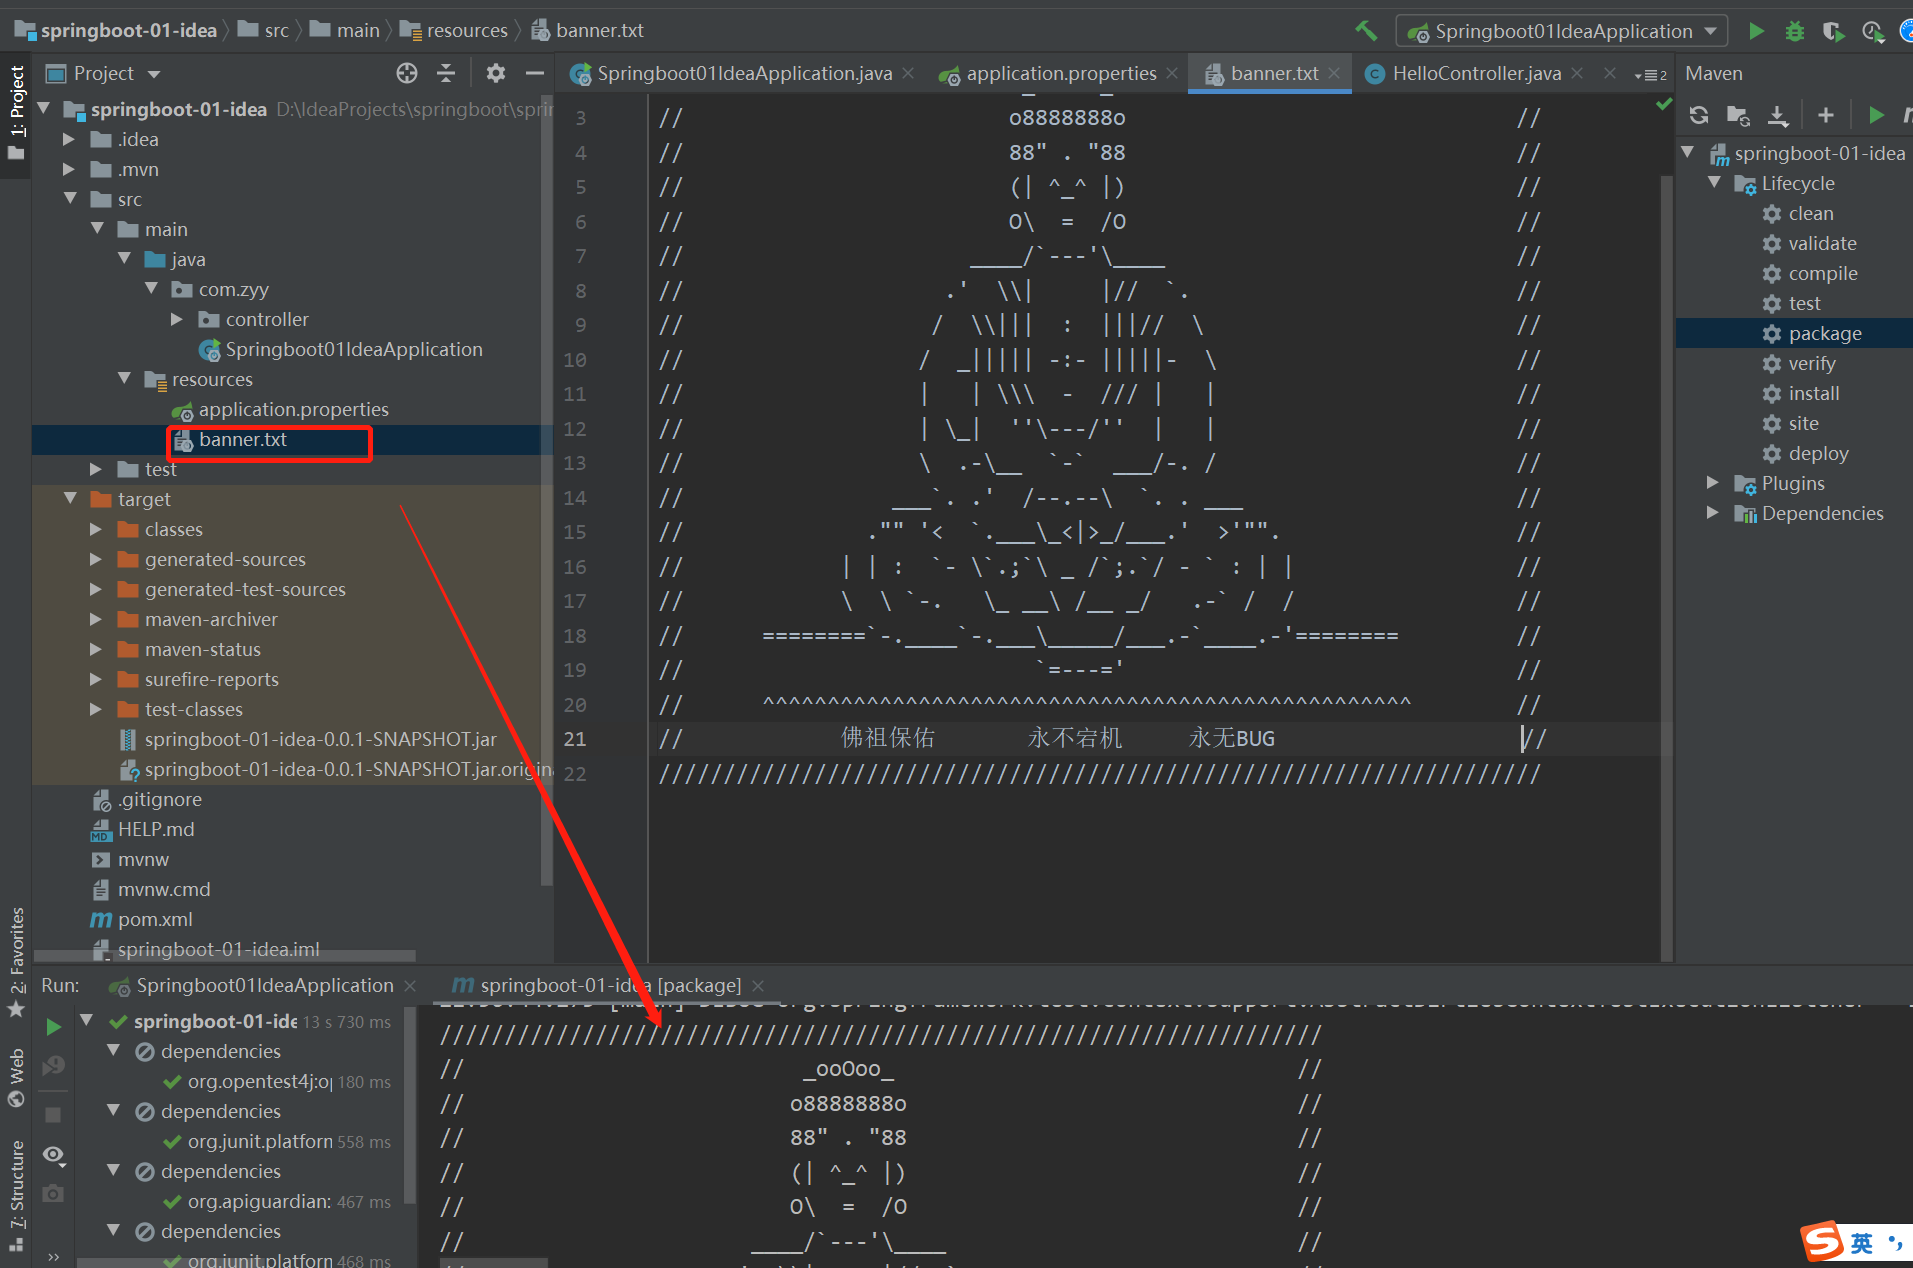
替换服务启动时候的banner
如何更改启动时显示的字符拼成的字母,SpringBoot呢?也就是 banner 图案;
只需一步:到项目下的 resources 目录下新建一个banner.txt 即可。
图案可以到:Spring Boot banner在线生成工具,制作下载英文banner.txt,修改替换banner.txt文字实现自定义,个性化启动banner-bootschool.net 这个网站生成,然后拷贝到文件中即可!
04、运行原理初探
我们之前写的helloword,到底是怎么运行的呢,Maven项目,我们一般从pom.xml文件探究起;
4.1、pom.xml
4.1.2、父依赖
其中它主要是依赖一个父项目,主要是管理项目的资源过滤及插件!
    <parent>
        <groupId>org.springframework.boot</groupId>
        <artifactId>spring-boot-starter-parent</artifactId>
        <version>2.7.1</version>
        <relativePath/> <!-- lookup parent from repository -->
    </parent>
点进去,发现还有一个父依赖
<!-- ... -->
  <parent>
    <groupId>org.springframework.boot</groupId>
    <artifactId>spring-boot-dependencies</artifactId>
    <version>2.7.1</version>
  </parent>
<!-- ... -->
再点进去,这里才是真正管理SpringBoot应用里面所有依赖版本的地方,SpringBoot的版本控制中心;
以后我们导入依赖默认是不需要写版本;但是如果导入的包没有在依赖中管理着就需要手动配置版本了;
4.1.2、启动器spring-boot-starter
<!-- ... -->
        <dependency>
            <groupId>org.springframework.boot</groupId>
            <artifactId>spring-boot-starter-web</artifactId>
        </dependency>
<!-- ... -->
springboot-boot-starter-xxx:就是spring-boot的场景启动器
spring-boot-starter-web:帮我们导入了web模块正常运行所依赖的组件
SpringBoot将所有的功能场景都抽取出来,做成一个个的starter (启动器),只需要在项目中引入这些starter即可,所有相关的依赖都会导入进来 , 我们要用什么功能就导入什么样的场景启动器即可 ;我们未来也可以自己自定义 starter;
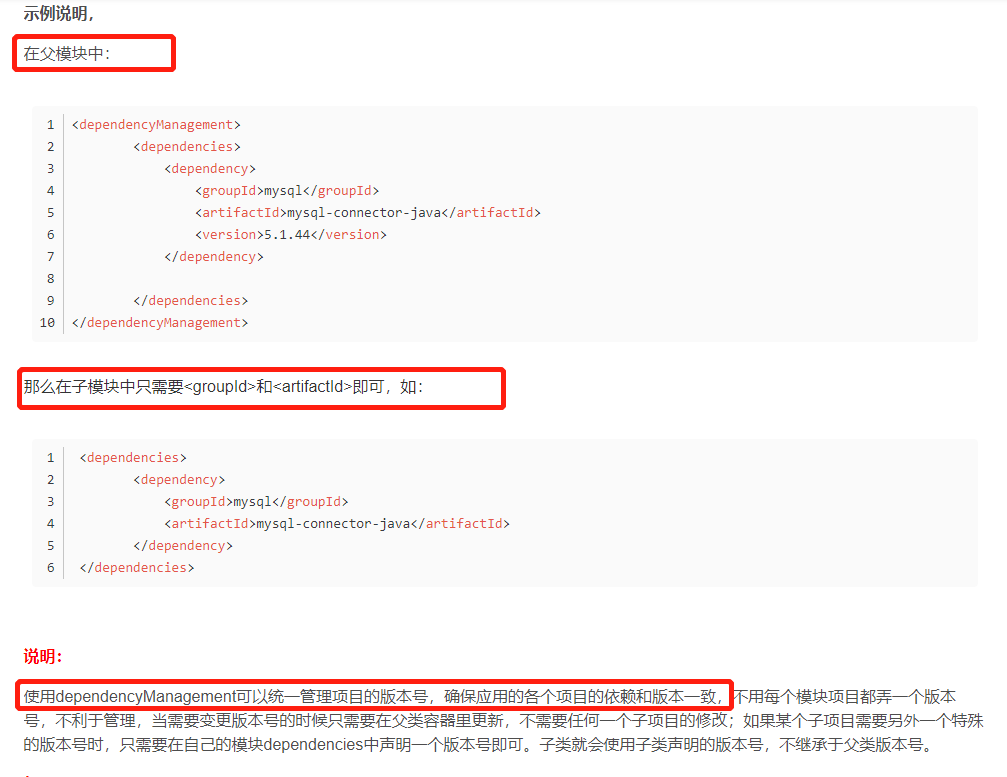
拓展:maven中的dependencyManagement
4.2、主启动类
默认的主启动类
import org.springframework.boot.SpringApplication;
import org.springframework.boot.autoconfigure.SpringBootApplication;

@SpringBootApplication
public class Springboot01IdeaApplication {

    public static void main(String[] args) {
        SpringApplication.run(Springboot01IdeaApplication.class, args);
    }

}
@SpringBootApplication
作用:标注在某个类上说明这个类是SpringBoot的主配置类 , SpringBoot就应该运行这个类的main方法来启动SpringBoot应用;
进入这个注解:可以看到上面还有很多其他注解!
//...
@SpringBootConfiguration
@EnableAutoConfiguration
@ComponentScan(excludeFilters = { @Filter(type = FilterType.CUSTOM, classes = TypeExcludeFilter.class),
		@Filter(type = FilterType.CUSTOM, classes = AutoConfigurationExcludeFilter.class) })
public @interface SpringBootApplication {
    //...
}
//...
@ComponentScan
这个注解在spring中很重要,它对应xml配置中的元素
作用:自动扫描并加载符合条件的附件或者bean,将这个bean定义加载到IOC容器中
@SpringBootConfiguration
作用:springboot的配置类,标准在某个类上,表示这是一个springboot的配置类
点进去这个注解,查看
//...
@Configuration
@Indexed
public @interface SpringBootConfiguration {
    //...
}
//...
@Configuration
//...
@Component
public @interface Configuration {
    //...
}
//...
这里的@Component,说明这个一个配置类,配置类就是对应spring的xml配置文件
里面的@Component这就说明启动类本身也是spring中的一个组件,负责启动应用。
@EnableAutoConfiguration开启自助配置功能
以前我们需要自己配置的东西,现在springboot可以自助帮我们配置
@EnableAutoConfiguration告诉springboot开启启动配置功能,这样自动配置才能生效
//...
@AutoConfigurationPackage
@Import(AutoConfigurationImportSelector.class)
public @interface EnableAutoConfiguration {
    //...
}
//...
@AutoConfigurationPackage自动配置包
//...
@Import(AutoConfigurationPackages.Registrar.class)
public @interface AutoConfigurationPackage {
    //...
}
//...
@Import:spring底层注解@Import,给容器中导入一个组件
Registrar.class作用:将主启动类的所在包及包下面所有子包里面的所有㢟扫描到spring容器
@Import(AutoConfigurationImportSelector.class)给容器导入组件
AutoConfigurationImportSelector:自助配置导入选择器
那么它会导入哪些组件的选择器呢?我们点开一下源码:
-
这个类中有一个这样的方法
// 获取候选配置
protected List<String> getCandidateConfigurations(AnnotationMetadata metadata, AnnotationAttributes attributes) {
    List<String> configurations = new ArrayList<>(
        SpringFactoriesLoader.loadFactoryNames(getSpringFactoriesLoaderFactoryClass(), getBeanClassLoader()));
    ImportCandidates.load(AutoConfiguration.class, getBeanClassLoader()).forEach(configurations::add);
    Assert.notEmpty(configurations,
                    "No auto configuration classes found in META-INF/spring.factories nor in META-INF/spring/org.springframework.boot.autoconfigure.AutoConfiguration.imports. If you "
                    + "are using a custom packaging, make sure that file is correct.");
    return configurations;
}
注意这句(新版本看
META-INF/spring/org.springframework.boot.autoconfigure.AutoConfiguration.imports)No auto configuration classes found in META-INF/spring.factories nor in META-INF/spring/org.springframework.boot.autoconfigure.AutoConfiguration.imports. If you are using a custom packaging, make sure that file is correct.
-
这个方法又调用了SpringFactoriesLoader的静态方法,我们进去loadFactoryNames方法
public static List<String> loadFactoryNames(Class<?> factoryType, @Nullable ClassLoader classLoader) { ClassLoader classLoaderToUse = classLoader; if (classLoaderToUse == null) { classLoaderToUse = SpringFactoriesLoader.class.getClassLoader(); } String factoryTypeName = factoryType.getName(); //这里又调用了loadSpringFactories方法 return loadSpringFactories(classLoaderToUse).getOrDefault(factoryTypeName, Collections.emptyList()); } -
我们继续点击查看loadSpringFactories方法
private static Map<String, List<String>> loadSpringFactories(ClassLoader classLoader) {
    Map<String, List<String>> result = cache.get(classLoader);
    if (result != null) {
        return result;
    }

    result = new HashMap<>();
    try {
        Enumeration<URL> urls = classLoader.getResources(FACTORIES_RESOURCE_LOCATION);
        while (urls.hasMoreElements()) {
            URL url = urls.nextElement();
            UrlResource resource = new UrlResource(url);
            Properties properties = PropertiesLoaderUtils.loadProperties(resource);
            for (Map.Entry<?, ?> entry : properties.entrySet()) {
                String factoryTypeName = ((String) entry.getKey()).trim();
                String[] factoryImplementationNames =
                    StringUtils.commaDelimitedListToStringArray((String) entry.getValue());
                for (String factoryImplementationName : factoryImplementationNames) {
                    result.computeIfAbsent(factoryTypeName, key -> new ArrayList<>())
                        .add(factoryImplementationName.trim());
                }
            }
        }

        // Replace all lists with unmodifiable lists containing unique elements
        result.replaceAll((factoryType, implementations) -> implementations.stream().distinct()
                          .collect(Collectors.collectingAndThen(Collectors.toList(), Collections::unmodifiableList)));
        cache.put(classLoader, result);
    }
    catch (IOException ex) {
        throw new IllegalArgumentException("Unable to load factories from location [" +
                                           FACTORIES_RESOURCE_LOCATION + "]", ex);
    }
    return result;
}
FACTORIES_RESOURCE_LOCATION
public static final String FACTORIES_RESOURCE_LOCATION = "META-INF/spring.factories";
-
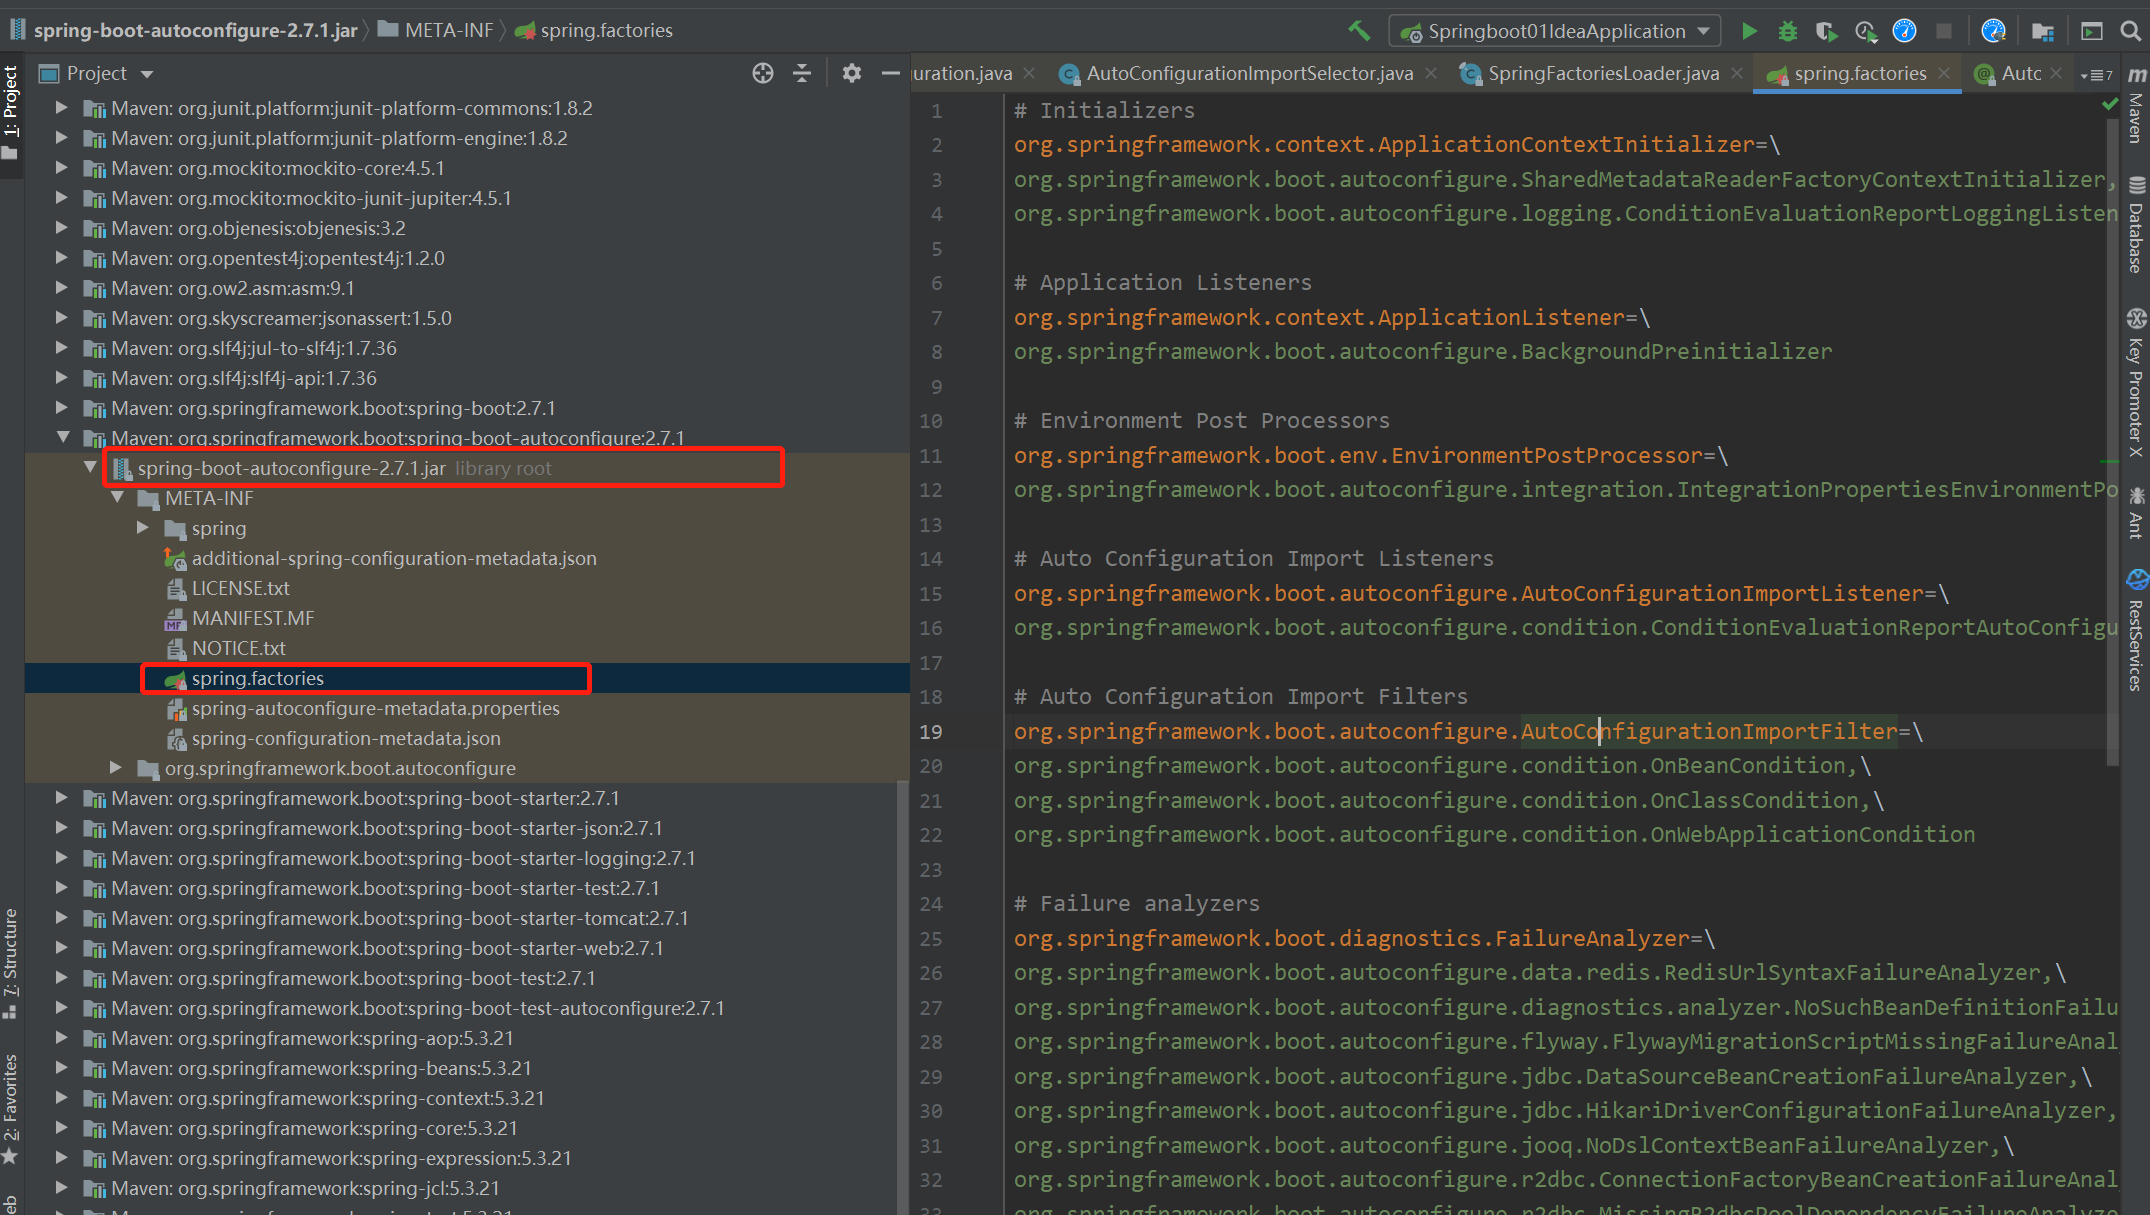
发现一个多次出现的文件:spring.factories,全局搜索它
spring.factories (ps:最新的版本将被弃用)
我们根据源头打开spring.factories , 看到了很多自动配置的文件;这就是自动配置根源所在!
新版本看

我们在上面的自动配置类随便找一个打开看看,比如 :WebMvcAutoConfiguration
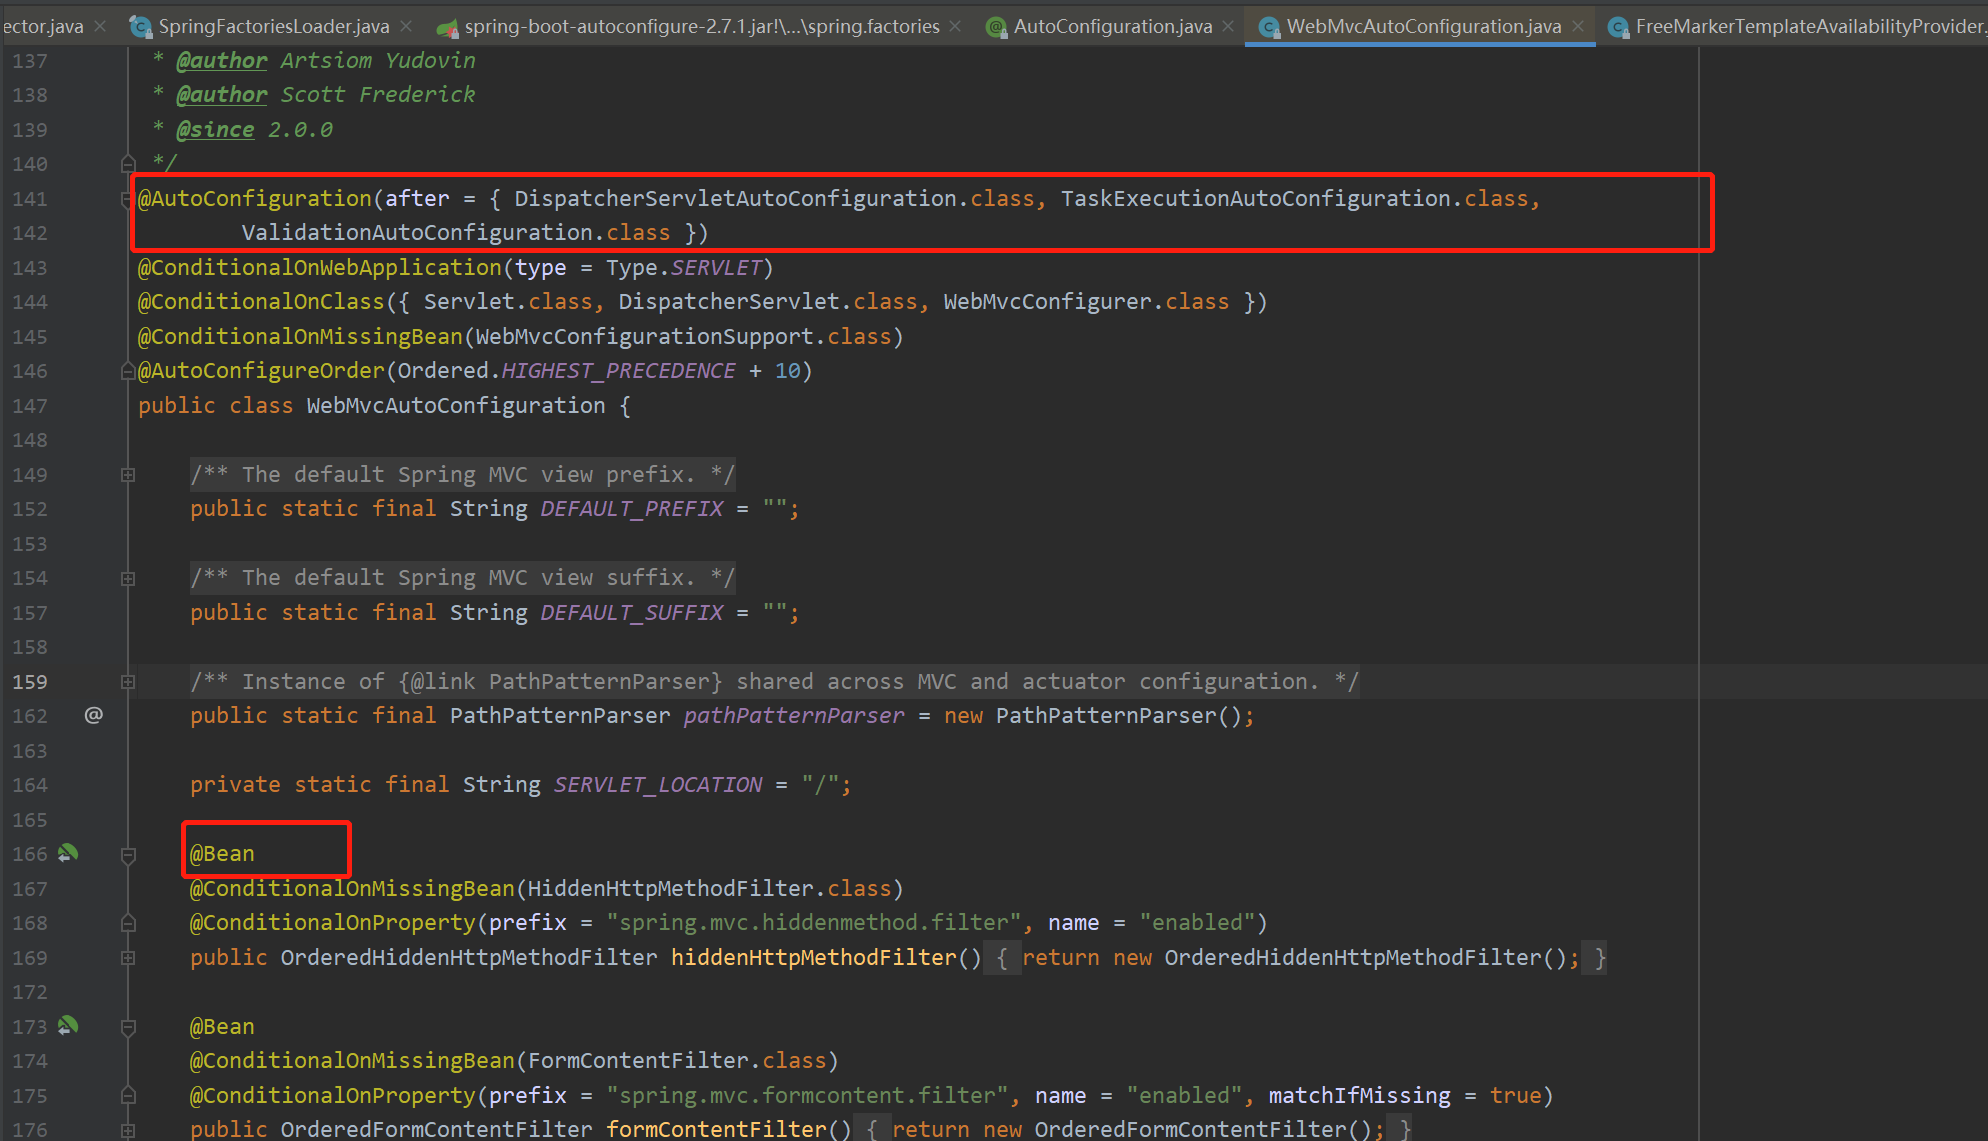
@AutoConfiguration
//...
@Configuration(proxyBeanMethods = false)
@AutoConfigureBefore
@AutoConfigureAfter
public @interface AutoConfiguration {
    //...
}
//...
可以看到这些一个个的都是JavaConfig配置类,而且都注入了一些Bean,可以找一些自己认识的类,看着熟悉一下!
所以,自动配置真正实现是从classpath中搜寻所有的META-INF/spring.factories配置文件 ,并将其中对应的 org.springframework.boot.autoconfigure. 包下的配置项,通过反射实例化为对应标注了 @Configuration的JavaConfig形式的IOC容器配置类 , 然后将这些都汇总成为一个实例并加载到IOC容器中。
4.3、结论
-
springboot在启动的时候从类路径在的META-INF/spring.factories中获取@EnableAutoConfiguration指定的值(新版本从
META-INF/spring/org.springframework.boot.autoconfigure.AutoConfiguration.imports中获取) -
将这些值作为自动配置类导入容器,自助配置类就生效,帮我们进行自动配置工作
-
整个J2EE的整体解决方法和自动配置都在springboot-autoconfigure的jar包中
-
它会给容器中导入非常多的自动配置类(***AutoConfiguration),就是给容器中导入这个场景需要的所有组件,并配置好这些组件
-
有了自动配置类,免去了我们手动编写配置注入功能组件等的工作
4.4、SpringApplication
我最初以为就是运行了一个main方法,没想到却开启了一个服务;
//...
@SpringBootApplication
public class Springboot01IdeaApplication {

    public static void main(String[] args) {
        SpringApplication.run(Springboot01IdeaApplication.class, args);
    }

}
SpringApplication.run分析
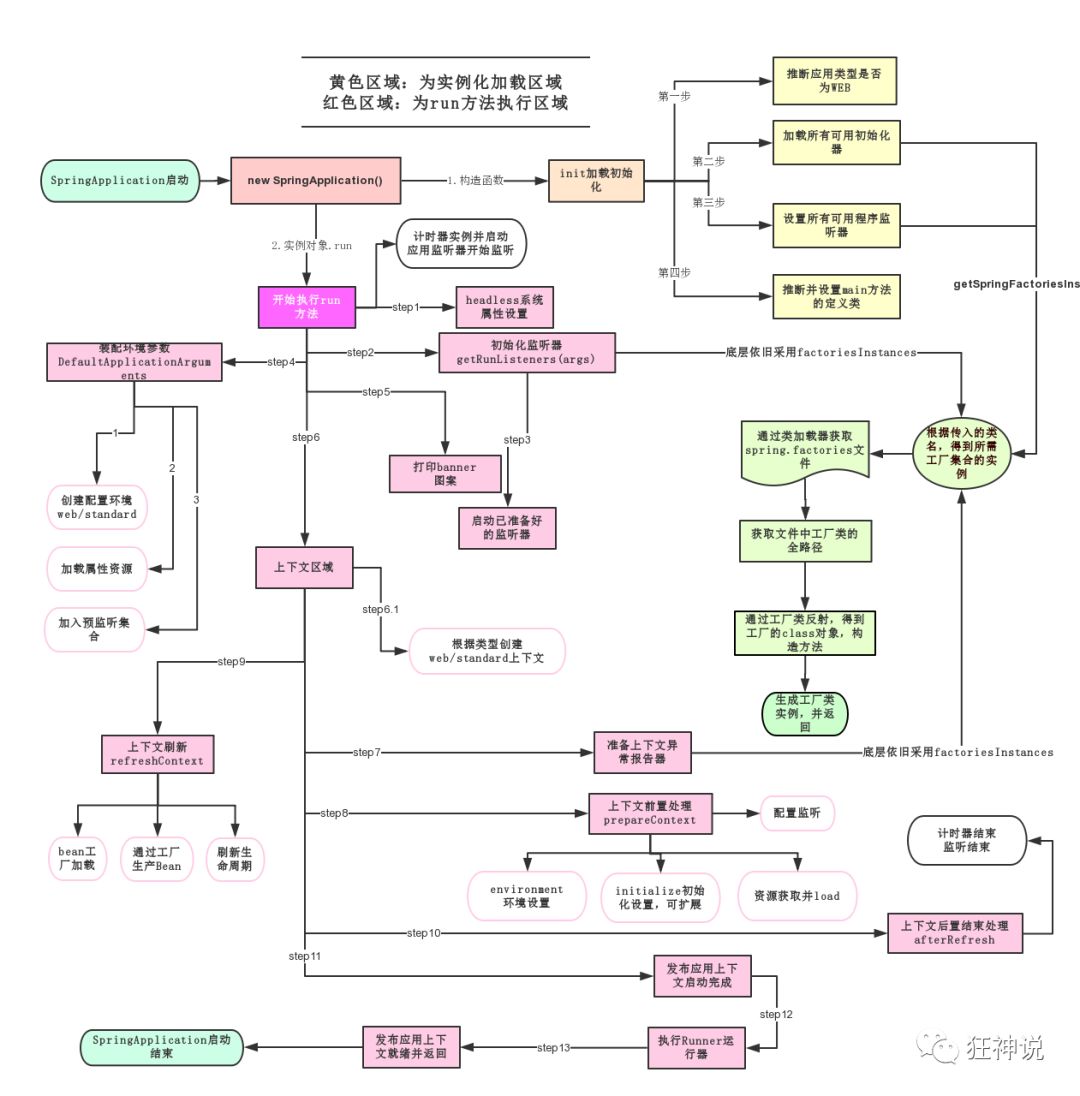
分析该方法主要分两部分,一部分是SpringApplication的实例化,二是run方法的执行;
SpringApplication
这个类主要做了以下四件事情:
-
推断应用的类型是普通的项目还是web项目
-
查找并加载所有可用初始化器,设置到initializers属性中
-
找出所有的应用程序监听器,设置到listeners属性中
-
推断并设置main方法的定义类,找到运行的主类
查看构造器:
//...
	public SpringApplication(ResourceLoader resourceLoader, Class<?>... primarySources) {
		this.resourceLoader = resourceLoader;
		Assert.notNull(primarySources, "PrimarySources must not be null");
		this.primarySources = new LinkedHashSet<>(Arrays.asList(primarySources));
		this.webApplicationType = WebApplicationType.deduceFromClasspath();
		this.bootstrapRegistryInitializers = new ArrayList<>(
				getSpringFactoriesInstances(BootstrapRegistryInitializer.class));
		setInitializers((Collection) getSpringFactoriesInstances(ApplicationContextInitializer.class));
		setListeners((Collection) getSpringFactoriesInstances(ApplicationListener.class));
		this.mainApplicationClass = deduceMainApplicationClass();
	}
//...
run方法流程分析
05、yaml配置注入
5.1、yaml语法学习
配置文件
SpringBoot使用一个全局的配置文件 , 配置文件名称是固定的
-
application.properties
语法结构:key=value
-
application.yml
语法结构:key: 空格value
配置文件的作用 :修改SpringBoot自动配置的默认值,因为SpringBoot在底层都给我们自动配置好了;
比如我们可以在配置文件中修改Tomcat 默认启动的端口号!测试一下!
server.port=8081
yaml概述
YAML是 "YAML Ain't a Markup Language" (YAML不是一种标记语言)的递归缩写。在开发的这种语言时,YAML 的意思其实是:"Yet Another Markup Language"(仍是一种标记语言)
这种语言以数据作为中心,而不是以标记语言为重点!
以前的配置文件,大多数都是使用xml来配置;比如一个简单的端口配置,我们来对比下yaml和xml
传统xml配置
<server>
    <port>8081<port>
</server>
yaml配置
server:
  port: 8080
yaml基础语法
说明:语法要求严格
-
空格不能省略
-
以缩进来控制层级关系,只要是左边对齐的一列数据都是同一个层级的
-
属性和值的大小写都是十分敏感的
字面量:普通的值 [ 数字,布尔值,字符串 ]
字面量直接写在后面就可以 , 字符串默认不用加上双引号或者单引号;
k: v
注意:
-
""双引号,不会转义字符串里面的特殊字符 , 特殊字符会作为本身想表示的意思;
比如 :name: "kuang \n shen" 输出 :kuang 换行 shen
-
''单引号,会转义特殊字符 , 特殊字符最终会变成和普通字符一样输出
比如 :name: ‘kuang \n shen’ 输出 :kuang \n shen
对象、Map(键值对)
#对象、Map格式
k:
    v1:
    v2:
在下一行来写对象的属性和值的关系,注意缩进;比如:
student:
  name: zyy
  age: 18
行内写法
student: {name: zyy, age: 18}
数组( List、set )
用 - 值表示数组中的一个元素,比如:
pets:
  - cat
  - dog
  - pig
行内写法
pets: [cat, dog, pig]
5.2、注入配置文件
yaml文件更强大的地方在于,他可以给我们的实体类直接注入匹配值!
yaml注入配置文件
-
在springboot项目中的resources目录下新建一个文件 application.yaml
-
编写一个实体类Dog,并用@Value给bean注入属性值(注:通过配置文件给属性注入值,一定要写set方法,下面类其实可以暂时不用写set方法,不过后面会用到)
@Component //bean注入到容器中 public class Dog { @Value("大黄") private String name; @Value("2") private int age; public void setName(String name) { this.name = name; } public void setAge(int age) { this.age = age; } @Override public String toString() { return "Dog{" + "name='" + name + '\'' + ", age=" + age + '}'; } } -
在测试类验证一下
@SpringBootTest class Springboot01IdeaApplicationTests { @Autowired private Dog dog; @Test void contextLoads() { System.out.println(dog); } } -
打印输入如下
Dog{name='大黄', age=2}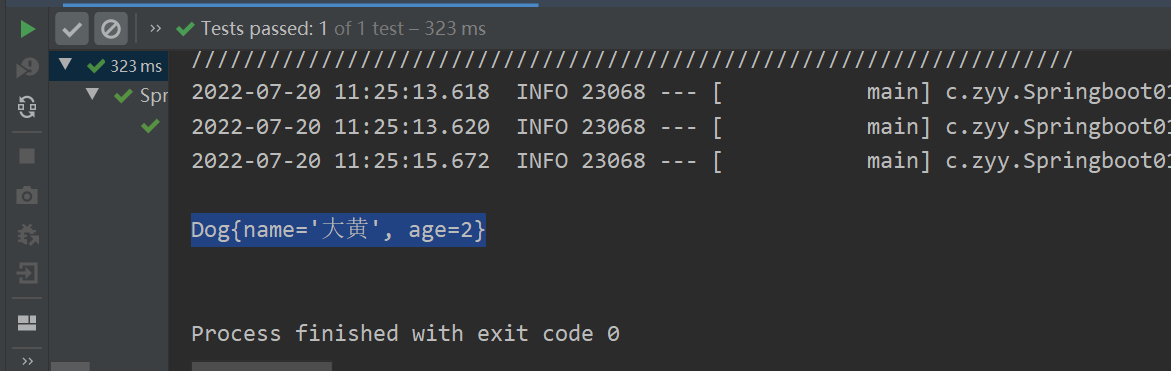
-
再新建一个复杂点的实体类Person
import org.springframework.boot.context.properties.ConfigurationProperties; import org.springframework.stereotype.Component; import java.util.Date; import java.util.List; import java.util.Map; /* @ConfigurationProperties作用: 将配置文件中配置的每一个属性的值,映射到这个组件中; 告诉SpringBoot将本类中的所有属性和配置文件中相关的配置进行绑定 参数 prefix = “person” : 将配置文件中的person下面的所有属性一一对应 */ @Component //注册bean到容器中 @ConfigurationProperties(prefix="person") public class Person { private String name; private int age; private boolean happy; private Date birth; private Map<String, Object> map; private List<Object> list; private Dog dog; public void setName(String name) { this.name = name; } public void setAge(int age) { this.age = age; } public void setHappy(boolean happy) { this.happy = happy; } public void setBirth(Date birth) { this.birth = birth; } public void setMap(Map<String, Object> map) { this.map = map; } public void setList(List<Object> list) { this.list = list; } public void setDog(Dog dog) { this.dog = dog; } @Override public String toString() { return "Person{" + "name='" + name + '\'' + ", age=" + age + ", happy=" + happy + ", birth=" + birth + ", map=" + map + ", list=" + list + ", dog=" + dog + '}'; } } -
IDEA 提示,springboot配置注解处理器没有找到,让我们看文档,我们可以查看文档,找到一个依赖!
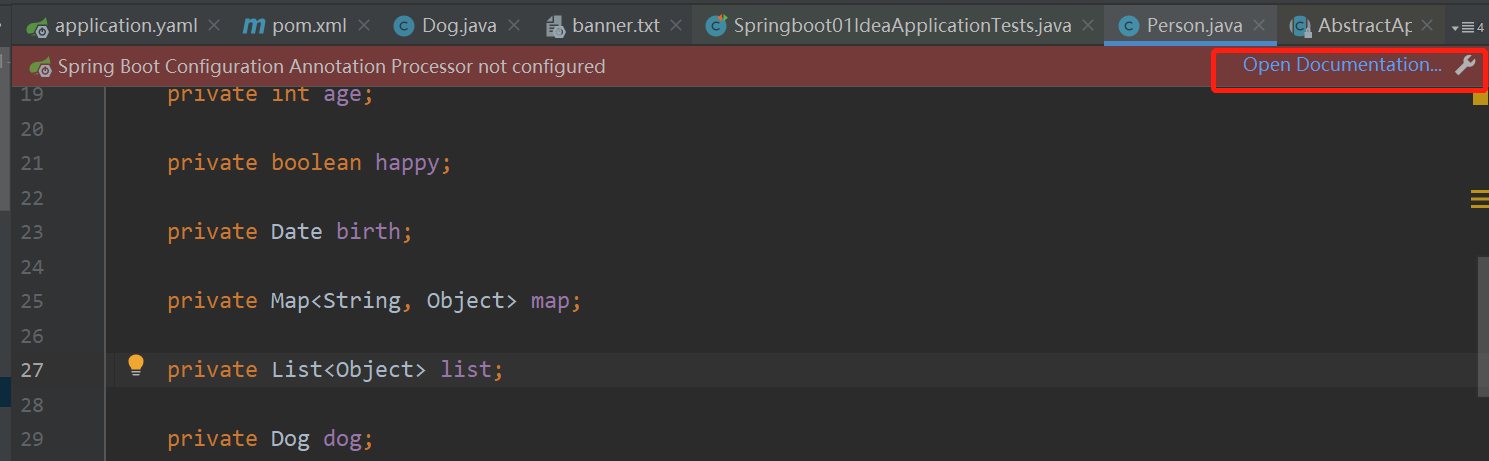
点击打开,跳转链接
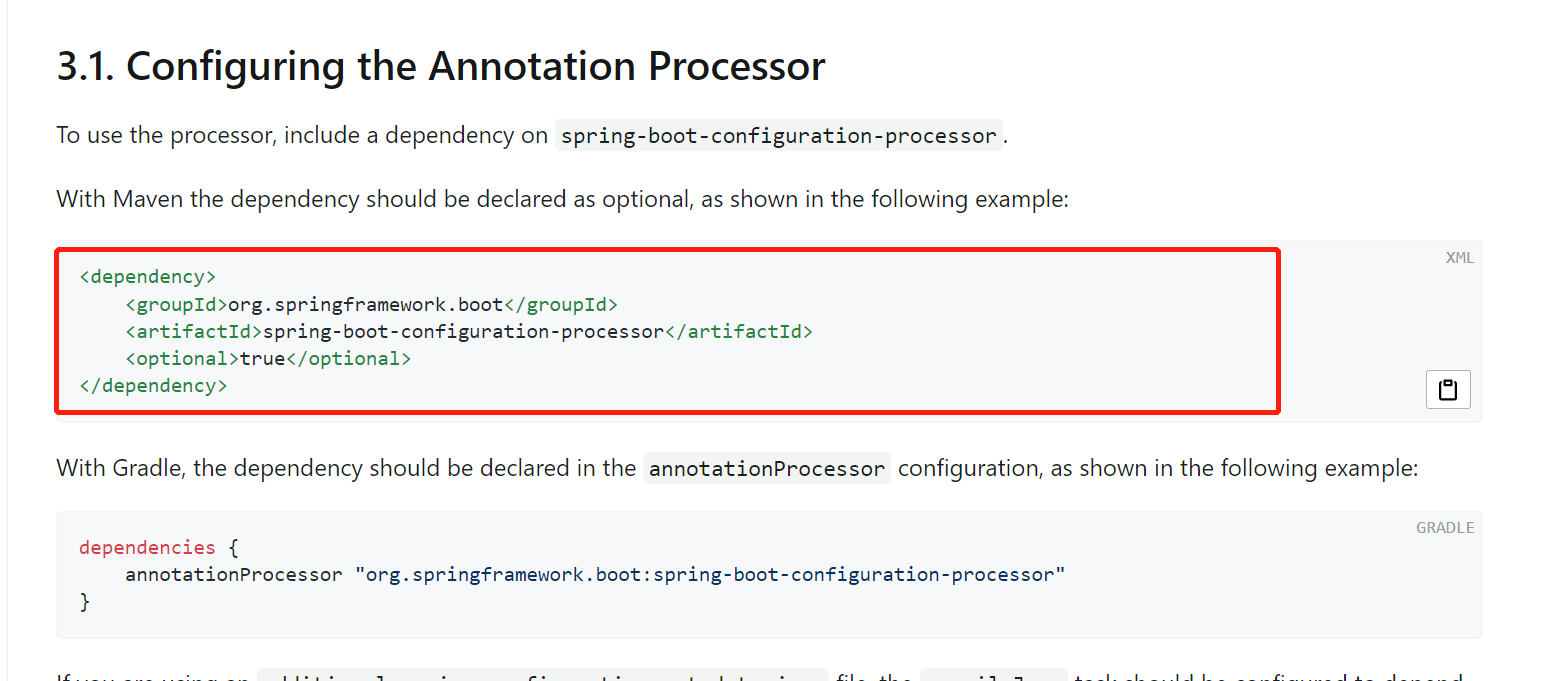
按照文档提供在pom.xml中导入依赖包,就不会报错了
<dependency> <groupId>org.springframework.boot</groupId> <artifactId>spring-boot-configuration-processor</artifactId> <optional>true</optional> </dependency> -
application.yaml中新增配置
person: name: zyy age: 18 happy: true birth: 1995/11/20 map: {k1: v1, k2: v2} list: - code - music dog: name: 小黄 age: 1 -
测试
@SpringBootTest
class Springboot01IdeaApplicationTests {

    @Autowired
    private Person person;

    @Test
    void contextLoads() {
        System.out.println(person);
    }
}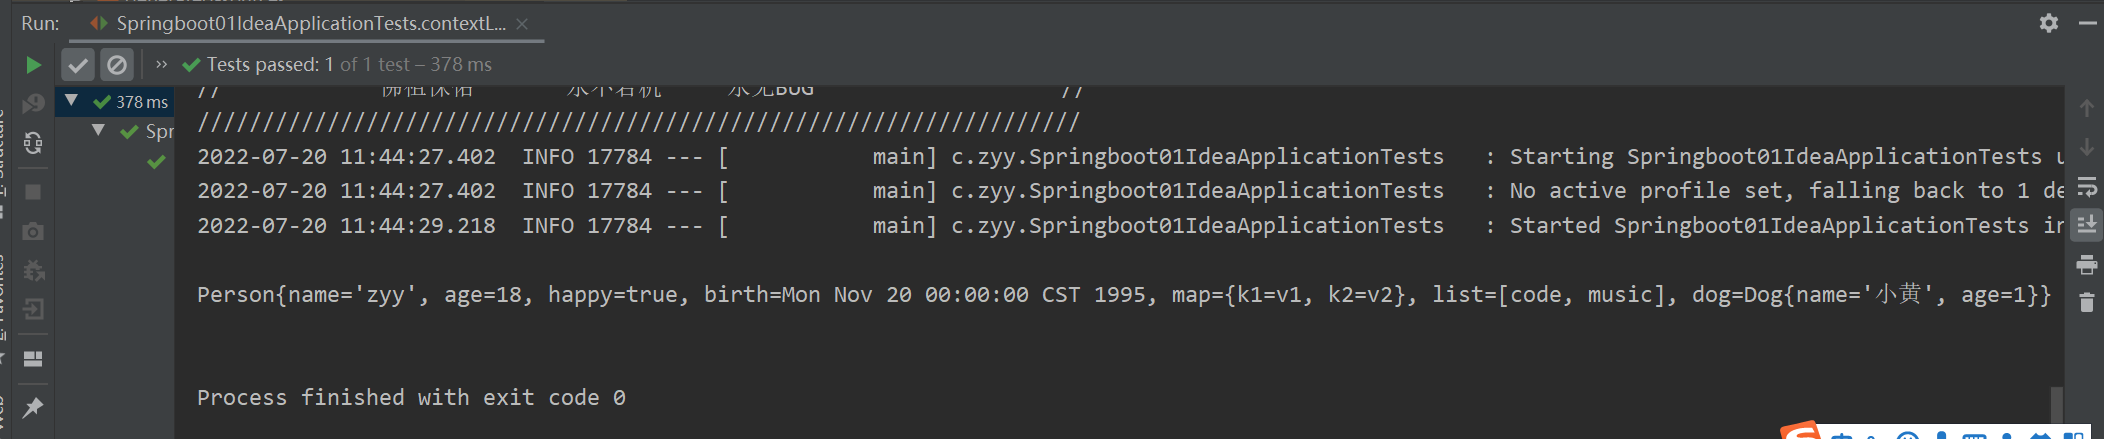
加载指定的配置文件
@PropertySource :加载指定的配置文件;
@ConfigurationProperties:默认从全局配置文件中获取值;
-
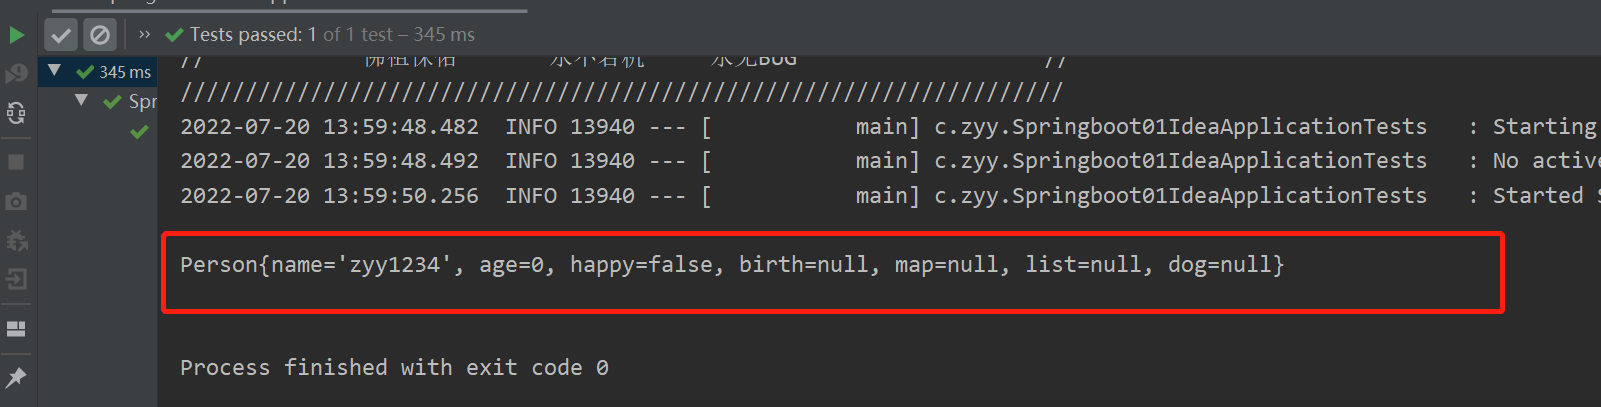
我们去在resources目录下新建一个person.properties文件
name=zyy1234
-
新建Person2,指定配置文件
@Component @PropertySource(value = "classpath:person.properties") public class Person2 { @Value("${name}") private String name; //... } -
测试,验证
配置文件占位符
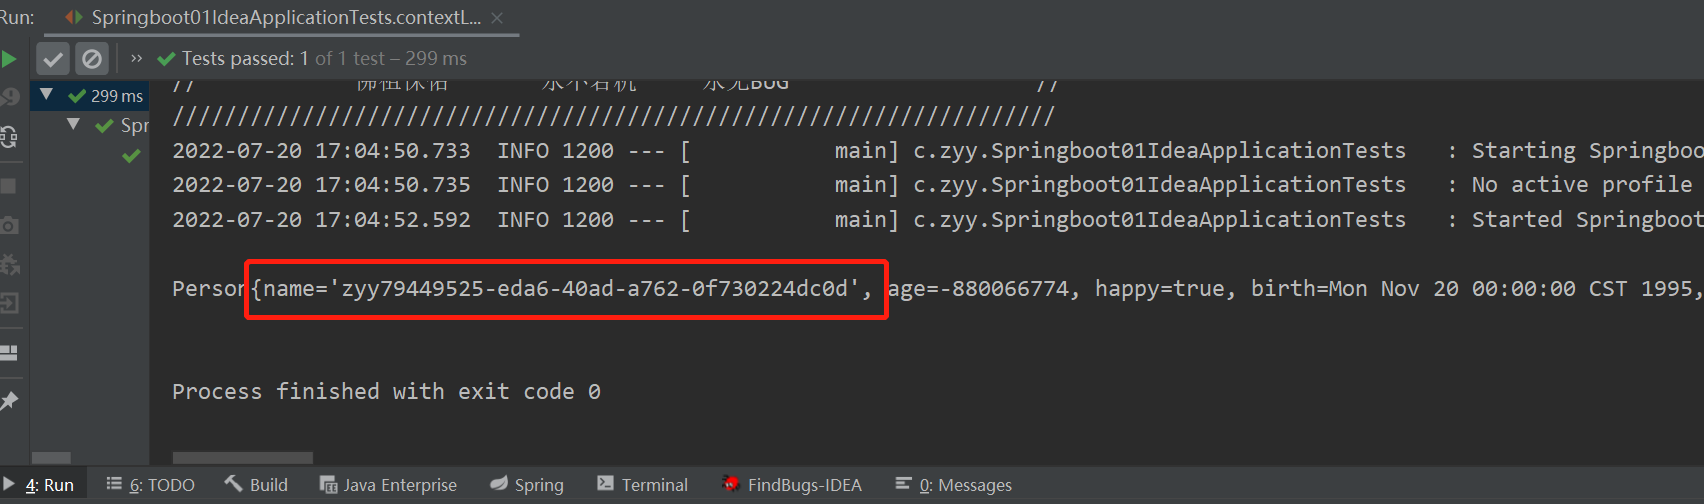
配置文件还可以编写占位符生成随机数
person:
  name: zyy${random.uuid}   # 随机uuid
  age: ${random.int} # 随机int
  happy: true
  birth: 1995/11/20
  map: {k1: v1, k2: v2}
  hello: z
  list:
    - code
    - music
  dog:
    name: ${person.hello:other}_小黄 # other代表默认值
    age: 1
打印结果如下
Person{name='zyye360040f-0b1b-4562-b555-fa409901a021', age=218521969, happy=true, birth=Mon Nov 20 00:00:00 CST 1995, map={k1=v1, k2=v2}, list=[code, music], dog=Dog{name='z_小黄', age=1}}
回顾properties配置
【注意】properties配置文件在写中文的时候,会有乱码 , 我们需要去IDEA中设置编码格式为UTF-8;
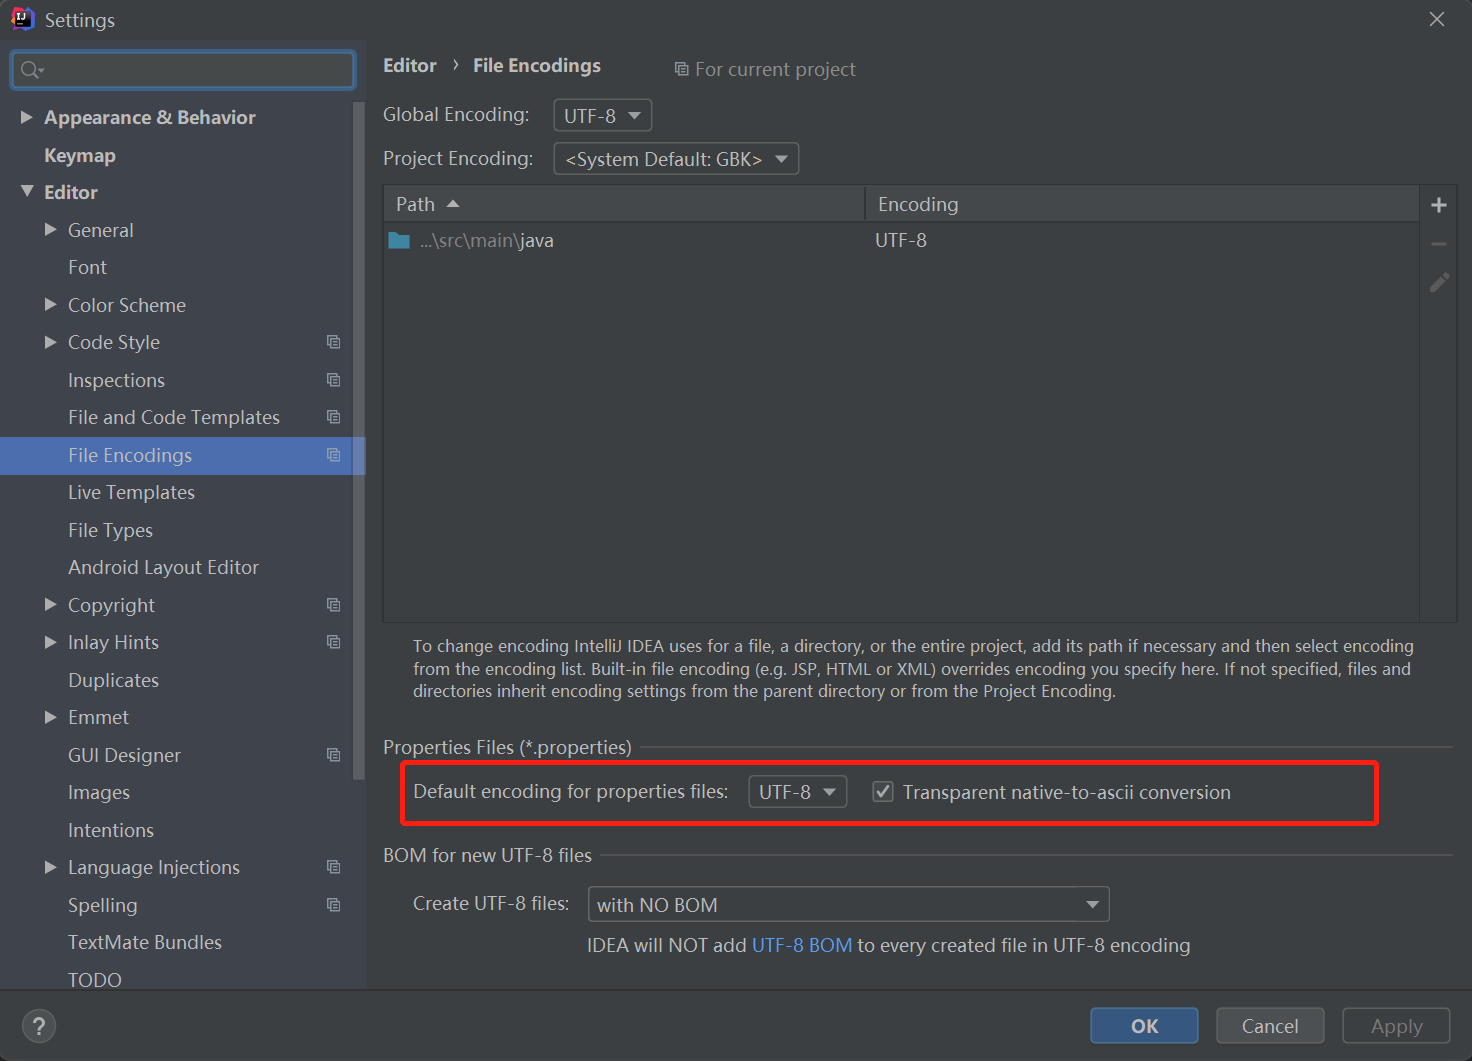
-
新建一个配置文件user.properties
user.name=zyy
user.age=18
user.sex=男
-
新建一个实体类User,并给属性注入值
import org.springframework.beans.factory.annotation.Value; import org.springframework.context.annotation.PropertySource; import org.springframework.stereotype.Component; @Component @PropertySource(value = "classpath:user.properties") public class User { /** * 从配置文件中取值 */ @Value("${user.name}") private String name; /** * #{SPEL} Spring表达式 */ @Value("#{9*2}") private int age; /** * 字面量 */ @Value("女") private String sex; @Override public String toString() { return "User{" + "name='" + name + '\'' + ", age=" + age + ", sex='" + sex + '\'' + '}'; } } -
测试验证
import com.zyy.pojo.User;
import org.junit.jupiter.api.Test;
import org.springframework.beans.factory.annotation.Autowired;
import org.springframework.boot.test.context.SpringBootTest;

@SpringBootTest
class Springboot01IdeaApplicationTests {

    @Autowired
    private User user;

    @Test
    void contextLoads() {
        System.out.println(user);
    }
}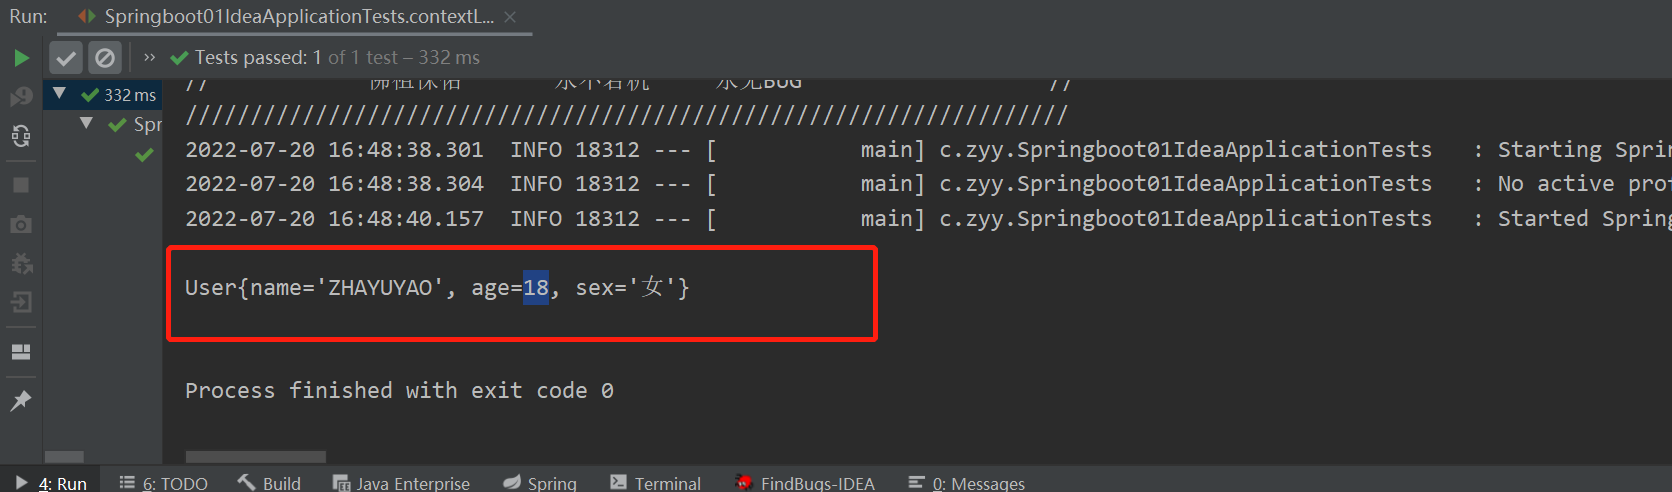
对比小结
| @ConfigurationProperties | @Value | |
|---|---|---|
| 功能 | 批量注入配置文件中的属性 | 一个个指定 |
| 松散绑定 | 支持 | 不支持 |
| SPEL | 不支持 | 支持 |
| JSR303数据校验 | 支持 | 不支持 |
| 复杂类型封装 | 支持 | 不支持 |
-
@ConfigurationProperties只需要写一次即可 , @Value则需要每个字段都添加
-
松散绑定:这个什么意思呢? 比如我的yml中写的last-name,这个和lastName是一样的, - 后面跟着的字母默认是大写的。这就是松散绑定。可以测试一下(注意set方法必须修改)
person:
  last-name: zyy${random.uuid}   # 随机uuid
  age: ${random.int} # 随机int
# ....
//... @Component @ConfigurationProperties(prefix="person") public class Person { private String lastName; //... public void setLastName(String lastName) { this.lastName = lastName; } //... }这种也是可以正常输出的
-
JSR303数据校验 , 这个就是我们可以在字段是增加一层过滤器验证 , 可以保证数据的合法性
导入jar包
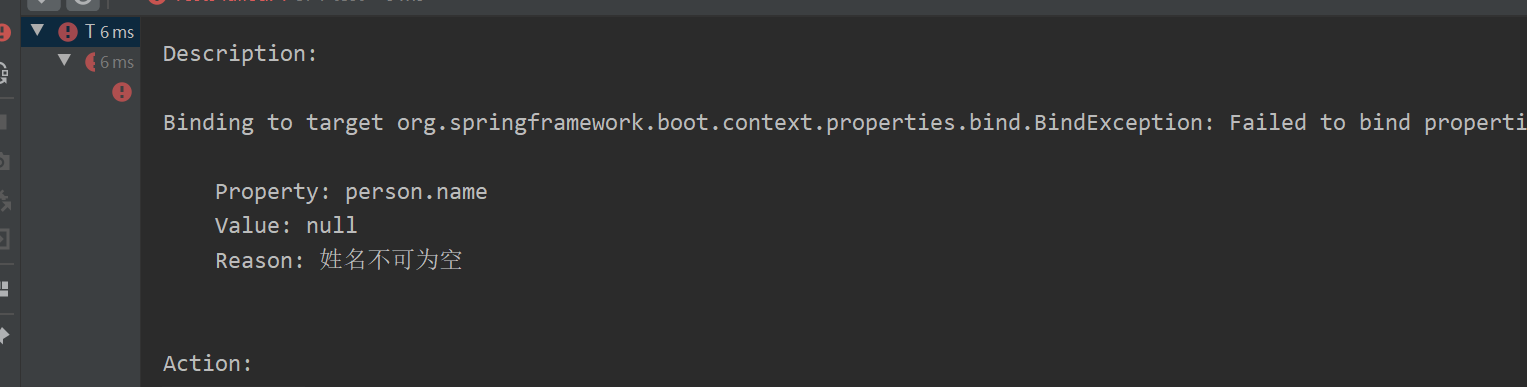
        <dependency>
            <groupId>javax.validation</groupId>
            <artifactId>validation-api</artifactId>
        </dependency>

        <dependency>
            <groupId>org.hibernate.validator</groupId>
            <artifactId>hibernate-validator</artifactId>
        </dependency>
实体类校验
//...
@Component
@ConfigurationProperties(prefix = "person")
@Validated //数据校验
public class Person {
    @NotBlank(message = "姓名不可为空")
    private String name;
    private int age;
    //...
}
application.yaml配置类
person:
  age: 18
测试验证,报错如下
拓展:
部分代码: @NotNull(message="名字不能为空") private String userName; @Max(value=120,message="年龄最大不能查过120") private int age; @Email(message="邮箱格式错误") private String email; ----------------------- 空检查 @Null 验证对象是否为null @NotNull 验证对象是否不为null, 无法查检长度为0的字符串 @NotBlank 检查约束字符串是不是Null还有被Trim的长度是否大于0,只对字符串,且会去掉前后空格. @NotEmpty 检查约束元素是否为NULL或者是EMPTY. Booelan检查 @AssertTrue 验证 Boolean 对象是否为 true @AssertFalse 验证 Boolean 对象是否为 false 长度检查 @Size(min=, max=) 验证对象(Array,Collection,Map,String)长度是否在给定的范围之内 @Length(min=, max=) string is between min and max included. 日期检查 @Past 验证 Date 和 Calendar 对象是否在当前时间之前 @Future 验证 Date 和 Calendar 对象是否在当前时间之后 @Pattern 验证 String 对象是否符合正则表达式的规则 -
复杂类型封装,yml中可以封装对象 , 使用value就不支持
结论
-
配置yml和配置properties都可以获取到值 , 强烈推荐 yml;
-
如果我们在某个业务中,只需要获取配置文件中的某个值,可以使用一下 @value;
-
如果说,我们专门编写了一个JavaBean来和配置文件进行一一映射,就直接@ConfigurationProperties,不要犹豫
06、多环境切换
profile是Spring对不同环境提供不同配置功能的支持,可以通过激活不同的环境版本,实现快速切换环境;
多配置文件
我们在主配置文件编写的时候,文件名可以是 application-{profile}.properties/yaml,用来指定多个环境版本
例如:
-
application-test.properties 代表测试环境配置
-
application-dev.properties 代表开发环境配置
但是Springboot并不会直接启动这些配置文件,它默认使用application.properties主配置文件;
我们需要通过一个配置来选择需要激活的环境:
application.properties
#比如在配置文件中指定使用dev环境,我们可以通过设置不同的端口号进行测试;
#我们启动SpringBoot,就可以看到已经切换到dev下的配置了;
spring.profiles.active=dev
application-dev.properties
server.port=8081
application-stg.properties
server.port=8082
这里系统启动的端口就是8081
yaml的多文档块
和properties配置文件中一样,也是可以创建多个配置文件,yml也可以在同一个文件中区分配置(不推荐使用)
#选择要激活那个环境块
spring:
  profiles:
    active: prod
---
server:
  port: 8083
spring:
  profiles: dev #配置环境的名称 不过现在已经废弃了,不推荐使用
---
server:
  port: 8084
spring:
  profiles: prod  #配置环境的名称
注意:如果yml和properties同时都配置了端口,并且没有激活其他环境 , 默认会使用properties配置文件的
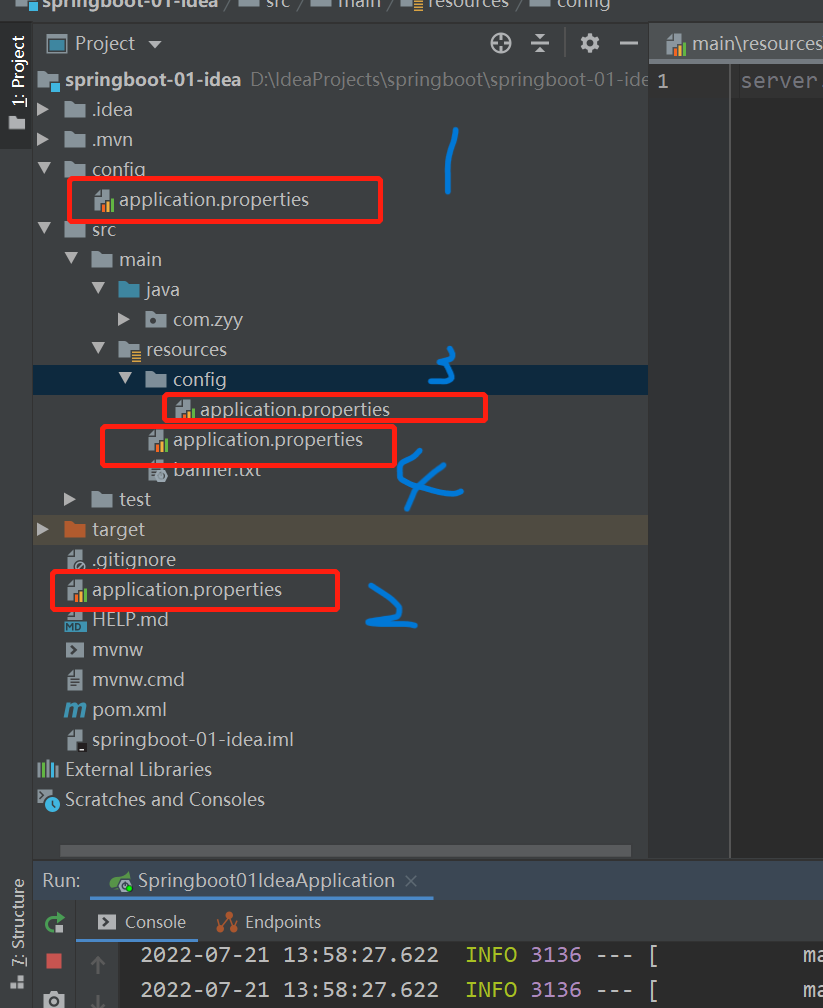
配置文件加载位置
外部加载配置文件的方式十分多,我们选择最常用的即可,在开发的资源文件中进行配置!
官方外部配置文件说明参考文档
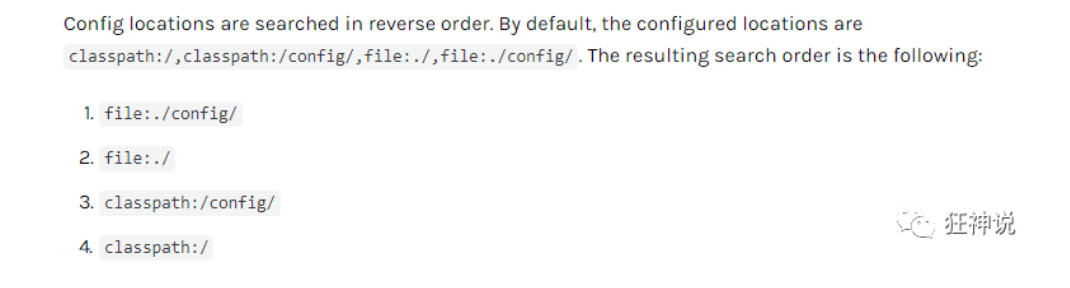
springboot 启动会扫描以下位置的application.properties或者application.yml文件作为Spring boot的默认配置文件:
优先级1:项目路径下的config文件夹配置文件
优先级2:项目路径下的配置文件
优先级3:资源路径下的config文件夹配置文件
优先级4:资源路径下的配置文件
优先级由高到底,高优先级的配置会覆盖低优先级的配置;
SpringBoot会从这四个位置全部加载主配置文件;互补配置;
拓展
指定位置加载配置文件
我们还可以通过spring.config.location来改变默认的配置文件位置
项目打包好以后,我们可以使用命令行参数的形式,启动项目的时候来指定配置文件的新位置;这种情况,一般是后期运维做的多,相同配置,外部指定的配置文件优先级最高
java -jar spring-boot-config.jar --spring.config.location=F:/application.properties
07、自动配置原理
分析自动配置原理
我们以HttpEncodingAutoConfiguration(Http编码自动配置)为例解释自动配置原理;
//表示这是一个配置类
@AutoConfiguration
//启动指定类的ConfigurationProperties功能;
//--进入这个HttpProperties查看,将配置文件中对应的值和HttpProperties绑定起来;
//--并把HttpProperties加入到ioc容器中
@EnableConfigurationProperties(ServerProperties.class)
//Spring底层@Conditional注解
//--根据不同的条件判断,如果满足指定的条件,整个配置类里面的配置就会生效;
//--这里的意思就是判断当前应用是否是web应用,如果是,当前配置类生效
@ConditionalOnWebApplication(type = ConditionalOnWebApplication.Type.SERVLET)
//判断当前项目有没有这个类CharacterEncodingFilter;SpringMVC中进行乱码解决的过滤器;
@ConditionalOnClass(CharacterEncodingFilter.class)
//判断配置文件中是否存在某个配置:spring.http.encoding.enabled;
//--如果不存在,判断也是成立的
//--使我们配置文件中不配置pring.http.encoding.enabled=true,也是默认生效的
@ConditionalOnProperty(
    prefix = "server.servlet.encoding",
    value = "enabled",
    matchIfMissing = true)
public class HttpEncodingAutoConfiguration {

	private final Encoding properties;

	public HttpEncodingAutoConfiguration(ServerProperties properties) {
		this.properties = properties.getServlet().getEncoding();
	}
    //给容器中添加一个组件,这个组件的某些值需要从properties中获取
	@Bean
	@ConditionalOnMissingBean //判断容器没有这个组件
	public CharacterEncodingFilter characterEncodingFilter() {
		CharacterEncodingFilter filter = new OrderedCharacterEncodingFilter();
		filter.setEncoding(this.properties.getCharset().name());
		filter.setForceRequestEncoding(this.properties.shouldForce(Encoding.Type.REQUEST));
		filter.setForceResponseEncoding(this.properties.shouldForce(Encoding.Type.RESPONSE));
		return filter;
	}
    //...
}
一句话总结:根据当前不同的条件判断,决定这个配置类是否生效!
-
一但这个配置类生效;这个配置类就会给容器中添加各种组件
-
这些组件的属性是从对应的properties类中获取的,这些类里面的每一个属性又是和配置文件绑定的
-
所有在配置文件中能配置的属性都是在***Properties类中封装着
-
配置文件能配置什么就可以参照某个功能对应的这个属性类
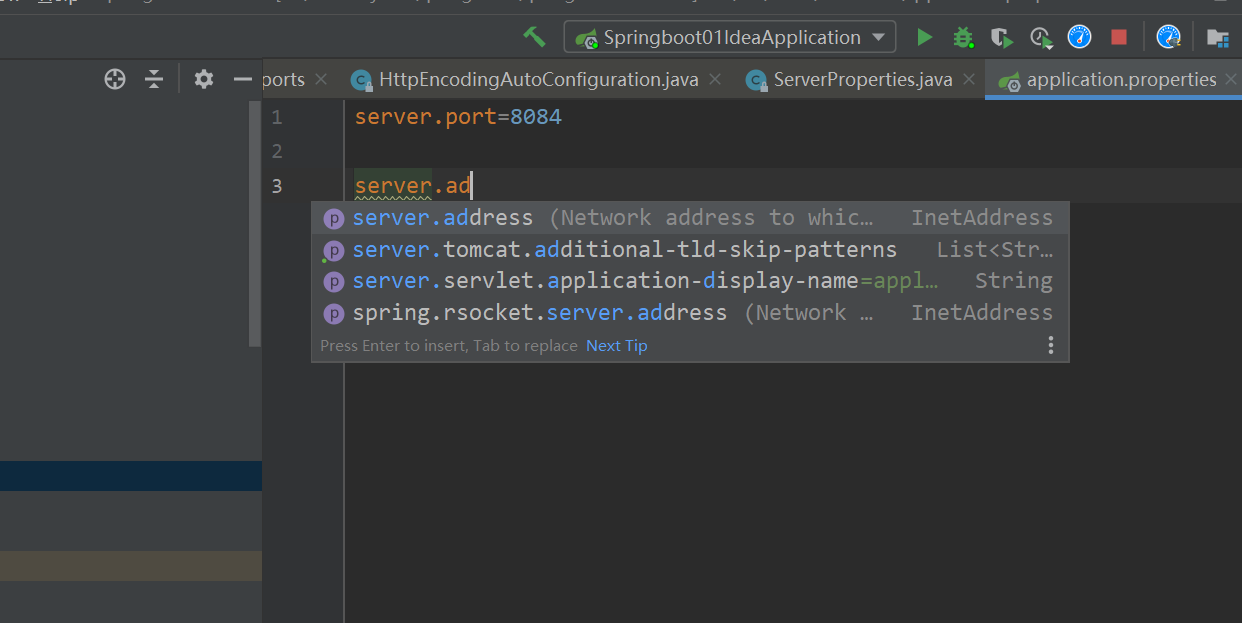
@ConfigurationProperties(prefix = "server", ignoreUnknownFields = true)
public class ServerProperties {

	/**
	 * Server HTTP port.
	 */
	private Integer port;

	/**
	 * Network address to which the server should bind.
	 */
	private InetAddress address;
    //...
}
我们去配置文件里面试试前缀,看提示!
这就是自动装配的原理!
精髓
-
SpringBoot启动会加载大量的自动配置类
-
我们看我们需要的功能有没有在SpringBoot默认写好的自动配置类当中
-
我们再来看这个自动配置类中到底配置了哪些组件;(只要我们要用的组件存在在其中,我们就不需要再手动配置了)
-
给容器中自动配置类添加组件的时候,会从properties类中获取某些属性。我们只需要在配置文件中指定这些属性的值即可;
xxxxAutoConfigurartion:自动配置类;给容器中添加组件
xxxxProperties:封装配置文件中相关属性;
了解:@Condition
了解完自动装配的原理后,我们来关注一个细节问题,自动配置类必须在一定的条件下才能生效;
@Conditional派生注解(Spring注解版原生的@Conditional作用)
作用:必须是@Conditional指定的条件成立,才给容器中添加组件,配置配里面的所有内容才生效;
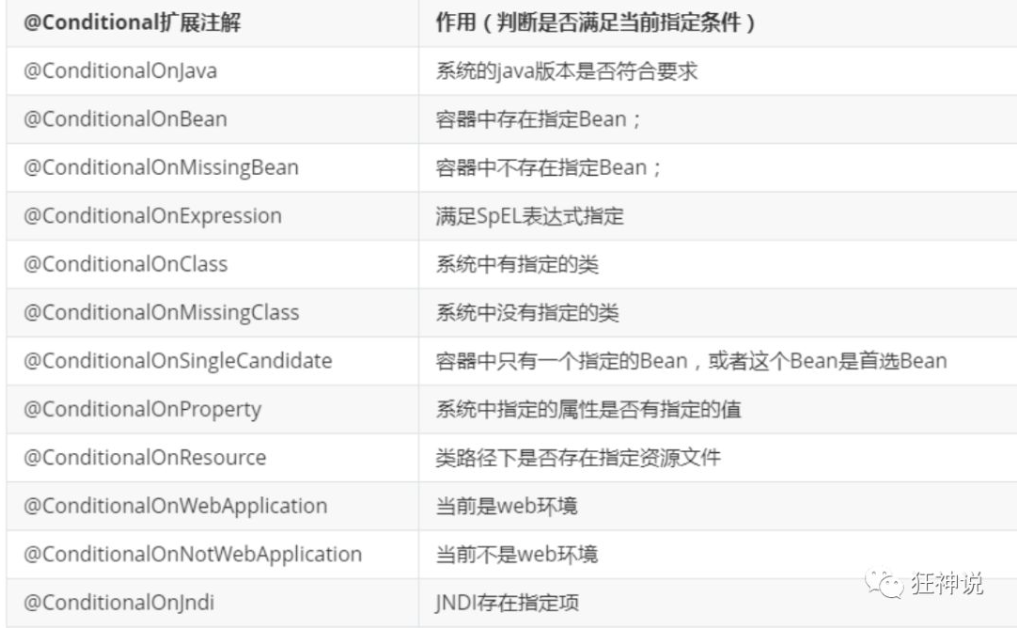
那么多的自动配置类,必须在一定的条件下才能生效;也就是说,我们加载了这么多的配置类,但不是所有的都生效了。
我们怎么知道哪些自动配置类生效?
我们可以通过启用 debug=true属性;来让控制台打印自动配置报告,这样我们就可以很方便的知道哪些自动配置类生效;
#开启springboot的调试类
debug=true
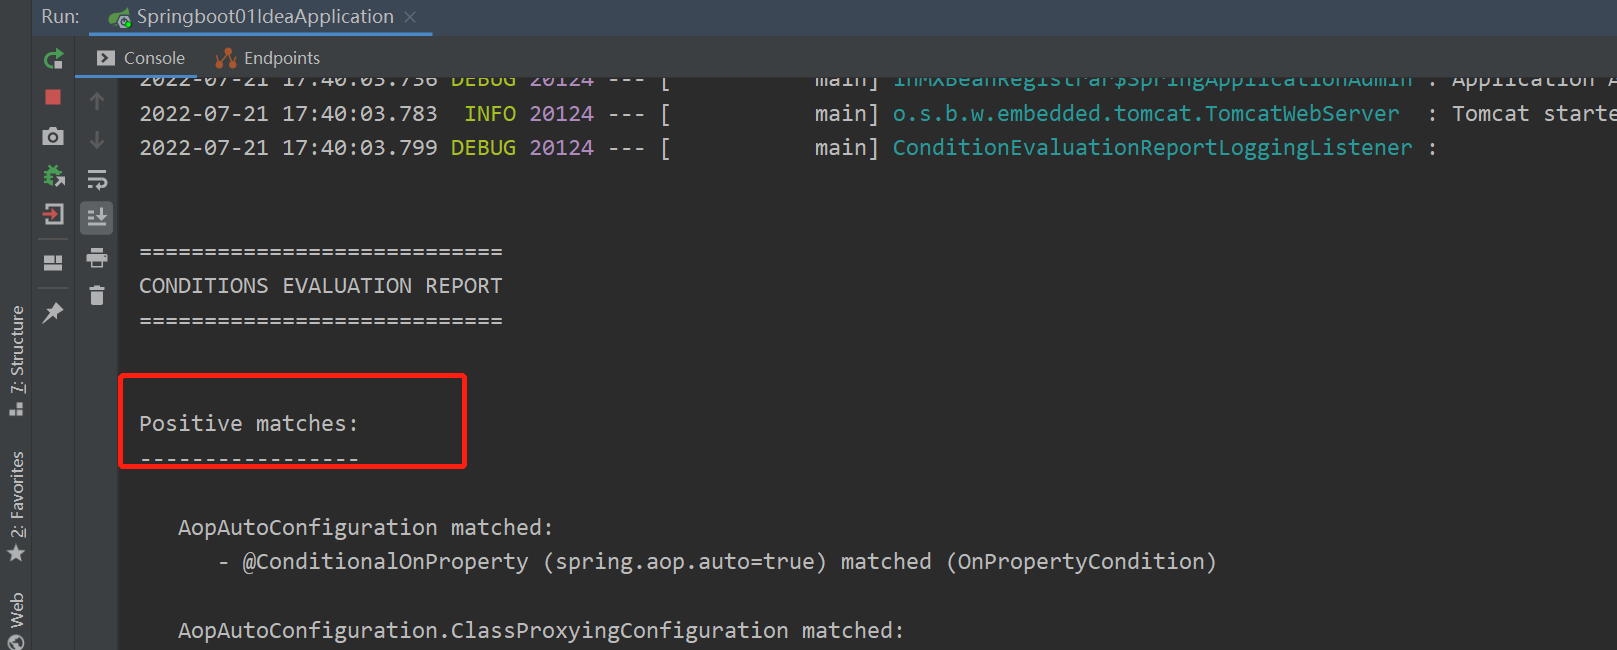
Positive matches:(自动配置类启用的:正匹配)
Negative matches:(没有启动,没有匹配成功的自动配置类:负匹配)
Unconditional classes: (没有条件的类)
08、自定义starter
说明
启动器模块是一个 空 jar 文件,仅提供辅助性依赖管理,这些依赖可能用于自动装配或者其他类库;
命名归约:
官方命名:
-
前缀:spring-boot-starter-xxx
-
比如:spring-boot-starter-web
自定义命名:
-
xxx-spring-boot-starter
-
比如:mybatis-spring-boot-starter
TODO:后面再补充
09、静态资源处理
SpringBoot最大的特点就是自动装配
首先我们新建一个干净的springboot项目,导入web依赖
9.1、静态资源处理
静态资源映射规则
写请求非常简单,那我们要引入我们前端资源,我们项目中有许多的静态资源,比如css,js等文件,这个SpringBoot怎么处理呢?
如果我们是一个web应用,我们的main下会有一个webapp,我们以前都是将所有的页面导在这里面的,对吧!但是我们现在的pom呢,打包方式是为jar的方式,那么这种方式SpringBoot能不能来给我们写页面呢?当然是可以的,但是SpringBoot对于静态资源放置的位置,是有规定的!
我们先来聊聊这个静态资源映射规则:
SpringBoot中,SpringMVC的web配置都在 WebMvcAutoConfiguration 这个配置类里面;
内部类WebMvcAutoConfigurationAdapter中有很多配置方法
有一个方法:addResourceHandlers添加资源处理
//...
		@Override
		public void addResourceHandlers(ResourceHandlerRegistry registry) {
			if (!this.resourceProperties.isAddMappings()) {
				logger.debug("Default resource handling disabled");
				return;
			}
            // webjar配置
			addResourceHandler(registry, "/webjars/**", "classpath:/META-INF/resources/webjars/");
            // 静态资源配置
			addResourceHandler(registry, this.mvcProperties.getStaticPathPattern(), (registration) -> {
				registration.addResourceLocations(this.resourceProperties.getStaticLocations());
				if (this.servletContext != null) {
					ServletContextResource resource = new ServletContextResource(this.servletContext, SERVLET_LOCATION);
					registration.addResourceLocations(resource);
				}
			});
		}
//...
什么是webjar呢?
Webjars本质就是以jar包的方式引入我们的静态资源 , 我们以前要导入一个静态资源文件,直接导入即可。
使用SpringBoot需要使用Webjars,我们可以去搜索一下:
网站:WebJars - Web Libraries in Jars
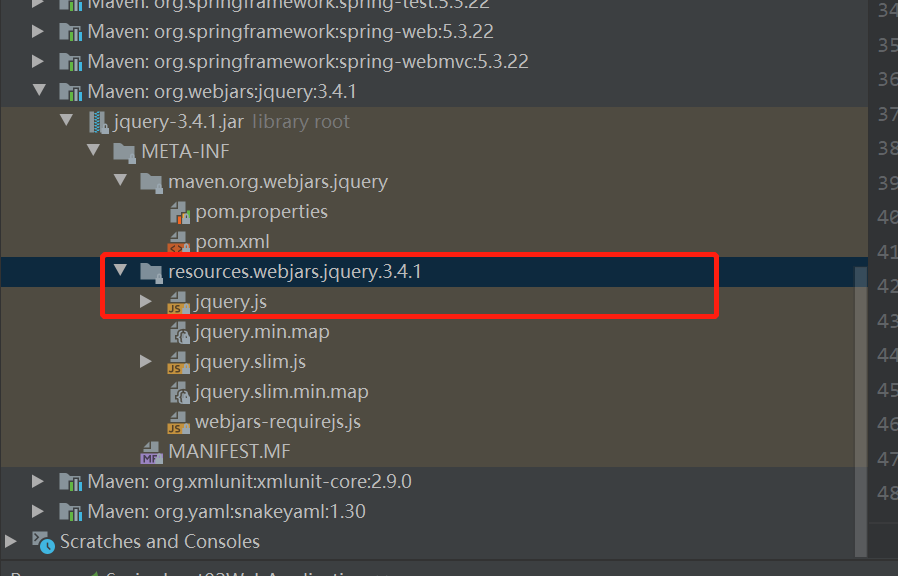
要使用jQuery,我们只要要引入jQuery对应版本的pom依赖即可!
        <dependency>
            <groupId>org.webjars</groupId>
            <artifactId>jquery</artifactId>
            <version>3.4.1</version>
        </dependency>
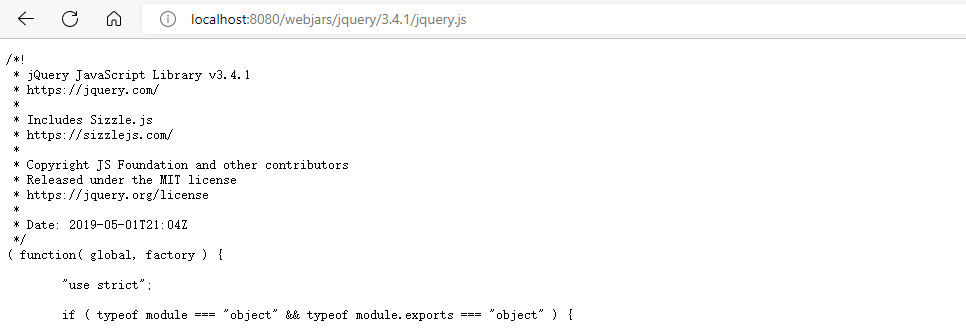
导入完毕,查看webjars目录结构,并访问Jquery.js文件!
访问:只要是静态资源,SpringBoot就会去对应的路径寻找资源,我们这里访问:
http://localhost:8080/webjars/jquery/3.4.1/jquery.js
第二种静态资源映射规则
那我们项目中要是使用自己的静态资源该怎么导入呢?我们看下一行代码;
我们去找staticPathPattern发现第二种映射规则 :/** , 访问当前的项目任意资源,它会去找 resourceProperties这个类,我们可以点进去看一下分析:
//...

	private String staticPathPattern = "/**";
//...
    public String getStaticPathPattern() {
		return this.staticPathPattern;
	}
//...
//...

		private static final String[] CLASSPATH_RESOURCE_LOCATIONS = {
            "classpath:/META-INF/resources/",
            "classpath:/resources/",
            "classpath:/static/",
            "classpath:/public/" };
//...
		private String[] staticLocations = CLASSPATH_RESOURCE_LOCATIONS;
//...
		public String[] getStaticLocations() {
			return this.staticLocations;
		}
//...
ResourceProperties 可以设置和我们静态资源有关的参数;这里面指向了它会去寻找资源的文件夹,即上面数组的内容。
所以得出结论,以下四个目录存放的静态资源可以被我们识别:
            "classpath:/META-INF/resources/",
            "classpath:/resources/",
            "classpath:/static/",
            "classpath:/public/"
我们可以在resources根目录下新建对应的文件夹,都可以存放我们的静态文件;
比如我们访问 http://localhost:8080/1.html , 他就会去这些文件夹中寻找对应的静态资源文件;
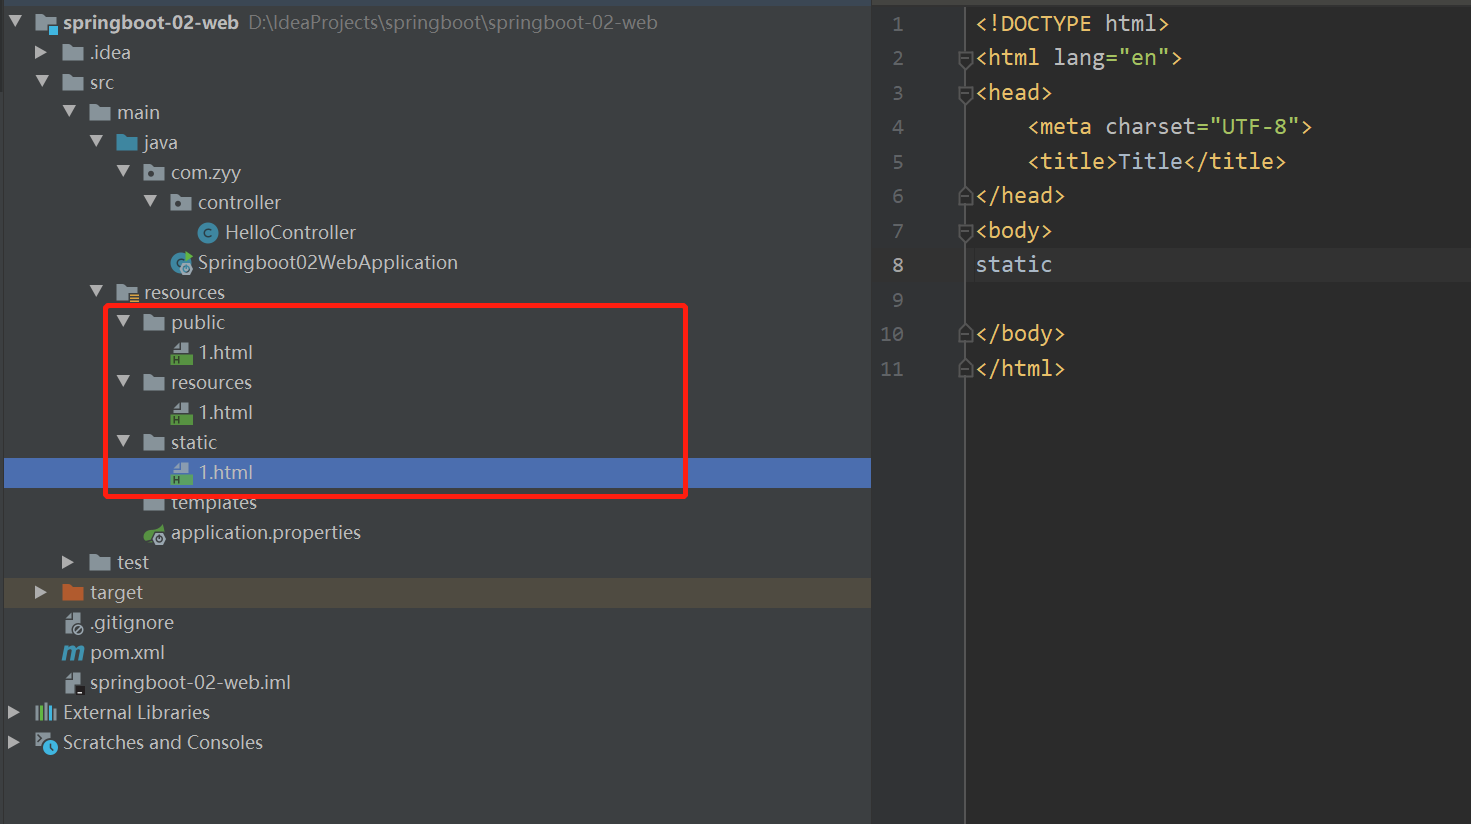
验证
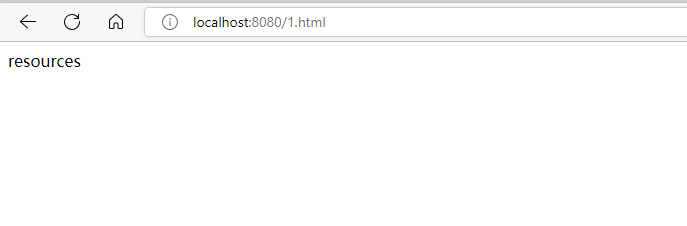
发现优先级:resources > static > public
自定义静态资源路径
我们也可以自己通过配置文件来指定一下,哪些文件夹是需要我们放静态资源文件的,在application.properties中配置
spring.web.resources.static-locations=classpath:/coding/,classpath:/zyy/
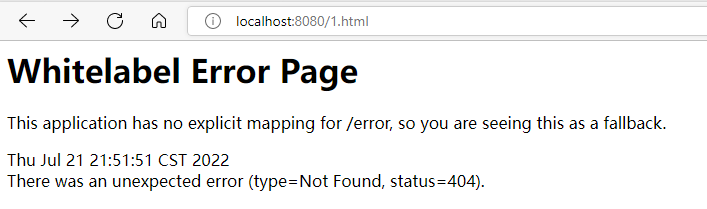
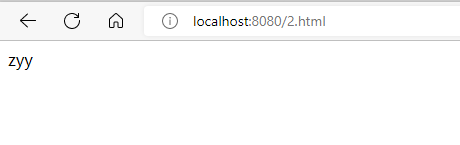
一旦自己定义了静态文件夹的路径,原来的自动配置就都会失效了!
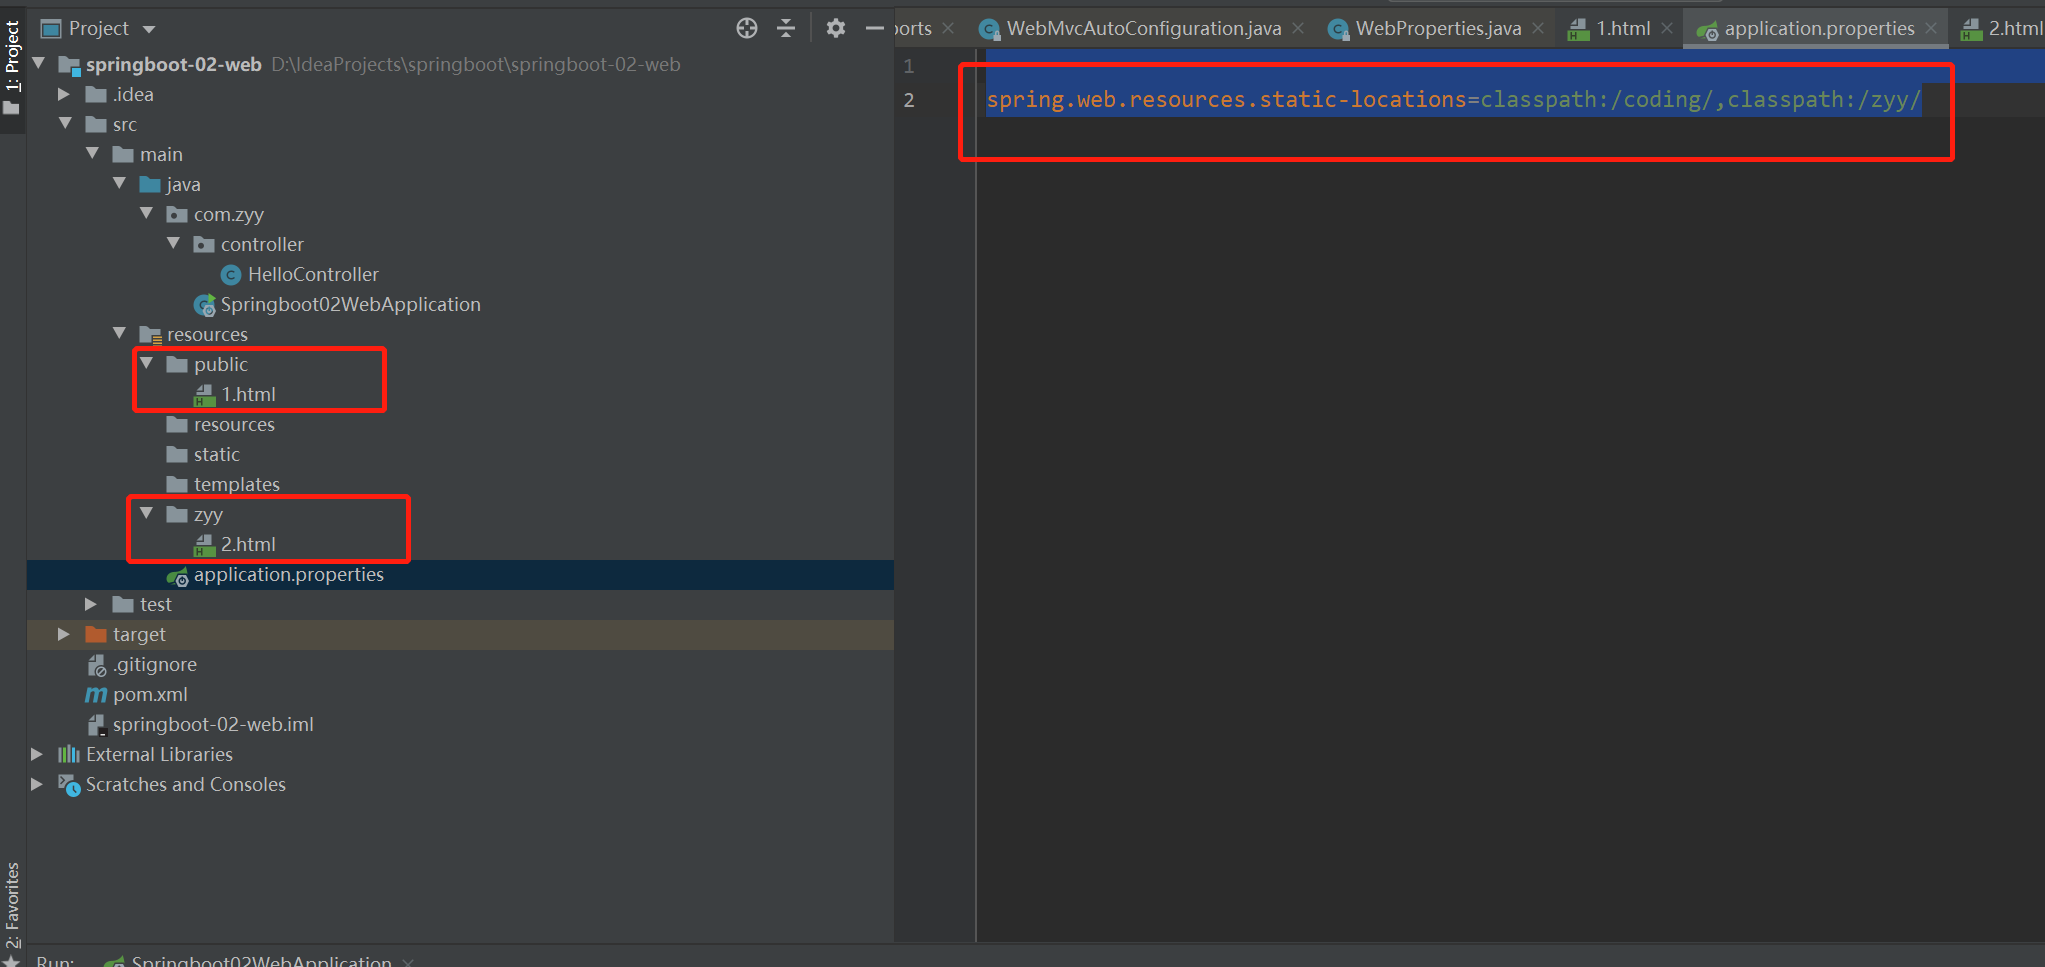
这个时候1.html就直接访问不了了,2.html就可以访问
9.2、首页处理
静态资源文件夹说完后,我们继续向下看源码!可以看到一个欢迎页的映射,就是我们的首页!
WebMvcAutoConfiguration
//...
@Bean
public WelcomePageHandlerMapping welcomePageHandlerMapping(ApplicationContext applicationContext,
                                                           FormattingConversionService mvcConversionService, ResourceUrlProvider mvcResourceUrlProvider) {
    WelcomePageHandlerMapping welcomePageHandlerMapping = new WelcomePageHandlerMapping(
        new TemplateAvailabilityProviders(applicationContext), applicationContext, getWelcomePage(),
        this.mvcProperties.getStaticPathPattern());
    welcomePageHandlerMapping.setInterceptors(getInterceptors(mvcConversionService, mvcResourceUrlProvider));
    welcomePageHandlerMapping.setCorsConfigurations(getCorsConfigurations());
    return welcomePageHandlerMapping;
}
//..
private Resource getWelcomePage() {
    for (String location : this.resourceProperties.getStaticLocations()) {
        Resource indexHtml = getIndexHtml(location);
        if (indexHtml != null) {
            return indexHtml;
        }
    }
    ServletContext servletContext = getServletContext();
    if (servletContext != null) {
        return getIndexHtml(new ServletContextResource(servletContext, SERVLET_LOCATION));
    }
    return null;
}
//...
private Resource getIndexHtml(String location) {
    return getIndexHtml(this.resourceLoader.getResource(location));
}

private Resource getIndexHtml(Resource location) {
    try {
        //欢迎页就是一个location下的的 index.html
        //location其实就是
        //--"classpath:/META-INF/resources/",
		//--"classpath:/resources/",
        //--"classpath:/static/",
        //--"classpath:/public/"
        Resource resource = location.createRelative("index.html");
        if (resource.exists() && (resource.getURL() != null)) {
            return resource;
        }
    }
    catch (Exception ex) {
    }
    return null;
}
//...
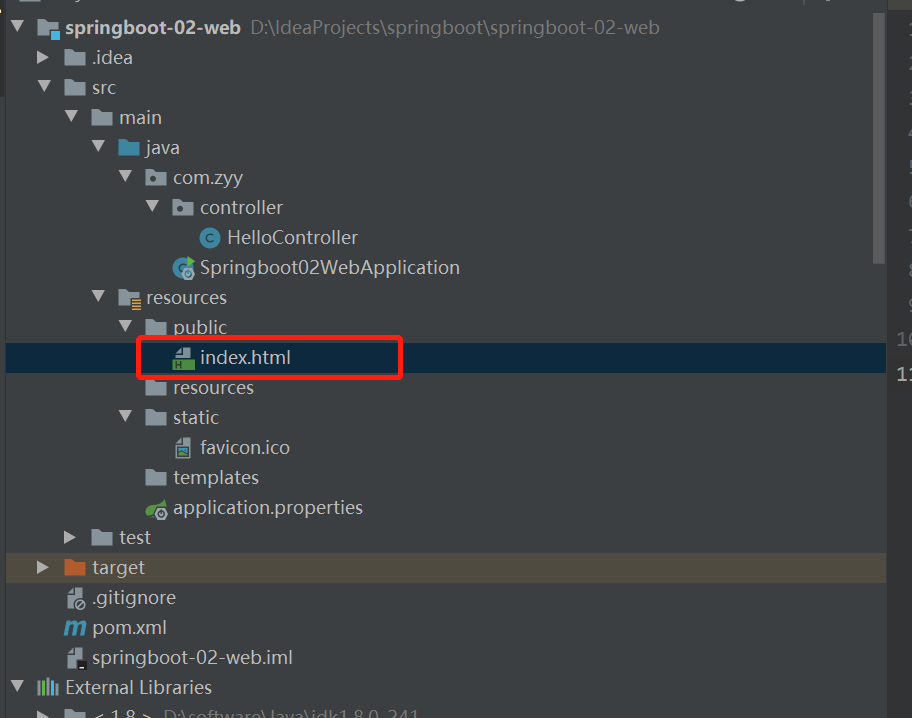
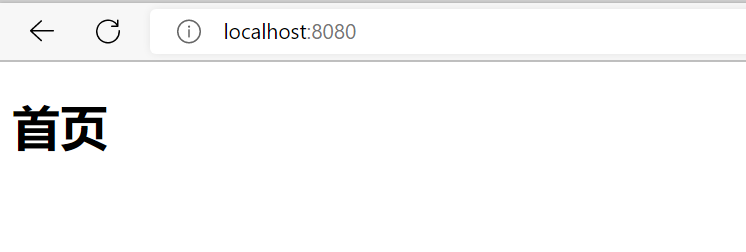
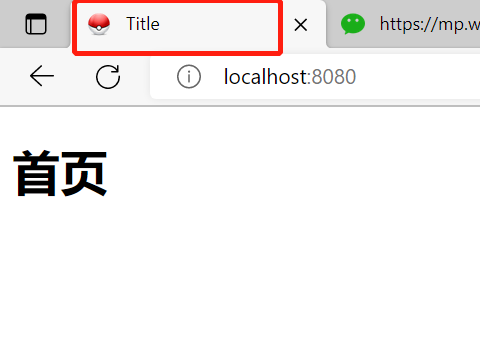
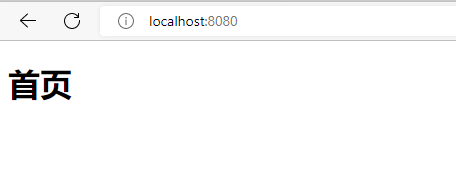
那么我们在指定目录下新增一个index.html,比如:public下
<!DOCTYPE html>
<html lang="en">
<head>
    <meta charset="UTF-8">
    <title>Title</title>
</head>
<body>
<h1>首页</h1>
</body>
</html>
然后启动服务,验证功能
图标说明
与其他静态资源一样,Spring Boot在配置的静态内容位置中查找 favicon.ico。如果存在这样的文件,它将自动用作应用程序的favicon。
之前的修改配置已经被弃用了
spring.mvc.favicon.enabled=false
其实自己直接放一个图标在静态资源目录下即可,我放在 public 目录下

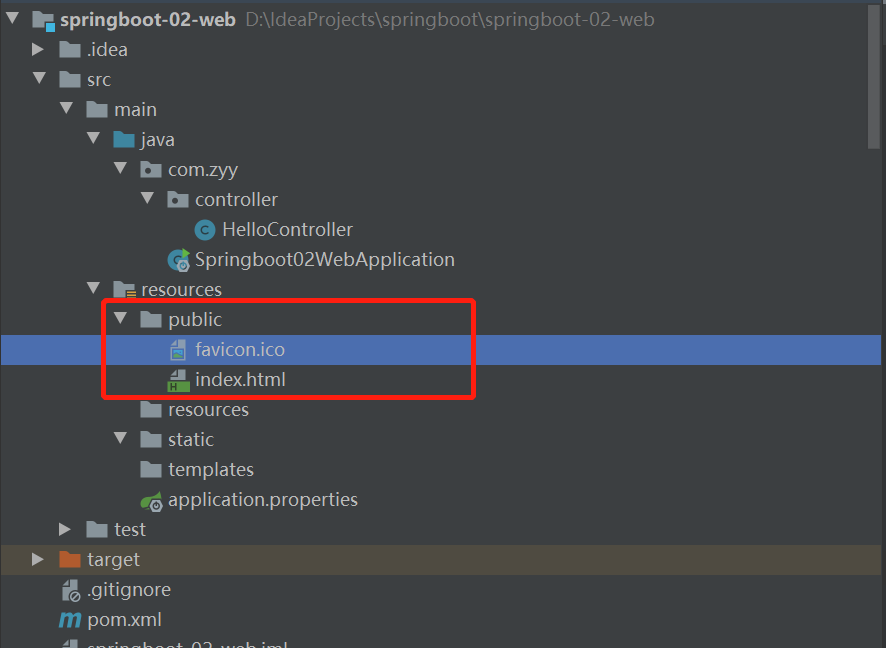
启动服务,清除浏览器缓存!刷新网页,发现图标已经变成自己的了!
10、Thymeleaf模板引擎
模板引擎
前端交给我们的页面,是html页面。如果是我们以前开发,我们需要把他们转成jsp页面,jsp好处就是当我们查出一些数据转发到JSP页面以后,我们可以用jsp轻松实现数据的显示,及交互等。
jsp支持非常强大的功能,包括能写Java代码,但是呢,我们现在的这种情况,SpringBoot这个项目首先是以jar的方式,不是war,像第二,我们用的还是嵌入式的Tomcat,所以呢,他现在默认是不支持jsp的。
那不支持jsp,如果我们直接用纯静态页面的方式,那给我们开发会带来非常大的麻烦,那怎么办呢?
SpringBoot推荐你可以来使用模板引擎:
模板引擎,我们其实大家听到很多,其实jsp就是一个模板引擎,还有用的比较多的freemarker,包括SpringBoot给我们推荐的Thymeleaf,模板引擎有非常多,但再多的模板引擎,他们的思想都是一样的,什么样一个思想呢我们来看一下这张图:
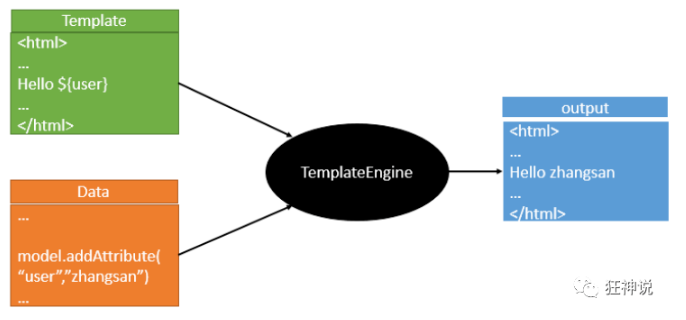
模板引擎的作用就是我们来写一个页面模板,比如有些值呢,是动态的,我们写一些表达式。
而这些值,从哪来呢,就是我们在后台封装一些数据。
然后把这个模板和这个数据交给我们模板引擎,
模板引擎按照我们这个数据帮你把这表达式解析、填充到我们指定的位置,
然后把这个数据最终生成一个我们想要的内容给我们写出去,
这就是我们这个模板引擎,
不管是jsp还是其他模板引擎,都是这个思想。
引入thymelead
Thymeleaf 官网:Thymeleaf
Thymeleaf 在Github 的主页:GitHub - thymeleaf/thymeleaf: Thymeleaf is a modern server-side Java template engine for both web and standalone environments.
Spring官方文档:找到我们对应的版本
Spring Boot Reference Documentation
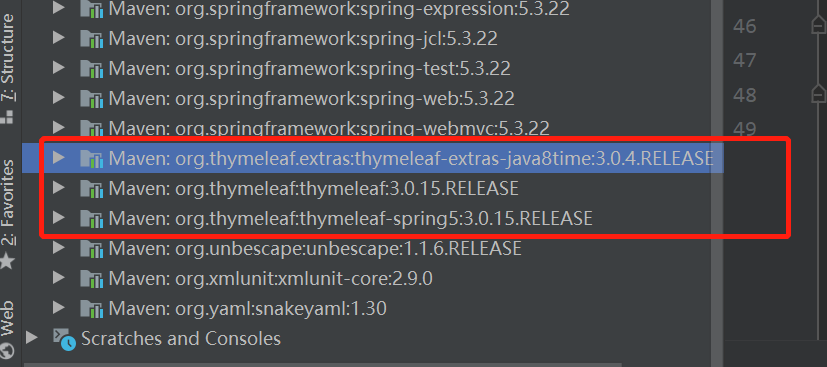
找到对应的pom依赖:可以适当点进源码看下本来的包!
        <!--thymeleaf-->
        <dependency>
            <groupId>org.springframework.boot</groupId>
            <artifactId>spring-boot-starter-thymeleaf</artifactId>
        </dependency>
Maven会自动下载jar包,我们可以去看下下载的东西;
thymeleaf分析
前面呢,我们已经引入了Thymeleaf,那这个要怎么使用呢?
我们首先得按照SpringBoot的自动配置原理看一下我们这个Thymeleaf的自动配置规则,在按照那个规则,我们进行使用。
我们去找一下Thymeleaf的自动配置类:ThymeleafProperties
//...
@ConfigurationProperties(prefix = "spring.thymeleaf")
public class ThymeleafProperties {

	private static final Charset DEFAULT_ENCODING = StandardCharsets.UTF_8;

	public static final String DEFAULT_PREFIX = "classpath:/templates/";

	public static final String DEFAULT_SUFFIX = ".html";
    //...

}
我们可以在其中看到默认的前缀和后缀!
我们只需要把我们的html页面放在类路径下的templates下,thymeleaf就可以帮我们自动渲染了。
使用thymeleaf什么都不需要配置,只需要将他放在指定的文件夹下即可!
测试
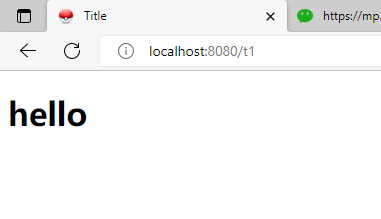
-
编写一个TestController
@Controller public class TestController { @RequestMapping("/t1") public String test1() { return "test"; } } -
编写一个测试页面 test.html 放在 templates 目录下
<!DOCTYPE html> <html lang="en"> <head> <meta charset="UTF-8"> <title>Title</title> </head> <body> <h1>hello</h1> </body> </html> -
启动项目请求测试
thymeleaf语法学习
要学习语法,还是参考官网文档最为准确,我们找到对应的版本看一下;
Thymeleaf 官网:Thymeleaf , 简单看一下官网!我们去下载Thymeleaf的官方文档!
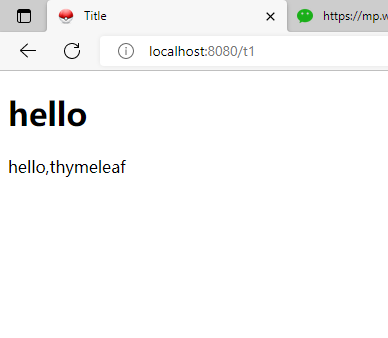
我们做个最简单的练习 :我们需要查出一些数据,在页面中展示
-
修改测试请求
@Controller public class TestController { @RequestMapping("/t1") public String test1(Model model) { model.addAttribute("msg", "hello,thymeleaf"); return "test"; } } -
我们要使用thymeleaf,需要在html文件中导入命名空间的约束,方便提示。
我们可以去官方文档的#3中看一下命名空间拿来过来:
<html xmlns:th="http://www.thymeleaf.org">
-
优化前端页面
<!DOCTYPE html> <html xmlns:th="http://www.thymeleaf.org"> <head> <meta charset="UTF-8"> <title>Title</title> </head> <body> <h1>hello</h1> <div th:text="#{msg}"></div> </body> </html> -
启动服务,验证功能
OK,入门搞定,我们来认真研习一下Thymeleaf的使用语法!
1、我们可以使用任意的 th:attr 来替换Html中原生属性的值!
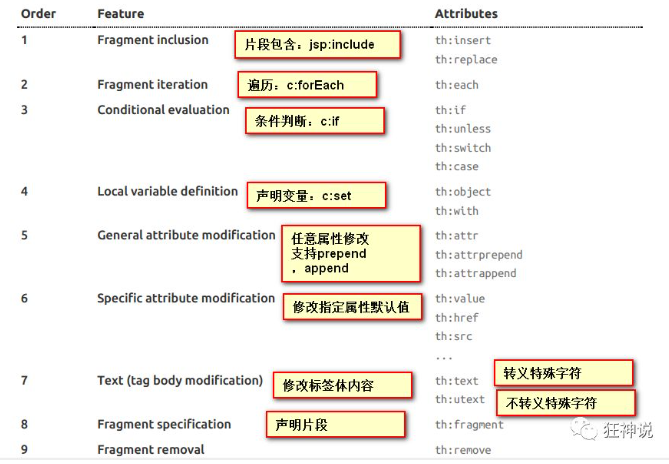
2、我们能写哪些表达式呢?
Simple expressions:(表达式语法)
  Variable Expressions: ${...}   获取变量值;
  Selection Variable Expressions: *{...}   选择表达式:和${}在功能上是一样
  Message Expressions: #{...}  获取国际化内容
  Link URL Expressions: @{...}  定义URL
  Fragment Expressions: ~{...}  片段引用表达式


使用内置的基本对象:
  #ctx : the context object.
  #vars: the context variables.
  #locale : the context locale.
  #request : (only in Web Contexts) the HttpServletRequest object.
  #response : (only in Web Contexts) the HttpServletResponse object.
  #session : (only in Web Contexts) the HttpSession object.
  #servletContext : (only in Web Contexts) the ServletContext object.

内置的一些工具对象:
  #execInfo : information about the template being processed.
  #uris : methods for escaping parts of URLs/URIs
  #conversions : methods for executing the configured conversion service (if any).
  #dates : methods for java.util.Date objects: formatting, component extraction, etc.
  #calendars : analogous to #dates , but for java.util.Calendar objects.
  #numbers : methods for formatting numeric objects.
  #strings : methods for String objects: contains, startsWith, prepending/appending, etc.
  #objects : methods for objects in general.
  #bools : methods for boolean evaluation.
  #arrays : methods for arrays.
  #lists : methods for lists.
  #sets : methods for sets.
  #maps : methods for maps.
  #aggregates : methods for creating aggregates on arrays or collections.
==================================================================================

Literals(字面量)
      Text literals: 'one text' , 'Another one!' ,…
      Number literals: 0 , 34 , 3.0 , 12.3 ,…
      Boolean literals: true , false
      Null literal: null
      Literal tokens: one , sometext , main ,…

Text operations:(文本操作)
    String concatenation: +
    Literal substitutions: |The name is ${name}|

Arithmetic operations:(数学运算)
    Binary operators: + , - , * , / , %
    Minus sign (unary operator): -

Boolean operations:(布尔运算)
    Binary operators: and , or
    Boolean negation (unary operator): ! , not

Comparisons and equality:(比较运算)
    Comparators: > , < , >= , <= ( gt , lt , ge , le )
    Equality operators: == , != ( eq , ne )

Conditional operators:条件运算(三元运算符)
    If-then: (if) ? (then)
    If-then-else: (if) ? (then) : (else)
    Default: (value) ?: (defaultvalue)

Special tokens:
    No-Operation: _
练习测试:
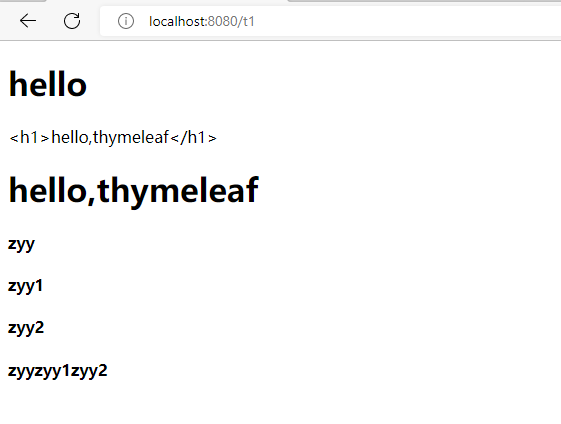
-
优化controller
@Controller public class TestController { @RequestMapping("/t1") public String test1(Model model) { model.addAttribute("msg", "<h1>hello,thymeleaf</h1>"); model.addAttribute("msg2", "<h1>hello,thymeleaf</h1>"); model.addAttribute("users", Arrays.asList("zyy", "zyy1", "zyy2")); return "test"; } } -
优化html
<!DOCTYPE html> <html xmlns:th="http://www.thymeleaf.org"> <head> <meta charset="UTF-8"> <title>Title</title> </head> <body> <h1>hello</h1> <div th:text="${msg}"></div> <!--不转义--> <div th:utext="${msg2}"></div> <h4 th:each="user:${users}" th:text="${user}"></h4> <h4> <!--行内写法:官网#12--> <span th:each="user:${users}">[[${user}]]</span> </h4> </body> </html> -
启动服务,验证功能
我们看完语法,很多样式,我们即使现在学习了,也会忘记,所以我们在学习过程中,需要使用什么,根据官方文档来查询,才是最重要的,要熟练使用官方文档!
11、mvc自动配置原理
官网阅读
在进行项目编写前,我们还需要知道一个东西,就是SpringBoot对我们的SpringMVC还做了哪些配置,包括如何扩展,如何定制。
只有把这些都搞清楚了,我们在之后使用才会更加得心应手。途径一:源码分析,途径二:官方文档!
官网位置:Spring Boot Reference Documentation
//Spring Boot 为 Spring MVC 提供了自动配置,适用于大多数应用程序。
Spring Boot provides auto-configuration for Spring MVC that works well with most applications.


//自动配置在 Spring 的默认值之上添加了以下特性:
The auto-configuration adds the following features on top of Spring’s defaults:
//包含视图解析器
- Inclusion of ContentNegotiatingViewResolver and BeanNameViewResolver beans.
//支持提供静态资源,包括对 WebJars 的支持(本文档后面会介绍)。
- Support for serving static resources, including support for WebJars (covered later in this document).
//自动注册了Converter
//转换器,这就是我们网页提交数据到后台自动封装成为对象的东西,比如把"1"字符串自动转换为int类型
//Formatter:【格式化器,比如页面给我们了一个2019-8-10,它会给我们自动格式化为Date对象】
- Automatic registration of Converter, GenericConverter, and Formatter beans.
//SpringMVC用来转换Http请求和响应的的,比如我们要把一个User对象转换为JSON字符串,可以去看官网文档解释
- Support for HttpMessageConverters (covered later in this document).
//定义错误代码生成规则的
- Automatic registration of MessageCodesResolver (covered later in this document).
//首页定制
- Static index.html support.
//初始化数据绑定器:帮我们把请求数据绑定到JavaBean中!
- Automatic use of a ConfigurableWebBindingInitializer bean (covered later in this document).


//如果您想保留那些 Spring Boot MVC 自定义并进行更多 MVC 自定义(拦截器、格式化程序、视图控制器和其他功能),
//您可以添加自己的WebMvcConfigurer 类型的 @Configuration 类,但不添加 @EnableWebMvc。
If you want to keep those Spring Boot MVC customizations and make more MVC customizations (interceptors, formatters, view controllers, and other features), you can add your own @Configuration class of type WebMvcConfigurer but without @EnableWebMvc.


//如果您想提供 RequestMappingHandlerMapping、RequestMappingHandlerAdapter
//或 ExceptionHandlerExceptionResolver 的自定义实例,并且仍然保留 Spring Boot MVC 自定义,
//您可以声明一个 WebMvcRegistrations 类型的 bean 并使用它来提供这些组件的自定义实例。
If you want to provide custom instances of RequestMappingHandlerMapping, RequestMappingHandlerAdapter, or ExceptionHandlerExceptionResolver, and still keep the Spring Boot MVC customizations, you can declare a bean of type WebMvcRegistrations and use it to provide custom instances of those components.


//如果您想完全控制 Spring MVC,您可以添加自己的带有 @EnableWebMvc 注释的 @Configuration,
//或者添加您自己的 @Configuration-annotated DelegatingWebMvcConfiguration,
//如 @EnableWebMvc 的 Javadoc 中所述。
If you want to take complete control of Spring MVC, you can add your own @Configuration annotated with @EnableWebMvc, or alternatively add your own @Configuration-annotated DelegatingWebMvcConfiguration as described in the Javadoc of @EnableWebMvc.
ContentNegotiatingViewResolver 内容协商视图解析器
自动配置了ViewResolver,就是我们之前学习的SpringMVC的视图解析器;
即根据方法的返回值取得视图对象(View),然后由视图对象决定如何渲染(转发,重定向)。
我们去看看这里的源码:我们找到 WebMvcAutoConfiguration,其内部类WebMvcAutoConfigurationAdapter下的viewResolver方法
//...
@Bean
@ConditionalOnBean(ViewResolver.class)
@ConditionalOnMissingBean(name = "viewResolver", value = ContentNegotiatingViewResolver.class)
public ContentNegotiatingViewResolver viewResolver(BeanFactory beanFactory) {
    ContentNegotiatingViewResolver resolver = new ContentNegotiatingViewResolver();
    resolver.setContentNegotiationManager(beanFactory.getBean(ContentNegotiationManager.class));
    // ContentNegotiatingViewResolver使用所有其他视图解析器来定位视图,因此它应该具有较高的优先级
    resolver.setOrder(Ordered.HIGHEST_PRECEDENCE);
    return resolver;
}
//...
进入ContentNegotiatingViewResolver源码,发现实现了ViewResolver接口,接口中只有一个resolveViewName,在ContentNegotiatingViewResolver找到他的实现方法
@Override
@Nullable
public View resolveViewName(String viewName, Locale locale) throws Exception {
    RequestAttributes attrs = RequestContextHolder.getRequestAttributes();
    Assert.state(attrs instanceof ServletRequestAttributes, "No current ServletRequestAttributes");
    List<MediaType> requestedMediaTypes = getMediaTypes(((ServletRequestAttributes) attrs).getRequest());
    if (requestedMediaTypes != null) {
        //获取候选的视图对象  方法源码见下方
        List<View> candidateViews = getCandidateViews(viewName, locale, requestedMediaTypes);
        //选择一个最适合的视图对象,然后把这个对象返回
        View bestView = getBestView(candidateViews, requestedMediaTypes, attrs);
        if (bestView != null) {
            return bestView;
        }
    }

    String mediaTypeInfo = logger.isDebugEnabled() && requestedMediaTypes != null ?
        " given " + requestedMediaTypes.toString() : "";

    if (this.useNotAcceptableStatusCode) {
        if (logger.isDebugEnabled()) {
            logger.debug("Using 406 NOT_ACCEPTABLE" + mediaTypeInfo);
        }
        return NOT_ACCEPTABLE_VIEW;
    }
    else {
        logger.debug("View remains unresolved" + mediaTypeInfo);
        return null;
    }
}

//...

private List<View> getCandidateViews(String viewName, Locale locale, List<MediaType> requestedMediaTypes)
    throws Exception {

    List<View> candidateViews = new ArrayList<>();
    if (this.viewResolvers != null) {
        Assert.state(this.contentNegotiationManager != null, "No ContentNegotiationManager set");
        for (ViewResolver viewResolver : this.viewResolvers) {
            View view = viewResolver.resolveViewName(viewName, locale);
            if (view != null) {
                candidateViews.add(view);
            }
            for (MediaType requestedMediaType : requestedMediaTypes) {
                List<String> extensions = this.contentNegotiationManager.resolveFileExtensions(requestedMediaType);
                for (String extension : extensions) {
                    String viewNameWithExtension = viewName + '.' + extension;
                    view = viewResolver.resolveViewName(viewNameWithExtension, locale);
                    if (view != null) {
                        candidateViews.add(view);
                    }
                }
            }
        }
    }
    if (!CollectionUtils.isEmpty(this.defaultViews)) {
        candidateViews.addAll(this.defaultViews);
    }
    return candidateViews;
}
//...
所以得出结论:ContentNegotiatingViewResolver 这个视图解析器就是用来组合所有的视图解析器的
我们再去研究下他的组合逻辑,看到有个属性viewResolvers,看看它是在哪里进行赋值的!
@Override
protected void initServletContext(ServletContext servletContext) {
    // 这里它是从beanFactory工具中获取容器中的所有视图解析器
    // ViewRescolver.class 把所有的视图解析器来组合的
    Collection<ViewResolver> matchingBeans =
        BeanFactoryUtils.beansOfTypeIncludingAncestors(obtainApplicationContext(), ViewResolver.class).values();
    if (this.viewResolvers == null) {
        this.viewResolvers = new ArrayList<>(matchingBeans.size());
        for (ViewResolver viewResolver : matchingBeans) {
            if (this != viewResolver) {
                this.viewResolvers.add(viewResolver);
            }
        }
    }
    else {
        for (int i = 0; i < this.viewResolvers.size(); i++) {
            ViewResolver vr = this.viewResolvers.get(i);
            if (matchingBeans.contains(vr)) {
                continue;
            }
            String name = vr.getClass().getName() + i;
            obtainApplicationContext().getAutowireCapableBeanFactory().initializeBean(vr, name);
        }

    }
    AnnotationAwareOrderComparator.sort(this.viewResolvers);
    this.cnmFactoryBean.setServletContext(servletContext);
}
既然它是在容器中去找视图解析器,我们是否可以猜想,我们就可以去实现一个视图解析器了呢?
我们可以自己给容器中去添加一个视图解析器;这个类就会帮我们自动的将它组合进来;我们去实现一下
-
新建一个配置类
@Configuration public class MyMvcConfig implements WebMvcConfigurer { @Bean public ViewResolver myViewResolver() { return new MyViewResolver(); } public static class MyViewResolver implements ViewResolver { @Override public View resolveViewName(String viewName, Locale locale) throws Exception { return null; } } } -
怎么看我们自己写的视图解析器有没有起作用呢?
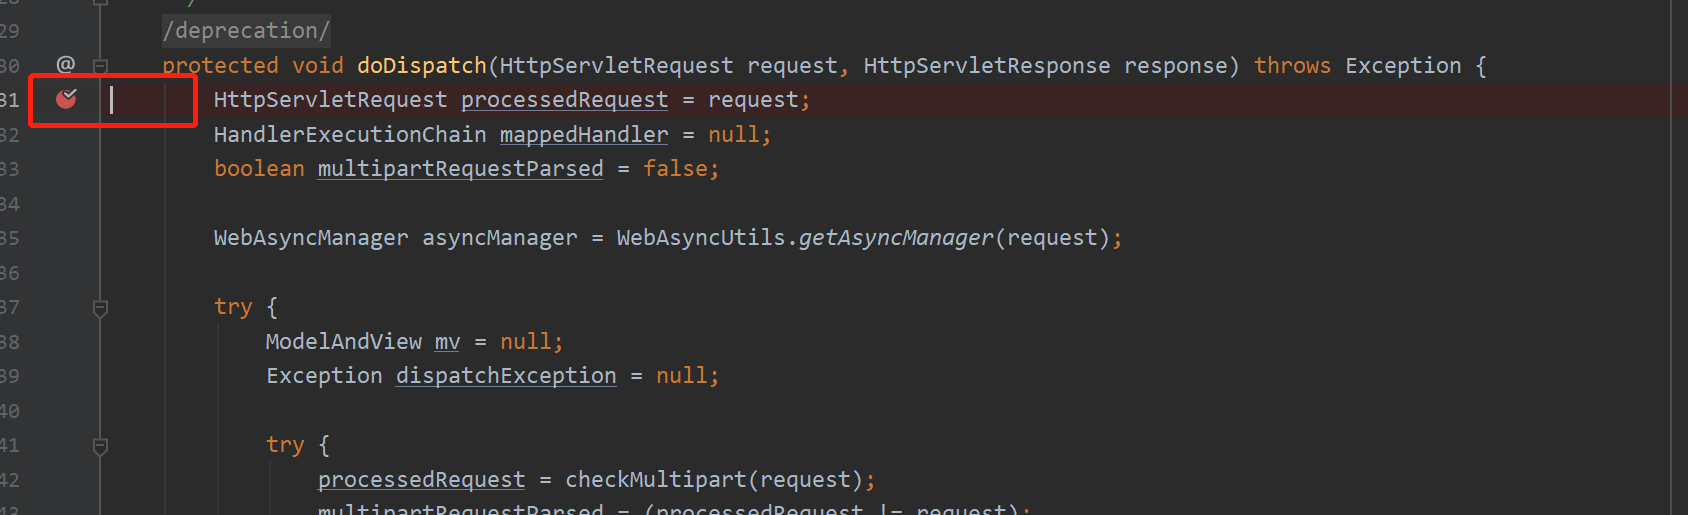
我们给 DispatcherServlet 中的 doDispatch方法 加个断点进行调试一下,因为所有的请求都会走到这个方法中
-
我们启动我们的项目,然后随便访问一个页面,看一下Debug信息
找到视图解析器,我们看到我们自己定义的就在这里了;
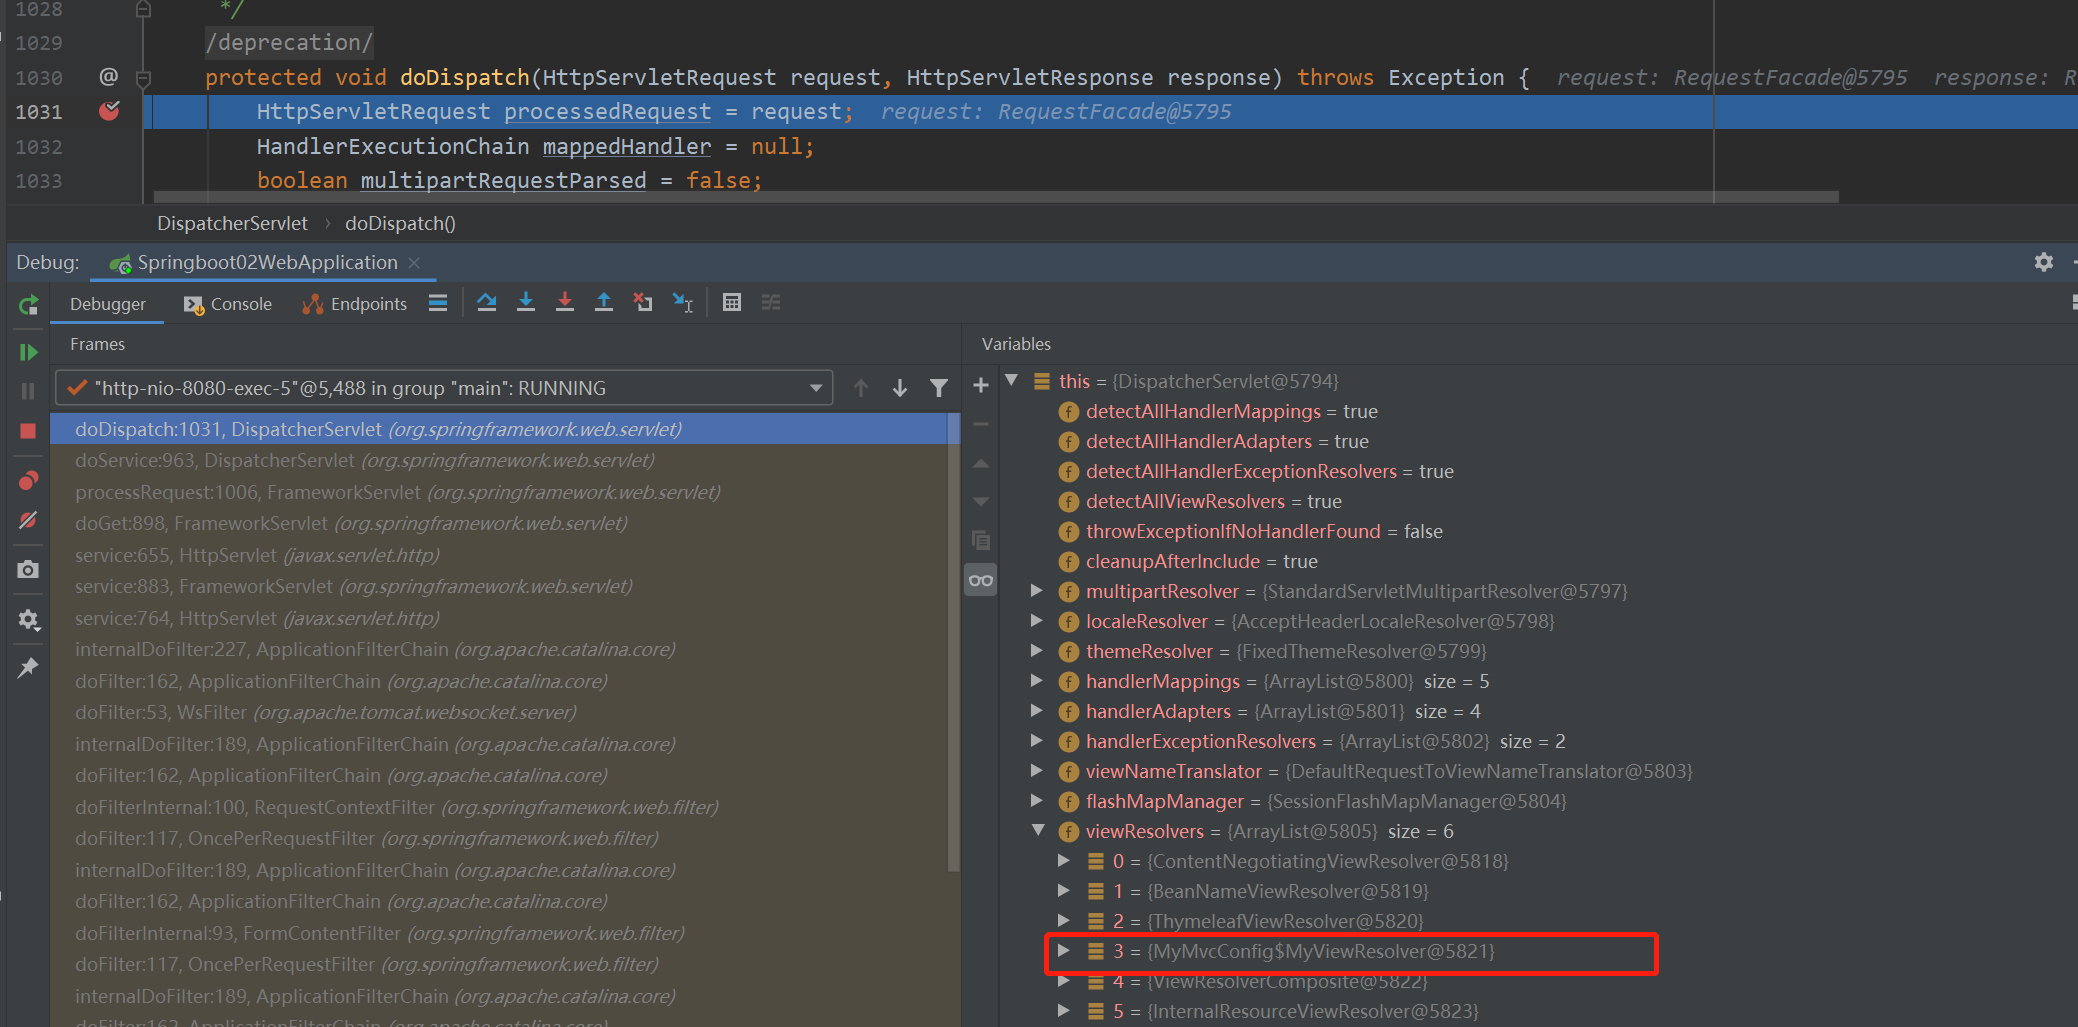
所以说,我们如果想要使用自己定制化的东西,我们只需要给容器中添加这个组件就好了!剩下的事情SpringBoot就会帮我们做了!
转换器和格式化器
WebMvcAutoConfiguration下的 EnableWebMvcConfiguration的mvcConversionService方法
//...
@Bean
@Override
public FormattingConversionService mvcConversionService() {
    Format format = this.mvcProperties.getFormat();
    WebConversionService conversionService = new WebConversionService(new DateTimeFormatters()
                                                                      .dateFormat(format.getDate()).timeFormat(format.getTime()).dateTimeFormat(format.getDateTime()));
    addFormatters(conversionService);
    return conversionService;
}
//...
getFormat()
//...
private final Format format = new Format();

//...
public Format getFormat() {
    return this.format;
}
//...
可以看到在我们的Properties文件中,我们可以进行自动配置它!
如果配置了自己的格式化方式,就会注册到Bean中生效,我们可以在配置文件中配置日期格式化的规则:
spring.mvc.format.date=dd/MM/yyyy
其余的就不一一举例了,大家可以下去多研究探讨即可!
修改SpringBoot的默认配置
这么多的自动配置,原理都是一样的,通过这个WebMVC的自动配置原理分析,我们要学会一种学习方式,通过源码探究,得出结论;这个结论一定是属于自己的,而且一通百通。
SpringBoot的底层,大量用到了这些设计细节思想,所以,没事需要多阅读源码!得出结论;
SpringBoot在自动配置很多组件的时候,先看容器中有没有用户自己配置的(如果用户自己配置@bean),如果有就用用户配置的,如果没有就用自动配置的;
如果有些组件可以存在多个,比如我们的视图解析器,就将用户配置的和自己默认的组合起来!
扩展使用SpringMVC 官方文档如下
If you want to keep those Spring Boot MVC customizations and make more MVC customizations (interceptors, formatters, view controllers, and other features), you can add your own @Configuration class of type WebMvcConfigurer but without @EnableWebMvc.
我们要做的就是编写一个@Configuration注解类,并且类型要为WebMvcConfigurer,还不能标注@EnableWebMvc注解;我们去自己写一个;我们新建一个包叫config,写一个类MyMvcConfig;
//因为类型要求为WebMvcConfigurer,所以我们实现其接口
//可以使用自定义类扩展MVC的功能
@Configuration
public class MyMvcConfig implements WebMvcConfigurer {

    @Override
    public void addViewControllers(ViewControllerRegistry registry) {
        //浏览器 请求 /zyy  ,就会跳转到test页面
        registry.addViewController("/zyy").setViewName("test");
    }
}
我们去浏览器访问一下:
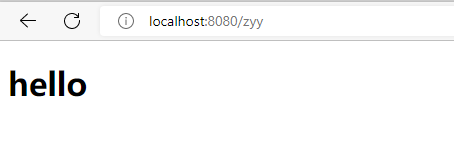
确实也跳转过来了!所以说,我们要扩展SpringMVC,官方就推荐我们这么去使用,既保SpringBoot留所有的自动配置,也能用我们扩展的配置!
我们可以去分析一下原理:
-
WebMvcAutoConfiguration 是 SpringMVC的自动配置类,里面有一个类WebMvcAutoConfigurationAdapter
//... @Configuration(proxyBeanMethods = false) @Import(EnableWebMvcConfiguration.class) @EnableConfigurationProperties({ WebMvcProperties.class, WebProperties.class }) @Order(0) public static class WebMvcAutoConfigurationAdapter implements WebMvcConfigurer, ServletContextAware { //... } //... -
我们点进EnableWebMvcConfiguration这个类看一下
//... @Configuration(proxyBeanMethods = false) @EnableConfigurationProperties(WebProperties.class) public static class EnableWebMvcConfiguration extends DelegatingWebMvcConfiguration implements ResourceLoaderAware { //... } //... -
它继承了一个父类:DelegatingWebMvcConfiguration
//... @Configuration(proxyBeanMethods = false) public class DelegatingWebMvcConfiguration extends WebMvcConfigurationSupport { private final WebMvcConfigurerComposite configurers = new WebMvcConfigurerComposite(); // 从容器中获取所有的webmvcConfigurer @Autowired(required = false) public void setConfigurers(List<WebMvcConfigurer> configurers) { if (!CollectionUtils.isEmpty(configurers)) { this.configurers.addWebMvcConfigurers(configurers); } } //... } //... -
我们可以在这个类中去寻找一个我们刚才设置的viewController当做参考,发现它调用了一个
//... @Override protected void addViewControllers(ViewControllerRegistry registry) { this.configurers.addViewControllers(registry); } //... -
在点进去
//...
@Override
public void addViewControllers(ViewControllerRegistry registry) {
    // 将所有的WebMvcConfigurer相关配置来一起调用!包括我们自己配置的和Spring给我们配置的
    for (WebMvcConfigurer delegate : this.delegates) {
        delegate.addViewControllers(registry);
    }
}
//...
所以得出结论:所有的WebMvcConfiguration都会被作用,不止Spring自己的配置类,我们自己的配置类当然也会被调用;
全面接管springmvc
官方文档:
If you want to take complete control of Spring MVC, you can add your own @Configuration annotated with @EnableWebMvc, or alternatively add your own @Configuration-annotated DelegatingWebMvcConfiguration as described in the Javadoc of @EnableWebMvc.
全面接管即:SpringBoot对SpringMVC的自动配置不需要了,所有都是我们自己去配置!
只需在我们的配置类中要加一个@EnableWebMvc。
我们看下如果我们全面接管了SpringMVC了,我们之前SpringBoot给我们配置的静态资源映射一定会无效,我们可以去测试一下;
不加注解之前,访问首页:
给配置类加上注解:@EnableWebMvc
//...
@Configuration
@EnableWebMvc
public class MyMvcConfig implements WebMvcConfigurer {

    @Override
    public void addViewControllers(ViewControllerRegistry registry) {
        //浏览器 请求 /zyy  ,就会跳转到test页面
        registry.addViewController("/zyy").setViewName("test");
    }
}
//...
我们发现所有的SpringMVC自动配置都失效了!(实际并没有,这个后面研究一下。。。)
当然,我们开发中,不推荐使用全面接管SpringMVC
思考问题?为什么加了一个注解,自动配置就失效了!我们看下源码:
-
这里发现它是导入了一个类,我们可以继续进去看
//... @Retention(RetentionPolicy.RUNTIME) @Target(ElementType.TYPE) @Documented @Import(DelegatingWebMvcConfiguration.class) public @interface EnableWebMvc { } -
它继承了一个父类
WebMvcConfigurationSupport//... @Configuration(proxyBeanMethods = false) public class DelegatingWebMvcConfiguration extends WebMvcConfigurationSupport { private final WebMvcConfigurerComposite configurers = new WebMvcConfigurerComposite(); //从容器中获取所有的webmvcConfigurer @Autowired(required = false) public void setConfigurers(List<WebMvcConfigurer> configurers) { if (!CollectionUtils.isEmpty(configurers)) { this.configurers.addWebMvcConfigurers(configurers); } } //... } //... -
我们来回顾一下Webmvc自动配置类
//...
@AutoConfiguration(after = { DispatcherServletAutoConfiguration.class, TaskExecutionAutoConfiguration.class,
		ValidationAutoConfiguration.class })
@ConditionalOnWebApplication(type = Type.SERVLET)
@ConditionalOnClass({ Servlet.class, DispatcherServlet.class, WebMvcConfigurer.class })
// 这个注解的意思就是:容器中没有这个组件的时候,这个自动配置类才生效
@ConditionalOnMissingBean(WebMvcConfigurationSupport.class)
@AutoConfigureOrder(Ordered.HIGHEST_PRECEDENCE + 10)
public class WebMvcAutoConfiguration {
    //...
}
//...
总结一句话:@EnableWebMvc将WebMvcConfigurationSupport组件导入进来了;
而导入的WebMvcConfigurationSupport只是SpringMVC最基本的功能!
在SpringBoot中会有非常多的扩展配置,只要看见了这个,我们就应该多留心注意~
12、员工管理系统
代码:springboot-emp: springboot员工管理--未连接数据库版本(狂神说java)
这个没有连接数据库,模拟的数据
内容:
-
登录(+登录拦截器)
-
注销
-
国际化
-
首页
-
员工管理:GRUD (增删改查)
-
404
-
其他
favicon修改
banner修改
前端公共代码提取(顶部导航栏、侧边栏)
-
...
13、富文本编辑器
简介
思考:我们平时在博客园,或者CSDN等平台进行写作的时候,有同学思考过他们的编辑器是怎么实现的吗?
在博客园后台的选项设置中,可以看到一个文本编辑器的选项:
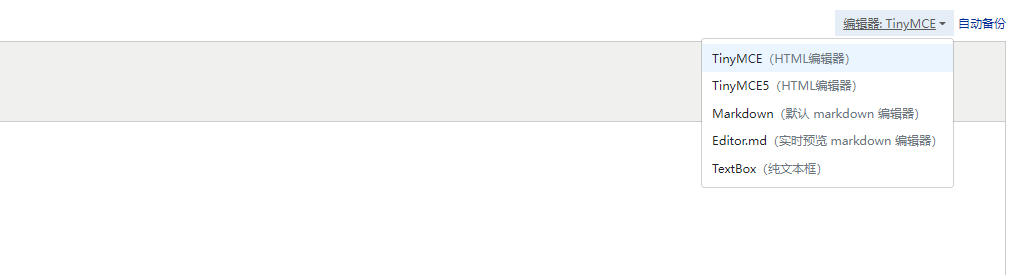
其实这个就是富文本编辑器,市面上有许多非常成熟的富文本编辑器,比如:
-
Editor.md——功能非常丰富的编辑器,左端编辑,右端预览,非常方便,完全免费
-
wangEditor——基于javascript和css开发的 Web富文本编辑器, 轻量、简洁、界面美观、易用、开源免费
-
TinyMCE——TinyMCE是一个轻量级的基于浏览器的所见即所得编辑器,由JavaScript写成。它对IE6+和Firefox1.5+都有着非常良好的支持。功能齐全,界面美观,就是文档是英文的,对开发人员英文水平有一定要求
-
百度ueditor——UEditor是由百度web前端研发部开发所见即所得富文本web编辑器,具有轻量,功能齐全,可定制,注重用户体验等特点,开源基于MIT协议,允许自由使用和修改代码,缺点是已经没有更新了
-
kindeditor——界面经典
-
CKEditor——国外的,界面美观
-
quill——功能强大,还可以编辑公式等
-
simditor——界面美观,功能较全
-
summernote——UI好看,精美
-
jodit——功能齐全
-
froala Editor——界面非常好看,功能非常强大,非常好用(非免费)
总之,目前可用的富文本编辑器有很多......这只是其中的一部分
Editor.md
我这里使用的就是Editor.md,作为一个资深码农,Mardown必然是我们程序猿最喜欢的格式,看下面,就爱上了!

去官网下载:Editor.md - 开源在线 Markdown 编辑器
得到它的压缩包
解压以后,在examples目录下面,可以看到他的很多案例使用!学习,其实就是看人家怎么写的,然后进行模仿就好了!
我们可以将整个解压的文件倒入我们的项目,将一些无用的测试和案例删掉即可!
基础工程搭建
参见(PS:我自己暂时没有搭建好):
14、整合jdbc
springdata简介
对于数据访问层,无论是 SQL(关系型数据库) 还是 NOSQL(非关系型数据库),Spring Boot 底层都是采用 Spring Data 的方式进行统一处理。
Spring Boot 底层都是采用 Spring Data 的方式进行统一处理各种数据库,Spring Data 也是 Spring 中与 Spring Boot、Spring Cloud 等齐名的知名项目。
Sping Data 官网:Spring Data
数据库相关的启动器 :可以参考官方文档:
Spring Boot Reference Documentation
整合jdbc
创建项目测试数据源
1、新建一个springboot项目:springboot-03-data
并且导入依赖
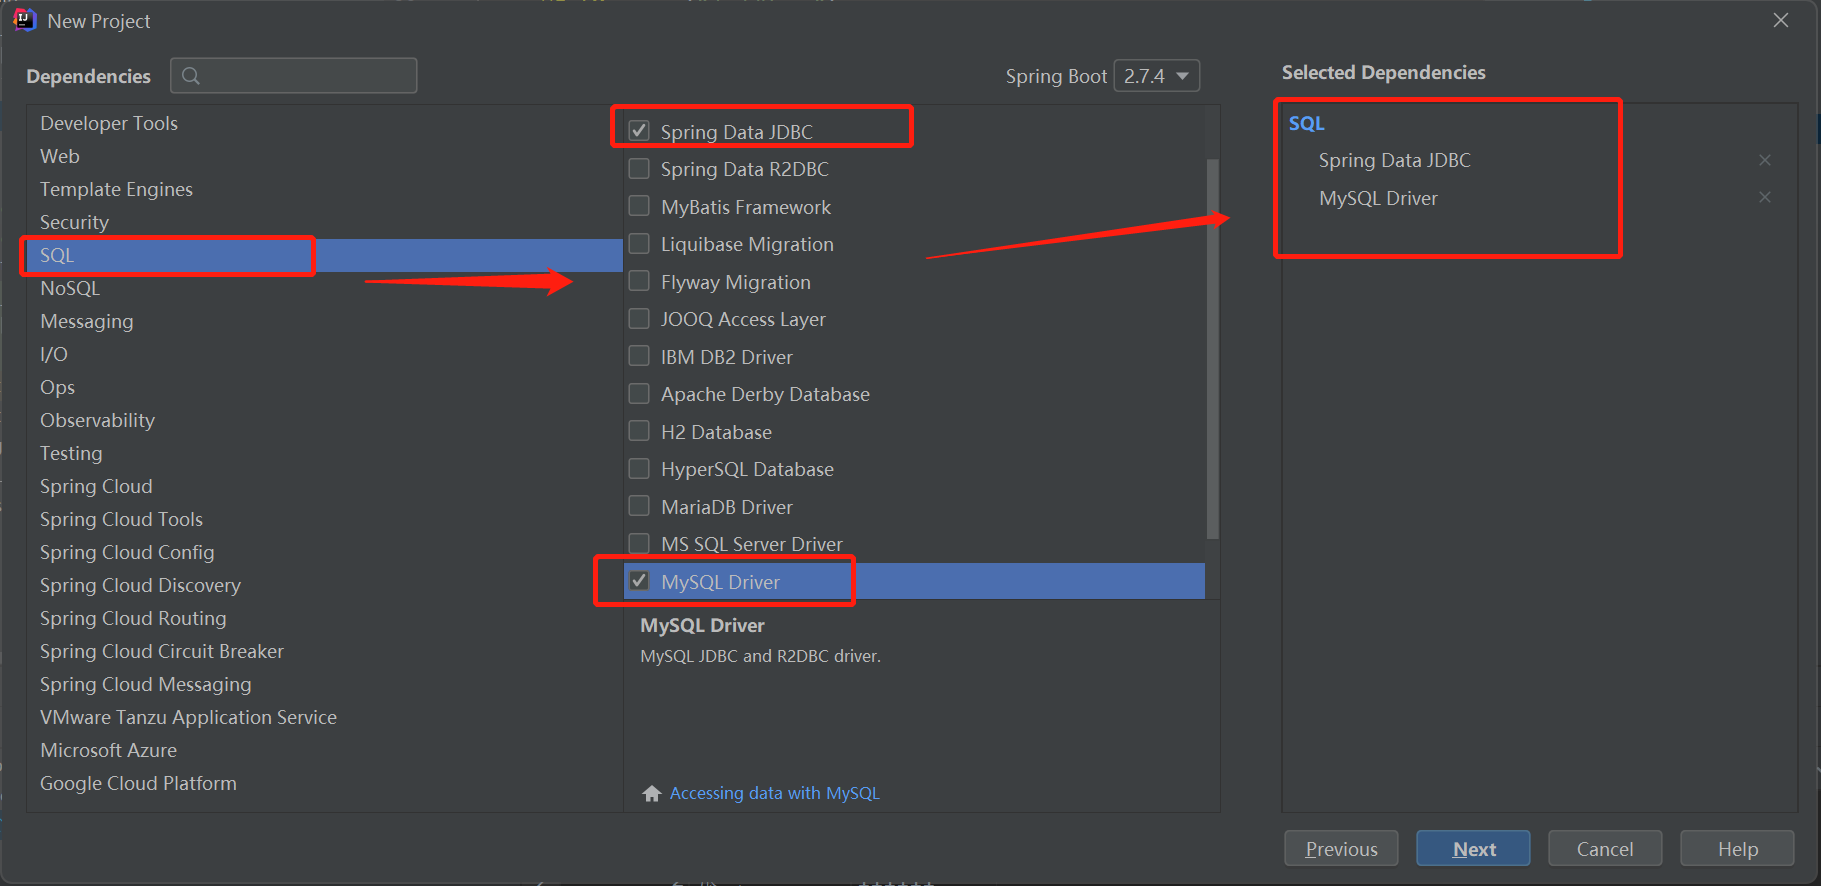
2、配置数据源
新建一个application.yaml(ps:这里以yaml为例)
spring:
  datasource:
    username: root
    password: 123456
    url: jdbc:mysql://localhost:3306/mybatis?useUnicode=true&characterEncoding=utf-8
    driver-class-name: com.mysql.cj.jdbc.Driver
3、验证配置的数据源
package com.zyy;

import org.junit.jupiter.api.Test;
import org.springframework.beans.factory.annotation.Autowired;
import org.springframework.boot.test.context.SpringBootTest;

import javax.sql.DataSource;
import java.sql.Connection;
import java.sql.SQLException;


@SpringBootTest
class Springboot03DataApplicationTests {

    @Autowired
    private DataSource dataSource;

    @Test
    void contextLoads() {
        //class com.zaxxer.hikari.HikariDataSource
        System.out.println(dataSource.getClass());

        //获取连接
        Connection connection = null;
        try {
            connection = dataSource.getConnection();
            System.out.println(connection);
        } catch (SQLException e) {
            e.printStackTrace();
        } finally {
            if (connection != null) {
                //关闭;连接
                try {
                    connection.close();
                } catch (SQLException e) {
                    e.printStackTrace();
                }
            }
        }
    }

}

结果:我们可以看到他默认给我们配置的数据源为 : class com.zaxxer.hikari.HikariDataSource , 我们并没有手动配置
我们来全局搜索一下,找到数据源的所有自动配置都在 :DataSourceAutoConfiguration文件:
	@Configuration(proxyBeanMethods = false)
	@Conditional(PooledDataSourceCondition.class)
	@ConditionalOnMissingBean({ DataSource.class, XADataSource.class })
	@Import({ DataSourceConfiguration.Hikari.class, DataSourceConfiguration.Tomcat.class,
			DataSourceConfiguration.Dbcp2.class, DataSourceConfiguration.OracleUcp.class,
			DataSourceConfiguration.Generic.class, DataSourceJmxConfiguration.class })
	protected static class PooledDataSourceConfiguration {

	}
这里导入的类都在 DataSourceConfiguration 配置类下,可以看出 Spring Boot 2.2.5 默认使用HikariDataSource 数据源,而以前版本,如 Spring Boot 1.5 默认使用 org.apache.tomcat.jdbc.pool.DataSource 作为数据源;
HikariDataSource 号称 Java WEB 当前速度最快的数据源,相比于传统的 C3P0 、DBCP、Tomcat jdbc 等连接池更加优秀;
可以使用 spring.datasource.type 指定自定义的数据源类型,值为 要使用的连接池实现的完全限定名。
关于数据源我们并不做介绍,有了数据库连接,显然就可以 CRUD 操作数据库了。但是我们需要先了解一个对象 JdbcTemplate
JdbcTemplate
-
有了数据源(com.zaxxer.hikari.HikariDataSource),然后可以拿到数据库连接(java.sql.Connection),有了连接,就可以使用原生的 JDBC 语句来操作数据库
-
即使不使用第三方第数据库操作框架,如 MyBatis等,Spring 本身也对原生的JDBC 做了轻量级的封装,即JdbcTemplate
-
数据库操作的所有 CRUD 方法都在 JdbcTemplate 中
-
Spring Boot 不仅提供了默认的数据源,同时默认已经配置好了 JdbcTemplate 放在了容器中,程序员只需自己注入即可使用
-
JdbcTemplate 的自动配置是依赖 org.springframework.boot.autoconfigure.jdbc 包下的 JdbcTemplateConfiguration 类
@AutoConfiguration(after = DataSourceAutoConfiguration.class)
@ConditionalOnClass({ DataSource.class, JdbcTemplate.class })
@ConditionalOnSingleCandidate(DataSource.class)
@EnableConfigurationProperties(JdbcProperties.class)
@Import({ DatabaseInitializationDependencyConfigurer.class, JdbcTemplateConfiguration.class,
		NamedParameterJdbcTemplateConfiguration.class })
public class JdbcTemplateAutoConfiguration {

}
@Configuration(proxyBeanMethods = false) @ConditionalOnMissingBean(JdbcOperations.class) class JdbcTemplateConfiguration { @Bean @Primary JdbcTemplate jdbcTemplate(DataSource dataSource, JdbcProperties properties) { JdbcTemplate jdbcTemplate = new JdbcTemplate(dataSource); JdbcProperties.Template template = properties.getTemplate(); jdbcTemplate.setFetchSize(template.getFetchSize()); jdbcTemplate.setMaxRows(template.getMaxRows()); if (template.getQueryTimeout() != null) { jdbcTemplate.setQueryTimeout((int) template.getQueryTimeout().getSeconds()); } return jdbcTemplate; } }
JdbcTemplate主要提供以下几类方法:
-
execute方法:可以用于执行任何SQL语句,一般用于执行DDL语句
-
update方法及batchUpdate方法:update方法用于执行新增、修改、删除等语句;
batchUpdate方法用于执行批处理相关语句;
-
query方法及queryForXXX方法:用于执行查询相关语句
-
call方法:用于执行存储过程、函数相关语句
测试
编写一个Controller,注入 jdbcTemplate,编写测试方法进行访问测试;
package com.zyy.controller;

import org.springframework.beans.factory.annotation.Autowired;
import org.springframework.jdbc.core.JdbcTemplate;
import org.springframework.web.bind.annotation.GetMapping;
import org.springframework.web.bind.annotation.PathVariable;
import org.springframework.web.bind.annotation.RestController;

import java.util.List;
import java.util.Map;

/**
 * @Description: 类描述
 * @Author: zyy
 * @Date: 2022/09/29 17:09
 */
@RestController
public class JDBCController {

    @Autowired
    private JdbcTemplate jdbcTemplate;

    @GetMapping("/getUserList")
    public List<Map<String, Object>> userList() {
        String sql = "select * from user";
        return jdbcTemplate.queryForList(sql);
    }

    @GetMapping("/addUser")
    public String addUser() {
        String sql = "insert into user(id,name,pwd) values(4,'小明','123456')";
        jdbcTemplate.update(sql);
        return "add-ok";
    }

    @GetMapping("/updateUser/{id}")
    public String updateUser(@PathVariable("id") int id) {
        String sql = "update user set name=?,pwd=? where id=" + id;
        Object[] paras = {"小明2", "zzzzzz"};
        jdbcTemplate.update(sql, paras);
        return "update-ok";
    }

    @GetMapping("/deleteUser/{id}")
    public String deleteUser(@PathVariable("id") int id) {
        String sql = "delete from user where id=?";
        jdbcTemplate.update(sql, id);
        return "delete-ok";
    }
}
测试请求,结果正常;
到此,CURD的基本操作,使用 JDBC 就搞定了。
15、整合Druid
druid简介
Java程序很大一部分要操作数据库,为了提高性能操作数据库的时候,又不得不使用数据库连接池。
Druid 是阿里巴巴开源平台上一个数据库连接池实现,结合了 C3P0、DBCP 等 DB 池的优点,同时加入了日志监控。
Druid 可以很好的监控 DB 池连接和 SQL 的执行情况,天生就是针对监控而生的 DB 连接池。
Druid已经在阿里巴巴部署了超过600个应用,经过一年多生产环境大规模部署的严苛考验。
Spring Boot 2.0 以上默认使用 Hikari 数据源,可以说 Hikari 与 Driud 都是当前 Java Web 上最优秀的数据源,我们来重点介绍 Spring Boot 如何集成 Druid 数据源,如何实现数据库监控。
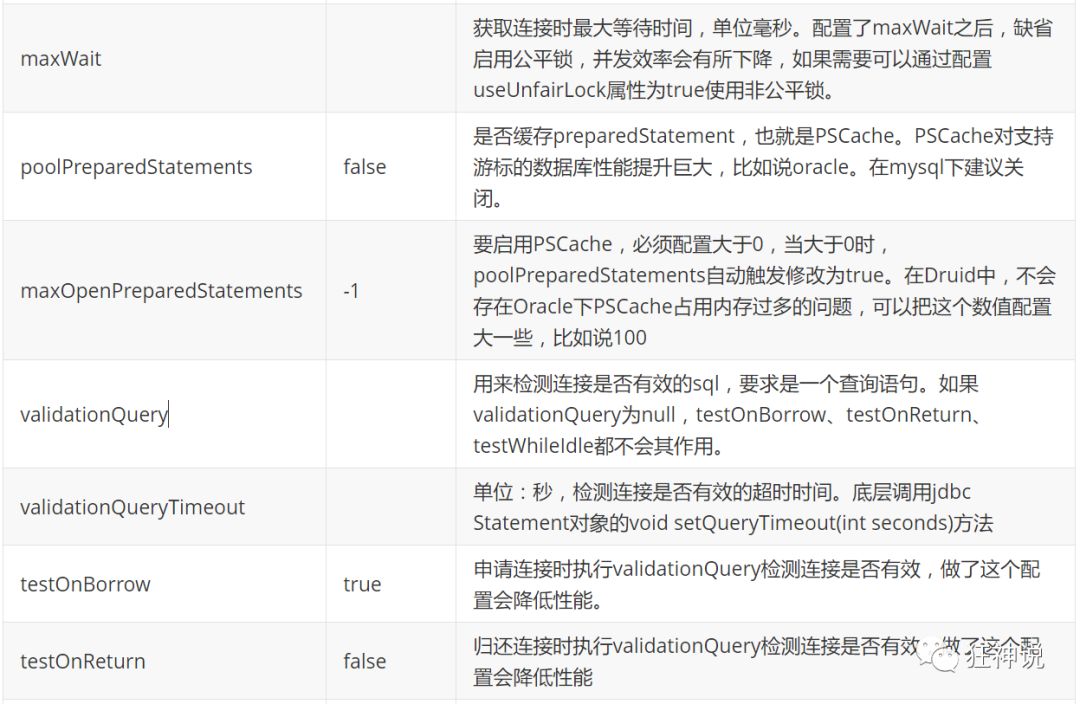
com.alibaba.druid.pool.DruidDataSource 基本配置参数如下:

配置数据源
-
添加依赖
<dependency> <groupId>com.alibaba</groupId> <artifactId>druid</artifactId> <version>1.2.12</version> </dependency> -
切换数据源
之前已经说过 Spring Boot 2.0 以上默认使用 com.zaxxer.hikari.HikariDataSource 数据源,但可以 通过 spring.datasource.type 指定数据源
application.yaml
spring: datasource: username: root password: 123456 url: jdbc:mysql://localhost:3306/mybatis?useUnicode=true&characterEncoding=utf-8 driver-class-name: com.mysql.cj.jdbc.Driver type: com.alibaba.druid.pool.DruidDataSource -
数据源切换之后,在测试类中注入 DataSource,然后获取到它,输出一看便知是否成功切换
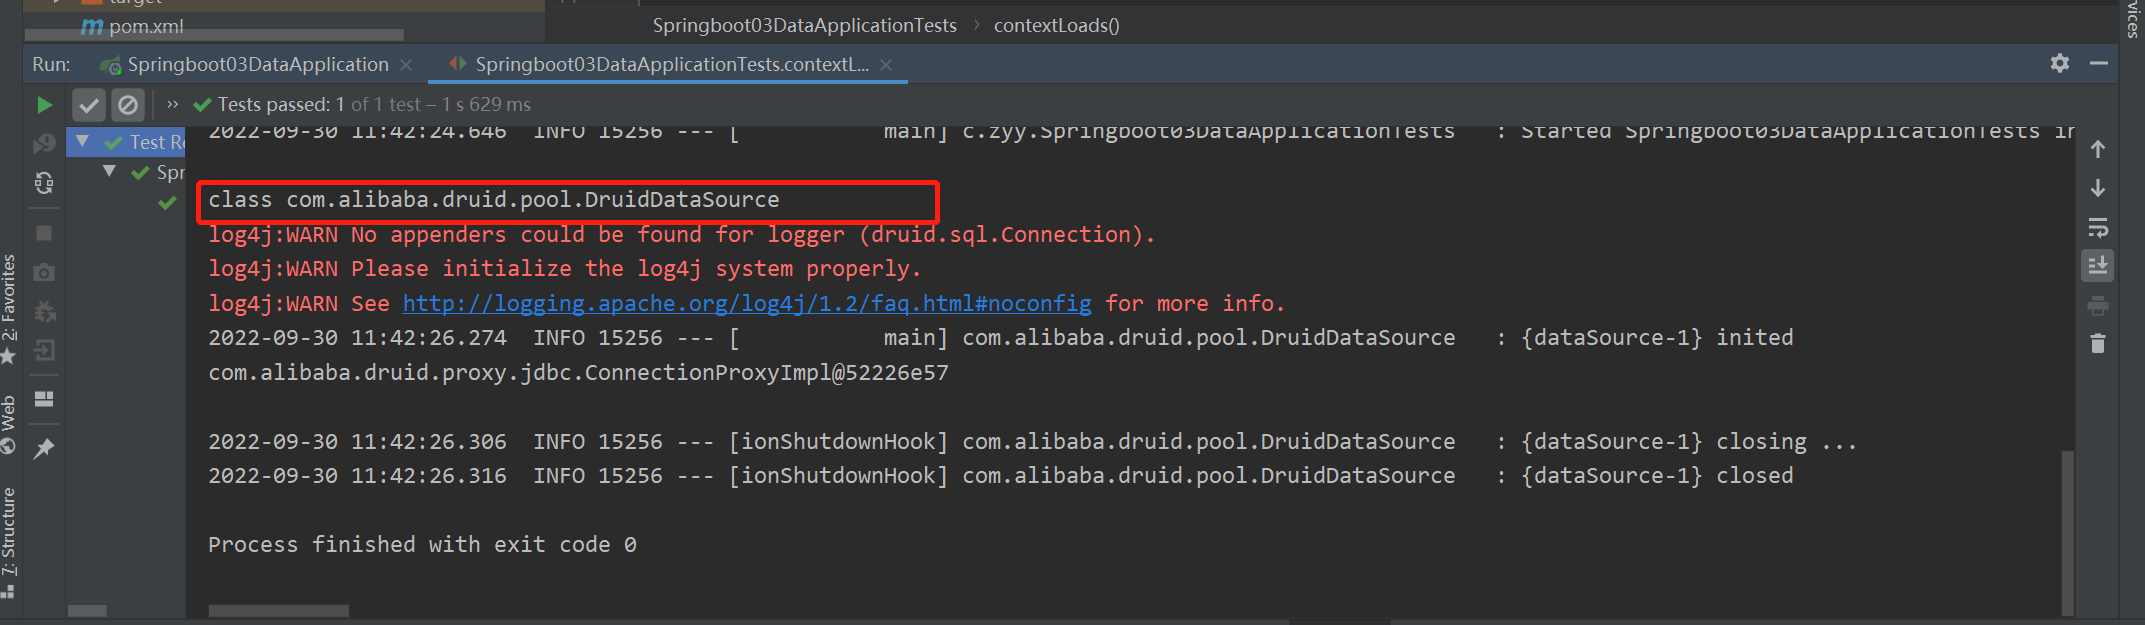
-
切换成功!既然切换成功,就可以设置数据源连接初始化大小、最大连接数、等待时间、最小连接数 等设置项;可以查看源码
application.yaml
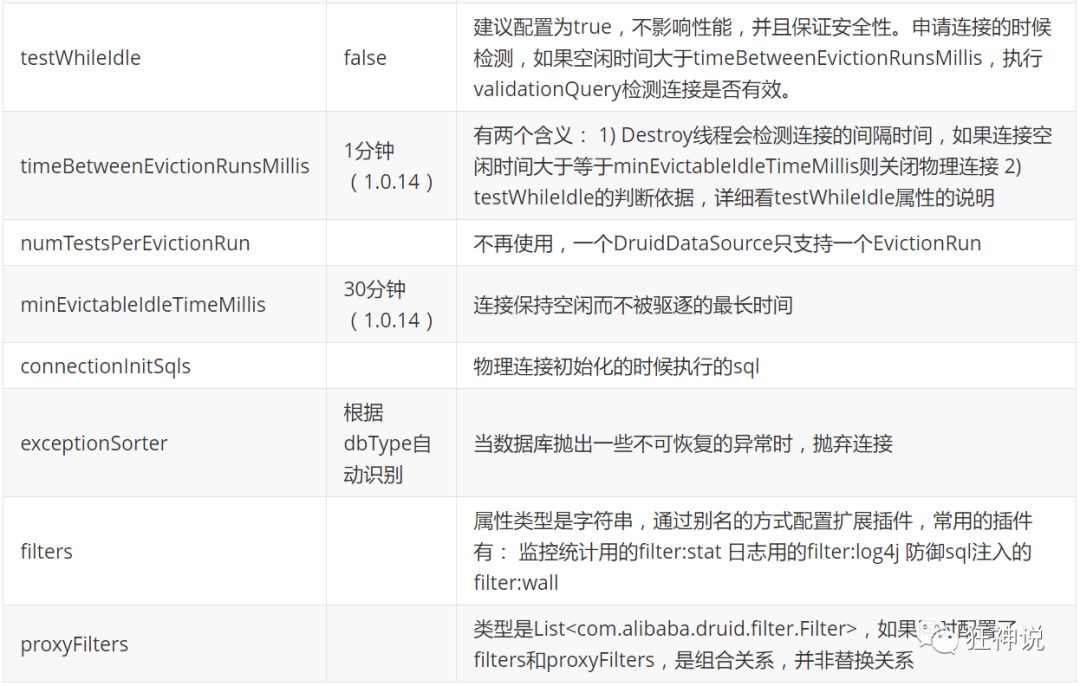
spring: datasource: username: root password: 123456 url: jdbc:mysql://localhost:3306/mybatis?useUnicode=true&characterEncoding=utf-8 driver-class-name: com.mysql.cj.jdbc.Driver type: com.alibaba.druid.pool.DruidDataSource #Spring Boot 默认是不注入这些属性值的,需要自己绑定 #druid 数据源专有配置 initialSize: 5 minIdle: 5 maxActive: 25 maxWait: 60000 timeBetweenEvictionRunsMillis: 60000 minEvictableIdleTimeMillis: 300000 validationQuery: SELECT 1 FROM DUAL testWhileIdle: true testOnBorrow: false testOnReturn: false poolPreparedStatements: true #配置监控统计拦截的filters,stat:监控统计、log4j:日志记录、wall:防御sql注入 #如果允许时报错 java.lang.ClassNotFoundException: org.apache.log4j.Priority #则导入 log4j 依赖即可,Maven 地址:https://mvnrepository.com/artifact/log4j/log4j filters: stat,wall,log4j maxPoolPreparedStatementPerConnectionSize: 20 useGlobalDataSourceStat: true connectionProperties: druid.stat.mergeSql=true;druid.stat.slowSqlMillis=500 -
导入Log4j 的依赖
<dependency> <groupId>log4j</groupId> <artifactId>log4j</artifactId> <version>1.2.17</version> </dependency> -
现在需要程序员自己为 DruidDataSource 绑定全局配置文件中的参数,再添加到容器中,而不再使用 Spring Boot 的自动生成了;我们需要 自己添加 DruidDataSource 组件到容器中,并绑定属性
package com.zyy.config; import com.alibaba.druid.pool.DruidDataSource; import com.alibaba.druid.support.http.StatViewServlet; import com.alibaba.druid.support.http.WebStatFilter; import org.springframework.boot.context.properties.ConfigurationProperties; import org.springframework.boot.web.servlet.FilterRegistrationBean; import org.springframework.boot.web.servlet.ServletRegistrationBean; import org.springframework.context.annotation.Bean; import org.springframework.context.annotation.Configuration; import javax.servlet.Filter; import javax.sql.DataSource; import java.util.HashMap; import java.util.Map; /** * @Description: 类描述 * @Author: zyy * @Date: 2022/09/30 10:11 */ @Configuration public class DruidConfig { /** * 将自定义的 Druid数据源添加到容器中,不再让 Spring Boot 自动创建 * 绑定全局配置文件中的 druid 数据源属性到 com.alibaba.druid.pool.DruidDataSource从而让它们生效 * * @ConfigurationProperties(prefix = "spring.datasource"):作用就是将 全局配置文件中 * 前缀为 spring.datasource的属性值注入到 com.alibaba.druid.pool.DruidDataSource 的同名参数中 */ @ConfigurationProperties(prefix = "spring.datasource") @Bean public DataSource druidDataSource() { return new DruidDataSource(); } } -
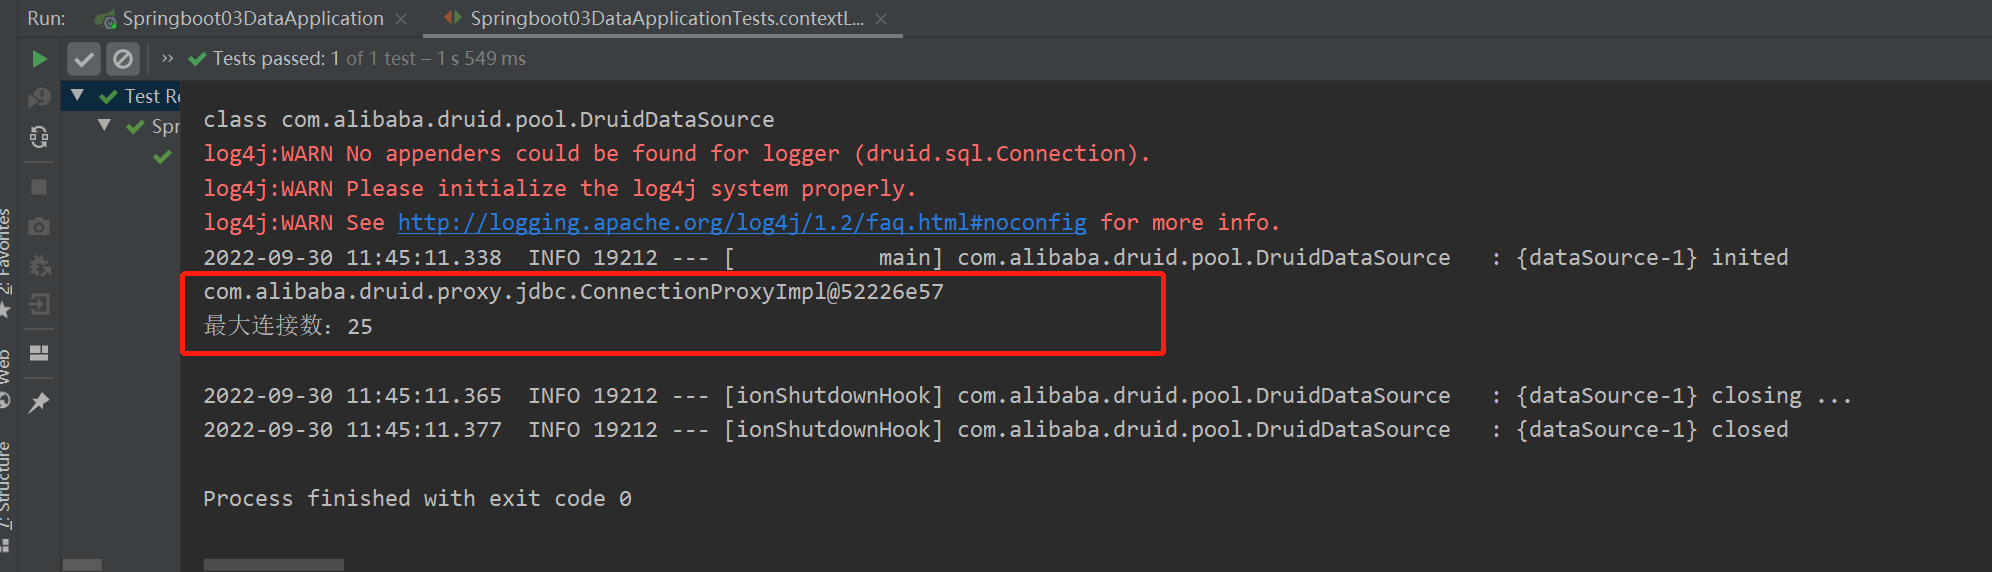
去测试类中测试一下;看是否成功
package com.zyy; import com.alibaba.druid.pool.DruidDataSource; import org.junit.jupiter.api.Test; import org.springframework.beans.factory.annotation.Autowired; import org.springframework.boot.test.context.SpringBootTest; import javax.sql.DataSource; import java.sql.Connection; import java.sql.SQLException; @SpringBootTest class Springboot03DataApplicationTests { @Autowired private DataSource dataSource; @Test void contextLoads() { //class com.zaxxer.hikari.HikariDataSource System.out.println(dataSource.getClass()); //获取连接 Connection connection = null; try { DruidDataSource druidDataSource = (DruidDataSource) dataSource; connection = druidDataSource.getConnection(); System.out.println(connection); System.out.println("最大连接数:" + druidDataSource.getMaxActive()); } catch (SQLException e) { e.printStackTrace(); } finally { if (connection != null) { //关闭;连接 try { connection.close(); } catch (SQLException e) { e.printStackTrace(); } } } } } -
输出结果 :可见配置参数已经生效!
配置druid数据源监控
Druid 数据源具有监控的功能,并提供了一个 web 界面方便用户查看,类似安装 路由器 时,人家也提供了一个默认的 web 页面。
所以第一步需要设置 Druid 的后台管理页面,比如 登录账号、密码 等;配置后台管理;
    @Bean
    public ServletRegistrationBean registrationBean() {
        ServletRegistrationBean bean =
                new ServletRegistrationBean(new StatViewServlet(), "/druid/*");

        Map<String, String> paraMap = new HashMap<>();
        paraMap.put("loginUsername", "root");
        paraMap.put("loginPassword", "123456");
        //后台页面允许谁访问
        //paraMap.put("allow", ""):为空或者为null时,表示允许所有访问
        //paraMap.put("allow", "localhost"):表示只有本机可以访问
        paraMap.put("allow", "");
        //后台页面拒绝谁访问
        //paraMap.put("zyy", "192.168.1.20");表示禁止此ip访问
        bean.setInitParameters(paraMap);
        return bean;
    }
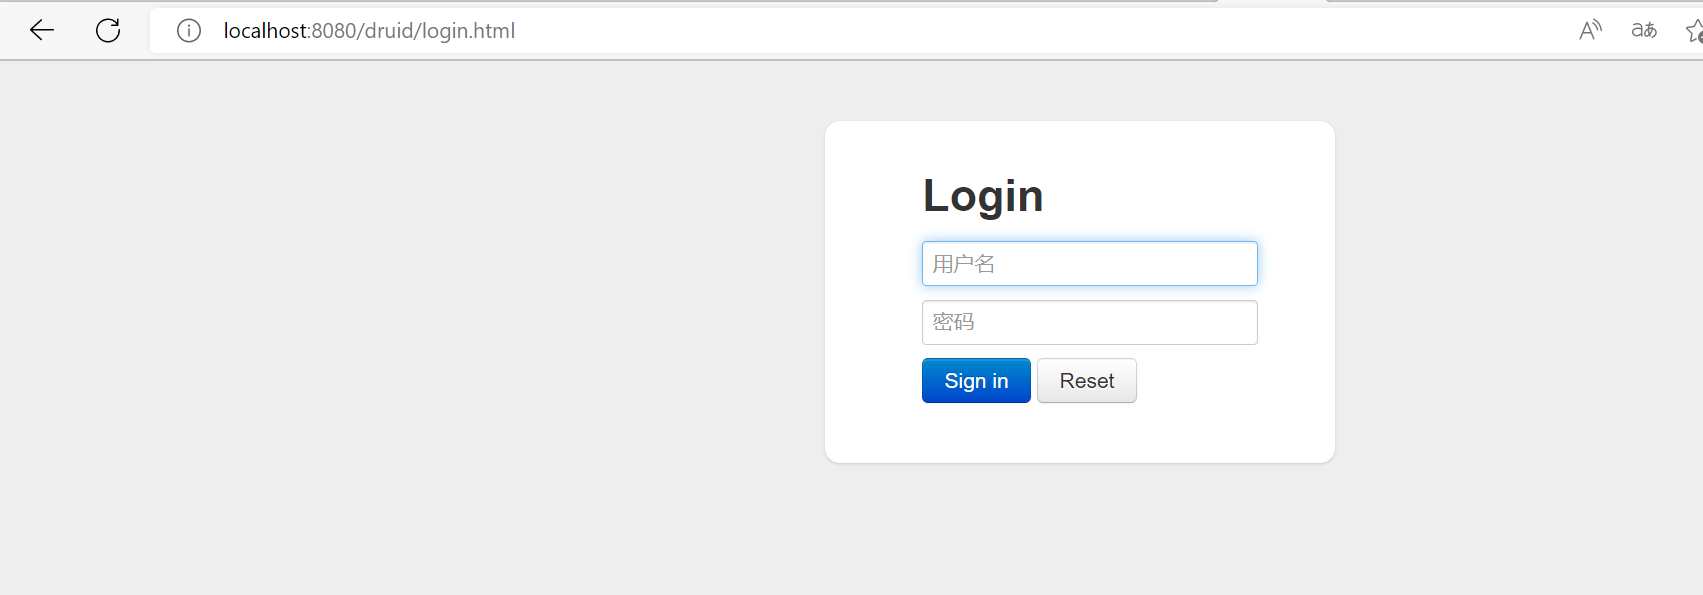
配置完毕后,我们可以选择访问 :http://localhost:8080/druid/login.html
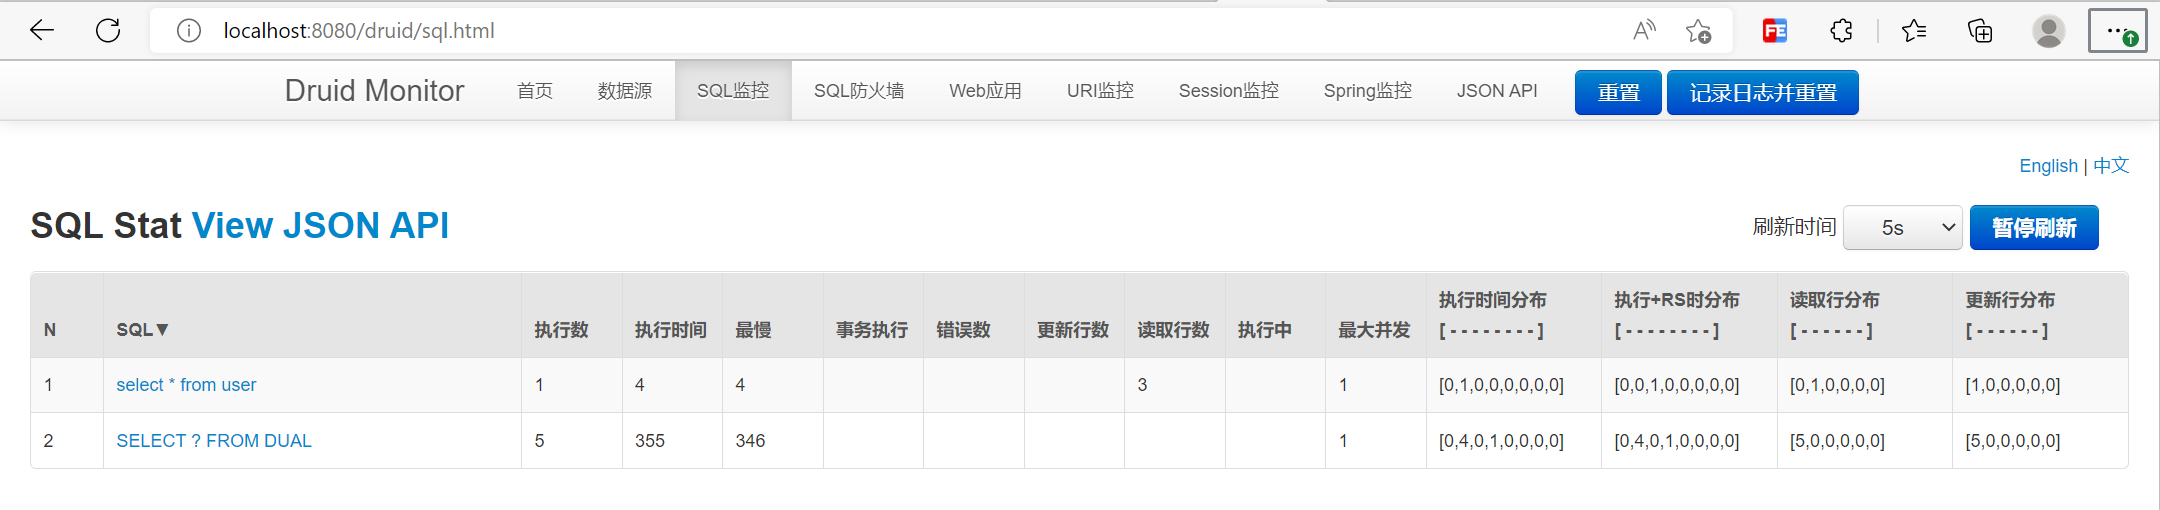
进入之后(调用一下之前的查询接口)
配置druid web监控filter过滤器
    @Bean
    public FilterRegistrationBean filterRegistrationBean() {
        FilterRegistrationBean<Filter> bean = new FilterRegistrationBean<>();
        bean.setFilter(new WebStatFilter());
        Map<String, String> paraMap = new HashMap<>();
        exclusions:设置哪些请求进行过滤排除掉,从而不进行统计
        paraMap.put("exclusions", "*.js,*.css,/druid/*,/jdbc/*");
        bean.setInitParameters(paraMap);
        //"/*" 表示过滤所有请求
//        bean.setUrlPatterns(Arrays.asList("/*"));
        return bean;
    }
平时在工作中,按需求进行配置即可,主要用作监控!
16、整合mybatis
官方文档:mybatis-spring-boot-autoconfigure – Introduction
Maven仓库地址:https://mvnrepository.com/artifact/org.mybatis.spring.boot/mybatis-spring-boot-starter/2.1.1
整合测试
1、导入mybatis所需要的的依赖
<?xml version="1.0" encoding="UTF-8"?>
<project xmlns="http://maven.apache.org/POM/4.0.0" xmlns:xsi="http://www.w3.org/2001/XMLSchema-instance"
         xsi:schemaLocation="http://maven.apache.org/POM/4.0.0 https://maven.apache.org/xsd/maven-4.0.0.xsd">
    <modelVersion>4.0.0</modelVersion>
    <parent>
        <groupId>org.springframework.boot</groupId>
        <artifactId>spring-boot-starter-parent</artifactId>
        <version>2.7.4</version>
        <relativePath/> <!-- lookup parent from repository -->
    </parent>
    <groupId>com.zyy</groupId>
    <artifactId>springboot-04-mybatis</artifactId>
    <version>0.0.1-SNAPSHOT</version>
    <name>springboot-04-mybatis</name>
    <description>Demo project for Spring Boot</description>
    <properties>
        <java.version>1.8</java.version>
    </properties>
    <dependencies>
        <dependency>
            <groupId>org.mybatis.spring.boot</groupId>
            <artifactId>mybatis-spring-boot-starter</artifactId>
            <version>2.2.2</version>
        </dependency>
        <dependency>
            <groupId>com.alibaba</groupId>
            <artifactId>druid</artifactId>
            <version>1.2.12</version>
        </dependency>
        <dependency>
            <groupId>org.springframework.boot</groupId>
            <artifactId>spring-boot-starter-jdbc</artifactId>
        </dependency>
        <dependency>
            <groupId>org.springframework.boot</groupId>
            <artifactId>spring-boot-starter-web</artifactId>
        </dependency>

        <dependency>
            <groupId>mysql</groupId>
            <artifactId>mysql-connector-java</artifactId>
            <scope>runtime</scope>
        </dependency>
        <dependency>
            <groupId>org.springframework.boot</groupId>
            <artifactId>spring-boot-starter-test</artifactId>
            <scope>test</scope>
        </dependency>
        <dependency>
            <groupId>log4j</groupId>
            <artifactId>log4j</artifactId>
            <version>1.2.17</version>
        </dependency>
    </dependencies>
    <build>
        <plugins>
            <plugin>
                <groupId>org.springframework.boot</groupId>
                <artifactId>spring-boot-maven-plugin</artifactId>
            </plugin>
        </plugins>
    </build>

</project>
2、配置数据库连接信息
spring:
  datasource:
    username: root
    password: 123456
    url: jdbc:mysql://localhost:3306/mybatis?useUnicode=true&characterEncoding=utf-8
    driver-class-name: com.mysql.cj.jdbc.Driver
    type: com.alibaba.druid.pool.DruidDataSource
    #Spring Boot 默认是不注入这些属性值的,需要自己绑定
    #druid 数据源专有配置
    initialSize: 5
    minIdle: 5
    maxActive: 25
    maxWait: 60000
    timeBetweenEvictionRunsMillis: 60000
    minEvictableIdleTimeMillis: 300000
    validationQuery: SELECT 1 FROM DUAL
    testWhileIdle: true
    testOnBorrow: false
    testOnReturn: false
    poolPreparedStatements: true
    #配置监控统计拦截的filters,stat:监控统计、log4j:日志记录、wall:防御sql注入
    #如果允许时报错  java.lang.ClassNotFoundException: org.apache.log4j.Priority
    #则导入 log4j 依赖即可,Maven 地址:https://mvnrepository.com/artifact/log4j/log4j
    filters: stat,wall,log4j
    maxPoolPreparedStatementPerConnectionSize: 20
    useGlobalDataSourceStat: true
    connectionProperties: druid.stat.mergeSql=true;druid.stat.slowSqlMillis=500
DruidConfig.java见整合Druid上面
3、创建实体类,导入lombok
        <dependency>
            <groupId>org.projectlombok</groupId>
            <artifactId>lombok</artifactId>
            <version>1.18.24</version>
            <scope>provided</scope>
        </dependency>
User.java
package com.zyy.pojo;

import lombok.AllArgsConstructor;
import lombok.Data;
import lombok.NoArgsConstructor;

@Data
@NoArgsConstructor
@AllArgsConstructor
public class User {
    private int id;
    private String name;
    private String pwd;
}
4、创建mapper目录以及对应的mapper接口
package com.zyy.mapper;

import com.zyy.pojo.User;
import org.apache.ibatis.annotations.Mapper;
import org.apache.ibatis.annotations.Param;

import java.util.List;

@Mapper
public interface UserMapper {

    List<User> getUserList();

    int addUser(User user);

    int updateUser(User user);

    int deleteUser(@Param("id") int id);

}
5、对应的mapper映射文件
<?xml version="1.0" encoding="UTF-8" ?>
<!DOCTYPE mapper
        PUBLIC "-//mybatis.org//DTD Mapper 3.0//EN"
        "http://mybatis.org/dtd/mybatis-3-mapper.dtd">
<mapper namespace="com.zyy.mapper.UserMapper">

    <select id="getUserList" resultType="com.zyy.pojo.User">
        select id,name,pwd from user
    </select>

    <insert id="addUser">
        insert into user(id, name, pwd) values (#{id}, #{name}, #{pwd})
    </insert>

    <update id="updateUser">
        update user set name = #{name}, pwd = #{pwd} where id = #{id}
    </update>

    <delete id="deleteUser">
        delete from user where id = #{id}
    </delete>
</mapper>
添加配置
mybatis:
  mapper-locations: mapper/*.xml
6、编写Controller
package com.zyy.controller;
import com.zyy.mapper.UserMapper;
import com.zyy.pojo.User;
import org.springframework.beans.factory.annotation.Autowired;
import org.springframework.web.bind.annotation.GetMapping;
import org.springframework.web.bind.annotation.PathVariable;
import org.springframework.web.bind.annotation.RestController;
import java.util.List;
@RestController
public class UserController {
@Autowired
private UserMapper userMapper;
@GetMapping("/user/getUserList")
public List<User> getUserList() {
return userMapper.getUserList();
}
@GetMapping("/user/addUser")
public String addUser() {
User user = new User(6, "zyy6", "123456");
int i = userMapper.addUser(user);
if (i > 0) {
return "add-ok";
}
return "add-fail";
}
@GetMapping("/user/updateUser")
public String updateUser() {
User user = new User(6, "zyy6", "111111");
int i = userMapper.updateUser(user);
if (i > 0) {
return "update-ok";
}
return "update-fail";
}
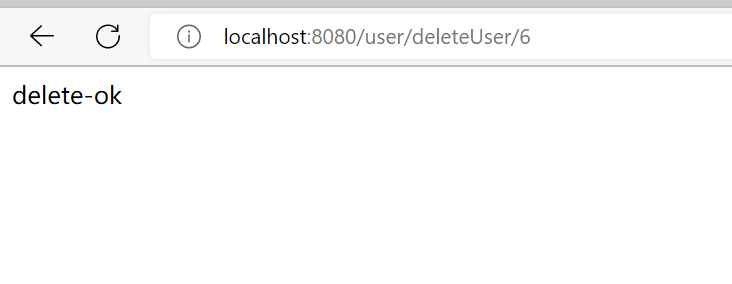
@GetMapping("/user/deleteUser/{id}")
public String deleteUser(@PathVariable("id") int id) {
int i = userMapper.deleteUser(id);
if (i > 0) {
return "delete-ok";
}
return "delete-fail";
}
}
7、测试验证
17、SpringSecurity环境搭建
源文档:狂神说SpringBoot18:集成SpringSecurity
Spring Security官网地址:Spring Security
Spring Security is a powerful and highly customizable authentication and access-control framework. It is the de-facto standard for securing Spring-based applications.

Spring Security is a framework that focuses on providing both authentication and authorization to Java applications. Like all Spring projects, the real power of Spring Security is found in how easily it can be extended to meet custom requirements
Spring Security是一个功能强大且高度可定制的身份验证和访问控制框架。它实际上是保护基于spring的应用程序的标准。
Spring Security是一个框架,侧重于为Java应用程序提供身份验证和授权。与所有Spring项目一样,Spring安全性的真正强大之处在于它可以轻松地扩展以满足定制需求
认识spring security
Spring Security 是针对Spring项目的安全框架,也是Spring Boot底层安全模块默认的技术选型,他可以实现强大的Web安全控制,对于安全控制,我们仅需要引入 spring-boot-starter-security 模块,进行少量的配置,即可实现强大的安全管理!
记住几个类:
-
WebSecurityConfigurerAdapter:自定义Security策略
-
AuthenticationManagerBuilder:自定义认证策略
-
@EnableWebSecurity:开启WebSecurity模式
Spring Security的两个主要目标是 “认证” 和 “授权”(访问控制)
“认证”(Authentication)
身份验证是关于验证您的凭据,如用户名/用户ID和密码,以验证您的身份。
身份验证通常通过用户名和密码完成,有时与身份验证因素结合使用。
“授权” (Authorization)
授权发生在系统成功验证您的身份后,最终会授予您访问资源(如信息,文件,数据库,资金,位置,几乎任何内容)的完全权限。
这个概念是通用的,而不是只在Spring Security 中存在。
代码:springboot-spring-security: 狂神说java--springboot-springSecurity
功能:
-
认证
-
登录的账户和密码
-
密码加密
-
角色
-
-
授权
-
不同的角色有不同的访问权限
-
自定义登录页面(springSecurity有自己的默认登录页面)
-
记住我
-
注销
-
18、整合shiro
18.1、简介
apache shiro是一个强大且易用的java安全框架
可以完成身份验证、授权、密码和会话管理
shiro不仅可以用在 JavaSE 环境中,也可以用在 JavaEE 环境中
官网:Get Started with Apache Shiro | Apache Shiro
18.2、功能
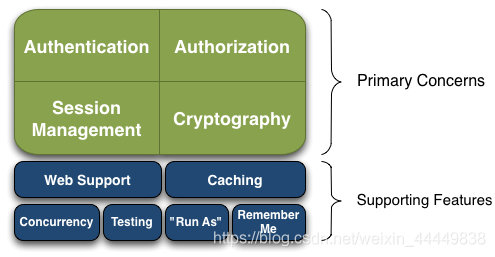
Authentication:身份认证/登录,验证用户是不是拥有相应的身份
Authorization:授权,即权限验证,验证某个已认证的用户是否拥有某个权限;即判断用户是否能做事情,常见的如:验证某个用户是否拥有某个角色。或者细粒度的验证某个用户对某个资源是否具有某个权限;
Session Manager:会话管理,即用户登录后就是一次会话,在没有退出之前,它的所有信息都在会话中;会话可以是普通JavaSE环境的,也可以是如Web环境的;
Cryptography:加密,保护数据的安全性,如密码加密存储到数据库,而不是明文存储;
Web Support:Web支持,可以非常容易的集成到Web环境;
Caching:缓存,比如用户登录后,其用户信息、拥有的角色/权限不必每次去查,这样可以提高效率;
Concurrency:shiro支持多线程应用的并发验证,即如在一个线程中开启另一个线程,能把权限自动传播过去;
Testing:提供测试支持;
Run As:允许一个用户假装为另一个用户(如果他们允许)的身份进行访问;
Remember Me:记住我,这个是非常常见的功能,即一次登录后,下次再来的话不用登录了。
18.3、从外部看
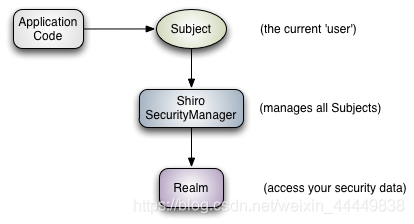
Subject:主体,代表了当前“用户”,这个用户不一定是一个具体的人,与当前应用交互的任何东西都是Subject,如网络爬虫,机器人等;即一个抽象概念;所有Subject都绑定到SecurityManager,与Subject的所有交互都会委托给SecurityManager;可以把Subject认为是一个门面;SecurityManager才是实际的执行者;
SecurityManager:安全管理器;即所有与安全有关的操作都会与SecurityManager交互;且它管理着所有Subject;可以看出它是Shiro的核心,它负责与后边介绍的其他组件进行交互,如果学习过SpringMVC,你可以把它看成DispatcherServlet前端控制器;
Realm:域,Shiro从从Realm获取安全数据(如用户、角色、权限),就是说SecurityManager要验证用户身份,那么它需要从Realm获取相应的用户进行比较以确定用户身份是否合法;也需要从Realm得到用户相应的角色/权限进行验证用户是否能进行操作;可以把Realm看成DataSource,即安全数据源。
也就是说对于我们而言,最简单的一个Shiro应用:
-
应用代码通过Subject来进行认证和授权,而Subject又委托给SecurityManager
-
我们需要给Shiro的SecurityManager注入Realm,从而让SecurityManager能得到合法的用户及其权限进行判断
从以上也可以看出,Shiro不提供维护用户/权限,而是通过Realm让开发人员自己注入
18.4、外部架构

Subject:主体,可以看到主体可以是任何可以与应用交互的“用户”;
SecurityManager:相当于SpringMVC中的DispatcherServlet或者Struts2中的FilterDispatcher;是Shiro的心脏;所有具体的交互都通过SecurityManager进行控制;它管理着所有Subject、且负责进行认证和授权、及会话、缓存的管理。 Authenticator:认证器,负责主体认证的,这是一个扩展点,如果用户觉得Shiro默认的不好,可以自定义实现;其需要认证策略(Authentication Strategy),即什么情况下算用户认证通过了;
Authrizer:授权器,或者访问控制器,用来决定主体是否有权限进行相应的操作;即控制着用户能访问应用中的哪些功能;
Realm:可以有1个或多个Realm,可以认为是安全实体数据源,即用于获取安全实体的;可以是JDBC实现,也可以是LDAP实现,或者内存实现等等;由用户提供;注意:Shiro不知道你的用户/权限存储在哪及以何种格式存储;所以我们一般在应用中都需要实现自己的Realm;
SessionManager:如果写过Servlet就应该知道Session的概念,Session呢需要有人去管理它的生命周期,这个组件就是SessionManager;而Shiro并不仅仅可以用在Web环境,也可以用在如普通的JavaSE环境、EJB等环境;所有呢,Shiro就抽象了一个自己的Session来管理主体与应用之间交互的数据;这样的话,比如我们在Web环境用,刚开始是一台Web服务器;接着又上了台EJB服务器;这时想把两台服务器的会话数据放到一个地方,这个时候就可以实现自己的分布式会话(如把数据放到Memcached服务器);
SessionDAO:DAO大家都用过,数据访问对象,用于会话的CRUD,比如我们想把Session保存到数据库,那么可以实现自己的SessionDAO,通过如JDBC写到数据库;比如想把Session放到Memcached中,可以实现自己的Memcached SessionDAO;另外SessionDAO中可以使用Cache进行缓存,以提高性能;
CacheManager:缓存控制器,来管理如用户、角色、权限等的缓存的;因为这些数据基本上很少去改变,放到缓存中后可以提高访问的性能
Cryptography:密码模块,Shiro提高了一些常见的加密组件用于如密码加密/解密的
18.5、认证流程
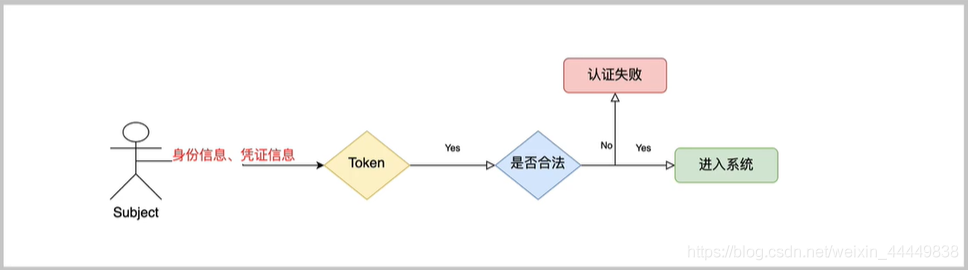
用户 提交 身份信息、凭证信息 封装成 令牌 交由 安全管理器 认证
18.6、快速入门
1、按照官网提示找到 快速入门案例
快速入门git地址:shiro/samples/quickstart at main · apache/shiro · GitHub
从GitHub 的文件中可以看出这个快速入门案例是一个 Maven 项目

2、新建一个maven项目springboot-06-shiro,删除src目录,将其作为父工程
3、在父工程新建一个maven模块hello-shiro
4、复制快速入门案例pom.xml文件中的依赖(版本号自选)
<?xml version="1.0" encoding="UTF-8"?>
<project xmlns="http://maven.apache.org/POM/4.0.0"
         xmlns:xsi="http://www.w3.org/2001/XMLSchema-instance"
         xsi:schemaLocation="http://maven.apache.org/POM/4.0.0 http://maven.apache.org/xsd/maven-4.0.0.xsd">
    <parent>
        <artifactId>springboot-06-shiro</artifactId>
        <groupId>com.zyy</groupId>
        <version>1.0-SNAPSHOT</version>
    </parent>
    <modelVersion>4.0.0</modelVersion>

    <artifactId>hello-shiro</artifactId>

    <dependencies>
        <dependency>
            <groupId>org.apache.shiro</groupId>
            <artifactId>shiro-core</artifactId>
            <version>1.9.1</version>
        </dependency>

        <!-- configure logging -->
        <dependency>
            <groupId>org.slf4j</groupId>
            <artifactId>jcl-over-slf4j</artifactId>
            <version>1.7.36</version>
        </dependency>
        <dependency>
            <groupId>org.apache.logging.log4j</groupId>
            <artifactId>log4j-slf4j-impl</artifactId>
            <version>2.17.1</version>
        </dependency>
        <dependency>
            <groupId>org.apache.logging.log4j</groupId>
            <artifactId>log4j-core</artifactId>
            <version>2.17.1</version>
        </dependency>
    </dependencies>

</project>
5、把快速入门案例中的resource下的log4j2.xml复制下来
<!--
  ~ Licensed to the Apache Software Foundation (ASF) under one
  ~ or more contributor license agreements.  See the NOTICE file
  ~ distributed with this work for additional information
  ~ regarding copyright ownership.  The ASF licenses this file
  ~ to you under the Apache License, Version 2.0 (the
  ~ "License"); you may not use this file except in compliance
  ~ with the License.  You may obtain a copy of the License at
  ~
  ~     http://www.apache.org/licenses/LICENSE-2.0
  ~
  ~ Unless required by applicable law or agreed to in writing,
  ~ software distributed under the License is distributed on an
  ~ "AS IS" BASIS, WITHOUT WARRANTIES OR CONDITIONS OF ANY
  ~ KIND, either express or implied.  See the License for the
  ~ specific language governing permissions and limitations
  ~ under the License.
  -->

<Configuration name="ConfigTest" status="ERROR" monitorInterval="5">
    <!--
      ~ Licensed to the Apache Software Foundation (ASF) under one
      ~ or more contributor license agreements.  See the NOTICE file
      ~ distributed with this work for additional information
      ~ regarding copyright ownership.  The ASF licenses this file
      ~ to you under the Apache License, Version 2.0 (the
      ~ "License"); you may not use this file except in compliance
      ~ with the License.  You may obtain a copy of the License at
      ~
      ~     http://www.apache.org/licenses/LICENSE-2.0
      ~
      ~ Unless required by applicable law or agreed to in writing,
      ~ software distributed under the License is distributed on an
      ~ "AS IS" BASIS, WITHOUT WARRANTIES OR CONDITIONS OF ANY
      ~ KIND, either express or implied.  See the License for the
      ~ specific language governing permissions and limitations
      ~ under the License.
      -->

    <Appenders>
        <Console name="Console" target="SYSTEM_OUT">
            <PatternLayout pattern="%d{HH:mm:ss.SSS} [%t] %-5level %logger{36} - %msg%n"/>
        </Console>
    </Appenders>
    <Loggers>
        <Logger name="org.springframework" level="warn" additivity="false">
            <AppenderRef ref="Console"/>
        </Logger>
        <Logger name="org.apache" level="warn" additivity="false">
            <AppenderRef ref="Console"/>
        </Logger>
        <Logger name="net.sf.ehcache" level="warn" additivity="false">
            <AppenderRef ref="Console"/>
        </Logger>
        <Logger name="org.apache.shiro.util.ThreadContext" level="warn" additivity="false">
            <AppenderRef ref="Console"/>
        </Logger>
        <Root level="info">
            <AppenderRef ref="Console"/>
        </Root>
    </Loggers>
</Configuration>
6、复制一下shiro.ini文件
#
# Licensed to the Apache Software Foundation (ASF) under one
# or more contributor license agreements.  See the NOTICE file
# distributed with this work for additional information
# regarding copyright ownership.  The ASF licenses this file
# to you under the Apache License, Version 2.0 (the
# "License"); you may not use this file except in compliance
# with the License.  You may obtain a copy of the License at
#
#     http://www.apache.org/licenses/LICENSE-2.0
#
# Unless required by applicable law or agreed to in writing,
# software distributed under the License is distributed on an
# "AS IS" BASIS, WITHOUT WARRANTIES OR CONDITIONS OF ANY
# KIND, either express or implied.  See the License for the
# specific language governing permissions and limitations
# under the License.
#
# =============================================================================
# Quickstart INI Realm configuration
#
# For those that might not understand the references in this file, the
# definitions are all based on the classic Mel Brooks' film "Spaceballs". ;)
# =============================================================================

# -----------------------------------------------------------------------------
# Users and their assigned roles
#
# Each line conforms to the format defined in the
# org.apache.shiro.realm.text.TextConfigurationRealm#setUserDefinitions JavaDoc
# -----------------------------------------------------------------------------
[users]
# user 'root' with password 'secret' and the 'admin' role
root = secret, admin
# user 'guest' with the password 'guest' and the 'guest' role
guest = guest, guest
# user 'presidentskroob' with password '12345' ("That's the same combination on
# my luggage!!!" ;)), and role 'president'
presidentskroob = 12345, president
# user 'darkhelmet' with password 'ludicrousspeed' and roles 'darklord' and 'schwartz'
darkhelmet = ludicrousspeed, darklord, schwartz
# user 'lonestarr' with password 'vespa' and roles 'goodguy' and 'schwartz'
lonestarr = vespa, goodguy, schwartz

# -----------------------------------------------------------------------------
# Roles with assigned permissions
#
# Each line conforms to the format defined in the
# org.apache.shiro.realm.text.TextConfigurationRealm#setRoleDefinitions JavaDoc
# -----------------------------------------------------------------------------
[roles]
# 'admin' role has all permissions, indicated by the wildcard '*'
admin = *
# The 'schwartz' role can do anything (*) with any lightsaber:
schwartz = lightsaber:*
# The 'goodguy' role is allowed to 'drive' (action) the winnebago (type) with
# license plate 'eagle5' (instance specific id)
goodguy = winnebago:drive:eagle5
7、复制一下Quickstart.java
/*
 * Licensed to the Apache Software Foundation (ASF) under one
 * or more contributor license agreements.  See the NOTICE file
 * distributed with this work for additional information
 * regarding copyright ownership.  The ASF licenses this file
 * to you under the Apache License, Version 2.0 (the
 * "License"); you may not use this file except in compliance
 * with the License.  You may obtain a copy of the License at
 *
 *     http://www.apache.org/licenses/LICENSE-2.0
 *
 * Unless required by applicable law or agreed to in writing,
 * software distributed under the License is distributed on an
 * "AS IS" BASIS, WITHOUT WARRANTIES OR CONDITIONS OF ANY
 * KIND, either express or implied.  See the License for the
 * specific language governing permissions and limitations
 * under the License.
 */

import org.apache.shiro.SecurityUtils;
import org.apache.shiro.authc.*;
import org.apache.shiro.config.IniSecurityManagerFactory;
import org.apache.shiro.mgt.SecurityManager;
import org.apache.shiro.session.Session;
import org.apache.shiro.subject.Subject;
import org.apache.shiro.util.Factory;
import org.slf4j.Logger;
import org.slf4j.LoggerFactory;


/**
 * Simple Quickstart application showing how to use Shiro's API.
 *
 * @since 0.9 RC2
 */
public class Quickstart {

    private static final transient Logger log = LoggerFactory.getLogger(Quickstart.class);


    public static void main(String[] args) {

        // The easiest way to create a Shiro SecurityManager with configured
        // realms, users, roles and permissions is to use the simple INI config.
        // We'll do that by using a factory that can ingest a .ini file and
        // return a SecurityManager instance:

        // Use the shiro.ini file at the root of the classpath
        // (file: and url: prefixes load from files and urls respectively):
        Factory<SecurityManager> factory = new IniSecurityManagerFactory("classpath:shiro.ini");
        SecurityManager securityManager = factory.getInstance();

        // for this simple example quickstart, make the SecurityManager
        // accessible as a JVM singleton.  Most applications wouldn't do this
        // and instead rely on their container configuration or web.xml for
        // webapps.  That is outside the scope of this simple quickstart, so
        // we'll just do the bare minimum so you can continue to get a feel
        // for things.
        SecurityUtils.setSecurityManager(securityManager);

        // Now that a simple Shiro environment is set up, let's see what you can do:

        // get the currently executing user:
        Subject currentUser = SecurityUtils.getSubject();

        // Do some stuff with a Session (no need for a web or EJB container!!!)
        Session session = currentUser.getSession();
        session.setAttribute("someKey", "aValue");
        String value = (String) session.getAttribute("someKey");
        if (value.equals("aValue")) {
            log.info("Retrieved the correct value! [" + value + "]");
        }

        // let's login the current user so we can check against roles and permissions:
        if (!currentUser.isAuthenticated()) {
            UsernamePasswordToken token = new UsernamePasswordToken("lonestarr", "vespa");
            token.setRememberMe(true);
            try {
                currentUser.login(token);
            } catch (UnknownAccountException uae) {
                log.info("There is no user with username of " + token.getPrincipal());
            } catch (IncorrectCredentialsException ice) {
                log.info("Password for account " + token.getPrincipal() + " was incorrect!");
            } catch (LockedAccountException lae) {
                log.info("The account for username " + token.getPrincipal() + " is locked.  " +
                        "Please contact your administrator to unlock it.");
            }
            // ... catch more exceptions here (maybe custom ones specific to your application?
            catch (AuthenticationException ae) {
                //unexpected condition?  error?
            }
        }

        //say who they are:
        //print their identifying principal (in this case, a username):
        log.info("User [" + currentUser.getPrincipal() + "] logged in successfully.");

        //test a role:
        if (currentUser.hasRole("schwartz")) {
            log.info("May the Schwartz be with you!");
        } else {
            log.info("Hello, mere mortal.");
        }

        //test a typed permission (not instance-level)
        if (currentUser.isPermitted("lightsaber:wield")) {
            log.info("You may use a lightsaber ring.  Use it wisely.");
        } else {
            log.info("Sorry, lightsaber rings are for schwartz masters only.");
        }

        //a (very powerful) Instance Level permission:
        if (currentUser.isPermitted("winnebago:drive:eagle5")) {
            log.info("You are permitted to 'drive' the winnebago with license plate (id) 'eagle5'.  " +
                    "Here are the keys - have fun!");
        } else {
            log.info("Sorry, you aren't allowed to drive the 'eagle5' winnebago!");
        }

        //all done - log out!
        currentUser.logout();

        System.exit(0);
    }
}
最终结构如下:
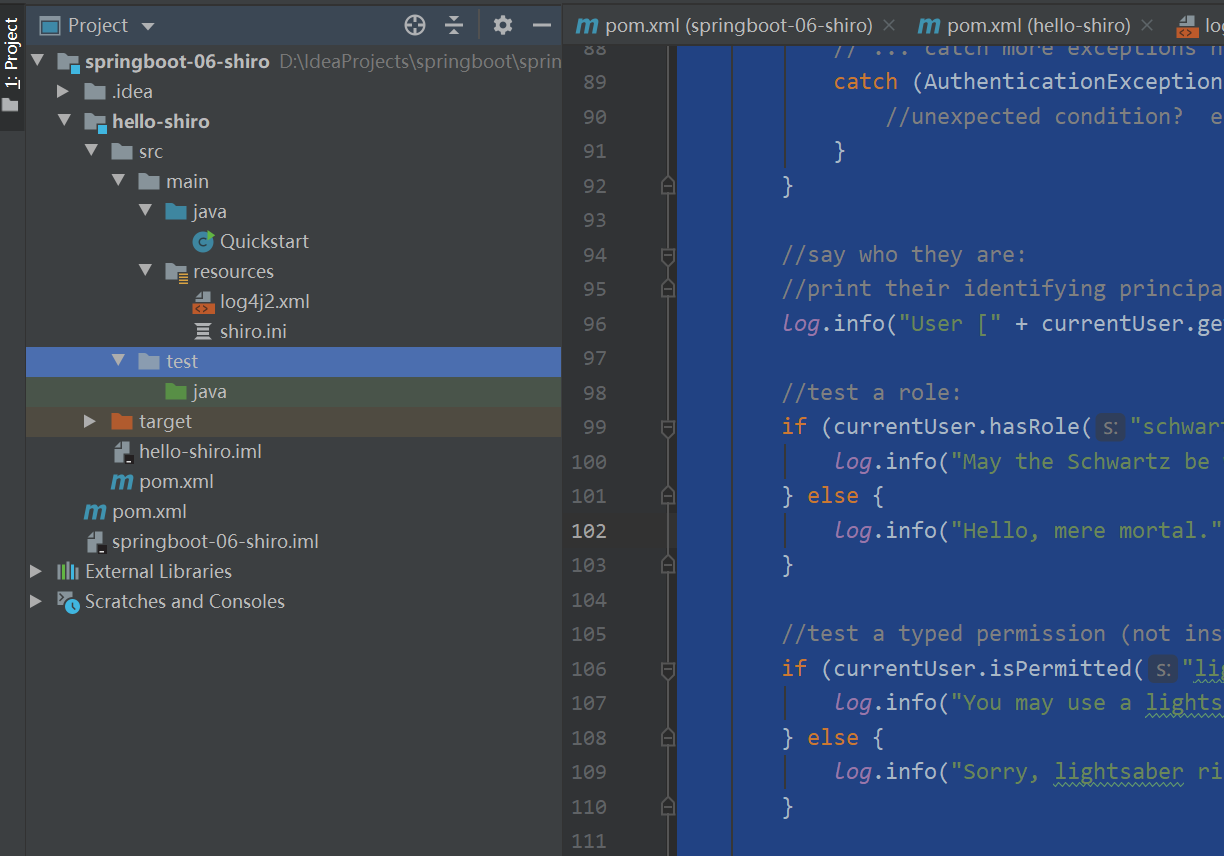
运行Quickstart中的main方法,得到结果如下:
22:55:36.695 [main] INFO  Quickstart - Retrieved the correct value! [aValue]
22:55:36.695 [main] INFO  Quickstart - User [lonestarr] logged in successfully.
22:55:36.695 [main] INFO  Quickstart - May the Schwartz be with you!
22:55:36.695 [main] INFO  Quickstart - You may use a lightsaber ring.  Use it wisely.
22:55:36.695 [main] INFO  Quickstart - You are permitted to 'drive' the winnebago with license plate (id) 'eagle5'.  Here are the keys - have fun!
18.7、springboot集成shiro
代码:springboot-shiro: 狂神说java springboot整合shiro
19、springboot集成swagger
19.1、swagger简介
前后端分离
-
前端 -> 前端控制层、视图层
-
后端 -> 后端控制层、服务层、数据访问层
-
前后端通过API进行交互
-
前后端相对独立且松耦合
产生的问题
-
前后端集成,前端或者后端无法做到“及时协商,尽早解决”,最终导致问题集中爆发
解决方案
-
首先定义schema [ 计划的提纲 ],并实时跟踪最新的API,降低集成风险
Swagger
-
号称世界上最流行的API框架
-
Restful Api 文档在线自动生成器 => API 文档 与API 定义同步更新
-
直接运行,在线测试API
-
支持多种语言 (如:Java,PHP等)
19.2、springboot集成swagger
代码:https://gitee.com/zhayuyao/springboot-swagger3
20、异步任务
1、新建一个springboot项目,并选择web依赖
2、新建一个controller类
package com.zyy.controller;

import com.zyy.service.HelloService;
import org.springframework.beans.factory.annotation.Autowired;
import org.springframework.web.bind.annotation.GetMapping;
import org.springframework.web.bind.annotation.RestController;

/**
 * @Description: 类描述
 * @Author: zyy
 * @Date: 2022/10/30 15:28
 */
@RestController
public class HelloController {

    @Autowired
    private HelloService helloService;

    @GetMapping("/hello")
    public String hello() {
        helloService.deal();
        return "ok";
    }
}
3、新建service接口和其实现接口
package com.zyy.service;

/**
 * @Description: 接口描述
 * @Author: zyy
 * @Date: 2022/10/30 15:29
 */
public interface HelloService {
    void deal();
}
package com.zyy.service.impl;

import com.zyy.service.HelloService;
import org.springframework.scheduling.annotation.Async;
import org.springframework.stereotype.Service;

/**
 * @Description: 类描述
 * @Author: zyy
 * @Date: 2022/10/30 15:30
 */
@Service
public class HelloServiceImpl implements HelloService {
    @Override
    @Async
    public void deal() {
        try {
            Thread.sleep(3000);
        } catch (InterruptedException e) {
            e.printStackTrace();
        }
        System.out.println("处理成功!");
    }
}
4、修改启动类,开启异步功能
package com.zyy;

import org.springframework.boot.SpringApplication;
import org.springframework.boot.autoconfigure.SpringBootApplication;
import org.springframework.scheduling.annotation.EnableAsync;

@SpringBootApplication
@EnableAsync
public class Springboot09AsynApplication {
    public static void main(String[] args) {
        SpringApplication.run(Springboot09AsynApplication.class, args);
    }
}
5、测试总结
没有开启异步任务的时候,页面请求http://localhost:8080/hello,后端同步处理任务,需要等待3秒返回;
开启后,页面瞬间拿到返回,后端异步处理处理。
异步处理还是非常常用的,比如我们在网站上发送邮件,后台会去发送邮件,此时前台会造成响应不动,直到邮件发送完毕,响应才会成功,所以我们一般会采用多线程的方式去处理这些任务。
21、邮件任务
1、添加依赖包
        <dependency>
            <groupId>org.springframework.boot</groupId>
            <artifactId>spring-boot-starter-mail</artifactId>
        </dependency>
2、查看源码MailSenderAutoConfiguration
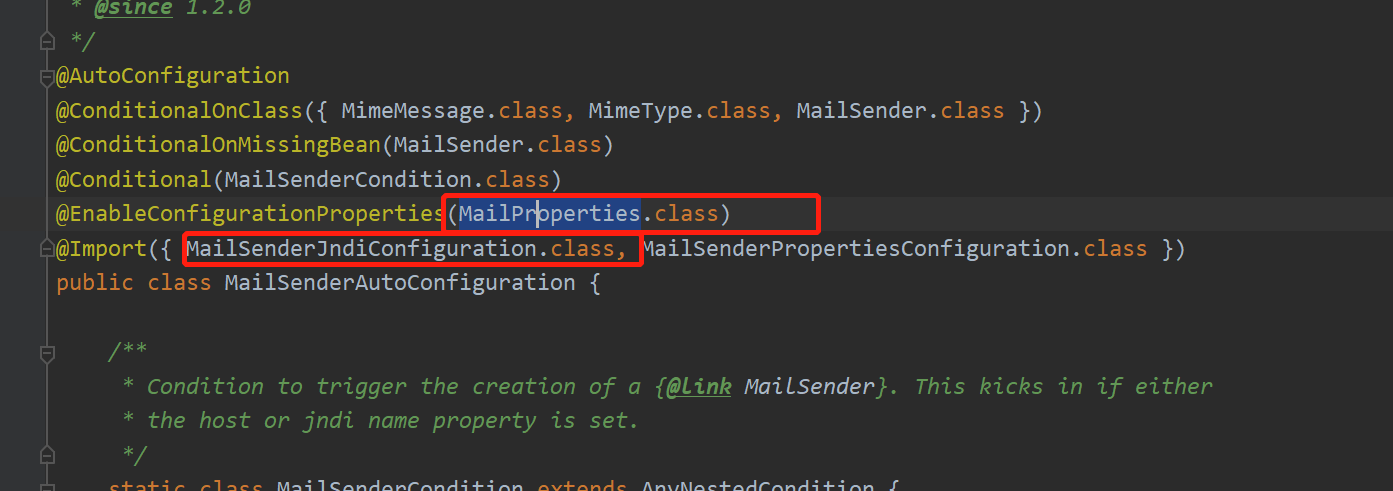
继续查看MailProperties,这个就是邮箱的相关配置类了
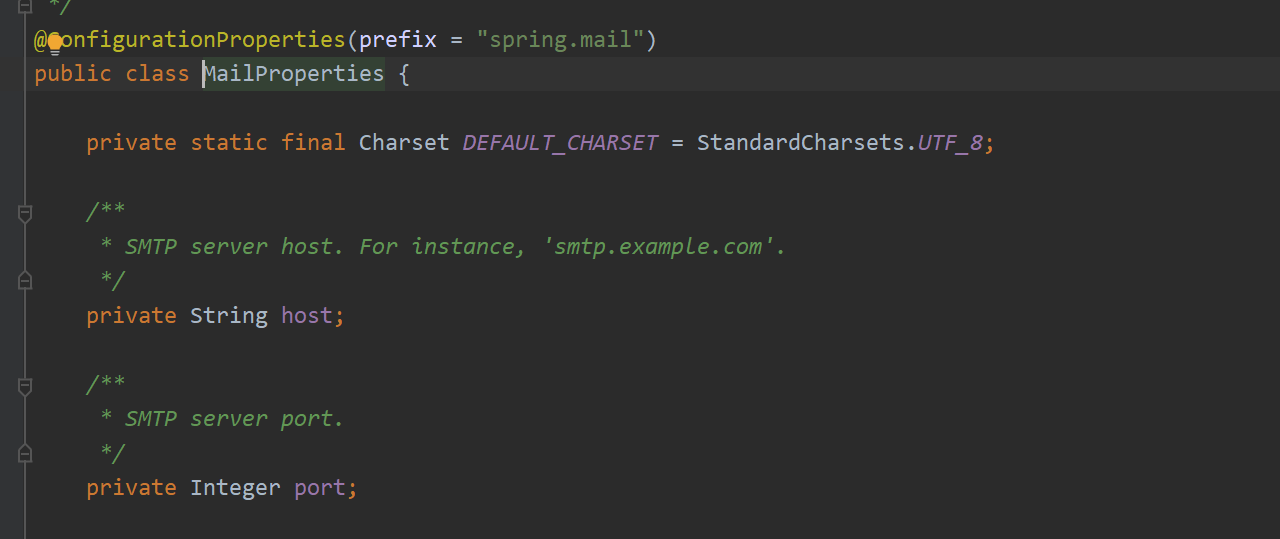
继续看MailSenderJndiConfiguration
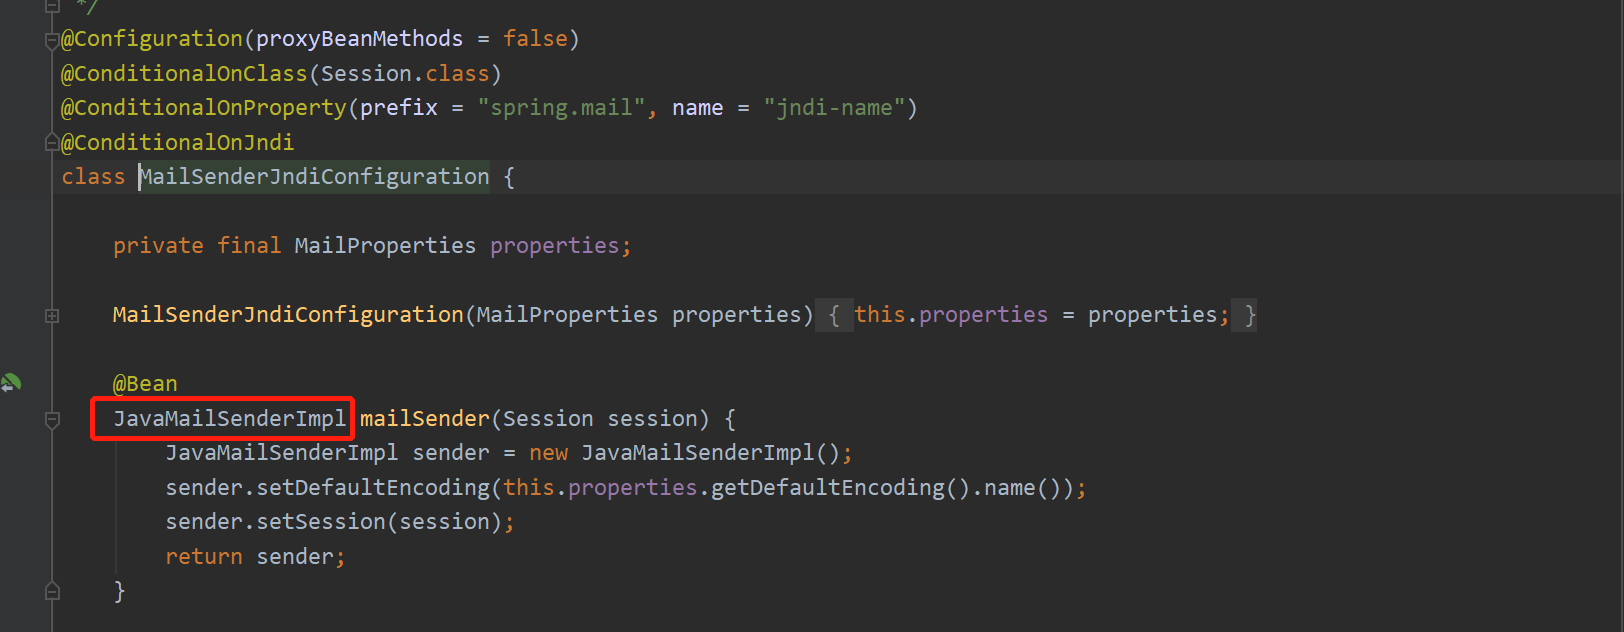
可以看到给容器中注入了JavaMailSenderImpl
3、添加邮件配置
spring.mail.username=2550****15@qq.com
spring.mail.host=smtp.qq.com
spring.mail.password=授权码
spring.mail.properties.mail.smtp.ssl.enable=true
4、编写代码
package com.zyy;

import org.junit.jupiter.api.Test;
import org.springframework.beans.factory.annotation.Autowired;
import org.springframework.boot.test.context.SpringBootTest;
import org.springframework.mail.SimpleMailMessage;
import org.springframework.mail.javamail.JavaMailSenderImpl;
import org.springframework.mail.javamail.MimeMessageHelper;

import javax.mail.MessagingException;
import javax.mail.internet.MimeMessage;
import java.io.File;

@SpringBootTest
class Springboot09AsynApplicationTests {

    @Autowired
    private JavaMailSenderImpl javaMailSender;

    /**
     * 发送简单邮件
     */
    @Test
    void contextLoads() {

        SimpleMailMessage message = new SimpleMailMessage();

        message.setSubject("通知");
        message.setText("万圣节来啦!");
        message.setTo("2550****15@qq.com");
        message.setFrom("2550****15@qq.com");

        javaMailSender.send(message);
    }

    /**
     * 发送一个复杂邮件
     *
     * @throws MessagingException
     */

    @Test
    void contextLoads2() throws MessagingException {

        MimeMessage mimeMessage = javaMailSender.createMimeMessage();
        MimeMessageHelper helper = new MimeMessageHelper(mimeMessage, true);

        helper.setSubject("通知2");
        helper.setText("<h1>万圣节哦!</h1>", true);
        helper.setTo("2550****15@qq.com");
        helper.setFrom("2550****15@qq.com");

        helper.addAttachment("thymeleaf官方文档.pdf",
                new File("C:\\Users\\ZHAYUYAO\\Desktop\\thymeleaf官方文档.pdf"));

        javaMailSender.send(mimeMessage);
    }

}
4、验证


22、定时任务
1、启动类直接开启定时任务
package com.zyy;

import org.springframework.boot.SpringApplication;
import org.springframework.boot.autoconfigure.SpringBootApplication;
import org.springframework.scheduling.annotation.EnableAsync;
import org.springframework.scheduling.annotation.EnableScheduling;

@SpringBootApplication
@EnableAsync
@EnableScheduling //开启定时任务
public class Springboot09AsynApplication {

    public static void main(String[] args) {
        SpringApplication.run(Springboot09AsynApplication.class, args);
    }

}
2、编写测试类
package com.zyy.task;

import org.springframework.scheduling.annotation.Scheduled;
import org.springframework.stereotype.Component;

/**
 * @Description: 类描述
 * @Author: zyy
 * @Date: 2022/10/30 16:53
 */
@Component
public class HelloTask {

    @Scheduled(cron = "0/5 * * * * ?")
    private void deal() {
        System.out.println("task deal");
    }
}
注意,类必须被容器托管,所以加了@Component注解,否则不会被执行
3、启动服务后,发现每5秒钟执行了task deal
cron表达式
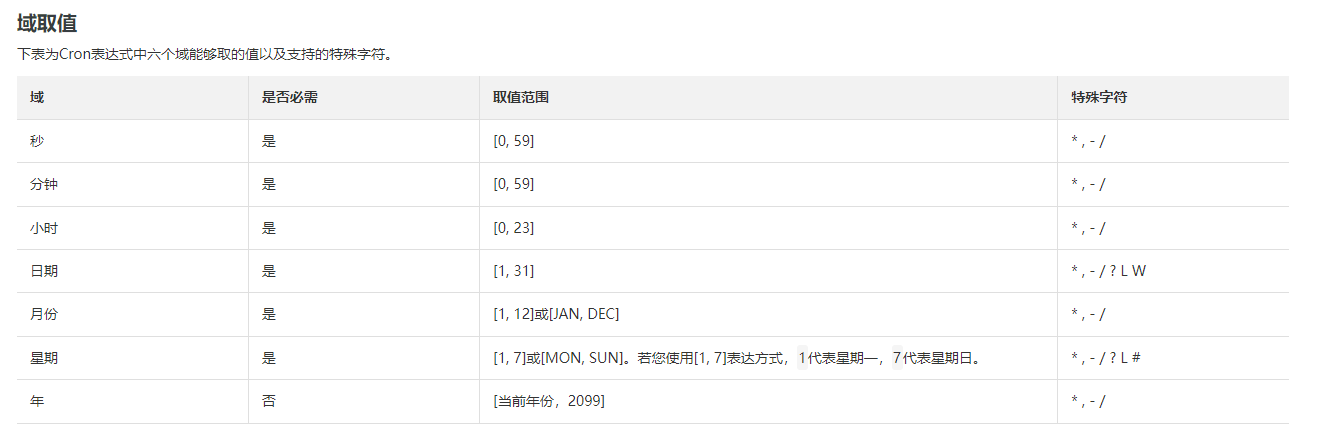

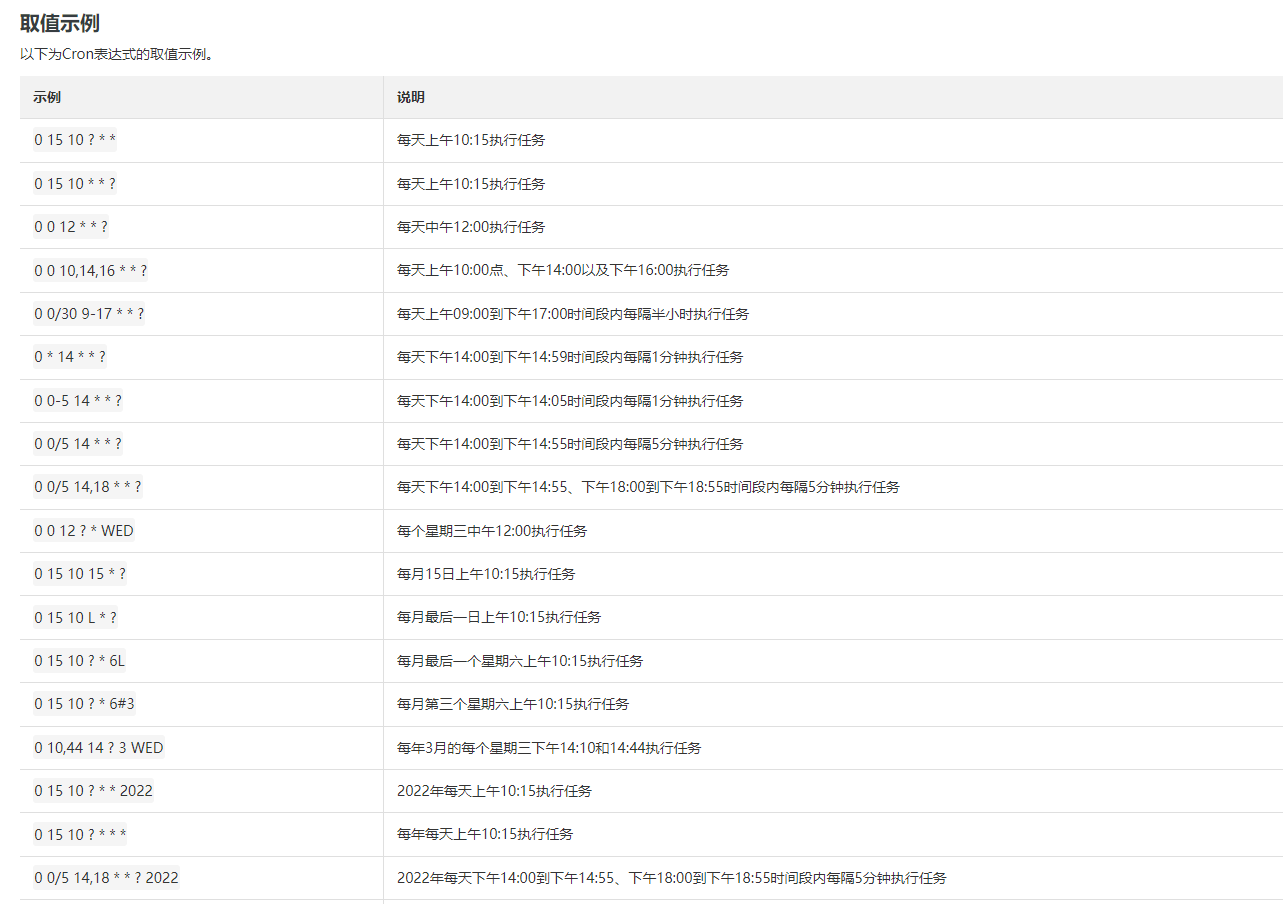
23、springboot集成redis
23.1、概述
lettuce
在spingboot2.X之后,原来的jedis被替换为了lettuce
jedis和lettuce区别
-
jedis:采用的是直连服务,如果多个线程操作的话,是不安全的,就需要使用jedis pool连接池解决。问题会比较多。
-
lettuce:底层采用netty,实例可以再多个线程中共享,不存在线程不安全的情况。可以减少线程数据了,性能更高。
源码分析
1、找到spring.factories
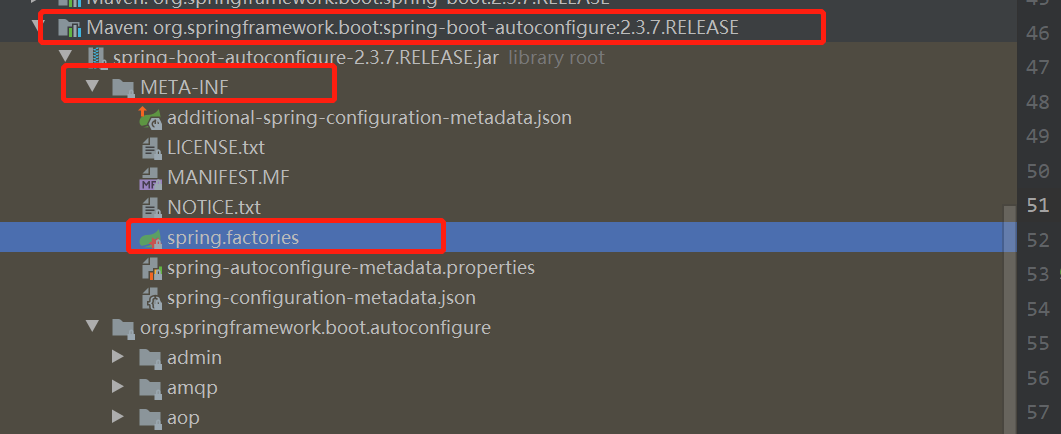
2、找到RedisAutoConfiguration
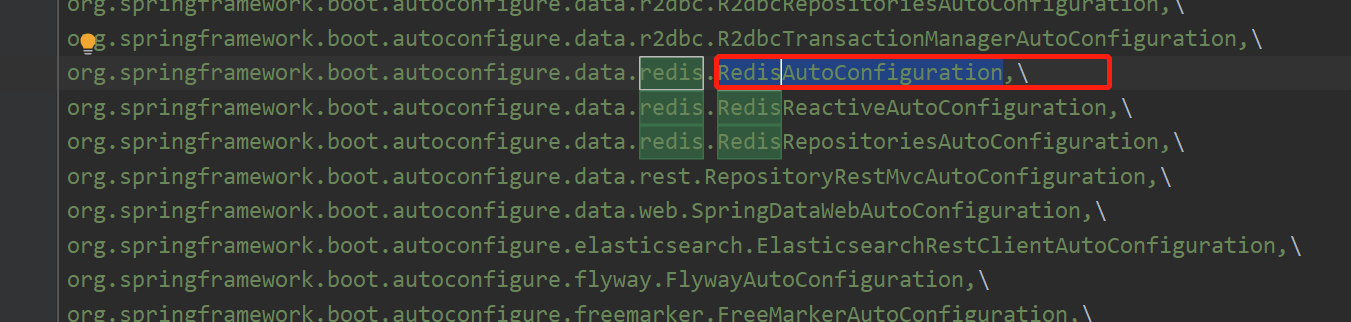
3、RedisAutoConfiguration源码
@Configuration(proxyBeanMethods = false)
@ConditionalOnClass(RedisOperations.class)
@EnableConfigurationProperties(RedisProperties.class)
@Import({ LettuceConnectionConfiguration.class, JedisConnectionConfiguration.class })
public class RedisAutoConfiguration {

	@Bean
	@ConditionalOnMissingBean(name = "redisTemplate") //由于这个注解,我们可知,如果不存在redisTemplate这个bean才生效,也就是我们可以自定义一个redisTemplate
	public RedisTemplate<Object, Object> redisTemplate(RedisConnectionFactory redisConnectionFactory)
			throws UnknownHostException {
		RedisTemplate<Object, Object> template = new RedisTemplate<>();
		template.setConnectionFactory(redisConnectionFactory);
		return template;
	}

	@Bean
	@ConditionalOnMissingBean
	public StringRedisTemplate stringRedisTemplate(RedisConnectionFactory redisConnectionFactory)
			throws UnknownHostException {
		StringRedisTemplate template = new StringRedisTemplate();
		template.setConnectionFactory(redisConnectionFactory);
		return template;
	}

}
4、redis配置类RedisProperties
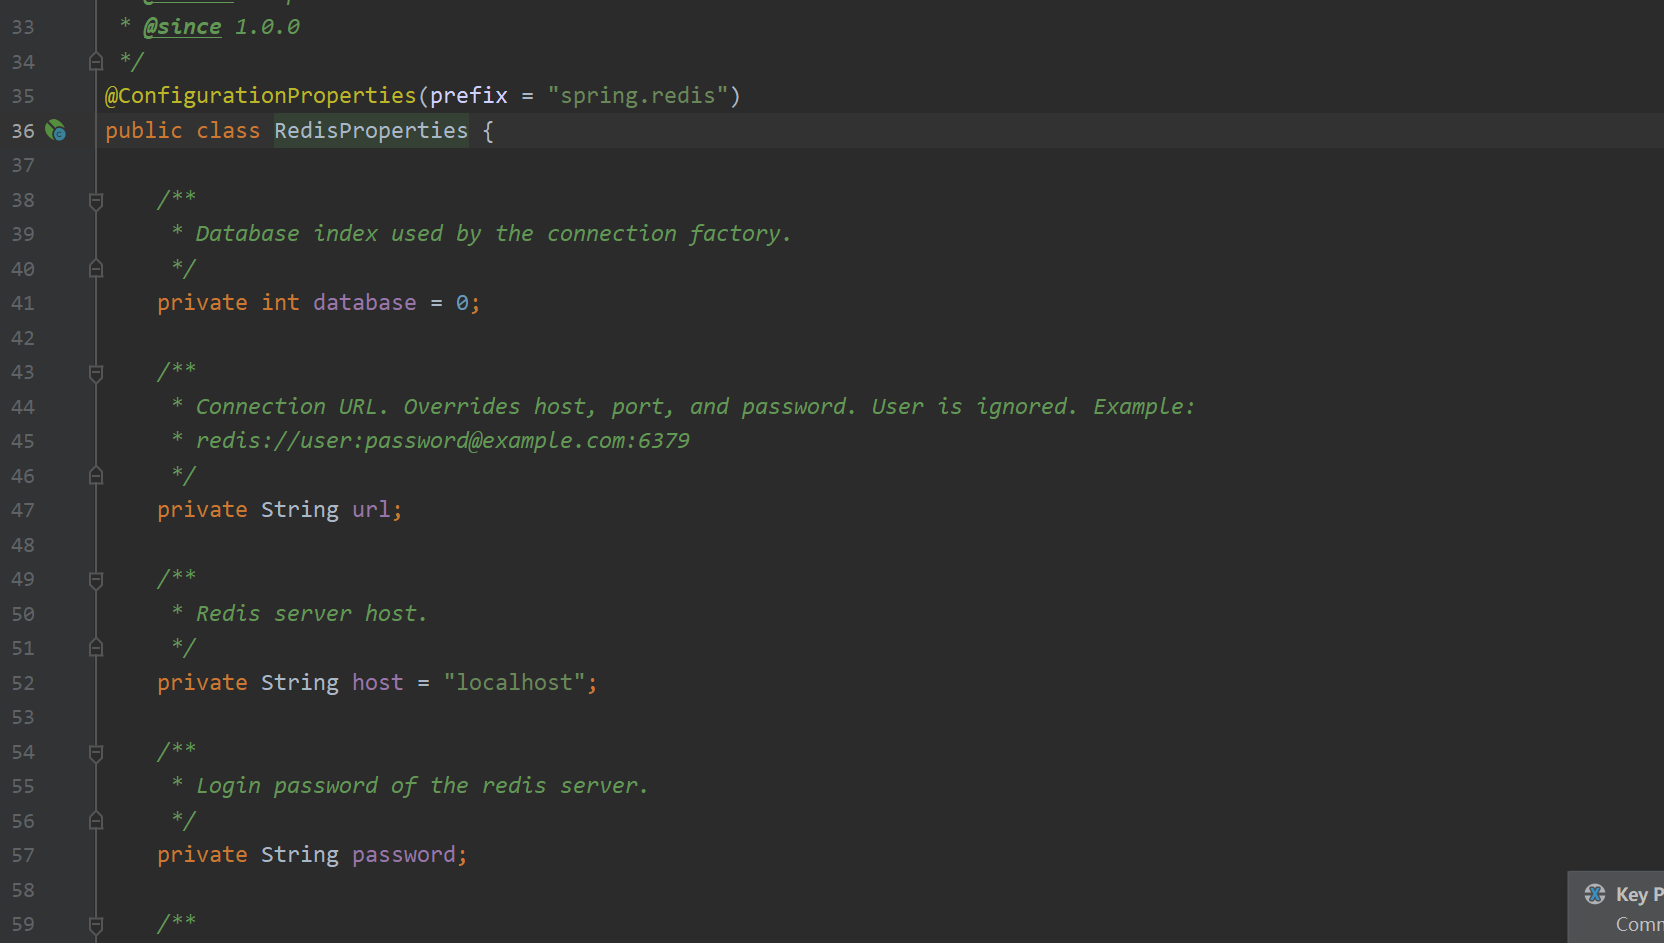
5、springboot更推荐使用lettuce
23.2、使用
1、下载redis
Releases · tporadowski/redis · GitHub
2、安装redis并且配置redis环境变量
Windows下安装Redis图文教程_windows安装redis-CSDN博客
4、新建项目springboot-10-redis,并添加依赖
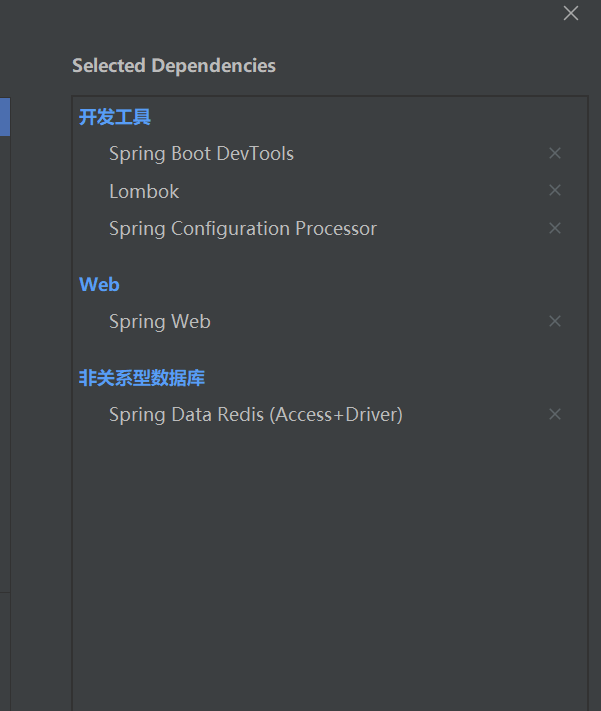
7、配置redis
# redis配置
spring.redis.host=127.0.0.1
spring.redis.port=6379
8、测试验证
package com.zyy;

import org.junit.jupiter.api.Test;
import org.springframework.beans.factory.annotation.Autowired;
import org.springframework.boot.test.context.SpringBootTest;
import org.springframework.data.redis.core.RedisTemplate;

@SpringBootTest
class Springboot10RedisApplicationTests {

    @Autowired
    private RedisTemplate redisTemplate;

    @Test
    void contextLoads() {

        redisTemplate.opsForValue().set("key", "zyy");

        System.out.println(redisTemplate.opsForValue().get("key"));

    }
}
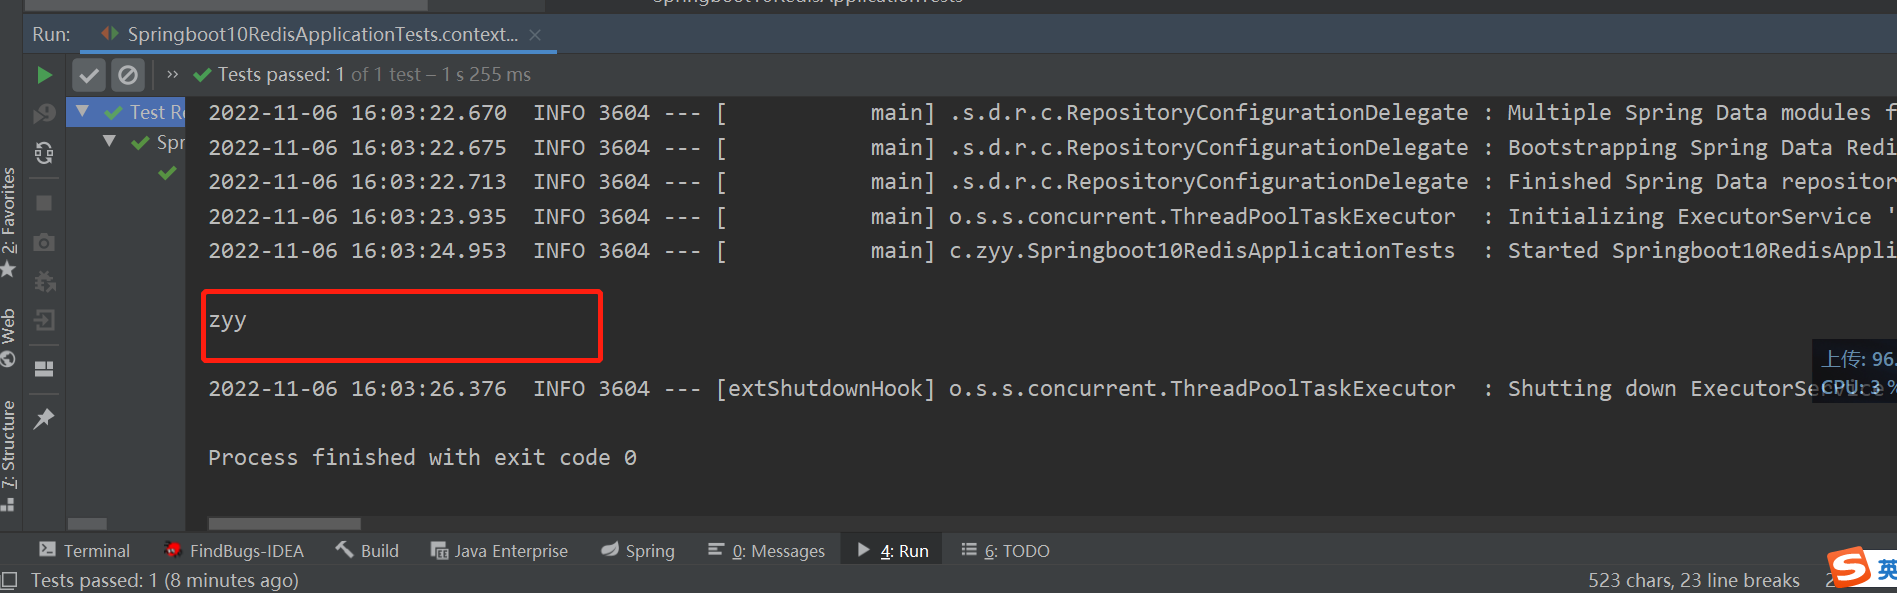
23.3、序列化
为什么需要序列化
新建一个实体类(不序列化)
package com.zyy.pojo;

import lombok.AllArgsConstructor;
import lombok.Data;
import lombok.NoArgsConstructor;

/**
 * @Description: 类描述
 * @Author: zyy
 * @Date: 2022/11/06 16:57
 */
@Data
@NoArgsConstructor
@AllArgsConstructor
public class User {
    private String name;
    private int age;

}
编写测试类
    @Test
    void test1() {
        User user = new User("zyy", 19);
        redisTemplate.opsForValue().set("zyy", user);
        System.out.println(redisTemplate.opsForValue().get("zyy"));
    }
执行报错如下:
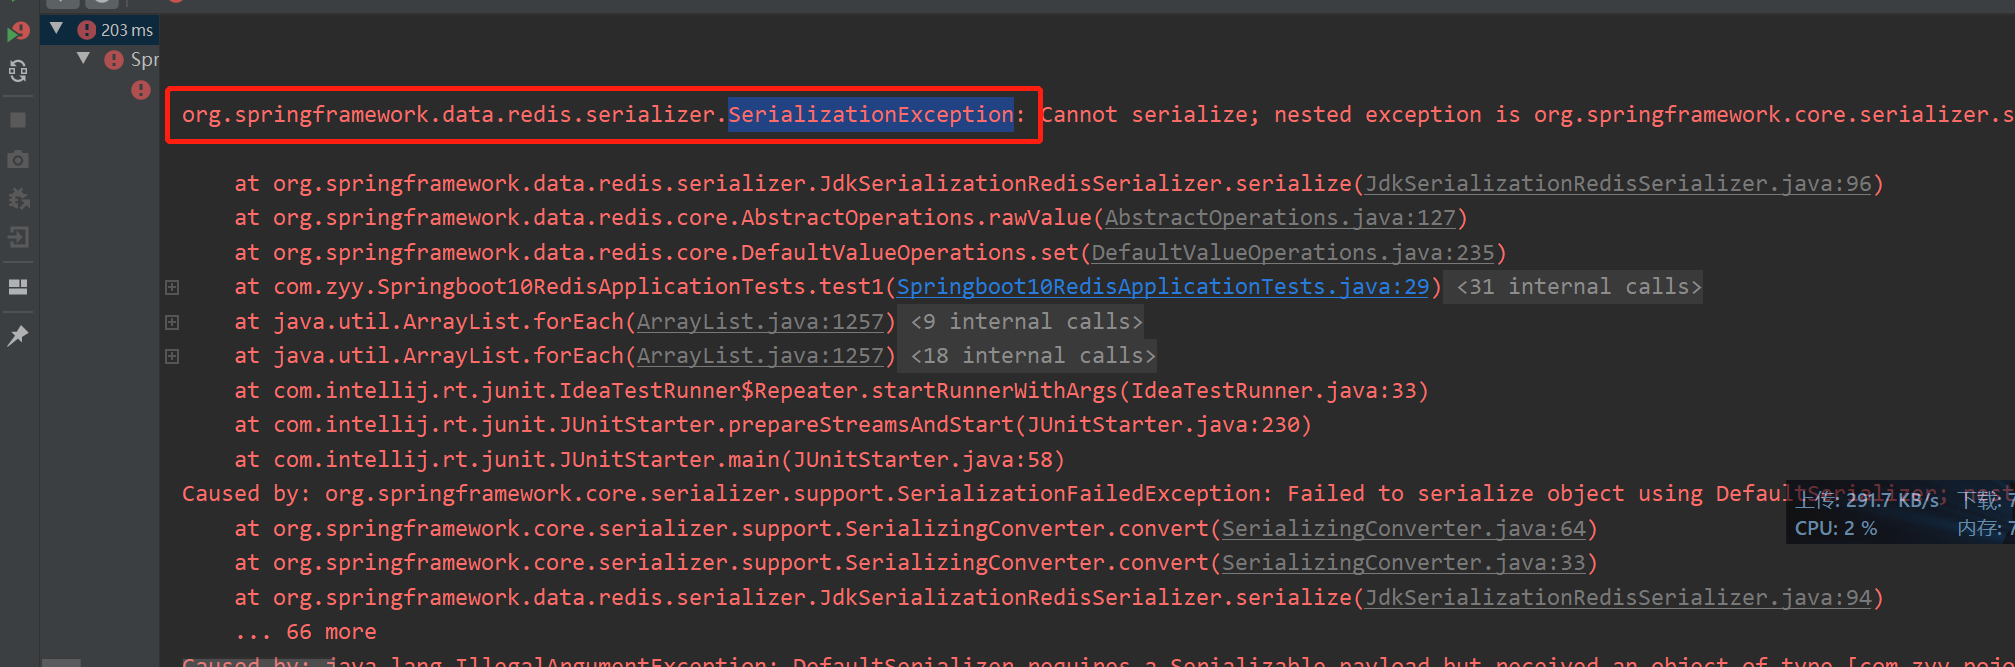
实体类序列化
import lombok.AllArgsConstructor;
import lombok.Data;
import lombok.NoArgsConstructor;

import java.io.Serializable;

@Data
@NoArgsConstructor
@AllArgsConstructor
public class User implements Serializable
{
    private String name;
    private int age;

}
再执行测试类(成功)
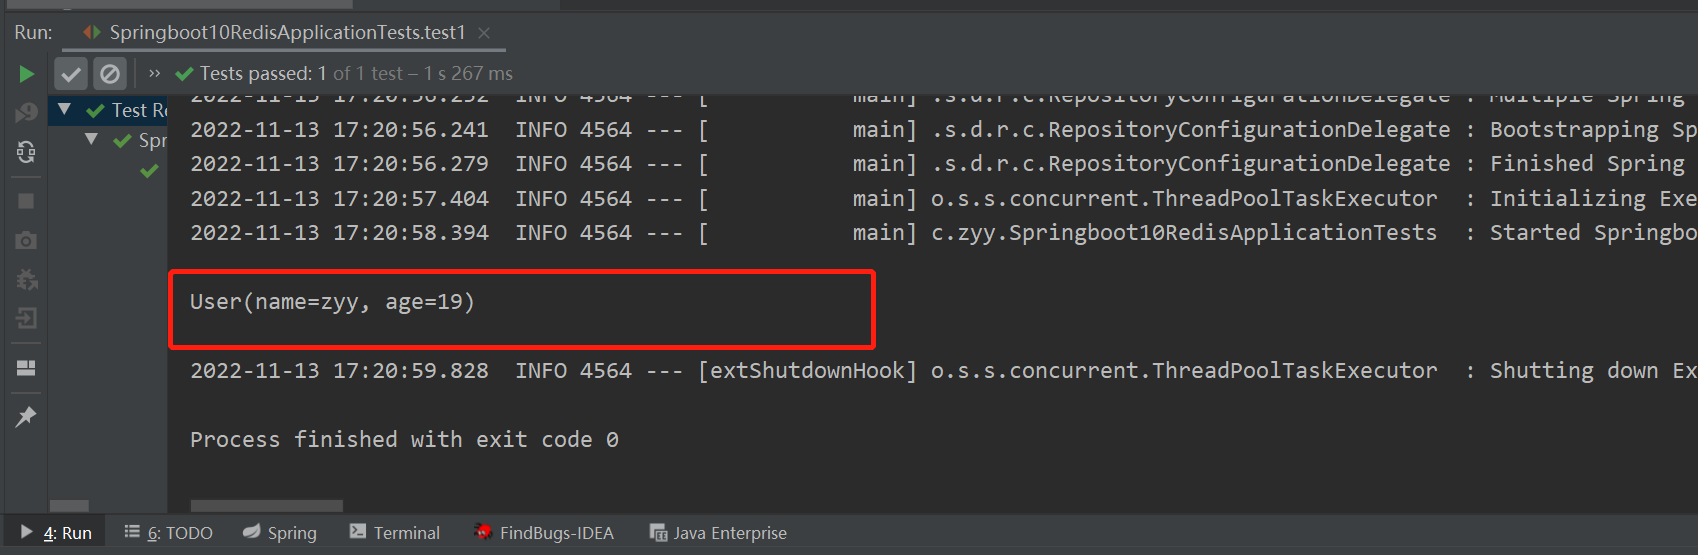
再查看(key是乱码,解决这个问题需要修改默认的序列化规则,后面通过自定义RedisTemplate解决)

自定义序列化
看RedisTemplate源码
public class RedisTemplate<K, V> extends RedisAccessor implements RedisOperations<K, V>, BeanClassLoaderAware {

	private boolean enableTransactionSupport = false;
	private boolean exposeConnection = false;
	private boolean initialized = false;
	private boolean enableDefaultSerializer = true;
	private @Nullable RedisSerializer<?> defaultSerializer;
	private @Nullable ClassLoader classLoader;

	@SuppressWarnings("rawtypes") private @Nullable RedisSerializer keySerializer = null;
	@SuppressWarnings("rawtypes") private @Nullable RedisSerializer valueSerializer = null;
	@SuppressWarnings("rawtypes") private @Nullable RedisSerializer hashKeySerializer = null;
	@SuppressWarnings("rawtypes") private @Nullable RedisSerializer hashValueSerializer = null;
	private RedisSerializer<String> stringSerializer = RedisSerializer.string();
}
看看哪里初始化的(可以看到默认用的jdk序列化的)
@Override
	public void afterPropertiesSet() {

		super.afterPropertiesSet();

		boolean defaultUsed = false;

		if (defaultSerializer == null) {

			defaultSerializer = new JdkSerializationRedisSerializer(
					classLoader != null ? classLoader : this.getClass().getClassLoader());
		}

		if (enableDefaultSerializer) {

			if (keySerializer == null) {
				keySerializer = defaultSerializer;
				defaultUsed = true;
			}
			if (valueSerializer == null) {
				valueSerializer = defaultSerializer;
				defaultUsed = true;
			}
			if (hashKeySerializer == null) {
				hashKeySerializer = defaultSerializer;
				defaultUsed = true;
			}
			if (hashValueSerializer == null) {
				hashValueSerializer = defaultSerializer;
				defaultUsed = true;
			}
		}

		if (enableDefaultSerializer && defaultUsed) {
			Assert.notNull(defaultSerializer, "default serializer null and not all serializers initialized");
		}

		if (scriptExecutor == null) {
			this.scriptExecutor = new DefaultScriptExecutor<>(this);
		}

		initialized = true;
	}
自定义一个RedisTemplate
package com.zyy.config;

import com.fasterxml.jackson.annotation.JsonAutoDetect;
import com.fasterxml.jackson.annotation.PropertyAccessor;
import com.fasterxml.jackson.databind.ObjectMapper;
import com.fasterxml.jackson.databind.jsontype.impl.LaissezFaireSubTypeValidator;
import org.springframework.context.annotation.Bean;
import org.springframework.context.annotation.Configuration;
import org.springframework.data.redis.connection.RedisConnectionFactory;
import org.springframework.data.redis.core.RedisTemplate;
import org.springframework.data.redis.serializer.Jackson2JsonRedisSerializer;
import org.springframework.data.redis.serializer.StringRedisSerializer;

/**
 * @Description: 类描述
 * @Author: zyy
 * @Date: 2022/11/06 22:02
 */
@Configuration
public class RedisConfig {

    @Bean
    public RedisTemplate<String, Object> redisTemplate(RedisConnectionFactory redisConnectionFactory) {
        //使用objectMapper进行转义
        ObjectMapper objectMapper = new ObjectMapper();
        objectMapper.setVisibility(PropertyAccessor.ALL, JsonAutoDetect.Visibility.ANY);
        objectMapper.activateDefaultTyping(LaissezFaireSubTypeValidator.instance, ObjectMapper.DefaultTyping.NON_FINAL);
        //jackson的序列化
        Jackson2JsonRedisSerializer jackson2JsonRedisSerializer = new Jackson2JsonRedisSerializer(Object.class);
        jackson2JsonRedisSerializer.setObjectMapper(objectMapper);
        //String 的序列化
        StringRedisSerializer stringRedisSerializer = new StringRedisSerializer();
        //为了方便开发,直接使用<String, Object>
        RedisTemplate<String, Object> template = new RedisTemplate<>();
        template.setConnectionFactory(redisConnectionFactory);
        //key采用String的序列化方式
        template.setKeySerializer(stringRedisSerializer);
        //Hash的key采用String的序列化方式
        template.setHashKeySerializer(stringRedisSerializer);
        //Hash的value采用String的序列化方式
        template.setHashValueSerializer(jackson2JsonRedisSerializer);
        //value 采用jackson的序列化方式
        template.setValueSerializer(jackson2JsonRedisSerializer);
        //把所有的配置set进template
        template.afterPropertiesSet();
        return template;
    }
}
执行测试类
@SpringBootTest
class Springboot10RedisApplicationTests {

    @Autowired
    @Qualifier("redisTemplate")
    private RedisTemplate redisTemplate;

    @Test
    void test1() {
        User user = new User("zyy", 19);
        redisTemplate.opsForValue().set("zyy", user);
        System.out.println(redisTemplate.opsForValue().get("zyy"));
    }
}
查看(这里key就变得正常了)
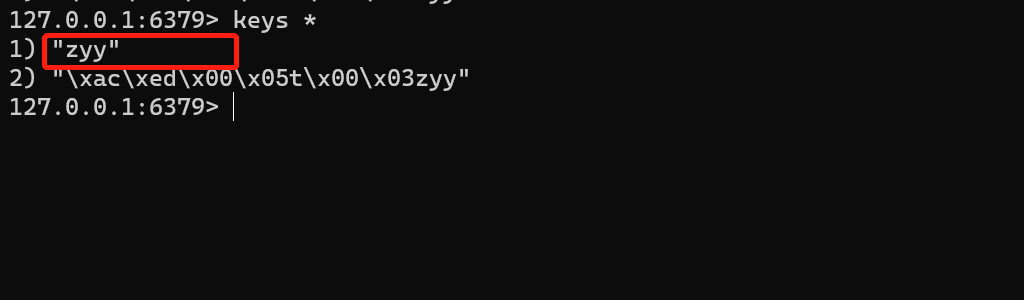
封装工具类
package com.zyy.util;

import org.springframework.beans.factory.annotation.Qualifier;
import org.springframework.data.redis.core.RedisTemplate;
import org.springframework.stereotype.Component;
import org.springframework.util.CollectionUtils;

import java.util.List;
import java.util.Map;
import java.util.Set;
import java.util.concurrent.TimeUnit;

/**
 * @Description: 类描述
 * @Author: zyy
 * @Date: 2022/11/06 22:26
 */
@Component
public final class RedisUtil {

    private final RedisTemplate<String, Object> redisTemplate;

    public RedisUtil(@Qualifier("redisTemplate") RedisTemplate<String, Object> redisTemplate) {
        this.redisTemplate = redisTemplate;
    }

    // =============================common============================

    /**
     * 指定缓存失效时间
     *
     * @param key  键
     * @param time 时间(秒)
     */
    public boolean expire(String key, long time) {
        try {
            if (time > 0) {
                redisTemplate.expire(key, time, TimeUnit.SECONDS);
            }
            return true;
        } catch (Exception e) {
            e.printStackTrace();
            return false;
        }
    }

    /**
     * 根据key 获取过期时间
     *
     * @param key 键 不能为null
     * @return 时间(秒) 返回0代表为永久有效
     */
    public long getExpire(String key) {
        return redisTemplate.getExpire(key, TimeUnit.SECONDS);
    }


    /**
     * 判断key是否存在
     *
     * @param key 键
     * @return true 存在 false不存在
     */
    public boolean hasKey(String key) {
        try {
            return redisTemplate.hasKey(key);
        } catch (Exception e) {
            e.printStackTrace();
            return false;
        }
    }


    /**
     * 删除缓存
     *
     * @param key 可以传一个值 或多个
     */
    public void del(String... key) {
        if (key != null && key.length > 0) {
            if (key.length == 1) {
                redisTemplate.delete(key[0]);
            } else {
                redisTemplate.delete(CollectionUtils.arrayToList(key));
            }
        }
    }


    // ============================String=============================

    /**
     * 普通缓存获取
     *
     * @param key 键
     * @return 值
     */
    public Object get(String key) {
        return key == null ? null : redisTemplate.opsForValue().get(key);
    }

    /**
     * 普通缓存放入
     *
     * @param key   键
     * @param value 值
     * @return true成功 false失败
     */

    public boolean set(String key, Object value) {
        try {
            redisTemplate.opsForValue().set(key, value);
            return true;
        } catch (Exception e) {
            e.printStackTrace();
            return false;
        }
    }


    /**
     * 普通缓存放入并设置时间
     *
     * @param key   键
     * @param value 值
     * @param time  时间(秒) time要大于0 如果time小于等于0 将设置无限期
     * @return true成功 false 失败
     */

    public boolean set(String key, Object value, long time) {
        try {
            if (time > 0) {
                redisTemplate.opsForValue().set(key, value, time, TimeUnit.SECONDS);
            } else {
                set(key, value);
            }
            return true;
        } catch (Exception e) {
            e.printStackTrace();
            return false;
        }
    }


    /**
     * 递增
     *
     * @param key   键
     * @param delta 要增加几(大于0)
     */
    public long incr(String key, long delta) {
        if (delta < 0) {
            throw new RuntimeException("递增因子必须大于0");
        }
        return redisTemplate.opsForValue().increment(key, delta);
    }


    /**
     * 递减
     *
     * @param key   键
     * @param delta 要减少几(小于0)
     */
    public long decr(String key, long delta) {
        if (delta < 0) {
            throw new RuntimeException("递减因子必须大于0");
        }
        return redisTemplate.opsForValue().increment(key, -delta);
    }


    // ================================Map=================================

    /**
     * HashGet
     *
     * @param key  键 不能为null
     * @param item 项 不能为null
     */
    public Object hget(String key, String item) {
        return redisTemplate.opsForHash().get(key, item);
    }

    /**
     * 获取hashKey对应的所有键值
     *
     * @param key 键
     * @return 对应的多个键值
     */
    public Map<Object, Object> hmget(String key) {
        return redisTemplate.opsForHash().entries(key);
    }

    /**
     * HashSet
     *
     * @param key 键
     * @param map 对应多个键值
     */
    public boolean hmset(String key, Map<String, Object> map) {
        try {
            redisTemplate.opsForHash().putAll(key, map);
            return true;
        } catch (Exception e) {
            e.printStackTrace();
            return false;
        }
    }


    /**
     * HashSet 并设置时间
     *
     * @param key  键
     * @param map  对应多个键值
     * @param time 时间(秒)
     * @return true成功 false失败
     */
    public boolean hmset(String key, Map<String, Object> map, long time) {
        try {
            redisTemplate.opsForHash().putAll(key, map);
            if (time > 0) {
                expire(key, time);
            }
            return true;
        } catch (Exception e) {
            e.printStackTrace();
            return false;
        }
    }


    /**
     * 向一张hash表中放入数据,如果不存在将创建
     *
     * @param key   键
     * @param item  项
     * @param value 值
     * @return true 成功 false失败
     */
    public boolean hset(String key, String item, Object value) {
        try {
            redisTemplate.opsForHash().put(key, item, value);
            return true;
        } catch (Exception e) {
            e.printStackTrace();
            return false;
        }
    }

    /**
     * 向一张hash表中放入数据,如果不存在将创建
     *
     * @param key   键
     * @param item  项
     * @param value 值
     * @param time  时间(秒) 注意:如果已存在的hash表有时间,这里将会替换原有的时间
     * @return true 成功 false失败
     */
    public boolean hset(String key, String item, Object value, long time) {
        try {
            redisTemplate.opsForHash().put(key, item, value);
            if (time > 0) {
                expire(key, time);
            }
            return true;
        } catch (Exception e) {
            e.printStackTrace();
            return false;
        }
    }


    /**
     * 删除hash表中的值
     *
     * @param key  键 不能为null
     * @param item 项 可以使多个 不能为null
     */
    public void hdel(String key, Object... item) {
        redisTemplate.opsForHash().delete(key, item);
    }


    /**
     * 判断hash表中是否有该项的值
     *
     * @param key  键 不能为null
     * @param item 项 不能为null
     * @return true 存在 false不存在
     */
    public boolean hHasKey(String key, String item) {
        return redisTemplate.opsForHash().hasKey(key, item);
    }


    /**
     * hash递增 如果不存在,就会创建一个 并把新增后的值返回
     *
     * @param key  键
     * @param item 项
     * @param by   要增加几(大于0)
     */
    public double hincr(String key, String item, double by) {
        return redisTemplate.opsForHash().increment(key, item, by);
    }


    /**
     * hash递减
     *
     * @param key  键
     * @param item 项
     * @param by   要减少记(小于0)
     */
    public double hdecr(String key, String item, double by) {
        return redisTemplate.opsForHash().increment(key, item, -by);
    }


    // ============================set=============================

    /**
     * 根据key获取Set中的所有值
     *
     * @param key 键
     */
    public Set<Object> sGet(String key) {
        try {
            return redisTemplate.opsForSet().members(key);
        } catch (Exception e) {
            e.printStackTrace();
            return null;
        }
    }


    /**
     * 根据value从一个set中查询,是否存在
     *
     * @param key   键
     * @param value 值
     * @return true 存在 false不存在
     */
    public boolean sHasKey(String key, Object value) {
        try {
            return redisTemplate.opsForSet().isMember(key, value);
        } catch (Exception e) {
            e.printStackTrace();
            return false;
        }
    }


    /**
     * 将数据放入set缓存
     *
     * @param key    键
     * @param values 值 可以是多个
     * @return 成功个数
     */
    public long sSet(String key, Object... values) {
        try {
            return redisTemplate.opsForSet().add(key, values);
        } catch (Exception e) {
            e.printStackTrace();
            return 0;
        }
    }


    /**
     * 将set数据放入缓存
     *
     * @param key    键
     * @param time   时间(秒)
     * @param values 值 可以是多个
     * @return 成功个数
     */
    public long sSetAndTime(String key, long time, Object... values) {
        try {
            Long count = redisTemplate.opsForSet().add(key, values);
            if (time > 0) {
                expire(key, time);
            }
            return count;
        } catch (Exception e) {
            e.printStackTrace();
            return 0;
        }
    }


    /**
     * 获取set缓存的长度
     *
     * @param key 键
     */
    public long sGetSetSize(String key) {
        try {
            return redisTemplate.opsForSet().size(key);
        } catch (Exception e) {
            e.printStackTrace();
            return 0;
        }
    }


    /**
     * 移除值为value的
     *
     * @param key    键
     * @param values 值 可以是多个
     * @return 移除的个数
     */

    public long setRemove(String key, Object... values) {
        try {
            Long count = redisTemplate.opsForSet().remove(key, values);
            return count;
        } catch (Exception e) {
            e.printStackTrace();
            return 0;
        }
    }

    // ===============================list=================================

    /**
     * 获取list缓存的内容
     *
     * @param key   键
     * @param start 开始
     * @param end   结束 0 到 -1代表所有值
     */
    public List<Object> lGet(String key, long start, long end) {
        try {
            return redisTemplate.opsForList().range(key, start, end);
        } catch (Exception e) {
            e.printStackTrace();
            return null;
        }
    }


    /**
     * 获取list缓存的长度
     *
     * @param key 键
     */
    public long lGetListSize(String key) {
        try {
            return redisTemplate.opsForList().size(key);
        } catch (Exception e) {
            e.printStackTrace();
            return 0;
        }
    }


    /**
     * 通过索引 获取list中的值
     *
     * @param key   键
     * @param index 索引 index>=0时, 0 表头,1 第二个元素,依次类推;index<0时,-1,表尾,-2倒数第二个元素,依次类推
     */
    public Object lGetIndex(String key, long index) {
        try {
            return redisTemplate.opsForList().index(key, index);
        } catch (Exception e) {
            e.printStackTrace();
            return null;
        }
    }


    /**
     * 将list放入缓存
     *
     * @param key   键
     * @param value 值
     */
    public boolean lSet(String key, Object value) {
        try {
            redisTemplate.opsForList().rightPush(key, value);
            return true;
        } catch (Exception e) {
            e.printStackTrace();
            return false;
        }
    }


    /**
     * 将list放入缓存
     *
     * @param key   键
     * @param value 值
     * @param time  时间(秒)
     */
    public boolean lSet(String key, Object value, long time) {
        try {
            redisTemplate.opsForList().rightPush(key, value);
            if (time > 0) {
                expire(key, time);
            }
            return true;
        } catch (Exception e) {
            e.printStackTrace();
            return false;
        }

    }


    /**
     * 将list放入缓存
     *
     * @param key   键
     * @param value 值
     * @return
     */
    public boolean lSet(String key, List<Object> value) {
        try {
            redisTemplate.opsForList().rightPushAll(key, value);
            return true;
        } catch (Exception e) {
            e.printStackTrace();
            return false;
        }

    }


    /**
     * 将list放入缓存
     *
     * @param key   键
     * @param value 值
     * @param time  时间(秒)
     * @return
     */
    public boolean lSet(String key, List<Object> value, long time) {
        try {
            redisTemplate.opsForList().rightPushAll(key, value);
            if (time > 0) {
                expire(key, time);
            }
            return true;
        } catch (Exception e) {
            e.printStackTrace();
            return false;
        }
    }


    /**
     * 根据索引修改list中的某条数据
     *
     * @param key   键
     * @param index 索引
     * @param value 值
     * @return
     */

    public boolean lUpdateIndex(String key, long index, Object value) {
        try {
            redisTemplate.opsForList().set(key, index, value);
            return true;
        } catch (Exception e) {
            e.printStackTrace();
            return false;
        }
    }


    /**
     * 移除N个值为value
     *
     * @param key   键
     * @param count 移除多少个
     * @param value 值
     * @return 移除的个数
     */

    public long lRemove(String key, long count, Object value) {
        try {
            Long remove = redisTemplate.opsForList().remove(key, count, value);
            return remove;
        } catch (Exception e) {
            e.printStackTrace();
            return 0;
        }

    }

}
编写测试类验证
    @Test
    void test2() {
        System.out.println(redisUtil.get("zyy"));
        redisUtil.set("zyy1", "查");
        System.out.println(redisUtil.get("zyy1"));
    }
查看
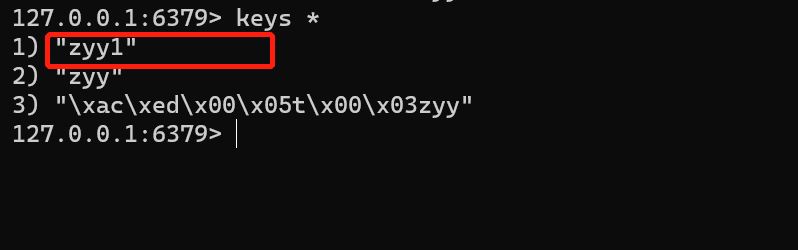
24、dubbo和zookeeper集成
24.1、分布式理论
什么是分布式系统
在《分布式系统原理与范型》一书中有如下定义:“分布式系统是若干独立计算机的集合,这些计算机对于用户来说就像单个相关系统”;
分布式系统是由一组通过网络进行通信、为了完成共同的任务而协调工作的计算机节点组成的系统。分布式系统的出现是为了用廉价的、普通的机器完成单个计算机无法完成的计算、存储任务。其目的是利用更多的机器,处理更多的数据。
分布式系统(distributed system)是建立在网络之上的软件系统。
dubbo文档
随着互联网的发展,网站应用的规模不断扩大,常规的垂直应用架构已无法应对,分布式服务架构以及流动计算架构势在必行,急需一个治理系统确保架构有条不紊的演进。
在Dubbo的官网文档有这样一张图
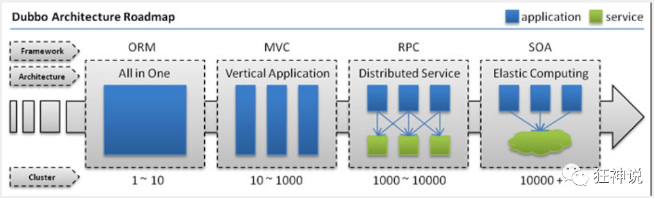
单一应用架构
当网站流量很小时,只需一个应用,将所有功能都部署在一起,以减少部署节点和成本。此时,用于简化增删改查工作量的数据访问框架(ORM)是关键。
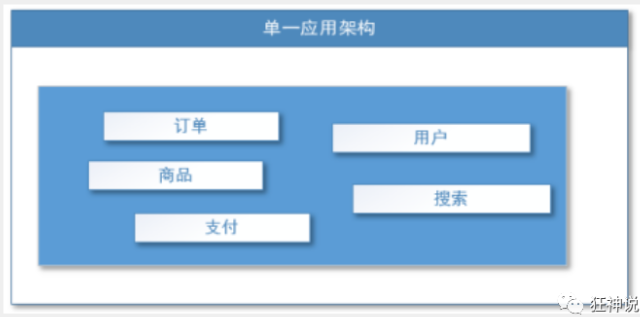
适用于小型网站,小型管理系统,将所有功能都部署到一个功能里,简单易用。
缺点:
-
性能扩展比较难
-
协同开发问题
-
不利于升级维护
垂直应用架构
当访问量逐渐增大,单一应用增加机器带来的加速度越来越小,将应用拆成互不相干的几个应用,以提升效率。此时,用于加速前端页面开发的Web框架(MVC)是关键。
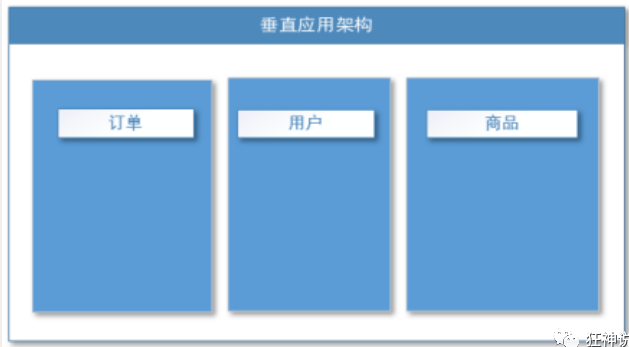
通过切分业务来实现各个模块独立部署,降低了维护和部署的难度,团队各司其职更易管理,性能扩展也更方便,更有针对性。
缺点
-
公用模块无法重复利用,开发性的浪费
分布式架构
当垂直应用越来越多,应用之间交互不可避免,将核心业务抽取出来,作为独立的服务,逐渐形成稳定的服务中心,使前端应用能更快速的响应多变的市场需求。此时,用于提高业务复用及整合的分布式服务框架(RPC)是关键。
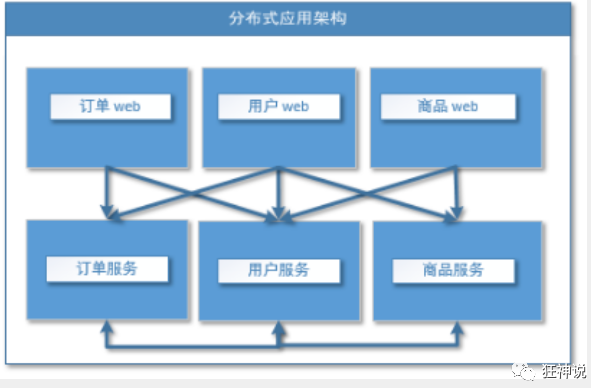
流动计算架构
当服务越来越多,容量的评估,小服务资源的浪费等问题逐渐显现,此时需增加一个调度中心基于访问压力实时管理集群容量,提高集群利用率。此时,用于提高机器利用率的资源调度和治理中心(SOA)[ Service Oriented Architecture]是关键。
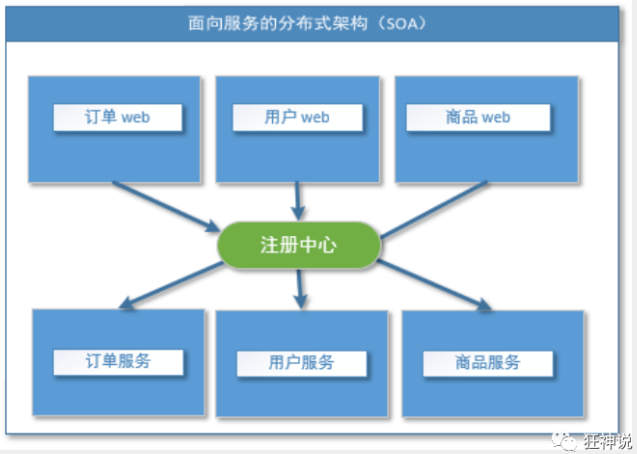
24.2、什么是rpc
RPC【Remote Procedure Call】是指远程过程调用,是一种进程间通信方式,他是一种技术的思想,而不是规范。它允许程序调用另一个地址空间(通常是共享网络的另一台机器上)的过程或函数,而不用程序员显式编码这个远程调用的细节。即程序员无论是调用本地的还是远程的函数,本质上编写的调用代码基本相同。
也就是说两台服务器A,B,一个应用部署在A服务器上,想要调用B服务器上应用提供的函数/方法,由于不在一个内存空间,不能直接调用,需要通过网络来表达调用的语义和传达调用的数据。为什么要用RPC呢?就是无法在一个进程内,甚至一个计算机内通过本地调用的方式完成的需求,比如不同的系统间的通讯,甚至不同的组织间的通讯,由于计算能力需要横向扩展,需要在多台机器组成的集群上部署应用。RPC就是要像调用本地的函数一样去调远程函数;
RPC基本原理
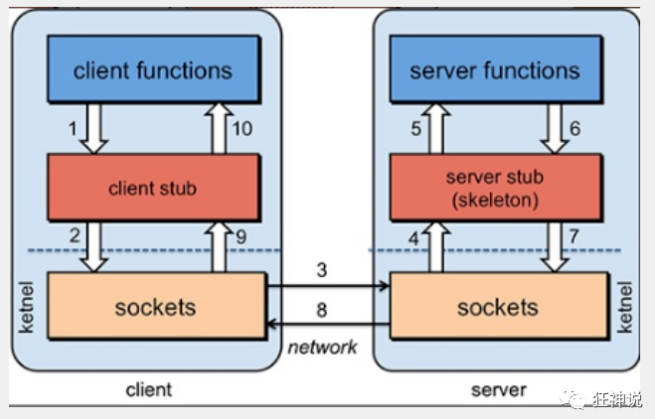
步骤解析
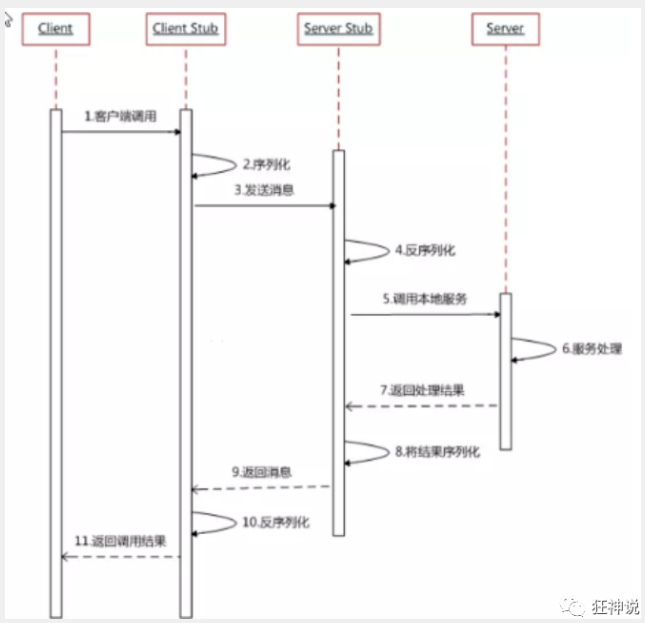
RPC两个核心模块:通讯,序列化。
24.3、测试环境搭建
dubbo
Apache Dubbo |ˈdʌbəʊ| 是一款高性能、轻量级的开源Java RPC框架,它提供了三大核心能力:面向接口的远程方法调用,智能容错和负载均衡,以及服务自动注册和发现。
dubbo官网:Apache Dubbo
dubbo基本概念:
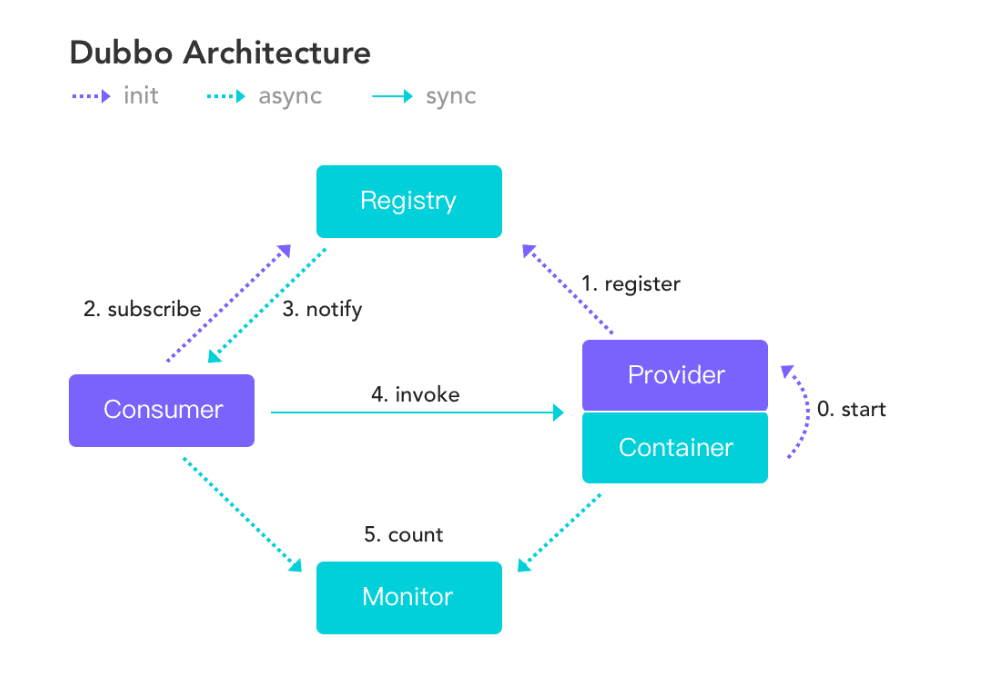
服务提供者(Provider):暴露服务的服务提供方,服务提供者在启动时,向注册中心注册自己提供的服务。
服务消费者(Consumer):调用远程服务的服务消费方,服务消费者在启动时,向注册中心订阅自己所需的服务,服务消费者,从提供者地址列表中,基于软负载均衡算法,选一台提供者进行调用,如果调用失败,再选另一台调用。
注册中心(Registry):注册中心返回服务提供者地址列表给消费者,如果有变更,注册中心将基于长连接推送变更数据给消费者
监控中心(Monitor):服务消费者和提供者,在内存中累计调用次数和调用时间,定时每分钟发送一次统计数据到监控中心
调用关系说明
-
服务容器负责启动,加载,运行服务提供者
-
服务提供者在启动时,向注册中心注册自己提供的服务
-
服务消费者在启动时,向注册中心订阅自己所需的服务
-
注册中心返回服务提供者地址列表给消费者,如果有变更,注册中心将基于长连接推送变更数据给消费者
-
服务消费者,从提供者地址列表中,基于软负载均衡算法,选一台提供者进行调用,如果调用失败,再选另一台调用
-
服务消费者和提供者,在内存中累计调用次数和调用时间,定时每分钟发送一次统计数据到监控中心
dubbo环境搭建
点进dubbo官方文档,推荐我们使用Zookeeper 注册中心
windows下安装zookeeper
1、下载zookeeper
网址:https://dlcdn.apache.org/zookeeper/zookeeper-3.8.0/
2、运行\bin\zkServer.cmd,可能闪退,编辑zkServer.cmd,添加pause
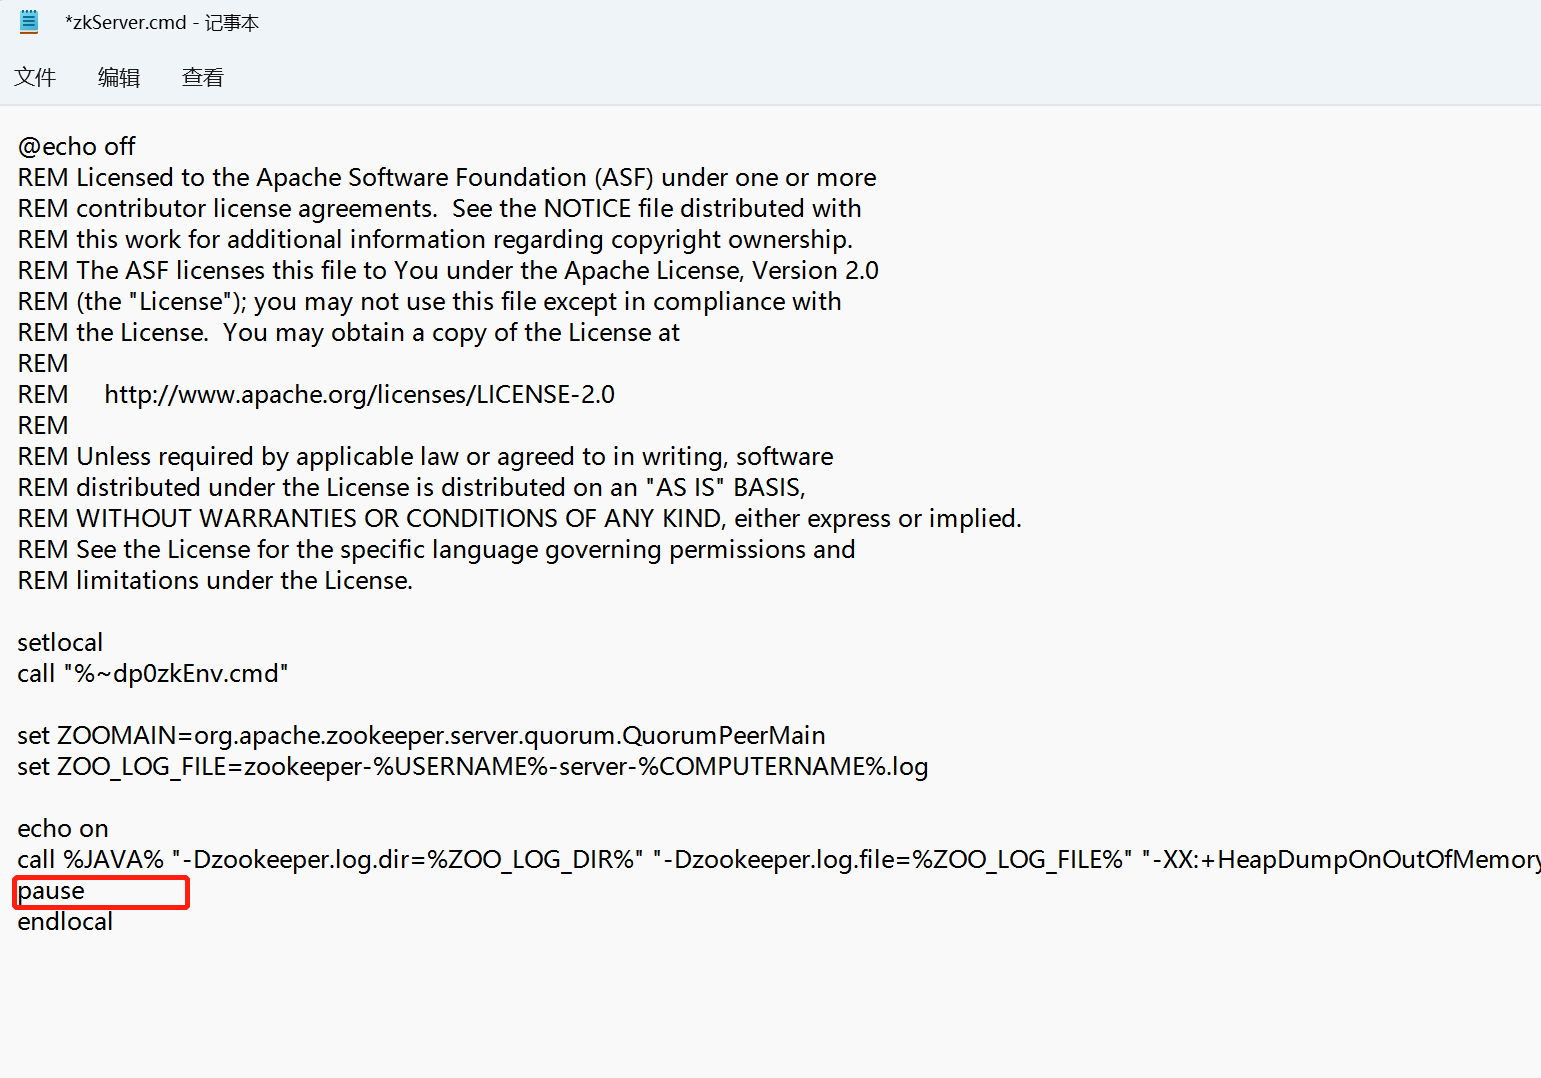
3、再次运行zkServer.cmd,发现如下错误
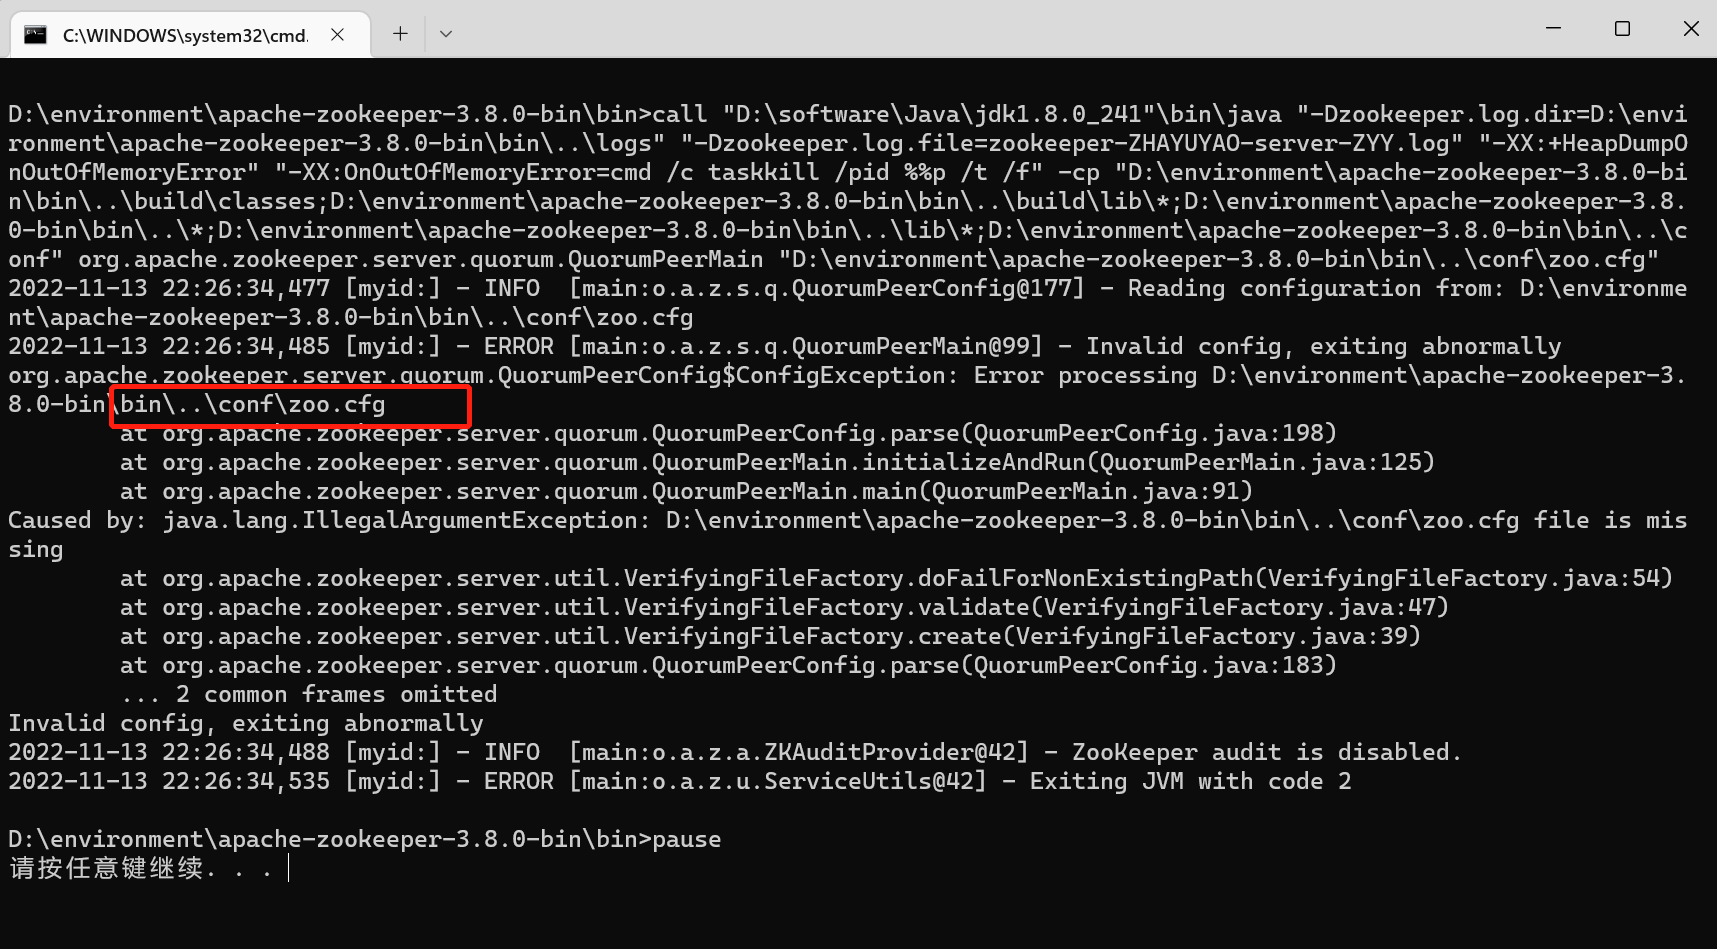
4、复制在\conf\zoo_sample.cfg 重新命名为zoo.cfg
5、再次启动zkServer.cmd,发现可以正常启动了

6、再次打开zkCli.cmd,输入输入操作
-
ls /列出zookeeper根下保存的所有节点 -
create –e /zyy 123创建一个zyy节点,值为123 -
get /zyy获取/zyy节点的值
windows下安装dubbo-admin
1、现在dubbo-admin
下载地址:https://github.com/apache/dubbo-admin/tree/master
因为最新版本打包一直报错,这里选择旧版本,后续研究一下新的版本
2、解压后,进入目录,查看配置文件
.\dubbo-admin\src\main\resources\application.properties
server.port=7001
spring.velocity.cache=false
spring.velocity.charset=UTF-8
spring.velocity.layout-url=/templates/default.vm
spring.messages.fallback-to-system-locale=false
spring.messages.basename=i18n/message
spring.root.password=root
spring.guest.password=guest

dubbo.registry.address=zookeeper://127.0.0.1:2181
3、在项目目录下打包dubbo-admin
mvn clean package -Dmaven.test.skip=true
4、执行jar
注意:zookeeper的服务一定要先打开!
找到.\dubbo-admin\target目录执行jar
java -jar dubbo-admin-0.0.1-SNAPSHOT.jar
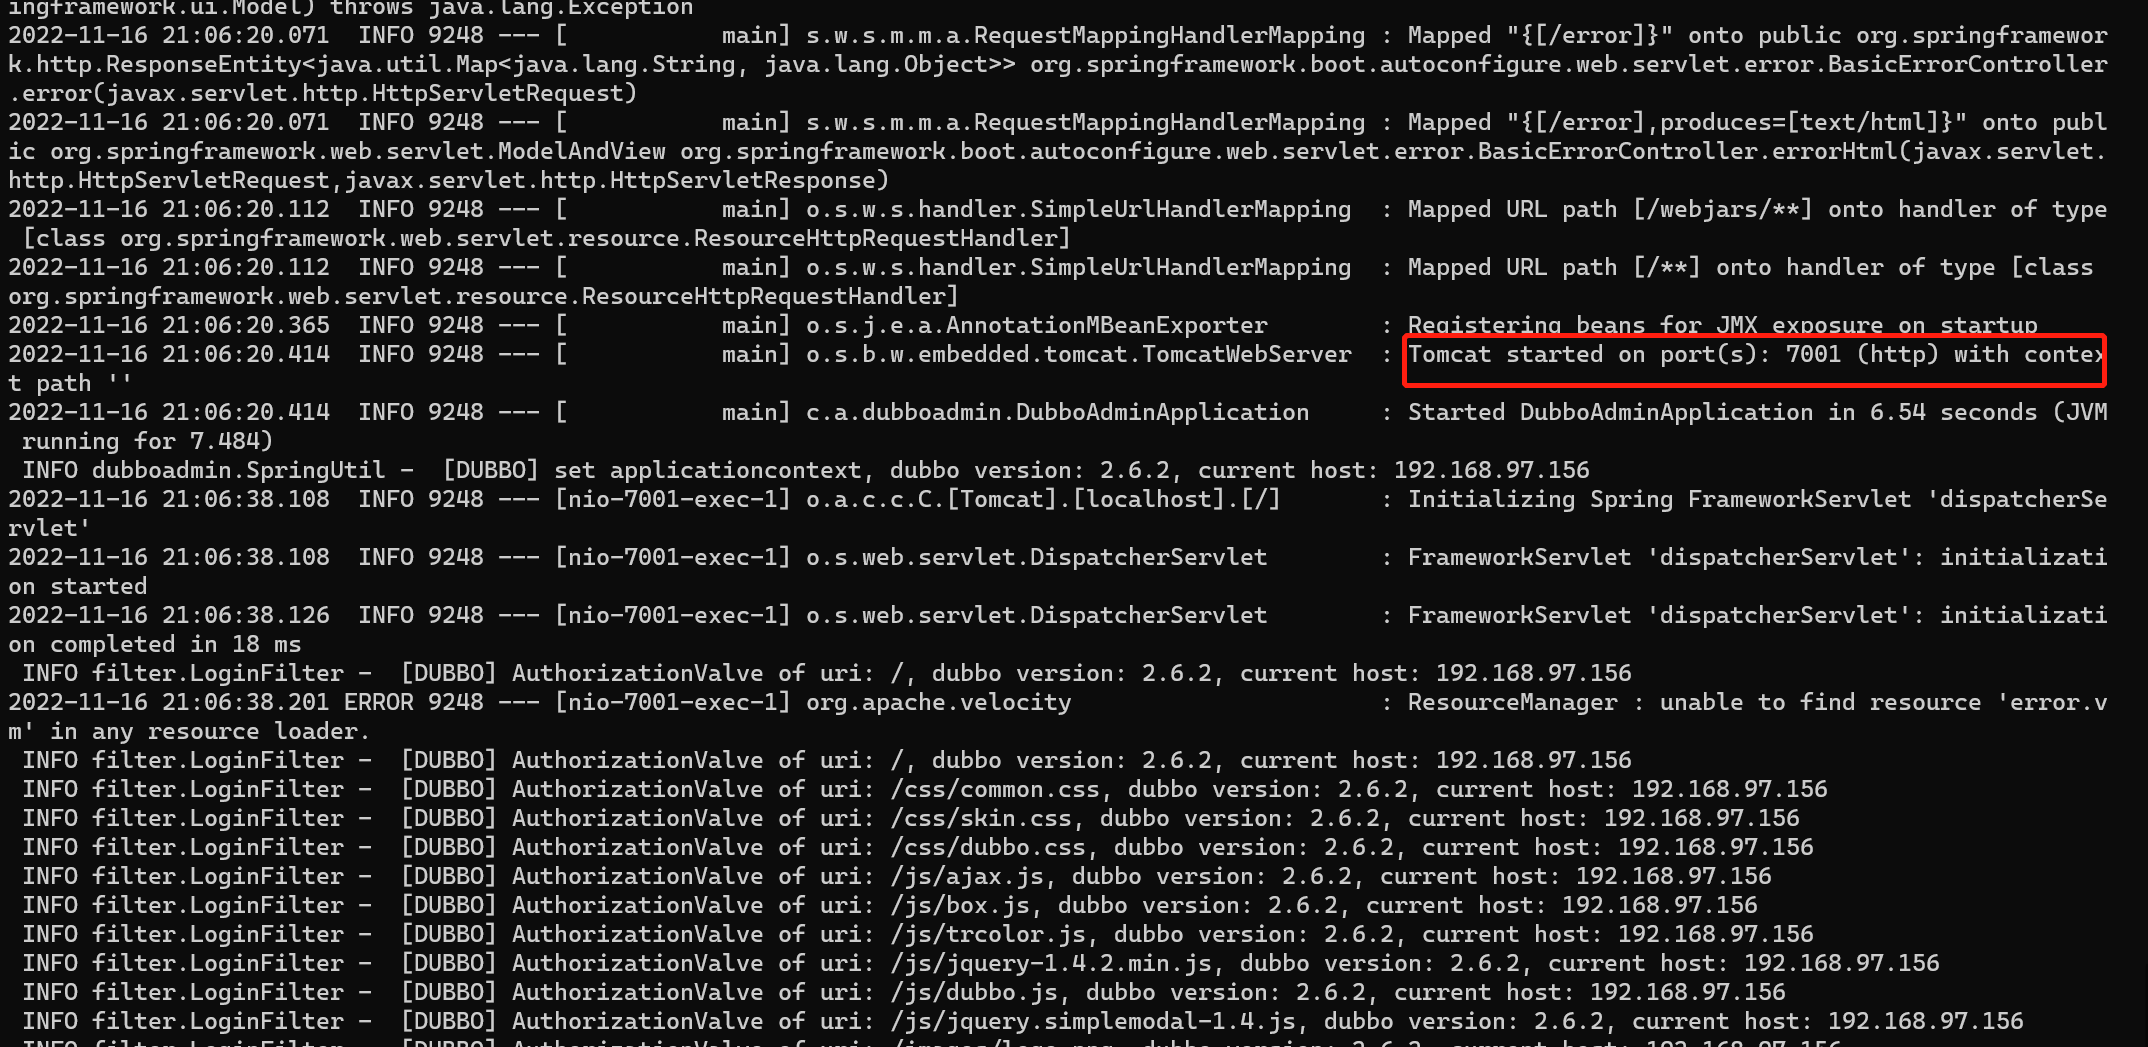
5、启动服务
用户名和密码都是root

24.4、springboot+dubbo+zookeeper
框架搭建
1、idea创建一个空项目springboot-11-dubbo
2、创建一个模块provider-server(服务提供者),选择web依赖即可
3、再创建一个模块consumer-server(服务消费者),选择web依赖即可
如下

4、在provider-server编写一个服务,比如买票的的服务
接口
public interface TicketService {
    String getTicket();
}
实现类
public class TicketServiceImpl implements TicketService {
    @Override
    public String getTicket() {
        return "狂神说java";
    }
}
5、在consumer-server编写一个服务,比如用户的服务
接口
public interface UserService {
    void bugTicket();
}
实现类
public class UserServiceImpl implements UserService {
    //我们需要去拿注册中心的服务
}
需求:现在我们的用户想要使用买票服务,怎么办?
服务提供者
1、将服务提供者注册到注册中心,我们需要整合Dubbo和zookeeper,所以需要导包
        <!-- Dubbo Spring Boot Starter -->
        <dependency>
            <groupId>org.apache.dubbo</groupId>
            <artifactId>dubbo-spring-boot-starter</artifactId>
            <version>2.7.3</version>
        </dependency>
zookeeper的包我们去maven仓库下载,zkclient;
        <!-- https://mvnrepository.com/artifact/com.github.sgroschupf/zkclient -->
        <dependency>
            <groupId>com.github.sgroschupf</groupId>
            <artifactId>zkclient</artifactId>
            <version>0.1</version>
        </dependency>
【新版的坑】zookeeper及其依赖包,解决日志冲突,还需要剔除日志依赖;
        <!-- 引入zookeeper -->
        <dependency>
            <groupId>org.apache.curator</groupId>
            <artifactId>curator-framework</artifactId>
            <version>2.12.0</version>
        </dependency>
        <dependency>
            <groupId>org.apache.curator</groupId>
            <artifactId>curator-recipes</artifactId>
            <version>2.12.0</version>
        </dependency>
        <dependency>
            <groupId>org.apache.zookeeper</groupId>
            <artifactId>zookeeper</artifactId>
            <version>3.4.14</version>
            <!--排除这个slf4j-log4j12-->
            <exclusions>
                <exclusion>
                    <groupId>org.slf4j</groupId>
                    <artifactId>slf4j-log4j12</artifactId>
                </exclusion>
            </exclusions>
        </dependency>
2、配置dubbo
# 应用服务 WEB 访问端口
server.port=8081
# 当前应用名字
dubbo.application.name=provider-server
# 注册中心地址
dubbo.registry.address=zookeeper://127.0.0.1:2181
# 扫描指定包下服务
dubbo.scan.base-packages=com.zyy.service
3、在service的实现类中配置服务注解,发布服务
import com.zyy.service.TicketService;
import org.apache.dubbo.config.annotation.Service;
import org.springframework.stereotype.Component;

//注意这里的@Service是dubbo的注解!为了将服务发布出去
@Service
@Component
public class TicketServiceImpl implements TicketService {
    @Override
    public String getTicket() {
        return "狂神说java";
    }
}
逻辑理解 :应用启动起来,dubbo就会扫描指定的包下带有@component注解的服务,将它发布在指定的注册中心中!
服务消费者
1、上面一样,导包
        <!-- Dubbo Spring Boot Starter -->
        <dependency>
            <groupId>org.apache.dubbo</groupId>
            <artifactId>dubbo-spring-boot-starter</artifactId>
            <version>2.7.3</version>
        </dependency>

        <!-- https://mvnrepository.com/artifact/com.github.sgroschupf/zkclient -->
        <dependency>
            <groupId>com.github.sgroschupf</groupId>
            <artifactId>zkclient</artifactId>
            <version>0.1</version>
        </dependency>

        <!-- 引入zookeeper -->
        <dependency>
            <groupId>org.apache.curator</groupId>
            <artifactId>curator-framework</artifactId>
            <version>2.12.0</version>
        </dependency>
        <dependency>
            <groupId>org.apache.curator</groupId>
            <artifactId>curator-recipes</artifactId>
            <version>2.12.0</version>
        </dependency>
        <dependency>
            <groupId>org.apache.zookeeper</groupId>
            <artifactId>zookeeper</artifactId>
            <version>3.4.14</version>
            <!--排除这个slf4j-log4j12-->
            <exclusions>
                <exclusion>
                    <groupId>org.slf4j</groupId>
                    <artifactId>slf4j-log4j12</artifactId>
                </exclusion>
            </exclusions>
        </dependency>
2、配置dubbo
# 应用服务 WEB 访问端口
server.port=8082
# 当前应用名字
dubbo.application.name=consumer-server
# 注册中心地址
dubbo.registry.address=zookeeper://127.0.0.1:2181
3. 本来正常步骤是需要将服务提供者的接口打包,然后用pom文件导入,我们这里使用简单的方式,直接将服务的接口拿过来,路径必须保证正确,即和服务提供者相同;

4、完善消费者的服务类
import com.zyy.service.TicketService;
import com.zyy.service.UserService;
import org.apache.dubbo.config.annotation.Reference;
import org.springframework.stereotype.Service;

@Service
public class UserServiceImpl implements UserService {

    /**
     * 远程引用指定的服务,他会按照全类名进行匹配,看谁给注册中心注册了这个全类名
     */
    @Reference
    TicketService ticketService;

    @Override
    public void bugTicket() {
        System.out.println(ticketService.getTicket());
    }
}
5、测试类编写
import com.zyy.service.UserService;
import org.junit.jupiter.api.Test;
import org.springframework.beans.factory.annotation.Autowired;
import org.springframework.boot.test.context.SpringBootTest;

@SpringBootTest
class ConsumerServerApplicationTests {

    @Autowired
    UserService userService;

    @Test
    void contextLoads() {
        userService.bugTicket();
    }

}
启动测试
-
启动zookeeper
-
启动provider-server的服务
-
跑一下consumer-server的测试类
-
打开dubbo-admin看一下


 8万+
8万+

 被折叠的 条评论
为什么被折叠?
被折叠的 条评论
为什么被折叠?
 到【灌水乐园】发言


