


SpringBoot中引入WebSocket
1、引入依赖
<dependency>
    <groupId>org.springframework.boot</groupId>
    <artifactId>spring-boot-starter-web</artifactId>
</dependency>
<dependency>
    <groupId>org.springframework.boot</groupId>
    <artifactId>spring-boot-starter-websocket</artifactId>
</dependency>
2、创建自己的处理类
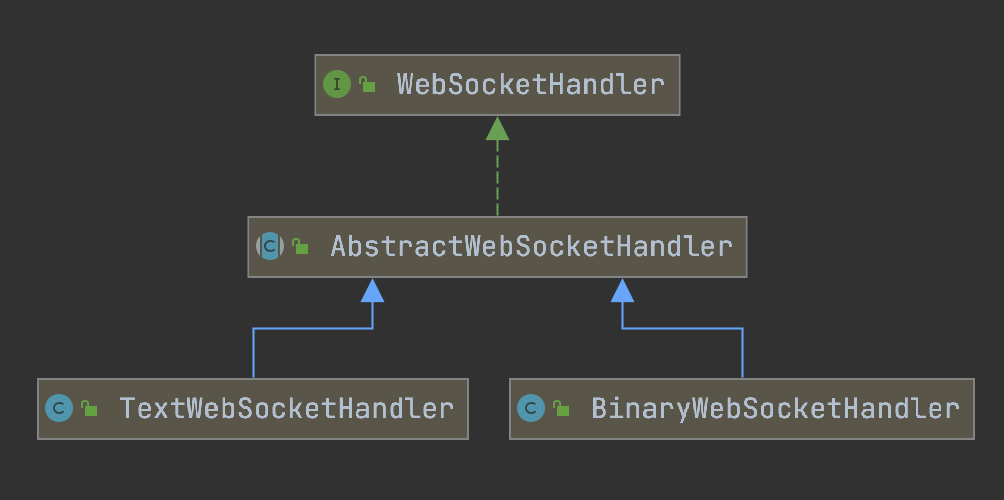
该类可以实现org.springframework.web.socket.WebSocketHandler,也可以继承org.springframework.web.socket.handler.TextWebSocketHandler或org.springframework.web.socket.handler.BinaryWebSocketHandler
它们的继承关系如下图所示:
WebSocketHandler
public interface WebSocketHandler {
    // 建立连接之后调用
    void afterConnectionEstablished(WebSocketSession var1) throws Exception;
	// 当新的WebSocket消息到达时调用
    void handleMessage(WebSocketSession var1, WebSocketMessage<?> var2) throws Exception;
	// 处理消息传输异常
    void handleTransportError(WebSocketSession var1, Throwable var2) throws Exception;
	// 在WebSocket连接被任意一方关闭后,或者发生传输错误之后调用
    void afterConnectionClosed(WebSocketSession var1, CloseStatus var2) throws Exception;
	/*
	 * WebSocket 是否支持处理部分消息,
	 * 若此标志设置为true,并且底层WebSocket服务器支持部分消息,
	 * 则大的 WebSocket 消息或未知大小的消息可能会被拆分并可能通过对handleMessage(WebSocketSession, WebSocketMessage)多次调用接收。
     * 标志WebSocketMessage.isLast()指示消息是否部分以及它是否是最后一部分
     */
    boolean supportsPartialMessages();
}
AbstractWebSocketHandler
public abstract class AbstractWebSocketHandler implements WebSocketHandler {

	@Override
	public void afterConnectionEstablished(WebSocketSession session) throws Exception {
	}

	@Override
	public void handleMessage(WebSocketSession session, WebSocketMessage<?> message) throws Exception {
		if (message instanceof TextMessage) {
			handleTextMessage(session, (TextMessage) message);
		}
		else if (message instanceof BinaryMessage) {
			handleBinaryMessage(session, (BinaryMessage) message);
		}
		else if (message instanceof PongMessage) {
			handlePongMessage(session, (PongMessage) message);
		}
		else {
			throw new IllegalStateException("Unexpected WebSocket message type: " + message);
		}
	}

	protected void handleTextMessage(WebSocketSession session, TextMessage message) throws Exception {
	}

	protected void handleBinaryMessage(WebSocketSession session, BinaryMessage message) throws Exception {
	}

	protected void handlePongMessage(WebSocketSession session, PongMessage message) throws Exception {
	}

	@Override
	public void handleTransportError(WebSocketSession session, Throwable exception) throws Exception {
	}

	@Override
	public void afterConnectionClosed(WebSocketSession session, CloseStatus status) throws Exception {
	}

	@Override
	public boolean supportsPartialMessages() {
		return false;
	}

}
可以看到除了handleMessage,其它方法都空方法,这些方法需我们在具体的业务中去实现。
该类还定义了三个方法: handleTextMessage,handleBinaryMessage,handlePongMessage,分别用来处理TextMessage,BinaryMessage和PongMessage,下图是WebSocketMessage的类图:
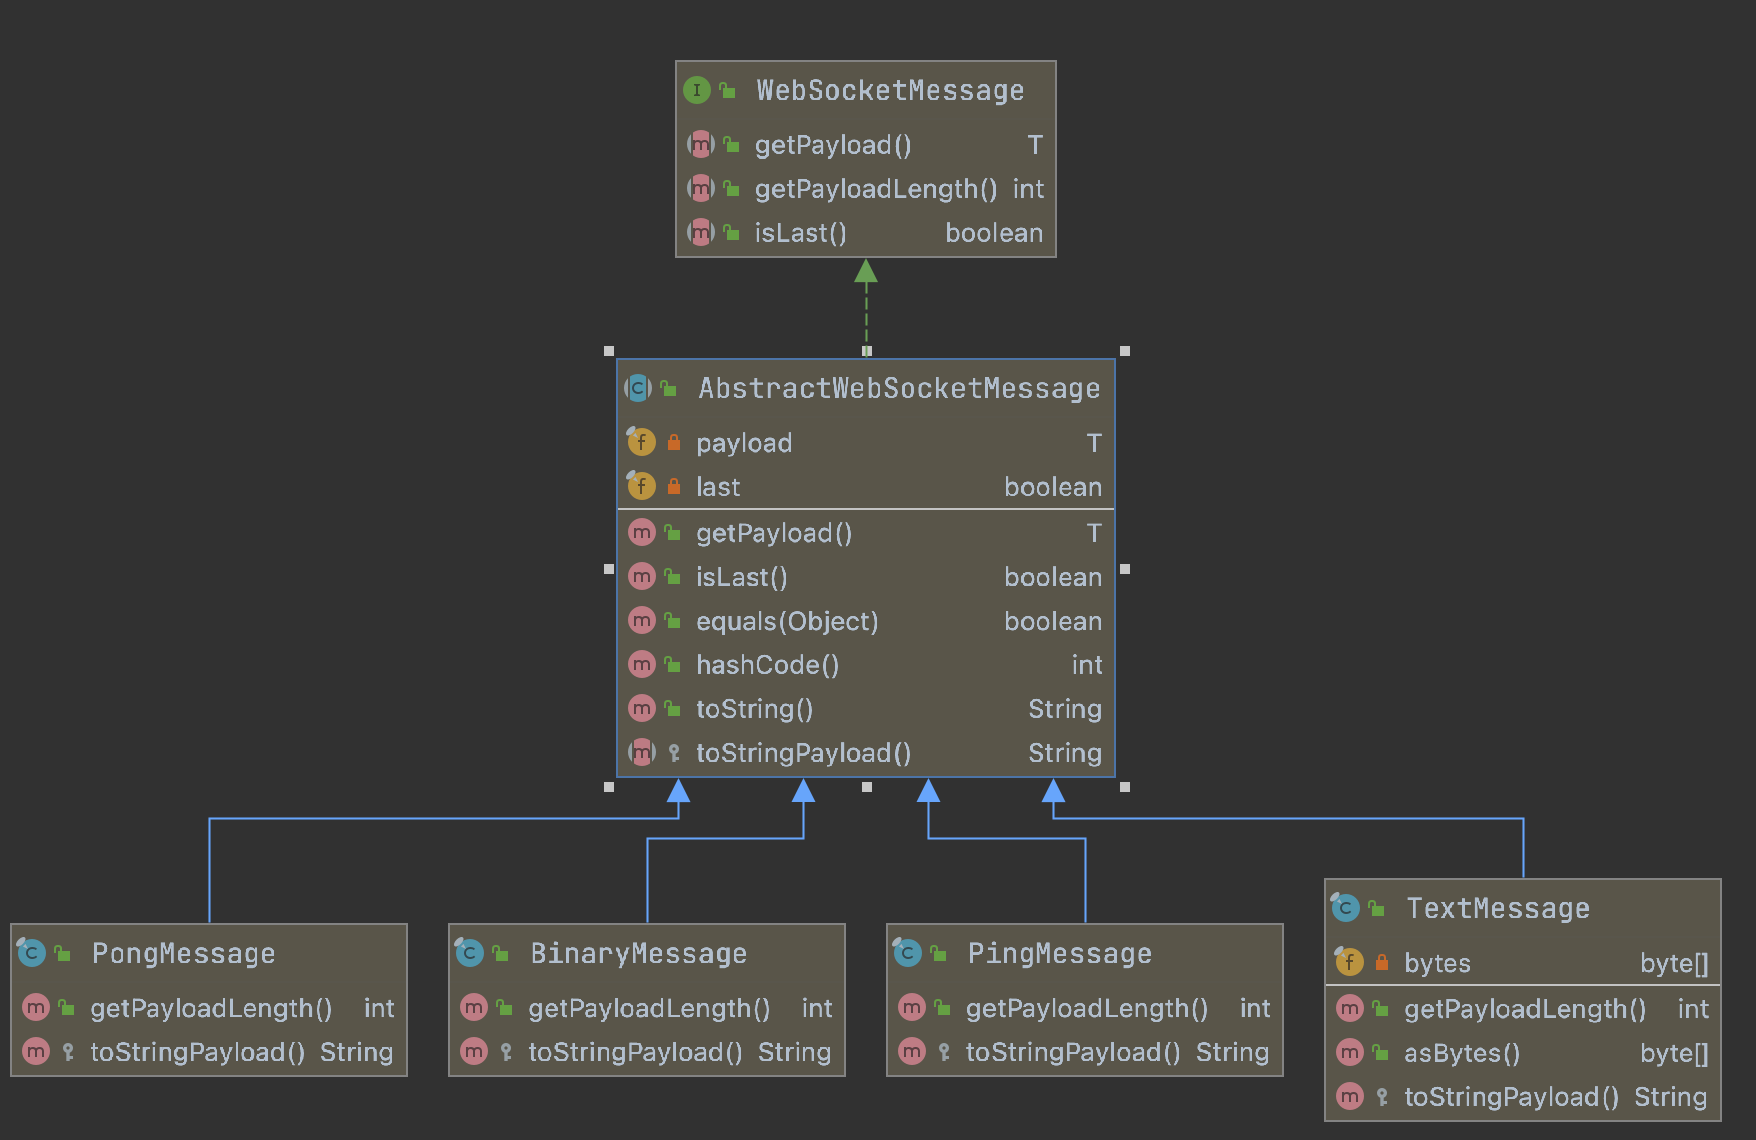
TextMessage的范型参数是String,BinaryMessage和PonMessage的范型参数都是ByteBuffer。
TextWebSocketHandler
public class TextWebSocketHandler extends AbstractWebSocketHandler {

	@Override
	protected void handleBinaryMessage(WebSocketSession session, BinaryMessage message) {
		try {
			session.close(CloseStatus.NOT_ACCEPTABLE.withReason("Binary messages not supported"));
		}
		catch (IOException ex) {
			// ignore
		}
	}

}
可以看到,该处理类重写了handlerBinaryMessage方法,如果是使用该处理类,那么就只能处理字符信息,若是接收的是字节信息,将会关闭该连接。
BinaryWebSocketHandler
public class BinaryWebSocketHandler extends AbstractWebSocketHandler {

	@Override
	protected void handleTextMessage(WebSocketSession session, TextMessage message) {
		try {
			session.close(CloseStatus.NOT_ACCEPTABLE.withReason("Text messages not supported"));
		}
		catch (IOException ex) {
			// ignore
		}
	}

}
与TextWebSocketHandler类同理,该处理类只能处理字节信息,若是接收到了字符信息,将会断开该连接。
根据业务的不同,若是只涉及到文本信息,那么我们可以继承TextWebSocketHandler;若是只需要传递二进制信息,那么可以继承BinaryWebSocketHandler;如果两种信息都有的话,可以继承AbstractWebSocketHandler或实现WebSocketHandler接口。
下面以继承TextWebSocketHandler为例:
public class MyHandler extends TextWebSocketHandler {
    private List<WebSocketSession> sessions = new ArrayList<>();
    @Override
    protected void handleTextMessage(WebSocketSession session, TextMessage message) throws Exception {
        /**
         * 广播消息
         */
        sessions.forEach(s -> {
                if (!s.equals(session)){
                    try {
                        s.sendMessage(message);
                    } catch (IOException e) {
                        e.printStackTrace();
                    }
                }
        });
    }

    @Override
    public void afterConnectionEstablished(WebSocketSession session) throws Exception {
        /**
         * 保存会话
         */
        sessions.add(session);
    }

    @Override
    public void afterConnectionClosed(WebSocketSession session, CloseStatus status) throws Exception {
        /**
         *	删除会话
         */
        sessions.remove(session);
    }
}
我们需要实现上面的3个方法,分别在建立连接时保存会话,收到消息时,将消息广播,然后再断开连接时删除相应的会话。
3、配置
@Configuration
@EnableWebSocket
public class WebsocketConfig implements WebSocketConfigurer {

    @Override
    public void registerWebSocketHandlers(WebSocketHandlerRegistry webSocketHandlerRegistry) {
        webSocketHandlerRegistry.addHandler(myWebsocketHandler(),"myWS");
    }

    public WebSocketHandler myWebsocketHandler(){
        return new MyHandler();
    }
}
-
使用
@EnableWebSocket注解 -
实现
WebSocketConfigurer该接口只定义了一个接口:
/**
 * Defines callback methods to configure the WebSocket request handling
 * via {@link org.springframework.web.socket.config.annotation.EnableWebSocket @EnableWebSocket}.
 *
 * @author Rossen Stoyanchev
 * @since 4.0
 */
public interface WebSocketConfigurer {

	/**
	 * Register {@link WebSocketHandler WebSocketHandlers} including SockJS fallback options if desired.
	 */
	void registerWebSocketHandlers(WebSocketHandlerRegistry registry);

}
正如注释所说,通过
@EnableWebSocket,定义一个回调方法来配置WebSocket的请求处理类。在demo中,我们注册了一个自定义处理类,来处理来自/myWS的WebSocket消息。
至此,我们就可以使用Websocket进行消息广播了。
4、点对点通信
如果我们想要做到点对点的通信,那么我们需要将会话与客户端的关联关系保存下来。
我们可以通过以下方式获取在建立WebSocket连接的时候获取当前会话的登陆信息:
@Override
public void afterConnectionEstablished(WebSocketSession session) throws Exception {
    Principal user = session.getPrincipal(); // 获取
    log.info("User {} has connected",user.getName());
    sessions.add(session);
}
用户信息都能获取到了,那点对点通信自然就不再话下了。
为什么WebSocketSession中会有用户信息呢?
我们在afterConnectionEstablished方法中打个断点,栈帧如图所示:
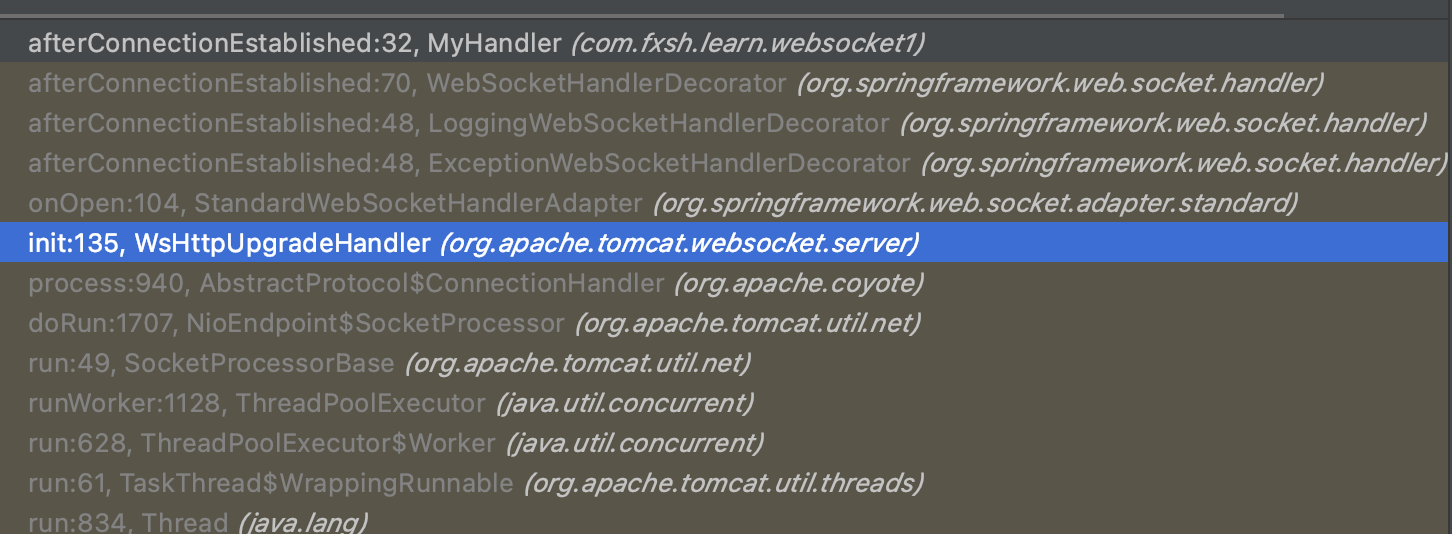
我在WsHttpUpgradeHandler.init中发现了下面这行代码:
try {
    this.wsRemoteEndpointServer = new WsRemoteEndpointImplServer(this.socketWrapper, this.upgradeInfo, this.webSocketContainer);
    //实例化WsSession
    this.wsSession = new WsSession(this.ep, this.wsRemoteEndpointServer, this.webSocketContainer, this.handshakeRequest.getRequestURI(), this.handshakeRequest.getParameterMap(), this.handshakeRequest.getQueryString(), this.handshakeRequest.getUserPrincipal(), httpSessionId, this.negotiatedExtensions, this.subProtocol, this.pathParameters, this.secure, this.serverEndpointConfig);
    this.wsFrame = new WsFrameServer(this.socketWrapper, this.upgradeInfo, this.wsSession, this.transformation, this.applicationClassLoader);
    this.wsRemoteEndpointServer.setTransformation(this.wsFrame.getTransformation());
    // 调用handler中的afterConnectionEstablished方法,
    this.ep.onOpen(this.wsSession, this.serverEndpointConfig);
    this.webSocketContainer.registerSession(this.serverEndpointConfig.getPath(), this.wsSession);
} catch (DeploymentException var10) {
    throw new IllegalArgumentException(var10);
} finally {
    t.setContextClassLoader(cl);
}
上面第8行onOpen方法最终会调用afterConnectionEstablished方法,而onOpen方法的第一行为:
public void onOpen(final javax.websocket.Session session, EndpointConfig config) {
    /**
     * 要注意区分这里的wsSession 和 init方法中的wsSession 是不同的对象
     * init方法中的wsSession === session
     * this.wsSession是StandardWebSocketSession的实例对象
     **/
    this.wsSession.initializeNativeSession(session);
    ...
    this.handler.afterConnectionEstablished(this.wsSession);
}
public void initializeNativeSession(Session session) {
    ...
    if (this.user == null) {
        this.user = session.getUserPrincipal();
    }
}
可以看到,handler中Principal user = session.getPrincipal();返回的user就是WsHttpUpgradeHandler.init中实例化的WsSession中的user。
我们再返回到上面WsHttpUpgradeHandler.init方法中的第4行,实例化WsSession时,向构造函数传了this.handshakeRequest.getUserPrincipal(),这就是用户登陆信息。
handshakeRequest是在preInit方法中赋值的
public void preInit(Endpoint ep, ServerEndpointConfig serverEndpointConfig, WsServerContainer wsc, WsHandshakeRequest handshakeRequest, List<Extension> negotiatedExtensionsPhase2, String subProtocol, Transformation transformation, Map<String, String> pathParameters, boolean secure) {
    this.ep = ep;
    this.serverEndpointConfig = serverEndpointConfig;
    this.webSocketContainer = wsc;
    // 得看看handshakeRequest中的Pringcipal那儿来的
    this.handshakeRequest = handshakeRequest;
    this.negotiatedExtensions = negotiatedExtensionsPhase2;
    this.subProtocol = subProtocol;
    this.transformation = transformation;
    this.pathParameters = pathParameters;
    this.secure = secure;
}
那我们在preInit方法中打个断点再康康:
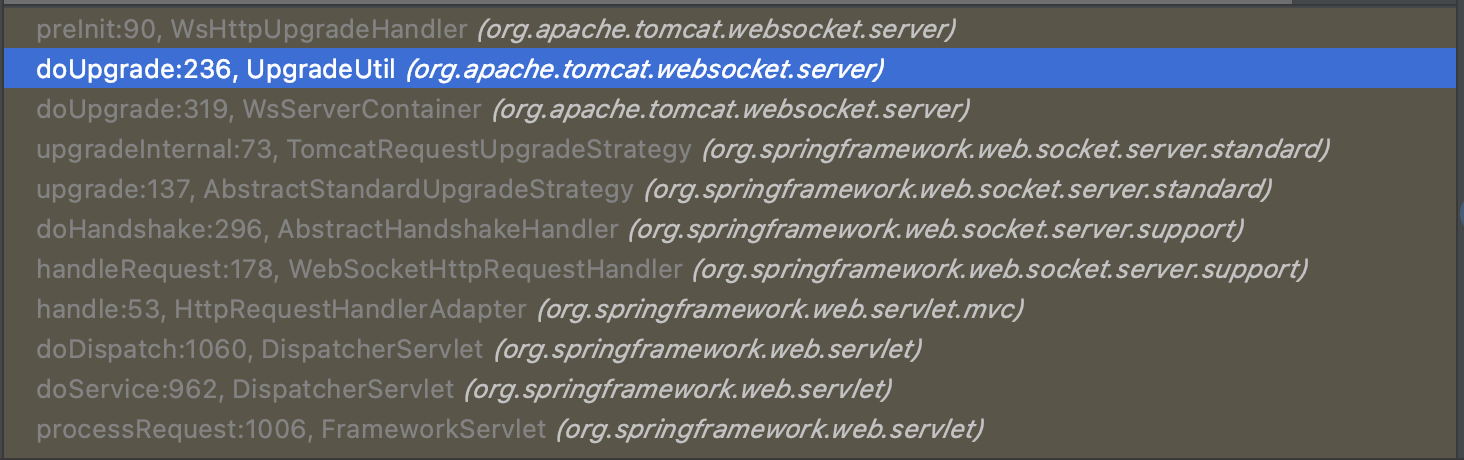
UpgradeUtil.doUpgrade:
// HttpServletRequest req
WsHandshakeRequest wsRequest = new WsHandshakeRequest(req, pathParams);
......
wsHandler.preInit((Endpoint)ep, perSessionServerEndpointConfig, sc, wsRequest, (List)negotiatedExtensionsPhase2, subProtocol, transformation, pathParams, req.isSecure());
public WsHandshakeRequest(HttpServletRequest request, Map<String, String> pathParams) {
    this.request = request;
    this.queryString = request.getQueryString();
    this.userPrincipal = request.getUserPrincipal(); // 破案了
    this.httpSession = request.getSession(false);
    this.requestUri = buildRequestUri(request);
    ......
}
至于为什么HttpServletRequest中有用户信息,那又是另一个故事了。
SpringBoot + STOMP
STOMP协议介绍
-
STOMP协议是一个简单的基于文本的通信协议,用于客户端之间通过消息中间件传递信息。
-
虽然STOMP协议是基于文本的协议,但它仍然可以用来传递二进制消息。
-
STOMP是一个基于帧的协议,该协议依赖一个可靠的双向流网络协议,如TCP,WebSocket等。客户端与服务端在网络流中传递STOMP帧,以达到通信的效果。
-
下面是一个场景的STOMP帧
-
SEND
destination:/queue/a
content-type:text/plain

hello queue a
^@
第一行:命令,命令一共有以下10种:
- CONNECT:客户端向服务端发送该命令来与客户端建立连接
- SEND:客户端向目的地(Destination) 发送消息
- SUBSCRIBE:客户端订阅某个目的地
- UNSUBSCRIBE:客户端取消订阅某个目的地
- BEGIN:用于开始一次通信
- COMMIT:用于提交一次通信
- ABORT:回滚通信
- ACK:消息同步,用户向目的地报告收到某个消息
- NACK:与
ACK相反 - DISCONNECT:客户端关闭与客户端的连接
- 优雅断开连接的方式:客户端向服务器发送DISCONNECT命令,并带有
receipt-id头信息,如果服务端已经收到了客户端发送的最后一条消息,那么将返回一个RECEIPT帧,然后客户端再断开连接
- 优雅断开连接的方式:客户端向服务器发送DISCONNECT命令,并带有
第二行至倒数第三行:头信息,键值对
倒数第二行:空行,用于将头信息和消息体隔开
最后是消息体,可以是文本也可能是二进制blob
这里只是简单的介绍,详细的介绍可以看官方文档,以后我可能会专门写一篇文章来介绍STOMP协议 🤔
-
Spring 引入STOMP
1、引入依赖
<dependency>
    <groupId>org.springframework.boot</groupId>
    <artifactId>spring-boot-starter-websocket</artifactId>
</dependency>
<dependency>
    <groupId>org.springframework.boot</groupId>
    <artifactId>spring-boot-starter-web</artifactId>
</dependency>
2、配置
@Configuration
@EnableWebSocketMessageBroker
public class WebSocketConfig implements WebSocketMessageBrokerConfigurer {
    @Override
    public void configureMessageBroker(MessageBrokerRegistry config) {
        // 设置消息代理的前缀,如果消息的前缀为"/topic",就会将消息转发给消息代理(broker)
        // 再由消息代理广播给当前连接的客户端
        config.enableSimpleBroker("/topic");
        // 下面方法可以配置一个或多个前缀,通过这些前缀过滤出需要被注解方法处理的消息。
        // 例如这里表示前缀为"/app"的destination可以通过@MessageMapping注解的方法处理
        // 而其他 destination(例如"/topic""/queue")将被直接交给 broker 处理
        config.setApplicationDestinationPrefixes("/app");
    }

    @Override
    public void registerStompEndpoints(StompEndpointRegistry registry) {
        // 定义一个HTTP URL,供Websocket或SockJS客户端连接
        // sockjs 可以解决浏览器对WebSocket的兼容性问题,客户端将通过这里配置的URL建立WebSocket连接
        registry.addEndpoint("/stomp-ws").withSockJS();
    }
}
- 使用
EnableWebSocketMessageBroker注解 - 实现
WebSocketMessageBrokerConfigurer,重写configuerMessageBroker和registerStompEndpoints方法
3、实现MessageMapping
@Controller
public class GreetingController {
    @MessageMapping("/greetings") // 向/app/gretings 发送的消息都会通过该方法处理
    @SendTo("/topic/greetings") // 方法的返回值会被发送给订阅了 /topic/greetings的客户端
    public Greeting greeting(HelloMessage message) throws Exception{
        Thread.sleep(1000);
        return new Greeting("Hello " + HtmlUtils.htmlEscape(message.getName()) + "!");
    }
}
4、前端
<script src="https://cdn.jsdelivr.net/npm/@stomp/stompjs@5.0.0/bundles/stomp.umd.js"></script>
<script>
stompClient = new StompJs.Client({
    brokerURL: 'ws://localhost:8080/stomp-ws'
});
/**
 * 建立连接之后的回调
 */
stompClient.onConnect = function (){
    // 订阅一个destination
    stompClient.subscribe('/topic/greetings',message =>{
        showGreeting(JSON.stringify(message.body));
    })
}
// 建立连接
stompClient.activate();
</script>
点对点通信
上面只是实现了消息的广播,如果我们想要向某个特定的用户发送消息呢?
向某个用户发送消息也有两种情况:
- 向本用户发送消息
- 向其他用户发送消息
向本用户发送消息
我们以获取当前时间为例,我们只需要做以下的修改:
1、新增一个消息代理:
@Override
public void configureMessageBroker(MessageBrokerRegistry config) {
    // 新增 point 消息代理
    config.enableSimpleBroker("/topic", "/point");
    config.setApplicationDestinationPrefixes("/app");
}
2、新增一个MessageMapper
@MessageMapping("/getTime")
@SendToUser("/point/whatNow")
public String getTime(){
    return "Now is " + LocalDateTime.now.format(DateTimeFormatter.ISO_LOCAL_DATE_TIME);
}
3、客户端订阅新增订阅 /user/point/whatNow
stompClient.onConnect = function (){
    // 订阅一个destination
    stompClient.subscribe('/user/point/whatNow',message =>{
        showGreeting(JSON.stringify(message.body));
    })
}
4、发送消息,获取当前时间
stompClient.publish({
    destination:'/app/getTime',
    body: null,
    skipContentLengthHeader: true,
})
在第3步中,我们订阅了一个以user开头的Destination,Spring会将这类destination认定为向制定客户端发送消息。如上面的例子,我们订阅了/user/point/whatNow,这个destination会交由UserDestinationMessageHandler来处理
订阅时对destination的处理结果:
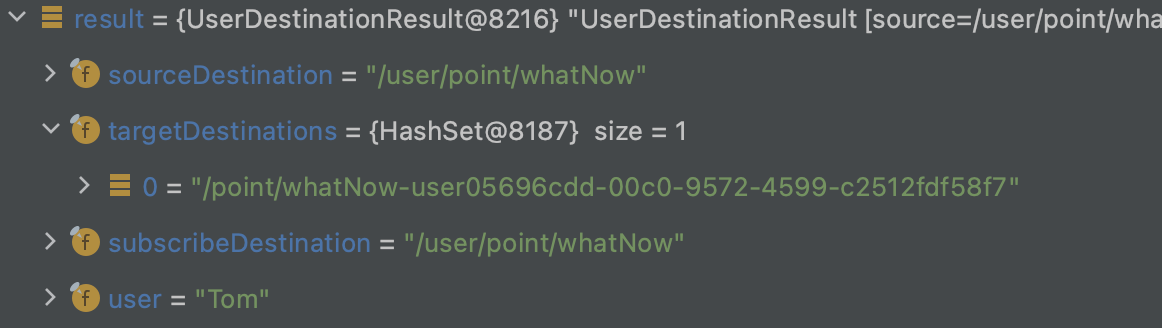
我们看到targetDestinations被解析为/point/whatNow-user{sessionId},所以客户端订阅的/user/point/whatNow经过UserDestinationMessageHandler的处理,最终订阅的destination是:/point/whatNow-user{sessionId};这样虽然表面上每个用户都订阅了相同的destination,但实际上每个客户端都有自己的destination,这样就可以向指定用户发送消息了。
返回消息时对destination的处理结果:
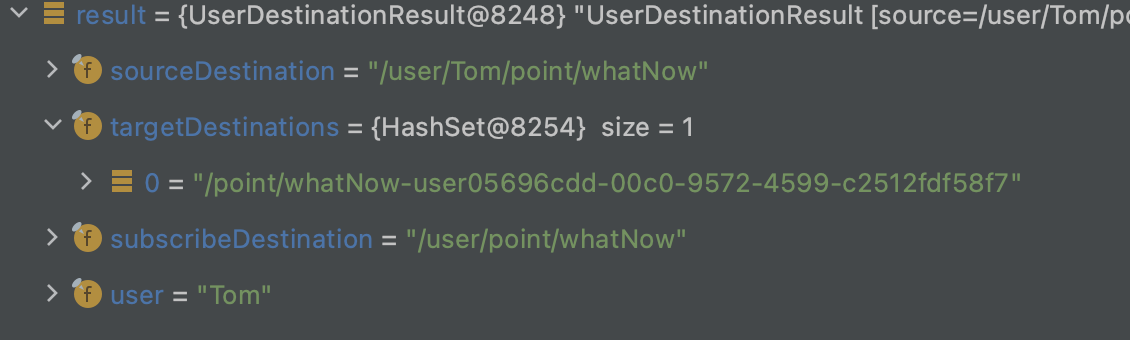
这里没有仔细研究,我猜测:我们使用@SendToUser("/point/whatNow")注解,在控制层的destination会变为:/user/{userName}/point/whatNow,然后通过UserDestinationMessageHandler的处理,找到真正的destination:/point/whatNow-user{sessionId}。
向他人发送消息
向他人发送消息,我们需要使用Spring提供的SimpMessagingTemplate
例如我们要向Jack发送当前时间,我们可以这样做:
@Autowired
private  SimpMessagingTemplate messagingTemplate;

public void sendTime(){
    String now = "Now is " + LocalDateTime.now.format(DateTimeFormatter.ISO_LOCAL_DATE_TIME);
    messagingTemplate.convertAndSendToUser("Jack", "/point/whatNow",now);
}
当然,成功的前提是Jack客户端订阅了/user/point/whatNow


 1253
1253


 被折叠的 条评论
为什么被折叠?
被折叠的 条评论
为什么被折叠?
 到【灌水乐园】发言


