jenkins在开发中处于的位置

准备工作
安装 Jenkins
1.Jenkins需要放在服务器上,跟测试项目在同一个地方
2.服务器需要提前部署jdk环境,然后官网下载 Jenkins的安装war包,之后直接 Java -jar jenkins.war 进行启动,也可以手动指定端口号
tips: 安装好jdk,还需要再运行命令,下载完整的jdk环境 : yum install -y java-devel
启动命令:
java -jar jenkins.war -httpPort=8010
启动效果

框出来的是文件存在地址,隐藏文件夹
进入文件夹:
[root@master .jenkins]# cd /root/.jenkins/  ## 按照图片地址,查看存储的文件
[root@master .jenkins]# ll
总用量 28
-rw-r--r--.  1 root root 1660 11月 15 20:38 config.xml
-rw-r--r--.  1 root root  156 11月 15 20:38 hudson.model.UpdateCenter.xml
-rw-------.  1 root root 1712 11月 15 20:38 identity.key.enc
-rw-r--r--.  1 root root  171 11月 15 20:38 jenkins.telemetry.Correlator.xml
drwxr-xr-x.  2 root root    6 11月 15 20:38 jobs
-rw-r--r--.  1 root root  907 11月 15 20:38 nodeMonitors.xml
drwxr-xr-x.  2 root root    6 11月 15 20:38 nodes
drwxr-xr-x.  2 root root    6 11月 15 20:38 plugins
-rw-r--r--.  1 root root   64 11月 15 20:38 secret.key
-rw-r--r--.  1 root root    0 11月 15 20:38 secret.key.not-so-secret
drwx------.  2 root root  164 11月 15 20:38 secrets
drwxr-xr-x.  2 root root   67 11月 15 20:38 updates
drwxr-xr-x.  2 root root   24 11月 15 20:38 userContent
drwxr-xr-x.  3 root root   56 11月 15 20:38 users
drwxr-xr-x. 11 root root 4096 11月 15 20:34 war
[root@master .jenkins]#
访问 Jenkins
启动的端口不管是什么,页面访问的路径都是 8080
访问后,页面:

密码在启动时已经打印出来:

将上面的密码填入即可:
页面初始化界面:

Jenkins相当于平台,需要搭配众多插件才可以方便使用,这里先选择推荐的插件进行安装即可;

等待安装。。。。
安装完成后,会跳转注册用户
注册账号:

使用 chenchong chenchong123
管理页面:

这里,jenkins 客户端算是安装完成,接下来先不引入项目,而是搭建项目拉取、打包、运行需要的一些环境基础配置支持;
因为自动化部署需要从gitee上拉取下来,并进行打包运行;因此需要安装git+maven,来进行拉取代码+打包的支持;
安装 git
服务器上的 jenkins 需要把代码拉取下来,因此还需要安装git;
安装命令
yum install git
检查安装成功
[root@192 jenkins]# git
用法:git [--version] [--help] [-C <path>] [-c <name>=<value>]
           [--exec-path[=<path>]] [--html-path] [--man-path] [--info-path]
           [-p | --paginate | -P | --no-pager] [--no-replace-objects] [--bare]
           [--git-dir=<path>] [--work-tree=<path>] [--namespace=<name>]
           [--super-prefix=<path>] [--config-env=<name>=<envvar>]
           <command> [<args>]

这些是各种场合常见的 Git 命令:

开始一个工作区(参见:git help tutorial)
   clone             克隆仓库到一个新目录
   init              创建一个空的 Git 仓库或重新初始化一个已存在的仓库

在当前变更上工作(参见:git help everyday)
   add               添加文件内容至索引
   mv                移动或重命名一个文件、目录或符号链接
   restore           恢复工作区文件
   rm                从工作区和索引中删除文件
   sparse-checkout   初始化及修改稀疏检出

检查历史和状态(参见:git help revisions)
   bisect            通过二分查找定位引入 bug 的提交
   diff              显示提交之间、提交和工作区之间等的差异
   grep              输出和模式匹配的行
   log               显示提交日志
   show              显示各种类型的对象
   status            显示工作区状态

扩展、标记和调校您的历史记录
   branch            列出、创建或删除分支
   commit            记录变更到仓库
   merge             合并两个或更多开发历史
   rebase            在另一个分支上重新应用提交
   reset             重置当前 HEAD 到指定状态
   switch            切换分支
   tag               创建、列出、删除或校验一个 GPG 签名的标签对象

协同(参见:git help workflows)
   fetch             从另外一个仓库下载对象和引用
   pull              获取并整合另外的仓库或一个本地分支
   push              更新远程引用和相关的对象

命令 'git help -a' 和 'git help -g' 显示可用的子命令和一些概念帮助。
查看 'git help <命令>' 或 'git help <概念>' 以获取给定子命令或概念的
帮助。
有关系统的概述,查看 'git help git'。
安装maven
maven官网下载linux安装包,上传到linux服务器,解压缩即可;
解压缩 : **tar zxvf apache-maven-3.8.6-bin.tar.gz **
测试命令:
[root@master apache-maven-3.8.6]# /usr/local/maven/apache-maven-3.8.6/bin/mvn
[INFO] Scanning for projects...
[INFO] ------------------------------------------------------------------------
[INFO] BUILD FAILURE
[INFO] ------------------------------------------------------------------------
[INFO] Total time:  0.054 s
[INFO] Finished at: 2022-11-15T21:13:40+08:00
[INFO] ------------------------------------------------------------------------
[ERROR] No goals have been specified for this build. You must specify a valid lifecycle phase or a goal in the format <plugin-prefix>:<goal> or <plugin-group-id>:<plugin-artifact-id>[:<plugin-version>]:<goal>. Available lifecycle phases are: validate, initialize, generate-sources, process-sources, generate-resources, process-resources, compile, process-classes, generate-test-sources, process-test-sources, generate-test-resources, process-test-resources, test-compile, process-test-classes, test, prepare-package, package, pre-integration-test, integration-test, post-integration-test, verify, install, deploy, pre-clean, clean, post-clean, pre-site, site, post-site, site-deploy. -> [Help 1]
[ERROR]
[ERROR] To see the full stack trace of the errors, re-run Maven with the -e switch.
[ERROR] Re-run Maven using the -X switch to enable full debug logging.
[ERROR]
[ERROR] For more information about the errors and possible solutions, please read the following articles:
[ERROR] [Help 1] http://cwiki.apache.org/confluence/display/MAVEN/NoGoalSpecifiedException
[root@master apache-maven-3.8.6]#

## 检查版本
[root@master apache-maven-3.8.6]# /usr/local/maven/apache-maven-3.8.6/bin/mvn -v
Apache Maven 3.8.6 (84538c9988a25aec085021c365c560670ad80f63)
Maven home: /usr/local/maven/apache-maven-3.8.6
Java version: 1.8.0_311, vendor: Oracle Corporation, runtime: /usr/local/java/jvm/jdk1.8.0_311/jre
Default locale: zh_CN, platform encoding: UTF-8
OS name: "linux", version: "3.10.0-1160.71.1.el7.x86_64", arch: "amd64", family: "unix"
[root@master apache-maven-3.8.6]#
证明运行成功;
因为需要下载依赖包,因此还需要给maven配置一个国内的镜像源
找到配置文件位置

替换内容为下面:
<?xml version="1.0" encoding="UTF-8"?>

<!--
Licensed to the Apache Software Foundation (ASF) under one
or more contributor license agreements.  See the NOTICE file
distributed with this work for additional information
regarding copyright ownership.  The ASF licenses this file
to you under the Apache License, Version 2.0 (the
"License"); you may not use this file except in compliance
with the License.  You may obtain a copy of the License at

    http://www.apache.org/licenses/LICENSE-2.0

Unless required by applicable law or agreed to in writing,
software distributed under the License is distributed on an
"AS IS" BASIS, WITHOUT WARRANTIES OR CONDITIONS OF ANY
KIND, either express or implied.  See the License for the
specific language governing permissions and limitations
under the License.
-->

<!--
 | This is the configuration file for Maven. It can be specified at two levels:
 |
 |  1. User Level. This settings.xml file provides configuration for a single user,
 |                 and is normally provided in ${user.home}/.m2/settings.xml.
 |
 |                 NOTE: This location can be overridden with the CLI option:
 |
 |                 -s /path/to/user/settings.xml
 |
 |  2. Global Level. This settings.xml file provides configuration for all Maven
 |                 users on a machine (assuming they're all using the same Maven
 |                 installation). It's normally provided in
 |                 ${maven.conf}/settings.xml.
 |
 |                 NOTE: This location can be overridden with the CLI option:
 |
 |                 -gs /path/to/global/settings.xml
 |
 | The sections in this sample file are intended to give you a running start at
 | getting the most out of your Maven installation. Where appropriate, the default
 | values (values used when the setting is not specified) are provided.
 |
 |-->
<settings xmlns="http://maven.apache.org/SETTINGS/1.0.0"
          xmlns:xsi="http://www.w3.org/2001/XMLSchema-instance"
          xsi:schemaLocation="http://maven.apache.org/SETTINGS/1.0.0 http://maven.apache.org/xsd/settings-1.0.0.xsd">
  <!-- localRepository
   | The path to the local repository maven will use to store artifacts.
   |
   | Default: ${user.home}/.m2/repository
  <localRepository>/path/to/local/repo</localRepository>
  -->
  <localRepository>${user.home}/.m2/repository</localRepository>
  <!-- interactiveMode
   | This will determine whether maven prompts you when it needs input. If set to false,
   | maven will use a sensible default value, perhaps based on some other setting, for
   | the parameter in question.
   |
   | Default: true
  <interactiveMode>true</interactiveMode>
  -->

  <!-- offline
   | Determines whether maven should attempt to connect to the network when executing a build.
   | This will have an effect on artifact downloads, artifact deployment, and others.
   |
   | Default: false
  <offline>false</offline>
  -->

  <!-- pluginGroups
   | This is a list of additional group identifiers that will be searched when resolving plugins by their prefix, i.e.
   | when invoking a command line like "mvn prefix:goal". Maven will automatically add the group identifiers
   | "org.apache.maven.plugins" and "org.codehaus.mojo" if these are not already contained in the list.
   |-->
  <pluginGroups>
    <!-- pluginGroup
     | Specifies a further group identifier to use for plugin lookup.
    <pluginGroup>com.your.plugins</pluginGroup>
    -->
    <pluginGroup>org.mortbay.jetty</pluginGroup>
  </pluginGroups>

  <!-- proxies
   | This is a list of proxies which can be used on this machine to connect to the network.
   | Unless otherwise specified (by system property or command-line switch), the first proxy
   | specification in this list marked as active will be used.
   |-->
  <proxies>
    <!-- proxy
     | Specification for one proxy, to be used in connecting to the network.
     |
    <proxy>
      <id>optional</id>
      <active>true</active>
      <protocol>http</protocol>
      <username>proxyuser</username>
      <password>proxypass</password>
      <host>proxy.host.net</host>
      <port>80</port>
      <nonProxyHosts>local.net|some.host.com</nonProxyHosts>
    </proxy>
    -->
  </proxies>

  <!-- servers
   | This is a list of authentication profiles, keyed by the server-id used within the system.
   | Authentication profiles can be used whenever maven must make a connection to a remote server.
   |-->
  <servers>
    <!-- server
     | Specifies the authentication information to use when connecting to a particular server, identified by
     | a unique name within the system (referred to by the 'id' attribute below).
     |
     | NOTE: You should either specify username/password OR privateKey/passphrase, since these pairings are
     |       used together.
     |
    <server>
      <id>deploymentRepo</id>
      <username>repouser</username>
      <password>repopwd</password>
    </server>
    -->

    <!-- Another sample, using keys to authenticate.
    <server>
      <id>siteServer</id>
      <privateKey>/path/to/private/key</privateKey>
      <passphrase>optional; leave empty if not used.</passphrase>
    </server>
    -->
    <server>
        <id>releases</id>
        <username>ali</username>
        <password>ali</password>
      </server>
      <server>
        <id>Snapshots</id>
        <username>ali</username>
        <password>ali</password>
      </server>
  </servers>

  <!-- mirrors
   | This is a list of mirrors to be used in downloading artifacts from remote repositories.
   |
   | It works like this: a POM may declare a repository to use in resolving certain artifacts.
   | However, this repository may have problems with heavy traffic at times, so people have mirrored
   | it to several places.
   |
   | That repository definition will have a unique id, so we can create a mirror reference for that
   | repository, to be used as an alternate download site. The mirror site will be the preferred
   | server for that repository.
   |-->
  <mirrors>
    <!-- mirror
     | Specifies a repository mirror site to use instead of a given repository. The repository that
     | this mirror serves has an ID that matches the mirrorOf element of this mirror. IDs are used
     | for inheritance and direct lookup purposes, and must be unique across the set of mirrors.
     |
    <mirror>
      <id>mirrorId</id>
      <mirrorOf>repositoryId</mirrorOf>
      <name>Human Readable Name for this Mirror.</name>
      <url>http://my.repository.com/repo/path</url>
    </mirror>
     -->
    <mirror>
      <!--This sends everything else to /public -->
      <id>nexus</id>
      <mirrorOf>*</mirrorOf>
      <url>http://maven.aliyun.com/nexus/content/groups/public/</url>
    </mirror>
    <mirror>
      <!--This is used to direct the public snapshots repo in the
          profile below over to a different nexus group -->
      <id>nexus-public-snapshots</id>
      <mirrorOf>public-snapshots</mirrorOf>
      <url>http://maven.aliyun.com/nexus/content/repositories/snapshots/</url>
    </mirror>
    <mirror>
      <!--This is used to direct the public snapshots repo in the
          profile below over to a different nexus group -->
      <id>nexus-public-snapshots1</id>
      <mirrorOf>public-snapshots1</mirrorOf>
      <url>https://artifacts.alfresco.com/nexus/content/repositories/public/</url>
    </mirror>
  </mirrors>

  <!-- profiles
   | This is a list of profiles which can be activated in a variety of ways, and which can modify
   | the build process. Profiles provided in the settings.xml are intended to provide local machine-
   | specific paths and repository locations which allow the build to work in the local environment.
   |
   | For example, if you have an integration testing plugin - like cactus - that needs to know where
   | your Tomcat instance is installed, you can provide a variable here such that the variable is
   | dereferenced during the build process to configure the cactus plugin.
   |
   | As noted above, profiles can be activated in a variety of ways. One way - the activeProfiles
   | section of this document (settings.xml) - will be discussed later. Another way essentially
   | relies on the detection of a system property, either matching a particular value for the property,
   | or merely testing its existence. Profiles can also be activated by JDK version prefix, where a
   | value of '1.4' might activate a profile when the build is executed on a JDK version of '1.4.2_07'.
   | Finally, the list of active profiles can be specified directly from the command line.
   |
   | NOTE: For profiles defined in the settings.xml, you are restricted to specifying only artifact
   |       repositories, plugin repositories, and free-form properties to be used as configuration
   |       variables for plugins in the POM.
   |
   |-->
   <profiles>
    <profile>
      <id>development</id>
      <repositories>
        <repository>
          <id>central</id>
          <url>http://central</url>
          <releases><enabled>true</enabled><updatePolicy>always</updatePolicy></releases>
          <snapshots><enabled>true</enabled><updatePolicy>always</updatePolicy></snapshots>
        </repository>
      </repositories>
     <pluginRepositories>
        <pluginRepository>
          <id>central</id>
          <url>http://central</url>
          <releases><enabled>true</enabled><updatePolicy>always</updatePolicy></releases>
          <snapshots><enabled>true</enabled><updatePolicy>always</updatePolicy></snapshots>
        </pluginRepository>
      </pluginRepositories>
    </profile>
    <profile>
      <!--this profile will allow snapshots to be searched when activated-->
      <id>public-snapshots</id>
      <repositories>
        <repository>
          <id>public-snapshots</id>
          <url>http://public-snapshots</url>
          <releases><enabled>false</enabled></releases>
          <snapshots><enabled>true</enabled><updatePolicy>always</updatePolicy></snapshots>
        </repository>
      </repositories>
     <pluginRepositories>
        <pluginRepository>
          <id>public-snapshots</id>
          <url>http://public-snapshots</url>
          <releases><enabled>false</enabled></releases>
          <snapshots><enabled>true</enabled><updatePolicy>always</updatePolicy></snapshots>
        </pluginRepository>
      </pluginRepositories>
    </profile>
  </profiles>

   <activeProfiles>
    <activeProfile>development</activeProfile>
    <activeProfile>public-snapshots</activeProfile>
   </activeProfiles>

  <!-- activeProfiles
   | List of profiles that are active for all builds.
   |
  <activeProfiles>
    <activeProfile>alwaysActiveProfile</activeProfile>
    <activeProfile>anotherAlwaysActiveProfile</activeProfile>
  </activeProfiles>
  -->
</settings>
互相集成
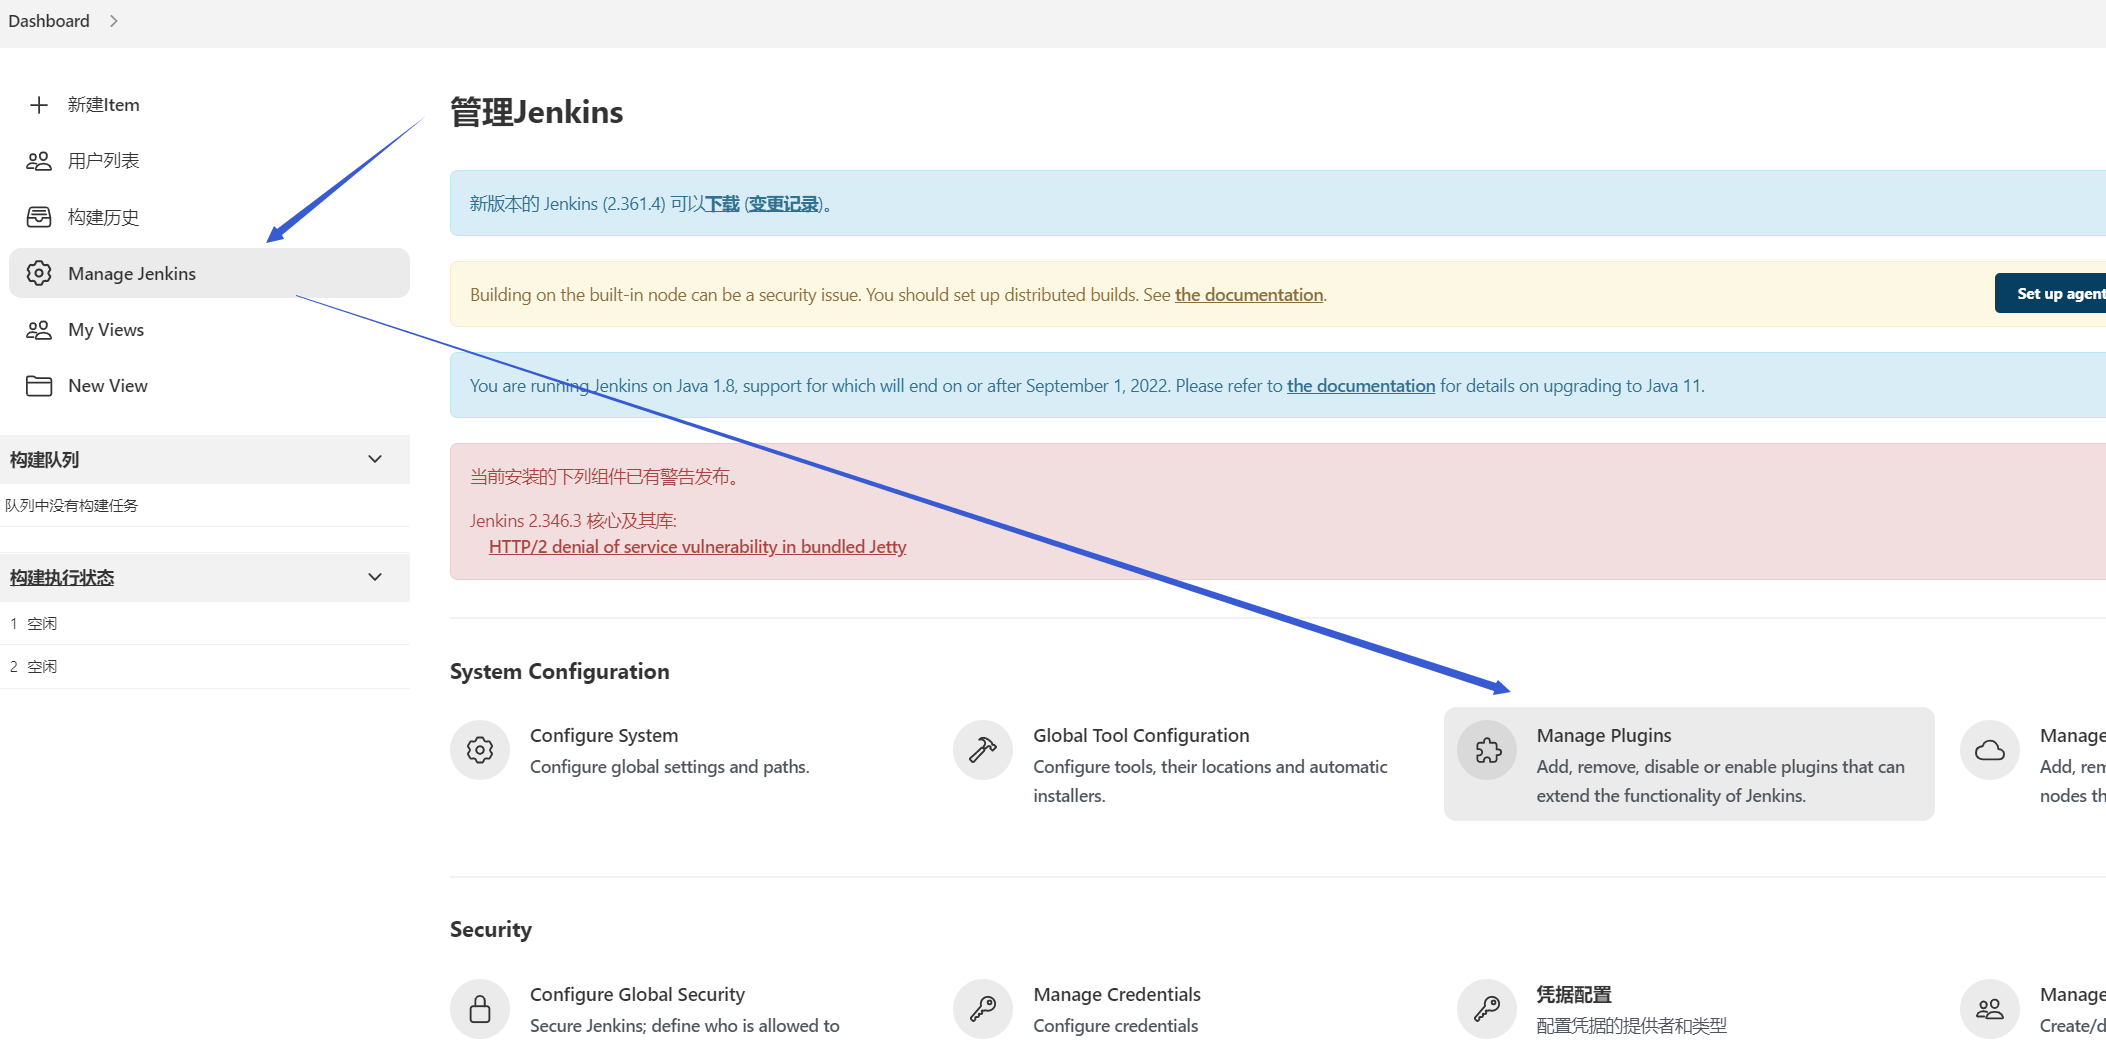
先管理插件,在可选插件里面,选择想要的插件并下载安装

勾选想要的插件,这里是maven,

等待安装成功

可以看到,maven插件已经安装完成
普通jar包自动部署
一、在jenkins上新建maven项目


因为安装了 Maven 插件,因此这里有maven项目的选项,不安装的话是无法选择maven项目的;
确定之后,就进入了配置页面:

二、配置项目基础、源码来源
配置页面分为几大块,分别为
- General 概述,一些描述性的动西
- 源码管理 配置代码来源,一般是gitee
- 构建触发器 什么情况下会触发构建项目,(可以设置为每上传一次代码就构建一次)一般默认即可
- 构建环境 会在构建时做一些额外处理,先默认不选择
- Pre Steps 构建前进行哪些操作,一般会用脚本去停止之前运行的进程,并删除老jar包
- Build 配置build即构建相关的配置,这里用maven
- Post Step 项目构建完成后,做些什么,一般会用来自动启动jar包并输出日志到文件
- 构建设置
- 构建后操作
general
一些描述性的内容
源码管理
设置代码来源

构建触发器
构建项目的时候触发的东西,一般默认即可

这里大概意思是,如果pom文件没有改动,那么就按照之前构建好的进行构建,避免重新解析Pom文件,省时省力;
构建环境
会在构建时做一些额外处理,先默认不选择
Pre Steps
构建前进行哪些操作(一般是停止旧进程,删除老的jar包),暂时先默认不处理,放在 六-2 中处理

Build
配置build即构建相关的配置,这里用maven,因此需要配置maven的位置等信息

点击这里;也可以在工作台点击 配置进入
![[外链图片转存失败,源站可能有防盗链机制,建议将图片保存下来直接上传(img-VUCz99ae-1669471161906)(https://gitee.com/chenchong123456/picture/raw/master/typora/%20Jenkins/202211161503234.png)]](https://img-blog.csdnimg.cn/a8485887f2a14fd99b10a4ef41b04107.png)
拉到最下面,选择新增maven

配置完可以发现,原先的红色提示已经没有了

然后就是配置 Pom 文件的位置,要配置到项目的主pom

Post Step
项目构建完成后,做些什么(一般是把打好的jar包传输到指定服务器上,并启动jar包),这里也先保持默认,放在 五.1 里面处理。

构建设置
构建后操作
配置完成后,点击保存即可
三、进行初步构建 - 代码拉取、依赖下载、jar包打成
即可进入该项目的工作空间

点击返回面板,即可返回主工作台
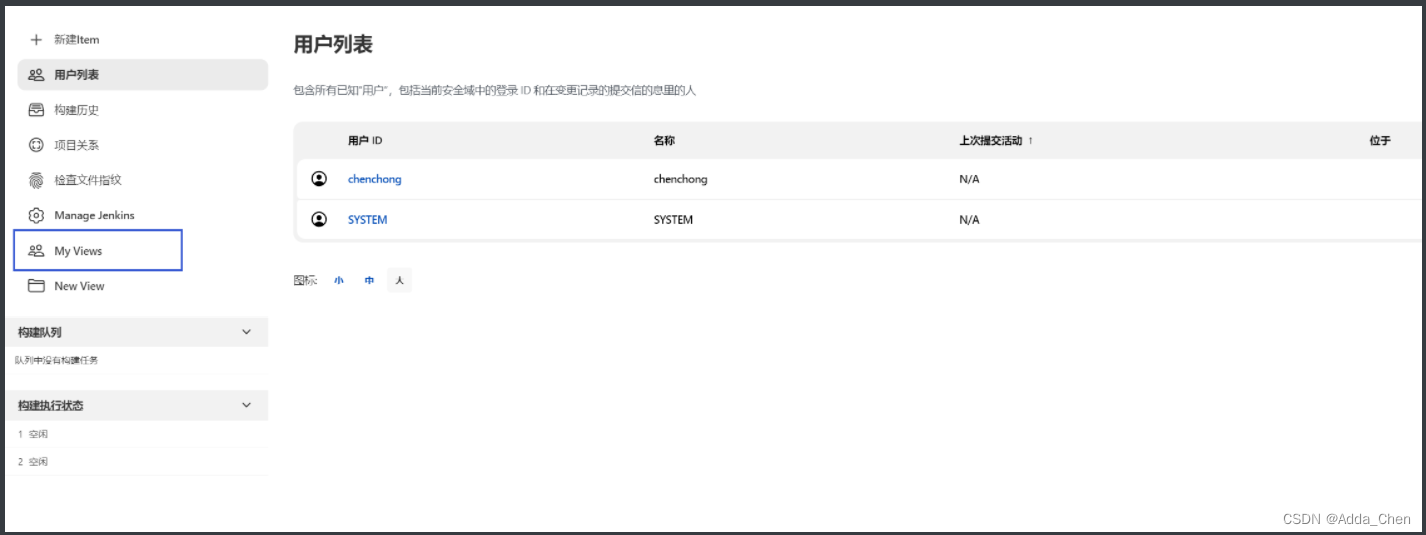
点击myView,即可管理项目

点击按钮,会开始构建项目
控制台会输出文件源码的位置

同样的,也可以看见,jenkins已经将代码从gitee上拉下来,且已经打成jar包了

因为只是简单的配置,所以这里构建,只是利用maven去解析pom文件,就如同本地idea里面进行打包一样的构建出jar包,所以要想启动,还需要手动运行一下。
测试运行
代码中已经有测试代码
@RestController
@RequestMapping("/bannerShow")
public class DemoController {
    /**
     * 测试
     *
     * @return
     */
    @GetMapping("/queryBanner")
    public String queryBanner() {
        return "hello word !!";
    }
}
手动启动 jar 包
[root@192 jenkins]# cd /root/.jenkins/workspace/buyBack01/target
[root@192 target]# ll
总用量 18416
drwxr-xr-x. 3 root root       71 11月 16 21:00 classes
-rw-r--r--. 1 root root 18843388 11月 16 21:04 buyBack01-0.0.1-SNAPSHOT.jar
-rw-r--r--. 1 root root     9300 11月 16 21:04 buyBack01-0.0.1-SNAPSHOT.jar.original
drwxr-xr-x. 3 root root       25 11月 16 21:00 generated-sources
drwxr-xr-x. 3 root root       30 11月 16 21:00 generated-test-sources
drwxr-xr-x. 2 root root       28 11月 16 21:01 maven-archiver
drwxr-xr-x. 3 root root       35 11月 16 21:00 maven-status
drwxr-xr-x. 2 root root      151 11月 16 21:01 surefire-reports
drwxr-xr-x. 3 root root       17 11月 16 21:00 test-classes
[root@192 target]# java -jar buyBack01-0.0.1-SNAPSHOT.jar

  .   ____          _            __ _ _
 /\\ / ___'_ __ _ _(_)_ __  __ _ \ \ \ \
( ( )\___ | '_ | '_| | '_ \/ _` | \ \ \ \
 \\/  ___)| |_)| | | | | || (_| |  ) ) ) )
  '  |____| .__|_| |_|_| |_\__, | / / / /
 =========|_|==============|___/=/_/_/_/
 :: Spring Boot ::                (v2.5.3)

2022-11-16 21:06:15.657  INFO 7826 --- [           main] com.design.demo.DemoApplication          : Starting DemoApplication v0.0.1-SNAPSHOT using Java 1.8.0_311 on 192.168.220.136 with PID 7826 (/root/.jenkins/workspace/desgin-learn01/target/demo-0.0.1-SNAPSHOT.jar started by root in /root/.jenkins/workspace/desgin-learn01/target)
2022-11-16 21:06:15.660  INFO 7826 --- [           main] com.design.demo.DemoApplication          : No active profile set, falling back to default profiles: default
2022-11-16 21:06:18.013  INFO 7826 --- [           main] o.s.b.w.embedded.tomcat.TomcatWebServer  : Tomcat initialized with port(s): 8090 (http)
2022-11-16 21:06:18.076  INFO 7826 --- [           main] o.apache.catalina.core.StandardService   : Starting service [Tomcat]
2022-11-16 21:06:18.076  INFO 7826 --- [           main] org.apache.catalina.core.StandardEngine  : Starting Servlet engine: [Apache Tomcat/9.0.50]
2022-11-16 21:06:18.231  INFO 7826 --- [           main] o.a.c.c.C.[Tomcat].[localhost].[/]       : Initializing Spring embedded WebApplicationContext
2022-11-16 21:06:18.232  INFO 7826 --- [           main] w.s.c.ServletWebServerApplicationContext : Root WebApplicationContext: initialization completed in 2490 ms
2022-11-16 21:06:19.504  WARN 7826 --- [           main] ion$DefaultTemplateResolverConfiguration : Cannot find template location: classpath:/templates/ (please add some templates or check your Thymeleaf configuration)
2022-11-16 21:06:19.621  INFO 7826 --- [           main] o.s.b.w.embedded.tomcat.TomcatWebServer  : Tomcat started on port(s): 8090 (http) with context path ''
2022-11-16 21:06:19.647  INFO 7826 --- [           main] com.design.demo.DemoApplication          : Started DemoApplication in 5.048 seconds (JVM running for 5.874)
2022-11-16 21:06:25.397  INFO 7826 --- [nio-8090-exec-1] o.a.c.c.C.[Tomcat].[localhost].[/]       : Initializing Spring DispatcherServlet 'dispatcherServlet'
2022-11-16 21:06:25.398  INFO 7826 --- [nio-8090-exec-1] o.s.web.servlet.DispatcherServlet        : Initializing Servlet 'dispatcherServlet'
2022-11-16 21:06:25.398  INFO 7826 --- [nio-8090-exec-1] o.s.web.servlet.DispatcherServlet        : Completed initialization in 0 ms
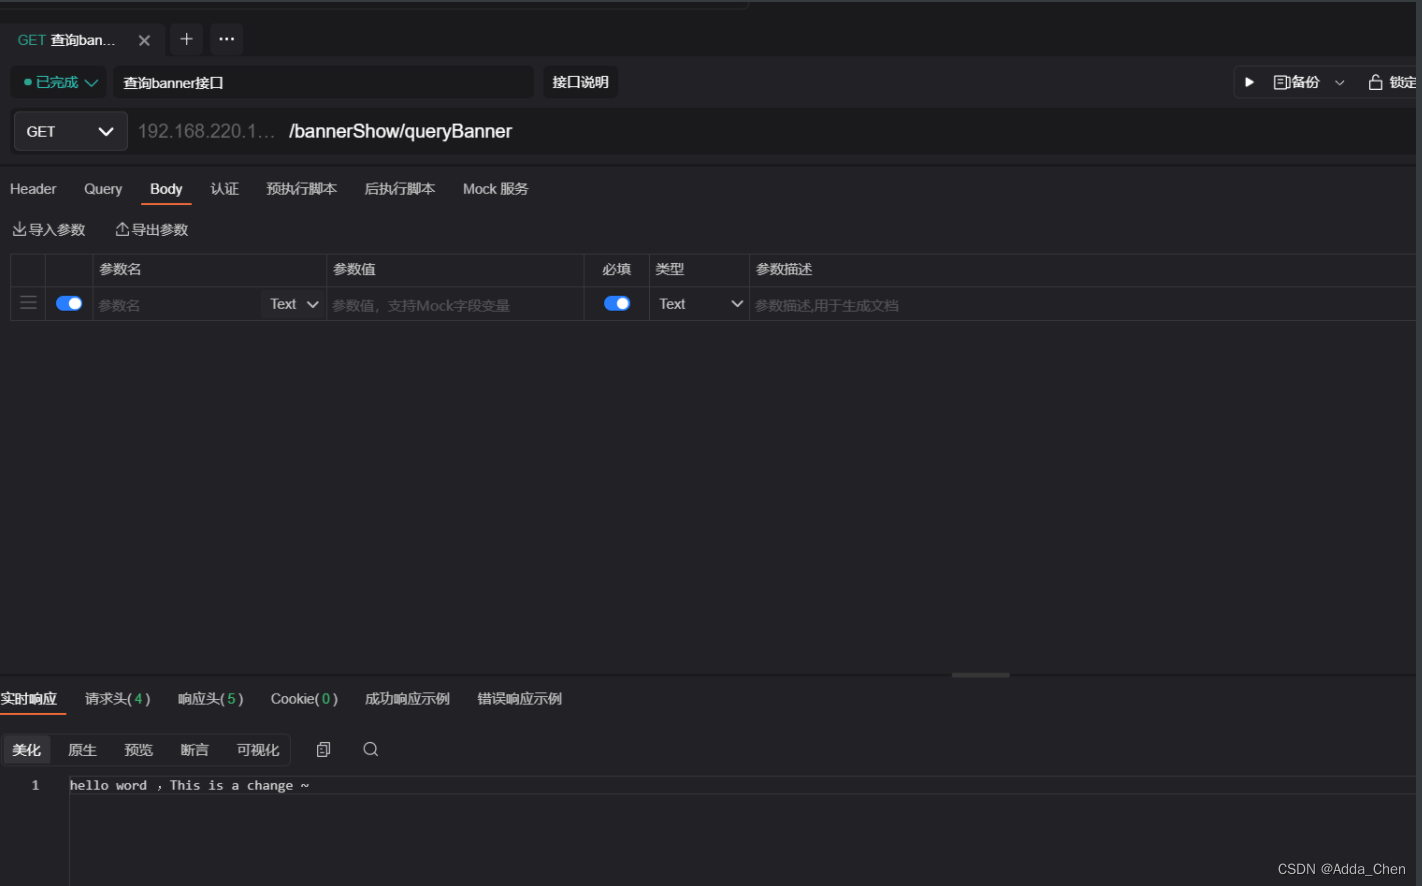
请求接口
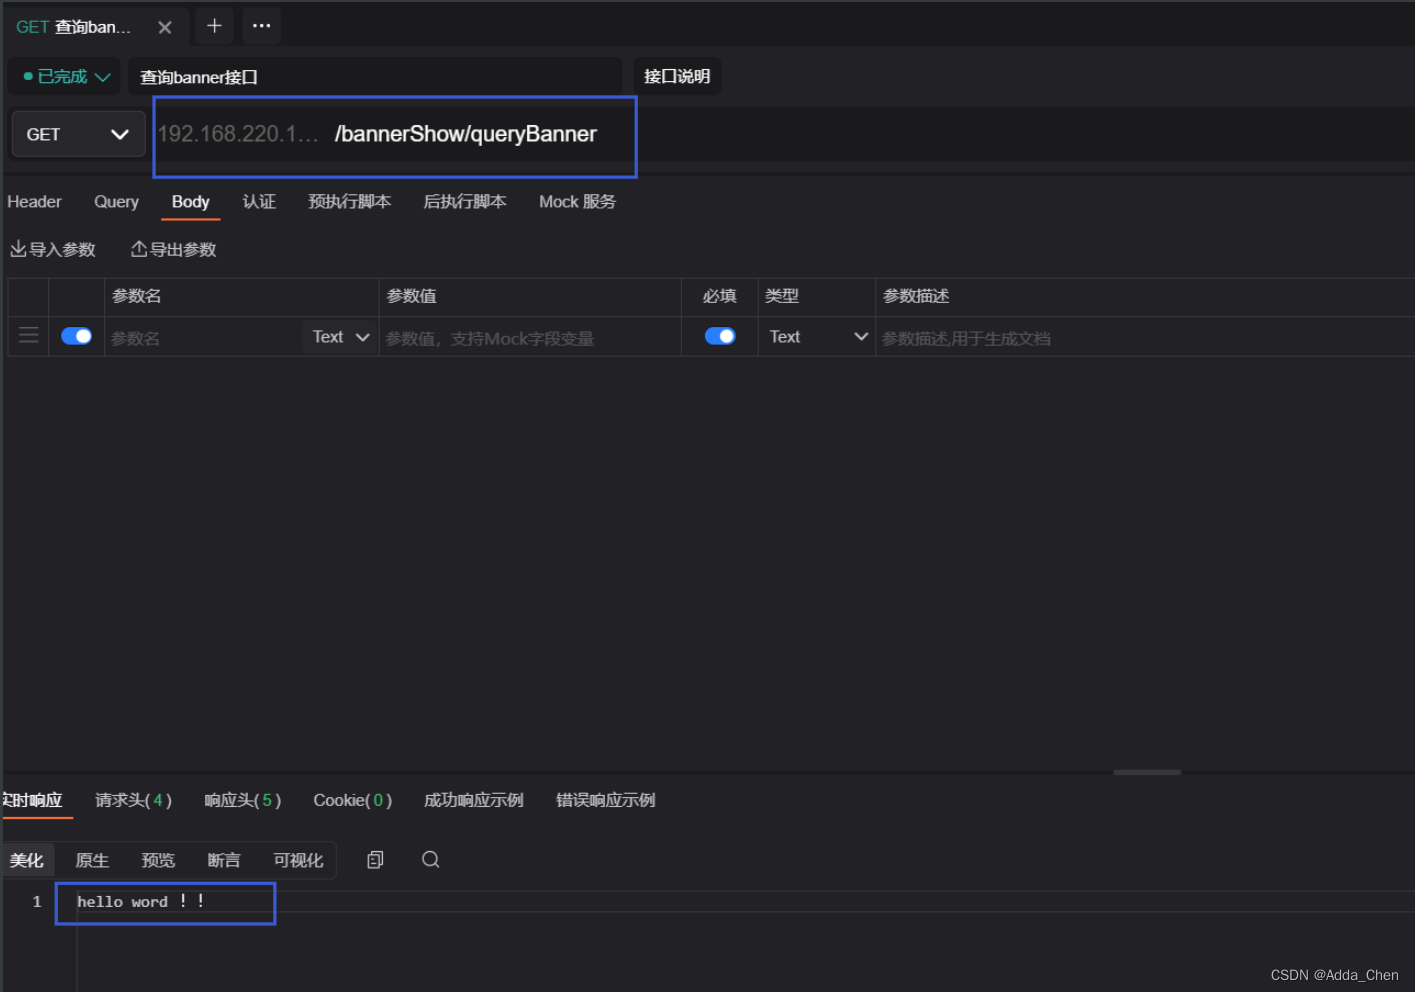
获得返回 hello word !!
测试更新代码后构建
修改代码
@RestController
@RequestMapping("/bannerShow")
public class DemoController {
    /**
     * 测试
     *
     * @return
     */
    @GetMapping("/queryBanner")
    public String queryBanner() {
        return "hello word ,This is a change ~";
    }
}
然后提交代码到gitee,确保代码正确提交到gitee上之后,重新构建,并重新运行
再次测试请求

已经是修改后的结果了。
五、jar包传输,并启动
下载插件 Publish Over SSH

配置服务器
因为存在jenkins与正式发布的服务器不在同一个服务器的情况,因此,需要将打包好的jar包传送到其他服务器;
所以需要配置另外一个服务器的地址(这里测试的时候,还是使用同一个服务器)

点进来之后,往下拉,找到 Publish over SSH 进行配置
新增一台服务器


最后,可以测试一下配置的服务器能不能连上,显示success即为成功

最后保存即可
给项目工程进行服务器传输配置
服务器配置好了,接下来就是配置一下,工程构建完成后,进行传输的配置了

进行详细配置
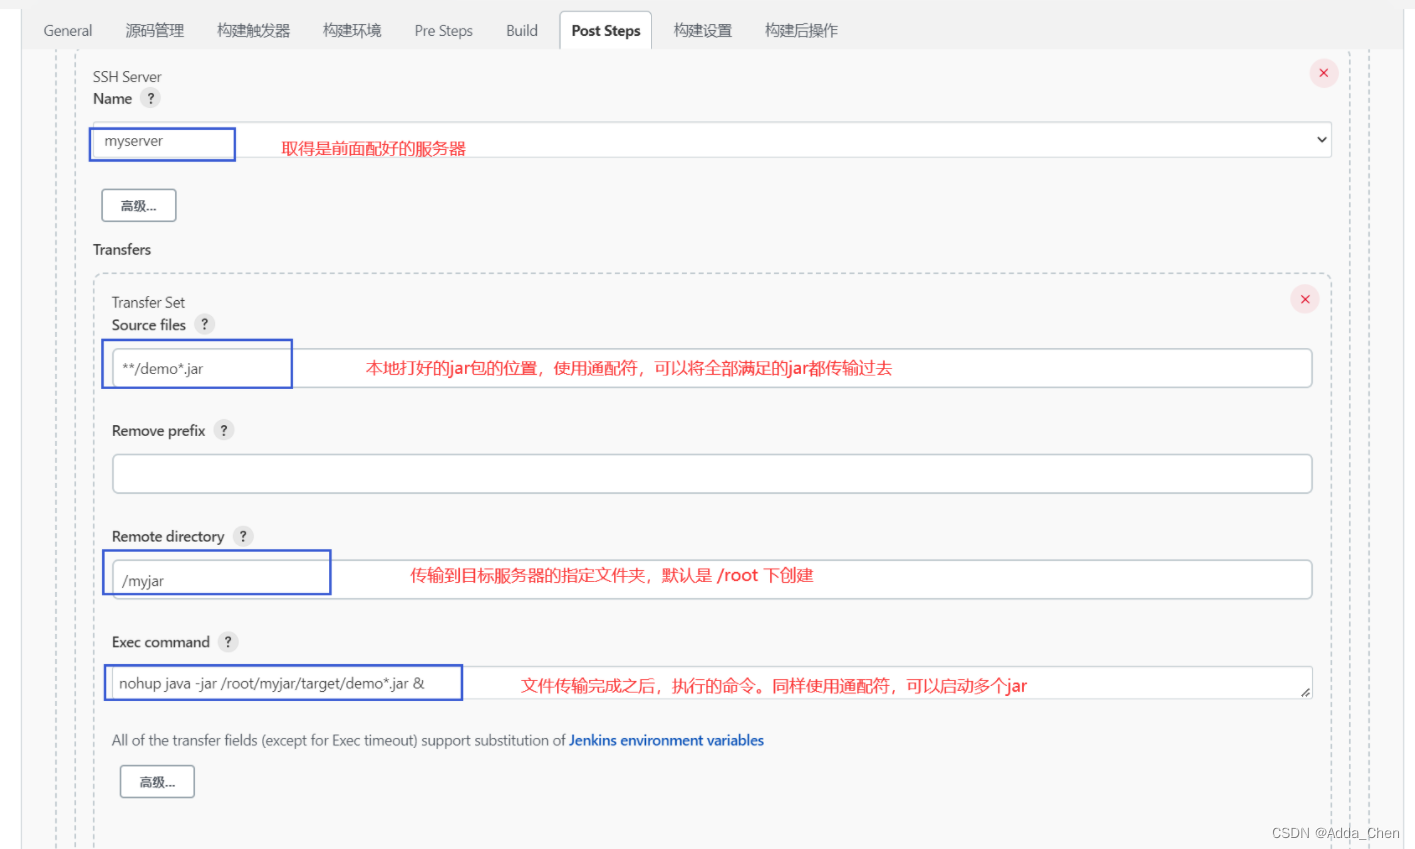
查看结果
要传输的jar路径及名称

成功传输过来了

也能够正常的启动jar包
六、优化配置
现在是自动拉取并打包传输到目标服务器上并自动化启动jar包,但是现在没有将日志输出到文件导致偶尔会进程卡死,且没有将上版本的jar包删除并停止上次启动的进程,因此需要进一步优化。

解决启动无日志,卡死进程
启动时,偶尔遇到日志卡住的问题

运行到最后,会返回错误信息,但是其实这个时候项目是正常启动了的。这是因为有可能jar包启动过程中,有日志提示信息返回,但是因为没有指定输出文件,就输出打印在命令行中了,导致卡死超过最大连接时间而保存,解决办法可以将日志信息输出到指定文件中并扩大最大连接时间即可 。
解决思路:增大连接时间+日志输出到文件
增大连接时间
日志输出:

配置

测试
可见,控制台输出也正常

log文件也生成了

项目也正常运行了

tips:查看启动的全部jar的命令
 ## 查看全部启动的jar
[root@192 jenkins]# jps
2597 demo-0.0.1-SNAPSHOT.jar
2808 Jps
2319 war
## 停止指定的jar
[root@192 jenkins]# kill -9 2597
[root@192 jenkins]#
 ## 查看全部启动的jar
[root@192 jenkins]# jps
2833 Jps
2319 war
[root@192 jenkins]#
启动前,停止之前的进程并删除原本的jar包
现在能够自动拉取代码、打包、传输到目标服务器、自动启动并输出日志;但是版本迭代的时候,我们还需要手动停止上次运行的jar进程,并手动删除老jar包,是非常麻烦的,因此这里开始配置自动化停止进程并删除jar包;
这需要事先写好 shell 脚本文件,然后配置jenkins在构建前先去执行这个shell文件
编写shell文件
**注意:**shell文件需要在linux环境下创建并编写,如果在windows环境下编写,会有格式问题。
### 第一步,删除之前的jar文件,这里直接删除文件夹比较方便,命令中文件夹都是以 /root 为默认文件夹的
rm -rf myjar   # 删除 /root/myjar 文件夹
### 第二步,获取进程号,并杀死进程
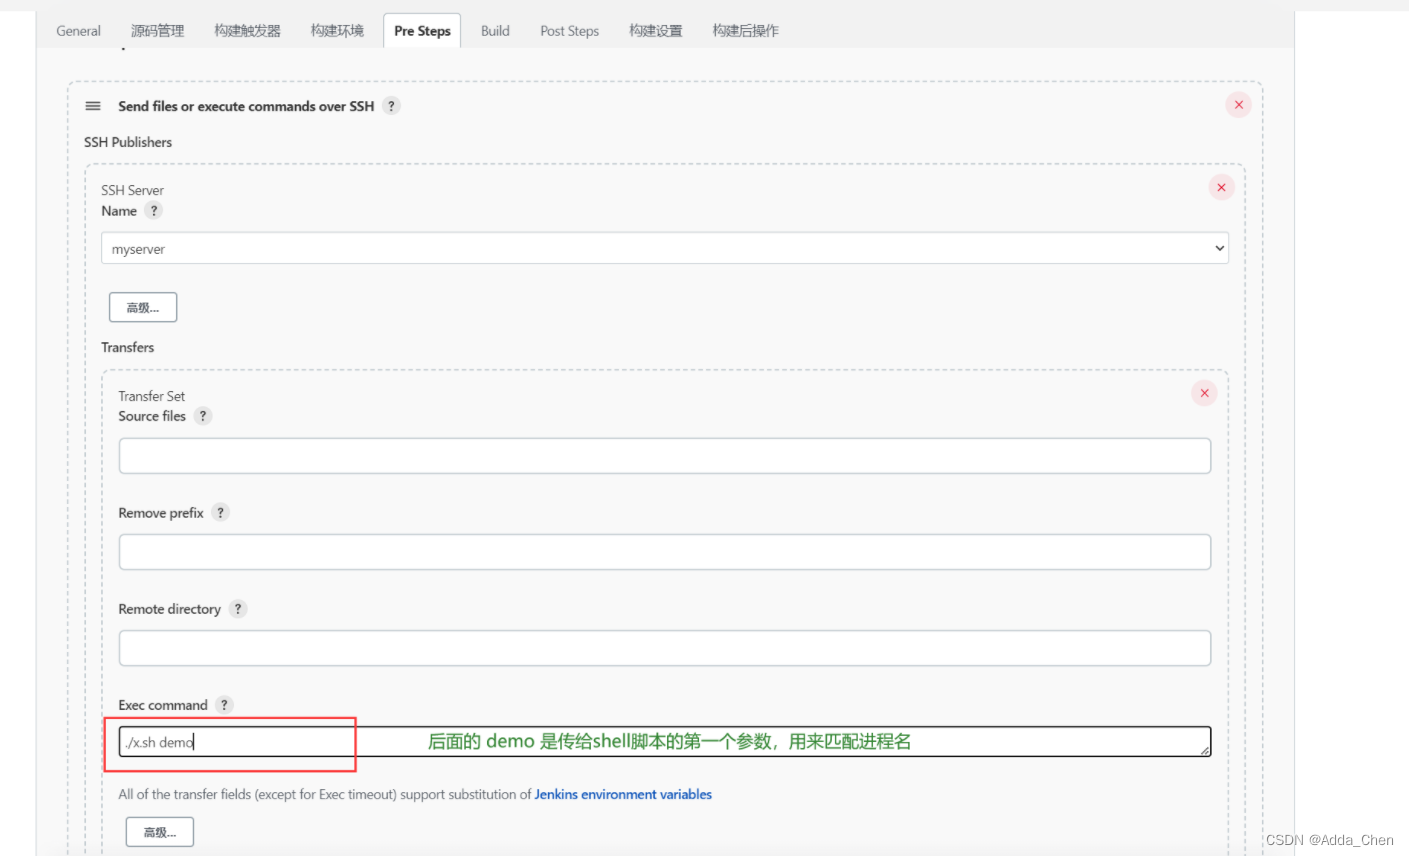
jarname=$1
## 2.1 # 找出含有 $jarname 字符串($1 由启动命令传入并赋值给jarname),且含有 'java -jar'的进程,并把第二个字符(也就是进程号)并赋值给 pid
pid=`ps -ef | grep $jarname | grep 'java -jar' | awk '{printf $2}'`

## 2.2 进行逻辑判断,满足条件就杀死进程
if [ -z $pid ];
		then
				echo "$jarname not started"
		else
				kill -9 $pid
fi
kill -9 $pid
##
**tips:**特别注意,删除文件夹的时候,千万不要把之前输出时的日志目录删除,否则会日志输出找不到位置而产生错误。
最好是多写几条,删除具体的jar文件 ,比如
修改为
## 第一步,删除之前的jar文件,这里直接删除文件夹比较方便,命令中文件夹都是以 /root 为默认文件夹的
rm -rf myjar/target/demo***   # 删除具体的文件
## 第二步,获取进程号,并杀死进程
### 。。。
编写完之后,还需要将脚本设置为可执行的状态 命令 chmod 777 x.sh

变色即代表完成。
shell文件应该放在 /root 文件夹下
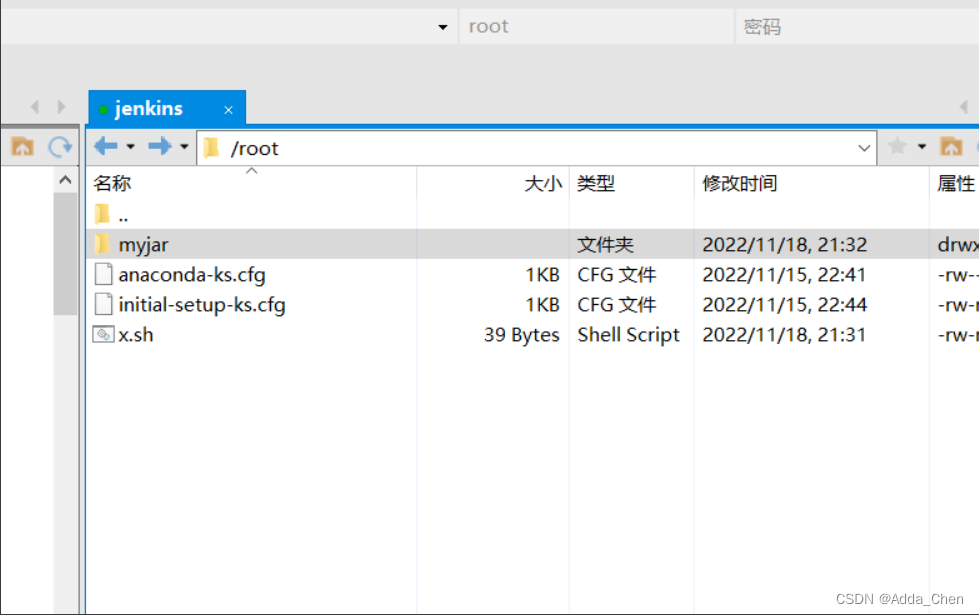
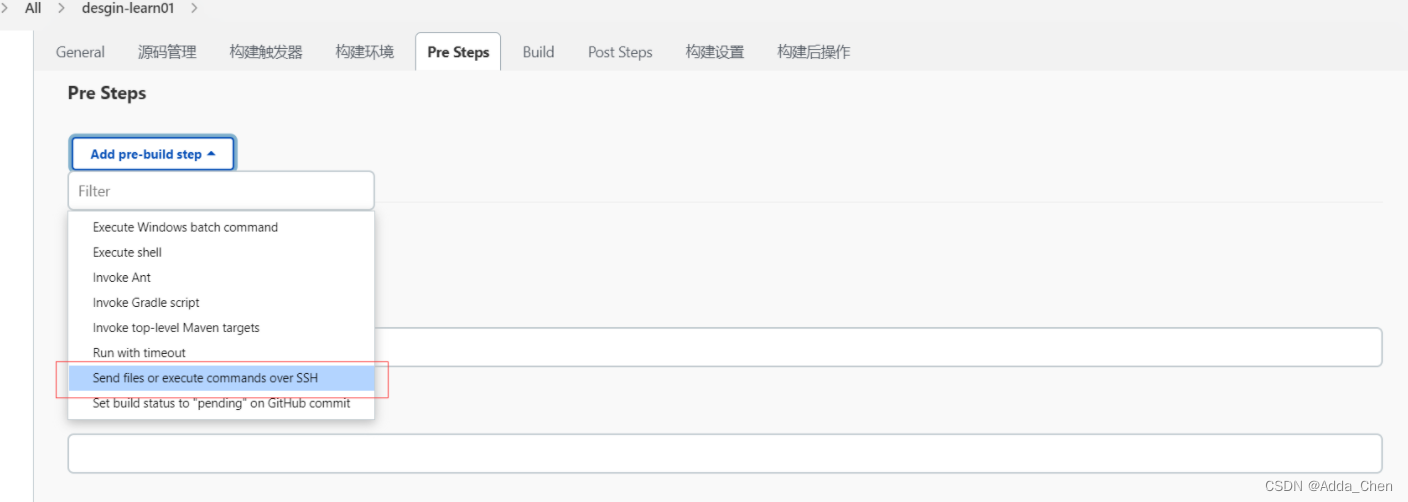
配置,构建前运行指定shell文件
启动
再次构建,可见,两次进程号不一样,证明是先杀死原进程,再启动的新进程。

docker 容器化自动部署
之前是把代码拉取下来然后打包,现在是拉取下来,打包,并放在容器中打成镜像,然后以容器的方式启动。
一.外挂jar包方式启动部署
整体思路步骤为:
① 服务器下载jdk的镜像,这里使用 openjdk11
② 把jar包先传送到服务器的指定目录下,本例是 /root/jarfile,然后使用外挂方式,将jar包挂载到openjdf11里面启动
docker run -d -p 8090:8090 --name demo-out -v /root/jarfile/demo-0.0.1-SNAPSHOT.jar:/app.jar openjdk:11 java -jar app.jar
③ 生成容器后,测试可以正常访问;这里需要明确,该容器启动就会重新执行②中的命令,因此每次重启该容器,都是重新读取的新jar;
⑤开始配置jenkins,
重点是构建前,清除 /root/jarfile 文件夹中的全部内容并停掉之前运行的外挂方式启动的容器
重点是构建后,启动 该容器,容器启动重新读取外挂jar包并运行,完成更新部署。
⑥ 完成更新部署。
详细步骤为:
1.准备一个有docker环境的服务器
先用原生的容器方式启动,确保环境无问题
1.1 外挂jar的方式 原生启动
外挂启动的方式,只需要提前将jar包放在服务器,并下载好需要用到的jdk,然后使用命令启动即可;这样的方式不产生镜像,只产生容器。
## 启动端口为 8090,名称为 demo-out, 外挂方式为将服务器/root/jarfile/demo-0.0.1-SNAPSHOT.jar 挂到 容器中 /app.jar位置 并用 Java-jar启动
[root@master jarfile]# docker run -d -p 8090:8090 --name demo-out -v /root/jarfile/demo-0.0.1-SNAPSHOT.jar:/app.jar openjdk:11 java -jar app.jar
915d773720e7d6ebd8b88c90ced50d38e94cabf8b1295a18b8501254a2218eba

## 成功运行并成功访问
[root@master jarfile]# docker ps
CONTAINER ID   IMAGE        COMMAND               CREATED         STATUS         PORTS                                       NAMES
915d773720e7   openjdk:11   "java -jar app.jar"   5 seconds ago   Up 3 seconds   0.0.0.0:8090->8090/tcp, :::8090->8090/tcp   demo-out
[root@master jarfile]# curl 127.0.0.1:8090/bannerShow/queryBanner
hello word ,This is a change ~[root@master jarfile]#

## 生成了一个 基于 openjdk11的名为 demo-out 的容器
[root@master jarfile]# docker ps -a
CONTAINER ID   IMAGE                 COMMAND                  CREATED        STATUS                      PORTS                                       NAMES
915d773720e7   openjdk:11            "java -jar app.jar"      2 hours ago    Up 4 minutes                0.0.0.0:8090->8090/tcp, :::8090->8090/tcp   demo-out
2.使用jenkins来进行启动
容器化启动,这里使用外挂jar的方式来进行;因为外挂方式创建出来的容器,运行的时候,其实也是再次去读取外挂命令,因此即是实时的读取到新的jar(前提是已经在服务器创建好一个外挂的镜像了)。
① 先按照普通方式,将Jenkins配置到能够传递到docker所在的服务器上的程度。
② 进行进一步配置
构建前

构建后

3.测试更新部署
旧代码
    /**
     * 测试
     *
     * @return
     */
    @GetMapping("/queryBanner")
    public String queryBanner() {
        return "hello word ,This is a change ~,docker外挂启动";
    }
请求

新代码
/**
 * 测试
 *
 * @return
 */
@GetMapping("/queryBanner")
public String queryBanner() {
    return "hello word ,This is a change ~,docker外挂启动,二次更改";
}
请求

二.容器内方式启动部署
整体思路步骤为:
① 先编写 dockerfile 文件,集成在项目里面,
② 将jar跟dockerfile文件都传输到服务器上,注意,shell命令默认是在/root下运行的,因此需要注意jar包跟dockerfile文件传输的位置
③ 配置jenkins
重点是构建前, 清除文件下的全部内容,停止运行中的容器 demo、删除容器demo、删除镜像demo
重点是构建后, 读取dockerfile生成镜像,运行镜像为容器
1.准备一个docker环境的服务器
先用原生的容器方式启动,确保环境无问题
1.1 容器内方式启动
① 编写 dockefile
FROM openjdk:11  ## 使用jdk作为容器的基础
EXPOSE 8090  ## 端口 跟 程序的端口保持一致

WORKDIR /root  ## 服务器的工作目录,同时也应该是 dockerfile 所在的文件夹

ADD jarfile/demo*.jar /root/app.jar  ## 将服务器上 /root/jarfile下的全部 demo为开头的jar包,添加到 容器的 /root/app.jar 文件
ENTRYPOINT ["java","-jar","/root/app.jar"]  ## 执行 Java -jar
目录结构
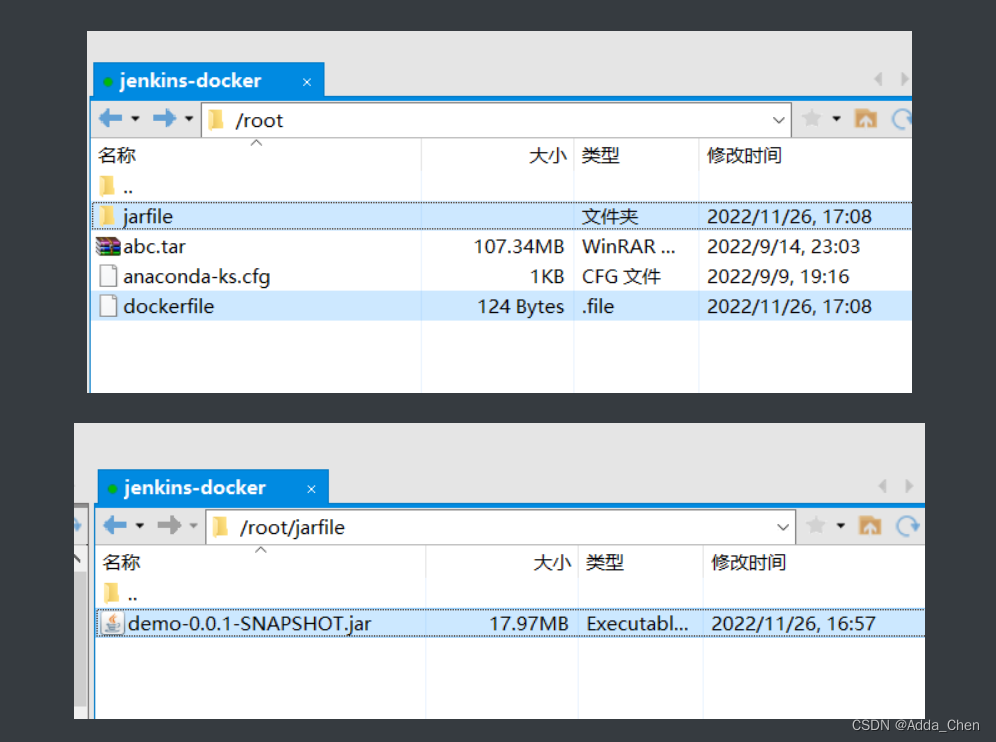
② 构建镜像
## 开始构建镜像,镜像名为 demo
[root@master ~]# docker build -t demo .
Sending build context to Docker daemon  589.5MB
Step 1/5 : FROM openjdk:11
 ---> 5505a9a39df1
Step 2/5 : EXPOSE 8080
 ---> Using cache
 ---> 3dbedcf3b9bb
Step 3/5 : WORKDIR /root
 ---> Using cache
 ---> fdb2957a2cc8
Step 4/5 : ADD jarfile/demo*.jar /root/app.jar
 ---> 16287a09d727
Step 5/5 : ENTRYPOINT ["java","-jar","/root/app.jar"]
 ---> Running in 762bf535ae29
Removing intermediate container 762bf535ae29
 ---> fb98ed92b904
Successfully built fb98ed92b904
Successfully tagged demo:latest


## 查看镜像
[root@master ~]# docker images
REPOSITORY                                                    TAG       IMAGE ID       CREATED         SIZE
demo                                                          latest    fb98ed92b904   5 seconds ago   678MB
③ 启动容器,容器名为 demo
[root@master ~]# docker run -d --name demo -p 8090:8090 demo
8b9bd83e73daea16431a08a30978955cd482ca84c05ad7d2dc31690880667b5e
[root@master ~]# docker ps
CONTAINER ID   IMAGE     COMMAND                  CREATED         STATUS         PORTS                                       NAMES
8b9bd83e73da   demo      "java -jar /root/app…"   4 seconds ago   Up 3 seconds   0.0.0.0:8080->8080/tcp, :::8080->8080/tcp   demo
测试连接
[root@master ~]# curl 127.0.0.1:8090/bannerShow/queryBanner
hello word ,This is a change ~            ## 访问成功
[root@master ~]#
2.项目中创建dockerfile
因为dockerfile可能经常变化,因此将他放在项目中存放,打包之后,将其连同jar一同发送到服务器即可;
具体步骤:项目下新建文件夹,命名为docker,并在文件夹下创建文件dockerfile,将写好的命令放进去;

3.使用jenkins来进行启动
构建前

构建后
第一个:传jar包
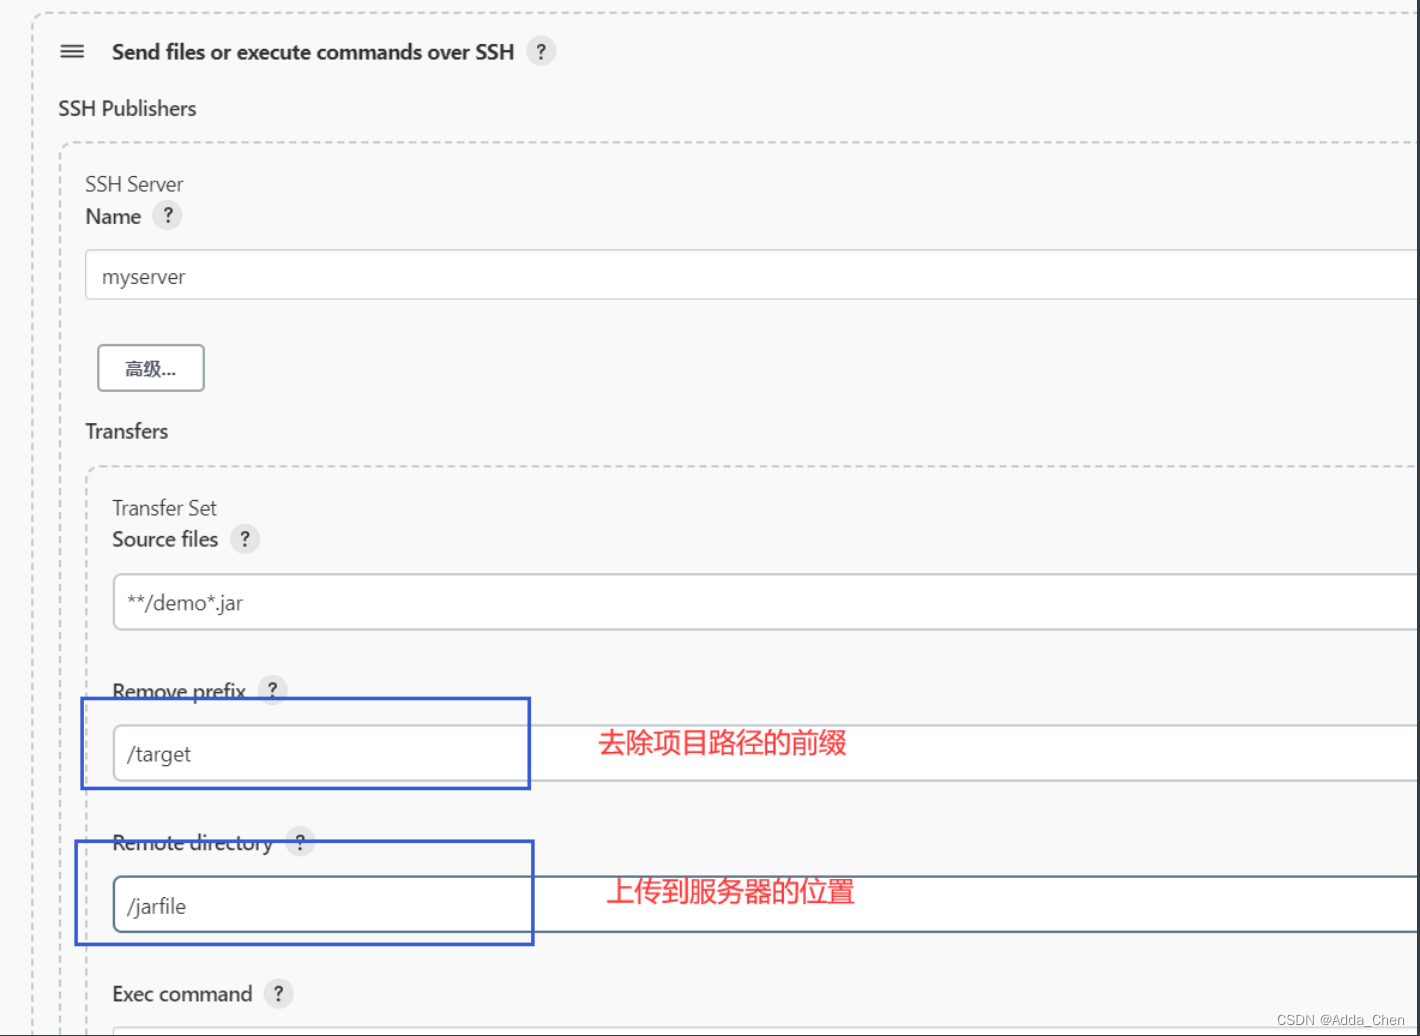
第二个:传dockerfile文件

上传完成后,文件结构

检查镜像、容器,是否删除了旧的,替换并运行了新的
## 检查,生成了新镜像,可以看出,创建时间为 4分钟前
[root@master jarfile]# docker images
REPOSITORY                                                    TAG       IMAGE ID       CREATED         SIZE
demo                                                          latest    fa7fd4a558be   4 minutes ago   678MB

## 检查,生成了新容器,可以看出,创建时间为 4分钟前
[root@master jarfile]# docker ps -a
CONTAINER ID   IMAGE                 COMMAND                  CREATED         STATUS                           PORTS                                       NAMES
fee7a4211d39   demo                  "java -jar /root/app…"   4 minutes ago   Up 4 minutes                     0.0.0.0:8090->8090/tcp, :::8090->8090/tcp   demo

## 检查,容器正在运行
[root@master jarfile]# docker ps
CONTAINER ID   IMAGE     COMMAND                  CREATED         STATUS         PORTS                                       NAMES
fee7a4211d39   demo      "java -jar /root/app…"   4 minutes ago   Up 4 minutes   0.0.0.0:8090->8090/tcp, :::8090->8090/tcp   demo
3.测试更新部署
旧代码
    /**
     * 测试
     *
     * @return
     */
    @GetMapping("/queryBanner")
    public String queryBanner() {
        return "hello word ,This is a change ~,docker外挂启动,三次更改,dockerfile";
    }
请求

新代码
    /**
     * 测试
     *
     * @return
     */
    @GetMapping("/queryBanner")
    public String queryBanner() {
        return "hello word ,This is a change ~,docker外挂启动,三次更改,dockerfile测试新修改";
    }
请求

完结
参考视频:尚硅谷 jenkins


 387
387


 被折叠的 条评论
为什么被折叠?


