


Universal Image Loade介绍
UIL有很多的优点高度的可定制性,是我使用最多的图片加载框架,今天就来整理下它的使用以及封装的方法。
Features:
- Multithread image loading (async or sync)
- Wide customization of ImageLoader’s configuration (thread executors, downloader, decoder, memory and disk cache, display image options, etc.)
- Many customization options for every display image call (stub images, caching switch, decoding options, Bitmap processing and displaying, etc.)
- Image caching in memory and/or on disk (device’s file system or SD card)
- Listening loading process (including downloading progress)
特点:
- 多线程图像加载(异步或同步)
- ImageLoader配置的广泛定制(线程执行器,下载器,解码器,内存和磁盘缓存,显示图像选项等)
- 每个显示图像调用的许多自定义选项(存根图像,缓存切换,解码选项,位图处理和显示等)
- 内存和/或磁盘上的图像缓存(设备的文件系统或SD卡)
- 监听加载过程(包括下载进度)
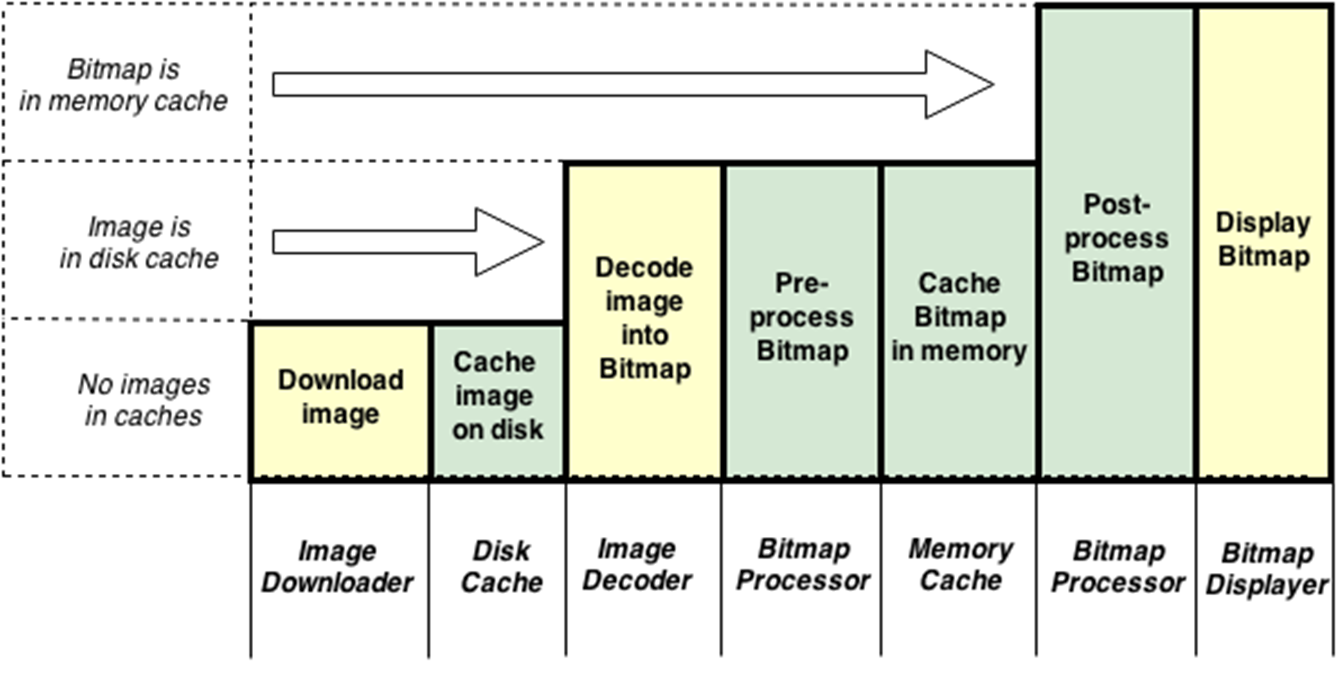
UIL图片处理流程:
我们的使用步骤:
- 搭建UIL使用环境
- 了解UIL常用的API
- 封装
一、我们首先来看下基础的UIL怎样使用
我们要使用之前首先需要获取到ImageLoader的一个实例:
// 先来获取到Image Loader的一个实例
ImageLoader imageLoader = ImageLoader.getInstance();//开始是使用默认的配置创建imageLoader
获取到ImageLoader的实例后就可以进行图片的加载:
//使用displayImage去加载图片,图片地址,要加载的地方
imageLoader.displayImage("url",imageView);
这是最简单的使用,在这里还可以添加显示图片时的一个Options以及一个加载的监听
        imageLoader.displayImage("url",imageView,options,new SimpleImageLoadingListener(){
            @Override
            public void onLoadingCancelled(String imageUri, View view) {
                super.onLoadingCancelled(imageUri, view);
            }

            @Override
            public void onLoadingStarted(String imageUri, View view) {
                super.onLoadingStarted(imageUri, view);
            }

            @Override
            public void onLoadingFailed(String imageUri, View view, FailReason failReason) {
                super.onLoadingFailed(imageUri, view, failReason);
            }

            @Override
            public void onLoadingComplete(String imageUri, View view, Bitmap loadedImage) {
                super.onLoadingComplete(imageUri, view, loadedImage);
            }
        });
options的获取:
//为我们显示图片的时候进行一个配置
DisplayImageOptions options = new DisplayImageOptions.Builder().build();
这些都使用的是一个默认的配置项,包括创建的ImageLoader实例,我们可以根据自己需求进行配置。说完基础的API使用下面介绍下我对UIL的封装思路。
二、对UIL的封装
ImageLoaderManager封装分为三个模块:
- 默认参数配置及提供必要的参数接口(方便不需要每次都配置一堆参数)
- 提供单例对象对外提供接口(仿照源码也以单例模式对外提供这个类的实例)
- 对外提供加载图片API(提供各种对外API供应用层来加载图片)
在封装之前我们首先创建一些默认的参数值用于配置
/**
     * 默认的参数值
     */
    //UIL最多可以有多少条线程
    private static final int THREAD_COUNT = 4;
    //图片加载优先级
    private static final int PROPRITY = 2;
    //UIL最多可以缓存多少图片(硬盘缓存大小)
    private static final int DISK_CACHE_SIZE = 50 * 1024;
    //连接的超时时间5s
    private static final int CONNECT_TIME_OUT = 5 * 1000;
    //读取的超时时间 30s
    private static final int READ_TIME_OUT = 30 * 1000;
下来我们来创建单例模式,用于获取到此类的对象供外层使用
private static ImageLoader mImageLoader = null;
    //单例模式
    private static ImageLoaderManager mInstance = null;

    public static ImageLoaderManager getmInstance(Context context) {
        //判断当前单例是否为空
        if (mInstance == null) {
            //为空,创建
            //同步块,保证不会因为多线程而产生多个实例
            synchronized (ImageLoaderManager.class) {
                if (mInstance == null) {
                    //调用私有构造方法
                    mInstance = new ImageLoaderManager(context);
                }
            }
        }
        //返回单例
        return mInstance;
    }
下来是单例模式的私有构造方法,以及我们对ImageLoader的配置
/**
  * 单例模式的私有构造方法
  *
  * @param context
  */
    private ImageLoaderManager(Context context) {
        //完成参数的配置
        ImageLoaderConfiguration configuration = new ImageLoaderConfiguration.
                Builder(context)
                .threadPoolSize(THREAD_COUNT)//设置图片下载线程的最大数量
                .threadPriority(Thread.NORM_PRIORITY - PROPRITY)//相对优先级,设备性能不同所以获取对应系统正常的优先级然后再降级
                .denyCacheImageMultipleSizesInMemory()//防止缓存多套尺寸图片
                .memoryCache(new WeakMemoryCache())//使用弱引用内存缓存,内存不足时会回收图片
                .diskCacheSize(DISK_CACHE_SIZE)//分配硬盘缓存大小
                .diskCacheFileNameGenerator(new Md5FileNameGenerator())//使用Md5命名文件,起到安全作用
                .tasksProcessingOrder(QueueProcessingType.LIFO)//设置图片下载顺序
                .defaultDisplayImageOptions(getDefultOptions())//默认的图片加载Option
                .imageDownloader(new BaseImageDownloader(context, CONNECT_TIME_OUT
                        , READ_TIME_OUT))//设置图片下载器
                .writeDebugLogs()//debug环境下会输出日志
                .build();

        //提供配置,初始化
        ImageLoader.getInstance().init(configuration);
        mImageLoader = ImageLoader.getInstance();
    }
配置我们的Options,显示图片时的一个配置
/**
  * 实现默认的Options
  *
  * @return
  */
    private DisplayImageOptions getDefultOptions() {
        DisplayImageOptions options = new DisplayImageOptions.Builder()
                .showImageForEmptyUri(R.mipmap.ic_launcher)//在图片地址为空时
                .showImageOnFail(R.mipmap.ic_launcher)//下载失败时显示的图片
                .cacheInMemory(true)//设置图片可以缓存在内存
                .cacheOnDisk(true)
                .bitmapConfig(Bitmap.Config.RGB_565)//设置图片解码类型,减少内存占用。使用的图片解码类型
                .decodingOptions(new BitmapFactory.Options())//图片解码配置(手机OS自带)
                .build();
        return options;
    }
到这我们的UIL的参数配置都已经换成我们的参数配置,接下来我们实现对外加载图片方法的封装
public void displayImage(ImageView imageView, String url,
                             DisplayImageOptions options, ImageLoadingListener listener) {

     if (mImageLoader != null) {
         mImageLoader.displayImage(url, imageView, options, listener);
     }
}

public void displayImage(ImageView imageView, String url, ImageLoadingListener listener) {
     displayImage(imageView, url, null, listener);
}

public void displayImage(ImageView imageView, String url) {
     displayImage(imageView, url, null);
}
这样我们就完成了基本的封装
下次我们使用时只需要ImageLoaderManager.getInstance(context).display()然后传入对应的参数就可以完成图片的加载。


 977
977

 被折叠的 条评论
为什么被折叠?
被折叠的 条评论
为什么被折叠?
 到【灌水乐园】发言


