


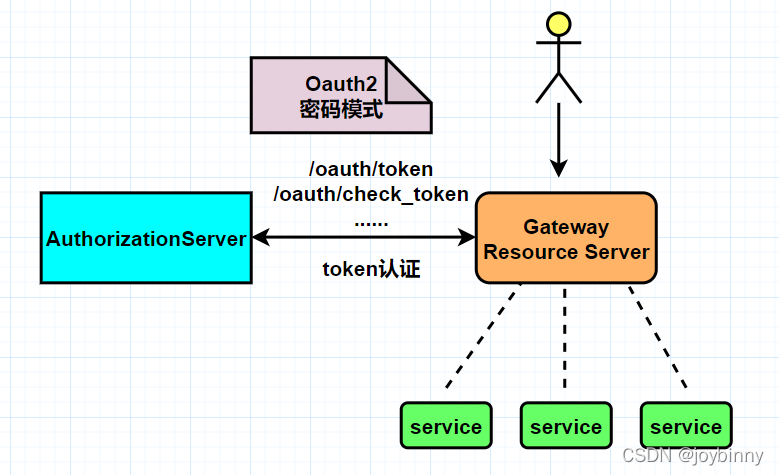
在微服务架构中,由于不同的业务会拆分成不同的微服务,传统的单体项目一般是通过过滤器进行拦截校验,而微服务显然不可能分发到各个服务进行用户认证,这就需要由一个统一的地方来管理所有服务的认证信息,实现只登录一次,即可在各个服务的授权范围内进行操作;本文采用springcloud-oauth2来实现多个微服务的统一认证,废话不多说,先来个架构图:
OAuth 2 有四种授权模式:
-
授权码模式(authorization code)
-
简化模式(implicit)
-
密码模式(resource owner password credentials)
-
客户端模式(client credentials)
具体 OAuth2 是什么,可以参考这篇文章:http://www.ruanyifeng.com/blog/2014/05/oauth_2_0.html
什么情况下需要用 OAuth2
首先大家最熟悉的就是几乎每个人都用过的,比如用微信登录、用 QQ 登录、用微博登录、用 Google 账号登录、用 github 授权登录等等,这些都是典型的 OAuth2 使用场景。假设我们做了一个自己的服务平台,如果不使用 OAuth2 登录方式,那么我们需要用户先完成注册,然后用注册号的账号密码或者用手机验证码登录。而使用了 OAuth2 之后,相信很多人使用过、甚至开发过公众号网页服务、小程序,当我们进入网页、小程序界面,第一次使用就无需注册,直接使用微信授权登录即可,大大提高了使用效率。因为每个人都有微信号,有了微信就可以马上使用第三方服务,这体验不要太好了。而对于我们的服务来说,我们也不需要存储用户的密码,只要存储认证平台返回的唯一ID 和用户信息即可。
以上是使用了 OAuth2 的授权码模式,利用第三方的权威平台实现用户身份的认证。当然了,如果你的公司内部有很多个服务,可以专门提取出一个认证中心,这个认证中心就充当上面所说的权威认证平台的角色,所有的服务都要到这个认证中心做认证
这样一说,发现没,这其实就是个单点登录的功能。这就是另外一种使用场景,对于多服务的平台,可以使用 OAuth2 实现服务的单点登录,只做一次登录,就可以在多个服务中自由穿行,当然仅限于授权范围内的服务和接口。
OAuth2 其实是一个关于授权的网络标准,它制定了设计思路和运行流程,利用这个标准我们其实是可以自己实现 OAuth2 的认证过程的。今天要介绍的 spring-cloud-starter-oauth2 ,其实是 Spring Cloud 按照 OAuth2 的标准并结合 spring-security 封装好的一个具体实现。接下来看一下系统架构说明:
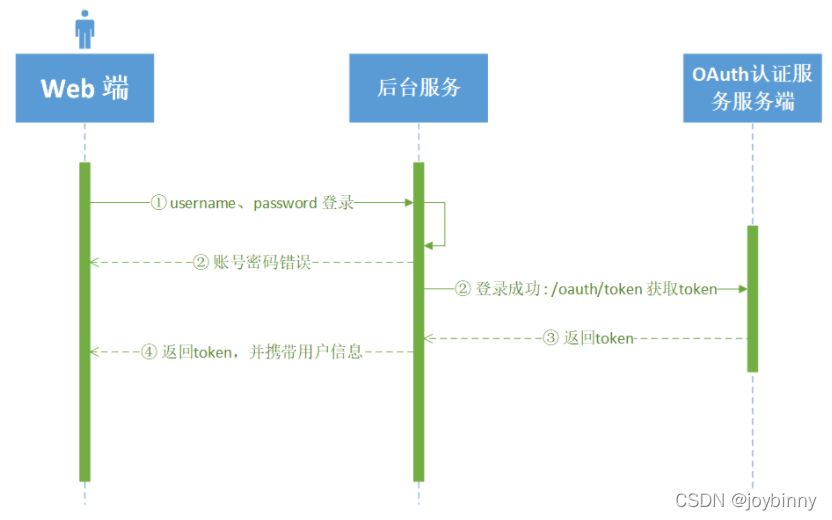
【登录时序图】
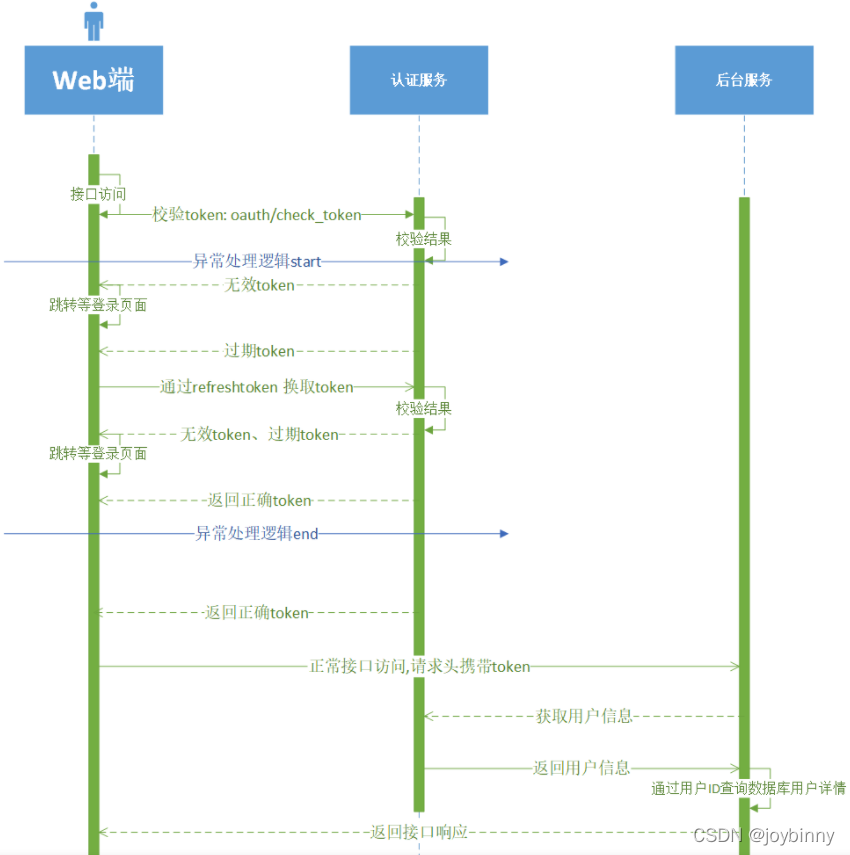
【接口调用时序图】
认证服务:OAuth2 主要实现端,Token 的生成、刷新、验证都在认证中心完成。
后台服务: 接收到请求后会到认证中心验证(微服务入口一般是网关)
前端:认证服务、后台服务之间的联调
上图描述了使用了 前端与OAuth2 认证服务、微服务间的请求过程。大致的过程就是前端用用户名和密码到后台服务登录,成功后后台服务到认证服务端换取 token,返回给前端,前端拿着 token 去各个微服务请求数据接口,一般这个 token 是放到 header 中的。当微服务接到请求后,先要拿着 token 去认证服务端检查 token 的合法性,如果合法,再根据用户所属的角色及具有的权限动态的返回数据。
接下来,正式进入实战阶段 !~
1. 搭建认证中心auth-center
<dependency>
    <groupId>org.springframework.cloud</groupId>
    <artifactId>spring-cloud-starter-oauth2</artifactId>
    <version>2.2.2.RELEASE</version>
</dependency>
启动类开启feign和服务发现注解:
@MapperScan("com.example.dao")
@SpringBootApplication
@EnableFeignClients
@EnableDiscoveryClient
public class AppAuthCenter {
    public static void main(String[] args) {
        SpringApplication.run(AppAuthCenter.class, args);
    }

}
server:
port: 8080
spring:
application:
name: auth-center
cloud:
nacos:
discovery:
server-addr: 127.0.0.1:8848
redis:
database: 2
host: 127.0.0.1
port: 6379
password: 123456
datasource:
type: com.zaxxer.hikari.HikariDataSource
driver-class-name: "com.mysql.cj.jdbc.Driver"
url: jdbc:mysql://127.0.0.1:3306/security?characterEncoding=utf8&characterSetResults=utf8&autoReconnect=true&failOverReadOnly=false
username: root
password: 123456
hikari:
minimum-idle: "0"
auto-commit: "true" # 此属性控制从池返回的连接的默认自动提交行为,默认值:true
pool-name: "springcloud-security-oauth2-jwt" # 连接池名称
max-lifetime: "1800000" # 此属性控制池中连接的最长生命周期,值0表示无限生命周期,默认1800000即30分钟
connection-timeout: "30000" # 数据库连接超时时间,默认30秒,即30000
connection-test-query: "SELECT 1"
mybatis-plus:
enabled: true #mybatis plus开启 如果没有此配置那么com.cnnho.redfish.common.config.MybatisPlusConfig 配置不起作用
mapper-locations: classpath:mapper/*Mapper.xml
global-config:
db-config:
field-strategy: not-empty #字段策略 0:"忽略判断",1:"非 NULL 判断"),2:"非空判断"
id-type: auto
db-type: mysql
refresh-mapper: "true"
configuration:
cache-enabled: true
map-underscore-to-camel-case: true
log-impl: org.apache.ibatis.logging.stdout.StdOutImpl
auto-mapping-unknown-column-behavior: none
1.1 spring security 基础配置:
package com.example.config;

import org.springframework.context.annotation.Bean;
import org.springframework.security.authentication.AuthenticationManager;
import org.springframework.security.config.annotation.web.builders.HttpSecurity;
import org.springframework.security.config.annotation.web.configuration.EnableWebSecurity;
import org.springframework.security.config.annotation.web.configuration.WebSecurityConfigurerAdapter;
import org.springframework.security.crypto.bcrypt.BCryptPasswordEncoder;
import org.springframework.security.crypto.password.PasswordEncoder;

/**
 * @author: joybinny
 */
@EnableWebSecurity
public class WebSecurityConfig extends WebSecurityConfigurerAdapter {

    @Bean
    public PasswordEncoder passwordEncoder() {
        return new BCryptPasswordEncoder();
    }

    @Bean
    @Override
    public AuthenticationManager authenticationManagerBean() throws Exception {
        return super.authenticationManagerBean();
    }

    /**
     * 允许匿名访问所有接口 主要是 oauth 接口
     * @param http
     * @throws Exception
     */
    @Override
    protected void configure(HttpSecurity http) throws Exception {
        http.authorizeRequests()
                .antMatchers("/**").permitAll();
    }
}
使用 @EnableWebSecurity 注解修饰,并继承自 WebSecurityConfigurerAdapter 类。 这个类的重点就是声明 PasswordEncoder 和 AuthenticationManager两个 Bean。稍后会用到。其中 BCryptPasswordEncoder是一个密码加密工具类,它可以实现不可逆的加密,AuthenticationManager是为了实现 OAuth2 的 password 模式必须要指定的授权管理 Bean。
1.2 实现 UserDetailsService
如果你之前用过 Security 的话,那肯定对这个类很熟悉,它是实现用户身份验证的一种方式,也是最简单方便的一种。另外还有结合 AuthenticationProvider的方式,有机会讲 Security 的时候再展开来讲吧。 UserDetailsService的核心就是 loadUserByUsername方法,它要接收一个字符串参数,也就是传过来的用户名,返回一个 UserDetails对象。
import com.baomidou.mybatisplus.core.conditions.query.QueryWrapper;
import com.example.dao.UserDao;
import com.example.entity.UserPo;
import io.micrometer.core.instrument.util.StringUtils;
import org.springframework.beans.factory.annotation.Autowired;
import org.springframework.security.core.userdetails.UserDetails;
import org.springframework.security.core.userdetails.UserDetailsService;
import org.springframework.security.core.userdetails.UsernameNotFoundException;
import org.springframework.stereotype.Component;

import java.util.ArrayList;

@Component(value = "kiteUserDetailsService")
public class KiteUserDetailsService implements UserDetailsService {

    @Autowired
    private UserDao userDao;

    /**
     * Security的登录,User赋予权限
     *
     * @param username
     * @return
     * @throws UsernameNotFoundException
     */
    @Override
    public UserDetails loadUserByUsername(String username) throws UsernameNotFoundException {
        if (StringUtils.isBlank(username)) {
            throw new UsernameNotFoundException("Username is not null");
        }
        QueryWrapper queryWrapper = new QueryWrapper();
        queryWrapper.eq("user_name", username);
        /** 只做认证,不做鉴权(如做鉴权,参考下面注释的代码..) */
        UserPo user = userDao.selectOne(queryWrapper);
        if (null == user) { //校验用户是否存在
            throw new UsernameNotFoundException("User is not exist");
        }
        return new org.springframework.security.core.userdetails.User(username, user.getOauthPassword(), new ArrayList<>());//返回null访问/oauth/token会报错Unauthorized


        /* 认证 + 鉴权
        String role = user.getRole();
        List<SimpleGrantedAuthority> authorities = new ArrayList<>();
        authorities.add(new SimpleGrantedAuthority(role));
        return new org.springframework.security.core.userdetails.User(username, user.getOauthPassword(), authorities);*/

    }
}
1.3 Oauth2配置文件
package com.example.config;

import org.springframework.beans.factory.annotation.Autowired;
import org.springframework.context.annotation.Configuration;
import org.springframework.security.authentication.AuthenticationManager;
import org.springframework.security.core.userdetails.UserDetailsService;
import org.springframework.security.crypto.password.PasswordEncoder;
import org.springframework.security.oauth2.config.annotation.builders.JdbcClientDetailsServiceBuilder;
import org.springframework.security.oauth2.config.annotation.configurers.ClientDetailsServiceConfigurer;
import org.springframework.security.oauth2.config.annotation.web.configuration.AuthorizationServerConfigurerAdapter;
import org.springframework.security.oauth2.config.annotation.web.configuration.EnableAuthorizationServer;
import org.springframework.security.oauth2.config.annotation.web.configurers.AuthorizationServerEndpointsConfigurer;
import org.springframework.security.oauth2.config.annotation.web.configurers.AuthorizationServerSecurityConfigurer;
import org.springframework.security.oauth2.provider.token.TokenEnhancer;
import org.springframework.security.oauth2.provider.token.TokenEnhancerChain;
import org.springframework.security.oauth2.provider.token.TokenStore;
import org.springframework.security.oauth2.provider.token.store.JwtAccessTokenConverter;

import javax.sql.DataSource;
import java.util.ArrayList;
import java.util.List;

@Configuration
@EnableAuthorizationServer
public class AuthorizationServerConfig extends AuthorizationServerConfigurerAdapter {

    /**
     * 指定密码的加密方式
     */
    @Autowired
    public PasswordEncoder passwordEncoder;

    /**
     * 该对象为刷新token提供支持
     */
    @Autowired
    public UserDetailsService kiteUserDetailsService;

    /**
     * 该对象用来支持password模式
     */
    @Autowired
    private AuthenticationManager authenticationManager;

    @Autowired
    private TokenStore jwtTokenStore;
    @Autowired
    private JwtAccessTokenConverter jwtAccessTokenConverter;
    @Autowired
    private TokenEnhancer jwtTokenEnhancer;
    @Autowired
    private DataSource dataSource;


    /**
     * 密码模式下配置认证管理器 AuthenticationManager,并且设置 AccessToken的存储介质tokenStore,如        果不设置,则会默认使用内存当做存储介质。
     * 而该AuthenticationManager将会注入 2个Bean对象用以检查(认证)
     * 1、ClientDetailsService的实现类 JdbcClientDetailsService (检查 ClientDetails 对象)
     * 2、UserDetailsService的实现类 KiteUserDetailsService (检查 UserDetails 对象)
     */
    @Override
    public void configure(final AuthorizationServerEndpointsConfigurer endpoints) throws Exception {
        /** jwt 增强模式 */
        TokenEnhancerChain enhancerChain = new TokenEnhancerChain();
        List<TokenEnhancer> enhancerList = new ArrayList<>();
        enhancerList.add(jwtTokenEnhancer);
        enhancerList.add(jwtAccessTokenConverter);
        enhancerChain.setTokenEnhancers(enhancerList);
        endpoints.tokenStore(jwtTokenStore)
                .userDetailsService(kiteUserDetailsService)
                // 支持 password 模式
                .authenticationManager(authenticationManager)
                .tokenEnhancer(enhancerChain)
                .accessTokenConverter(jwtAccessTokenConverter);
    }

    /**
     * 配置 oauth_client_details【client_id和client_secret等】信息的认证【检查ClientDetails的合        法性】服务
     * 设置 认证信息的来源:数据库 (可选项:数据库和内存,使用内存一般用来作测试)
     * 自动注入:ClientDetailsService的实现类 JdbcClientDetailsService (检查 ClientDetails 对        象)
     * 1.inMemory 方式存储的,将配置保存到内存中,相当于硬编码了。正式环境下的做法是持久化到数据库中,比如        mysql 中。
     * 2. secret加密是client_id:secret 然后通过base64编码后的字符串
     */
    @Override
    public void configure(ClientDetailsServiceConfigurer clients) throws Exception {
        JdbcClientDetailsServiceBuilder jcsb = clients.jdbc(dataSource);
        jcsb.passwordEncoder(passwordEncoder);
    }
//    @Override
//    public void configure(ClientDetailsServiceConfigurer clients) throws Exception {
//        //添加客户端信息
//        //使用内存存储OAuth客服端信息
//        clients.inMemory()
//                // client_id 客户单ID
//                .withClient("order_client")
//                // client_secret 客户单秘钥
//                .secret(passwordEncoder.encode("order6666"))
//                // 该客户端允许的授权类型,不同的类型,则获取token的方式不一样
//                .authorizedGrantTypes("refresh_token", "authorization_code", "password")
//                // token 有效期
//                .accessTokenValiditySeconds(EXPIRE_TIME)
//                // 允许的授权范围
//                .scopes("all")
//                .and()
//                .withClient("user_client")
//                .secret(passwordEncoder.encode("user8888"))
//                .authorizedGrantTypes("refresh_token", "authorization_code", "password")
//                .accessTokenValiditySeconds(EXPIRE_TIME)
//                .scopes("all");
//    }


    /**
     * 配置:安全检查流程
     * 默认过滤器:BasicAuthenticationFilter
     * 1、oauth_client_details表中clientSecret字段加密【ClientDetails属性secret】
     * 2、CheckEndpoint类的接口 oauth/check_token 无需经过过滤器过滤,默认值:denyAll()
     */
    @Override
    public void configure(AuthorizationServerSecurityConfigurer security) throws Exception {
        ///允许客户表单认证
        security.allowFormAuthenticationForClients();
        //对于CheckEndpoint控制器[框架自带的校验]的/oauth/check端点允许所有客户端发送器请求而不会被  Spring-security拦截
        security.checkTokenAccess("permitAll()");
        security.tokenKeyAccess("permitAll()");

    }


}
认证信息的来源采用数据库的方式,放弃内存模式;这就需要我们提前在数据库生成一张固定模板的表结构:
CREATE TABLE `oauth_client_details` (
`client_id` varchar(256) CHARACTER SET utf8mb4 COLLATE utf8mb4_unicode_ci NOT NULL,
`resource_ids` varchar(256) CHARACTER SET utf8mb4 COLLATE utf8mb4_unicode_ci NULL DEFAULT NULL,
`client_secret` varchar(256) CHARACTER SET utf8mb4 COLLATE utf8mb4_unicode_ci NULL DEFAULT NULL,
`scope` varchar(256) CHARACTER SET utf8mb4 COLLATE utf8mb4_unicode_ci NULL DEFAULT NULL,
`authorized_grant_types` varchar(256) CHARACTER SET utf8mb4 COLLATE utf8mb4_unicode_ci NULL DEFAULT NULL,
`web_server_redirect_uri` varchar(256) CHARACTER SET utf8mb4 COLLATE utf8mb4_unicode_ci NULL DEFAULT NULL,
`authorities` varchar(256) CHARACTER SET utf8mb4 COLLATE utf8mb4_unicode_ci NULL DEFAULT NULL,
`access_token_validity` int(11) NULL DEFAULT NULL,
`refresh_token_validity` int(11) NULL DEFAULT NULL,
`additional_information` varchar(4096) CHARACTER SET utf8mb4 COLLATE utf8mb4_unicode_ci NULL DEFAULT NULL,
`autoapprove` varchar(256) CHARACTER SET utf8mb4 COLLATE utf8mb4_unicode_ci NULL DEFAULT NULL,
PRIMARY KEY (`client_id`) USING BTREE
) ENGINE = InnoDB CHARACTER SET = utf8mb4 COLLATE = utf8mb4_unicode_ci COMMENT = 'https://blog.csdn.net/wangxuelei036/article/details/109491215' ROW_FORMAT = Dynamic;
-- ----------------------------
-- Records of oauth_client_details
-- ----------------------------
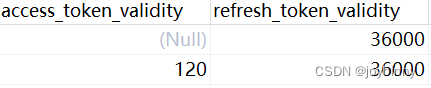
INSERT INTO `oauth_client_details` VALUES ('order-client', NULL, '$2a$10$lU.YisICL1MQORkGMX6OUuggYZVj2PKZetd8j7PfJgEnQJXZzw9dS', 'all', 'authorization_code,refresh_token,password', NULL, NULL, 60, 36000, NULL, '1');
INSERT INTO `oauth_client_details` VALUES ('user-client', NULL, '$2a$10$ZgTwua6DPOhnI6Q1519AP.YkZsDZThST5qlqu5Wa1kJ7biXzXERvO', 'all', 'authorization_code,refresh_token,password', NULL, NULL, 120, 36000, NULL, '1');
其中密码是用 PasswordEncoder 加密生成,关于该表的详细说明可参考该文章:https://blog.csdn.net/wangxuelei036/article/details/109491215
配置jwt增强器,通过 oAuth2Authentication 可以拿到用户名等信息,通过这些我们可以在这里查询数据库或者缓存获取更多的信息,而这些信息都可以作为 JWT 扩展信息加入其中。
package com.example.config.jwt;

import com.baomidou.mybatisplus.core.conditions.query.QueryWrapper;
import com.example.dao.UserDao;
import com.example.entity.UserPo;
import org.springframework.beans.factory.annotation.Autowired;
import org.springframework.security.core.userdetails.User;
import org.springframework.security.oauth2.common.DefaultOAuth2AccessToken;
import org.springframework.security.oauth2.common.OAuth2AccessToken;
import org.springframework.security.oauth2.provider.OAuth2Authentication;
import org.springframework.security.oauth2.provider.token.TokenEnhancer;

import java.util.HashMap;
import java.util.Map;

public class JWTokenEnhancer implements TokenEnhancer {

    @Autowired
    private UserDao userDao;

    /**
     *
     * @param oAuth2AccessToken
     * @param oAuth2Authentication 根据它获取用户token
     * @return
     */
    @Override
    public OAuth2AccessToken enhance(OAuth2AccessToken oAuth2AccessToken, OAuth2Authentication oAuth2Authentication) {
        Map<String, Object> info = new HashMap<>();
        info.put("jwt-ext", "JWT 扩展信息");
        User user = (User) oAuth2Authentication.getPrincipal();
        if(user != null){
            QueryWrapper queryWrapper = new QueryWrapper();
            queryWrapper.eq("user_name", user.getUsername());
            /** 只做认证,不做鉴权 */
            UserPo userEntity = userDao.selectOne(queryWrapper);
            info.put("userPo", userEntity); //也可以只把userId放在附加信息里面
        }
        ((DefaultOAuth2AccessToken) oAuth2AccessToken).setAdditionalInformation(info);
        return oAuth2AccessToken;
    }

}
添加JwtConfig配置类
package com.example.config.jwt;

import org.springframework.context.annotation.Bean;
import org.springframework.context.annotation.Configuration;
import org.springframework.security.oauth2.provider.token.TokenStore;
import org.springframework.security.oauth2.provider.token.store.JwtAccessTokenConverter;
import org.springframework.security.oauth2.provider.token.store.JwtTokenStore;

@Configuration
public class JwtTokenConfig {

    @Bean
    public TokenStore jwtTokenStore() {
        return new JwtTokenStore(jwtAccessTokenConverter());
    }

    @Bean
    public JwtAccessTokenConverter jwtAccessTokenConverter() {
        JwtAccessTokenConverter accessTokenConverter = new JwtAccessTokenConverter();
        accessTokenConverter.setSigningKey("mysecret"); //签名秘钥
        return accessTokenConverter;
    }

}
JwtAccessTokenConverter 是为了做 JWT 数据转换,这样做是因为 JWT 有自身独特的数据格式。如果没有了解过 JWT ,可以参考本人之前博客:https://blog.csdn.net/AkiraNicky/article/details/99307713
1.4 其它配置
配置全局统一异常处理:
@RestControllerAdvice
public class MyExceptionHandler {

    @ExceptionHandler(value = InvalidGrantException.class)
    public Result exceptionHandler(InvalidGrantException e) {
        return Result.error("用户名密码错误");
    }

}
重写check_token:
package com.example.controller;
import com.alibaba.fastjson.JSON;
import com.alibaba.fastjson.JSONObject;
import org.springframework.beans.factory.annotation.Autowired;
import org.springframework.security.oauth2.common.exceptions.InvalidTokenException;
import org.springframework.security.oauth2.provider.endpoint.CheckTokenEndpoint;
import org.springframework.web.bind.annotation.RequestMapping;
import org.springframework.web.bind.annotation.RequestParam;
import org.springframework.web.bind.annotation.RestController;
import java.util.Map;
/**
* 重写check_token接口
*/
@RestController
@RequestMapping("/oauth")
public class TokenEndpointController {
@Autowired
private CheckTokenEndpoint checkTokenEndpoint;
@RequestMapping("/check_token")
public String checkToken(@RequestParam("token") String token) {
Map<String, ?> stringMap;
try {
stringMap = checkTokenEndpoint.checkToken(token);
} catch (InvalidTokenException e) {
JSONObject err = new JSONObject();
err.put("error", "invalid_token");
err.put("error_description", "Token has expired");
return JSON.toJSONString(err);
}
return JSON.toJSONString(stringMap);
}
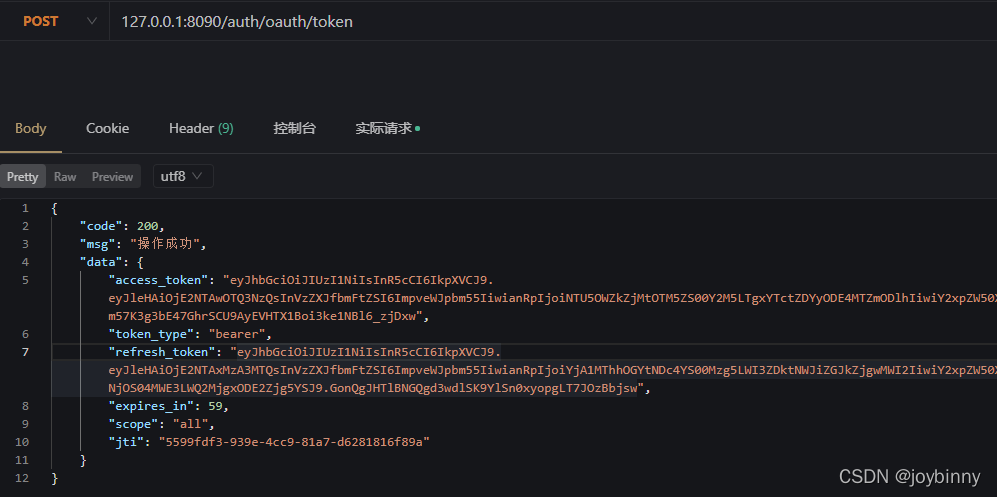
}添加切面,/oauth/token端点请求的结果进行拦截封装处理:
package com.example.aspect;

import com.example.entity.Result;
import org.aspectj.lang.ProceedingJoinPoint;
import org.aspectj.lang.annotation.Around;
import org.aspectj.lang.annotation.Aspect;
import org.springframework.http.HttpStatus;
import org.springframework.http.ResponseEntity;
import org.springframework.security.authentication.InsufficientAuthenticationException;
import org.springframework.security.core.Authentication;
import org.springframework.security.oauth2.common.OAuth2AccessToken;
import org.springframework.security.oauth2.common.util.OAuth2Utils;
import org.springframework.stereotype.Component;

import java.security.Principal;
import java.util.Map;

/**
 * 原理就是通过切面编程实现对/oauth/token端点请求的结果进行拦截封装处理,由于/oauth/token是Spring Cloud OAuth2的内部端点,因此需要对相关的Spring源码进行分析。最终定位到
 *     org.springframework.security.oauth2.provider.endpoint.TokenEndpoint.postAccessToken()
 */
@Component
@Aspect
public class AccessTokenAspect {

    @Around("execution(* org.springframework.security.oauth2.provider.endpoint.TokenEndpoint.postAccessToken(..))")
    public Object handleControllerMethod(ProceedingJoinPoint joinPoint) throws Throwable {
        Object[] args = joinPoint.getArgs();
        Principal principal = (Principal) args[0];
        if (!(principal instanceof Authentication)) {
            throw new InsufficientAuthenticationException("There is no client authentication. Try adding an appropriate authentication filter.");
        }
        Map<String, String> parameters = (Map<String, String>) args[1];
        String grantType = parameters.get(OAuth2Utils.GRANT_TYPE);
        Object proceed = joinPoint.proceed();
        if ("authorization_code".equals(grantType)) {
            //如果使用 @EnableOAuth2Sso 注解不能修改返回格式,否则授权码模式可以统一改
            return proceed;
        } else {
            ResponseEntity<OAuth2AccessToken> responseEntity = (ResponseEntity<OAuth2AccessToken>) proceed;
            OAuth2AccessToken body = responseEntity.getBody();
            return ResponseEntity.status(HttpStatus.OK).body(Result.success(body));
        }
    }

}
2. 搭建网关Gateway
<dependency>
    <groupId>org.springframework.cloud</groupId>
    <artifactId>spring-cloud-starter-gateway</artifactId>
    <version>2.2.8.RELEASE</version>
</dependency>

<dependency>
    <groupId>org.springframework.cloud</groupId>
    <artifactId>spring-cloud-starter-openfeign</artifactId>
    <version>2.2.2.RELEASE</version>
</dependency>
server:
port: 8090
spring:
application:
name: gateway
cloud:
nacos:
discovery:
server-addr: 127.0.0.1:8848
gateway:
discovery:
locator:
enabled: true
lower-case-service-id: true
routes:
- id: auth
uri: lb://auth-center
predicates:
- Path=/auth/**
filters:
- StripPrefix=1
- id: order
uri: lb://service-order
predicates:
- Path=/order/**
filters:
- StripPrefix=1
whitelist:
token: "/auth/oauth/token,/user/user/getAuthentication,/order/order/testOrderWithoutToken,/auth/oauth/check_token"
param-sign: ""
blacklist:
token: ""
param-sign: ""
package com.example.config;


import org.springframework.beans.factory.ObjectProvider;
import org.springframework.boot.SpringBootConfiguration;
import org.springframework.boot.autoconfigure.condition.ConditionalOnMissingBean;
import org.springframework.boot.autoconfigure.http.HttpMessageConverters;
import org.springframework.context.annotation.Bean;
import org.springframework.http.converter.HttpMessageConverter;

import java.util.stream.Collectors;

/**
 * feign response 返回数据解析配置
 */
@SpringBootConfiguration
public class FeignMessageConfig {

    @Bean
    @ConditionalOnMissingBean
    public HttpMessageConverters messageConverters(ObjectProvider<HttpMessageConverter<?>> converters) {
        return new HttpMessageConverters(converters.orderedStream().collect(Collectors.toList()));
    }

}
@FeignClient(value = "auth-center")
@Component
public interface VerifyTokenFeign {

    @RequestMapping(value = "/oauth/check_token", method = RequestMethod.POST)
    String verifyToken(@RequestParam(value="token") String token);

}
package com.example.filter;
import com.alibaba.fastjson.JSON;
import com.alibaba.fastjson.JSONObject;
import com.example.feign.VerifyTokenFeign;
import io.netty.buffer.UnpooledByteBufAllocator;
import org.apache.commons.lang3.StringUtils;
import org.springframework.beans.factory.annotation.Autowired;
import org.springframework.beans.factory.annotation.Value;
import org.springframework.cloud.gateway.filter.GatewayFilterChain;
import org.springframework.cloud.gateway.filter.GlobalFilter;
import org.springframework.core.Ordered;
import org.springframework.core.io.buffer.NettyDataBufferFactory;
import org.springframework.http.HttpHeaders;
import org.springframework.http.HttpStatus;
import org.springframework.http.server.reactive.ServerHttpRequest;
import org.springframework.http.server.reactive.ServerHttpResponse;
import org.springframework.stereotype.Component;
import org.springframework.util.AntPathMatcher;
import org.springframework.web.server.ServerWebExchange;
import reactor.core.publisher.Flux;
import reactor.core.publisher.Mono;
import java.nio.charset.StandardCharsets;
/**
* 请求token全局过滤
*/
@Component
public class GlobalTokenFilter implements GlobalFilter, Ordered {
private AntPathMatcher antPathMatcher = new AntPathMatcher();
@Autowired
private VerifyTokenFeign verifyTokenFeign;
// 白名单
@Value(value = "${whitelist.token}")
private String whitelist;
@Override
public Mono<Void> filter(ServerWebExchange exchange, GatewayFilterChain chain) {
ServerHttpRequest request = exchange.getRequest();
String urlPath = request.getPath().toString();
boolean action = false;
String[] whitelistArray = whitelist.split(",");
for (String url : whitelistArray) {
if (antPathMatcher.match(url, urlPath)) {
action = true;
break;
}
}
if (action) return chain.filter(exchange); //白名单,放行
String token = request.getHeaders().getFirst(HttpHeaders.AUTHORIZATION);
if (StringUtils.isNotBlank(token)) {
// token = token.substring(7);
String verifyToken = verifyTokenFeign.verifyToken(token);
if (StringUtils.isNotBlank(verifyToken)) {
JSONObject verifyTokenJson = JSON.parseObject(verifyToken);
if (verifyTokenJson.containsKey("active") && verifyTokenJson.getBoolean("active")) { //JWT验证Token固定格式
return chain.filter(exchange);
}
}
}
return unAuthorized(exchange);
}
/**
* 认证未通过
*/
public Mono<Void> unAuthorized(ServerWebExchange exchange) {
ServerHttpResponse response = exchange.getResponse();
response.setStatusCode(HttpStatus.OK);
response.getHeaders().add("Content-Type", "application/json;charset=UTF-8");
JSONObject message = new JSONObject();
message.put("code", "-2");
message.put("msg", "登录失效,请重新登录");
return response.writeWith(Flux.create(sink -> {
sink.next(new NettyDataBufferFactory(new UnpooledByteBufAllocator(false)).wrap(message.toJSONString().getBytes(StandardCharsets.UTF_8)));
sink.complete();
}));
}
@Override
public int getOrder() {
return 0;
}
}
3. 测试
新开个order服务,写个测试接口 :
package com.example.controller;

import com.example.entity.Result;
import io.swagger.annotations.Api;
import io.swagger.annotations.ApiOperation;
import org.springframework.web.bind.annotation.PostMapping;
import org.springframework.web.bind.annotation.RequestMapping;
import org.springframework.web.bind.annotation.RestController;


@Api(tags = "订单模块")
@RestController
@RequestMapping("/order/")
public class OrderController {

    @ApiOperation("测试订单-验证token")
    @PostMapping("testOrder")
    public Result testOrder(){
        return Result.success("testOrder");
    }


    @ApiOperation("测试订单-不验证token")
    @PostMapping("testOrderWithoutToken")
    public Result testOrderWithoutToken(){
        return Result.success("testOrderWithoutToken");
    }

}
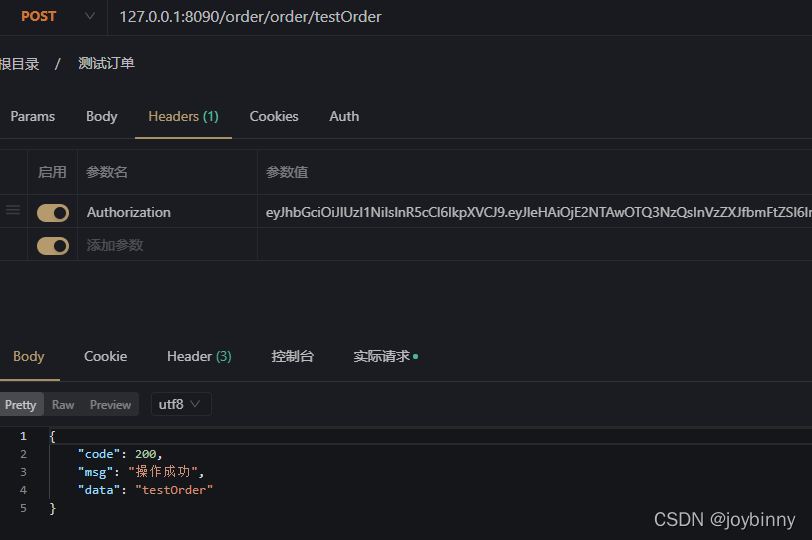
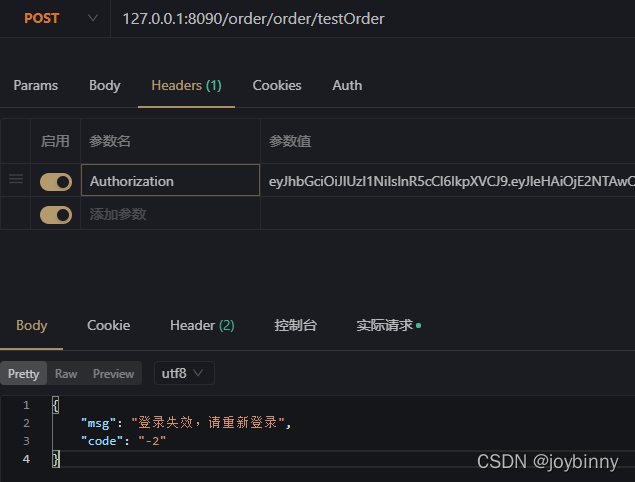
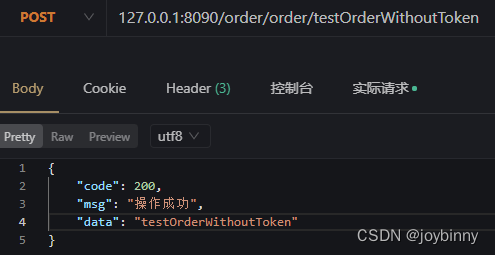
由于我在数据库设置的order-client过期时间为一分钟,所以一分钟之内携带token是可以随意请求testOrder的,但是token一旦失效则返回“登录失效,请重新登录”。而testOrderWithoutToken接口在白名单中,gateway过滤器不会校验token,所以不需要token也可以访问:
关于用户无感知刷新token
用户登录,后端验证用户成功之后生成两个token,这两个token分别是access_token(访问接口使用的token)、refresh_token(access_token过期后用于刷续期的token,注意设置refresh_token的过期时间需比access_token的过期时间长),后端将用户信息和这两个token存放到redis中并返回给前端并存储。
为什么需要刷新令牌?
如果access token超时时间很长,比如14天,由于第三方软件获取受保护资源都要带着access token,这样access token的攻击面就比较大。如果access token超时时间很短,比如1个小时,那其超时之后就需要用户再次授权,这样的频繁授权导致用户体验不好。引入refresh token,就解决了该矛盾。
什么时候使用刷新令牌呢?
在第三方软件收到访问令牌的同时,也会收到访问令牌的过期时间expires_in。一个设计良好的第三方应用,应该将expires_in值保存下来并定时检测;如果发现expires_in即将过期,则需要利用refresh_token去重新请求授权服务,以便获取新的、有效的访问令牌。
比如第三方软件访问受保护资源的时候,突然收到一个访问令牌失效的响应,此时第三方软件立即使用refresh_token来请求一个访问令牌,以便继续代表用户使用他的数据。
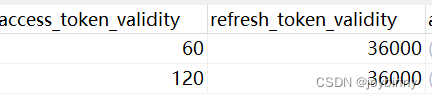
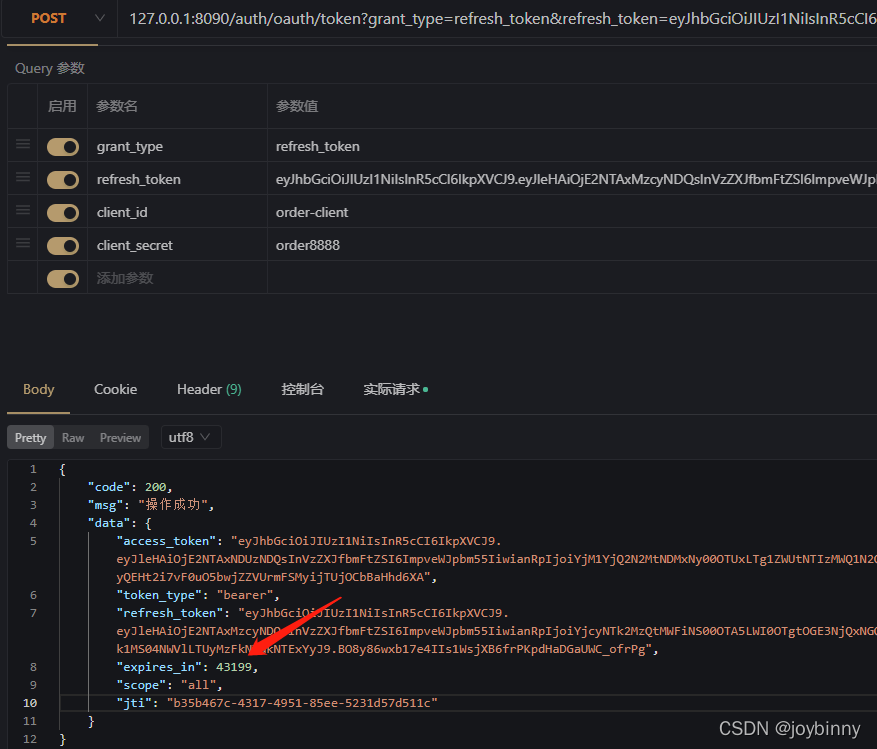
由于order-client在数据库配置的access_token过期时间为60秒,refresh_token过期时间为36000秒,所以token过期后将请求不到后台资源,此时可以用refresh_token去重新获取token,客户端重新保存token即可,如果refresh_token也过期,让用户重新登录即可。
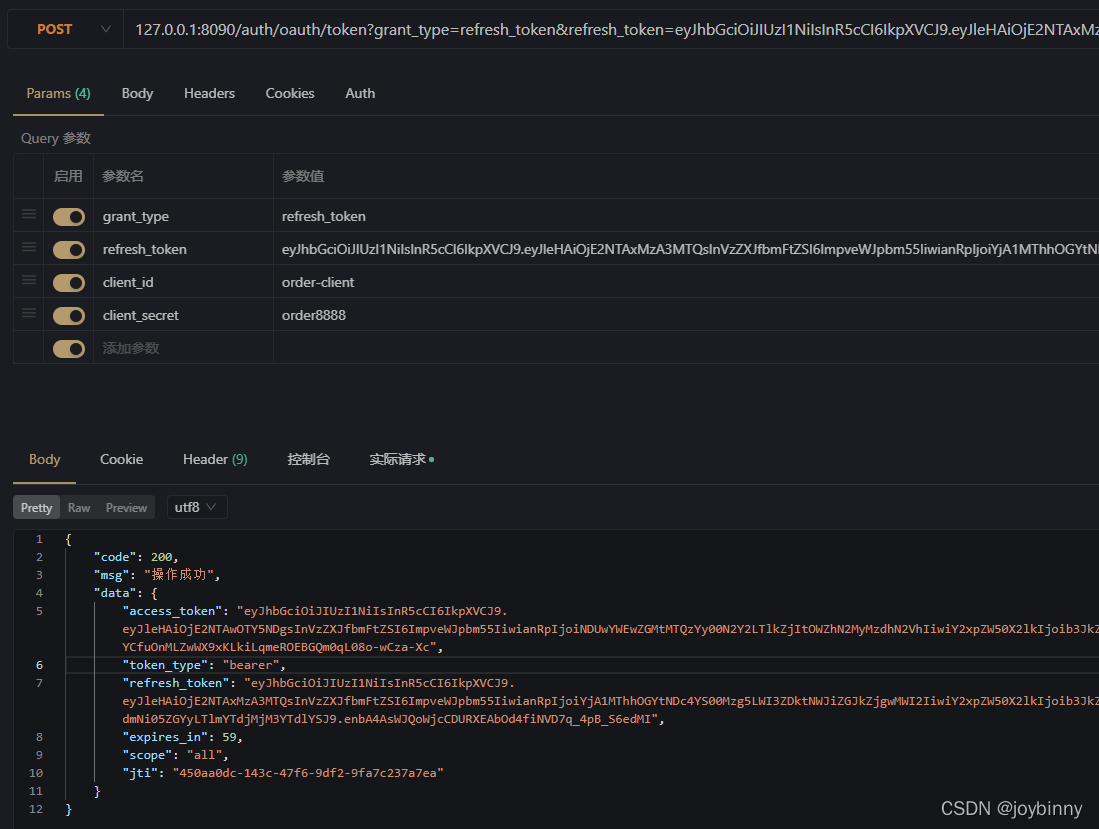
注意:如果不设置access_token_validity和refresh_token_validity,则会采用默认值:access_token_validity默认60 * 60 * 12 秒(12小时),refresh_token_validity默认默认60 *60 * 24 * 30秒 (30天)
在使用刷新令牌的时候,也是需要应用传递它的app_id和app_sercet的。


 1047
1047

 被折叠的 条评论
为什么被折叠?
被折叠的 条评论
为什么被折叠?
 到【灌水乐园】发言


