


1、初识ElasticSearch
1.1数据库查询存在的问题:
- 性能低:使用模糊查询,左边有通配符,不会走索引,会全表扫描,性能低
- 功能弱:如果以”华为手机“作为条件,查询有华为和手机这两个词的文本查询不出来数据
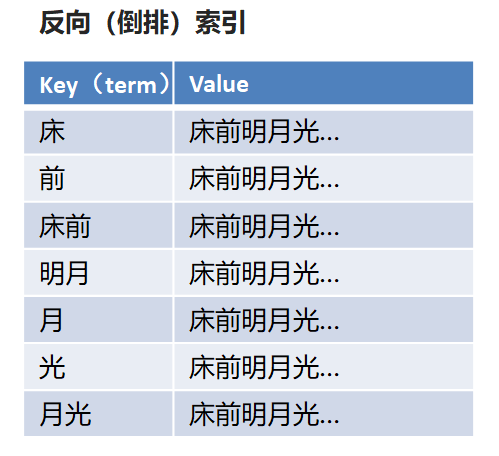
1.2倒排索引
倒排索引:将文档进行分词,形成词条和id的对应关系即为反向索引。
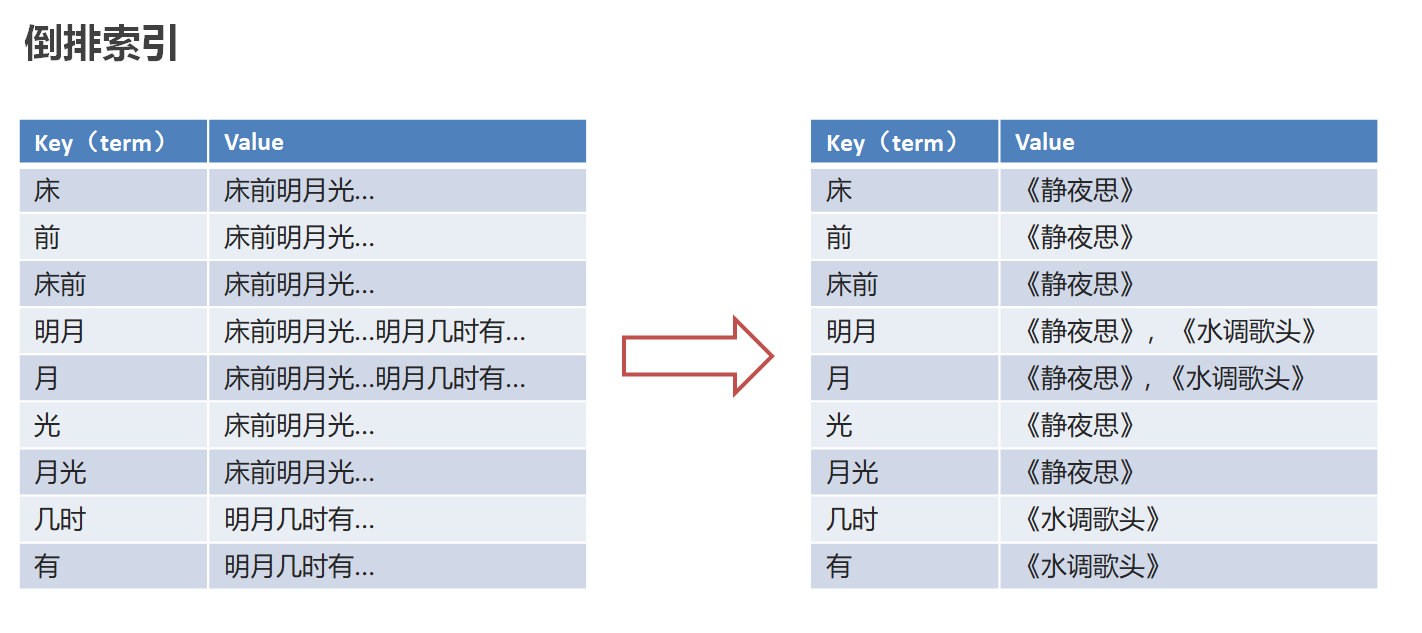
以唐诗为例,所处包含“前”的诗句
正向索引:由《静夜思》–>窗前明月光—>“前”字
反向索引:“前”字–>窗前明月光–>《静夜思》
反向索引的实现就是对诗句进行分词,分成单个的词,由词推据,即为反向索引
“床前明月光”–> 分词
将一段文本按照一定的规则,拆分为不同的词条(term)
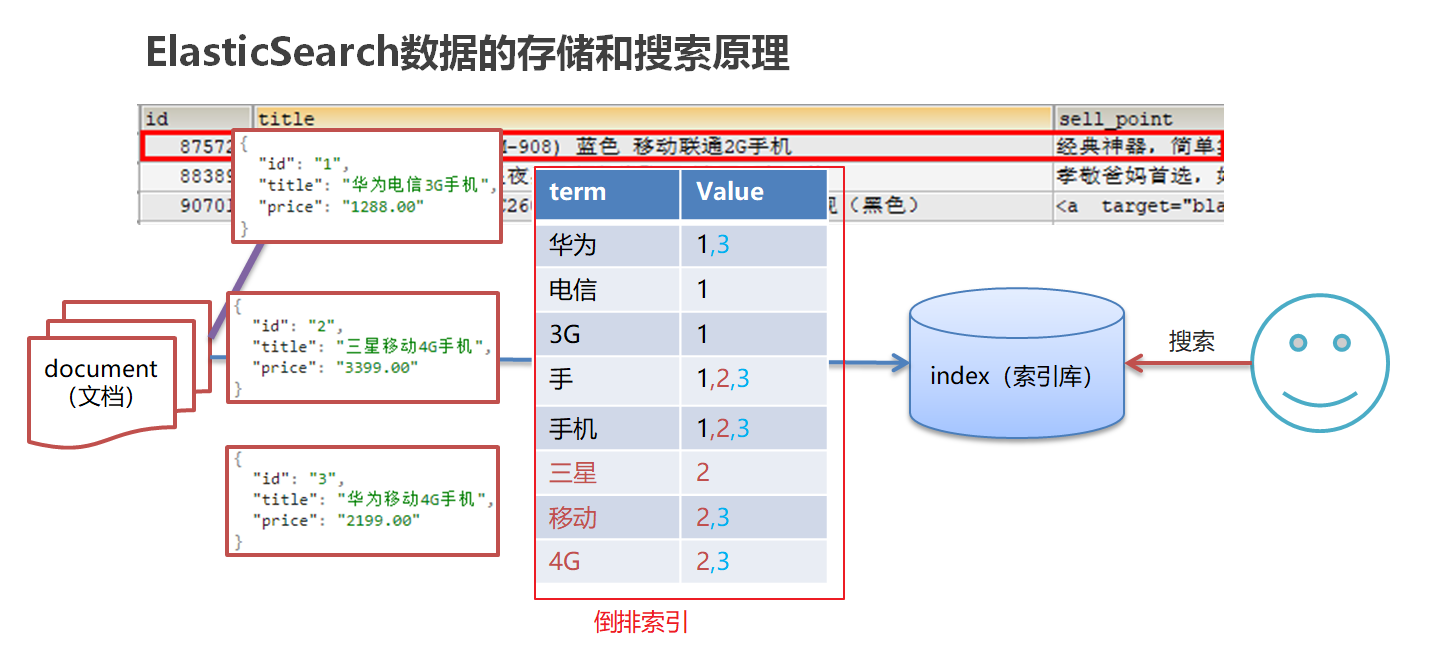
1.3-ES存储和查询的原理
index(索引):相当于mysql的库
映射:相当于mysql 的表结构
document(文档):相当于mysql的表中的数据
数据库查询存在的问题:
- 性能低:使用模糊查询,左边有通配符,不会走索引,会全表扫描,性能低
- 功能弱:如果以”华为手机“作为条件,查询不出来数据
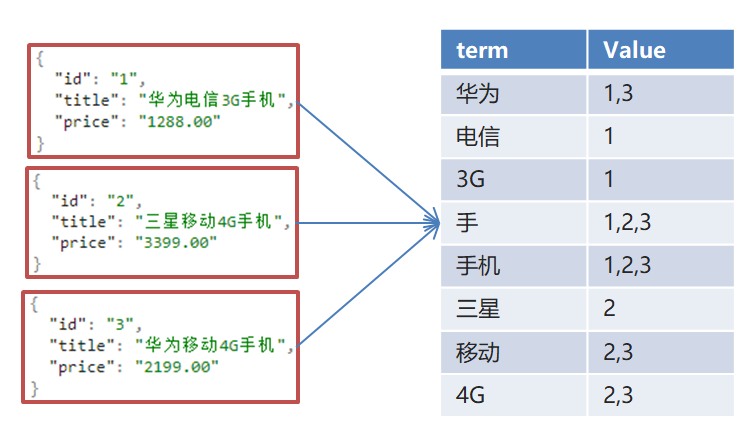
Es使用倒排索引,对title 进行分词
-
使用“手机”作为关键字查询
生成的倒排索引中,词条会排序,形成一颗树形结构,提升词条的查询速度
-
使用“华为手机”作为关键字查询
华为:1,3
手机:1,2,3
1.4-ES概念详解
•ElasticSearch是一个基于Lucene的搜索服务器

•是一个分布式、高扩展、高实时的搜索与数据分析引擎
•基于RESTful web接口
•Elasticsearch是用Java语言开发的,并作为Apache许可条款下的开放源码发布,是一种流行的企业级搜索引擎
•官网:https://www.elastic.co/
应用场景
•搜索:海量数据的查询
•日志数据分析
•实时数据分析
2-安装ElasticSearch
docker安装
拉取镜像
docker pull elasticsearch:7.4.0
配置分词器
#切换目录
mkdir /usr/share/elasticsearch/plugins
cd /usr/share/elasticsearch/plugins
#新建目录
mkdir analysis-ik
cd analysis-ik
#root根目录中拷贝文件
mv elasticsearch-analysis-ik-7.4.0.zip /usr/share/elasticsearch/plugins/analysis-ik
#解压文件
cd /usr/share/elasticsearch/plugins/analysis-ik
unzip elasticsearch-analysis-ik-7.4.0.zip
创建容器
docker run -id --name elasticsearch -d -p 9200:9200 -p 9300:9300 -v /usr/share/elasticsearch/plugins:/usr/share/elasticsearch/plugins -e "discovery.type=single-node" elasticsearch:7.4.0
设置开机启动
docker update --restart=always elasticsearch
安装Kibana
docker pull kibana:7.4.0
docker run -d -p 5601:5601 --link elasticsearch -e "ELASTICSEARCH_URL=http://192.168.200.130:9200" kibana:7.4.0
3、ElasticSearch核心概念
索引(index)
ElasticSearch存储数据的地方,可以理解成关系型数据库中的数据库概念。
映射(mapping)
mapping定义了每个字段的类型、字段所使用的分词器等。相当于关系型数据库中的表结构。
文档(document)
Elasticsearch中的最小数据单元,常以json格式显示。一个document相当于关系型数据库中的一行数据。
倒排索引
一个倒排索引由文档中所有不重复词的列表构成,对于其中每个词,对应一个包含它的文档id列表。
类型(type)
一种type就像一类表。如用户表、角色表等。在Elasticsearch7.X默认type为_doc
 \- ES 5.x中一个index可以有多种type。

  \- ES 6.x中一个index只能有一种type。

  \- ES 7.x以后,将逐步移除type这个概念,现在的操作已经不再使用,默认_doc
4、脚本操作ES
4.1-操作索引
PUT
http://ip:端口/索引名称
查询
GET http://ip:端口/索引名称  # 查询单个索引信息
GET http://ip:端口/索引名称1,索引名称2...  # 查询多个索引信息
GET http://ip:端口/_all  # 查询所有索引信息
•删除索引
DELETE http://ip:端口/索引名称
•关闭、打开索引
POST http://ip:端口/索引名称/_close
POST http://ip:端口/索引名称/_open
4.2-ES数据类型
- 简单数据类型
- 字符串
聚合:相当于mysql 中的sum(求和)
text:会分词,不支持聚合

keyword:不会分词,将全部内容作为一个词条,支持聚合
-
数值
-
布尔:boolean
-
二进制:binary
-
范围类型
integer_range, float_range, long_range, double_range, date_range
- 日期:date
- 复杂数据类型
•数组:[ ] Nested: nested (for arrays of JSON objects 数组类型的JSON对象)
•对象:{ } Object: object(for single JSON objects 单个JSON对象)
4.3-操作映射
 PUT person

 GET person
 #添加映射
 PUT /person/_mapping
 {
   "properties":{
     "name":{
       "type":"text"
     },
     "age":{
       "type":"integer"
     }
   }
 }
创建索引并添加映射
 #创建索引并添加映射
 PUT /person1
{
  "mappings": {
    "properties": {
      "name": {
        "type": "text"
      },
      "age": {
        "type": "integer"
      }
    }
  }
}

GET person1/_mapping
添加字段
#添加字段
PUT /person1/_mapping
{
  "properties": {
      "name": {
        "type": "text"
      },
      "age": {
        "type": "integer"
      }
    }
}
4.4-操作文档
添加文档,指定id
POST /person1/_doc/2
{
  "name":"张三",
  "age":18,
  "address":"北京"
}

GET /person1/_doc/1
添加文档,不指定id
#添加文档,不指定id
POST /person1/_doc/
{
  "name":"张三",
  "age":18,
  "address":"北京"
}

#查询所有文档
GET /person1/_search
删除文档
#删除指定id文档
DELETE /person1/_doc/1
删除指定条件的文档
# 清空文档
POST person1/_delete_by_query
{
  "query": {
    "match_all": {}
  }
}
5-分词器
5.1-ik分词器使用
IK分词器有两种分词模式:ik_max_word和ik_smart模式。
1、ik_max_word
会将文本做最细粒度的拆分,比如会将“乒乓球明年总冠军”拆分为“乒乓球、乒乓、球、明年、总冠军、冠军。
#方式一ik_max_word
GET /_analyze
{
  "analyzer": "ik_max_word",
  "text": "乒乓球明年总冠军"
}
2、ik_smart
会做最粗粒度的拆分,比如会将“乒乓球明年总冠军”拆分为乒乓球、明年、总冠军。
#方式二ik_smart
GET /_analyze
{
  "analyzer": "ik_smart",
  "text": "乒乓球明年总冠军"
}
3、添加映射,并指定分词器为ik分词器
PUT person2
{
  "mappings": {
    "properties": {
      "name": {
        "type": "keyword"
      },
      "address": {
        "type": "text",
        "analyzer": "ik_max_word"
      }
    }
  }
}
6.SpringBoot整合ES
①搭建SpringBoot工程
②引入ElasticSearch相关坐标
<!--引入es的坐标-->
<dependency>
    <groupId>org.elasticsearch.client</groupId>
    <artifactId>elasticsearch-rest-high-level-client</artifactId>
    <version>7.4.0</version>
</dependency>
<dependency>
    <groupId>org.elasticsearch.client</groupId>
    <artifactId>elasticsearch-rest-client</artifactId>
    <version>7.4.0</version>
</dependency>
<dependency>
    <groupId>org.elasticsearch</groupId>
    <artifactId>elasticsearch</artifactId>
    <version>7.4.0</version>
</dependency>
③测试
ElasticSearchConfig
@Configuration
@ConfigurationProperties(prefix="elasticsearch")
public class ElasticSearchConfig {

    private String host;

    private int port;

    public String getHost() {
        return host;
    }

    public void setHost(String host) {
        this.host = host;
    }

    public int getPort() {
        return port;
    }

    public void setPort(int port) {
        this.port = port;
    }
    @Bean
    public RestHighLevelClient client(){
        return new RestHighLevelClient(RestClient.builder(
                new HttpHost(host,port,"http")
        ));
    }
}
ElasticsearchDay01ApplicationTests
注意:使用@Autowired注入RestHighLevelClient 如果报红线,则是因为配置类所在的包和测试类所在的包,包名不一致造成的
@SpringBootTest
class ElasticsearchDay01ApplicationTests {

    @Autowired
    RestHighLevelClient client;

    /**
     * 测试
     */
    @Test
    void contextLoads() {

        System.out.println(client);
    }
}
7-JavaApi-索引操作
7.1添加索引
/**
    * 添加索引
    * @throws IOException
    */
   @Test
   public void addIndex() throws IOException {
      //1.使用client获取操作索引对象
       IndicesClient indices = client.indices();
       //2.具体操作获取返回值
       //2.1 设置索引名称
       CreateIndexRequest createIndexRequest=new CreateIndexRequest("person");

       CreateIndexResponse createIndexResponse = indices.create(createIndexRequest, RequestOptions.DEFAULT);
       //3.根据返回值判断结果
       System.out.println(createIndexResponse.isAcknowledged());
   }
7.2添加索引,并添加映射
 /**
     * 添加索引,并添加映射
     */
    @Test
    public void addIndexAndMapping() throws IOException {
       //1.使用client获取操作索引对象
        IndicesClient indices = client.indices();
        //2.具体操作获取返回值
        //2.具体操作,获取返回值
        CreateIndexRequest createIndexRequest = new CreateIndexRequest("person");
        //2.1 设置mappings
        String mapping = "{\n" +
                "      \"properties\" : {\n" +
                "        \"address\" : {\n" +
                "          \"type\" : \"text\",\n" +
                "          \"analyzer\" : \"ik_max_word\"\n" +
                "        },\n" +
                "        \"age\" : {\n" +
                "          \"type\" : \"long\"\n" +
                "        },\n" +
                "        \"name\" : {\n" +
                "          \"type\" : \"keyword\"\n" +
                "        }\n" +
                "      }\n" +
                "    }";
        createIndexRequest.mapping(mapping,XContentType.JSON);

        CreateIndexResponse createIndexResponse = indices.create(createIndexRequest, RequestOptions.DEFAULT);
        //3.根据返回值判断结果
        System.out.println(createIndexResponse.isAcknowledged());
    }
7.3-查询、删除、判断索引
查询索引
    /**
     * 查询索引
     */
    @Test
    public void queryIndex() throws IOException {
        IndicesClient indices = client.indices();

        GetIndexRequest getRequest=new GetIndexRequest("person");
        GetIndexResponse response = indices.get(getRequest, RequestOptions.DEFAULT);
        Map<String, MappingMetaData> mappings = response.getMappings();
        //iter 提示foreach
        for (String key : mappings.keySet()) {
            System.out.println(key+"==="+mappings.get(key).getSourceAsMap());
        }
    }
删除索引
 	/**
     * 删除索引
     */
    @Test
    public void deleteIndex() throws IOException {
         IndicesClient indices = client.indices();
        DeleteIndexRequest deleteRequest=new DeleteIndexRequest("person");
        AcknowledgedResponse delete = indices.delete(deleteRequest, RequestOptions.DEFAULT);
        System.out.println(delete.isAcknowledged());

    }
索引是否存在
 	/**
     * 索引是否存在
     */
    @Test
    public void existIndex() throws IOException {
        IndicesClient indices = client.indices();

        GetIndexRequest getIndexRequest=new GetIndexRequest("person");
        boolean exists = indices.exists(getIndexRequest, RequestOptions.DEFAULT);
        System.out.println(exists);

    }
8-JavaApi-文档增删改查
8.1.添加文档
1.使用map作为数据
 @Test
    public void addDoc1() throws IOException {
        Map<String, Object> map=new HashMap<>();
        map.put("name","张三");
        map.put("age","18");
        map.put("address","北京二环");
        IndexRequest request=new IndexRequest("person").id("1").source(map);
        IndexResponse response = client.index(request, RequestOptions.DEFAULT);
        System.out.println(response.getId());
    }
2.添加文档,使用对象作为数据
@Test
public void addDoc2() throws IOException {
    Person person=new Person();
    person.setId("2");
    person.setName("李四");
    person.setAge(20);
    person.setAddress("北京三环");
    String data = JSON.toJSONString(person);
    IndexRequest request=new IndexRequest("person").id(person.getId()).source(data,XContentType.JSON);
    IndexResponse response = client.index(request, RequestOptions.DEFAULT);
    System.out.println(response.getId());
}
8.2-修改、查询
- 修改文档:添加文档时,如果id存在则修改,id不存在则添加
    /**
     * 修改文档:添加文档时,如果id存在则修改,id不存在则添加
     */

    @Test
    public void UpdateDoc() throws IOException {
        Person person=new Person();
        person.setId("2");
        person.setName("李四");
        person.setAge(20);
        person.setAddress("北京三环车王");

        String data = JSON.toJSONString(person);

        IndexRequest request=new IndexRequest("person").id(person.getId()).source(data,XContentType.JSON);
        IndexResponse response = client.index(request, RequestOptions.DEFAULT);
        System.out.println(response.getId());
    }
- 根据id查询文档
    /**
     * 根据id查询文档
     */
    @Test
    public void getDoc() throws IOException {

        //设置查询的索引、文档
        GetRequest indexRequest=new GetRequest("person","2");

        GetResponse response = client.get(indexRequest, RequestOptions.DEFAULT);
        System.out.println(response.getSourceAsString());
    }
8.3 删除文档
1.根据id删除文档
/**
     * 根据id删除文档
     */
    @Test
    public void delDoc() throws IOException {

        //设置要删除的索引、文档
        DeleteRequest deleteRequest=new DeleteRequest("person","1");

        DeleteResponse response = client.delete(deleteRequest, RequestOptions.DEFAULT);
        System.out.println(response.getId());
    }
2.删除满足给定条件的文档
/**
 * 删除满足给定条件的文档
 */
@Test
void test09() throws IOException {
    //设置要删除的索引
    DeleteByQueryRequest deleteByQueryRequest = new DeleteByQueryRequest("person");
    //设置条件,可设置多个
    deleteByQueryRequest.setQuery(new TermQueryBuilder("age", 11));
    deleteByQueryRequest.setQuery(new TermQueryBuilder("name", 张三));

    // 设置并行
    deleteByQueryRequest.setSlices(2);
    // 设置超时
    deleteByQueryRequest.setTimeout(TimeValue.timeValueMinutes(2));
    BulkByScrollResponse response = client.deleteByQuery(deleteByQueryRequest, RequestOptions.DEFAULT);
    System.out.println(response.getStatus().getDeleted());
}
9-bulk批量操作
9.1-bulk批量操作-脚本
脚本:
测试用的5号文档
POST /person1/_doc/5
{
  "name":"张三5号",
  "age":18,
  "address":"北京海淀区"
}
批量操作文本
#批量操作
#1.删除5号
#2.新增8号
#3.更新2号 name为2号
POST _bulk
{"delete":{"_index":"person1","_id":"5"}}
{"create":{"_index":"person1","_id":"8"}}
{"name":"八号","age":18,"address":"北京"}
{"update":{"_index":"person1","_id":"2"}}
{"doc":{"name":"2号"}}
结果
{
  "took" : 51,
  "errors" : true,
  "items" : [
    {
      "delete" : {
        "_index" : "person1",
        "_type" : "_doc",
        "_id" : "5",
        "_version" : 2,
        "result" : "deleted",
        "_shards" : {
          "total" : 2,
          "successful" : 1,
          "failed" : 0
        },
        "_seq_no" : 6,
        "_primary_term" : 2,
        "status" : 200
      }
    },
    {
      "create" : {
        "_index" : "person1",
        "_type" : "_doc",
        "_id" : "8",
        "_version" : 1,
        "result" : "created",
        "_shards" : {
          "total" : 2,
          "successful" : 1,
          "failed" : 0
        },
        "_seq_no" : 7,
        "_primary_term" : 2,
        "status" : 201
      }
    },
    {
      "update" : {
        "_index" : "person1",
        "_type" : "_doc",
        "_id" : "2",
        "_version" : 2,
        "result" : "updated",
        "_shards" : {
          "total" : 2,
          "successful" : 1,
          "failed" : 0
        },
        "_seq_no" : 10,
        "_primary_term" : 2,
        "status" : 200
      }
    }
  ]
}
9.2-bulk批量操作-JavaAPI
 /**
     *  Bulk 批量操作
     */
    @Test
    public void test2() throws IOException {

        //创建bulkrequest对象,整合所有操作
        BulkRequest bulkRequest =new BulkRequest();

           /*
        # 1. 删除5号记录
        # 2. 添加6号记录
        # 3. 修改3号记录 名称为 “三号”
         */
        //添加对应操作
        //1. 删除5号记录
        DeleteRequest deleteRequest=new DeleteRequest("person1","5");
        bulkRequest.add(deleteRequest);

        //2. 添加6号记录
        Map<String, Object> map=new HashMap<>();
        map.put("name","六号");
        IndexRequest indexRequest=new IndexRequest("person1").id("6").source(map);
        bulkRequest.add(indexRequest);
        //3. 修改3号记录 名称为 “三号”
        Map<String, Object> mapUpdate=new HashMap<>();
        mapUpdate.put("name","三号");
        UpdateRequest updateRequest=new UpdateRequest("person1","3").doc(mapUpdate);

        bulkRequest.add(updateRequest);
        //执行批量操作


        BulkResponse response = client.bulk(bulkRequest, RequestOptions.DEFAULT);
        System.out.println(response.status());

    }
9.4-批量导入数据-代码实现
 /**
     * 从Mysql 批量导入 elasticSearch
     */
    @Test
    public void test3() throws IOException {
        //1.查询所有数据,mysql
        List<Goods> goodsList = goodsMapper.findAll();

        //2.bulk导入
        BulkRequest bulkRequest=new BulkRequest();

        //2.1 循环goodsList,创建IndexRequest添加数据
        for (Goods goods : goodsList) {

            //2.2 设置spec规格信息 Map的数据   specStr:{}
            String specStr = goods.getSpecStr();

            //将json格式字符串转为Map集合
            Map map = JSON.parseObject(specStr, Map.class);

            //设置spec map
            goods.setSpec(map);

            //将goods对象转换为json字符串
            String data = JSON.toJSONString(goods);

            IndexRequest indexRequest=new IndexRequest("goods").source(data,XContentType.JSON);
            bulkRequest.add(indexRequest);

        }

        BulkResponse response = client.bulk(bulkRequest, RequestOptions.DEFAULT);
        System.out.println(response.status());

    }
10-ElasticSearch查询
1、matchAll
脚本
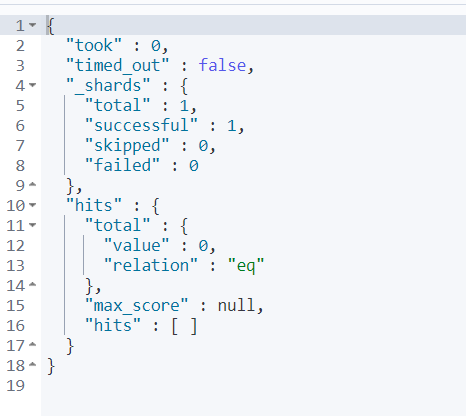
# 默认情况下,es一次展示10条数据,通过from和size来控制分页
# 查询结果详解
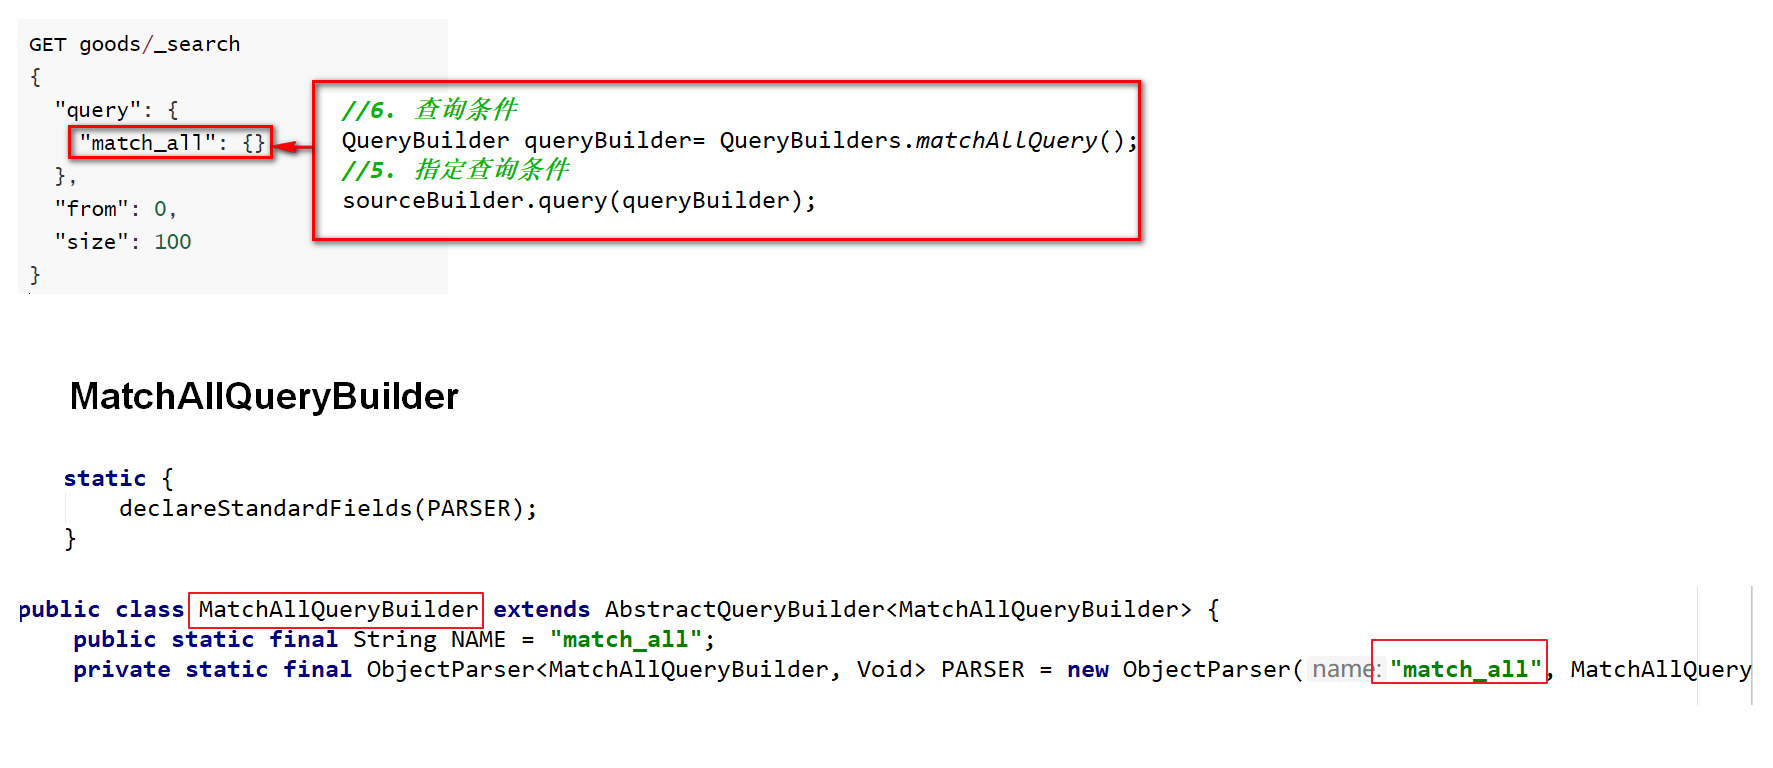
GET goods/_search
{
"query": {
"match_all": {}
},
"from": 0,
"size": 100
}
GET goods
matchAll 代码
	/**
     * 查询所有
     *  1. matchAll
     *  2. 将查询结果封装为Goods对象,装载到List中
     *  3. 分页。默认显示10条
     */
    @Test
    public void matchAll() throws IOException {

        //2. 构建查询请求对象,指定查询的索引名称
        SearchRequest searchRequest=new SearchRequest("goods");

        //4. 创建查询条件构建器SearchSourceBuilder
        SearchSourceBuilder sourceBuilder=new SearchSourceBuilder();

        //6. 查询条件
        QueryBuilder queryBuilder= QueryBuilders.matchAllQuery();
        //5. 指定查询条件
        sourceBuilder.query(queryBuilder);

        //3. 添加查询条件构建器 SearchSourceBuilder
        searchRequest.source(sourceBuilder);
        // 8 . 添加分页信息  不设置 默认10条
//        sourceBuilder.from(0);
//        sourceBuilder.size(100);
        //1. 查询,获取查询结果

        SearchResponse searchResponse = client.search(searchRequest, RequestOptions.DEFAULT);

        //7. 获取命中对象 SearchHits
        SearchHits hits = searchResponse.getHits();

        //7.1 获取总记录数
      Long total= hits.getTotalHits().value;
        System.out.println("总数:"+total);
        //7.2 获取Hits数据  数组
        SearchHit[] hits1 = hits.getHits();
            //获取json字符串格式的数据
        List<Goods> goodsList = new ArrayList<>();
        for (SearchHit searchHit : hits1) {
            String sourceAsString = searchHit.getSourceAsString();
            //转为java对象
            Goods goods = JSON.parseObject(sourceAsString, Goods.class);
            goodsList.add(goods);
        }

        for (Goods goods : goodsList) {
            System.out.println(goods);
        }

    }
设置条件的疑问点
2、termQuery、termsQuery
term查询和字段类型有关系,首先回顾一下ElasticSearch两个数据类型
ElasticSearch两个数据类型
text:会分词,不支持聚合

keyword:不会分词,将全部内容作为一个词条,支持聚合
term查询:不会对查询条件进行分词。
GET goods/_search
{
  "query": {
    "term": {
      "title": {
        "value": "华为"
      }
    }
  }
}
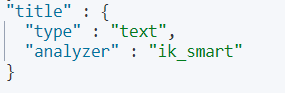
term查询,查询text类型字段时,只有其中的单词相匹配都会查到,text字段会对数据进行分词
例如:查询title 为“华为”的,title type 为text

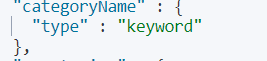
查询categoryName 字段时,categoryName字段为keyword ,keyword:不会分词,将全部内容作为一个词条,
即完全匹配,才能查询出结果
GET goods/_search
{
  "query": {
    "term": {
      "categoryName": {
        "value": "华为手机"
      }
    }
  }
}
termQuery 代码
// 将matchAll代码中 设置查询条件修改为
// termQuery 完全匹配
QueryBuilder queryBuilder = QueryBuilders.termQuery("title", "华为");
// termsQuery 一次匹配多个值
QueryBuilder queryBuilder = QueryBuilders.termQuery("title", "华为", "小米", "三星");
3、matchQuery、multiMatchQuery
match查询:
•会对查询条件进行分词。
•然后将分词后的查询条件和词条进行等值匹配
•默认取并集(OR)
# match查询
GET goods/_search
{
  "query": {
    "match": {
      "title": "华为手机"
    }
  },
  "size": 500
}
match 的默认搜索(or 并集)
例如:华为手机,会分词为 “华为”,“手机” 只要出现其中一个词条都会搜索到
match的 and(交集) 搜索
例如:例如:华为手机,会分词为 “华为”,“手机” 但要求“华为”,和“手机”同时出现在词条中
matchQuery 代码
// matchQuery 单个匹配
MatchQueryBuilder queryBuilder = QueryBuilders.matchQuery("title", "华为");
// multiMatchQuery 匹配多个字段
MatchQueryBuilder queryBuilder = QueryBuilders. multiMatchQuery("text", "field1", "field2"..);
总结:
-
term query会去倒排索引中寻找确切的term,它并不知道分词器的存在。这种查询适合keyword 、numeric、date
-
match query知道分词器的存在。并且理解是如何被分词的
4、模糊查询
a、wildcard查询
wildcard查询:会对查询条件进行分词。还可以使用通配符 ?(任意单个字符) 和 * (0个或多个字符)
"*华*"  包含华字的
"华*"   华字后边多个字符
"华?"  华字后边多个字符
"*华"或"?华" 会引发全表(全索引)扫描 注意效率问题
# wildcard 查询。查询条件分词,模糊查询
GET goods/_search
{
  "query": {
    "wildcard": {
      "title": {
        "value": "华*"
      }
    }
  }
}
b、正则查询
\W:匹配包括下划线的任何单词字符,等价于 [A-Z a-z 0-9_]   开头的反斜杠是转义符

+号多次出现

(.)*为任意字符
正则查询取决于正则表达式的效率
GET goods/_search
{
  "query": {
    "regexp": {
      "title": "\\w+(.)*"
    }
  }
}
c、前缀查询
对keyword类型支持比较好
# 前缀查询 对keyword类型支持比较好
GET goods/_search
{
  "query": {
    "prefix": {
      "brandName": {
        "value": "三"
      }
    }
  }
}
d、模糊查询 代码
//模糊查询
WildcardQueryBuilder query = QueryBuilders.wildcardQuery("title", "华*");//华后多个字符
//正则查询
RegexpQueryBuilder query = QueryBuilders.regexpQuery("title", "\\w+(.)*");
//前缀查询
PrefixQueryBuilder query = QueryBuilders.prefixQuery("brandName", "三");
5、范围&排序查询
# 范围查询
GET goods/_search
{
  "query": {
    "range": {
      "price": {
        "gte": 2000,
        "lte": 3000
      }
    }
  },
  "sort": [
    {
      "price": {
        "order": "desc"
      }
    }
  ]
}
范围查询API
 //范围查询 以price 价格为条件
RangeQueryBuilder query = QueryBuilders.rangeQuery("price");

//指定下限
query.gte(2000);
//指定上限
query.lte(3000);

sourceBuilder.query(query);

//排序  价格 降序排列
sourceBuilder.sort("price",SortOrder.DESC);
6、queryString多条件查询
queryString 多条件查询
•会对查询条件进行分词。
•然后将分词后的查询条件和词条进行等值匹配
•默认取并集(OR)
•可以指定多个查询字段
query_string:识别query中的连接符(or 、and)
# queryString

GET goods/_search
{
  "query": {
    "query_string": {
      "fields": ["title","categoryName","brandName"],
      "query": "华为 AND 手机"
    }
  }
}
simple_query_string:不识别query中的连接符(or 、and),查询时会将 “华为”、“and”、“手机”分别进行查询
GET goods/_search
{
  "query": {
    "simple_query_string": {
      "fields": ["title","categoryName","brandName"],
      "query": "华为 AND 手机"
    }
  }
}
query_string:有default_operator连接符的脚本
GET goods/_search
{
  "query": {
    "query_string": {
      "fields": ["title","brandName","categoryName"],
      "query": "华为手机 "
      , "default_operator": "AND"
    }
  }
}
java代码
QueryStringQueryBuilder query = QueryBuilders.queryStringQuery("华为手机").field("title").field("categoryName")
.field("brandName").defaultOperator(Operator.AND);
simple_query_string:有default_operator连接符的脚本
GET goods/_search
{
  "query": {
    "simple_query_string": {
      "fields": ["title","brandName","categoryName"],
      "query": "华为手机 "
      , "default_operator": "OR"
    }
  }
}
7、布尔查询
boolQuery:对多个查询条件连接。连接方式:
•must(and):条件必须成立
•must_not(not):条件必须不成立
•should(or):条件可以成立
•filter:条件必须成立,性能比must高。不会计算得分
**得分:**即条件匹配度,匹配度越高,得分越高
# boolquery
#must和filter配合使用时,max_score(得分)是显示的
#must 默认数组形式
GET goods/_search
{
  "query": {
    "bool": {
      "must": [
        {
          "term": {
            "brandName": {
              "value": "华为"
            }
          }
        }
      ],
      "filter":[
        {
        "term": {
          "title": "手机"
        }
       },
       {
         "range":{
          "price": {
            "gte": 2000,
            "lte": 3000
         }
         }
       }

      ]
    }
  }
}
#filter 单独使用   filter可以是单个条件,也可多个条件(数组形式)
GET goods/_search
{
  "query": {
    "bool": {
      "filter": [
        {
          "term": {
            "brandName": {
              "value": "华为"
            }
          }
        }
      ]
    }
  }
}
布尔查询-JavaAPI
布尔查询:boolQuery
- 查询品牌名称为:华为
- 查询标题包含:手机
- 查询价格在:2000-3000
must 、filter为连接方式
term、match为不同的查询方式
//1.构建boolQuery
BoolQueryBuilder boolQuery = QueryBuilders.boolQuery();
//2.构建各个查询条件
//2.1 查询品牌名称为:华为
TermQueryBuilder termQueryBuilder = QueryBuilders.termQuery("brandName", "华为");
boolQuery.must(termQueryBuilder);
//2.2. 查询标题包含:手机
MatchQueryBuilder matchQuery = QueryBuilders.matchQuery("title", "手机");
boolQuery.filter(matchQuery);

//2.3 查询价格在:2000-3000
RangeQueryBuilder rangeQuery = QueryBuilders.rangeQuery("price");
rangeQuery.gte(2000);
rangeQuery.lte(3000);
boolQuery.filter(rangeQuery);

sourceBuilder.query(boolQuery);
8、聚合查询
•指标聚合:相当于MySQL的聚合函数。max、min、avg、sum等
•桶聚合:相当于MySQL的 group by 操作。不要对text类型的数据进行分组,会失败。
# 聚合查询

# 指标聚合 聚合函数

GET goods/_search
{
  "query": {
    "match": {
      "title": "手机"
    }
  },
  "aggs": {
    "max_price": {
      "max": {
        "field": "price"
      }
    }
  }
}

# 桶聚合  分组

GET goods/_search
{
  "query": {
    "match": {
      "title": "手机"
    }
  },
  "aggs": {
    "goods_brands": {
      "terms": {
        "field": "brandName",
        "size": 100
      }
    }
  }
}
聚合查询-JavaAPI
聚合查询:桶聚合,分组查询
- 查询title包含手机的数据
- 查询品牌列表
/**
     * 聚合查询:桶聚合,分组查询
     * 1. 查询title包含手机的数据
     * 2. 查询品牌列表
     */
@Test
public void testAggQuery() throws IOException {

    SearchRequest searchRequest=new SearchRequest("goods");

    SearchSourceBuilder sourceBuilder=new SearchSourceBuilder();
    //1. 查询title包含手机的数据

    MatchQueryBuilder queryBuilder = QueryBuilders.matchQuery("title", "手机");

    sourceBuilder.query(queryBuilder);
    //2. 查询品牌列表  只展示前100条
    AggregationBuilder aggregation=AggregationBuilders.terms("goods_brands").field("brandName").size(100);
    sourceBuilder.aggregation(aggregation);


    searchRequest.source(sourceBuilder);

    SearchResponse searchResponse = client.search(searchRequest, RequestOptions.DEFAULT);

    //7. 获取命中对象 SearchHits
    SearchHits hits = searchResponse.getHits();

    //7.1 获取总记录数
    Long total= hits.getTotalHits().value;
    System.out.println("总数:"+total);

    // aggregations 对象
    Aggregations aggregations = searchResponse.getAggregations();
    //将aggregations 转化为map
    Map<String, Aggregation> aggregationMap = aggregations.asMap();


    //通过key获取goods_brands 对象 使用Aggregation的子类接收  buckets属性在Terms接口中体现

    //        Aggregation goods_brands1 = aggregationMap.get("goods_brands");
    Terms goods_brands =(Terms) aggregationMap.get("goods_brands");

    //获取buckets 数组集合
    List<? extends Terms.Bucket> buckets = goods_brands.getBuckets();

    Map<String,Object>map=new HashMap<>();
    //遍历buckets   key 属性名,doc_count 统计聚合数
    for (Terms.Bucket bucket : buckets) {

        System.out.println(bucket.getKey());
        map.put(bucket.getKeyAsString(),bucket.getDocCount());
    }

    System.out.println(map);

}
9、高亮查询
高亮三要素:
•高亮字段
•前缀
•后缀
默认前后缀 :em
<em>手机</em>
脚本
GET goods/_search
{
  "query": {
    "match": {
      "title": "电视"
    }
  },
  "highlight": {
    "fields": {
      "title": {
        "pre_tags": "<font color='red'>",
        "post_tags": "</font>"
      }
    }
  }
}
高亮查询 代码
实施步骤:
1. 设置高亮:高亮字段、前缀、 后缀
2. 将高亮了的字段数据,替换原有数据
/**
     *
     * 高亮查询:
     *  1. 设置高亮:高亮字段、前缀、 后缀
     *  2. 将高亮了的字段数据,替换原有数据
     */
@Test
public void testHighLightQuery() throws IOException {


    SearchRequest searchRequest = new SearchRequest("goods");

    SearchSourceBuilder sourceBulider = new SearchSourceBuilder();

    // 1. 查询title包含手机的数据
    MatchQueryBuilder query = QueryBuilders.matchQuery("title", "手机");

    sourceBulider.query(query);

    //设置高亮
    HighlightBuilder highlighter = new HighlightBuilder();
    //设置三要素
    highlighter.field("title");
    //设置前后缀标签
    highlighter.preTags("<font color='red'>");
    highlighter.postTags("</font>");

    //加载已经设置好的高亮配置
    sourceBulider.highlighter(highlighter);

    searchRequest.source(sourceBulider);

    SearchResponse searchResponse = client.search(searchRequest, RequestOptions.DEFAULT);


    SearchHits searchHits = searchResponse.getHits();
    //获取记录数
    long value = searchHits.getTotalHits().value;
    System.out.println("总记录数:"+value);

    List<Goods> goodsList = new ArrayList<>();
    SearchHit[] hits = searchHits.getHits();
    for (SearchHit hit : hits) {
        String sourceAsString = hit.getSourceAsString();

        //转为java
        Goods goods = JSON.parseObject(sourceAsString, Goods.class);

        // 获取高亮结果,替换goods中的title
        Map<String, HighlightField> highlightFields = hit.getHighlightFields();
        HighlightField HighlightField = highlightFields.get("title");
        Text[] fragments = HighlightField.fragments();
        //highlight title替换 替换goods中的title
        goods.setTitle(fragments[0].toString());
        goodsList.add(goods);
    }

    for (Goods goods : goodsList) {
        System.out.println(goods);
    }


}
10、重建索引&索引别名
#查询别名 默认别名无法查看,默认别名同索引名
GET goods/_alias/
#结果
{
  "goods" : {
    "aliases" : { }
  }
}
1.新建student_index_v1索引
# -------重建索引-----------

# 新建student_index_v1。索引名称必须全部小写

PUT student_index_v1
{
  "mappings": {
    "properties": {
      "birthday":{
        "type": "date"
      }
    }
  }
}
#查看 student_index_v1 结构
GET student_index_v1
#添加数据
PUT student_index_v1/_doc/1
{
  "birthday":"1999-11-11"
}
#查看数据
GET student_index_v1/_search

#添加数据
PUT student_index_v1/_doc/1
{
  "birthday":"1999年11月11日"
}
2.重建索引:将student_index_v1 数据拷贝到 student_index_v2
# 业务变更了,需要改变birthday字段的类型为text

# 1. 创建新的索引 student_index_v2
# 2. 将student_index_v1 数据拷贝到 student_index_v2

# 创建新的索引 student_index_v2
PUT student_index_v2
{
  "mappings": {
    "properties": {
      "birthday":{
        "type": "text"
      }
    }
  }
}
# 将student_index_v1 数据拷贝到 student_index_v2
# _reindex 拷贝数据
POST _reindex
{
  "source": {
    "index": "student_index_v1"
  },
  "dest": {
    "index": "student_index_v2"
  }
}

GET student_index_v2/_search


PUT student_index_v2/_doc/2
{
  "birthday":"1999年11月11日"
}
3.创建索引库别名:
注意:DELETE student_index_v1 这一操作将删除student_index_v1索引库,并不是删除别名
# 思考: 现在java代码中操作es,还是使用的实student_index_v1老的索引名称。
# 1. 改代码(不推荐)
# 2. 索引别名(推荐)

# 步骤:
# 0. 先删除student_index_v1
# 1. 给student_index_v2起个别名 student_index_v1


# 先删除student_index_v1
#DELETE student_index_v1 这一操作将删除student_index_v1索引库
#索引库默认的别名与索引库同名,无法删除

# 给student_index_v1起个别名 student_index_v11
POST student_index_v2/_alias/student_index_v11
#测试删除命令
POST /_aliases
{
    "actions": [
        {"remove": {"index": "student_index_v1", "alias": "student_index_v11"}}
    ]
}

# 给student_index_v2起个别名 student_index_v1
POST student_index_v2/_alias/student_index_v1

#查询别名
GET goods/_alias/


GET student_index_v1/_search
GET student_index_v2/_search


 1万+
1万+


 被折叠的 条评论
为什么被折叠?
被折叠的 条评论
为什么被折叠?
 到【灌水乐园】发言


