


接上篇文章《Hive集群安装》
一、使用beeline连接hive
1. 启动Hadoop:start-dfs.sh、start-yarn.sh
[root@node4 hadoop-2.6.4]# sbin/start-dfs.sh
[root@node4 hadoop-2.6.4]# sbin/start-yarn.sh
2. 连接hive
[root@node4 apache-hive-2.1.0-bin]# beeline
Beeline version 2.1.0 by Apache Hive
beeline> !connect jdbc:hive2://node4:10000
Connecting to jdbc:hive2://node4:10000
Enter username for jdbc:hive2://node4:10000: root
Enter password for jdbc:hive2://node4:10000: ******
SLF4J: Class path contains multiple SLF4J bindings.
SLF4J: Found binding in [jar:file:/opt/module/hive/apache-hive-2.1.0-bin/lib/hive-jdbc-2.1.0-standalone.jar!/org/slf4j/impl/StaticLoggerBinder.class]
SLF4J: Found binding in [jar:file:/opt/module/hive/apache-hive-2.1.0-bin/lib/log4j-slf4j-impl-2.4.1.jar!/org/slf4j/impl/StaticLoggerBinder.class]
SLF4J: Found binding in [jar:file:/opt/module/hadoop/hadoop-2.6.4/share/hadoop/common/lib/slf4j-log4j12-1.7.5.jar!/org/slf4j/impl/StaticLoggerBinder.class]
SLF4J: See http://www.slf4j.org/codes.html#multiple_bindings for an explanation.
SLF4J: Actual binding is of type [org.apache.logging.slf4j.Log4jLoggerFactory]
Connected to: Apache Hive (version 2.1.0)
Driver: Hive JDBC (version 2.1.0)
20/04/29 15:25:33 [main]: WARN jdbc.HiveConnection: Request to set autoCommit to false; Hive does not support autoCommit=false.
Transaction isolation: TRANSACTION_REPEATABLE_READ
0: jdbc:hive2://node4:10000>常见错误:Error: Could not open client transport with JDBC Uri: jdbc:hive2://node4:10000: java.net.ConnectException: 拒绝连接 (Connection refused) (state=08S01,code=0)

首先查看10000端口是否开启或者被占用:
sudo netstat -anp|grep 10000![]()
发现10000端口没有开启,所以连接失败。开启10000端口
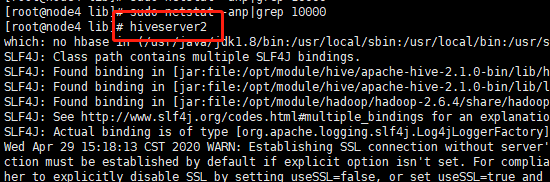
再次查看端口:netstat -anp|grep 10000(因为我用的是root账号,可以不用sudo)

再使用beeline命令连接即可成功。
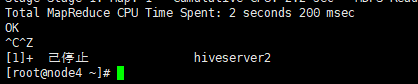
| 备注: hive2添加了新的client:beeline -u jdbc:hive2://xxxx:10000 beeline还提供了一些内置命令,使用“!help”或者“?”可以查看。此外,beeline的交互性也更强,比如错误提示和数据展示都更加友好。 hive不等同于关系型数据库,本身不存储数据也不提供对数据的操作方法,如果要使用jdbc连接hive,必须启动了hiveserver2,默认连接端口是10000. 启动beeline的方法有两个: 方法一(上面介绍的) 方法二 beeline退出命令:!exit
Hiveserver2的退出命令:Ctrl+z
|
hive> insert into test values (1,'Allen',28,'13112345678');

WARNING: Hive-on-MR is deprecated in Hive 2 and may not be available in the future versions. Consider using a different execution engine (i.e. spark, tez) or using Hive 1.X releases.

Query ID = root_20200429142221_0dd0a586-06ba-471f-960a-11978c91c6b5

Total jobs = 3

Launching Job 1 out of 3

Number of reduce tasks is set to 0 since there's no reduce operator

Starting Job = job_1588141075954_0001, Tracking URL = http://node4:8088/proxy/application_1588141075954_0001/

Kill Command = /opt/module/hadoop/hadoop-2.6.4/bin/hadoop job  -kill job_1588141075954_0001

Hadoop job information for Stage-1: number of mappers: 1; number of reducers: 0

2020-04-29 14:23:11,854 Stage-1 map = 0%,  reduce = 0%

2020-04-29 14:24:07,105 Stage-1 map = 100%,  reduce = 0%, Cumulative CPU 9.23 sec

MapReduce Total cumulative CPU time: 9 seconds 230 msec

Ended Job = job_1588141075954_0001

Stage-4 is selected by condition resolver.

Stage-3 is filtered out by condition resolver.

Stage-5 is filtered out by condition resolver.

Moving data to directory hdfs://node4:9000/user/hive/warehouse/test/.hive-staging_hive_2020-04-29_14-22-21_394_2799053765880594353-1/-ext-10000

Loading data to table default.test

MapReduce Jobs Launched:

Stage-Stage-1: Map: 1   Cumulative CPU: 9.23 sec   HDFS Read: 4401 HDFS Write: 91 SUCCESS

Total MapReduce CPU Time Spent: 9 seconds 230 msec

OK

Time taken: 111.636 seconds

hive> select * from test;

OK

1     Allen       28    13112345678

Time taken: 0.276 seconds, Fetched: 1 row(s)二、Hive的4种导入方式和3种导出方式
1. Hive表导入数据的4种方式
上面的insert语句,我们也可以看出来耗费的时间太久了(我的虚拟机配置内存太低了,只分配了2G,所以这个时间只是我的测试时间),如果是上万、百万、亿,推荐使用导入文件的方法。
| 1. 本地数据加载到Hive表 创建表:
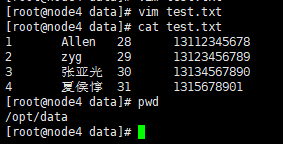
数据准备: 创建本地文件:注意以tab键间隔 vim /opt/data/test.txt 1 Allen 28 13112345678 2 zyg 29 13123456789 3 张亚光 30 13134567890 4 夏侯惇 31 1315678901
把本地文件加载到hive表
2. HDFS上的数据加载到hive表 从本地文件系统中将数据导入到Hive表的过程中,其实是先将数据临时复制到HDFS的一个目录下(典型的情况是复制到上传用户的HDFS home目录下,比如/opt/data/),然后再将数据从那个临时目录下移动(注意,这里说的是移动,不是复制!)到对应的Hive表的数据目录里面。既然如此,那么Hive肯定支持将数据直接从HDFS上的一个目录移动到相应Hive表的数据目录下 查看HDFS上的目录:hdfs dfs –ls /
创建一个/test文件夹:hdfs dfs -mkdir /test
数据准备: 在本地编辑一个文件:vim /opt/data/student.txt 5 wyp1 23 131212121212 6 wyp2 24 134535353535 7 wyp3 25 132453535353 8 wyp4 26 154243434355
把student.txt放到HDFS的/test目录下并查看数据: [root@node4 data]# hdfs dfs -put student.txt /test/ [root@node4 data]# hdfs dfs -cat /test/student.txt
将HDFS的/test/student.txt数据导入student表
此时http://node4:50070/explorer.html#/user/hive/warehouse/student目录下有两个文件:分别是本地的test.txt和HDFS上的student.txt
由于第3、4种导入方式较简单,不再操作截图 3. 从别的表中查询出相应的数据并导入到Hive表中 insert into student (id,name,age) select id,name,age from user; 4. 在创建表的时候通过从别的表中查询出相应的记录并插入到所创建的表中 在实际情况中,表的输出结果可能太多,不适于显示在控制台上,这时候,将Hive的查询输出结果直接存在一个新的表中是非常方便的,我们称这种情况为CTAS(create table .. as select)如下: create table student2 as select id, name, tel from student; 数据就插入到student2表中去了,CTAS操作是原子的,因此如果select查询由于某种原因而失败,新表是不会创建的! |


2. Hive数据导出3种方式
| 1. 导出到本地文件系统 0: jdbc:hive2://node4:10000> insert overwrite local directory '/opt/data/hive_out' select * from student;
这里的/opt/data/hive_out路径(这个文件是Reduce产生的结果(这里生成的文件名是000000_0)),不需要创建,执行insert overwrite local directory '/opt/data/hive_out' select * from student;命令时,会自动创建 查看:cat /opt/data/hive_out/000000_0
备注:数据中的列与列之间的分隔符是^A(ascii码是\00001) 怎么导入数据到文件中,数据的列之间为什么不是student表设定的列分隔符呢?其实在Hive 0.11.0版本之前,数据的导出是不能指定列之间的分隔符的,只能用默认的列分隔符,也就是上面的^A来分割,这样导出来的数据很不直观,看起来很不方便!如果你用的Hive版本是0.11.0之后版本,那么你可以在导出数据的时候来指定列之间的分隔符。 在Hive0.11.0版本新引进了一个新的特性,也就是当用户将Hive查询结果输出到文件,用户可以指定列的分割符,而在之前的版本是不能指定列之间的分隔符,这样给我们带来了很大的不变。 可以在hiveserver2窗口看到执行计划:
WARNING: Hive-on-MR is deprecated in Hive 2 and may not be available in the future versions. Consider using a different execution engine (i.e. spark, tez) or using Hive 1.X releases. Query ID = root_20200429174034_f76de987-184c-423e-9d35-fdeb282390a3 Total jobs = 1 Launching Job 1 out of 1 Number of reduce tasks is set to 0 since there's no reduce operator Starting Job = job_1588152533292_0001, Tracking URL = http://node4:8088/proxy/application_1588152533292_0001/ Kill Command = /opt/module/hadoop/hadoop-2.6.4/bin/hadoop job -kill job_1588152533292_0001 Hadoop job information for Stage-1: number of mappers: 1; number of reducers: 0 2020-04-29 17:41:26,479 Stage-1 map = 0%, reduce = 0% 2020-04-29 17:41:39,401 Stage-1 map = 100%, reduce = 0%, Cumulative CPU 3.16 sec MapReduce Total cumulative CPU time: 3 seconds 160 msec Ended Job = job_1588152533292_0001 Moving data to local directory /opt/data/hive_out MapReduce Jobs Launched: Stage-Stage-1: Map: 1 Cumulative CPU: 3.16 sec HDFS Read: 3898 HDFS Write: 189 SUCCESS Total MapReduce CPU Time Spent: 3 seconds 160 msec OK 2. 导出到HDFS中 执行命令: 0: jdbc:hive2://node4:10000> insert overwrite directory '/test/hive_out' select * from student;
查看: [root@node4 hive_out]# hdfs dfs -cat /test/hive_out/000000_0
3. 导出到Hive的另一个表中(比较简单就不操作了) insert into table student2 (id,name,tel) select id, name, tel from student; |


 3088
3088


 被折叠的 条评论
为什么被折叠?
被折叠的 条评论
为什么被折叠?
 到【灌水乐园】发言


