


乱七八糟的个人感慨(个人浅见,勿喷!!)
不特别愿意使用Retrofit框架,每加一个接口都需要到接口里定义方法,还要添加相关请求实现,每次请求都要做这么几步,私下里也曾想过封装成泛型,实践后发现有点问题,注解Method返回的Call这里会出问题,不能取到明确类型。
这个框架你不能说个人用着感觉不方便就放弃,不去了解,但从团队考虑队友都会用,而你不会这就是你的不对了,所以一定要会熟练使用Retrofit+Okhttp框架,至于RX系列目前还没到那种必须会的程度,自行考量吧。
目前呢很多人说你怎么还在用xutils 、volley这些过时的框架啊?我只想说:能被很多人使用过的技术,说明他也有闪光点,这点谁都不能抹杀,很多新兴的框架出现,比现有的框架还要完美,这并不是说现有框架就是过时了,一个项目用什么框架取决于项目大小、团队配合、项目维护成本等因素。最近有些人再吹RX+Dagger2+Retrofit2+Okhttp3+MVP,听上去是那么回事,让人感觉你很nb,但是你在想想,如果我的项目只有三个接口5个简单的界面,再采用这一套框架,代码要多些多少呢?开发周期又会增加多少呢?如果你突然辞职了,公司招人不会RX 、Dagger2这些框架咋办呢?这些都是技术成本,都是你为公司留下的。作为程序员仅仅考虑代码写得漂亮,有没有考虑过产出的效率问题呢?有没有为公司考虑过呢?
最后在说一下框架过时这个问题,每个流行过的框架,他的代码设计思想、模式等技术核心都值得我们去学习,如果你想说他过时了,就看不起它了,那么我想请问你两三个问题:你很牛逼么?你是大牛你能写出这样的框架么?请把你写好的托管在github的框架地址给我一个,可以么?
Retrofit
配置开发环境
Retrofit requires at minimum Java 7 or Android 2.3.要求开发环境JDK1.7+ android SDK 2.3+,目前Retrofit出了多个版本,项目导入建议使用release版本,最新版本自行跟踪项目托管地址
//github地址: https://github.com/square/retrofit

compile 'com.squareup.retrofit2:retrofit:2.1.0'
基本的请求流程
导入项目后,通过ServiceGenerator方法将创建HTTP客户端包括头定义的授权,调用自己定义的接口注解的方法获取返回值。关于这里要注意区分1.9版本与2.0+是有区别的,个人使用2.0版本这里就不提1.x版本相关知识,如想了解更多请参考这里(下面提到的Retrofit都是只Retrofit2.0别咬文嚼字啊)
// https://futurestud.io/tutorials/android-basic-authentication-with-retrofit在2.0以后Retrofit不再依赖Gson,使用需要自己添加依赖(当然你也可以使用Jackson)
compile 'com.squareup.retrofit2:converter-gson:2.1.0'请求流程概要分为以下几步(这里以发送验证码为例)
定义响应实体类ResponseBean.java
定义接口SendAuthCodeService
/**
 * Created by idea on 2016/11/18.
 */
public interface SendAuthCodeService {

    @POST
    Call<ResponseBean> sendAuthCode();
}- 定义Service
public class ServiceGenerator {

    public static final String API_BASE_URL = "";

    private static OkHttpClient.Builder httpClient = new OkHttpClient.Builder();

    private static Retrofit.Builder builder =
            new Retrofit.Builder()
                    .baseUrl(API_BASE_URL).....略..

    public static <S> S createService(Class<S> serviceClass, final String phone) {

          //................略过拦截器处理..........................

        OkHttpClient client = httpClient.build();
        Retrofit retrofit = builder.client(client).build();
        return retrofit.create(serviceClass);
    }
}- 调用(Call的方法有异步和同步,使用时各取所需)
    public void sendAuthCode(String phone){
        SendAuthCodeService sendAuthCodeService =
                ServiceGenerator.createService(SendAuthCodeService.class, "15828331414");
        Call<ResponseBean > responseBean = sendAuthCodeService.sendAuthCode();
        responseBean.enqueue(new Callback<ResponseBean>(){
            @Override
            public void onResponse(Call<ResponseBean> call, Response<ResponseBean> response) {

            }

            @Override
            public void onFailure(Call<ResponseBean> call, Throwable t) {

            }
        });
    }
请求携带token和令牌验证
每个app账户登录基本都会有这么一个token值,作为访问凭证,每次访问都要携带,Okhttp有拦截器这么个功能可以帮我们实现,至于拦截器这块知识稍后再提。下面是相关实现代码块
 public static <S> S createService(Class<S> serviceClass, final String authToken) {
        if (authToken != null) {
            httpClient.addInterceptor(new Interceptor() {
                @Override
                public Response intercept(Interceptor.Chain chain) throws IOException {
                    Request original = chain.request();

                    // Request customization: add request headers
                    Request.Builder requestBuilder = original.newBuilder()
                            .header("Authorization", authToken)
                            .method(original.method(), original.body());

                    Request request = requestBuilder.build();
                    return chain.proceed(request);
                }
            });
        }
经常我们登录缓存了token,而每次需要同步用户信息就可以用到这个玩意儿了,代码调用示例如下(OAuth 这块略过,知识点都差不多。)
UserService userService =
    ServiceGenerator.create(UserService.class, "auth-token");
Call<User> call = userService.getUserInformation();
User user = call.execute().body();
一个key对应1个或多个value的GET请求查询
服务器的api无非就是增删改查,客户端传递参数执行这些操作。传递这些参数在Retrofit框架下该怎么使用呢?且看下面代码块
public interface UserService {

    @GET("/user")
    Call<User> getUserInformation(@Query("userId") long userId);
}
只需要注解Query的字段参数即可,这里补充说明一点:@GET @POST这些作用在方法之上的注解可以含参,用于拼接完整api接口,当@GET或@POST注解的url为全路径时,会直接使用注解的url。(从某个层面来讲,对外只有一个接口,具体访问哪个接口,只需要把这里GET/POST的Path作为参数通过post提交可能会更好一点)
baseUrl = "http://www.baidu.com"

@GET("/user")

requestUrl = "http://www.baidu.com/user"

// 补充:@Url作为参数传递,@Url注解的路径如果为全路径,则直接使用它,否则通过BaseUrl+@Url拼接
如遇到如下需求: hr林妹妹要统计公司员工都是211、985工程院校毕业有多少人?这个查询条件多个值怎么办呢?Retrofit对这种需求也是信手拈来
public interface UserService {

    @GET("/user")
    Call<Integer> getUserCount(@Query("school") List<Integer> schools);
}
schools: [211,985]
拼接后的Url: http://www.baidu.com/user?school=211&school=985
同步异步请求
同步请求
上面有提到过同步和异步请求,这里简单来了解相关知识。下面是一个同步请求接口定义实例代码
public interface UserService {

    @GET("/user")
    Call<User> getUserInformation(@Query String token);
}
同步请求的数据处理如下
Call<User> call = userService.getUserInformation("Uid1232342");
user = call.execute().body();
Warning: 同步请求可能是导致APP在4.0及以上版本崩溃,你可能会得到一个Exception 的异常错误,为了不阻塞UI,一般通过handler message来解决,这种使用方法很不爽的
异步请求
异步请求通过接口回调方式返回结果,也是我们最常用的方式,与同步请求从方法来来比较:excute()、enqueue(Callback)
 Call<ResponseBean > responseBean = sendAuthCodeService.sendAuthCode();
 responseBean.enqueue(new Callback<ResponseBean>(){
      @Override
      public void onResponse(Call<ResponseBean> call, Response<ResponseBean> response) {

      }

      @Override
      public void onFailure(Call<ResponseBean> call, Throwable t) {

     }
  });
如果你需要最原始的响应内容而不是经过映射后的数据,可以通过onResponse()response参数获取(一般情况下用不到)
Response raw = response.raw();请求参数使用@Body注解发送Object
请求的Body部分不再像以前那样直接key value 这样直接设置键值对,而是把请求参数封装成对象,使用注解 @Body
public interface TaskService {
    @POST("/tasks")
    Call<Task> createTask(@Body Task task);
}

public class Task {
    private long id;
    private String text;

    public Task(long id, String text) {
        this.id = id;
        this.text = text;
    }
}

Task task = new Task(1, "my task title");
Call<Task> call = taskService.createTask(task);
call.enqueue(new Callback<Task>() {});
上面这种方式在某种情况下,你会发现请求不成功,一直提示你请求参数格式有问题,这时候可能是服务器端的api可能仅仅支持form表单提交,这里需要@FieldMap注解标签,把对象转换一下
响应参数映射 转换器
请求响应内容JSON数据得映射转换,Retrofit提供了几种,最常用的就是GSON了(Jackson效率最高)
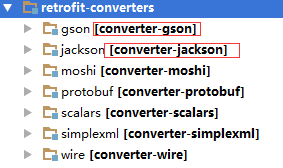
这块我使用的就是GsonConverterFactory,这里需要注意一下,如果你compile的版本是2.0及以下版本是没有这个类的,我用的2.1.0.当然你也可以自定义Converter转换器.
   retrofit = new Retrofit.Builder()
                    .baseUrl(Constact.BASE_URL)
                    .callFactory(OkhttpHelper.getOkhttpClient())
                    .addConverterFactory(GsonConverterFactory.create())
                    .build();
添加请求头部
为请求添加请求头,主要方案有一下三种
静态请求头
动态请求头
请求头拦截器
添加头部请求头静态的方式也分为两种:单一请求头和多个请求头
public interface UserService {
    @Headers("Cache-Control: max-age=640000")
    @GET("/tasks")
    Call<List<Task>> getTasks();
}

public interface UserService {
    @Headers({
        "Accept: application/vnd.yourapi.v1.full+json",
        "User-Agent: Your-App-Name"
    })
    @GET("/tasks/{task_id}")
    Call<Task> getTask(@Path("task_id") long taskId);
}
添加拦截器,通过拦截请求添加请求头
OkHttpClient.Builder httpClient = new OkHttpClient.Builder();
httpClient.addInterceptor(new Interceptor() {
    @Override
    public Response intercept(Interceptor.Chain chain) throws IOException {
        Request original = chain.request();

        Request request = original.newBuilder()
            .header("User-Agent", "Your-App-Name")
            .header("Accept", "application/vnd.yourapi.v1.full+json")
            .method(original.method(), original.body())
            .build();

        return chain.proceed(request);
    }
}

OkHttpClient client = httpClient.build();
Retrofit retrofit = new Retrofit.Builder()
    .baseUrl(API_BASE_URL)
    .addConverterFactory(GsonConverterFactory.create())
    .client(client)
    .build();
添加动态请求头
public interface UserService {
    @GET("/tasks")
    Call<List<Task>> getTasks(@Header("Content-Range") String contentRange);
}
Retrofit2 与Retrofit1添加请求头截然不同,如果你想使用Retrofit1请忽略这篇blog.
@Query 注解的可选参数
根据查询条件获取请求结果,使用@GET请求注解+@Query/@QueryMap
public interface TaskService {
    @GET("/tasks")
    Call<List<Task>> getTasks(@Query("sort") String order);
}
如果你使用的 BaseUrl https://your.api.com,调用上面接口的方法,传入参数值=1,拼接后的请求路径就是:
https://your.api.com/tasks?sort=1注解@Query的参数支持多种类型:int, float, long等
public interface TaskService {
    @GET("/tasks")
    Call<List<Task>> getTasks(
        @Query("sort") String order,
        @Query("page") Integer page);
}
How to Integrate XML Converter?关于这个xml解析这块略过了(一般情况下不会用到,都JSON+GSON),使用也挺简单一个套路。
Debug 调试请求,打印log日志
在开发中打印网络请求和返回结果是非常重要的,如果你在Retrofit中使用它,你会发现实现该功能的方法已经不可用了。
RestAdapter.Builder builder = new RestAdapter.Builder()
    .setEndpoint(API_LOCATION)
    .setLogLevel(RestAdapter.LogLevel.FULL) // this is the important line
    .setClient(new OkClient(new OkHttpClient()));
Retrofit 依靠okhttp提供的日志系统,HttpLoggingInterceptor.需要添加相关依赖,使用类似上面提到的添加头部拦截器一样。
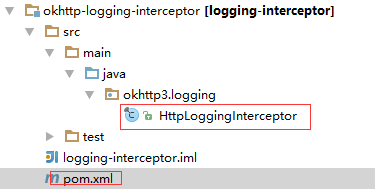
个人更喜欢使用Logger库配合输出,所以自定义HttpLoggingInterceptor最好。修改HttpLoggingInterceptor.Logger接口类名定义和log方法调用即可
 public interface Logger {
    void log(String message);

    /** A {@link Logger} defaults output appropriate for the current platform. */
    Logger DEFAULT = new Logger() {
      @Override public void log(String message) {
        Platform.get().log(INFO, message, null);
      }
    };
  }
如何上传文件到服务器
文件上传有很多种方式,先大致列举一二
File转String上传
文件流上传
byte字节上传
文件上传
上传的文件又分为单一文件和多个文件,在Retrofit下面又该如何编码呢?按照流程还是的定义interface,@Multipart注解方法,@Part注解参数
/**
 * Created by idea on 2016/11/28.
 */
public interface ApiService {

    @Multipart
    @POST("/upload")
    Call<ResponseBean> uploadPhone(@Part("description") RequestBody requestBody,@Part MultipartBody.Part part);
}
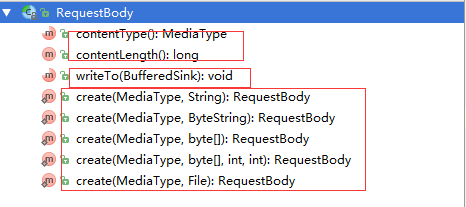
RequestBody在这里进行一下拓展,RequestBody源自Okhttp3的一个类,writeTo方法依赖于Okio框架,这块知识有想要了解的自行补脑。
MediaType这里列举三类
text/plain; charset=utf-8 //构建字符串请求体
application/octet-stream //构建字节请求体 、文件请求体
application/json; charset=utf-8 //post上传json
……………
通过调用RequestBody定义好的create方法即可。当然获取RequestBody实例方法不止这一种,大致可分为三类
- create()
/**
 * 此方法在使用Retrofit基本不会用到 post参数传入
 */
public Request getRequest(){
  Request request = new Request.Builder()
     .url(baseUrl)
     .post()
     .build();
  return request;
}- FormBody.Builder()
/**
 * 请求表单构建
 */
public RequestBody getRequestBody(){
   RequestBody formBody=new FormBody.Builder()
                .add("name","idea")
                .add("sex","1")
                .build();
   return request;
}- MultipartBody.Builder()
 /**
  * MultipartBody.builder构建RequestBody
  */
 public void getRequestBody(String imageUrl,String uuid){
        RequestBody multipartBody=new MultipartBody.Builder()
                .setType(MultipartBody.FORM)
                .addFormDataPart("uuid", uuid)
                .addFormDataPart("avatar", "20160808324.jpg",      RequestBody.create(MediaType.parse("application/octet-stream"),new File(imageUrl)))
                .addPart(...)
                .build();
        return multipartBody;
    }
addPart(..)方法用于添加RequestBody,Headers和添加自定义Part

下面是一段上传文件的代码块
 public void onUploadImage(String imageUrl,String description,ApiService apiService){
        File file = new File(imageUrl);
        RequestBody requestFile = RequestBody.create(MediaType.parse("multipart/form-data"), file);
        MultipartBody.Part body = MultipartBody.Part.createFormData("image", file.getName(), requestFile);
        RequestBody descriptionRequestBody = RequestBody.create(MediaType.parse("multipart/form-data"), description);

        Call<ResponseBean> call = apiService.uploadPhone(descriptionRequestBody,body);
        call.enqueue(new Callback<ResponseBean>() {
            @Override
            public void onResponse(Call<ResponseBean> call,Response<String> response) {

            }

            @Override
            public void onFailure(Call<ResponseBean> call, Throwable t) {

            }
        });
    }
这里使用multipart/form-data,它和其他有什么区别呢?
1.application/x-www-form-urlencoded
这是通过表单发送数据时默认的编码类型。我们没有在from标签中设置enctype属性时默认就是application/x-www-form-urlencoded类型的。application/x-www-form-urlencoded编码类型会把表单中发送的数据编码为名称/值对。这是标准的编码格式。当表单的ACTION为POST的时候,浏览器把form数据封装到http body中,然后发送到服务器。当表单的ACTION为GET的时候,application/x-www-form-urlencoded编码类型会把表单中发送的数据转换成一个字符串(name=coderbolg&key=php),然后把这个字符串附加到URL后面,并用?分割,接着就请求这个新的URL。
2.multipart/form-data
这个是专门用来传输特殊类型数据的,如我们上传的非文本的内容,比如图片或者MP3等。multipart/form-data编码类型会把表单中的发送的数据编码为一条消息,页面上每个表单控件对应消息中的一部分。当表单中有file类型控件并希望它正常工作的话(废话吧)就必须设置成multipart/form-data类型,浏览器会把整个表单以控件为单位分割,并为每个部分加上Content-Disposition(form-data或者file),Content-Type(默认为text/plain),name(控件 name)等信息,并加上分割符(boundary)。
3.text/plain
数据以纯文本形式进行编码,其中不含任何控件或格式字符。
以上资料三点摘自:http://www.fx114.net/qa-163-89638.aspx,平时上传文件使用multipart/form-data基本没问题,如果你想知道更多的HTTP Content-Type相关信息,可以参考下面链接
// http://tool.oschina.net/commonsRetrofit 2 与1.9的差异
Retrofit2与之前版本的具体差异变化自行参考(idea没用过以以前版本的直接2.1.0)
// https://futurestud.io/tutorials/retrofit-2-upgrade-guide-from-1-9这里补充一点:假设项目你自己引入了高版本的Okhttp versionA,而使用的Retrofit2.x版本底层依赖的Okhttp的版本号versionB,明显Okhttp重复引用,如果versionB 小于你当前引入versionA,当你删除了versionA会发现method找不到等一些列问题,最好的解决办法就是把Retrofit2依赖库改成你当前compile的库
compile ('com.squareup.retrofit2:retrofit:2.1.0') {
  // exclude Retrofit’s OkHttp peer-dependency module and define your own module import
  exclude module: 'okhttp'
}
compile 'com.squareup.okhttp3:okhttp:3.4.1'
Retrofit 2 错误异常处理
首先,我们创建一个错误对象,官方给出的ErrorUtils对个人来讲并不太完美,我还是比较喜欢这样
{
    code: 404,
    msg: "服务器连接失败"
}
/**
 * Created by idea on 2016/11/9.
 */
public class AppErrorCode {
    /**
     * 未知错误
     */
    public static final int UNKNOWN = 1000;
    /**
     * 解析错误
     */
    public static final int PARSE_ERROR = 1001;
    /**
     * 网络错误
     */
    public static final int NETWORK_ERROR = 1002;
    /**
     * 协议出错
     */
    public static final int HTTP_ERROR = 1003;
}

/**
 * Created by idea on 2016/11/9.
 */
public class AppException extends Exception {
    private int code;
    private String msg;

    public AppException(int code, String msg) {
        this.code = code;
        this.msg = msg;
    }

    public int getCode() {
        return code;
    }

    public String getMsg() {
        return msg;
    }

    public static AppException handleException(Throwable e) {
        if (e instanceof JsonParseException
                || e instanceof IOException
                || e instanceof JSONException
                || e instanceof ParseException) {
            return new ApiException(AppErrorCode.PARSE_ERROR, "解析错误");
        } else if (e instanceof ConnectException) {
            return new ApiException(AppErrorCode.NETWORK_ERROR, "连接失败");
        } else if(){
            //.............略......................
        }else{
            return new ApiException(AppErrorCode.UNKNOWN, "未知错误");
        }
    }

}
举个例子,当你convert response数据发生io异常是,只需要这样
    try {
            error = converter.convert(response.errorBody());
        } catch (IOException e) {
            return AppException.handleException(e);
        }
表单提交@Field @FieldMap
表单提交可能存在一个key对应一个或多个值的情况,在Retrofit中编码如下
public interface TaskService {
    @FormUrlEncoded
    @POST("tasks")
    Call<Task> createTask(@Field("title") String title);
}

public interface TaskService {
    @FormUrlEncoded
    @POST("tasks")
    Call<List<Task>> createTasks(@Field("title") List<String> titles);
}
当你的参数@Field参数过多了,可以尝试用@FieldMap
public interface UserService {
    @FormUrlEncoded
    @PUT("user")
    Call<User> update(@FieldMap Map<String, String> fields);
}
Retrofit 2 怎么为每个请求都添加 Query Parameters
第一个想到的就应该是拦截器了,intercept回调方法addQueryParameter
OkHttpClient.Builder httpClient =
new OkHttpClient.Builder();
httpClient.addInterceptor(new Interceptor() {
@Override
public Response intercept(Chain chain) throws IOException {
Request original = chain.request();
HttpUrl originalHttpUrl = original.url();
HttpUrl url = originalHttpUrl.newBuilder()
.addQueryParameter("apikey", "your-actual-api-key")
.build();
// Request customization: add request headers
Request.Builder requestBuilder = original.newBuilder()
.url(url);
Request request = requestBuilder.build();
return chain.proceed(request);
}
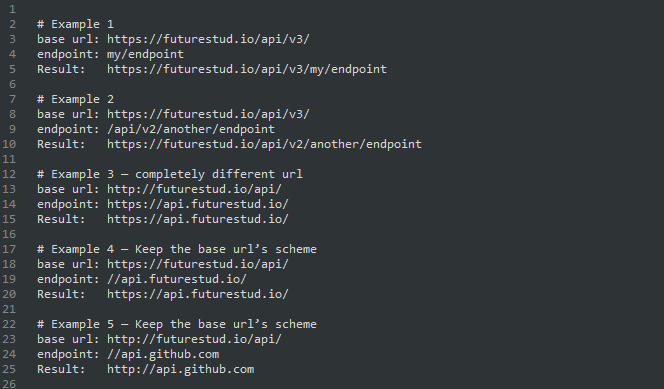
});Retrofit 2 Url语法
个人觉得这里没什么好理解,参考实例看看就明白了
Retrofit 2 如何从服务器下载文件
从服务器下载文件主要分为以下几个步凑(个人更喜欢用开源库进行下载,一般采用三级缓存+动态权限)
- 如何改造Request
// option 1: a resource relative to your base URL
@GET("/resource/example.zip")
Call<ResponseBody> downloadFileWithFixedUrl();

// option 2: using a dynamic URL
@GET
Call<ResponseBody> downloadFileWithDynamicUrlSync(@Url String fileUrl); - 如何调用请求
FileDownloadService downloadService = ServiceGenerator.create(FileDownloadService.class);

Call<ResponseBody> call = downloadService.downloadFileWithDynamicUrlSync(fileUrl);

call.enqueue(new Callback<ResponseBody>() {
    @Override
    public void onResponse(Call<ResponseBody> call, Response<ResponseBody> response) {
        if (response.isSuccess()) {
            Log.d(TAG, "server contacted and has file");

            boolean writtenToDisk = writeResponseBodyToDisk(response.body());

            Log.d(TAG, "file download was a success? " + writtenToDisk);
        } else {
            Log.d(TAG, "server contact failed");
        }
    }

    @Override
    public void onFailure(Call<ResponseBody> call, Throwable t) {
        Log.e(TAG, "error");
    }
});- 如何缓存文件
private boolean writeResponseBodyToDisk(ResponseBody body) {
    try {
        // todo change the file location/name according to your needs
        File futureStudioIconFile = new File(getExternalFilesDir(null) + File.separator + "Future Studio Icon.png");

        InputStream inputStream = null;
        OutputStream outputStream = null;

        try {
            byte[] fileReader = new byte[4096];

            long fileSize = body.contentLength();
            long fileSizeDownloaded = 0;

            inputStream = body.byteStream();
            outputStream = new FileOutputStream(futureStudioIconFile);

            while (true) {
                int read = inputStream.read(fileReader);

                if (read == -1) {
                    break;
                }

                outputStream.write(fileReader, 0, read);

                fileSizeDownloaded += read;

                Log.d(TAG, "file download: " + fileSizeDownloaded + " of " + fileSize);
            }

            outputStream.flush();

            return true;
        } catch (IOException e) {
            return false;
        } finally {
            if (inputStream != null) {
                inputStream.close();
            }

            if (outputStream != null) {
                outputStream.close();
            }
        }
    } catch (IOException e) {
        return false;
    }
}- 下载大文件使用@Streaming
@Streaming
@GET
Call<ResponseBody> downloadFileWithDynamicUrlAsync(@Url String fileUrl);

final FileDownloadService downloadService =
                ServiceGenerator.create(FileDownloadService.class);

new AsyncTask<Void, Long, Void>() {
   @Override
   protected Void doInBackground(Void... voids) {
       Call<ResponseBody> call = downloadService.downloadFileWithDynamicUrlSync(fileUrl);
       call.enqueue(new Callback<ResponseBody>() {
           @Override
           public void onResponse(Call<ResponseBody> call, Response<ResponseBody> response) {
               if (response.isSuccess()) {
                   Log.d(TAG, "server contacted and has file");

                   boolean writtenToDisk = writeResponseBodyToDisk(response.body());

                   Log.d(TAG, "file download was a success? " + writtenToDisk);
               }
               else {
                   Log.d(TAG, "server contact failed");
               }
           }
       return null;
   }
}.execute();
Retrofit 2 — 取消 Requests
当前界面在请求中,突然要结束当前界面亦或者是有新的请求进来,需要取消之前的请求,此时可以调用Call提供的方法
new Callback<ResponseBody>() {
            @Override
            public void onResponse(Call<ResponseBody> call, Response<ResponseBody> response) {
                Log.d(TAG, "request success");
            }

            @Override
            public void onFailure(Call<ResponseBody> call, Throwable t) {
                if(!call.isCanceled()){
                    call.cancel();
                }
                //..........................

            }
        };
Retrofit 2如何在运行时动态改变BaseUrl
一般情况下我们使用Retrofit2时都会进行一下封装,把BaseUrl封装进去。在某种情况下(上传文件服务器和表单提交服务器不在一起),就需要我们改变BaseUrl,具体做法如下changeApiBaseUrl()
public class ServiceGenerator {
    public static String apiBaseUrl = "http://futurestud.io/api";
    private static Retrofit retrofit;

    private static Retrofit.Builder builder =
            new Retrofit.Builder()
                    .addConverterFactory(GsonConverterFactory.create())
                    .baseUrl(apiBaseUrl);

    private static OkHttpClient.Builder httpClient =
            new OkHttpClient.Builder();

    // No need to instantiate this class.
    private ServiceGenerator() {
    }

    public static void changeApiBaseUrl(String newApiBaseUrl) {
        apiBaseUrl = newApiBaseUrl;

        builder = new Retrofit.Builder()
                        .addConverterFactory(GsonConverterFactory.create())
                        .baseUrl(apiBaseUrl);
    }

    public static <S> S createService(Class<S> serviceClass, AccessToken token) {
        String authToken = token.getTokenType().concat(token.getAccessToken());
        return createService(serviceClass, authToken);
    }

    // more methods
    // ...
}
请求的Path Parameters
如果你的url的路径参数是正确的,但注解的路径参数含有一个空字符串会导致错误的请求url
public interface TaskService {
    @GET("tasks/{taskId}/subtasks")
    Call<List<Task>> getSubTasks(@Path("taskId") String taskId);
}
taskId传递空值将导致以下url
// https://your.api.url/tasks//subtasks 不允许您传递null作为路径参数的值,如果你这样做,就会抛出IllegalArgumentException
Retrofit 2响应内容为String
有那么一群人不喜欢使用Gson、Jackson解析,喜欢自己封装一套解析工具,那么返回值需要为String,我们就需要添加返回值的支持(返回他不支持的结果时,就会崩溃)
compile 'com.squareup.retrofit2:converter-scalars:2.1.0' private static Retrofit getRetrofit(String url) {
return new Retrofit.Builder().baseUrl(url)
//增加返回值为String的支持
.addConverterFactory(ScalarsConverterFactory.create())
//增加返回值为Gson的支持(以实体类返回)
.addConverterFactory(GsonConverterFactory.create())
//增加返回值为Oservable<T>的支持
.addCallAdapterFactory(RxJavaCallAdapterFactory.create())
.build();使用方面的知识点大概就这么多了,以上内容多数参照https://futurestud.io/tutorials/retrofit-getting-started-and-android-client这里,看完之后做个记录,收获还是不小的。


 1649
1649

 被折叠的 条评论
为什么被折叠?
被折叠的 条评论
为什么被折叠?
 到【灌水乐园】发言


