


Okhttp和Retrofit
一、Okhttp
1.什么是Okhttp
Overview - OkHttp (square.github.io)
由Square公司贡献的一个处理网络请求的开源项目,是目前Android使用最广泛的网络框架。从Android4.4开始 HttpURLConnection的底层实现采用的是OkHttp。
-
支持HTTP/2并允许对同一主机的所有请求共享一个套接字;
-
如果非HTTP/2,则通过连接池,减少了请求延迟;
-
默认请求GZip压缩数据;
-
响应缓存,避免了重复请求的网络;
导入
implementation("com.squareup.okhttp3:okhttp:4.9.0")
测试URL:httpbin.org
2.Okhttp基本用法
private OkHttpClient okHttpClient;
okHttpClient = new OkHttpClient();
get同步
new Thread(){
    @Override
    public void run() {
        Request request = new Request.Builder().url("https://www.httpbin.org/get?a=1&b=1").build();
        // 准备好请求的Call对象
        Call call = okHttpClient.newCall(request);
        try {
            // 同步是用execute()方法
            Response execute = call.execute();
            Log.i(TAG, "getSync:"+execute.body().string());
        } catch (IOException e) {
            e.printStackTrace();
        }
    }
}.start();
get异步
Request request = new Request.Builder().url("https://www.httpbin.org/get?a=1&b=1").build();
// 准备好请求的Call对象
Call call = okHttpClient.newCall(request);
// 异步使用enqueue()方法
call.enqueue(new Callback() {
@Override
public void onFailure(@NonNull Call call, @NonNull IOException e) {
}
@Override
public void onResponse(@NonNull Call call, @NonNull Response response) throws IOException {
if (response.isSuccessful()){
Log.i(TAG, "getAsync:"+response.body().string());
}
}
});
post同步
new Thread(){
    @Override
    public void run() {
        // 创建一个请求体
        FormBody formBody = new FormBody.Builder().add("a", "1").add("b", "2").build();
        Request request = new Request.Builder().url("https://www.httpbin.org/post")
                .post(formBody).build();
        // 准备好请求的Call对象
        Call call = okHttpClient.newCall(request);
        try {
            // 同步是用execute()方法
            Response execute = call.execute();
            Log.i(TAG, "postSync:"+execute.body().string());
        } catch (IOException e) {
            e.printStackTrace();
        }
    }
}.start();
post异步
// 创建一个请求体
FormBody formBody = new FormBody.Builder().add("a", "1").add("b", "2").build();
Request request = new Request.Builder().url("https://www.httpbin.org/post")
.post(formBody).build();
// 准备好请求的Call对象
Call call = okHttpClient.newCall(request);
call.enqueue(new Callback() {
@Override
public void onFailure(@NonNull Call call, @NonNull IOException e) {
}
@Override
public void onResponse(@NonNull Call call, @NonNull Response response) throws IOException {
if (response.isSuccessful()){
Log.i(TAG, "postAsync:"+response.body().string());
}
}
});
协议规定 POST 提交的数据必须放在请求体中,但协议并没有规定数据必须使用什么编码方式 。而常用的数据编码方式有: HTTP content-type | 菜鸟教程
3.拦截器
OkHttpClient okHttpClient = new OkHttpClient.Builder().addInterceptor(new XXX).build(); OkHttpClient okHttpClient = new OkHttpClient.Builder().addNetworkInterceptor(new XXX).build()
注意 addInterceptor()方法的执行顺序比addNetworkInterceptor()高
new Interceptor() {
            @NonNull
            @Override
            public Response intercept(@NonNull Chain chain) throws IOException {
                // 前置处理
                Request request = chain.request().newBuilder().addHeader("Os", "ios")
                        .addHeader("version", "1.0").build();
                Response response = chain.proceed(request);
                // 后置处理
                return response;
            }
        }
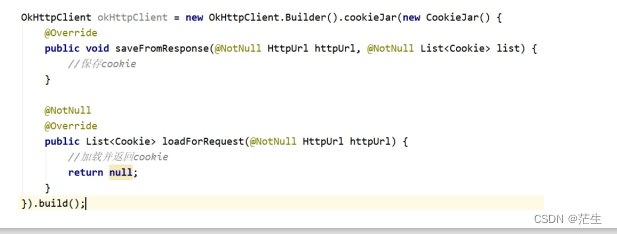
4.缓存与Cookie
OkHttp按照Http协议规则实现了缓存的处理,缓存是比如:当我们发起第一次请求之后,如果后续还需要进 行同样的请求,此时如果符合缓存规则,则可以减少与服务器的网络通信,直接从本地文件缓存中读取响应 返回给请求者。但是默认情况下,OkHttp的缓存是关闭状态,需要我们开启。

Cookie是某些网站为了辨别用户身份,进行会话跟踪(比如确定登陆状态)而储存在用户本地终端上的数据(通常经 过加密),由用户客户端计算机暂时或永久保存的信息
二、Retrofit
A type-safe HTTP client for Android and Java。封装了OkHttp,也是由Square公司贡献的一个处理网络请求的 开源项目。 GitHub - square/retrofit: A type-safe HTTP client for Android and the JVM
引入
// 引入Retrofit后就可以不用再引入Okhttp Retrofit会自动引入Okhttp
implementation 'com.squareup.retrofit2:retrofit:2.9.0'
1.Retrofit的基本使用
根据Http接口创建Java接口
public interface HttpbinService {
@POST("post")
@FormUrlEncoded
Call<ResponseBody> post(@Field("username") String userName, @Field("password") String pwd);
@GET("get")
Call<ResponseBody> get(@Query("username") String userName, @Query("password") String pwd);
}
创建Retrofit对象,并生成接口实现类对象
private Retrofit retrofit;
private HttpbinService httpbinService;
retrofit = new Retrofit.Builder().baseUrl("https://www.httpbin.org/").build();
httpbinService = retrofit.create(HttpbinService.class);
接口实现类对象调用对应方法获得响应
retrofit2.Call<ResponseBody> call = httpbinService.post("ljj", "123");
call.enqueue(new retrofit2.Callback<ResponseBody>() {
@Override
public void onResponse(retrofit2.Call<ResponseBody> call, retrofit2.Response<ResponseBody> response) {
try {
Log.i(TAG, "postAsync:"+response.body().string());
} catch (IOException e) {
e.printStackTrace();
}
}
@Override
public void onFailure(retrofit2.Call<ResponseBody> call, Throwable t) {
}
});
2.Retrofit的注解
• 方法注解:@GET,@POST,@PUT,@DELETE,@PATH,@HEAD,@OPTIONS,@HTTP(这一个可以自定义HTTP请求方法) • 标记注解:@FormUrlEncoded(form表单注解),@Multipart,@Streaming • 参数注解:@Query(get请求),@QueryMap,@Body,@Field,@FieldMap,@Part,@PartMap • 其他注解:@Path,@Header, @Headers,@Url
3.Retrofit的转换器
在我们接到服务器的响应后,目前无论是OkHttp还是Retrofit都只能接收到String字符串类型的数据,在实际开发中, 我们经常需要对字符串进行解析将其转变为一个Java Bean对象。比如服务器响应数据为JSON格式字符串,那么我 们可以自己利用GSON库完成反序列化的操作。而Retrofit提供了多个转换器使得响应能够完成自动的数据转换。以 json解析为例:
添加依赖:Gson序列化
implementation 'com.squareup.retrofit2:converter-gson:2.9.0'
修改接口方法: 例
@POST("user/login")
@FormUrlEncoded
Call<ResponseBody> login(@Field("username") String username, @Field("password") String pwd);
手动转换
Retrofit retrofit = new Retrofit.Builder().baseUrl("https://www.wanandroid.com/").build();
WanAndroidService wanAndroidService = retrofit.create(WanAndroidService.class);
Call<ResponseBody> call = wanAndroidService.login("clearljj", "123456");
Response<ResponseBody> response = call.execute();
System.out.println(response.body().string());
//手动转换
BaseResponse baseResponse = new Gson().fromJson(response.body().string(), BaseResponse.class);
System.out.println(baseResponse);
自动转化
Retrofit retrofit1 = new Retrofit.Builder()
.baseUrl("https://www.wanandroid.com/")
// 添加转换器
.addConverterFactory(GsonConverterFactory.create())
.build();
WanAndroidService2 wanAndroidService2 = retrofit1.create(WanAndroidService2.class);
Call<BaseResponse> call = wanAndroidService2.login("clearljj", "123456");
Response<BaseResponse> response = call.execute();
// 利用转换器自动转化
BaseResponse body = response.body();
System.out.println(body);
4.Retrofit的嵌套请求 +适配器
Retrofit的接口方法返回类型必须是Call,如果能够将Call改为RxJava中的Observable,对于嵌套的情况,就能得到非 常方便优雅的解决。这就是适配器的功能,如果我们想要返回的不是Call,适配器就能够帮助我们转换为其他类型。 以RxJava3为例:
添加依赖
implementation 'com.squareup.retrofit2:adapter-rxjava3:2.9.0'
implementation 'io.reactivex.rxjava3:rxandroid:3.0.0'
修改接口方法
@GET("lg/collect/list/{pageNum}/json")
Flowable<ResponseBody> getActicle(@Path("pageNum") int pageNum);
嵌套请求
Retrofit retrofit3 = new Retrofit.Builder()
        .baseUrl("https://www.wanandroid.com/")
        // 添加转换器
        .addConverterFactory(GsonConverterFactory.create())
        .addCallAdapterFactory(RxJava3CallAdapterFactory.create())//添加适配器
        .build();
WanAndroidService2 wanAndroidService3 = retrofit3.create(WanAndroidService2.class);
wanAndroidService3.login2("lanceedu", "123123")
        .flatMap(new Function<BaseResponse, Publisher<ResponseBody>>() {
            @Override
            public Publisher<ResponseBody> apply(BaseResponse baseResponse) throws Throwable {
                return wanAndroidService3.getActicle(0);
            }
        })
        .observeOn(Schedulers.io())
        .subscribeOn(Schedulers.newThread())
        .subscribe(new Consumer<ResponseBody>() {
            @Override
            public void accept(ResponseBody responseBody) throws Throwable {
                System.out.println(responseBody.string());
            }
        });


 670
670


 被折叠的 条评论
为什么被折叠?
被折叠的 条评论
为什么被折叠?
 到【灌水乐园】发言


