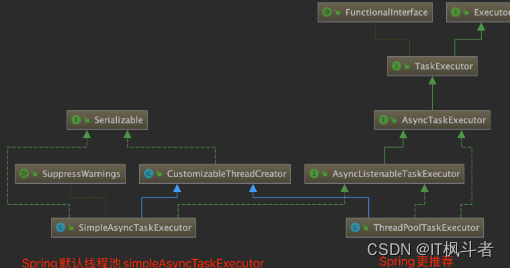
Spring默认线程池SimpleAsyncTaskExecutor
简介
- SimpleAsyncTaskExecutor,不是真的线程池,这个类不重用线程,每次调用都会创建一个新的线程,没有最大线程数设置。并发大的时候会产生严重的性能问题。
- 在Java中创建线程并不便宜,线程对象占用大量内存,在大型应用程序中,分配和取消分配许多线程对象会产生大量内存管理开销。
类的介绍
-
从接口实现上看,现实 Executor 接口。
-

-

-
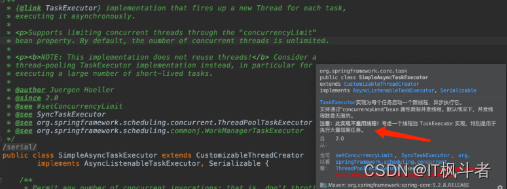
此类特点概括为以下几点:
-
为每个任务启动一个新线程,异步执行它。
-
支持通过“concurrencyLimit”bean 属性限制并发线程。默认情况下,并发线程数是无限的。
-
注意:此实现不重用线程!
-
考虑一个线程池 TaskExecutor 实现,特别是用于执行大量短期任务。
-
看到这个介绍后,是不是细思恐极:创建新线程、无限、不重用。
-
这是不是和我们印象中的的线程池不一样,可以说是相悖的,完美躲过线程池优势。
-
线程池的优势:
- 降低创建线程和销毁线程的性能开销。
- 提高响应速度,当有新任务需要执行是不需要等待线程创建就可以立马执行。
- 合理的设置线程池大小可以避免因为线程数超过硬件资源瓶颈带来的问题。
-
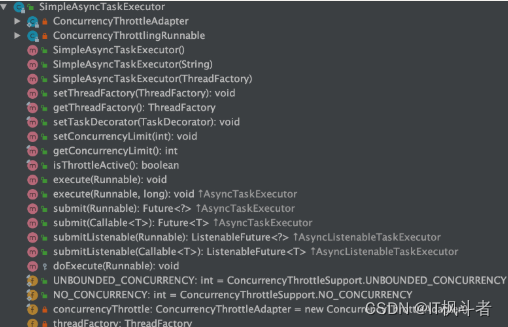
再看下SimpleAsyncTaskExecutor 类的结构:
-

-
可能常用的方法就是
-
setConcurrencyLimit 设置允许的最大并行访问数,起到一定的资源节流作用。 默认-1 表示根本没有并发限制,即不启用资源节流。
-
setTaskDecorator 指定一个自定义TaskDecorator以应用于任何即将执行的Runnable 。主要用例是围绕任务调度设置一些执行上下文,或者未任务执行提供一些监控/统计。
-
execute
-
submit
示例、源码分析
-
先来个示例,再从源码看执行的流程:
-
public static void main(String[] args) { SimpleAsyncTaskExecutor executor = new SimpleAsyncTaskExecutor("simple-async-"); //设置允许的最大并行访问数 executor.setConcurrencyLimit(Runtime.getRuntime().availableProcessors() + 1); //设置装饰者,传递一些上下文 executor.setTaskDecorator(runnable -> { SecurityContext context = SecurityContextHolder.getContext(); return () -> { try { SecurityContextHolder.setContext(context); runnable.run(); } finally { SecurityContextHolder.clearContext(); } }; }); for (int i = 0; i < 10; i++) { executor.execute(() -> log.info("执行线程:{}", Thread.currentThread().getName())); } } -
结果:创建了10个线程。
-
源码走起,从 execute 方法开始:
-
//限流主要实现 private final SimpleAsyncTaskExecutor.ConcurrencyThrottleAdapter concurrencyThrottle = new SimpleAsyncTaskExecutor.ConcurrencyThrottleAdapter(); private ThreadFactory threadFactory; //设置最大的线程数量 public void setConcurrencyLimit(int concurrencyLimit) { this.concurrencyThrottle.setConcurrencyLimit(concurrencyLimit); } //是否开启了限流 限流数量大于0? public final boolean isThrottleActive() { return this.concurrencyThrottle.isThrottleActive(); } /** * Executes the given task, within a concurrency throttle * if configured (through the superclass's settings). * @see #doExecute(Runnable) */ @Override public void execute(Runnable task) { //调用下面的execute方法,TIMEOUT_INDEFINITE = = Long.MAX_VALUE; execute(task, TIMEOUT_INDEFINITE); } /** * Executes the given task, within a concurrency throttle * if configured (through the superclass's settings). * <p>Executes urgent tasks (with 'immediate' timeout) directly, * bypassing the concurrency throttle (if active). All other * tasks are subject to throttling. * @see #TIMEOUT_IMMEDIATE * @see #doExecute(Runnable) */ @Override public void execute(Runnable task, long startTimeout) { Assert.notNull(task, "Runnable must not be null"); Runnable taskToUse = (this.taskDecorator != null ? this.taskDecorator.decorate(task) : task); //如果设置了并发限制且startTimeout>0,TIMEOUT_IMMEDIATE = 0 if (isThrottleActive() && startTimeout > TIMEOUT_IMMEDIATE) { //开启并发/限流将执行的Runable进行封装,执行完成调用final方法 当前数量-- this.concurrencyThrottle.beforeAccess(); doExecute(new ConcurrencyThrottlingRunnable(taskToUse)); } //没有设置并发数 else { doExecute(taskToUse); } } -
看下 isThrottleActive 方法:
-
/** * 返回此油门当前是否处于活动状态。 * Return whether this throttle is currently active. * 如果此实例的并发限制处于活动状态,则为true * @return {@code true} if the concurrency limit for this instance is active * @see #getConcurrencyLimit() */ public boolean isThrottleActive() { return (this.concurrencyLimit >= 0); } -
进入if后调用 beforeAccess 和 doExecute方法:beforeAccess 主要就是进行并发控制。
-
并发控制/限流处理其实就是在执行任务之前和之后对于当前线程数量进行统计。
-
简单的通过 synchronized 和 wati and notify 达到控制线程数量的效果,从而实现限流的策略。
-
/** * 在具体子类的主要执行逻辑之前被调用。 * To be invoked before the main execution logic of concrete subclasses. * 此实现应用并发限制 * <p>This implementation applies the concurrency throttle. * @see #afterAccess() */ protected void beforeAccess() { // concurrencyLimit并发限制数量, NO_CONCURRENCY=0,如果并发限制为0则报错 if (this.concurrencyLimit == NO_CONCURRENCY) { throw new IllegalStateException( "Currently no invocations allowed - concurrency limit set to NO_CONCURRENCY"); } // 并发限制>0 if (this.concurrencyLimit > 0) { boolean debug = logger.isDebugEnabled(); //上锁 synchronized (this.monitor) { boolean interrupted = false; // 如果当时的并发数量大于并发限制数量-就是我们设置那个值 while (this.concurrencyCount >= this.concurrencyLimit) { if (interrupted) { throw new IllegalStateException("Thread was interrupted while waiting for invocation access, " + "but concurrency limit still does not allow for entering"); } if (debug) { logger.debug("Concurrency count " + this.concurrencyCount + " has reached limit " + this.concurrencyLimit + " - blocking"); } try { // 则等待,一直等待,等到并发数量变小。 this.monitor.wait(); } catch (InterruptedException ex) { // Re-interrupt current thread, to allow other threads to react. Thread.currentThread().interrupt(); interrupted = true; } } if (debug) { logger.debug("Entering throttle at concurrency count " + this.concurrencyCount); } // 并发数量增加 this.concurrencyCount++; } } } -
doExecute方法:看到这,就知道了,每次都会创建新线程去执行任务。
-
/** * 用于实际执行任务的模板方法。 * Template method for the actual execution of a task. * 默认实现创建一个新线程并启动它。 * <p>The default implementation creates a new Thread and starts it. * @param task the Runnable to execute * @see #setThreadFactory * @see #createThread * @see java.lang.Thread#start() */ protected void doExecute(Runnable task) { Thread thread = (this.threadFactory != null ? this.threadFactory.newThread(task) : createThread(task)); thread.start(); } -
到此,再回头看开始的设置代码:
-
executor.setConcurrencyLimit(Runtime.getRuntime().availableProcessors() + 1); -
并发数=Java虚拟机的可用的处理器数量+1,
-
当需要创建的线程数量大于并发数时,会等待,等待有任务结束,才创建新线程。区别于其他线程池,就意味着没任务队列,没有最大线程,请求会一直等待,可能就会等待超时。
-
如果我们不设置并发数量,那么每次就会直接创建新线程(无限创建)。物极必反。
-
到此,应该是 SimpleAsyncTaskExecutor 有了较清晰了解了吧,慎用。
-
如果是我,是不会在生产环境使用上使用的!
-
其他相关源码,这里就不做过多赘述了:
-
//这里是对于Runable对象执行再次封装,在执行完毕后处理限流操作
private class ConcurrencyThrottlingRunnable implements Runnable {
    private final Runnable target;

    public ConcurrencyThrottlingRunnable(Runnable target) {
        this.target = target;
    }

    public void run() {
        try {
           this.target.run();
        } finally {
            SimpleAsyncTaskExecutor.this.concurrencyThrottle.afterAccess();
        }
    }
}


 1206
1206


 被折叠的 条评论
为什么被折叠?


