


初一听,这个词,还不知道是怎么回事,且听我慢慢道来。
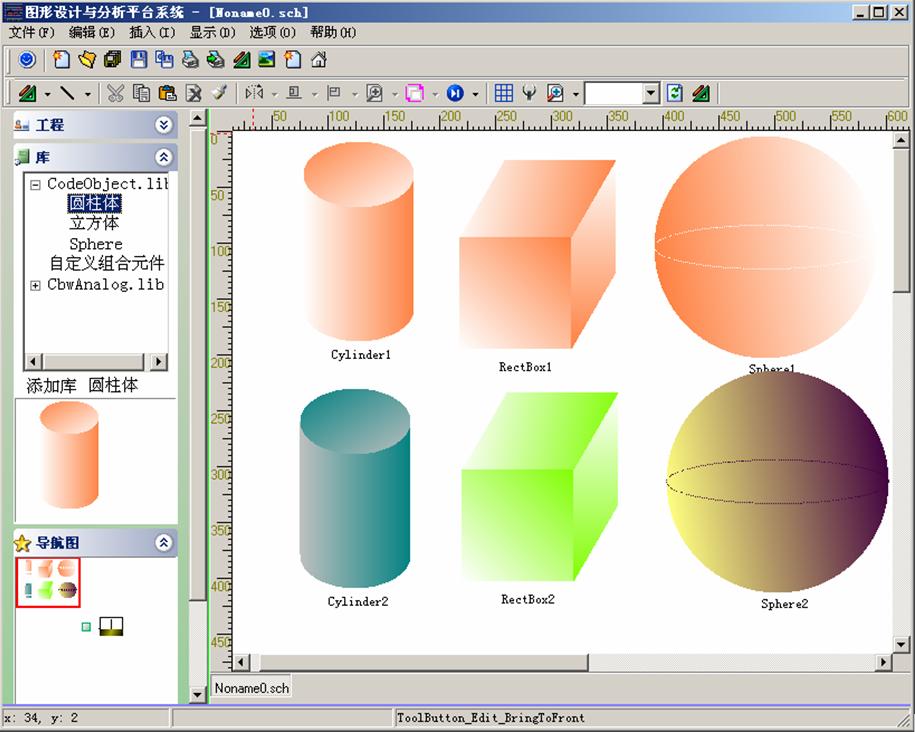 其中,圆柱体代码为
 PenData.Style
=
5
;
//
无画笔
PenData.Style
=
5
;
//
无画笔
BrushData.BrushStyle
=
1
;
//
渐变效果
BrushData.Color1
=
Color1;
//
渐变起始颜色
BrushData.Color2
=
Color2;
//
渐变结束色
Rectangle(
-
a,
0
, a, h);
//
画出矩形
Ellipse(
0
, h, a, b);
//
画出底部椭圆
BrushData.BackgroundStyle
=
2
;
//
渐变底纹效果
BrushData.GradientIndex
=
1
;
//
渐变变形效果
Ellipse(
0
,
0
, a, b);
//
画出顶部椭圆
PenData.Style
=
5
;
//
无画笔
double
x[
4
],y[
4
];
//
4个坐标点分量
double
sqrt3
=
0.866
;
//
其实是sqrt(3) / 2
BrushData.BrushStyle
=
1
;
//
渐变效果
BrushData.Color1
=
Color1;
//
渐变起始颜色
BrushData.Color2
=
Color2;
//
渐变结束色
BrushData.BackgroundStyle
=
3
;
//
渐变底纹效果:副对角线
BrushData.GradientIndex
=
1
;
//
渐变变形效果
x[
0
]
=
0
; y[
0
]
=
0
; x[
1
]
=
a; y[
1
]
=
0
; x[
2
]
=
a; y[
2
]
=
h; x[
3
]
=
0
; y[
3
]
=
h;
Polygon(x, y,
4
);
//
画出正面矩形
BrushData.BackgroundStyle
=
1
;
//
渐变底纹效果:水平
BrushData.GradientIndex
=
0
;
//
渐变变形效果
x[
0
]
=
a
+
b
/
2
; y[
0
]
=
-
sqrt3
*
b; x[
3
]
=
a
+
b
/
2
; y[
3
]
=
h
-
sqrt3
*
b;
Polygon(x, y,
4
);
//
画出侧面矩形
BrushData.BackgroundStyle
=
0
;
//
渐变底纹效果:垂直
BrushData.Degree
=
10
;
//
旋转画刷10度
x[
2
]
=
0
; y[
2
]
=
0
; x[
3
]
=
b
/
2
; y[
3
]
=
-
sqrt3
*
b;
Polygon(x, y,
4
);
//
画出顶面矩形
 class
TCbwMetaType :
public
TObject
class
TCbwMetaType :
public
TObject

 ...
{
...
{
 TFloatPoint CentralPoint;
int Type;
TPoint * Points;
int Number;
public:
__fastcall TCbwMetaType(int t, TPoint * p, int n);
__fastcall ~TCbwMetaType();
 }
;
}
;
class
TCbwBackReference :
public
TObject
...
{
vector<TCbwMetaType *> FObjects;
void __fastcall Clear();
bool FRecord;
public:

 __fastcall TCbwBackReference() ...{}
__fastcall ~TCbwBackReference() ...{ Clear(); }
void __fastcall Add(int type, TPoint * DrawPoints, int PointNumber);
__published:
__property bool Record = ...{ read = FRecord, write = FRecord };
}
;
__fastcall TCbwMetaType::TCbwMetaType(
int
t, TPoint
*
p,
int
n)
...
{
Type = t;
Points = new TPoint[n];
for(int i = 0; i < n; ++i)
Points[i] = p[i];
}
__fastcall TCbwMetaType::
~
TCbwMetaType()
...
{
delete [] Points;
}
void
__fastcall TCbwBackReference::Clear()
...
{
FlushVector(FObjects, true);
}
void
__fastcall TCbwBackReference::Add(
int
type, TPoint
*
DrawPoints,
int
PointNumber)
...
{
TCbwMetaType * object = new TCbwMetaType(type, DrawPoints, PointNumber);
FObjects.push_back(object);
}
void
__fastcall TCbwCodeObject::GdiDraw(CbwDrawType type,
bool
reloadGdiFlag)
...
{
if(FBackReference->Record)
FBackReference->Add(type, DrawPoints, PointNumber);
inherited::GdiDraw(type, reloadGdiFlag);
}
PenData.Style
=
5
;
//
无画笔
BrushData.BrushStyle
=
1
;
//
渐变效果
BrushData.Color1
=
0x4080ff
;
//
渐变起始颜色
BrushData.Color2
=
clWhite;
//
渐变结束色
BrushData.BackgroundStyle
=
2
;
//
底纹样式: 对角线
BrushData.GradientIndex
=
0
;
//
渐变变形效果
BackReference.Record
=
true
;
Ellipse(
0
,
0
,
80
,
30
);
//
画出椭圆
BackReference.Record
=
false
;
 PenData.Style
=
5
;
//
无画笔
PenData.Style
=
5
;
//
无画笔
BrushData.BrushStyle
=
1
;
//
渐变效果
BrushData.Color1
=
0x4080ff
;
//
渐变起始颜色
BrushData.Color2
=
clWhite;
//
渐变结束色
BrushData.BackgroundStyle
=
2
;
//
底纹样式: 对角线
BrushData.GradientIndex
=
0
;
//
渐变变形效果
BackReference.Record
=
true
;
Ellipse(
0
,
0
,
80
,
30
);
//
画出椭圆
double
x[
181
], y[
181
];
GetPoints(
0
,
0
,
180
, x, y,
0
);
//
取点函数,取得上面椭圆0~180度的点
BackReference.Record
=
false
;
int
backReferenceIndex
=
AnsiString(function
->
Realize
->
Parameters[index
++
]
->
Variable
->
Value).ToInt();
int
startTheta
=
AnsiString(function
->
Realize
->
Parameters[index
++
]
->
Variable
->
Value).ToInt();
int
endTheta
=
AnsiString(function
->
Realize
->
Parameters[index
++
]
->
Variable
->
Value).ToInt();
TSentence_Declare_Variable
*
xValues
=
function
->
Realize
->
Parameters[index
++
];
TSentence_Declare_Variable
*
yValues
=
function
->
Realize
->
Parameters[index
++
];
int
startIndex
=
AnsiString(function
->
Realize
->
Parameters[index
++
]
->
Variable
->
Value).ToInt();
void
__fastcall GetPoints(
int
index,
int
beginTheta,
int
endTheta,
TSentence_Declare_Variable
*
x,
TSentence_Declare_Variable
*
y,
int
startIndex);
void
__fastcall TCbwBackReference::GetPoints(
int
index,
int
beginTheta,
int
endTheta,
TSentence_Declare_Variable
*
x,
TSentence_Declare_Variable
*
y,
int
startIndex)
...
{
if(index >= 0 && index < FObjects.size())
...{
TCbwMetaType * object = FObjects[index];
for(int i = beginTheta; i <= endTheta; ++i)
...{
TPoint p = object->GetPointAt(i);
x->SetValueAt(i + startIndex, p.x);
y->SetValueAt(i + startIndex, p.y);
 }
}
}
}
TPoint __fastcall GetPointAt(
int
index);
TPoint __fastcall TCbwMetaType::GetPointAt(
int
index)
...
{
…
}
TPoint __fastcall TCbwMetaType::GetPointAt(
int
theta)
...
{
while(theta < 0) theta += 360;
while(theta >= 360) theta -= 360;
bool negativeFlag = (theta > 90 && theta < 270);
double x0 = Points[0].x, y0 = Points[0].y;
double a = Points[1].x, b = Points[1].y;
double k = tan(theta * PI / 180.0);
double v = sqrt( a*a*b*b / (b*b + a*a*k*k));
double x = x0 + v;
if(negativeFlag)
x = x0 - v;
v *= k;
double y = y0 - v;
if(negativeFlag)
y = y0 + v;
return TPoint(x, y);
}
 PenData.Style
=
5
;
//
无画笔
PenData.Style
=
5
;
//
无画笔
BrushData.BrushStyle
=
1
;
//
渐变效果
BrushData.Color1
=
0x4080ff
;
//
渐变起始颜色
BrushData.Color2
=
clWhite;
//
渐变结束色
BrushData.BackgroundStyle
=
2
;
//
底纹样式: 对角线
BrushData.GradientIndex
=
0
;
//
渐变变形效果
BackReference.Record
=
true
;
Ellipse(
0
,
0
,
80
,
30
);
//
画出椭圆
double
x[
381
], y[
381
];
GetPoints(
0
,
180
,
0
, x, y,
0
);
//
取点函数,取得上面椭圆0~180度的点
Arc(
0
,
20
,
80
,
80
,
-
10
,
200
);
GetPoints(
1
,
-
10
,
190
, x, y,
180
);
Polygon(x, y,
381
);
BackReference.Record
=
false
;
所有的一切的一切,都是由需求引起的。
所谓代码图元,就是不用鼠标画,而是用编写代码直接画出图,这样,图的效果可达到绝美的境界。
下面是一些系统中已支持例子,可简单设置各元件对象的颜色达到各种效果。
PenData.Style
=
5
;
//
无画笔
BrushData.BrushStyle
=
1
;
//
渐变效果
BrushData.Color1
=
Color1;
//
渐变起始颜色
BrushData.Color2
=
Color2;
//
渐变结束色
Rectangle(
-
a,
0
, a, h);
//
画出矩形
Ellipse(
0
, h, a, b);
//
画出底部椭圆
BrushData.BackgroundStyle
=
2
;
//
渐变底纹效果
BrushData.GradientIndex
=
1
;
//
渐变变形效果
Ellipse(
0
,
0
, a, b);
//
画出顶部椭圆
长方体代码为
PenData.Style
=
5
;
//
无画笔
double
x[
4
],y[
4
];
//
4个坐标点分量
double
sqrt3
=
0.866
;
//
其实是sqrt(3) / 2
BrushData.BrushStyle
=
1
;
//
渐变效果
BrushData.Color1
=
Color1;
//
渐变起始颜色
BrushData.Color2
=
Color2;
//
渐变结束色
BrushData.BackgroundStyle
=
3
;
//
渐变底纹效果:副对角线
BrushData.GradientIndex
=
1
;
//
渐变变形效果
x[
0
]
=
0
; y[
0
]
=
0
; x[
1
]
=
a; y[
1
]
=
0
; x[
2
]
=
a; y[
2
]
=
h; x[
3
]
=
0
; y[
3
]
=
h; Polygon(x, y,
4
);
//
画出正面矩形
BrushData.BackgroundStyle
=
1
;
//
渐变底纹效果:水平
BrushData.GradientIndex
=
0
;
//
渐变变形效果
x[
0
]
=
a
+
b
/
2
; y[
0
]
=
-
sqrt3
*
b; x[
3
]
=
a
+
b
/
2
; y[
3
]
=
h
-
sqrt3
*
b;Polygon(x, y,
4
);
//
画出侧面矩形
BrushData.BackgroundStyle
=
0
;
//
渐变底纹效果:垂直
BrushData.Degree
=
10
;
//
旋转画刷10度
x[
2
]
=
0
; y[
2
]
=
0
; x[
3
]
=
b
/
2
; y[
3
]
=
-
sqrt3
*
b;Polygon(x, y,
4
);
//
画出顶面矩形
椭球代码为
PenData.Style
=
5
;
//
无线条颜色
BrushData.BrushStyle
=
1
;
//
渐变效果
BrushData.Color1
=
Color1;
//
渐变起始颜色
BrushData.Color2
=
Color2;
//
渐变结束色
BrushData.BackgroundStyle
=
2
;
//
底纹样式: 对角线
BrushData.GradientIndex
=
1
;
//
渐变变形效果
BrushData.Degree
=
-
10
;
//
旋转画刷-10度
Ellipse(
0
,
0
, a, b);
//
画出椭圆
PenData.Style
=
2
;
//
画笔为虚线
PenData.Color
=
Color1;
//
画笔颜色
Ellipse(
0
,
0
, a, b
/
5
)
//
画出小椭圆
PenData.Style
=
5
;
//
无线条颜色
BrushData.BrushStyle
=
1
;
//
渐变效果
BrushData.Color1
=
Color1;
//
渐变起始颜色
BrushData.Color2
=
Color2;
//
渐变结束色
BrushData.BackgroundStyle
=
2
;
//
底纹样式: 对角线
BrushData.GradientIndex
=
1
;
//
渐变变形效果
BrushData.Degree
=
-
10
;
//
旋转画刷-10度
Ellipse(
0
,
0
, a, b);
//
画出椭圆
PenData.Style
=
2
;
//
画笔为虚线
PenData.Color
=
Color1;
//
画笔颜色
Ellipse(
0
,
0
, a, b
/
5
)
//
画出小椭圆
各代码可以在库文件CodeObject.lib中看到。
具体的代码含义及效果设置代码请参阅我写的组态说明书,说明书在
www.drgraph.com可以下载,当然,可能最新的技术还没有更新,不过,大体如此。
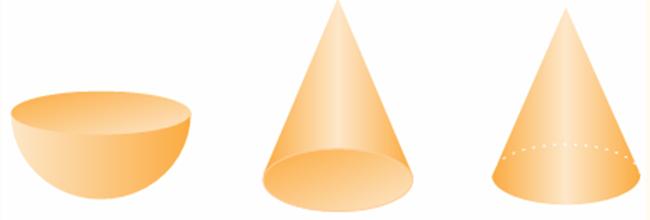
现在,系统已能支持相当多的组态效果了,但更进一步,新的需求又来了,如下面的效果。
第一个是个碗,碗口简单,用一个椭圆即可画出,剩下的呢?
第二个是一个锥体,底部亦可用一个椭圆画出,锥体呢?
当然,这些效果可以通过区域处理的方式来实现,但让用户操作起来将很是不便。
为此,我计划将借鉴正则表达式中的反向引用技术来完成这项工作,即用户可以让程序记下刚画的图,如上面所说的椭圆,然后,取出该图的边界上的一些点,附加上其余的点,构成一个多边形的点,最后,画出这个多边形即可。
这种思路好象可行。
1. 首先,设计数据类型BackReference,其中向量类型设计为MetaType
头文件代码
class
TCbwMetaType :
public
TObject
...
{ TFloatPoint CentralPoint; int Type; TPoint * Points; int Number;public: __fastcall TCbwMetaType(int t, TPoint * p, int n); __fastcall ~TCbwMetaType();}
;
class
TCbwBackReference :
public
TObject
...
{ vector<TCbwMetaType *> FObjects; void __fastcall Clear(); bool FRecord;public: __fastcall TCbwBackReference() ...{} __fastcall ~TCbwBackReference() ...{ Clear(); } void __fastcall Add(int type, TPoint * DrawPoints, int PointNumber);__published: __property bool Record = ...{ read = FRecord, write = FRecord };}
;
源文件代码:
__fastcall TCbwMetaType::TCbwMetaType(
int
t, TPoint
*
p,
int
n)
...
{ Type = t; Points = new TPoint[n]; for(int i = 0; i < n; ++i) Points[i] = p[i];}
__fastcall TCbwMetaType::
~
TCbwMetaType()
...
{ delete [] Points;}
void
__fastcall TCbwBackReference::Clear()
...
{ FlushVector(FObjects, true);}
void
__fastcall TCbwBackReference::Add(
int
type, TPoint
*
DrawPoints,
int
PointNumber)
...
{ TCbwMetaType * object = new TCbwMetaType(type, DrawPoints, PointNumber); FObjects.push_back(object);}
2. 下来就应该在代码图元中加上相应支持了,简单声明发布属性TCbwBackReference * BackReference即可。然后在画图过程中进行处理
void
__fastcall TCbwCodeObject::GdiDraw(CbwDrawType type,
bool
reloadGdiFlag)
...
{ if(FBackReference->Record) FBackReference->Add(type, DrawPoints, PointNumber); inherited::GdiDraw(type, reloadGdiFlag);}
则,记录过程完成。
3. 剩下的就应该获取期望的点数了,怎么调用呢?设计一个系统函数支持,即
void GetPoints(int index, int beginTheta, int endTheta, double x[], double y[], int startIndex);
该函数中的各参数含义:
index: 反向引用下标值,自0开始,即取得对应的画法
beginTheta, endTheta: 即自对应画法的中心点,按角度取得边界的范围
x[], y[]:取得点的保存目标处
startIndex: x[], y[]的保存起始下标
该函数的含义是应该清楚了吧,可能说得不是很清楚,待后续具体示例进行说明。
比如,要画出上面的锥体,可写代码先画出
PenData.Style
=
5
;
//
无画笔
BrushData.BrushStyle
=
1
;
//
渐变效果
BrushData.Color1
=
0x4080ff
;
//
渐变起始颜色
BrushData.Color2
=
clWhite;
//
渐变结束色
BrushData.BackgroundStyle
=
2
;
//
底纹样式: 对角线
BrushData.GradientIndex
=
0
;
//
渐变变形效果
BackReference.Record
=
true
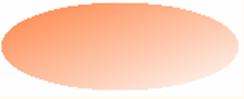
;Ellipse(
0
,
0
,
80
,
30
);
//
画出椭圆
BackReference.Record
=
false
;
其运行效果为
OK
,现在加入取点函数
PenData.Style
=
5
;
//
无画笔
BrushData.BrushStyle
=
1
;
//
渐变效果
BrushData.Color1
=
0x4080ff
;
//
渐变起始颜色
BrushData.Color2
=
clWhite;
//
渐变结束色
BrushData.BackgroundStyle
=
2
;
//
底纹样式: 对角线
BrushData.GradientIndex
=
0
;
//
渐变变形效果
BackReference.Record
=
true
;Ellipse(
0
,
0
,
80
,
30
);
//
画出椭圆
double
x[
181
], y[
181
];GetPoints(
0
,
0
,
180
, x, y,
0
);
//
取点函数,取得上面椭圆0~180度的点
BackReference.Record
=
false
;
为支持这些用法,还得一步步解决。
4. 首先得在编译处理时取得这些参数,这个简单
int
backReferenceIndex
=
AnsiString(function
->
Realize
->
Parameters[index
++
]
->
Variable
->
Value).ToInt();
int
startTheta
=
AnsiString(function
->
Realize
->
Parameters[index
++
]
->
Variable
->
Value).ToInt();
int
endTheta
=
AnsiString(function
->
Realize
->
Parameters[index
++
]
->
Variable
->
Value).ToInt();TSentence_Declare_Variable
*
xValues
=
function
->
Realize
->
Parameters[index
++
];TSentence_Declare_Variable
*
yValues
=
function
->
Realize
->
Parameters[index
++
];
int
startIndex
=
AnsiString(function
->
Realize
->
Parameters[index
++
]
->
Variable
->
Value).ToInt();
然后调用函数
FBackReference->GetPoints(index, startTheta, endTheta, xValues, yValues, startIndex);
需要在反向引用类中支持又得需要在模型类中处理
void
__fastcall GetPoints(
int
index,
int
beginTheta,
int
endTheta, TSentence_Declare_Variable
*
x, TSentence_Declare_Variable
*
y,
int
startIndex);
其实现源代码
void
__fastcall TCbwBackReference::GetPoints(
int
index,
int
beginTheta,
int
endTheta, TSentence_Declare_Variable
*
x, TSentence_Declare_Variable
*
y,
int
startIndex)
...
{ if(index >= 0 && index < FObjects.size()) ...{ TCbwMetaType * object = FObjects[index]; for(int i = beginTheta; i <= endTheta; ++i) ...{ TPoint p = object->GetPointAt(i); x->SetValueAt(i + startIndex, p.x); y->SetValueAt(i + startIndex, p.y); } }}
TPoint __fastcall GetPointAt(
int
index);TPoint __fastcall TCbwMetaType::GetPointAt(
int
index)
...
{ …}
5. 到此,只剩下数学问题了,即已知一个函数,求其与一条射线的交点。
函数为记录下的画法函数,以椭圆为例,椭圆的画法函数为
Ellipse(x0, y0, a, b)
其中,(x0,y0)为中心点坐标,a,b分别为长短半轴
其对应的数学函数为(x-x0)^2/a^2 + (y-y0)^2/b^2 = 0
射线为由x0, y0出发,角度为theta的射线,好象该用什么点斜式,赶快查书。稍等。
《数学实用手册》确实是一本好书,一查就查到,倾角为theta,则斜率为tg(theta),在计算机里面该表示为tan(theta),则射线方程为y-y0=tan(theta)(x-x0)
这两个方程联立求解,其实需要先将射线方程代入数学函数中
得x = x0±sqrt((ab)^2/(b^2 + (a tan(theta))^2),根据theta确定正负号
再求得y = y0 ± sqrt((ab)^2/(b^2 + (a tan(theta))^2)tan(theta)
则实现椭圆版的求解代码为
TPoint __fastcall TCbwMetaType::GetPointAt(
int
theta)
...
{ while(theta < 0) theta += 360; while(theta >= 360) theta -= 360; bool negativeFlag = (theta > 90 && theta < 270); double x0 = Points[0].x, y0 = Points[0].y; double a = Points[1].x, b = Points[1].y; double k = tan(theta * PI / 180.0); double v = sqrt( a*a*b*b / (b*b + a*a*k*k)); double x = x0 + v; if(negativeFlag) x = x0 - v; v *= k; double y = y0 - v; if(negativeFlag) y = y0 + v; return TPoint(x, y);}
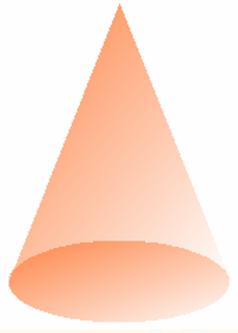
现在,试试画出效果
运行,看下结果
OK,目标实现,剩下的事就是调一下画刷填充效果。
顺带把上面的碗也画出来
代码
PenData.Style
=
5
;
//
无画笔
BrushData.BrushStyle
=
1
;
//
渐变效果
BrushData.Color1
=
0x4080ff
;
//
渐变起始颜色
BrushData.Color2
=
clWhite;
//
渐变结束色
BrushData.BackgroundStyle
=
2
;
//
底纹样式: 对角线
BrushData.GradientIndex
=
0
;
//
渐变变形效果
BackReference.Record
=
true
;Ellipse(
0
,
0
,
80
,
30
);
//
画出椭圆
double
x[
381
], y[
381
];GetPoints(
0
,
180
,
0
, x, y,
0
);
//
取点函数,取得上面椭圆0~180度的点
Arc(
0
,
20
,
80
,
80
,
-
10
,
200
);GetPoints(
1
,
-
10
,
190
, x, y,
180
); Polygon(x, y,
381
);BackReference.Record
=
false
;

效果与示例可到http://www.drgraph.com/viewthread.php?tid=22&extra=page%3D1下载


 被折叠的 条评论
为什么被折叠?
被折叠的 条评论
为什么被折叠?
 到【灌水乐园】发言


