


缘由分析
对于我们现在的中大型项目于来说,用得最多的,应该就数我们的SSM,记Spring、SpringMvc、Mybatis,那么我们今天,就会来完成他们的集成。需要说明一下,本次集成我没有使用maven项目,如果需要maven项目的,可以直接讲jar包删除,在pom.xml中引入依赖即可,其他的内容都没有任何变化。
前期准备
1.jar包
这里的jar包有点多,我就直接截图出来,也会放一个某云的链接,有需要可以直接提取
![[外链图片转存失败,源站可能有防盗链机制,建议将图片保存下来直接上传(img-KfNYyqyH-1584696313563)(/img/bVbEBkr)]](https://img-blog.csdnimg.cn/20200320172613347.png?x-oss-process=image/watermark,type_ZmFuZ3poZW5naGVpdGk,shadow_10,text_aHR0cHM6Ly9ibG9nLmNzZG4ubmV0L0FydmluMG8=,size_16,color_FFFFFF,t_70)
如有需要,请点击,提取码4fy8
2.数据库
数据库的话,可以在里面创建一个user表,里面添加几条数据,目的是为了在部署到tomcat上面的时候测试链接数据库提取数据成功与否
3.开发工具
我所用的是idea1903版本的,像eclipse也同理
具体步骤
1.新建一个java web项目
![[外链图片转存失败,源站可能有防盗链机制,建议将图片保存下来直接上传(img-1IYEI3Da-1584696313564)(/img/bVbEBni)]](https://img-blog.csdnimg.cn/20200320172708240.png?x-oss-process=image/watermark,type_ZmFuZ3poZW5naGVpdGk,shadow_10,text_aHR0cHM6Ly9ibG9nLmNzZG4ubmV0L0FydmluMG8=,size_16,color_FFFFFF,t_70)
![[外链图片转存失败,源站可能有防盗链机制,建议将图片保存下来直接上传(img-iMCfpGCj-1584696313565)(/img/bVbEBnE)]](https://img-blog.csdnimg.cn/20200320172723298.png?x-oss-process=image/watermark,type_ZmFuZ3poZW5naGVpdGk,shadow_10,text_aHR0cHM6Ly9ibG9nLmNzZG4ubmV0L0FydmluMG8=,size_16,color_FFFFFF,t_70)
2.开始导入jar包
2.1在你的web/WEB-INF文件夹下面建一个名叫lib的文件夹,然后将所有的jar包复制进这个文件夹里面
2.2右键该文件夹,然后点击Add as Library,即完成导包操作
![[外链图片转存失败,源站可能有防盗链机制,建议将图片保存下来直接上传(img-HsJaCmiK-1584696313566)(/img/bVbEBn2)]](https://img-blog.csdnimg.cn/20200320172741847.png?x-oss-process=image/watermark,type_ZmFuZ3poZW5naGVpdGk,shadow_10,text_aHR0cHM6Ly9ibG9nLmNzZG4ubmV0L0FydmluMG8=,size_16,color_FFFFFF,t_70)
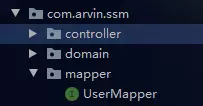
3.在src下面创建所需的包及类
下图是我创建好之后的样子
![[外链图片转存失败,源站可能有防盗链机制,建议将图片保存下来直接上传(img-0yIsqdCa-1584696313566)(/img/bVbEBo4)]](https://img-blog.csdnimg.cn/20200320172756585.png)
4.xml配置
4.1 Spring配置文件
这里的每一项都写了注释,就不多做解释,只是有一点需要注意的是,寡欲配置的事务即tx命名空间,如果我们直接在下面写而不先写上面的命名空间的话,会将tx前面的schema自动写为cache,从而我们后续在运行的时候,就会报一个No bean named 'cacheManager' is defined的错误,需要注意一下,所以特别提一下
<?xml version="1.0" encoding="UTF-8"?>
<beans xmlns="http://www.springframework.org/schema/beans"
   xmlns:xsi="http://www.w3.org/2001/XMLSchema-instance"
   xmlns:context="http://www.springframework.org/schema/context"
   xmlns:tx="http://www.springframework.org/schema/tx"
   xsi:schemaLocation="http://www.springframework.org/schema/beans
   http://www.springframework.org/schema/beans/spring-beans.xsd
   http://www.springframework.org/schema/context
   http://www.springframework.org/schema/context/spring-context.xsd
   http://www.springframework.org/schema/tx
   http://www.springframework.org/schema/tx/spring-tx.xsd">

<!--引入数据库连接配置文件-->
<context:property-placeholder location="classpath:jdbc.properties"/>

<!--数据库连接池-->
<bean id="dataSource" class="org.apache.commons.dbcp.BasicDataSource">
    <property name="driverClassName" value="${driverClassName}"/>
    <property name="url" value="${url}"/>
    <property name="username" value="${username}"/>
    <property name="password" value="${password}"/>
</bean>

<bean id="sqlSessionFactory" class="org.mybatis.spring.SqlSessionFactoryBean">
    <!--配置加载数据库路径-->
    <property name="dataSource" ref="dataSource"/>
    <!--配置加载mapper资源文件路径-->
    <property name="mapperLocations" value="classpath:com/arvin/ssm/mapper/*Mapper.xml"/>
<!--给对应包下面的domain或者类配置别名,配置完了默认为类名,一般建议类名首字母小写-->
    <property name="typeAliasesPackage">
        <value>
            com.arvin.ssm.domain
            com.arvin.ssm.query
        </value>
    </property>
</bean>

<!--配置扫描mapper的路径-->
<bean class="org.mybatis.spring.mapper.MapperScannerConfigurer">
    <property name="basePackage" value="com.arvin.ssm.mapper"></property>
</bean>

<!--事务配置-->
<bean id="transactionManager" class="org.springframework.jdbc.datasource.DataSourceTransactionManager">
    <property name="dataSource" ref="dataSource"/>
</bean>

<!--配置事务对注解的支持-->
<tx:annotation-driven/>

<!--扫描service包-->
<context:component-scan base-package="com.arvin.ssm.service"/>
###### 4.2 SpringMvc配置文件
这个配置文件相对简单,只是需要注意的是mvc命名空间前面的schema也存在上述的问题,需要大家注意一下,这个是idea自动代码提示生成的,目前我还没有更好的解决办法,只有看到了之后自己手动改为schema
    <?xml version="1.0" encoding="UTF-8"?>
    <beans xmlns="http://www.springframework.org/schema/beans"
       xmlns:xsi="http://www.w3.org/2001/XMLSchema-instance"
       xmlns:mvc="http://www.springframework.org/schema/mvc"
       xmlns:context="http://www.springframework.org/schema/context"
       xsi:schemaLocation="http://www.springframework.org/schema/beans
       http://www.springframework.org/schema/beans/spring-beans.xsd
       http://www.springframework.org/schema/mvc
       http://www.springframework.org/schema/mvc/spring-mvc.xsd
       http://www.springframework.org/schema/context
       http://www.springframework.org/schema/context/spring-context.xsd">


    <!--Controller包扫描-->
    <context:component-scan base-package="com.arvin.ssm.controller"/>
    <!--静态资源放行-->
    <mvc:default-servlet-handler/>
    <!--开启注解支持-->
    <mvc:annotation-driven/>
    <!--视图解析器-->
    <bean class="org.springframework.web.servlet.view.InternalResourceViewResolver">
        <property name="prefix" value="/WEB-INF/views"/>
        <property name="suffix" value=".jsp"/>
    </bean>

</beans>
4.3 数据库连接池配置文件
这个很简单就不多做说明了
    driverClassName=com.mysql.jdbc.Driver
    username=root
    password=123456
    url=jdbc:mysql:///mybatis
4.4 web.xml配置文件
这里也没有比较特殊的地方,就不多说了
    <?xml version="1.0" encoding="UTF-8"?>
    <web-app xmlns="http://xmlns.jcp.org/xml/ns/javaee"
         xmlns:xsi="http://www.w3.org/2001/XMLSchema-instance"
         xsi:schemaLocation="http://xmlns.jcp.org/xml/ns/javaee http://xmlns.jcp.org/xml/ns/javaee/web-app_4_0.xsd"
         version="4.0">

    <!--前端控制器-->
    <servlet>
        <servlet-name>dispatcherServlet</servlet-name>
        <servlet-class>org.springframework.web.servlet.DispatcherServlet</servlet-class>
        <init-param>
            <param-name>contextConfigLocation</param-name>
            <!--加载mvc的配置文件-->
            <param-value>classpath:applicationContext-mvc.xml</param-value>
        </init-param>
        <!--在web应用程序启动的时候就加载这个servlet-->
        <load-on-startup>1</load-on-startup>
    </servlet>
    <servlet-mapping>
        <servlet-name>dispatcherServlet</servlet-name>
        <url-pattern>/</url-pattern>
    </servlet-mapping>

    <!--配置加载spring的配置文件-->
    <context-param>
        <param-name>contextConfigLocation</param-name>
        <param-value>classpath:applicationContext.xml</param-value>
    </context-param>

    <!--监听器-->
    <listener>
        <listener-class>org.springframework.web.context.ContextLoaderListener</listener-class>
    </listener>

    <!--字符编码集过滤-->
    <filter>
        <filter-name>EncodingFilter</filter-name>
        <filter-class>org.springframework.web.filter.CharacterEncodingFilter</filter-class>
        <init-param>
            <param-name>encoding</param-name>
            <param-value>utf-8</param-value>
        </init-param>
    </filter>
    <filter-mapping>
        <filter-name>EncodingFilter</filter-name>
        <url-pattern>/*</url-pattern>
    </filter-mapping>

</web-app>
4.5 关于mapper的配置
这里有需要注意的点了
####### 4.5.1 建的位置必须要和对应mapper所在类的文件夹名相同
举例说明:我这里的UserMapper.xml所在位置为\com\arvin\ssm\mapper,那么我们写的配置文件也必须要和这个对应起来

即做成如下图
![[外链图片转存失败,源站可能有防盗链机制,建议将图片保存下来直接上传(img-PberuJDx-1584696591213)(/img/bVbEDBH)]](https://img-blog.csdnimg.cn/20200320173105318.png)
![[外链图片转存失败,源站可能有防盗链机制,建议将图片保存下来直接上传(img-5t7aUdrr-1584696591219)(/img/bVbEDBI)]](https://img-blog.csdnimg.cn/20200320173117700.png)
####### 4.5.2 别名的配置,都有写注释,可以参考
<?xml version="1.0" encoding="UTF-8"?>
<!DOCTYPE mapper PUBLIC "-//mybatis.org//DTD Mapper 3.0//EN"
        "http://mybatis.org/dtd/mybatis-3-mapper.dtd">

<!--这里的namesprace对应的为我们UserMapper接口的全限定名-->
<mapper namespace="com.arvin.ssm.mapper.UserMapper">
    <!--这里是我预先抽取的公共sql语句-->
    <sql id="showAll">
        select * from user
    </sql>
    <!--这里的id,对应的是UserMapper中的方法名-->
    <!--resultTpye可以写对应domain的全限定名,我这里写了类名首字母小写是因为我在前面配置了别名,
    具体可以看application.xml中的配置-->
    <select id="getAll" resultType="user">
        <!--这里是在引用上面抽取的公共sql语句,refid对应上面sql标签中的id-->
        <include refid="showAll"/>
    </select>
</mapper>
到这里,我们的配置就算完成了,可以在Controller里面先写一个请求测试!!


 408
408


 被折叠的 条评论
为什么被折叠?
被折叠的 条评论
为什么被折叠?
 到【灌水乐园】发言


