spring 引入外部配置文件propertice
引用外部配置文件是为了更好的阅读与维护
在这里只讲述context方法引入外部配置文件
1、spring.xml的配置
<?xml version="1.0" encoding="UTF-8"?>
<beans xmlns="http://www.springframework.org/schema/beans"
    xmlns:xsi="http://www.w3.org/2001/XMLSchema-instance" xmlns:aop="http://www.springframework.org/schema/aop"
    xmlns:tx="http://www.springframework.org/schema/tx" xmlns:context="http://www.springframework.org/schema/context"
    xsi:schemaLocation="http://www.springframework.org/schema/beans
        http://www.springframework.org/schema/beans/spring-beans.xsd
        http://www.springframework.org/schema/context
        http://www.springframework.org/schema/context/spring-context.xsd">
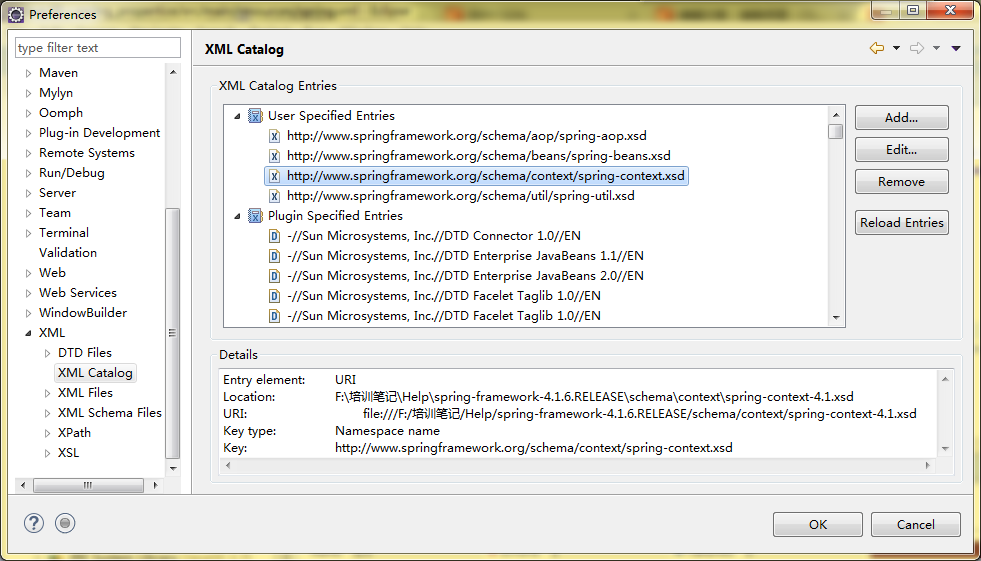
2、配置校验文件

3、db.propertice文件内容
jdbc.driverClassName=oracle.jdbc.driver.OracleDriver
jdbc.url=jdbc:oracle:thin:@localhost:1521:orcl
jdbc.username=mybatis
jdbc.password=a
4、引入外部的Properties属性文件
<context:property-placeholder location="classpath:db.properties" />5、spring配置数据源
    <!-- ${xxxx}:表示动态引用外部的配置文件 -->
    <bean id="dataSource" class="org.apache.commons.dbcp2.BasicDataSource">
        <property name="driverClassName" value="${jdbc.driverClassName}" />
        <property name="url" value="${jdbc.url}" />
        <property name="username" value="${jdbc.username}" />
        <property name="password" value="${jdbc.password}" />
    </bean>
6、测试
pom.xml中引用Junit包
        <dependency>
            <groupId>junit</groupId>
            <artifactId>junit</artifactId>
            <version>4.12</version>
            <scope>test</scope>
        </dependency>
测试类:
import static org.junit.Assert.*;
import java.sql.Connection;
import java.sql.SQLException;
import javax.sql.DataSource;
import org.junit.Test;
import org.springframework.context.ApplicationContext;
import org.springframework.context.support.ClassPathXmlApplicationContext;

public class test {
    @Test
    public void testConn() {
        ApplicationContext ac=new ClassPathXmlApplicationContext("spring2.xml");
        DataSource d=(DataSource) ac.getBean("dataSource");
        try {
            Connection con=d.getConnection();
            System.out.println(con);
            assertNotNull(con);
        } catch (SQLException e) {
            e.printStackTrace();
        }
    }
}
返回结果输出,并且Junit结果显示正确:
25927067, URL=jdbc:oracle:thin:@localhost:1521:orcl, UserName=MYBATIS, Oracle JDBC driver如果需要引入多个配置文件
<!-- 通过context:property-placeholde加载多个配置文件 只需在第1.2步中将多个配置文件以逗号分隔即可
<context:property-placeholder
        location="classpath:jdbc.properties,classpath:XXX.properties"/> -->
配置数据源时也可采用这种方式
<property name="password">
    <value>${jdbc.password}</value>
</property>


 1133
1133

 被折叠的 条评论
为什么被折叠?


