


 本文围绕Qt开发展开,介绍了常见问题及解决办法,如换源安装提速、多媒体模块播放问题等。阐述了核心知识点,包括对象树、信号与槽和多线程等。还涉及搭建Android环境、Qt插件系统、模型视图、日志系统和QML等内容,为Qt开发者提供了全面的参考。
Qt 虽然经常被当做一个 GUI 库,用来开发图形界面应用程序,但这并不是 Qt 的全部;Qt 除了可以绘制漂亮的界面(包括控件、布局、交互),还包含很多其它功能,比如多线程、访问数据库、图像处理、音频视频处理、网络通信、文件操作等,这些 Qt 都已经内置了。
笔者大部分时间都在使用Qt开发各类应用,qt又恰好弥补了c++语言本身开发业务所需要的的库,纯C++一般做业务开发大量依赖第三方库,导致一个项目可能混杂十几个第三方库,每个库的线程管理机制都不尽相同,库使用文档之类的学习成本也甚高,这很让人困扰给开发者造成许多额外负担。
不过要学习qt也不是一件简单的事情,它的设计虽然已经尽可能易于使用,但不意味着简单qt就简单好学,它仍需要使用者对时间及自身的沉淀。
相关网址
官网在线下载
其它下载
关于大佬Qt总结
QML Book
QML Book中文
QCustomPlot 绘图库
ps:关于QML的学习,可以前往B站,输入QML搜索关键字,便可查阅到相关的大量学习视频。
常见问题
换源安装提速
- 中国科学技术大学 http://mirrors.ustc.edu.cn/qtproject/
- 清华大学 https://mirrors.tuna.tsinghua.edu.cn/qt/
- 北京理工大学 http://mirror.bit.edu.cn/qtproject/
- 中国互联网络信息中心 http://mirror.bit.edu.cn/qtproject/
// cmd命令程序可以是qt-unified-windows-x64-4.5.2-online,也可以是MaintenanceTool.exe。
[cmd] --mirror [URL]
// 示例
qt-unified-windows-x64-4.5.2-online.exe --mirror https://mirror.nju.edu.cn/qt
PS D:\qt> .\MaintenanceTool.exe --mirror https://mirror.nju.edu.cn/qt
multimedia多媒体模块播放不了视频
如果你是windows电脑,那么就可能是没有对应的解码器,它使用的系统多媒体框架。去安装一个LAVFilters解码器在电脑就能够正常播放了的。
LAVFilters
延迟调用对象函数
使用QMetaObject::invokeMethod()函数,进行安全调用及延迟调用。
// 记住最后一个参数必须为Qt::QueuedConnection,这样它就会进入对象的线程队列中去,否则它会立即执行的。
QMetaObject::invokeMethod(this, std::bind(&App::onOpen, this), Qt::QueuedConnection);

// 如果你打开了c++17语法标准,那么你可以使用Lambda表达式
QMetaObject::invokeMethod(this, [this]{}, Qt::QueuedConnection);
windows打包
可以在Qt的安装目录中,找到${QT_PATH}\qt\6.2.4\msvc2019_64\binwindeployqt.exe来进行程序打包。这里是对应msvc版本的,如果是mingw则去mingw的路径中去寻找。
D:\qt\6.2.4\msvc2019_64>windeployqt -h
Usage: windeployqt [options] [files]
Qt Deploy Tool 6.2.4

The simplest way to use windeployqt is to add the bin directory of your Qt
installation (e.g. <QT_DIR\bin>) to the PATH variable and then run:
  windeployqt <path-to-app-binary>
If ICU, etc. are not in the bin directory, they need to be in the PATH
variable. If your application uses Qt Quick, run:
  windeployqt --qmldir <path-to-app-qml-files> <path-to-app-binary>

Options:
  -?, -h, --help              Displays help on commandline options.
  --help-all                  Displays help including Qt specific options.
  -v, --version               Displays version information.
  --dir <directory>           Use directory instead of binary directory.
  --qmake <path>              Use specified qmake instead of qmake from PATH.
  --libdir <path>             Copy libraries to path.
  --plugindir <path>          Copy plugins to path.
  --debug                     Assume debug binaries.
  --release                   Assume release binaries.
  --pdb                       Deploy .pdb files (MSVC).
  --force                     Force updating files.
  --dry-run                   Simulation mode. Behave normally, but do not
                              copy/update any files.
  --no-patchqt                Do not patch the Qt6Core library.
  --ignore-library-errors     Ignore errors when libraries cannot be found.
  --no-plugins                Skip plugin deployment.
  --no-libraries              Skip library deployment.
  --qmldir <directory>        Scan for QML-imports starting from directory.
  --qmlimport <directory>     Add the given path to the QML module search
                              locations.
  --no-quick-import           Skip deployment of Qt Quick imports.
  --translations <languages>  A comma-separated list of languages to deploy
                              (de,fi).
  --no-translations           Skip deployment of translations.
  --no-system-d3d-compiler    Skip deployment of the system D3D compiler.
  --compiler-runtime          Deploy compiler runtime (Desktop only).
  --no-virtualkeyboard        Disable deployment of the Virtual Keyboard.
  --no-compiler-runtime       Do not deploy compiler runtime (Desktop only).
  --json                      Print to stdout in JSON format.
  --no-opengl-sw              Do not deploy the software rasterizer library.
  --list <option>             Print only the names of the files copied.
                              Available options:
                               source:   absolute path of the source files
                               target:   absolute path of the target files
                               relative: paths of the target files, relative
                                         to the target directory
                               mapping:  outputs the source and the relative
                                         target, suitable for use within an
                                         Appx mapping file
  --verbose <level>           Verbose level (0-2).

Qt libraries can be added by passing their name (-xml) or removed by passing
the name prepended by --no- (--no-xml). Available libraries:
bluetooth concurrent core declarative designer designercomponents gamepad gui
qthelp multimedia multimediawidgets multimediaquick network nfc opengl
openglwidgets positioning printsupport qml qmltooling quick quickparticles
quickwidgets script scripttools sensors serialport sql svg svgwidgets test
websockets widgets winextras xml webenginecore webengine webenginewidgets 3dcore
3drenderer 3dquick 3dquickrenderer 3dinput 3danimation 3dextras geoservices
webchannel texttospeech serialbus webview shadertools

Arguments:
  [files]                     Binaries or directory containing the binary.
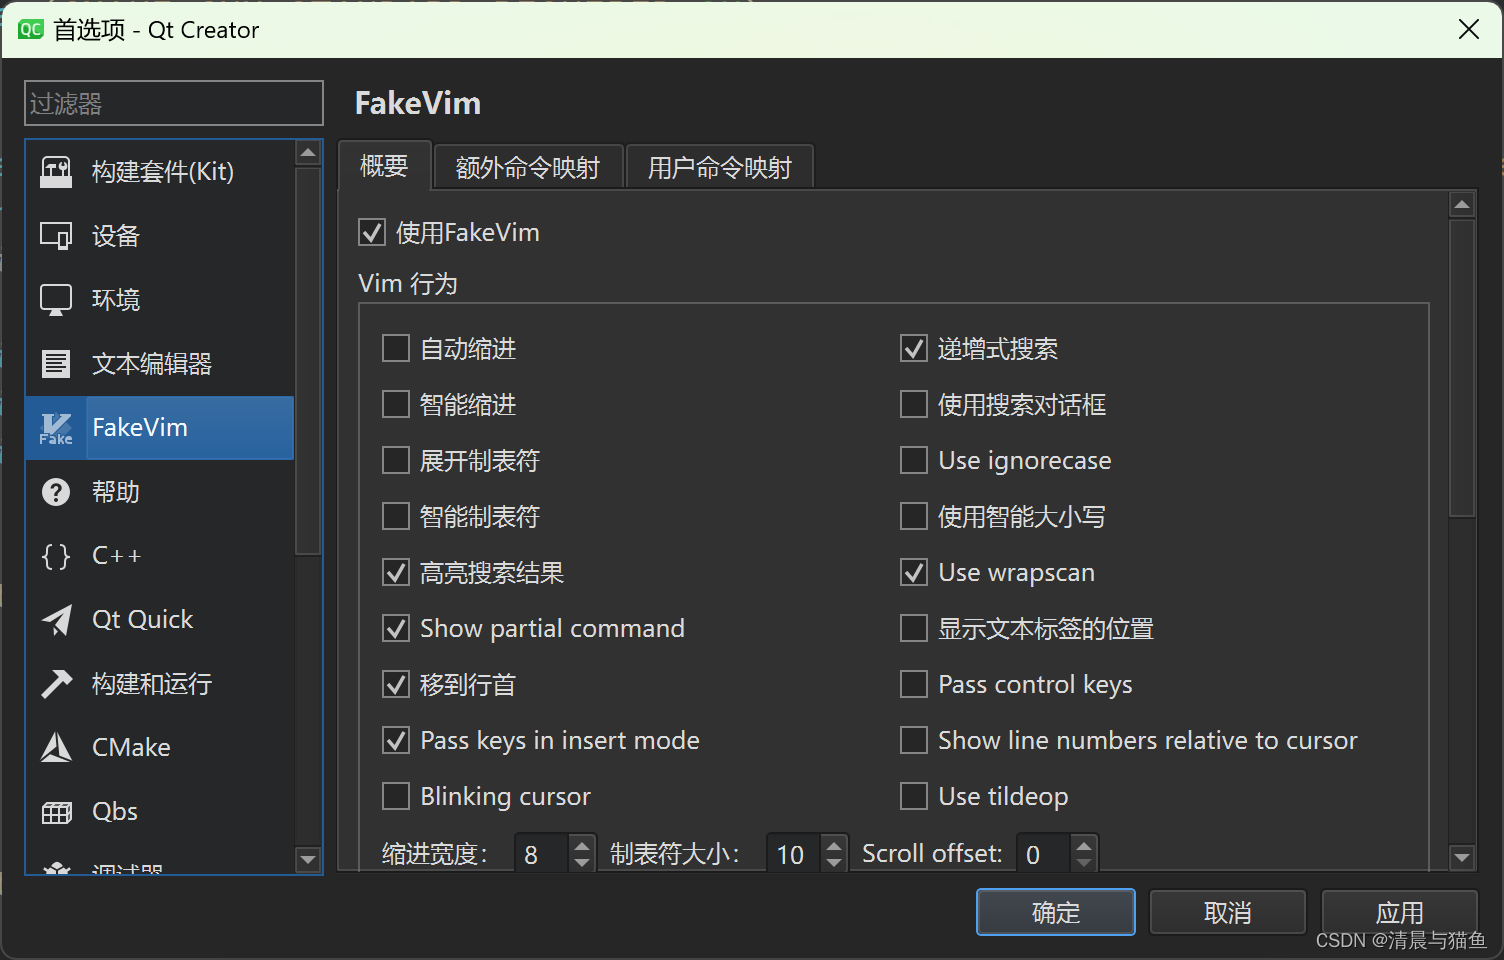
打开vim按键映射
勾选使用FakeVim
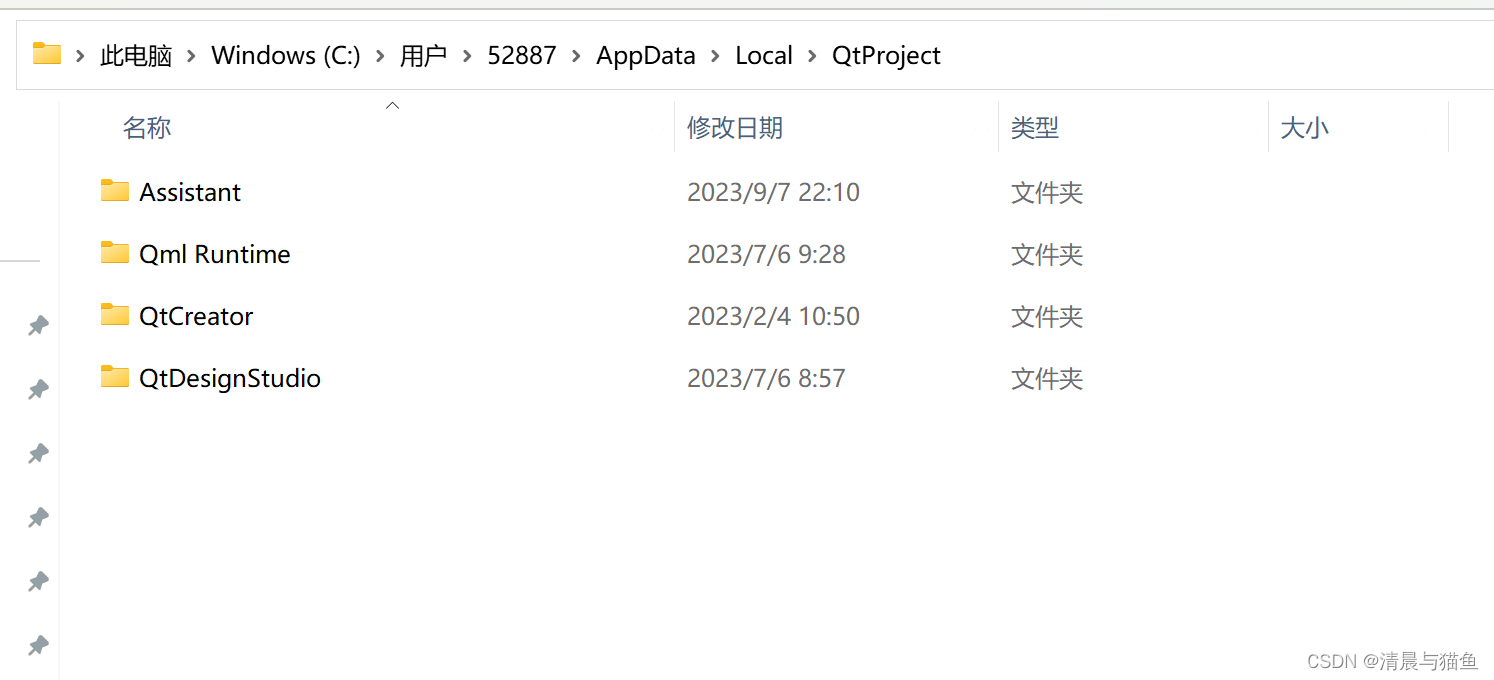
Qt Create打不开或者卡顿严重
可以试着把QtProject目录删除掉,位置在这里C:\Users\52887\AppData\Local\QtProject
如果你怕删除会带来什么不好的影响,你可以先拷贝备份一个QtProject
Qt 无边框窗口点击任务栏依旧能支持最大化与最小化的支持
// 直接设置窗口属性
setWindowFlags(Qt::FramelessWindowHint | Qt::Window | Qt::WindowSystemMenuHint | Qt::WindowMinimizeButtonHint|Qt::WindowMaximizeButtonHint);

// 你可以保留之前的窗口属性增加无标题窗口
setWindowFlags(windowFlags() | Qt::FramelessWindowHint);
快速生成QObject元属性
我们通常在定对象的元属性数据时,总是会重复定义许多重复的简单函数以及一些简单的信号。在数量少的时候,看着或许还好,但如果数量变得极多时,对文件的污染简直就是致命性的。笔者对此采用了一个宏来优化这些函数和变量的定义。笔者这里分为两种情况,第一个是不加锁的情况下。第二个就是要考虑加锁的情况。总之代码如下:
// 不加锁,typeName类型,varName变量名称,funcName设置与获取方法
#define Jie_Make_Qt_Property(typeName, varName, funcName, ...) \
private:			\
Q_PROPERTY(typeName varName READ get##funcName WRITE set##funcName NOTIFY varName##Changed FINAL)		\
typeName __##varName##__ = {__VA_ARGS__};			\
Q_SIGNAL		\
void varName##Changed();	\
public:		\
void set##funcName(const typeName &val) \
{			\
    __##varName##__ = val;		\
    Q_EMIT varName##Changed();	\
}			\
const typeName &get##funcName() const noexcept \
{		\
    return __##varName##__;		\
}

// 加锁的情况
#define Jie_Make_Qt_Property_mutex(mutex, typeName, varName, funcName, ...) \
private:			\
Q_PROPERTY(typeName varName READ get##funcName WRITE set##funcName NOTIFY varName##Changed FINAL)		\
typeName __##varName##__ = {__VA_ARGS__};			\
Q_SIGNAL		\
void varName##Changed();	\
public:		\
void set##funcName(const typeName &val) \
{			\
    mutex.lock();		\
    __##varName##__ = val;		\
    mutex.unlock(); 			\
    Q_EMIT varName##Changed();	\
}			\
typeName get##funcName() \
{		\
    mutex.lock();		\
    typeName retVal = __##varName##__;		\
    mutex.unlock();		\
    return retVal;		\
}
使用方式
class App : public QObject
{
    Q_OBJECT
public:
    App(QObject *parent = nullptr);
    Jie_Make_Qt_Property(QString, appName, AppName, "Jie App")
};
QML StackView取消动画过渡
这淡入淡出的效果,但是把动画持续时间置为0,就能达到我们要的无过渡动画的效果。
StackView {
	// 进入项的动画过渡
	pushEnter: Transition {
		PropertyAnimation {
			property: "opacity"
			from: 0
			to:1
			duration: 0
		}
	}

	// 退出项的动画过渡
	pushExit: Transition {
		PropertyAnimation {
			property: "opacity"
			from: 1
			to:0
			duration: 0
		}
	}

	// 退出进入项的动画过渡
	popEnter: Transition {
		PropertyAnimation {
			property: "opacity"
			from: 0
			to:1
			duration: 0
		}
	}

	// 退出进入项的动画过渡
	popExit: Transition {
		PropertyAnimation {
			property: "opacity"
			from: 1
			to:0
			duration: 0
		}
	}
}
核心知识点
对象树
对象树机制并不是继承子父类关系,而是一种对象与对象之间的父节点与字节点的关系。在这个机制下,Qt是不建议你使用栈内存创建对象的(最顶层节点对象除外),所以你创建Qt对象应该以new动态内存分配比较合适。
setParent()方法可以设置对象的上级节点关系,一旦设置了这种节点关系之后,在父节点对象在析构销毁时,则会把子节点进行释放,以此来达到内存泄露的管理问题。
不过对象树有一点限制,就是对象树的整个节点树必须都是同一个线程对象绑定。假设对象A关联线程A,对象B关联线程B它们之间是无法设置父子节点对象树关系的。要设置对象树关系必须满足,对象A关联线程A,对象B也关联线程A,它们之间关联同一个线程才可以设置它们之间的对象树关系。
信号与槽与多线程
其实信号与槽是很优秀机制,它把异步编程做了很巧妙的封装,同时提出了解决多线程解决方案及思路及设计。
在关联信号与槽时,提供了一个参数,这个参数描述了触发信号时如何执行槽函数的策略,大多数时候我们不填最后一个参数代表默认自动。
对笔者而言只关注两个点,触发信号时立即调用还是由别的线程调用?
假设对象A是发射信号方,对象B是槽函数处理方。根据线程关联机制,那么有两种情况,1.对象A和对象B关联到同一个线程。2.对象A和对象B关联在不同的线程。
如果针对的是情况1,同属于一个线程,那么它则会立即调用。只有一个线程并不存在线程的缓存一致性问题及资源互斥问题。
如果针对的是情况2,不同属一个线程,那么它不会立即调用。而是将处理投入到槽函数所在的对象事件列表中,等待时机进行调用。
它这么设计的原因是,是以单线程为模型的多线程设计。因为在单线程中不存在资源互斥的问题,但是有些数据是要在另一个线程处理的,处理后的结果需要给回这个线程。因为它的每个线程都有一个执行事件队列,我们投入设置操作由那个线程去执行,在投入执行队列中肯定是互斥的,但对于使用者来说它可以避免使用大量的锁。只需要专注于单线程开发机制,控制好线程之间的变量与模块边界。
这种机制也不是完全没有问题,比如一些全局的数据操作就是一个很大的问题。比如,警报记录这种全局的消息,你可能给每个设备单独配置了一个线程,那么在查询处理设备时它产生的异常总是需要记录下来的。如果是多个设备那么就会存在,多个设备竞争互斥一个数据结构的问题。那如果我们将这个数据结构单独配置为一个线程,修改操作只能通过信号与槽的形式,是否就解决了这个问题呢?
没有解决,读写往往是同时存在的操作,一个数据结构往往都是要具备读和写的操作,所以这种形式你写也只能通过信号与槽进行查询,然后在将结果通过信号发出,其实不用将信号发出也是可以的,我们可以使用元调用一样将操作推入到该对象的线程去执行。
最简单的方式就是将这个列表使用互斥锁保护起来,这样就不需要通过线程读写的方式来进行了,这在大多数时候都是非常有效且简单的方式。但有些时候我们往往读的操作要数倍于写操作,这个时候需要提升读的并行能力,最简单且有效的方式是读写锁,该互斥提升允许读锁的并行能力,在大量读操作的情况下效率是要优于写操作的。当然笔者在大多数时候也是优先考虑互斥量及读写锁来解决全局数据结构的访问问题。
当然对于读操作写操作更多情况下,仍有一种方案。即们设计一个数据结构作为master独立运行于单独的一个模块内,然后在其它salve模块内放置一份这个数据结构的拷贝。这样在模块有数据进行读操作直接从模块的数据数据进行读操作即可,这样不需要加锁以为该资源为线程资源,提升了读的效率。但写操作则要更加复杂一些,写操作只能将操作发送到master模块中进行修改,修改完毕要发送修到所有salve模块告诉他们那个数据已经进行修改了,让他们的数据结构进行同步操作放置数据出现不一致的情况。
线程对象绑定
继承QObject对象之后,可以使用moveThread()将对象转移到另一个线程中去。由于父节点于子节点必须同属关联同一个线程,如果转移节点的线程拥有父节点,那么需要设置setParent(nullptr)脱离父节点才可以转移,并且其节点下面的所有子节点也会一并转移到此线程进行关联。在创建对象时,会将所在的线程进行关联为线程对象,例如在主线程创建的对象默认就关联主线程。
线程事件循环
QThread对象中,如果执行start()函数,它默认执行的run()函数实现是调用exec()进行事件循环阻塞。这个事件阻塞,会等待事件进行执行调用也就是信号与槽的基础。如果你实现的是自定义QThread如果要关联其它对象那么必须要执行exec(),否则它无法进行关联的槽函数调用。
元属性系统
Qt的元属性系统非常复杂,相关的有Q_PROPERTY设置的动态属性,还要Q_INVOKABLE所设置的元属性方法。其中Q_INVOKABLE所设置的方法能被QML直接调用,Q_PORPERTY属性也是一样的。这是一个基于反射的信息系统,会调用相关连绑定的一些函数。除了这两个常用的外,还有许多元属性的宏,它是由moc生成的部分代码。比如Q_ENUM。包括信号槽传参也是一样要对应的类型进行元注册之后才可以使用。
当然Qt的元系统没有那么简单,不过也是依赖moc生成文件,里面涉及到的东西复杂且多。笔者在这里也不乱说什么。
搭建Andoird环境
要好好搭建出一个Andorid编译环境并不是一件简单的事情,好在如果了解一些原理倒也不难的。先把andorid模块选上。

本来想写详细些的,看来只能先把重点的东西先说了,以后在慢慢补细节把。
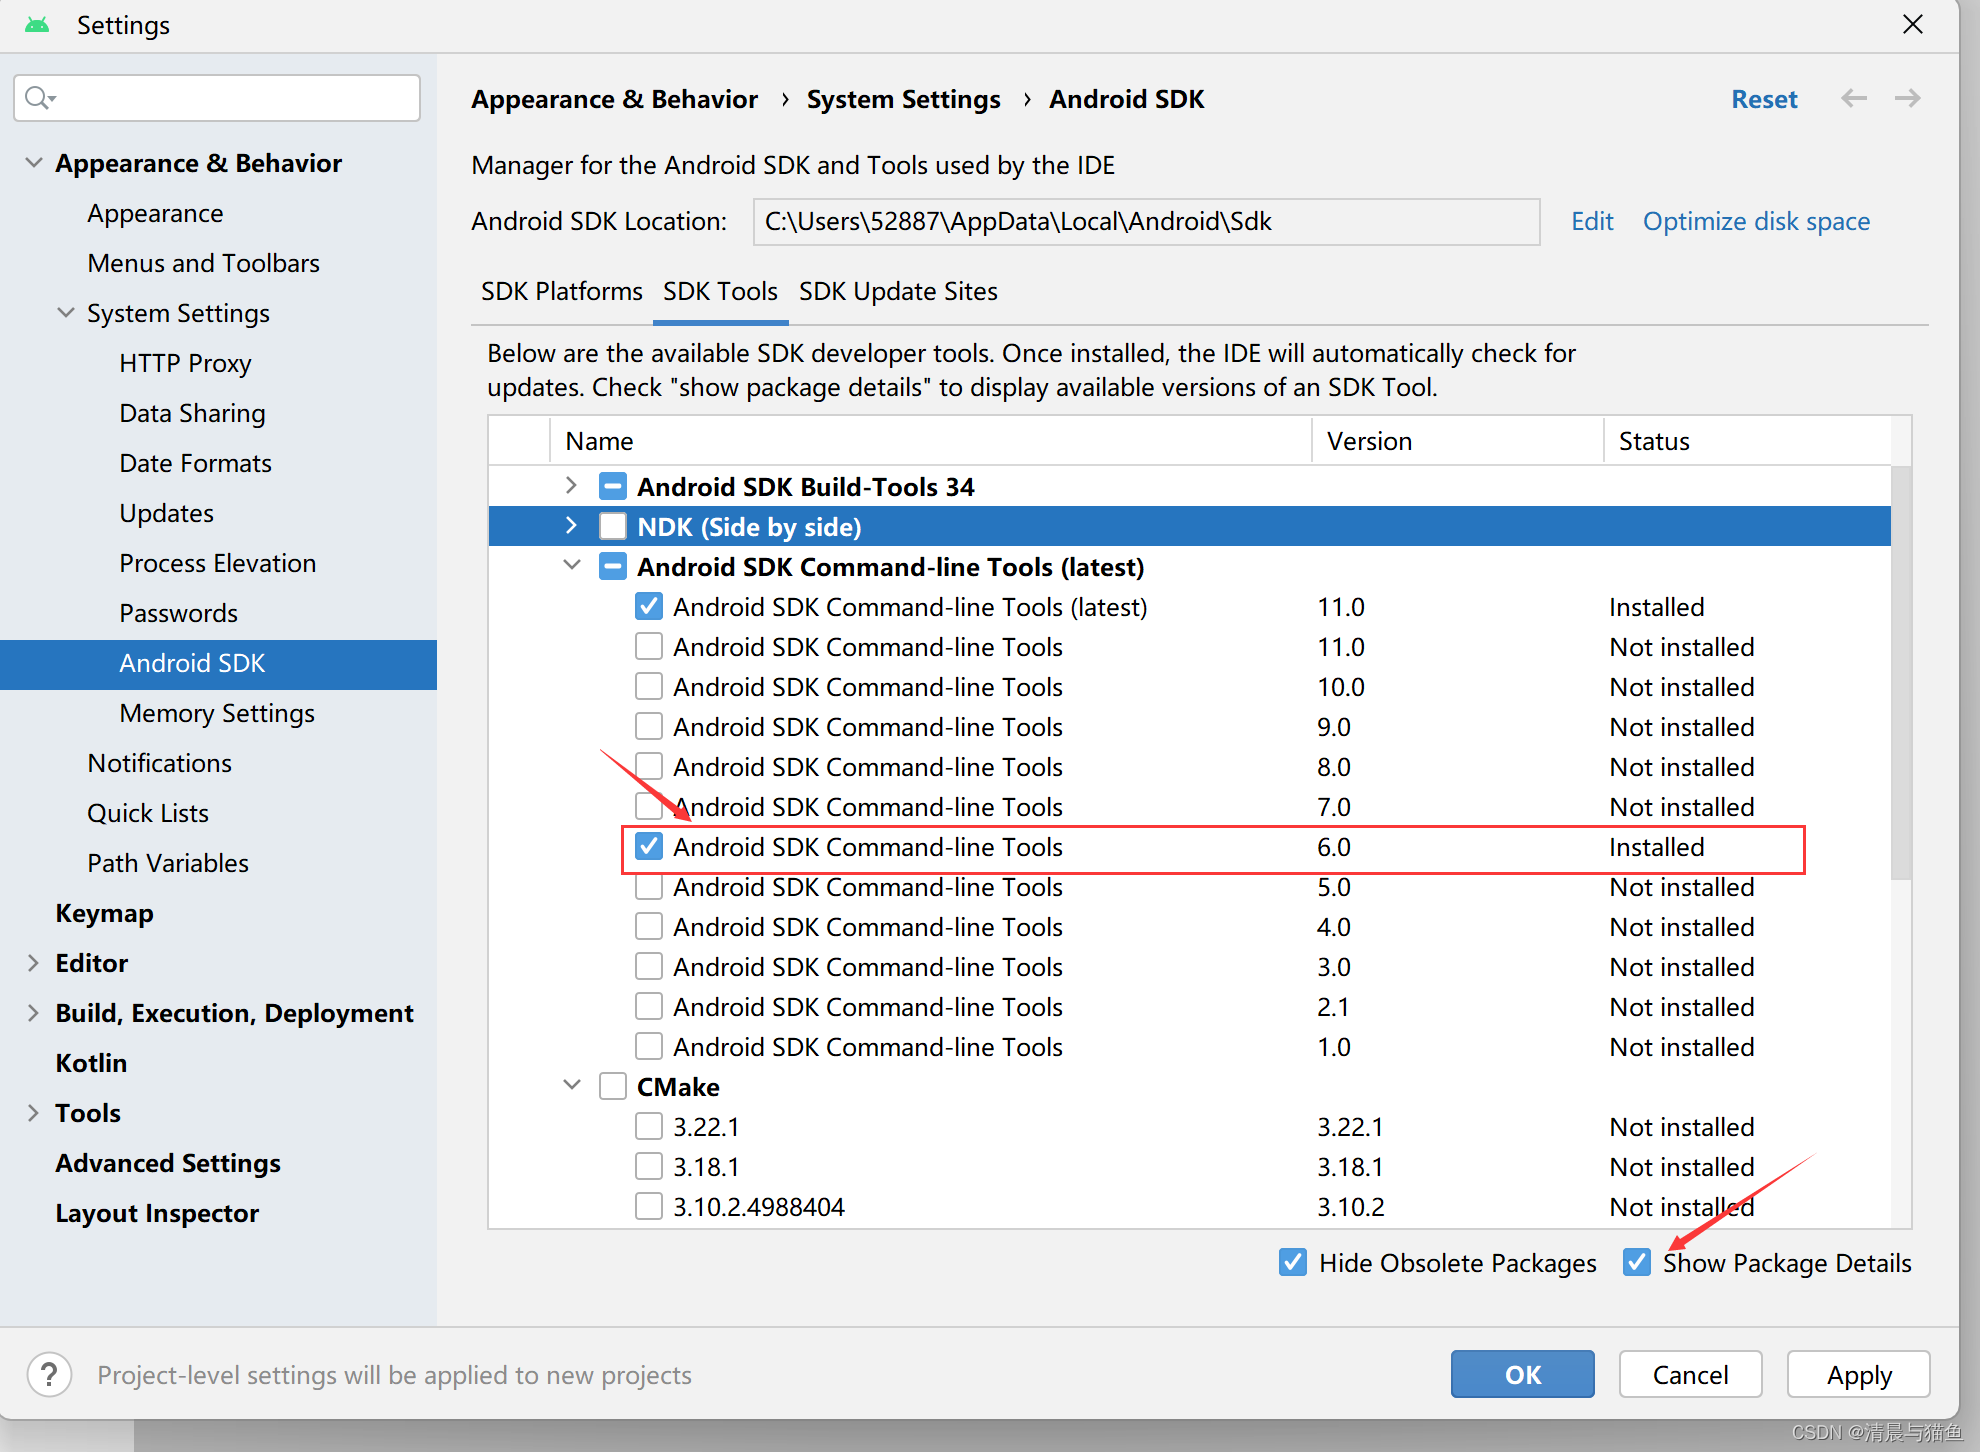
就目前版本的Qt你安装的JDK超过11编译会出现报错的等等问题。但是它的SDK那个cmdline-tools命令行工具是依靠设置JDK来运行的。
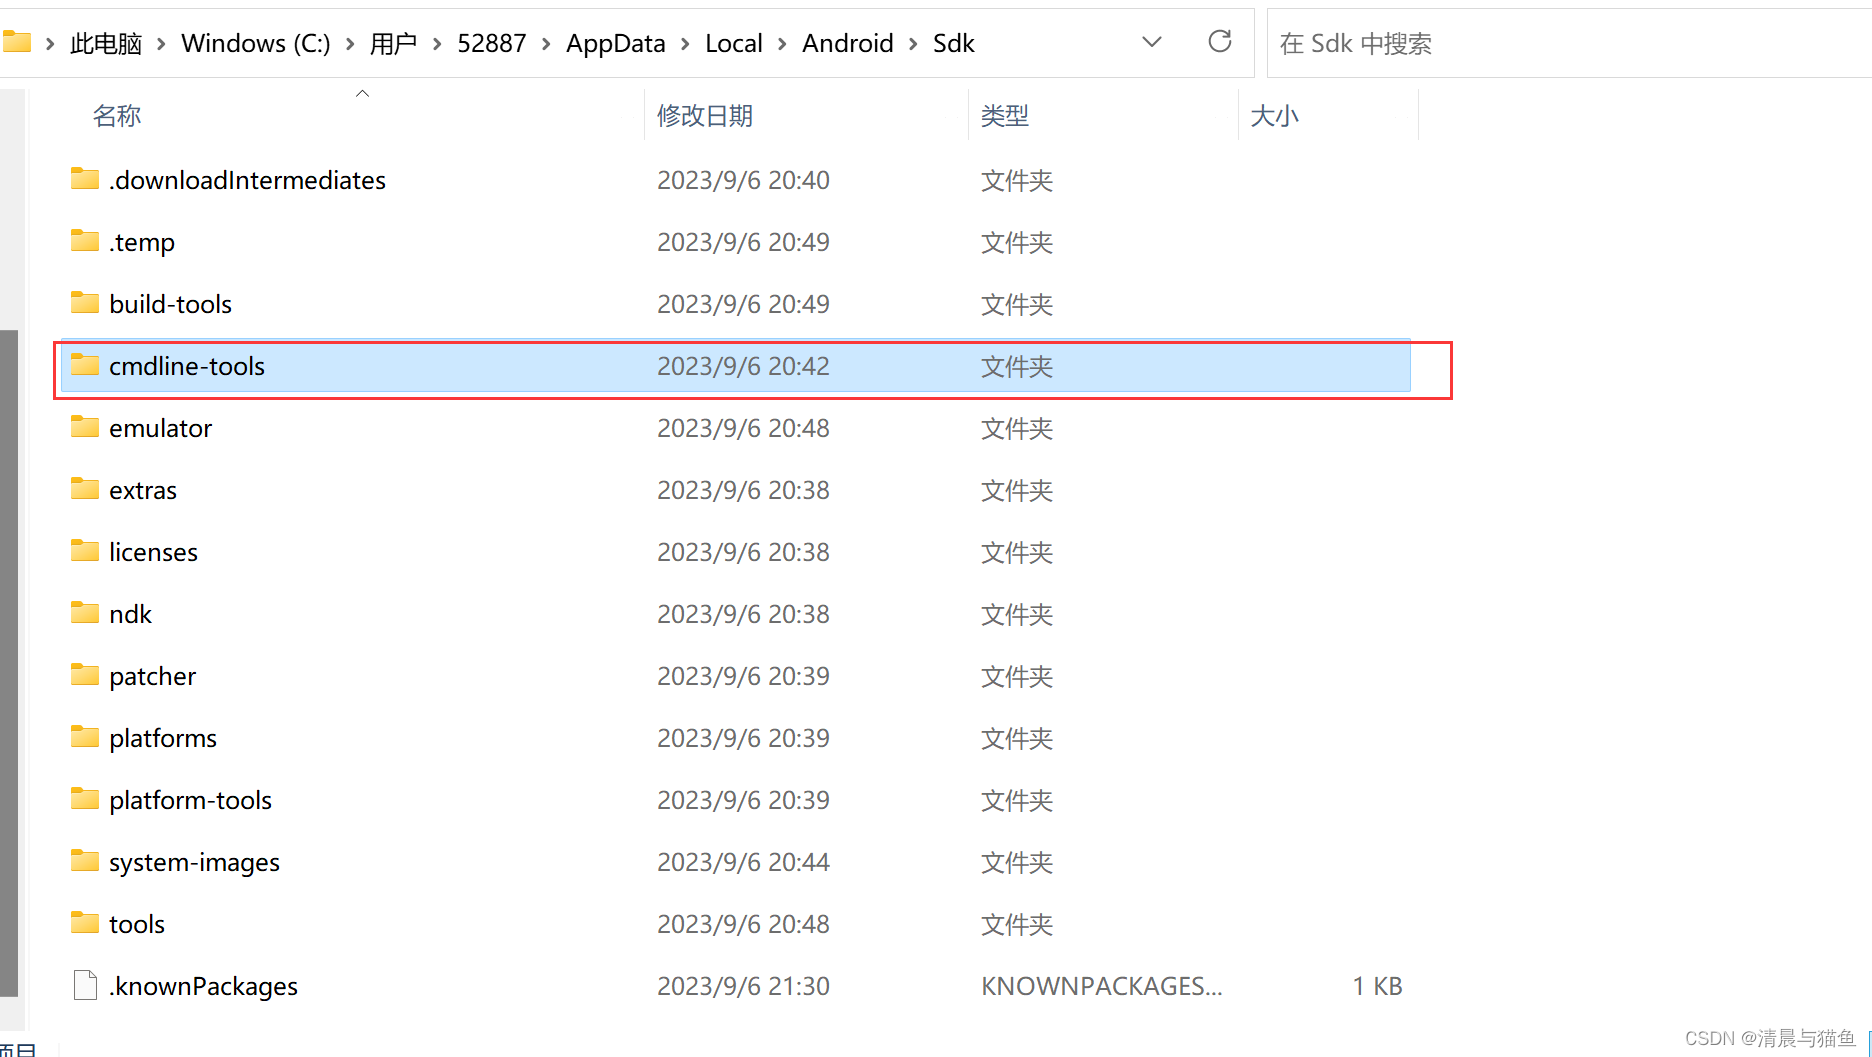
设置的SDK依靠设置的JDK来运行。

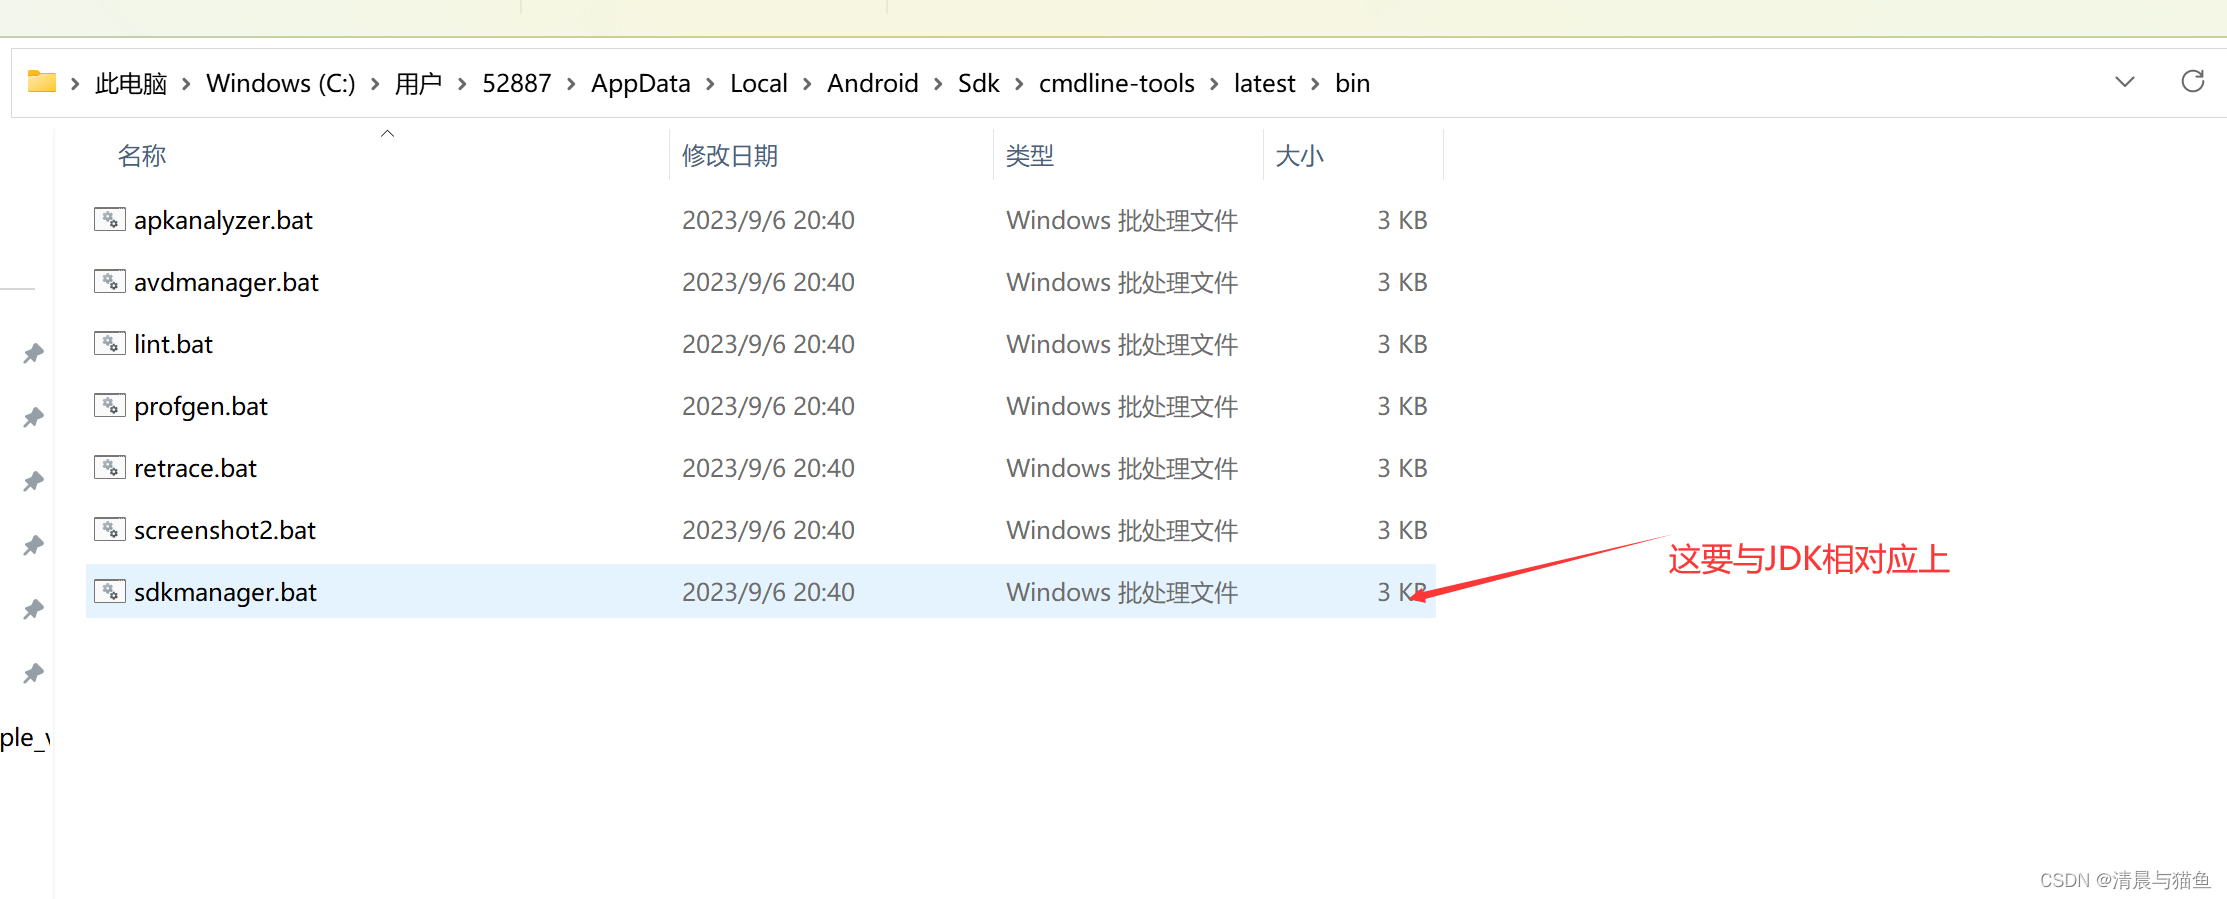
所以,JDK要cmdline-tools里面的sdkmanager.bat要能被JDK匹配上。但是QT它默认给你安装的sdkmanager.bat(版本11)其实是高版本的JDK(17-TLS)才能执行的。所以cmdline-tools工具要去下载能被KJDK11或者JDK8运行。
要去安装旧版本的cmdline-tools,最好的办法就是去用andorid-studio里面的sdk manager管理器去安装。
选择6.0或者其它版本下载也行,只要能被你的JDK运行就行,如果你不知道那个,就跟笔者选一样的就行。之后点击ok就进行安装了。
安装完成之后,去sdk cmdline-tools里面改名称,因为它只识别latest里面的命令行,所以把你需要的命令行版本改为latest即可。
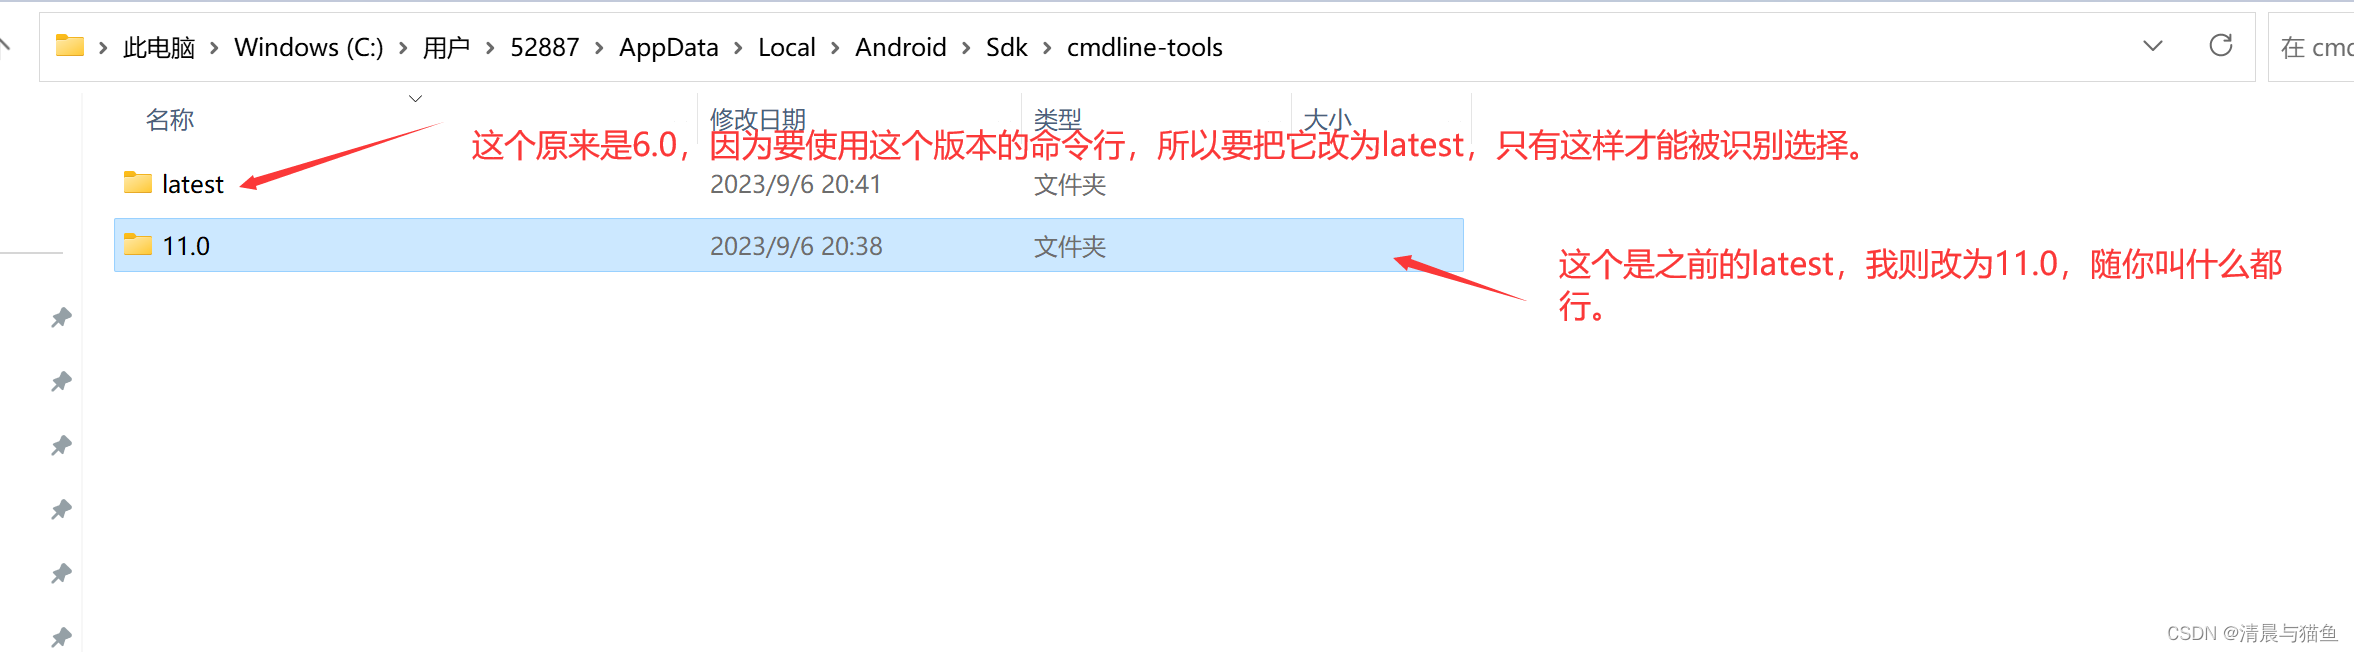
最后,Qt的Android就能够去正确执行和识别sdk 管理器,你可以用这个管理器去安装你需要的版本。
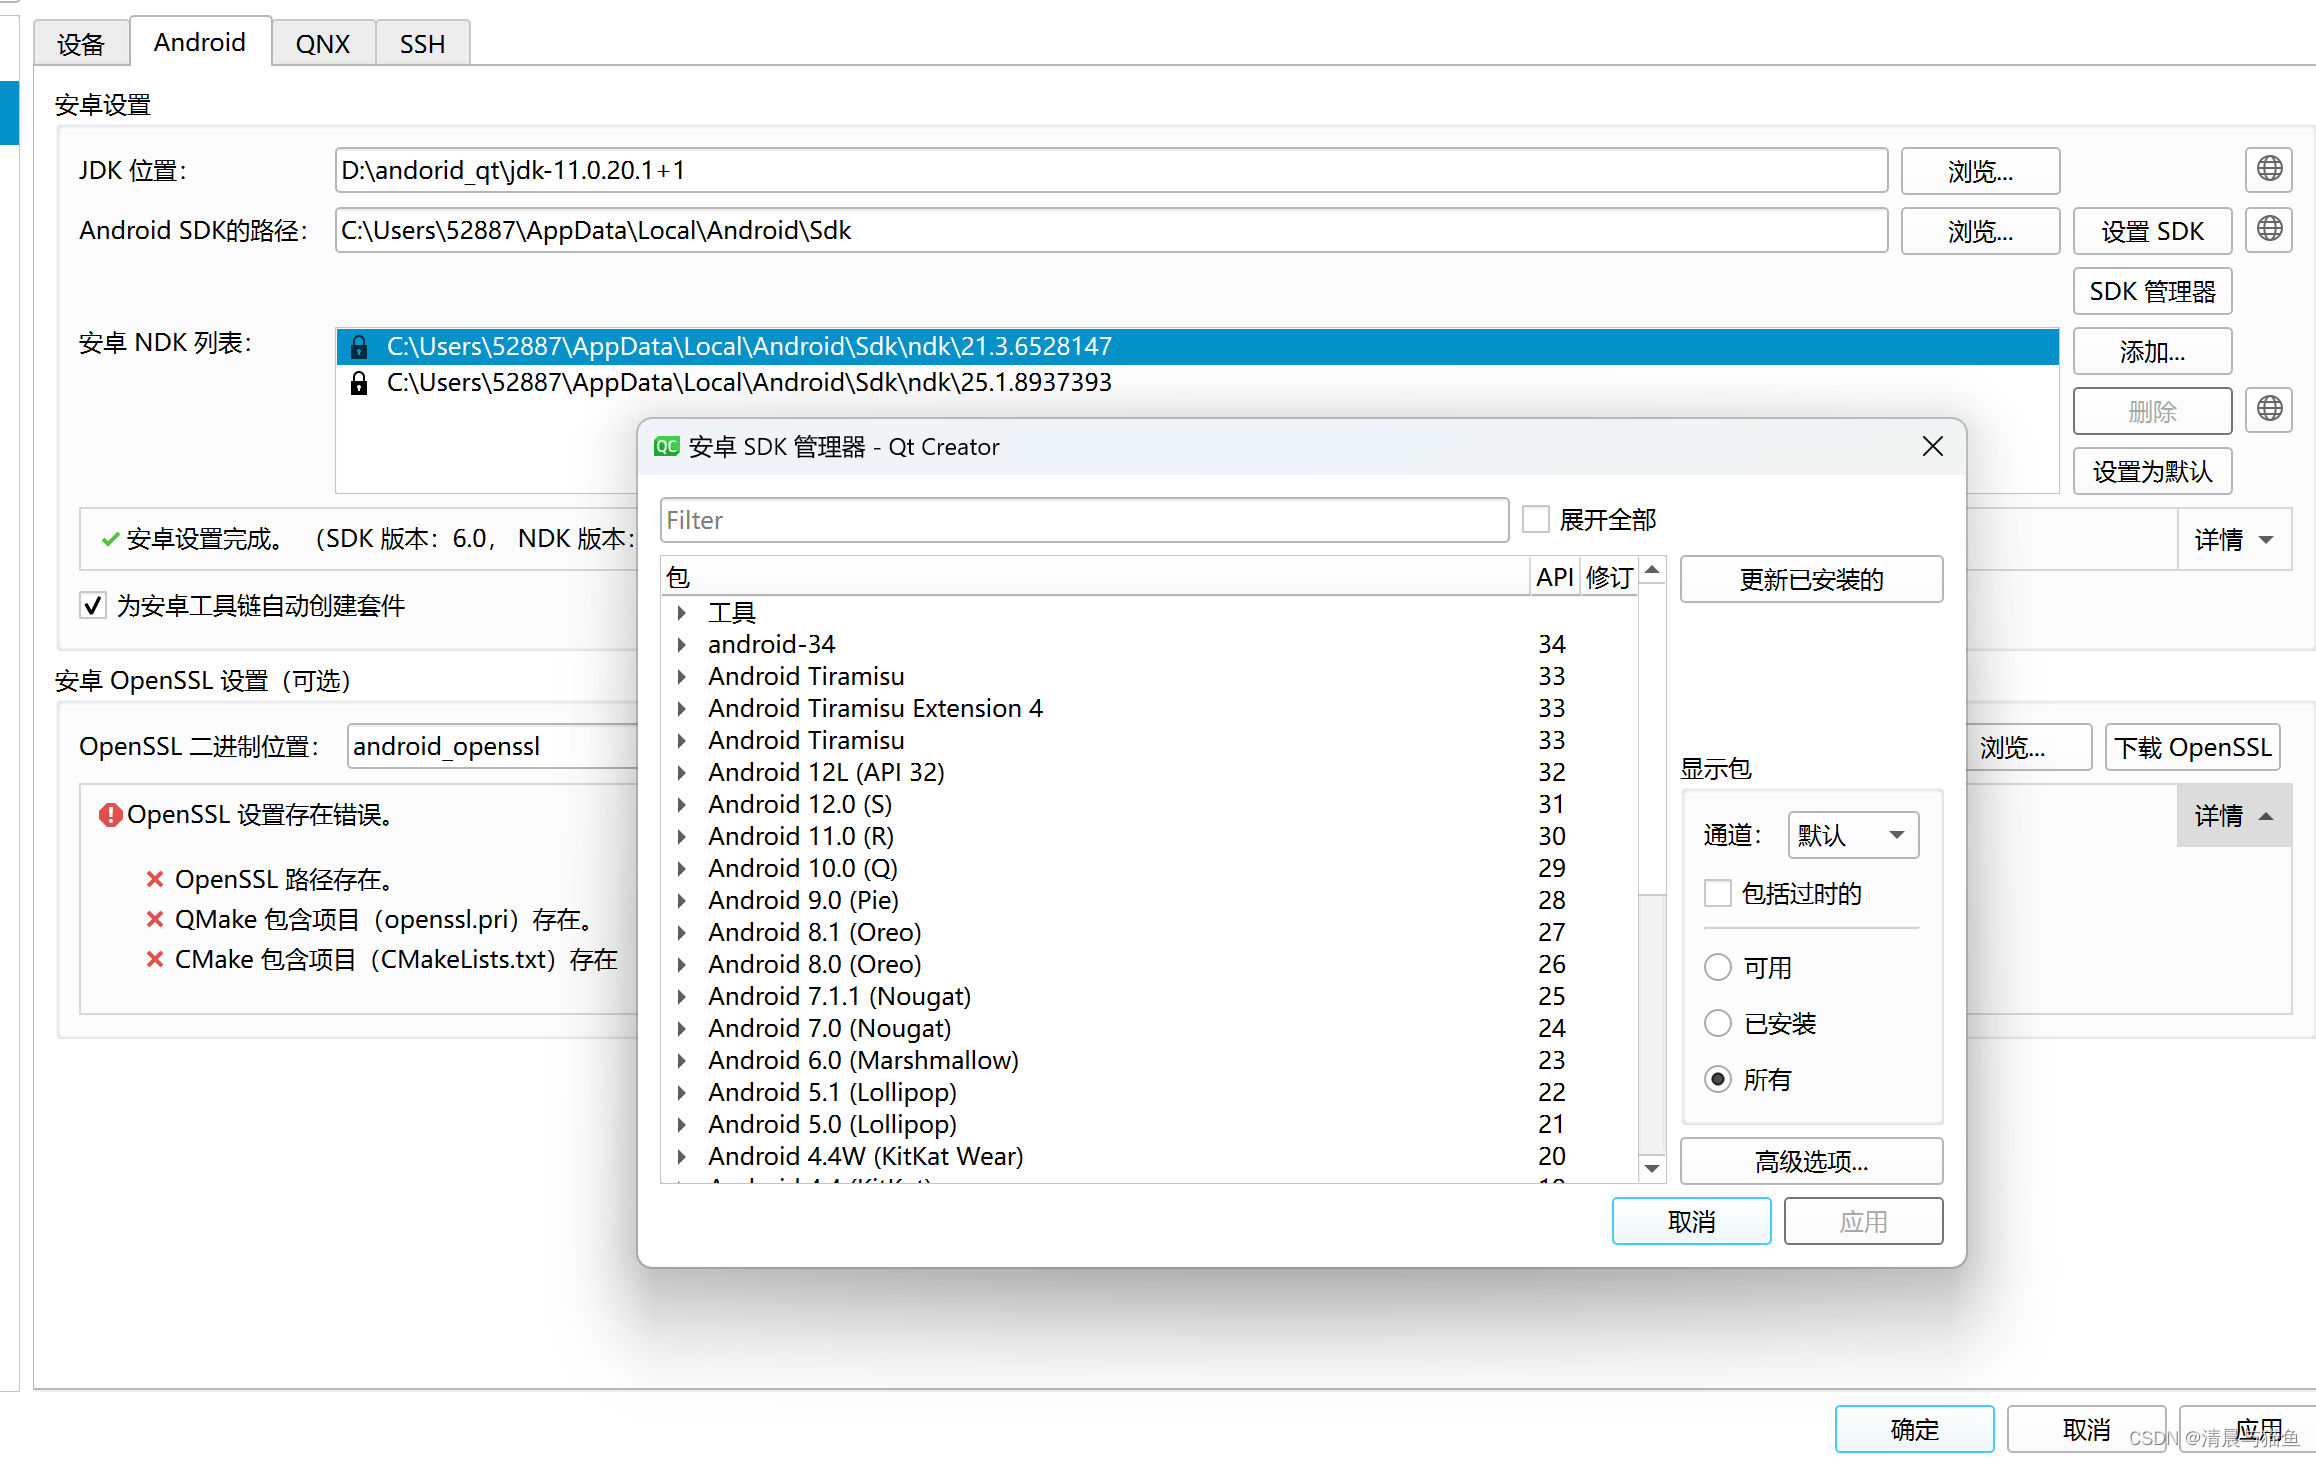
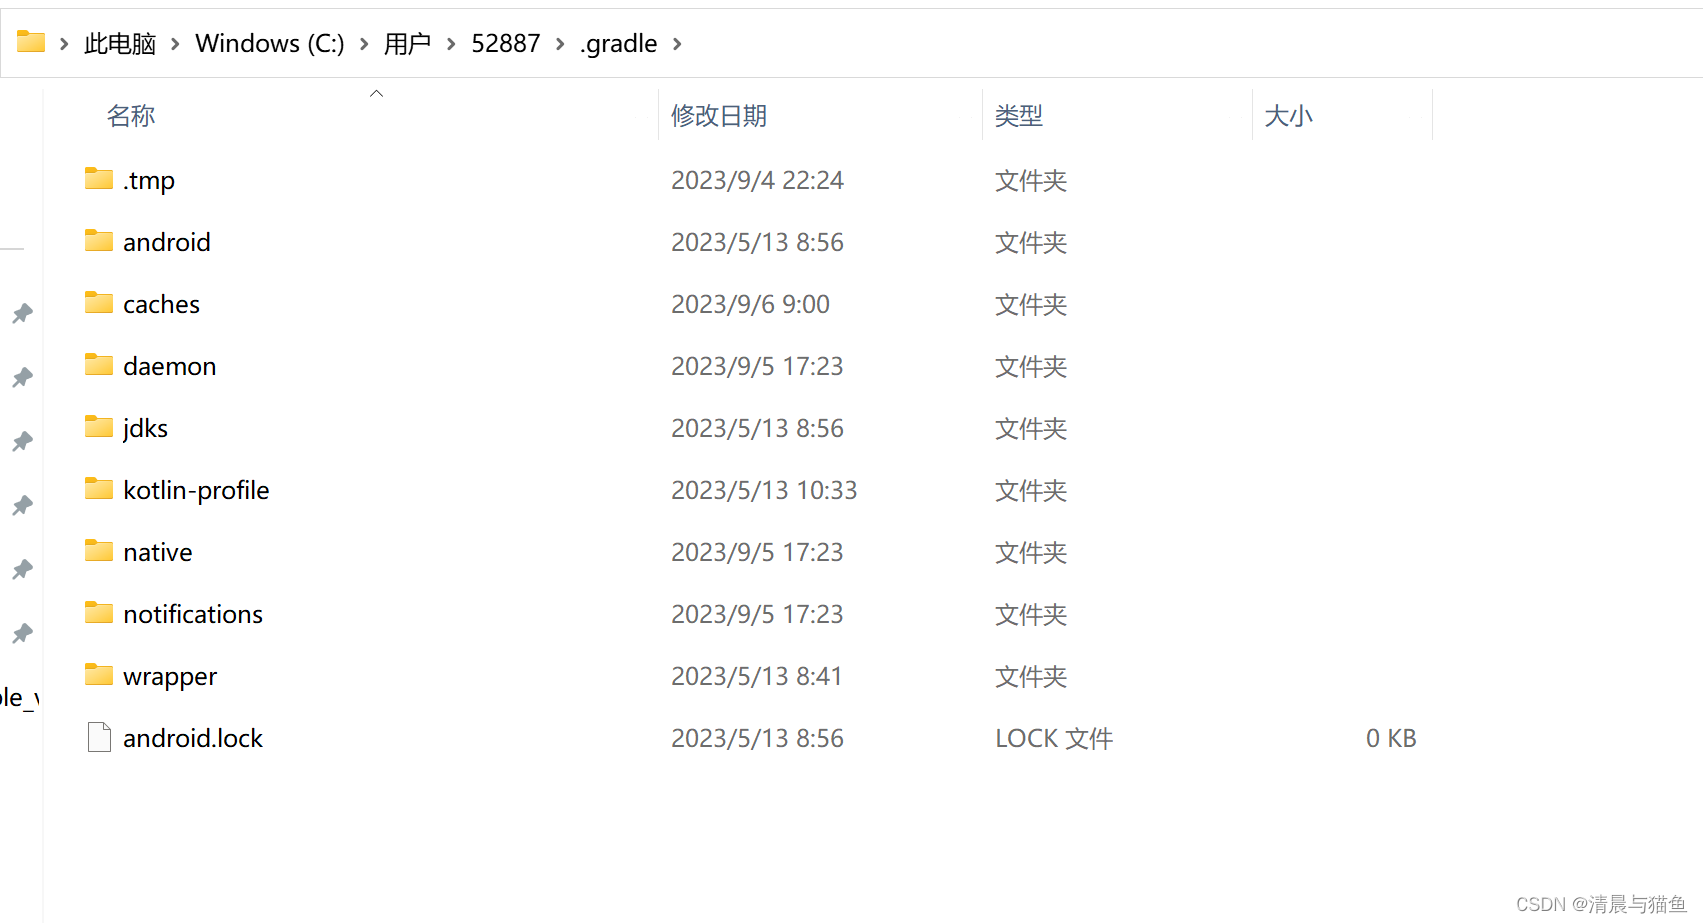
首先编译会下载很多依赖,如果你网络不好没开VPN可能会下载失败一部分,你就清掉这个目录的东西就能重新下载了,重新编译就会重新下载了。
Qt插件系统
Qt基本插件
所谓的插件就是动态库的一种延申扩展,基于系统所支持的动态加载库及卸载库的基础实现的,Qt Plugin则是qt的一种规范,或者所支持的包装格式。
当然关于插件的设计思想其实大差不差的,必须要满足一些规则。比如说,必须是dll的形式,存在在某些指定目录下在程序运行的过程中进行加载。当然插件设计者本身仍需考虑二进制兼容的问题,我们无法保证dll与.exe使用的是同一个编译器各方面的规则都完全相同。尤其是在dll与exe进行交互时,参数的设计对象等。
Qt插件实现类需要继承,QObject。
相关宏
- Q_DECLARE_INTERFACE
这个宏将给定的标识符(字符串字面值)关联到名为ClassName的接口类,标识符必须是唯一的。 - Q_PLUGIN_METADATA
此宏用于声明元数据,该元数据是实例化此对象的插件的一部分。 - Q_INTERFACES
这个宏告诉Qt类实现了哪些接口。这在实现插件时使用。 - QT_MOC_EXPORT_PLUGIN
moc编译器生成的代码文件,该宏创建了dll导出函数以及创建对象实例函数。
从源码中看出Q_DECLARE_INTERFACE宏,实际上是创建了对应的对象的元信息系统函数尤其是关于qobject_cast<IFace *>(QObject *object),qt安全转换的对象真相qt_metacast()函数实际上是由moc编译器所生成的函数。
#  define Q_DECLARE_INTERFACE(IFace, IId) \
    template <> inline const char *qobject_interface_iid<IFace *>() \
    { return IId; } \
    template <> inline IFace *qobject_cast<IFace *>(QObject *object) \
    { return reinterpret_cast<IFace *>((object ? object->qt_metacast(IId) : nullptr)); } \
    template <> inline IFace *qobject_cast<IFace *>(const QObject *object) \
    { return reinterpret_cast<IFace *>((object ? const_cast<QObject *>(object)->qt_metacast(IId) : nullptr)); }
#endif // Q_MOC_RUN
Q_PLUGIN_METADATA,其实就是Qt自动生成对应的元信息的宏,那个iid数值是用于qobject_cast<>()转换时用到的FILE则是一个文件的内容是JSON格式,里面描述的信息可以被QPluginLoader的metaData()获取到。
#define Q_PLUGIN_METADATA(x) QT_ANNOTATE_CLASS(qt_plugin_metadata, x)
Q_INTERFACES,也是Qt自动生成对应的元信息宏,生成的信息用于qobject_cast<>()进行类型转换查询。
#define Q_INTERFACES(x) QT_ANNOTATE_CLASS(qt_interfaces, x)
QT_MOC_EXPORT_PLUGIN,生成导出dll函数以及创建对象实例方法,静态插件的方法会有点差别但位置一样的。
#define Q_PLUGIN_INSTANCE(IMPLEMENTATION) \
        { \
            static QT_PREPEND_NAMESPACE(QPointer)<QT_PREPEND_NAMESPACE(QObject)> _instance; \
            if (!_instance) {    \
                QT_PLUGIN_RESOURCE_INIT \
                _instance = new IMPLEMENTATION; \
            } \
            return _instance; \
        }

#  define QT_MOC_EXPORT_PLUGIN(PLUGINCLASS, PLUGINCLASSNAME)      \
            Q_EXTERN_C Q_DECL_EXPORT \
            const char *qt_plugin_query_metadata() \
            { return reinterpret_cast<const char *>(qt_pluginMetaData); } \
            Q_EXTERN_C Q_DECL_EXPORT QT_PREPEND_NAMESPACE(QObject) *qt_plugin_instance() \
            Q_PLUGIN_INSTANCE(PLUGINCLASS)
一个示例
接口文件定义接口
#ifndef ECHOINTERFACE_H
#define ECHOINTERFACE_H

#include <QObject>
#include <QString>

//! [0]
class EchoInterface
{
public:
    virtual ~EchoInterface() = default;
    virtual QString echo(const QString &message) = 0;
};

QT_BEGIN_NAMESPACE

#define EchoInterface_iid "org.qt-project.Qt.Examples.EchoInterface"

Q_DECLARE_INTERFACE(EchoInterface, EchoInterface_iid)
QT_END_NAMESPACE

//! [0]
#endif
EchoPlugin插件文件
#ifndef ECHOPLUGIN_H
#define ECHOPLUGIN_H

#include <QObject>
#include <QtPlugin>
#include "echointerface.h"


//! [0]
class EchoPlugin : public QObject, EchoInterface
{
    Q_OBJECT
    Q_PLUGIN_METADATA(IID "org.qt-project.Qt.Examples.EchoInterface" FILE "echoplugin.json")
    Q_INTERFACES(EchoInterface)

public:
    QString echo(const QString &message) override;
};
//! [0]

#endif
自动生成的moc代码文件,接口转换部分代码。ps:这可是qt安全转换对象的真相哦。
void *EchoPlugin::qt_metacast(const char *_clname)
{
    if (!_clname) return nullptr;
    if (!strcmp(_clname, qt_meta_stringdata_EchoPlugin.stringdata0))
        return static_cast<void*>(this);
    if (!strcmp(_clname, "EchoInterface"))
        return static_cast< EchoInterface*>(this);
    if (!strcmp(_clname, "org.qt-project.Qt.Examples.EchoInterface"))
        return static_cast< EchoInterface*>(this);
    return QObject::qt_metacast(_clname);
}
在这里的话,只能算作是低级插件。但其实高级插件也是一样的东西,只不过是继承它指定的类,而不是自己编写类。
具体的话,你可以查阅源码编译MySQL你会发现它在main文件则是继承的QSqlDriverPlugin驱动来实现。具体可以查阅文档,一般都是实现它的create方法即可。
编译MySQL数据库Qt驱动
目前版本的Qt并不自带Mysql驱动,Mysql驱动需要自行进行编译。好在源码中提供了,Qt插件驱动的项目D:\qt\5.15.2\Src\qtbase\src\plugins\sqldrivers\mysql
ps:如果没有安装源码,请先安装源码。
ps:请自行替换为自己的QT路径。
需要对此mysql的.pro文件进行修改,按照下面的方式修改,MySQL C库设置INCLUDEPATH 和LIBS。
TARGET = qsqlmysql

HEADERS += $$PWD/qsql_mysql_p.h
SOURCES += $$PWD/qsql_mysql.cpp $$PWD/main.cpp

#QMAKE_USE += mysql

OTHER_FILES += mysql.json

PLUGIN_CLASS_NAME = QMYSQLDriverPlugin
include(../qsqldriverbase.pri)

#MySQL c库的头文件路径
INCLUDEPATH += "C:\Program Files\MySQL\MySQL Server 8.0\include"

#mysql c库的.lib路径
LIBS += -L"C:\Program Files\MySQL\MySQL Server 8.0\lib" -l"libmysql"
点击编译,即可将MySQL驱动插件编译完成,然后打开vs命令行,进入编译出来的目录输入指令nmake install安装到qt环境中去,最后再把libmysql.dll拷贝到qt的bin目录,这样运行MySQL驱动时就不会缺少底层依赖了。
windows c sdk获取问题。Windows平台安装的mysql,在mysql server中默认包含了c api库。
Model-View(模型视图)
MVC模式是软件工程中常见的一种软件架构模式,该模式把软件系统(项目)分为三个基本部分:模型(Model)、视图(View)和控制器(Controller)。使用MVC模式有很多优势,例如:简化后期对项目的修改、扩展等维护操作;使项目的某一部分变得可以重复利用;使项目的结构更加直观。
有三个关键的抽象类作为扩展接口。
QAbstractItemDelegate               // 呈现项交互项,即渲染显示项,以及与用户交互时的QWidget部件
QAbstractItemModel                  // 数据源模型,用来提供显示数据层面的一个模型
QAbstractItemView                   // 视图交互展示并且与交互事件
代理(QAbstractItemView)
项代理,负责项的视觉呈现以及生产用户交互的编辑代理,最后将交互的数据设置到模型中,最后模型刷新view视图更新数据显示。在自定义项代理时分为两个部分。
- 渲染部分
 // 绘制代理项内容,option包含了widget及rect等关键数据
virtual void paint(QPainter *painter, const QStyleOptionViewItem &option, const QModelIndex &index) const = 0

// 推荐绘制项的大小,并不一定起作用,比如listview中,你设置height是可以生效的但width则是不会考虑,tableview则是height与widht都不予以考虑。
virtual QSize sizeHint(const QStyleOptionViewItem &option, const QModelIndex &index) const = 0
- 交互部分
// 创建一个用户交互编辑部件,然后返回
virtual QWidget *createEditor(QWidget *parent, const QStyleOptionViewItem &option, const QModelIndex &index) const

// 设置交互编辑部件里面的数据
virtual void setEditorData(QWidget *editor, const QModelIndex &index) const

// 更新设置小部件基于父项部件的大小及坐标
virtual void updateEditorGeometry(QWidget *editor, const QStyleOptionViewItem &option, const QModelIndex &index) const

// 将编辑完成的数据写入到模型中去
virtual void setModelData(QWidget *editor, QAbstractItemModel *model, const QModelIndex &index) const
当然,qt也提供了QStyledItemDelegate一个带有渲染的代理项进行展示,用户只需要负责创建交互小部件即可。这也是推荐的作法。
一个代码例子,我们在项的左边画个椭圆200个像素,然后右边显示数据内容。用到了自定义绘制,用了Qt样式部件的项绘制就是项的默认呈现绘制样式表也是可以生效的。
当然QStyledItemDelegate也差不多是这个逻辑实现的。除了显示还创建了编辑交互代理,需要注意创建交互代理的流程,在编辑完成时要发送的数据。
ps:原谅笔者只展示核心的关键代码部分,完整代码有些不方便编写。
void ItemDelegate::paint(QPainter *painter,
                         const QStyleOptionViewItem &option, const QModelIndex &index) const {

    // 绘制背景
    if (option.state & QStyle::State_Selected) {
      // 被选中状态设置成红色
      painter->setBrush(Qt::red);
    } else if (option.state & QStyle::State_MouseOver) {
      // 鼠标盘旋设置为绿色
      painter->setBrush(Qt::green);
    } else {
      // 默认为黑色
      painter->setBrush(Qt::black);
    }
    // 画一个椭圆
    painter->drawEllipse(option.rect.x(), option.rect.y(), 200, option.rect.height());

    QStyleOptionViewItem opt = option;
    // 设置宽度及x轴,这里不需要减去椭圆部分的,因为默认它会减去x的坐标
    opt.rect.setWidth(opt.rect.width());
    opt.rect.setX(opt.rect.x() + 200);

    // 拿到要显示的数据
    opt.text = index.data().toString();

    // 使用qt样式进行绘制控制外形可以 样式表能生效,重点是要传入opt.widget参数
    qApp->style()->drawControl(QStyle::CE_ItemViewItem, &opt, painter, opt.widget);
}

QSize ItemDelegate::sizeHint(const QStyleOptionViewItem &option,
                             const QModelIndex &/*index*/) const {
    return QSize(option.rect.width(), 200);
}

QWidget *ItemDelegate::createEditor(QWidget *parent,
                              const QStyleOptionViewItem &option,
                                    const QModelIndex &index) const {
    // 交互小部件,调用顺序1
    qDebug() << __FUNCTION__;

    // 创建一个编辑小部件
    QLineEdit* line = new QLineEdit(parent);

    // 关联小部件编辑完成时,进行提交和关闭小部件,否则的话是不会调用到sheModelData函数的
    QObject::connect(line, &QLineEdit::editingFinished, this, &ItemDelegate::editFinish);
    return line;
}

void ItemDelegate::setEditorData(QWidget *editor, const QModelIndex &index) const {
    // 交互小部件,调用顺序3
    qDebug() << __FUNCTION__;

    // 设置小部件数据显示
    QLineEdit* line = qobject_cast<QLineEdit*>(editor);
    if (line)
      line->setText(index.data(Qt::DisplayRole).toString());
}

void ItemDelegate::setModelData(QWidget *editor,
                          QAbstractItemModel *model,
                                const QModelIndex &index) const {
    // 交互小部件,调用顺序4
    qDebug() << __FUNCTION__;

    // 将小部件的数据更新到模型中
    QLineEdit* line = qobject_cast<QLineEdit*>(editor);
    if (line)
      model->setData(index, line->text(), Qt::EditRole);
}

void ItemDelegate::updateEditorGeometry(QWidget *editor,
                                  const QStyleOptionViewItem &option,
                                        const QModelIndex &/*index*/) const {
    // 交互小部件,调用顺序2
    qDebug() << __FUNCTION__;

    // 设置小部件对于父部件的位置,位置信息在opiton中
    editor->setGeometry(option.rect);
}

void ItemDelegate::editFinish() {
    // 完成编辑提交数据,关闭编辑器
    QLineEdit* line = qobject_cast<QLineEdit*>(sender());
    emit commitData(line);
    emit closeEditor(line);
}
模型(QAbstractItemModel)
QAbstractItemModel类定义了项目模型必须使用的标准接口,以便能够与模型/视图体系结构中的其他组件进行互操作。
其实大多数使用者并不了解这个,官方提供了QStandardItemModel一个标准模型,它毕竟是易于使用则为更多人所知。相对的在于某些情况下需要自定义实现model时,也有QAbstractListModel与QAbstractTableModel来进行更为便捷的继承实现。
在qt的示例中则提供了许多例子来帮助我们理解D:\qt\Examples\Qt-6.2.4\widgets\itemviews
QAbstractItemModel必须实现的接口
不要把模型和实际数据结构混为一谈,这里的模型应该只是指定了一些接口规则。比如data()获取数据时,是区分不同的角色获得不同的数据。
// 返回列数
virtual int columnCount(const QModelIndex &parent = QModelIndex()) const = 0
// 返回行数
virtual int rowCount(const QModelIndex &parent = QModelIndex()) const = 0
// 返回指定角色的值
virtual QVariant data(const QModelIndex &index, int role = Qt::DisplayRole) const = 0
// 返回指定行列的索引,在list和table中,parent参数始终为QModelIndex(),无效索引
virtual QModelIndex index(int row, int column, const QModelIndex &parent = QModelIndex()) const = 0
// 返回指定索引的父索引
virtual QModelIndex parent(const QModelIndex &index) const = 0
刷新视图相关操作函数与信号
在更改模型数据时,通知视图刷新的规则与操作。
// 信号,数据发生改变时发送,通知视图刷新
void dataChanged(const QModelIndex &topLeft, const QModelIndex &bottomRight, const QList<int> &roles = QList<int>())

// 标题头数据改边时发送,通知视图刷新
void headerDataChanged(Qt::Orientation orientation, int first, int last)

// 布局发生改变前发出
void layoutAboutToBeChanged(const QList<QPersistentModelIndex> &parents = QList<QPersistentModelIndex>(), QAbstractItemModel::LayoutChangeHint hint = QAbstractItemModel::NoLayoutChangeHint
// 更改持久索引
void changePersistentIndex(const QModelIndex &from, const QModelIndex &to)
// 布局改变完成,刷新视图
void layoutChanged(const QList<QPersistentModelIndex> &parents = QList<QPersistentModelIndex>(), QAbstractItemModel::LayoutChangeHint hint = QAbstractItemModel::NoLayoutChangeHint)

// 重置刷新视图
void beginResetModel()
void endResetModel()

// 刷新视图指定的列
void beginInsertColumns(const QModelIndex &parent, int first, int last)
void endInsertColumns()

// 刷新视图指定的行
void beginInsertRows(const QModelIndex &parent, int first, int last)
void endInsertRows()

// 刷新视图移动指定的行
bool beginMoveRows(const QModelIndex &sourceParent, int sourceFirst, int sourceLast, const QModelIndex &destinationParent, int destinationChild)
void endMoveRows()

// 刷新视图移动的列
bool beginMoveColumns(const QModelIndex &sourceParent, int sourceFirst, int sourceLast, const QModelIndex &destinationParent, int destinationChild)
void endMoveColumns()
笔者以qt示例中的D:\qt\Examples\Qt-6.2.4\widgets\itemviews\editabletreemodel的代码进行简单的理解一下。
你问,“笔者为何不写一个新例子?”
笔者,“那是因为笔者不会写啊,还有能别的理由吗?”
treeitem.h
#ifndef TREEITEM_H
#define TREEITEM_H

#include <QVariant>
#include <QList>

//! [0]
// 项结构是一个树型结构的套娃设计,不要因为套娃而迷糊,虽然笔者也曾在第一次接触链表套娃时迷糊了很久。
class TreeItem
{
public:
    explicit TreeItem(const QList<QVariant> &data, TreeItem *parent = nullptr);
    ~TreeItem();
	// 获取指定位置的子项节点
    TreeItem *child(int number);
    // 获取子节点数量
    int childCount() const;
	// 获取列的数量
    int columnCount() const;
    // 返回当前项的指定列的值,注意这个可不是model的那个data()
    QVariant data(int column) const;
    // 指定位置,插入count子项,每个子项都有columns列(扩展子项)
    bool insertChildren(int position, int count, int columns);
    // 指定位置,插入指定数量的列(扩展数据列)
    bool insertColumns(int position, int columns);
    // 返回父项
    TreeItem *parent();
    // 移除指定位置的,count子项行
    bool removeChildren(int position, int count);
    // 移除指定位置的,columns列项
    bool removeColumns(int position, int columns);
	// 返回处于父项所在的位置
    int childNumber() const;
    // 设置指定列的数据
    bool setData(int column, const QVariant &value);
private:
    QList<TreeItem *> childItems;			// 这里是一个列表存储着子项列表
    QList<QVariant> itemData;				// 对应不同角色的存储不同角色的值列表
    TreeItem *parentItem;					// 父项
};
//! [0]

#endif // TREEITEM_H
treeitem.cpp
#include "treeitem.h"

//! [0]
TreeItem::TreeItem(const QList<QVariant> &data, TreeItem *parent)
    : itemData(data), parentItem(parent)
{}
//! [0]

//! [1]
TreeItem::~TreeItem()
{
	// 删除全部子项,这是个便捷宏
    qDeleteAll(childItems);
}
//! [1]

//! [2]
TreeItem *TreeItem::child(int number)
{
    if (number < 0 || number >= childItems.size())
        return nullptr;
    return childItems.at(number);
}
//! [2]

//! [3]
int TreeItem::childCount() const
{
    return childItems.count();
}
//! [3]

//! [4]
int TreeItem::childNumber() const
{
	// 父项存在,根节点父项其实是null
    if (parentItem)
        return parentItem->childItems.indexOf(const_cast<TreeItem*>(this));
    return 0;
}
//! [4]

//! [5]
int TreeItem::columnCount() const
{
    return itemData.count();
}
//! [5]

//! [6]
QVariant TreeItem::data(int column) const
{
    if (column < 0 || column >= itemData.size())
        return QVariant();
    return itemData.at(column);
}
//! [6]

//! [7]
bool TreeItem::insertChildren(int position, int count, int columns)
{
    if (position < 0 || position > childItems.size())
        return false;
	// 添加子项
    for (int row = 0; row < count; ++row) {
    	// 创建columns的数据列
        QList<QVariant> data(columns);
        // 创建一个子项
        TreeItem *item = new TreeItem(data, this);
        // 添加子项到指定位置
        childItems.insert(position, item);
    }
    return true;
}
//! [7]

//! [8]
bool TreeItem::insertColumns(int position, int columns)
{
    if (position < 0 || position > itemData.size())
        return false;
	// 当前项扩展列
    for (int column = 0; column < columns; ++column)
        itemData.insert(position, QVariant());
	// 子项扩展列
    for (TreeItem *child : qAsConst(childItems))
        child->insertColumns(position, columns);
    return true;
}
//! [8]

//! [9]
TreeItem *TreeItem::parent()
{
    return parentItem;
}
//! [9]

//! [10]
bool TreeItem::removeChildren(int position, int count)
{
    if (position < 0 || position + count > childItems.size())
        return false;
	// 移除指定数量的子项
    for (int row = 0; row < count; ++row)
        delete childItems.takeAt(position);

    return true;
}
//! [10]

bool TreeItem::removeColumns(int position, int columns)
{
    if (position < 0 || position + columns > itemData.size())
        return false;
	// 移除当前项的指定数据列
    for (int column = 0; column < columns; ++column)
        itemData.remove(position);
	// 子项移除指定的数据列
    for (TreeItem *child : qAsConst(childItems))
        child->removeColumns(position, columns);

    return true;
}

//! [11]
bool TreeItem::setData(int column, const QVariant &value)
{
    if (column < 0 || column >= itemData.size())
        return false;
	// 设置指定列数据
    itemData[column] = value;
    return true;
}
//! [11]
treemodel.h
#ifndef TREEMODEL_H
#define TREEMODEL_H

#include <QAbstractItemModel>
#include <QModelIndex>
#include <QVariant>

// 声明对象,这样声明之后就不需要在这边的头文件进行文件包含,但这里的类型不可以实例只能是指针或引用的类型,这是一种非常常用的操作
class TreeItem;

//! [0]
class TreeModel : public QAbstractItemModel
{
    Q_OBJECT
public:
	// 构造函数,data这里是序列化文本数据
    TreeModel(const QStringList &headers, const QString &data, QObject *parent = nullptr);
    ~TreeModel();
//! [0] //! [1]

	// 根据role获取数据
    QVariant data(const QModelIndex &index, int role) const override;
    // 获取头数据
    QVariant headerData(int section, Qt::Orientation orientation, int role = Qt::DisplayRole) const override;
	// 获取索引,他们是相对于parent获取的,所以为啥要有parent参数,在list和table中parent则为null索引
    QModelIndex index(int row, int column, const QModelIndex &parent = QModelIndex()) const override;
    // 获取索引处的父项索引
    QModelIndex parent(const QModelIndex &index) const override;
    // 返回指定父项索引的子项行数,list和table则为null
    int rowCount(const QModelIndex &parent = QModelIndex()) const override;
    // 返回列数,和行数不同,列数一般都是统一固定的,所以这里parent在这里实际上没有用到
    int columnCount(const QModelIndex &parent = QModelIndex()) const override;
//! [1]

//! [2]
	// 获取索引项的标志,比如是否可以编辑之类的
    Qt::ItemFlags flags(const QModelIndex &index) const override;
    // 将数据设置到指定处索引
    bool setData(const QModelIndex &index, const QVariant &value, int role = Qt::EditRole) override;
    // 设置标题列数据
    bool setHeaderData(int section, Qt::Orientation orientation, const QVariant &value, int role = Qt::EditRole) override;
	// 插入指定位置的columns列
    bool insertColumns(int position, int columns, const QModelIndex &parent = QModelIndex()) override;
   // 移除指定位置columns列
    bool removeColumns(int position, int columns, const QModelIndex &parent = QModelIndex()) override;
     // 插入指定索引位置的row行
    bool insertRows(int position, int rows, const QModelIndex &parent = QModelIndex()) override;
    // 移除指定位置rowh行
    bool removeRows(int position, int rows, const QModelIndex &parent = QModelIndex()) override;

private:
	// 设置模型初始化数据
    void setupModelData(const QStringList &lines, TreeItem *parent);
    // 通过索引返回TreeItem对象
    TreeItem *getItem(const QModelIndex &index) const;

    TreeItem *rootItem;			// 根项
};
//! [2]

#endif // TREEMODEL_H
treemodel.cpp
#include "treemodel.h"
#include "treeitem.h"

#include <QtWidgets>

//! [0]
TreeModel::TreeModel(const QStringList &headers, const QString &data, QObject *parent)
    : QAbstractItemModel(parent)
{
	// 设置列头标题
    QList<QVariant> rootData;
    for (const QString &header : headers)
        rootData << header;
	// 创建根节点
    rootItem = new TreeItem(rootData);

	// 解析data数据,进行配置初始化
    setupModelData(data.split('\n'), rootItem);
}
//! [0]

//! [1]
TreeModel::~TreeModel()
{
	// 删除根节点
    delete rootItem;
}
//! [1]

//! [2]
int TreeModel::columnCount(const QModelIndex &parent) const
{
    Q_UNUSED(parent);
    return rootItem->columnCount();
}
//! [2]

QVariant TreeModel::data(const QModelIndex &index, int role) const
{
	// 索引无效,则返回无效的值
    if (!index.isValid())
        return QVariant();

	// 如果数据角色不是指定的显示角色也不是可编辑的角色,就返回无效的值。角色判断是根据自己的场景来设置的,在自定义model时要结合自身的实际情况
    if (role != Qt::DisplayRole && role != Qt::EditRole)
        return QVariant();
	// 通过索引获取到原本的节点
    TreeItem *item = getItem(index);
	// 节点返回数据
    return item->data(index.column());
}

//! [3]
Qt::ItemFlags TreeModel::flags(const QModelIndex &index) const
{
	// 索引是无效的,则返回项的数据是不可用
    if (!index.isValid())
        return Qt::NoItemFlags;
	// 索引返回可编辑属性 加上一些默认属性,这里可以由视图判断绘制是否选中提供代理编辑
    return Qt::ItemIsEditable | QAbstractItemModel::flags(index);
}
//! [3]

//! [4]
TreeItem *TreeModel::getItem(const QModelIndex &index) const
{
	// 索引有效,那就获取到索创建createIndex()索引时所传递的进来的void* 指针参数
    if (index.isValid()) {
        TreeItem *item = static_cast<TreeItem*>(index.internalPointer());
        if (item)
            return item;
    }
    return rootItem;
}
//! [4]

QVariant TreeModel::headerData(int section, Qt::Orientation orientation,
                               int role) const
{
	// 如果是水平,并且角色为显示时,那就返回根节点所保存的列表头数据
    if (orientation == Qt::Horizontal && role == Qt::DisplayRole)
        return rootItem->data(section);

    return QVariant();
}

//! [5]
QModelIndex TreeModel::index(int row, int column, const QModelIndex &parent) const
{
	// 这里判断父索引时候的,要考虑到下面代码中的createIndex(parentItem->childNumber(), 0, parentItem),列参数传递是0,否则你会无法理解
    if (parent.isValid() && parent.column() != 0)
        return QModelIndex();
//! [5]

//! [6]
	// 通过索引获取员的项
    TreeItem *parentItem = getItem(parent);
    if (!parentItem)
        return QModelIndex();

	// 获取指定行的项,之后创建索引返回
    TreeItem *childItem = parentItem->child(row);
    if (childItem)
        return createIndex(row, column, childItem);
    return QModelIndex();
}
//! [6]

bool TreeModel::insertColumns(int position, int columns, const QModelIndex &parent)
{
	// 插入指定的列数,这里最后必须-1,它是前开后闭假设,position=0;columns=1,那么范围是[0,0] = 所以 [0, 0 + 1 - 1]
	// beginInsertColumns()必须调用,这是局部刷新
    beginInsertColumns(parent, position, position + columns - 1);
    const bool success = rootItem->insertColumns(position, columns);
    endInsertColumns();

    return success;
}

bool TreeModel::insertRows(int position, int rows, const QModelIndex &parent)
{
    TreeItem *parentItem = getItem(parent);
    if (!parentItem)
        return false;
	// 这里和上面一样,只是改为了行
    beginInsertRows(parent, position, position + rows - 1);
    const bool success = parentItem->insertChildren(position,
                                                    rows,
                                                    rootItem->columnCount());
    endInsertRows();

    return success;
}

//! [7]
QModelIndex TreeModel::parent(const QModelIndex &index) const
{
	// 索引无效
    if (!index.isValid())
        return QModelIndex();

	// 这里是获取父项
    TreeItem *childItem = getItem(index);
    TreeItem *parentItem = childItem ? childItem->parent() : nullptr;

	// 如果父项等于根项,或者父项为null,那么都返回无效的项,无效的项在这里代表最顶层的项
    if (parentItem == rootItem || !parentItem)
        return QModelIndex();
	// 创建父项索引返回
    return createIndex(parentItem->childNumber(), 0, parentItem);
}
//! [7]

bool TreeModel::removeColumns(int position, int columns, const QModelIndex &parent)
{
	// beginRemoveColumns()参考前面的注释来理解,这里是局部刷新移除的列
    beginRemoveColumns(parent, position, position + columns - 1);
    const bool success = rootItem->removeColumns(position, columns);
    endRemoveColumns();

	// 如果列数为0,那么就删除全部节点
    if (rootItem->columnCount() == 0)
        removeRows(0, rowCount());

    return success;
}

bool TreeModel::removeRows(int position, int rows, const QModelIndex &parent)
{
    TreeItem *parentItem = getItem(parent);
    if (!parentItem)
        return false;
	// beginRemoveRows()参考前面的注释来理解,这里是局部刷新移除的行
    beginRemoveRows(parent, position, position + rows - 1);
    const bool success = parentItem->removeChildren(position, rows);
    endRemoveRows();

    return success;
}

//! [8]
int TreeModel::rowCount(const QModelIndex &parent) const
{
	// 父项有效,并且父项的列数大于0,那么返回0行。因为这个父项有问题,因为获取父项的函数,返回的索引列数都为0
    if (parent.isValid() && parent.column() > 0)
        return 0;

    const TreeItem *parentItem = getItem(parent);
	// 返回子项数
    return parentItem ? parentItem->childCount() : 0;
}
//! [8]

bool TreeModel::setData(const QModelIndex &index, const QVariant &value, int role)
{
	// 设置数据时,角色要为可编辑角色
    if (role != Qt::EditRole)
        return false;

    TreeItem *item = getItem(index);
    // 设置数据
    bool result = item->setData(index.column(), value);

	// 设置数据完成后要发出数据改变的信号来刷新视图
    if (result)
        emit dataChanged(index, index, {Qt::DisplayRole, Qt::EditRole});

    return result;
}

bool TreeModel::setHeaderData(int section, Qt::Orientation orientation,
                              const QVariant &value, int role)
{
    if (role != Qt::EditRole || orientation != Qt::Horizontal)
        return false;

    const bool result = rootItem->setData(section, value);

	// 列头数据被修改,发出信号通知视图
    if (result)
        emit headerDataChanged(orientation, section, section);

    return result;
}

void TreeModel::setupModelData(const QStringList &lines, TreeItem *parent)
{
	// 这个函数不用在意,这是示例初始化模型数据,此时模型还未设置到视图中,所以不用发出视图刷新相关的指示信号操作
    QList<TreeItem *> parents;
    QList<int> indentations;
    parents << parent;
    indentations << 0;

    int number = 0;

    while (number < lines.count()) {
        int position = 0;
        while (position < lines[number].length()) {
            if (lines[number].at(position) != ' ')
                break;
            ++position;
        }

        const QString lineData = lines[number].mid(position).trimmed();

        if (!lineData.isEmpty()) {
            // Read the column data from the rest of the line.
            const QStringList columnStrings =
                lineData.split(QLatin1Char('\t'), Qt::SkipEmptyParts);
            QList<QVariant> columnData;
            columnData.reserve(columnStrings.size());
            for (const QString &columnString : columnStrings)
                columnData << columnString;

            if (position > indentations.last()) {
                // The last child of the current parent is now the new parent
                // unless the current parent has no children.

                if (parents.last()->childCount() > 0) {
                    parents << parents.last()->child(parents.last()->childCount()-1);
                    indentations << position;
                }
            } else {
                while (position < indentations.last() && parents.count() > 0) {
                    parents.pop_back();
                    indentations.pop_back();
                }
            }

            // Append a new item to the current parent's list of children.
            TreeItem *parent = parents.last();
            parent->insertChildren(parent->childCount(), 1, rootItem->columnCount());
            for (int column = 0; column < columnData.size(); ++column)
                parent->child(parent->childCount() - 1)->setData(column, columnData[column]);
        }
        ++number;
    }
}
Qt日志系统
我们经常用的qDebug()打印日志调试信息函数,就是日志系统里面的。在Qt的日志系统中,消息是分为日志器类别,然后每个日志器类别在区分日志等级。我们常用的qDebug()打印消息则属于default日志类别。
系统许多模块他们都有单独的日志类别,虽然他们平常不打印出来。
相关宏、函数
// 安装日志输出最终处理函数,qInstallMessageHandler(nullptr)则设置回默认的处理函数。
QtMessageHandler qInstallMessageHandler(QtMessageHandler handler)

// 返回一个根据当前消息模式格式化的QString。
QString qFormatLogMessage(QtMsgType type, const QMessageLogContext &context, const QString &str)

// 设置过滤的规则,这是默认规则才生效的,如果安装了自定义的过滤函数,则不会生效
void QLoggingCategory::setFilterRules(const QString &rules)

// 设置安装过滤处理函数
QLoggingCategory::CategoryFilter installFilter(QLoggingCategory::CategoryFilter filter)

// 设置消息格式
void qSetMessagePattern(const QString &pattern)

// 默认的日志器
QLoggingCategory *defaultCategory()

// 声明一个外部的日志器
Q_DECLARE_LOGGING_CATEGORY(name)

// 创建日志器,这里只是用宏来包装了,所以看起来很黑科技
Q_LOGGING_CATEGORY(name, string, msgType)
Q_LOGGING_CATEGORY(name, string)

// 日志器输出消息,和qDebug()其实差不多的,qDebug() 相当于 qCDebug(QLoggingCategory::defaultCategory())
qCCritical(category, const char *message, ...)
qCCritical(category)
qCDebug(category, const char *message, ...)
qCDebug(category)
qCInfo(category, const char *message, ...)
qCInfo(category)
qCWarning(category, const char *message, ...)
qCWarning(category)
安装自定义的最终输入处理
QtMessageHandler qInstallMessageHandler(QtMessageHandler handler)
官方示例,其实不用过多解释,基本上有点编程基础的人一看就懂了,如果没有特别的需求一般我们不会更改它,如果你需要更改它来实现自定义输出,你想要获取qSetMessagePattern设置的消息格式,可以使用qFormatLogMessage来进行生成。
 #include <qapplication.h>
 #include <stdio.h>
 #include <stdlib.h>

 void myMessageOutput(QtMsgType type, const QMessageLogContext &context, const QString &msg)
 {
     QByteArray localMsg = msg.toLocal8Bit();
     const char *file = context.file ? context.file : "";
     const char *function = context.function ? context.function : "";
     switch (type) {
     case QtDebugMsg:
         fprintf(stderr, "Debug: %s (%s:%u, %s)\n", localMsg.constData(), file, context.line, function);
         break;
     case QtInfoMsg:
         fprintf(stderr, "Info: %s (%s:%u, %s)\n", localMsg.constData(), file, context.line, function);
         break;
     case QtWarningMsg:
         fprintf(stderr, "Warning: %s (%s:%u, %s)\n", localMsg.constData(), file, context.line, function);
         break;
     case QtCriticalMsg:
         fprintf(stderr, "Critical: %s (%s:%u, %s)\n", localMsg.constData(), file, context.line, function);
         break;
     case QtFatalMsg:
         fprintf(stderr, "Fatal: %s (%s:%u, %s)\n", localMsg.constData(), file, context.line, function);
         break;
     }

    /*
    // qFormatLogMessage获取qSetMessagePattern设置的格式
	QString message = qFormatLogMessage(type, context, msg);
	std::cout << message;
	*/
 }

 int main(int argc, char **argv)
 {
     qInstallMessageHandler(myMessageOutput);
     QApplication app(argc, argv);
     ...
     return app.exec();
 }
设置过滤的规则,这是默认规则才生效的,如果安装了自定义的过滤函数,则不会生效
void QLoggingCategory::setFilterRules(const QString &rules)

// 语法规则 <category>[.<type>] = true|false

// 例子,driver.usb是日志器的名称
QLoggingCategory::setFilterRules(QStringLiteral("driver.usb.debug=true"));

// 设置多个日志器的控制
QLoggingCategory::setFilterRules("*.debug=false\n"
								"driver.usb.debug=true");

// 其它的设置方式,请去查阅官方文档。
设置安装过滤处理函数
// 如果你不想配置日志规则想按照自己的方式来控制日志器的过滤,可以直接安装自己的过滤处理函数,笔者建议请谨慎操作。
QLoggingCategory::CategoryFilter installFilter(QLoggingCategory::CategoryFilter filter)

// 它默认的过滤处理函数
void QLoggingRegistry::defaultCategoryFilter(QLoggingCategory *cat)
{
    const QLoggingRegistry *reg = QLoggingRegistry::instance();
    Q_ASSERT(reg->categories.contains(cat));
    QtMsgType enableForLevel = reg->categories.value(cat);

    // NB: note that the numeric values of the Qt*Msg constants are
    //     not in severity order.
    bool debug = (enableForLevel == QtDebugMsg);
    bool info = debug || (enableForLevel == QtInfoMsg);
    bool warning = info || (enableForLevel == QtWarningMsg);
    bool critical = warning || (enableForLevel == QtCriticalMsg);

    // hard-wired implementation of
    //   qt.*.debug=false
    //   qt.debug=false
    if (const char *categoryName = cat->categoryName()) {
        // == "qt" or startsWith("qt.")
        if (strcmp(categoryName, "qt") == 0 || strncmp(categoryName, "qt.", 3) == 0)
            debug = false;
    }

    const auto categoryName = QLatin1String(cat->categoryName());

    for (const auto &ruleSet : reg->ruleSets) {
        for (const auto &rule : ruleSet) {
            int filterpass = rule.pass(categoryName, QtDebugMsg);
            if (filterpass != 0)
                debug = (filterpass > 0);
            filterpass = rule.pass(categoryName, QtInfoMsg);
            if (filterpass != 0)
                info = (filterpass > 0);
            filterpass = rule.pass(categoryName, QtWarningMsg);
            if (filterpass != 0)
                warning = (filterpass > 0);
            filterpass = rule.pass(categoryName, QtCriticalMsg);
            if (filterpass != 0)
                critical = (filterpass > 0);
        }
    }

    cat->setEnabled(QtDebugMsg, debug);
    cat->setEnabled(QtInfoMsg, info);
    cat->setEnabled(QtWarningMsg, warning);
    cat->setEnabled(QtCriticalMsg, critical);
}
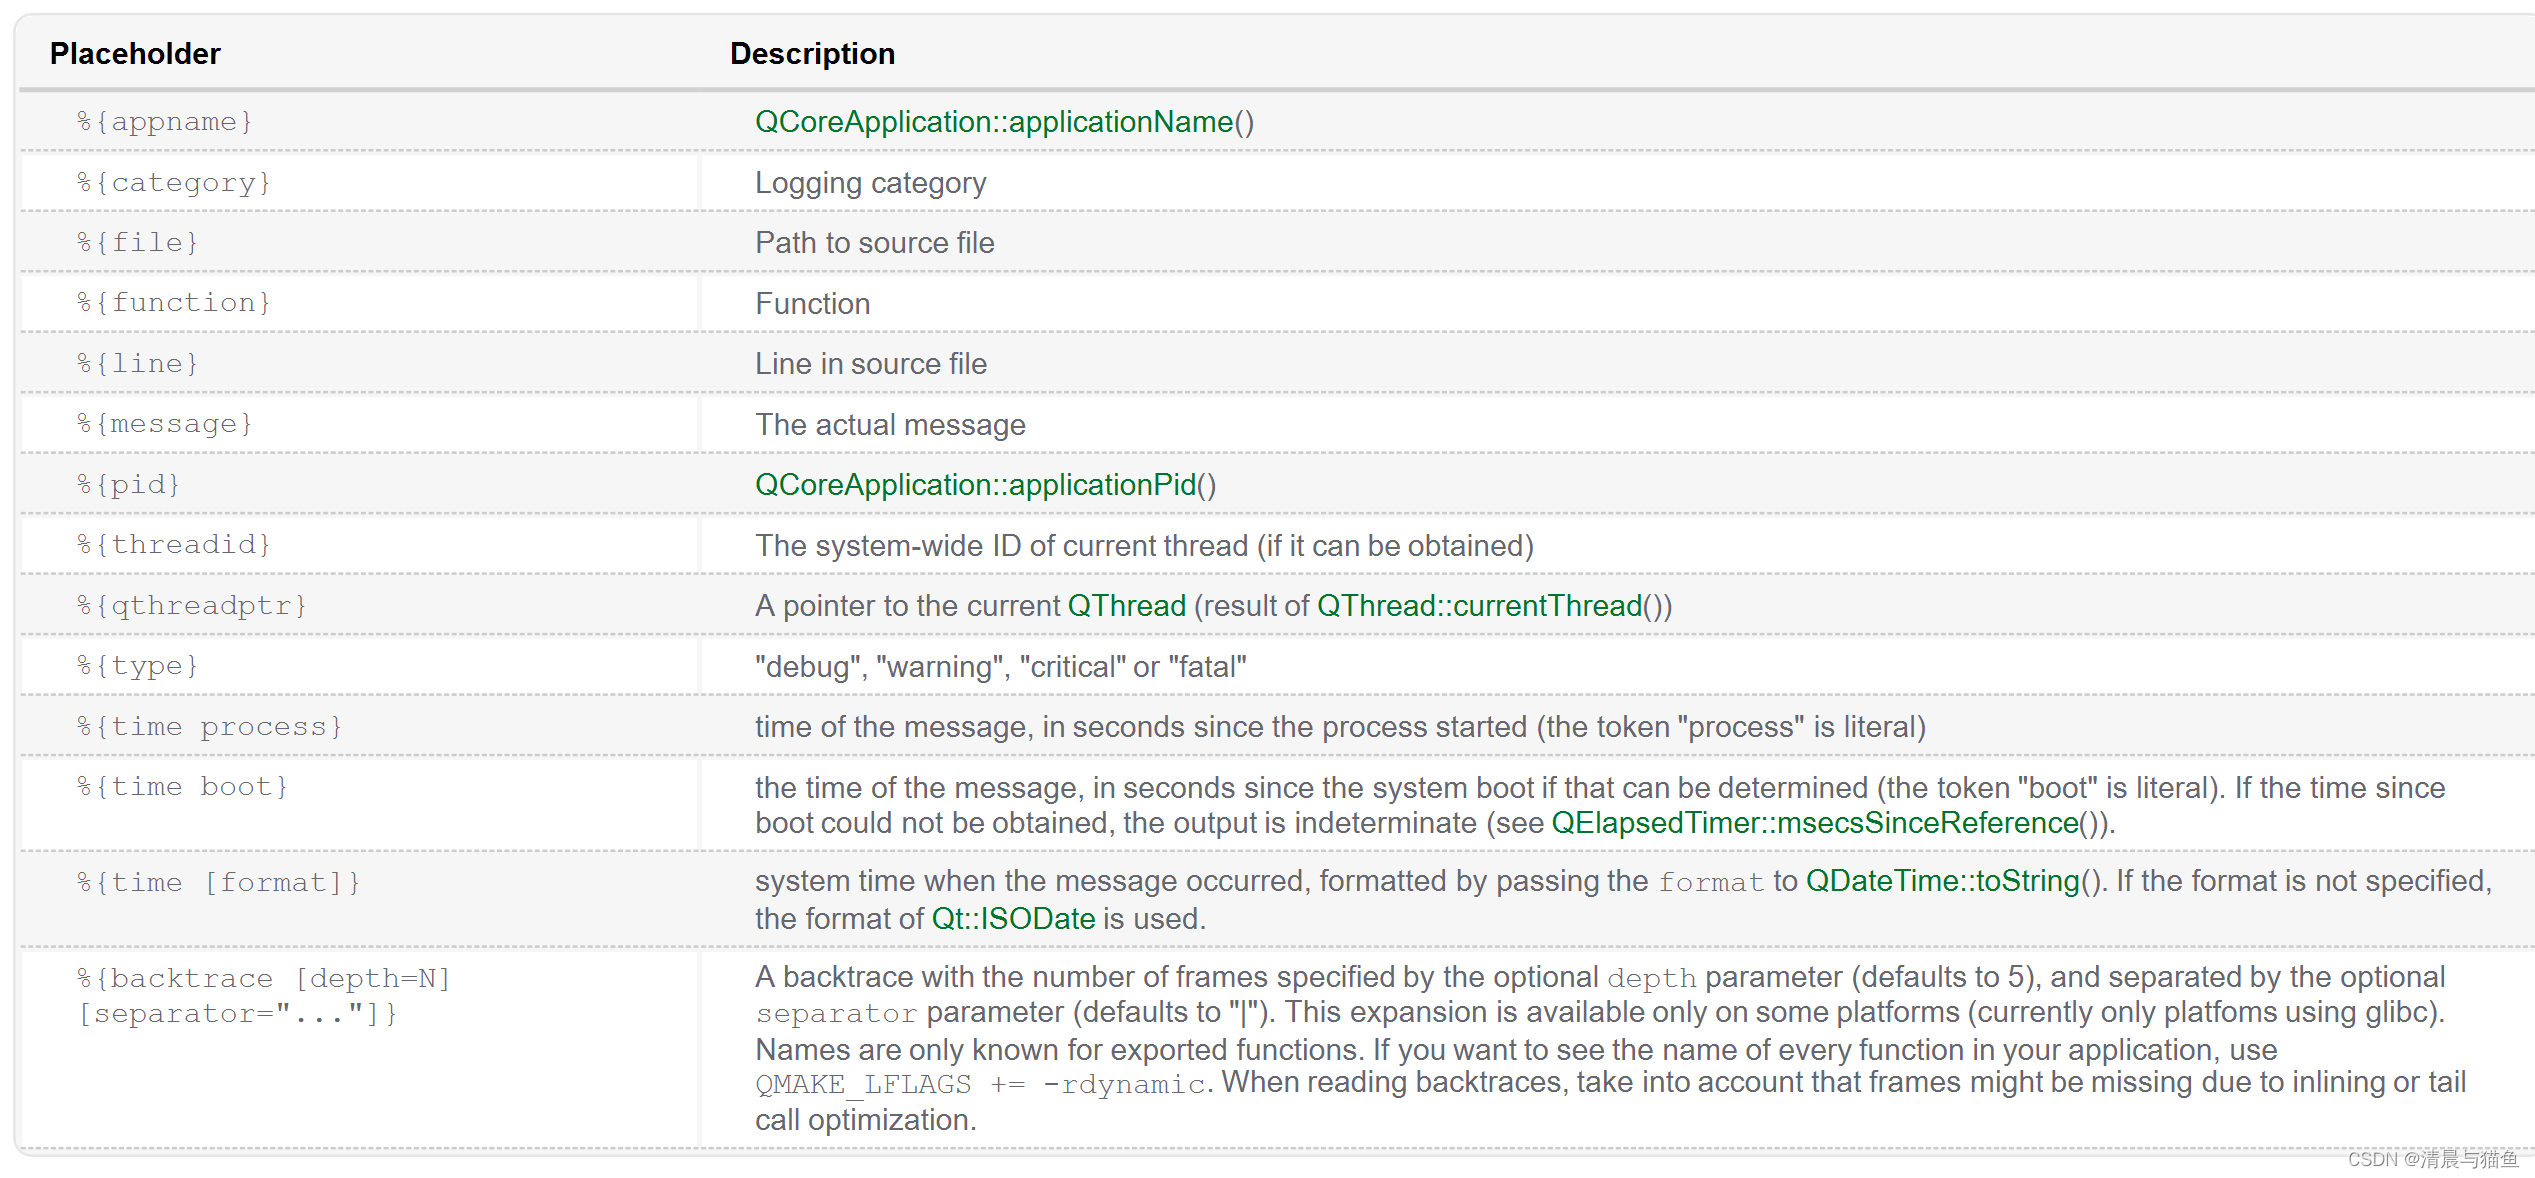
设置消息打印格式
void qSetMessagePattern(const QString &pattern)
请查看这个格式,比如你想打印,类型、日志器、消息、行号。
qSetMessagePattern("%{type} %{category} %{message} %{line}");
声明一个外部的日志器,实际上代码是这样的
Q_DECLARE_LOGGING_CATEGORY(name)

// 这个函数是外部的
#define Q_DECLARE_LOGGING_CATEGORY(name) \
    extern const QLoggingCategory &name();
创建日志器
Q_LOGGING_CATEGORY(name, string, msgType)
Q_LOGGING_CATEGORY(name, string)

// 这里实际上是一个函数name就是函数的名称,后面的都是QLoggingCategory对象的参数
#define Q_LOGGING_CATEGORY(name, ...) \
    const QLoggingCategory &name() \
    { \
        static const QLoggingCategory category(__VA_ARGS__); \
        return category; \
    }

// 没有规定函数名称和日志器一定要相同的,所以你可以这样。
Q_LOGGING_CATEGORY(rainy, "Jie")

// 使用的时候是这样的,它的日志器名称为Jie
qCDebug(rainy()) << "hello rainy";
比如你一般来说只需要自定义一个属于自己的日志类别,那么下面的代码可以给你带来参考。
// 在使用日志类别的地方声明这个函数,比如这里就叫rainy
Q_DECLARE_LOGGING_CATEGORY(rainy)

// 任意cpp文件中去实现这个函数,rainy是函数名称,后面是构造日志器的参数
Q_LOGGING_CATEGORY(rainy, "Jie")

// 获取日志器,你可以通过日志器来配置日志过滤或者检查判断开启了那些过滤
rainy()

// 打印日志的话,可以这样样子。
qCDebug(rainy()) << "hello rainy";
QML
QML 是什么?: 一种用于描述应用程序用户界面的声明式编程语言。
自定义一个Model
在使用qml模型型,qt虽然提供了一个ListModel,但很多时候我们更喜欢操作json。所以这里写了一个json模型,便于QML使用。
.h文件
class JsonModel : public QAbstractListModel
{
    Q_OBJECT

    Q_PROPERTY(QJsonArray datas READ getDatas WRITE setDatas NOTIFY datasChanged FINAL)
    Q_PROPERTY(QJsonArray roles READ getRoleNames WRITE setRoleNames NOTIFY rolesChanged FINAL)
public:
    using Roles = QHash<int, QByteArray>;

    JsonModel(QObject *parent = nullptr);
    JsonModel(QJsonArray datas, QObject *parent = nullptr) noexcept;
    JsonModel(QJsonArray datas, Roles roles, QObject *parent = nullptr) noexcept;

    Roles roleNames() const override;
    void setRoleNames(Roles roles) noexcept;

    QJsonArray getRoleNames() const noexcept;
    void setRoleNames(const QJsonArray &roles);

    const QJsonArray &getDatas() const noexcept;
    void setDatas(QJsonArray datas) noexcept;

    Q_INVOKABLE void append(const QJsonValue &value);
    Q_INVOKABLE void append(int i, const QJsonValue &value);
    Q_INVOKABLE void remove();
    Q_INVOKABLE void remove(int i);
    Q_INVOKABLE bool update(int i, const QJsonValue &value);

    bool setData(const QModelIndex &index, const QVariant &value, int role = Qt::EditRole) override;
    QVariant data(const QModelIndex &index, int role = Qt::DisplayRole) const override;
    int rowCount(const QModelIndex &parent = QModelIndex()) const override;
    int columnCount(const QModelIndex &parent = QModelIndex()) const override;

signals:
    void datasChanged();
    void rolesChanged();

private:
    void init();

    QJsonArray _datas;
    Roles _roles;
};
.cpp文件
JsonModel::JsonModel(QObject *parent)
    : QAbstractListModel(parent)
{
    init();
}

JsonModel::JsonModel(QJsonArray datas, QObject *parent) noexcept
    : QAbstractListModel(parent), _datas(qMove(datas))
{
    init();
}

JsonModel::JsonModel(QJsonArray datas, Roles roles, QObject *parent) noexcept
    : QAbstractListModel(parent), _datas(qMove(datas)), _roles(qMove(roles))
{
    init();
}

JsonModel::Roles JsonModel::roleNames() const
{
    return _roles;
}

void JsonModel::setRoleNames(Roles roles) noexcept
{
    _roles.swap(roles);
}

QJsonArray JsonModel::getRoleNames() const noexcept
{
    QJsonArray roles;
    foreach (int key, _roles.keys()) {
        QJsonObject role;
        role["name"] = QString(_roles.value(key));
        role["index"] = key;
        roles << role;
    }
    return roles;
}

void JsonModel::setRoleNames(const QJsonArray &roles)
{
    _roles.clear();
    foreach (const QJsonValue &role, roles) {
        if (!role.isObject())
            continue;

        QJsonObject elem = role.toObject();
        if (elem.contains("name") && elem.contains("index")) {
            QString roleName = elem["name"].toString();
            int index = elem["index"].toInt();
            _roles.insert(index, roleName.toUtf8());
        }
    }
}

const QJsonArray &JsonModel::getDatas() const noexcept
{
    return _datas;
}

void JsonModel::setDatas(QJsonArray datas) noexcept
{
    beginResetModel();
    _datas.swap(datas);
    endResetModel();
}

void JsonModel::append(const QJsonValue &value)
{
    beginInsertRows(QModelIndex{}, _datas.count(), _datas.count());
    _datas << value;
    endInsertRows();
}

void JsonModel::append(int i, const QJsonValue &value)
{
    if (i >= _datas.count())
        i = _datas.count();

    beginInsertRows(QModelIndex{}, i, i);
    _datas.insert(i, value);
    endInsertRows();
}

void JsonModel::remove()
{
    if (_datas.empty())
        return;

    beginRemoveRows(QModelIndex{}, _datas.count() - 1, _datas.count() - 1);
    _datas.pop_back();
    endRemoveRows();
}

void JsonModel::remove(int i)
{
    if (_datas.count() <= i)
        return;

    beginRemoveRows(QModelIndex{}, i, i);
    _datas.removeAt(i);
    endRemoveRows();
}

bool JsonModel::update(int i, const QJsonValue &value)
{
    return setData(createIndex(i, 0), value);
}

bool JsonModel::setData(const QModelIndex &index, const QVariant &value, int /*role*/)
{
    if (index.row() >= _datas.count())
        return false;

    _datas[index.row()] = value.toJsonValue();
    emit dataChanged(index, index, {});
    return true;
}

QVariant JsonModel::data(const QModelIndex &index, int role) const
{
    if (!index.isValid())
        return QVariant{};

    if (!_roles.contains(role))
        return QVariant{};

    if (_roles.size() == 1 && _roles.contains(Qt::UserRole)) {
        if (_roles.value(role) == "modelData")
            return QVariant(_datas[index.row()]);
    }

    QJsonObject elem = _datas[index.row()].toObject();
    QByteArray roleName = _roles.value(role);
    if (elem.contains(roleName))
        return QVariant(elem[roleName]);

    return QVariant{};
}

int JsonModel::rowCount(const QModelIndex &/*parent*/) const
{
    return _datas.count();
}

int JsonModel::columnCount(const QModelIndex &/*parent*/) const
{
    return _datas.count();
}

void JsonModel::init()
{
    _roles.insert(Qt::UserRole, "modelData");
}
使用前记得要注册
qmlRegisterType<JsonModel>("Jie", 1, 0, "JsonModel");
作用域
笔者相信对于大多数人对于QML的印象是没有作用域的,即全局都可以通过id索引调用。但也有一些时候可能会违反视觉,那就是ListView之类的为代表时的组件,由于这种组件是动态生成的,每一个代理的id都可以是相同的作为外部访问不到它的id,就跟我们编写的.qml组件一样。
所以即便是同一个.qml页面中,也不可以访问那种动态创建的组件所设置的id,事实上你也拿不到。
例子
import QtQuick 2.15
import QtQuick.Controls 2.15
import QtQuick.Window 2.15

Window {
    width: 640
    height: 480
    visible: true
    title: qsTr("Hello World")


    Item {
        anchors.fill: parent


        ListView {
            id: list
            anchors.fill: parent
            model: 5

            delegate: Item {
                id: listItem			//  listItem 该id只能作用于 代理范围
                width: list.width
                height: 20

                Label {
                    anchors.fill: parent
                    text: index + ' '+ listItem.width
                }
            }
        }
    }
}
插件
qmldir是模块定义文件
module ExampleModule
MyButton 1.0 MyButton.qml
MyButton 1.1 MyButton11.qml
MyButton 1.3 MyButton13.qml
MyRectangle 1.2 MyRectangle12.qml
可以使用qmlplugindump生成qmltypes信息类型文件,有了这个文件之后,QML就能够正常的语法识别提示了。
qmlpluginduqmlplugindumpmp My.Module 1.0 /tmp/imports > /tmp/imports/My/Module/mymodule.qmltypes
未完待续....


 被折叠的 条评论
为什么被折叠?
被折叠的 条评论
为什么被折叠?
 到【灌水乐园】发言


