


1.概述
第一次接触链表的时候是大学的数据结构课上,当时设计的链表就是针对某种数据结构的链表。后来学习了C++,由于C++支持泛型编程所以链表可以被设计成可以应用在任意的数据类型中。但是,如何能将C语言的链表应用在任意数据类型的应用场景下是一直困扰我的问题。直到我接触了Linux的内核链表,它的设计思想直接惊艳到了我。
下面我们先从使用者的角度去试着理解其内部设计的精妙之处。
2.既然链表不能包含所有数据类型那就让所有数据类型都可以包含链表
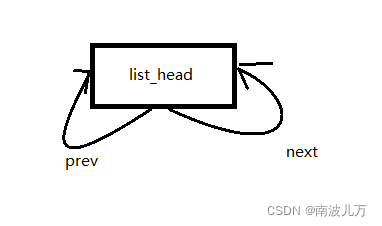
标题既是Linux内核设计链表的核心思想,Linux内核链表是一个双向循环链表。它被设计为只有链表指针,用户如果想使用链表就在自己的数据结构中包含链表。
struct list_head{
	struct list_head *next, *prev;
};
3.使用步骤
1.在自己的数据结构中包含链表头
下面以bcos中tasklet链表为例:
typedef struct bcos_tasklet_s
{
    /* 链表头 */
    struct list_head list;

    /* 回调函数 */
    void (*handler)(void *ptr);
    void *ptr;

    BC_OS_TICK  stamp;
}bcos_tasklet_t;
2.初始化、插入、删除
这是链表使用过程中最基本的三个操作,下面看看Linux内核链表是如何实现的:
1)初始化:
static inline void INIT_LIST_HEAD(struct list_head *list){
    list->next = list;
    list->prev = list;
}
链表在初始化时将next和prev指针指向链表头,这样既方便判断链表是否为空,也方便遍历和插入。
当然判断链表是否为空也是根据链表头的两个指针是否指向自己判断的:
static inline int list_empty(const struct list_head *head){
    return head->next == head;
}
2)插入:
插入操作很简单,就是传入新节点、新节点的前驱和后继即可将新节点串入链表:
static inline void __list_add(struct list_head *new_,
        struct list_head *prev,
        struct list_head *next){
    next->prev = new_;
    new_->next = next;
    new_->prev = prev;
    prev->next = new_;
}

上图把插入的过程已经画的很清楚了,这里就不再赘述。另外,基于上面的函数我还提供了两个额外的函数,他们分别时将新节点插入到链表的头和尾。
static inline void list_add(struct list_head *new_,
        struct list_head *head){
    __list_add(new_, head, head->next);
}
static inline void list_add_tail(struct list_head *new_,
        struct list_head *head){
    __list_add(new_, head->prev, head);
}
3)删除
删除的过程也很容易理解,都是对链表指针的操作,这里就不再赘述。
static inline void __list_del(struct list_head *prev,
        struct list_head *next){
    next->prev = prev;
    prev->next = next;
}

static inline void list_del(struct list_head *entry){
    __list_del(entry->prev, entry->next);
    entry->next = NULL;
    entry->prev = NULL;
}

static inline void list_del_init(struct list_head *entry){
    __list_del(entry->prev, entry->next);
    INIT_LIST_HEAD(entry);
}
4)如何从list_head的指针获取链表节点的数据域?
想必到这里很多读者会有这样的疑问,而这个疑问恰恰时Linux内核链表设计与实现过程中的高明之处。C语言的寻址方式是基地址加偏移地址。在一个结构体中如果我们知道了某一个元素在结构体中的偏移地址,那我们就可以根据该元素的地址找到对应的结构体变量的基地址。

typedef struct bcos_tcb_s {
    /* Pointer to current top of stack */
    BC_OS_STK       *OSTCBStkPtr;
    /* 链表头 */
    struct list_head list;
    /* 优先级 */
    uint8_t          priority;
    /* 延时时间戳 */
    BC_OS_TICK       delay_stamp;
} bcos_tcb_t;
上面是bcos任务控制块的结构体定义,我们发现链表头不是在结构体的最前面定义的,由于栈指针在结构体中占4个字节,所以链表头在结构体中的offset = 4,如果知道此时list元素的地址,在该地址的基础上减4就得到了结构体变量的指针。这样我们就获得到了链表节点对应的数据域。我不知道我描述的是否清晰,下面给出我实际调试过程中的截图,方便读者理解。
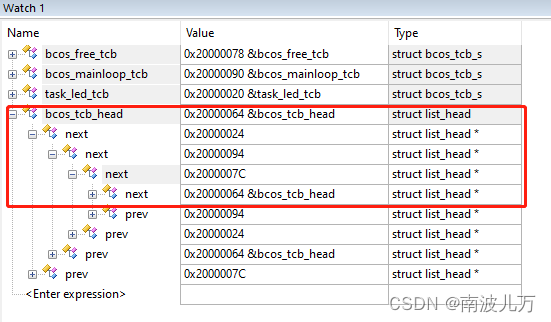
从图中可以看到我的任务就绪链表中有三个节点,其链表头的地址分别是0x20000024、0x20000094、0x2000007C,细心的读者可能已经观察到了,在红框的上面有三个bcos_tcb_t的结构体变量task_led_tcb(0x20000020)、bcos_mainloop_tcb(0x20000090)、bcos_free_tcb(0x20000078)。图中的各变量的类型也很清晰,我们如何通过链表节点找到对应数据结构体的指针就一目了然了。具体如何实现,其关键就是这个offset的计算:
//技术结构体元素相对与结构体首地址的offset
#define offsetof(TYPE, MEMBER)  ((size_t) &((TYPE *)0)->MEMBER)

#define container_of(ptr, type, member) ({          \
    const typeof( ((type *)0)->member) *__mptr = (ptr); \
    (type *)( (char *)__mptr - offsetof(type, member) );})
上面两个宏的实现是整个链表实现过程中的精髓,他们实现了从链表节点获取数据域的方法。上面这两个宏的实现有很多文章对其分析的非常详细,感兴趣的读者可以再深入研究。
5)遍历
/**
 * list_entry - get the struct for this entry.
 * @ptr:      the &struct list_head pointer.
 * @type:     the type of the struct this is embedded in.
 * @member:   the name of the list_head within the struct.
 */
#define list_entry(ptr, type, member)   container_of(ptr, type, member)

/**
 * list_for_each_entry_safe - iterate over list of given type safe against
 * removal of list enty.
 * @pos:      the type * to use as a loop sursor.
 * @n:        another type * to use as temporary storage.
 * @head:     the head for your list.
 * @member:   the name of the list_struct within the strut.
 */
#define list_for_each_entry_safe(pos, n, head, member)      		\
    for (pos = list_entry((head)->next, typeof(*pos), member),      \
         n = list_entry(pos->member.next, typeof(*pos), member); 	\
         &pos->member != (head);                                    \
         pos = n, n = list_entry(n->member.next, typeof(*n), member))
/**
 * list_for_each_entry_reverse - iterate backwards over list of given type.
 * @pos:     the type * to use as a loop cursor.
 * @head:    the head for your list.
 * @member:  the name of the list_struct within the struct.
 */
#define list_for_each_entry_reverse(pos, head, member)      \
    for(pos = list_entry((head)->prev, typeof(*pos), member);\
    prefetch(pos->member.prev), &pos->member != (head);      \
    pos = list_entry(pos->member.prev, typeof(*pos), member))
遍历接口的实现其实是用宏对for循环的封装,使用户不必关心遍历结束的条件、数据域的获取等问题。这里给一个插入、删除、遍历的例子:
/**
 * 在列表中升序插入,值更小的靠近链表头
 */
#define list_ascending_order_add(new_, pos, n, head, member, condition_member) 	\
do{ 																			\
	if(!list_empty(head)) 														\
    { 																			\
        list_for_each_entry_safe(pos, n, head, member) 							\
        { 																		\
            if(pos->condition_member > new_->condition_member) 					\
            { 																	\
                list_add_tail(&new_->member, &pos->member); 					\
                break; 															\
            } 																	\
        } 																		\
    } 																			\
    /* 如果节点没有被插入队列,则empty检查为空,前提是对节点进行初始化 */ 		\
    if(list_empty(&new_->member)) 												\
    { 																			\
        list_add_tail(&new_->member, head); 									\
    } 																			\
}while(0)
总结
该链表的实现方案的高明之处就是将链表的操作跟数据域完全分开了,通过一套接口可以适用于所有类型的数据。当然同样的思路也可以应用在许多其他的程序设计方案中。在应用篇中的单向循环链表的实现原理也是一样的,另外详细的使用示例可以参考应用篇。


 60
60

 被折叠的 条评论
为什么被折叠?
被折叠的 条评论
为什么被折叠?
 到【灌水乐园】发言


