


SpringSession的产生机制
在单机版的项目中,客户端第一次请求服务端时会创建session对象,同时生成一个session_id,返回给客户端保存至cookie中,从而服务端和客户端建立一种关联关系,利用这种关系可以做到用户会话保持;
但是对于分布式或者集群环境下,由于服务器端会话未保持同步,如果客户端请求被分发至其他服务器导致根据cookie无法找到session的这种局面,所以对于分布式系统来说,会话保持是要解决的一个关键问题;
对于上面的问题,出现了若干种解决方案:
- nginx或者haproxy实现ip绑定:nginx负载均衡策略ip_hash; haproxy负载均衡配置balance source;但是这种方式意味着一个ip会固定访问一台服务器,对于集群环境某台服务器宕机产生的session不一致问题无法解决;
- 通过配置tomcat server.xml来实现每个服务器都保持全局session,但是这种造成严重的内存消耗,以及网络开销,而且迁移升级非常不友好;
3. 利用redis来实现session同步,既当客户端访问服务器端的时候,将服务器端生成的session信息保存在redis中,然后访问的时候通过redis获取session信息;
4. 使用token 替代 session 即 auth2认证方案,一般用于移动端的开发 - 基于JWT,jwt和token很类似,其主要区别是token需要查询数据库获取用户信息,jwt中已经包含的用户的信息,直接通过加解密就可以获取;
spring session的实际是上面3的实现方案,支持数据库,redis等存储方式;
业内使用比较多的就是第三种和第四种方式,第三种多用于PC端,第四种多用于移动端或者与其他方对接的系统中;我们这里主要介绍Spring Session的原理,其使用场景还是非常多的比如说我们公司登录OA,就可以同步登录监控系统,运营后台,日志系统等等,因为他们的一级域名都是相同的。
spring session 的使用
想要知道spring session的原理,必须知道spring sesion的使用,我简单的搭建了一个测试平台,用于调试代码。
运行环境
JDK 1.8
redis 5.0.5
Tomcat 9.0.22
spring 5.1.9.RELEASE
spring-session-data-redis 2.1.8.RELEASE
首先在pom.xml中增加依赖
<dependency>
      <groupId>org.springframework</groupId>
      <artifactId>spring-web</artifactId>
      <version>5.1.9.RELEASE</version>
    </dependency>

    <dependency>
      <groupId>org.springframework.session</groupId>
      <artifactId>spring-session-data-redis</artifactId>
      <version>2.1.8.RELEASE</version>
    </dependency>

    <!--redis的驱动-->
    <dependency>
      <groupId>io.lettuce</groupId>
      <artifactId>lettuce-core</artifactId>
      <version>5.1.8.RELEASE</version>
    </dependency>
在spring 配置文件中增加:
<!--读取redis.properties属性配置文件-->
    <context:property-placeholder location="classpath:redis.properties"/>

    <!-- spring注解、bean的处理器 Activates various annotations to be detected in bean classes -->
    <context:annotation-config/>

    <!-- Spring session 的配置类 -->
    <bean class="org.springframework.session.data.redis.config.annotation.web.http.RedisHttpSessionConfiguration">
        <!--设置session过期时间,单位是秒,默认是30分钟-->
        <property name="maxInactiveIntervalInSeconds" value="120"/>
        <!--指定cookie的存放方式-->
        <property name="cookieSerializer" ref="cookieSerializer"/>
    </bean>

    <!--cookie存放策略-->
    <bean id="cookieSerializer" class="org.springframework.session.web.http.DefaultCookieSerializer">
        <!--cookie存放在项目的根路径下 “/”,默认是你的项目上下文 -->
        <property name="cookiePath" value="/"/>
        <!--cookie存放在web.com根域名下,默认是你项目访问的域名 -->
        <property name="domainName" value="learn.com"/>
    </bean>

    <!-- 配置redis连接工厂 -->
    <bean class="org.springframework.data.redis.connection.lettuce.LettuceConnectionFactory">
        <!--构造方法初始化-->
        <constructor-arg index="0" ref="redisStandaloneConfiguration"/>
    </bean>

    <!-- jedis连接配置信息 -->
    <bean id="redisStandaloneConfiguration" class="org.springframework.data.redis.connection.RedisStandaloneConfiguration">
        <property name="hostName" value="${redis.hostName}"/>
        <property name="port" value="${redis.port}"/>
        <property name="database" value="${redis.database}"/>
        <!--配置redis密码
        <property name="password" ref="thePassword"/>
        -->
    </bean>

    <!-- jedis连接密码信息
    <bean id="thePassword" class="org.springframework.data.redis.connection.RedisPassword">
        <constructor-arg index="0" value="${redis.password}"/>
    </bean>
   -->
redis.properties
redis.hostName=xxx.xxx.xxx.xxx
redis.port=6379
redis.database=0
修改web.xml
  <!--spring session的一个过滤器-->
  <filter>
    <filter-name>springSessionRepositoryFilter</filter-name>
    <filter-class>org.springframework.web.filter.DelegatingFilterProxy</filter-class>
  </filter>
  <filter-mapping>
    <filter-name>springSessionRepositoryFilter</filter-name>
    <url-pattern>/*</url-pattern>
    <dispatcher>REQUEST</dispatcher>
    <dispatcher>ERROR</dispatcher>
  </filter-mapping>

  <listener>
    <listener-class>org.springframework.web.context.ContextLoaderListener</listener-class>
  </listener>

  <servlet>
    <servlet-name>session</servlet-name>
    <servlet-class>com.learn.session.SessionServlet</servlet-class>
  </servlet>
  <servlet-mapping>
    <servlet-name>session</servlet-name>
    <url-pattern>/session</url-pattern>
  </servlet-mapping>
页面jsp
<%@ page contentType="text/html;charset=UTF-8" language="java" %>
<%@ taglib prefix="c" uri="http://java.sun.com/jsp/jstl/core" %>
<!DOCTYPE html>
<html lang="en">
<head>
    <title>Spring Session 演示</title>
    <link rel="stylesheet" href="${pageContext.request.contextPath}/css/bootstrap.min.css"/>
    <style type="text/css">
        body {
            padding: 1em;
        }
    </style>
</head>
<body>
<div class="container">
    <h1>演示</h1>
    <p>Spring Session + Redis</p>

    <h1>测试</h1>

    <form id="attr" class="form-inline" role="form" action="${pageContext.request.contextPath}/session" method="post">
        <label for="attributeName">Attribute Name</label>
        <input id="attributeName" type="text" name="attributeName"/>
        <label for="attributeValue">Attribute Value</label>
        <input id="attributeValue" type="text" name="attributeValue"/>
        <input type="submit" value="Set Attribute"/>
    </form>

    <hr/>

    <table class="table table-striped">
        <thead>
        <tr>
            <th>属性名</th>
            <th>属性值</th>
        </tr>
        </thead>
        <tbody>
        <c:forEach items="${sessionScope}" var="attr">
            <tr>
                <td><c:out value="${attr.key}"/></td>
                <td><c:out value="${attr.value}"/></td>
            </tr>
        </c:forEach>
        </tbody>
    </table>
</div>
</body>
</html>
java代码
    @Override
    protected void doPost(HttpServletRequest req, HttpServletResponse resp) throws ServletException, IOException {
        String attributeName = req.getParameter("attributeName");
        String attributeValue = req.getParameter("attributeValue");
        req.getSession().setAttribute(attributeName, attributeValue);
        //重定向
        resp.sendRedirect(req.getContextPath() + "/");
    }

    @Override
    protected void doGet(HttpServletRequest req, HttpServletResponse resp) throws ServletException, IOException {
        this.doPost(req, resp);
    }
注意我们存放域名为 learn.com ,注意修改hosts文件哦
验证
我们使用chrome浏览器访问端口为8080 和 8090 的服务器发现设置的属性和属性值都是存在的,但是使用火狐浏览器访问确是没有的,这说明会话保持生效了。

源代码分析
第一步:启动创建Spring容器
通过web.xml我们知道,程序的入口是在 org.springframework.web.context.ContextLoaderListener
tomcat在启动的时候会调用其下面方法
public void contextInitialized(ServletContextEvent event) {
      this.initWebApplicationContext(event.getServletContext());
 }
这个方法时启动Spring容器或刷新Spring容器的方法,此处我们不做讲解扩展。
第二步:FilterBean的初始化
另外Tomcat 启动的时候会加载Filter,我们看web.xml 中注册了 org.springframework.web.filter.DelegatingFilterProxy, 这个是一个Spring的Filter的代理类,但是它也是一个filter,任何Filter的入口一定是init方法。
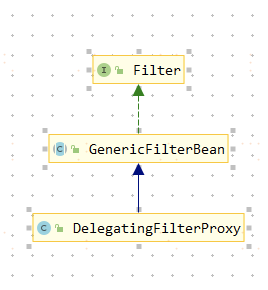


通过 GnenricFilterBean 可以知道这步骤主要是initFilterBean,即从Spring容器中获取Bean对象,而获取Bean对象的方式是通过filter-name获取的,Spring的这种处理是很精妙的。
相信很多朋友用过Shrio,刚才看到web.xml文件的时候是不是感觉很眼熟。。类比一下:


意思就是说DelgatingFilterProxy可以通过filter-name获取filter进行执行filter中的逻辑,而filter-name是配置到web.xml
第三步:调用执行逻辑
任何过滤器拦截都会走doFilter方法,所以这块是我们关注的重点!注意此处是DelegatingFilterProxy的doFilter方法,这里还使用了双重检查锁

因为SessionReposiitoryFilter是OncePerRequestFilter的子类,所以会先调用OncePerRequestFilter中的doFilter方法


一次请求本来就只过一次,为什么还要由此特别限定呢,此方式是为了兼容不同的web container,特意而为之(jsr168),也就是说并不是所有的container都像我们期望的只过滤一次,servlet版本不同,过滤情况不同;
在servlet-2.3中,Filter会过滤一切请求,包括服务器内部使用forward转发请求和<%@ include file="/index.jsp"%>的情况。
到了servlet-2.4中Filter默认下只拦截外部提交的请求,forward和include这些内部转发都不会被过滤,但是有时候我们需要 forward的时候也用到Filter。


客户端再次请求时会调用获取getSession方法,而因为上面我们说过了Spring Session 已经将Tomcat的HttpServletRequest,HttpServletResponse重新封装,会调用到重写的getSession方法,将过期时间进行延长。如果是已经过期的将会再次创建 new RedisSession() 对象
欢迎给位大佬关注小编微信公众号,一起学习,一起进步:


 666
666


 被折叠的 条评论
为什么被折叠?
被折叠的 条评论
为什么被折叠?
 到【灌水乐园】发言


