


控件之间的绑定
通过绑定两个控件,可以实现数据的实时同步,且不需要写后台代码。
本例Slider源控件,TextBox为目标控件,通过
Text="{Binding ElementName=one, Path=Value, Mode=TwoWay,FallbackValue=0,UpdateSourceTrigger=PropertyChanged}"
实现数据的双向绑定。 如下所示:

示例源码
控件之间数据绑定的固定格式为{Binding ElementName=源, Path=属性,Mode=方式,FallbackValue=默认值,UpdateSourceTrigger=触发方式}。其中有些可以省略,如下所示:
<Window x:Class="WpfApp2.B1Window"
        xmlns="http://schemas.microsoft.com/winfx/2006/xaml/presentation"
        xmlns:x="http://schemas.microsoft.com/winfx/2006/xaml"
        xmlns:d="http://schemas.microsoft.com/expression/blend/2008"
        xmlns:mc="http://schemas.openxmlformats.org/markup-compatibility/2006"
        xmlns:local="clr-namespace:WpfApp2"
        mc:Ignorable="d"
        Title="数据绑定基础示例" Height="450" Width="600">
    <StackPanel>
        <Slider x:Name="one" Orientation="Horizontal" Minimum="0" Maximum="100" Height="25" Margin="5" Value="10" Foreground="AliceBlue" Background="LightSalmon" IsSnapToTickEnabled="True" ></Slider>
        <TextBox x:Name="two"  Text="{Binding ElementName=one, Path=Value,Mode=TwoWay,FallbackValue=0,UpdateSourceTrigger=PropertyChanged}" Padding="5" Margin="5" FontSize="20"></TextBox>
    </StackPanel>
</Window>
控件与资源的绑定
控件绑定资源,即可达到资源的一次定义,多次复用。通过
Text="{Binding Source={StaticResource zero}}"
进行绑定资源,如下所示:

示例源码
控件与资源之间,通过{Binding Source={StaticResource 资源名}}的方式进行绑定,如果资源还有其他属性,则需要指定Path对应的属性名,若纯文本内容,则不需要指定Path。如下所示:
<Window x:Class="WpfApp2.B2Window"
        xmlns="http://schemas.microsoft.com/winfx/2006/xaml/presentation"
        xmlns:x="http://schemas.microsoft.com/winfx/2006/xaml"
        xmlns:d="http://schemas.microsoft.com/expression/blend/2008"
        xmlns:mc="http://schemas.openxmlformats.org/markup-compatibility/2006"
        xmlns:local="clr-namespace:WpfApp2"
        xmlns:sys="clr-namespace:System;assembly=mscorlib"
        mc:Ignorable="d"
        Title="资源绑定示例" Height="250" Width="400" Background="AliceBlue">
    <Window.Resources>
        <sys:String x:Key="zero">静夜思</sys:String>
        <sys:String x:Key="one">床前明月光,疑似地上霜。</sys:String>
        <sys:String x:Key="two">举头望明月,低头思故乡。</sys:String>
    </Window.Resources>
    <StackPanel Orientation="Vertical" HorizontalAlignment="Center" VerticalAlignment="Center" >
        <TextBlock x:Name="title"  Text="{Binding Source={StaticResource zero}}" Margin="5" Padding="5" FontSize="20" TextAlignment="Center"></TextBlock>
        <TextBlock x:Name="first"  Text="{Binding Source={StaticResource one}}" Margin="5" Padding="5" FontSize="20"></TextBlock>
        <TextBlock x:Name="after" Text="{Binding Source={StaticResource two}}" Margin="5" Padding="5" FontSize="20"></TextBlock>
    </StackPanel>
</Window>
DataContext
DataContext是指数据上下文,在WPF中,每一个控件都可以设置DataContext。通过上下文,可以自动匹配属性进行绑定。
XAML中设置DataContext
- 设置资源x:Key=“student”,定义一个学生对象,如下所示:
<Window.Resources>
        <Style TargetType="TextBlock">
            <Setter Property="HorizontalAlignment" Value="Center"></Setter>
            <Setter Property="VerticalAlignment" Value="Center"></Setter>
            <Setter Property="FontSize" Value="16"></Setter>
        </Style>
        <Style TargetType="TextBox">
            <Setter Property="VerticalAlignment" Value="Center"></Setter>
            <Setter Property="FontSize" Value="16"></Setter>
        </Style>
        <local:Student x:Key="student" Name="张三" Age="18" Sex="男" Classes="三班" >

        </local:Student>
    </Window.Resources>
- 将资源赋值给DataContext,并在控件上绑定属性,如下所示:
<Grid DataContext="{StaticResource student}">
        <Grid.ColumnDefinitions>
            <ColumnDefinition Width="1*"></ColumnDefinition>
            <ColumnDefinition Width="3*"></ColumnDefinition>
        </Grid.ColumnDefinitions>
        <Grid.RowDefinitions>
            <RowDefinition></RowDefinition>
            <RowDefinition></RowDefinition>
            <RowDefinition></RowDefinition>
            <RowDefinition></RowDefinition>
        </Grid.RowDefinitions>
        <TextBlock Margin="5" Padding="5">姓名:</TextBlock>
        <TextBox Grid.Row="0" Grid.Column="1" x:Name="txtName" Margin="5" Padding="5" Text="{Binding Name}"></TextBox>

        <TextBlock Grid.Row="1" Grid.Column="0" Margin="5" Padding="5">年龄:</TextBlock>
        <TextBox Grid.Row="1" Grid.Column="1" x:Name="txtAge" Margin="5" Padding="5" Text="{Binding Age}"></TextBox>

        <TextBlock Grid.Row="2" Grid.Column="0" Margin="5" Padding="5">性别:</TextBlock>
        <TextBox Grid.Row="2" Grid.Column="1" x:Name="txtSex" Margin="5" Padding="5" Text="{Binding Sex}"></TextBox>

        <TextBlock Grid.Row="3" Grid.Column="0" Margin="5" Padding="5">班级:</TextBlock>
        <TextBox Grid.Row="3" Grid.Column="1" x:Name="txtClassses" Margin="5" Padding="5" Text="{Binding Classes}"></TextBox>

    </Grid>
经过以上两步,就可以实现数据的绑定,示例效果如下:

代码设置DataContext
DataContext不仅可以通过XAML进行赋值,也可以通过C#代码设定,如下所示:
Student s = new Student()
{
     Name="李四",
     Age=22,
     Sex="女",
     Classes="4班"
};
//one是grid的Name
this.one.DataContext = s;
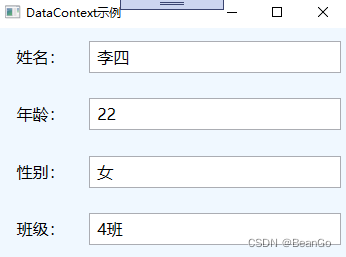
注意:要实现DataContext数据绑定,有以下两点要求:
数据源对象的属性不能是private修饰。
绑定的名称必须和属性名保持一致,如不一致,则绑定失效。
双向绑定
普通的对象只能实现一次的单向绑定,如果要实现双向绑定,需要实现通知接口【System.ComponentModel.INotifyPropertyChanged】并在属性变更时进行通知,如下所示:
public class Person:INotifyPropertyChanged
    {
        private string name;
        public string Name
        {
            get
            {
                return name;
            }
            set
            {
                name = value;
                OnPropertyChanged("Name");
            }
        }

        private int age;

        public int Age
        {
            get { return age; }
            set
            {
                age = value;
                OnPropertyChanged("Age");
            }
        }

        private string sex;

        public string Sex
        {
            get { return sex; }
            set
            {
                sex = value;
                OnPropertyChanged("Sex");
            }
        }

        private string classes;

        public string Classes
        {
            get { return classes; }
            set
            {
                classes = value;
                OnPropertyChanged("Classes");
            }
        }

        public event PropertyChangedEventHandler PropertyChanged;

        protected void OnPropertyChanged(string propertyName)
        {
            if (PropertyChanged != null) {
                PropertyChanged(this, new PropertyChangedEventArgs(propertyName));
            }
        }
    }
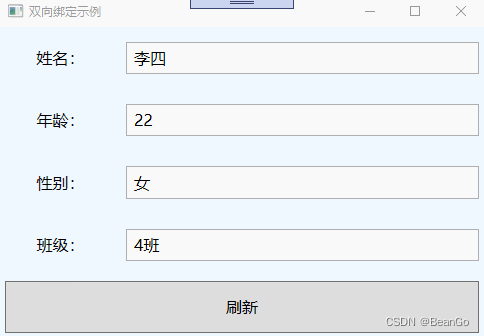
在初始化时对DataCotext进行赋值,然后在变更事件中,更改属性值,则页面绑定的值也会随着改变。如下所示:
	/// <summary>
    /// B4Window.xaml 的交互逻辑
    /// </summary>
    public partial class B4Window : Window
    {
        private Person person;
        public B4Window()
        {
            InitializeComponent();
            person = new Person()
            {
                Name = "李四",
                Age = 22,
                Sex = "女",
                Classes = "4班"
            };
            //one是grid的Name
            this.one.DataContext = person;
        }

        private void btnUpdate_Click(object sender, RoutedEventArgs e)
        {
            this.person.Name = "王五";
            this.person.Age = 18;
            this.person.Sex = "男";
            this.person.Classes = "6班";

        }
    }
双向绑定效果,如下所示:


 1076
1076

 被折叠的 条评论
为什么被折叠?
被折叠的 条评论
为什么被折叠?
 到【灌水乐园】发言


