


一、Redis了解
1.1、Redis介绍:
redis是一个key-value存储系统。和Memcached类似,它支持存储的value类型相对更多,包括string(字符串)、list(链表)、set(集合)、zset(sorted set –有序集合)和hash(哈希类型)。这些数据类型都支持push/pop、add/remove及取交集并集和差集及更丰富的操作,而且这些操作都是原子性的。在此基础上,redis支持各种不同方式的排序。与memcached一样,为了保证效率,数据都是缓存在内存中。区别的是redis会周期性的把更新的数据写入磁盘或者把修改操作写入追加的记录文件,并且在此基础上实现了master-slave(主从)同步。
Redis数据库完全在内存中,使用磁盘仅用于持久性。相比许多键值数据存储,Redis拥有一套较为丰富的数据类型。Redis可以将数据复制到任意数量的从服务器。
1.2、Redis优点:
(1)异常快速:Redis的速度非常快,每秒能执行约11万集合,每秒约81000+条记录。
(2)支持丰富的数据类型:Redis支持最大多数开发人员已经知道像列表,集合,有序集合,散列数据类型。这使得它非常容易解决各种各样的问题,因为我们知道哪些问题是可以处理通过它的数据类型更好。
(3)操作都是原子性:所有Redis操作是原子的,这保证了如果两个客户端同时访问的Redis服务器将获得更新后的值。
(4)多功能实用工具:Redis是一个多实用的工具,可以在多个用例如缓存,消息,队列使用(Redis原生支持发布/订阅),任何短暂的数据,应用程序,如Web应用程序会话,网页命中计数等。
1.3、Redis缺点:
(1)单线程
(2)耗内存
二、64位windows下Redis安装
Redis官方是不支持windows的,但是Microsoft Open Tech group 在 GitHub上开发了一个Win64的版本,下载地址:https://github.com/MSOpenTech/redis/releases。注意只支持64位哈。
小宝鸽是下载了Redis-x64-3.0.500.msi进行安装。安装过程中全部采取默认即可。
安装完成之后可能已经帮你开启了Redis对应的服务,博主的就是如此。查看资源管理如下,说明已经开启:
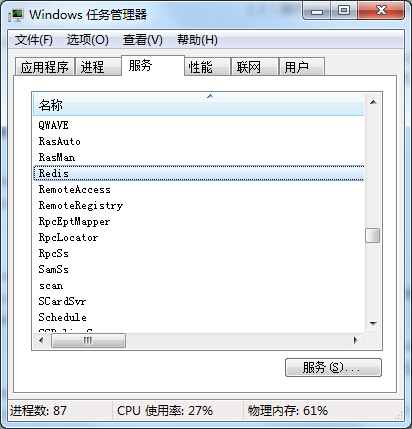
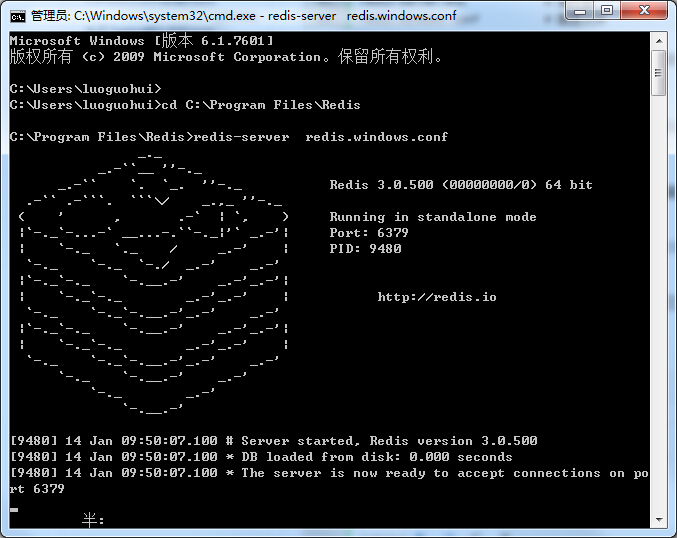
已经开启了对应服务的,我们让它保持,下面例子需要用到。如果没有开启的,我们命令开启,进入Redis的安装目录(博主的是C:\Program Files\Redis),然后如下命令开启:
|
1
|
redis-server redis.windows.conf
|
OK,下面我们进行实例。
三、详细实例
本工程采用的环境:Eclipse + maven + spring + junit
3.1、添加相关依赖(spring+junit+redis依赖),pom.xml:
|
1
2
3
4
5
6
7
8
9
10
11
12
13
14
15
16
17
18
19
20
21
22
23
24
25
26
27
28
29
30
31
32
33
34
35
36
37
38
39
40
41
42
43
44
45
46
47
48
49
50
51
52
53
54
55
56
57
58
59
60
61
62
63
64
65
66
67
68
69
70
71
72
73
74
75
76
77
78
79
80
81
82
83
84
85
86
87
88
89
90
91
|
<project xmlns=
"http://maven.apache.org/POM/4.0.0"
xmlns:xsi=
"http://www.w3.org/2001/XMLSchema-instance"
xsi:schemaLocation=
"http://maven.apache.org/POM/4.0.0 http://maven.apache.org/xsd/maven-4.0.0.xsd"
>
<modelVersion>
4.0
.
0
</modelVersion>
<groupId>com.luo</groupId>
<artifactId>redis_project</artifactId>
<version>
0.0
.
1
-SNAPSHOT</version>
<properties>
<!-- spring版本号 -->
<spring.version>
3.2
.
8
.RELEASE</spring.version>
<!-- junit版本号 -->
<junit.version>
4.10
</junit.version>
</properties>
<dependencies>
<!-- 添加Spring依赖 -->
<dependency>
<groupId>org.springframework</groupId>
<artifactId>spring-core</artifactId>
<version>${spring.version}</version>
</dependency>
<dependency>
<groupId>org.springframework</groupId>
<artifactId>spring-webmvc</artifactId>
<version>${spring.version}</version>
</dependency>
<dependency>
<groupId>org.springframework</groupId>
<artifactId>spring-context</artifactId>
<version>${spring.version}</version>
</dependency>
<dependency>
<groupId>org.springframework</groupId>
<artifactId>spring-context-support</artifactId>
<version>${spring.version}</version>
</dependency>
<dependency>
<groupId>org.springframework</groupId>
<artifactId>spring-aop</artifactId>
<version>${spring.version}</version>
</dependency>
<dependency>
<groupId>org.springframework</groupId>
<artifactId>spring-aspects</artifactId>
<version>${spring.version}</version>
</dependency>
<dependency>
<groupId>org.springframework</groupId>
<artifactId>spring-tx</artifactId>
<version>${spring.version}</version>
</dependency>
<dependency>
<groupId>org.springframework</groupId>
<artifactId>spring-jdbc</artifactId>
<version>${spring.version}</version>
</dependency>
<dependency>
<groupId>org.springframework</groupId>
<artifactId>spring-web</artifactId>
<version>${spring.version}</version>
</dependency>
<!--单元测试依赖 -->
<dependency>
<groupId>junit</groupId>
<artifactId>junit</artifactId>
<version>${junit.version}</version>
<scope>test</scope>
</dependency>
<!--spring单元测试依赖 -->
<dependency>
<groupId>org.springframework</groupId>
<artifactId>spring-test</artifactId>
<version>${spring.version}</version>
<scope>test</scope>
</dependency>
<!-- Redis 相关依赖 -->
<dependency>
<groupId>org.springframework.data</groupId>
<artifactId>spring-data-redis</artifactId>
<version>
1.6
.
1
.RELEASE</version>
</dependency>
<dependency>
<groupId>redis.clients</groupId>
<artifactId>jedis</artifactId>
<version>
2.7
.
3
</version>
</dependency>
</dependencies>
</project>
|
3.2、spring配置文件application.xml:
|
1
2
3
4
5
6
7
8
9
10
11
12
13
14
15
16
17
18
19
20
21
22
23
24
25
26
27
28
29
30
31
32
33
34
35
36
37
38
39
40
41
42
43
44
45
46
47
48
49
50
51
52
53
54
55
56
57
58
59
60
61
62
63
64
65
66
67
68
69
70
71
72
73
74
75
76
77
|
<?xml version=
"1.0"
encoding=
"UTF-8"
?>
<beans xmlns=
"http://www.springframework.org/schema/beans"
xmlns:xsi=
"http://www.w3.org/2001/XMLSchema-instance"
xmlns:context=
"http://www.springframework.org/schema/context"
xmlns:aop=
"http://www.springframework.org/schema/aop"
xsi:schemaLocation="
http:
//www.springframework.org/schema/beans
http:
//www.springframework.org/schema/beans/spring-beans-3.0.xsd
http:
//www.springframework.org/schema/aop
http:
//www.springframework.org/schema/aop/spring-aop-3.0.xsd
http:
//www.springframework.org/schema/context
http:
//www.springframework.org/schema/context/spring-context-3.0.xsd">
<!-- 自动扫描注解的bean -->
<context:component-scan base-
package
=
"com.luo.service"
/>
<!-- 引入properties配置文件 -->
<bean id=
"propertyConfigurer"
class
=
"org.springframework.beans.factory.config.PropertyPlaceholderConfigurer"
>
<property name=
"locations"
>
<list>
<value>classpath:properties/*.properties</value>
<!--要是有多个配置文件,只需在这里继续添加即可 -->
</list>
</property>
</bean>
<!-- jedis 配置 -->
<bean id=
"poolConfig"
class
=
"redis.clients.jedis.JedisPoolConfig"
>
<property name=
"maxIdle"
value=
"${redis.maxIdle}"
/>
<property name=
"maxWaitMillis"
value=
"${redis.maxWait}"
/>
<property name=
"testOnBorrow"
value=
"${redis.testOnBorrow}"
/>
</bean >
<!-- redis服务器中心 -->
<bean id=
"connectionFactory"
class
=
"org.springframework.data.redis.connection.jedis.JedisConnectionFactory"
>
<property name=
"poolConfig"
ref=
"poolConfig"
/>
<property name=
"port"
value=
"${redis.port}"
/>
<property name=
"hostName"
value=
"${redis.host}"
/>
<!-- <property name=
"password"
value=
"${redis.password}"
/> -->
<property name=
"timeout"
value=
"${redis.timeout}"
></property>
</bean >
<bean id=
"redisTemplate"
class
=
"org.springframework.data.redis.core.RedisTemplate"
>
<property name=
"connectionFactory"
ref=
"connectionFactory"
/>
<property name=
"keySerializer"
>
<bean
class
=
"org.springframework.data.redis.serializer.StringRedisSerializer"
/>
</property>
<property name=
"valueSerializer"
>
<bean
class
=
"org.springframework.data.redis.serializer.JdkSerializationRedisSerializer"
/>
</property>
</bean >
<!-- cache配置 -->
<bean id=
"methodCacheInterceptor"
class
=
"com.luo.redis.cache.MethodCacheInterceptor"
>
<property name=
"redisTemplate"
ref=
"redisTemplate"
/>
</bean >
<!-- aop配置切点跟通知 -->
<bean id=
"methodCachePointCut"
class
=
"org.springframework.aop.support.RegexpMethodPointcutAdvisor"
>
<property name=
"advice"
ref=
"methodCacheInterceptor"
/>
<property name=
"pattern"
value=
".*ServiceImpl.*getTimestamp"
/>
</bean>
<bean id=
"redisTestService"
class
=
"com.luo.service.impl.RedisTestServiceImpl"
>
</bean>
<bean
class
=
"org.springframework.aop.framework.autoproxy.DefaultAdvisorAutoProxyCreator"
/>
</beans>
|
3.3、Redis配置参数,redis.properties:
|
1
2
3
4
5
6
7
8
9
10
11
12
13
14
15
16
17
|
#redis中心
#绑定的主机地址
redis.host=
127.0
.
0.1
#指定Redis监听端口,默认端口为
6379
redis.port=
6379
#授权密码(本例子没有使用)
redis.password=
123456
#最大空闲数:空闲链接数大于maxIdle时,将进行回收
redis.maxIdle=
100
#最大连接数:能够同时建立的“最大链接个数”
redis.maxActive=
300
#最大等待时间:单位ms
redis.maxWait=
1000
#使用连接时,检测连接是否成功
redis.testOnBorrow=
true
#当客户端闲置多长时间后关闭连接,如果指定为
0
,表示关闭该功能
redis.timeout=
10000
|
3.4、添加接口及对应实现RedisTestService.Java和RedisTestServiceImpl.java:
|
1
2
3
4
5
|
package
com.luo.service;
public
interface
RedisTestService {
public
String getTimestamp(String param);
}
|
|
1
2
3
4
5
6
7
8
9
10
11
12
13
14
|
package
com.luo.service.impl;
import
org.springframework.stereotype.Service;
import
com.luo.service.RedisTestService;
@Service
public
class
RedisTestServiceImpl
implements
RedisTestService {
public
String getTimestamp(String param) {
Long timestamp = System.currentTimeMillis();
return
timestamp.toString();
}
}
|
3.5、本例采用spring aop切面方式进行缓存,配置已在上面spring配置文件中,对应实现为MethodCacheInterceptor.java:
|
1
2
3
4
5
6
7
8
9
10
11
12
13
14
15
16
17
18
19
20
21
22
23
24
25
26
27
28
29
30
31
32
33
34
35
36
37
38
39
40
41
42
43
44
45
46
47
48
49
50
51
52
53
54
55
56
57
58
59
60
61
62
63
64
65
66
67
68
69
70
71
72
73
74
75
76
77
78
79
80
81
82
83
84
85
86
87
88
89
90
91
92
93
94
95
96
97
98
99
100
101
102
103
104
105
106
107
108
109
110
111
112
113
114
115
116
117
|
package
com.luo.redis.cache;
import
java.io.Serializable;
import
java.util.concurrent.TimeUnit;
import
org.aopalliance.intercept.MethodInterceptor;
import
org.aopalliance.intercept.MethodInvocation;
import
org.springframework.data.redis.core.RedisTemplate;
import
org.springframework.data.redis.core.ValueOperations;
public
class
MethodCacheInterceptor
implements
MethodInterceptor {
private
RedisTemplate<Serializable, Object> redisTemplate;
private
Long defaultCacheExpireTime = 10l;
// 缓存默认的过期时间,这里设置了10秒
public
Object invoke(MethodInvocation invocation)
throws
Throwable {
Object value =
null
;
String targetName = invocation.getThis().getClass().getName();
String methodName = invocation.getMethod().getName();
Object[] arguments = invocation.getArguments();
String key = getCacheKey(targetName, methodName, arguments);
try
{
// 判断是否有缓存
if
(exists(key)) {
return
getCache(key);
}
// 写入缓存
value = invocation.proceed();
if
(value !=
null
) {
final
String tkey = key;
final
Object tvalue = value;
new
Thread(
new
Runnable() {
public
void
run() {
setCache(tkey, tvalue, defaultCacheExpireTime);
}
}).start();
}
}
catch
(Exception e) {
e.printStackTrace();
if
(value ==
null
) {
return
invocation.proceed();
}
}
return
value;
}
/**
* 创建缓存key
*
* @param targetName
* @param methodName
* @param arguments
*/
private
String getCacheKey(String targetName, String methodName,
Object[] arguments) {
StringBuffer sbu =
new
StringBuffer();
sbu.append(targetName).append(
"_"
).append(methodName);
if
((arguments !=
null
) && (arguments.length !=
0
)) {
for
(
int
i =
0
; i < arguments.length; i++) {
sbu.append(
"_"
).append(arguments[i]);
}
}
return
sbu.toString();
}
/**
* 判断缓存中是否有对应的value
*
* @param key
* @return
*/
public
boolean
exists(
final
String key) {
return
redisTemplate.hasKey(key);
}
/**
* 读取缓存
*
* @param key
* @return
*/
public
Object getCache(
final
String key) {
Object result =
null
;
ValueOperations<Serializable, Object> operations = redisTemplate
.opsForValue();
result = operations.get(key);
return
result;
}
/**
* 写入缓存
*
* @param key
* @param value
* @return
*/
public
boolean
setCache(
final
String key, Object value, Long expireTime) {
boolean
result =
false
;
try
{
ValueOperations<Serializable, Object> operations = redisTemplate
.opsForValue();
operations.set(key, value);
redisTemplate.expire(key, expireTime, TimeUnit.SECONDS);
result =
true
;
}
catch
(Exception e) {
e.printStackTrace();
}
return
result;
}
public
void
setRedisTemplate(
RedisTemplate<Serializable, Object> redisTemplate) {
this
.redisTemplate = redisTemplate;
}
}
|
3.6、单元测试相关类:
|
1
2
3
4
5
6
7
8
9
10
11
12
13
14
|
package
com.luo.baseTest;
import
org.junit.runner.RunWith;
import
org.springframework.test.context.ContextConfiguration;
import
org.springframework.test.context.junit4.AbstractJUnit4SpringContextTests;
import
org.springframework.test.context.junit4.SpringJUnit4ClassRunner;
//指定bean注入的配置文件
@ContextConfiguration
(locations = {
"classpath:application.xml"
})
//使用标准的JUnit @RunWith注释来告诉JUnit使用Spring TestRunner
@RunWith
(SpringJUnit4ClassRunner.
class
)
public
class
SpringTestCase
extends
AbstractJUnit4SpringContextTests {
}
|
|
1
2
3
4
5
6
7
8
9
10
11
12
13
14
15
16
17
18
19
20
21
|
package
com.luo.service;
import
org.junit.Test;
import
org.springframework.beans.factory.annotation.Autowired;
import
com.luo.baseTest.SpringTestCase;
public
class
RedisTestServiceTest
extends
SpringTestCase {
@Autowired
private
RedisTestService redisTestService;
@Test
public
void
getTimestampTest()
throws
InterruptedException{
System.out.println(
"第一次调用:"
+ redisTestService.getTimestamp(
"param"
));
Thread.sleep(
2000
);
System.out.println(
"2秒之后调用:"
+ redisTestService.getTimestamp(
"param"
));
Thread.sleep(
11000
);
System.out.println(
"再过11秒之后调用:"
+ redisTestService.getTimestamp(
"param"
));
}
}
|
3.7、运行结果:


 257
257


 被折叠的 条评论
为什么被折叠?
被折叠的 条评论
为什么被折叠?
 到【灌水乐园】发言


