


一、使用zxing库实现
1.1 ZXing
ZXing是Google官方提供的二维码生成和扫描库,支持扫码、相册解码,生成二维码等功能
Zxing github 地址 :https://github.com/zxing/zxing
由于zxing开源库太大了,有很多不是Android要用的,所以网上很多都是介绍将zxing库中Android用到内容重新封装使用。
这里直接使用zxing-android-embedded开源库(其实差不多,但是方便,简单),对于需要快速实现该功能的项目来说还是很好的。
zxing-android-embedded 地址:https://github.com/journeyapps/zxing-android-embedded
1.2 gradle中引入zxing-android-embedded库
// Config for SDK 24+

repositories {
    mavenCentral()
}
dependencies {
    implementation 'com.journeyapps:zxing-android-embedded:4.3.0'
	implementation 'com.blankj:utilcodex:1.31.1'//工具库
}
1.3 添加权限
添加相机和闪光灯权限
    <uses-feature
        android:name="android.hardware.camera"
        android:required="false" />
    <uses-permission android:name="android.permission.CAMERA" />
    <uses-permission android:name="android.permission.FLASHLIGHT" />
1.4 申请权限
    fun gotoScan(){
        PermissionUtils.permission(Manifest.permission.CAMERA)
            .callback(object : PermissionUtils.SimpleCallback {
                override fun onGranted() {
                    //相机权限已开启
                    LogUtils.i("相机权限已开启")
                }

                override fun onDenied() {
                    LogUtils.e("没有相机权限,无法扫码,请在设置中开启")
                    ToastUtils.showShort("没有相机权限,无法扫码,请在设置中开启")
                }
            }).request()
    }
1.5 添加扫码布局
DecoratedBarcodeView是二维码扫描的主要控件,由三个view组成 BarcodeView(相机扫描时的预览控件)、ViewfinderView(扫码框、遮罩和底部提示文字,后面自定义扫描框就是对其自定义)、TextView(提示文本)
<?xml version="1.0" encoding="utf-8"?>
<androidx.constraintlayout.widget.ConstraintLayout xmlns:android="http://schemas.android.com/apk/res/android"
    xmlns:app="http://schemas.android.com/apk/res-auto"
    xmlns:tools="http://schemas.android.com/tools"
    android:id="@+id/main"
    android:layout_width="match_parent"
    android:layout_height="match_parent">

    <com.journeyapps.barcodescanner.DecoratedBarcodeView
       android:id="@+id/barcodeScanner"
        android:layout_width="match_parent"
        android:layout_height="match_parent"
        app:zxing_framing_rect_height="200dp"
        app:zxing_framing_rect_width="200dp" />


</androidx.constraintlayout.widget.ConstraintLayout>
1.6 添加扫码代码
class ScanQRActivity: BaseVBActivity<ActivityScanQrBinding>() {
    private lateinit var beepManager:BeepManager

    override fun initView() {
        //设置屏幕常亮
        window.addFlags(WindowManager.LayoutParams.FLAG_KEEP_SCREEN_ON)

        //初始化扫码
        val formats: Collection<BarcodeFormat> =
            listOf(BarcodeFormat.QR_CODE, BarcodeFormat.CODE_39)
        mViewBinding.barcodeScanner.barcodeView.setDecoderFactory(DefaultDecoderFactory(formats))
        mViewBinding.barcodeScanner.initializeFromIntent(intent)
        mViewBinding.barcodeScanner.decodeContinuous(callback)

        beepManager = BeepManager(this)
    }

    private val callback: BarcodeCallback = object : BarcodeCallback {
        override fun barcodeResult(result: BarcodeResult) {
            if (result.text == null ) {
                // Prevent duplicate scans
                return
            }
            mViewBinding.barcodeScanner.setStatusText(result.text)

            beepManager.playBeepSoundAndVibrate()
        }

        override fun possibleResultPoints(resultPoints: List<ResultPoint>) {
        }
    }

    override fun onResume() {
        super.onResume()
        mViewBinding.barcodeScanner.resume()
    }

    override fun onPause() {
        super.onPause()
        mViewBinding.barcodeScanner.pause()
    }

    override fun onKeyDown(keyCode: Int, event: KeyEvent?): Boolean {
        return mViewBinding.barcodeScanner.onKeyDown(keyCode, event) ||  super.onKeyDown(keyCode, event)
    }
}
其中result就是扫码的结果
1.7 自定义扫描框
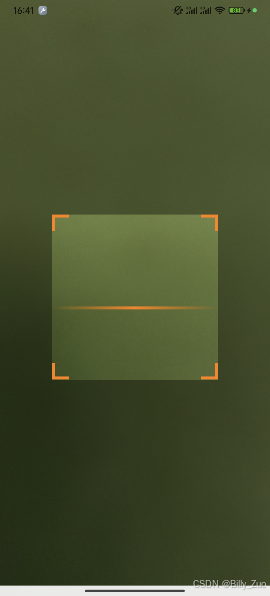
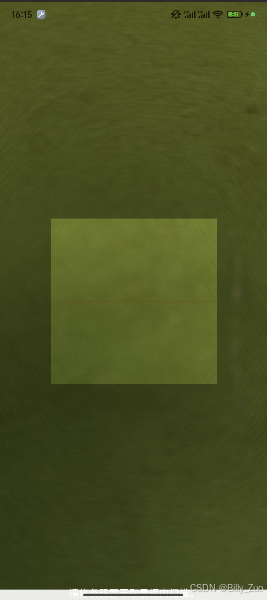
上面有提到DecoratedBarcodeView,主要的三个view:BarcodeView、ViewfinderView、TextView。这里对包括扫描框的ViewfinderView进行自定义。ViewfinderView的默认效果从演示效果图中可以看到是中间的一根红色线,渐隐渐现,扫描时在还能出现些许黄色的小圆点。

    这里我们要做的是去掉中间红色的线,换成我们绘制的扫描线,并在四个角绘制边角。这里我们的自定义view只需要继承原先的ViewfinderView,并重写onDraw(),去掉不需要的,绘制我们的需要的即可。
下面为CustomViewfinderView的全部代码:
class CustomViewfinderView(context: Context, attrs: AttributeSet?) : ViewfinderView(context, attrs) {
    /* ******************************************    边角线相关属性    ************************************************/ //"边角线长度/扫描边框长度"的占比 (比例越大,线越长)
    var mLineRate: Float = 0.1f

    //边角线厚度 (建议使用dp)
    var mLineDepth: Float = dp2px(4).toFloat()

    //边角线颜色
    var mLineColor: Int

    /* *******************************************    扫描线相关属性    ************************************************/ //扫描线起始位置
    var mScanLinePosition: Int = 0

    //扫描线厚度
    var mScanLineDepth: Float = dp2px(4).toFloat()

    //扫描线每次移动距离
    var mScanLineDy: Float = dp2px(3).toFloat()

    //渐变线
    var mLinearGradient: LinearGradient? = null

    //图形paint
    var mBitmapPaint: Paint

    ///颜色在渐变中所占比例,此处均衡渐变
    var mPositions: FloatArray = floatArrayOf(0f, 0.5f, 1f)

    //线性梯度各个位置对应的颜色值
    var mScanLineColor: IntArray = intArrayOf(0x00000000, Color.YELLOW, 0x00000000)

    //扫描框宽、高
    var mScanFrameWidth: Float
    var mScanFrameHeight: Float

    init {
        val typedArray = context.obtainStyledAttributes(attrs, R.styleable.CustomViewfinderView)
        mLineColor = typedArray.getColor(R.styleable.CustomViewfinderView_lineColor, Color.YELLOW)
        mScanLineColor[1] =
            typedArray.getColor(R.styleable.CustomViewfinderView_cornerColor, Color.YELLOW)
        mScanFrameWidth = typedArray.getDimension(
            R.styleable.CustomViewfinderView_scanFrameWidth,
            dp2px(160).toFloat()
        )
        mScanFrameHeight = typedArray.getDimension(
            R.styleable.CustomViewfinderView_scanFrameHeight,
            dp2px(160).toFloat()
        )
        typedArray.recycle()
        mBitmapPaint = Paint()
        mBitmapPaint.isAntiAlias = true
    }

    @SuppressLint("DrawAllocation")
    override fun onDraw(canvas: Canvas) {
        refreshSizes()
        if (framingRect == null || previewSize == null) {
            return
        }

        val frame = framingRect

        val width = width
        val height = height

        //绘制扫描框外部遮罩
        paint.color = if (resultBitmap != null) resultColor else maskColor
        canvas.drawRect(0f, 0f, width.toFloat(), frame.top.toFloat(), paint)
        canvas.drawRect(
            0f,
            frame.top.toFloat(),
            frame.left.toFloat(),
            (frame.bottom + 1).toFloat(),
            paint
        )
        canvas.drawRect(
            (frame.right + 1).toFloat(),
            frame.top.toFloat(),
            width.toFloat(),
            (frame.bottom + 1).toFloat(),
            paint
        )
        canvas.drawRect(0f, (frame.bottom + 1).toFloat(), width.toFloat(), height.toFloat(), paint)

        //绘制4个角
        paint.color = mLineColor
        canvas.drawRect(
            frame.left.toFloat(),
            frame.top.toFloat(),
            frame.left + frame.width() * mLineRate,
            frame.top + mLineDepth,
            paint
        )
        canvas.drawRect(
            frame.left.toFloat(),
            frame.top.toFloat(),
            frame.left + mLineDepth,
            frame.top + frame.height() * mLineRate,
            paint
        )

        canvas.drawRect(
            frame.right - frame.width() * mLineRate,
            frame.top.toFloat(),
            frame.right.toFloat(),
            frame.top + mLineDepth,
            paint
        )
        canvas.drawRect(
            frame.right - mLineDepth,
            frame.top.toFloat(),
            frame.right.toFloat(),
            frame.top + frame.height() * mLineRate,
            paint
        )

        canvas.drawRect(
            frame.left.toFloat(),
            frame.bottom - mLineDepth,
            frame.left + frame.width() * mLineRate,
            frame.bottom.toFloat(),
            paint
        )
        canvas.drawRect(
            frame.left.toFloat(),
            frame.bottom - frame.height() * mLineRate,
            frame.left + mLineDepth,
            frame.bottom.toFloat(),
            paint
        )

        canvas.drawRect(
            frame.right - frame.width() * mLineRate,
            frame.bottom - mLineDepth,
            frame.right.toFloat(),
            frame.bottom.toFloat(),
            paint
        )
        canvas.drawRect(
            frame.right - mLineDepth,
            frame.bottom - frame.height() * mLineRate,
            frame.right.toFloat(),
            frame.bottom.toFloat(),
            paint
        )


        if (resultBitmap != null) {
            // Draw the opaque result bitmap over the scanning rectangle
            paint.alpha = CURRENT_POINT_OPACITY
            canvas.drawBitmap(resultBitmap, null, frame, paint)
        } else {
            // 绘制渐变扫描线
            mScanLinePosition = (mScanLinePosition + mScanLineDy).toInt()
            if (mScanLinePosition >= frame.height()) {
                mScanLinePosition = 0
            }
            mLinearGradient = LinearGradient(
                frame.left.toFloat(),
                (frame.top + mScanLinePosition).toFloat(),
                frame.right.toFloat(),
                (frame.top + mScanLinePosition).toFloat(),
                mScanLineColor,
                mPositions,
                Shader.TileMode.CLAMP
            )
            paint.setShader(mLinearGradient)
            canvas.drawRect(
                frame.left.toFloat(),
                (frame.top + mScanLinePosition).toFloat(),
                frame.right.toFloat(),
                frame.top + mScanLinePosition + mScanLineDepth,
                paint
            )
            paint.setShader(null)


            //绘制资源图片扫描线
//            Rect lineRect = new Rect();
//            lineRect.left = frame.left;
//            lineRect.top = frame.top + mScanLinePosition;
//            lineRect.right = frame.right;
//            lineRect.bottom = frame.top + dp2px(6) + mScanLinePosition;
//            Bitmap bitmap = BitmapFactory.decodeResource(getResources(),R.drawable.img_line);
//            canvas.drawBitmap(bitmap, null, lineRect, mBitmapPaint);


            //============绘制扫描时小圆点,效果为默认=======================
            val scaleX = this.width / previewSize.width.toFloat()
            val scaleY = this.height / previewSize.height.toFloat()
            // draw the last possible result points
            if (!lastPossibleResultPoints.isEmpty()) {
                paint.alpha = CURRENT_POINT_OPACITY / 2
                paint.color = resultPointColor
                val radius = POINT_SIZE / 2.0f
                for (point in lastPossibleResultPoints) {
                    canvas.drawCircle(
                        (point.x * scaleX).toInt().toFloat(),
                        (point.y * scaleY).toInt().toFloat(),
                        radius, paint
                    )
                }
                lastPossibleResultPoints.clear()
            }

            // draw current possible result points
            if (!possibleResultPoints.isEmpty()) {
                paint.alpha = CURRENT_POINT_OPACITY
                paint.color = resultPointColor
                for (point in possibleResultPoints) {
                    canvas.drawCircle(
                        (point.x * scaleX).toInt().toFloat(),
                        (point.y * scaleY).toInt().toFloat(),
                        POINT_SIZE.toFloat(), paint
                    )
                }

                // swap and clear buffers
                val temp = possibleResultPoints
                possibleResultPoints = lastPossibleResultPoints
                lastPossibleResultPoints = temp
                possibleResultPoints.clear()
            }

            //============绘制扫描时小圆点,效果为默认 end=======================
        }

        //定时刷新扫描框
        postInvalidateDelayed(
            INT_ANIMATION_DELAY,
            frame.left - POINT_SIZE,
            frame.top - POINT_SIZE,
            frame.right + POINT_SIZE,
            frame.bottom + POINT_SIZE
        )
    }

    override fun refreshSizes() {
        if (cameraPreview == null) {
            return
        }
        //添加设置边框大小代码
        cameraPreview.framingRectSize =
            Size(mScanFrameWidth.toInt(), mScanFrameHeight.toInt())

        val framingRect = cameraPreview.framingRect
        val previewSize = cameraPreview.previewSize
        if (framingRect != null && previewSize != null) {
            this.framingRect = framingRect
            this.previewSize = previewSize
        }
    }

    private fun dp2px(dp: Int): Int {
        val density = context.resources.displayMetrics.density
        return (dp * density + 0.5f).toInt()
    }

    companion object {
        //重绘时间间隔
        const val INT_ANIMATION_DELAY: Long = 12
    }
}
代码中主要看onDraw(),里面的关键代码已添加注释,同时里面的扫描线可以替换成我们需要的图形,有需要打开onDraw中注释的代码即可
自定义的属性文件attrs.xml
<?xml version="1.0" encoding="utf-8"?>
<resources>
    <declare-styleable name="CustomViewfinderView">
        <attr format="color" name="lineColor"/><!--扫描线的颜色-->
        <attr format="color" name="cornerColor"/><!--四边角的颜色-->
        <attr format="dimension" name="scanFrameWidth"/><!--扫描框的宽度-->
        <attr format="dimension" name="scanFrameHeight"/><!--扫描框的高度-->
    </declare-styleable>
</resources>
使用方法
创建custom_barcode_scanner.xml
<?xml version="1.0" encoding="utf-8"?>
<merge xmlns:android="http://schemas.android.com/apk/res/android"
    xmlns:app="http://schemas.android.com/apk/res-auto">

    <com.journeyapps.barcodescanner.BarcodeView
        android:layout_width="match_parent"
        android:layout_height="match_parent"
        android:id="@+id/zxing_barcode_surface"/>

    <com.home.testzxing.CustomViewfinderView
        android:layout_width="match_parent"
        app:lineColor="#ff8100"
        app:cornerColor="#ff8100"
        app:scanFrameWidth="180dp"
        app:scanFrameHeight="180dp"
        android:layout_height="match_parent"
        android:id="@+id/zxing_viewfinder_view"/>

    <TextView android:id="@+id/zxing_status_view"
        android:layout_width="wrap_content"
        android:layout_height="wrap_content"
        android:layout_gravity="bottom|center_horizontal"
        android:background="@color/zxing_transparent"
        android:text="@string/zxing_msg_default_status"
        android:textColor="@color/zxing_status_text"/>
</merge>
里面就包含我们刚才提到的三个View,ViewfinderView替换成我们的CustomViewfinderView,另外这三个View的id不可改变
在DecoratedBarcodeView的布局文件中通过zxing_scanner_layout属性引入我们创建的xml
<?xml version="1.0" encoding="utf-8"?>
<androidx.constraintlayout.widget.ConstraintLayout xmlns:android="http://schemas.android.com/apk/res/android"
    xmlns:app="http://schemas.android.com/apk/res-auto"
    xmlns:tools="http://schemas.android.com/tools"
    android:id="@+id/main"
    android:layout_width="match_parent"
    android:layout_height="match_parent">

    <com.journeyapps.barcodescanner.DecoratedBarcodeView
       android:id="@+id/barcodeScanner"
        android:layout_width="match_parent"
        android:layout_height="match_parent"
        app:zxing_scanner_layout="@layout/custom_barcode_scanner"
        />


</androidx.constraintlayout.widget.ConstraintLayout>

二、使用华为统一扫码服务实现
华为统一扫码服务(Scan Kit)提供便捷的条形码和二维码扫描、解析、生成能力,帮助开发者快速构建应用内的扫码功能。
华为统一扫码服务(Scan Kit)官方地址:https://developer.huawei.com/consumer/cn/hms/huawei-scankit/
华为统一扫码服务(Scan Kit)和Zxing对照测试:https://developer.huawei.com/consumer/cn/forum/topic/0201248342859390343?fid=18%EF%BC%8C
2.1 引入依赖项
官方教程中【配置AppGallery Connect】步骤,如果应用无上架需求,可以忽略。
在项目的 build.gradle 里面添加引入依赖项
pluginManagement {
    repositories {
        maven { url=uri ("https://maven.aliyun.com/repository/releases")}
        maven { url=uri ("https://maven.aliyun.com/repository/google")}
        maven { url=uri ("https://maven.aliyun.com/repository/central")}
        maven { url=uri ("https://maven.aliyun.com/repository/gradle-plugin")}
        maven { url=uri ("https://maven.aliyun.com/repository/public")}
        google()
        mavenCentral()
        jcenter()
        gradlePluginPortal()
    }
}
dependencyResolutionManagement {
    repositoriesMode.set(RepositoriesMode.FAIL_ON_PROJECT_REPOS)
    repositories {
        maven { url=uri ("https://maven.aliyun.com/repository/releases")}
        maven { url=uri ("https://maven.aliyun.com/repository/google")}
        maven { url=uri ("https://maven.aliyun.com/repository/central")}
        maven { url=uri ("https://maven.aliyun.com/repository/gradle-plugin")}
        maven { url=uri ("https://maven.aliyun.com/repository/public")}
        google()
        jcenter()
        mavenCentral()
        maven { url = uri("https://jitpack.io") }

        //配置华为扫码 HMS Core SDK的Maven仓地址
        maven { url = uri("https://developer.huawei.com/repo/") }
    }
}
在Module的 build.gradle 里面添加引入依赖项
    //华为扫码库
    implementation("com.huawei.hms:scanplus:1.3.2.300")
2.2 扫码方式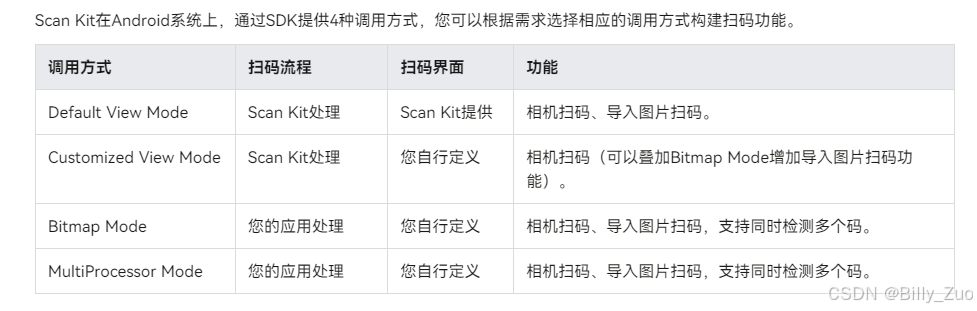
2.3 显示华为默认扫码页面
      val option =
            HmsScanAnalyzerOptions.Creator()
                .setHmsScanTypes(HmsScan.ALL_SCAN_TYPE)
                .create()
        ScanUtil.startScan(activity, Constants.SCAN_REQUEST_CODE, option)
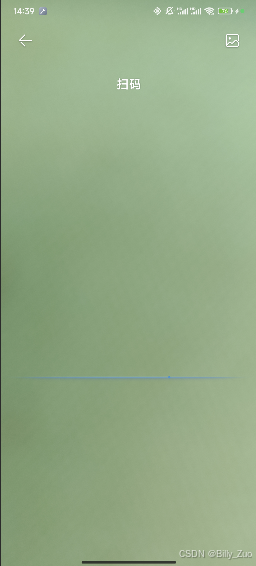
2.4 Customized View开发者自定义扫码界面
这里以Customized View开发者自定义扫码界面为例
activity_scan.xml页面布局
<?xml version="1.0" encoding="utf-8"?>
<RelativeLayout xmlns:android="http://schemas.android.com/apk/res/android"
    xmlns:my_view="http://schemas.android.com/apk/res-auto"
    android:layout_width="match_parent"
    android:layout_height="match_parent">

    <!-- customize layout needed by scankit for camera preview -->
    <FrameLayout
        android:id="@+id/rim1"
        android:layout_width="match_parent"
        android:layout_height="match_parent"
        android:background="#C0C0C0" />


    <!--  customize back button view -->
    <ImageView
        android:id="@+id/back_img"
        android:layout_width="48dp"
        android:layout_height="48dp"
        android:layout_alignParentStart="true"
        android:layout_alignParentLeft="true"
        android:layout_marginStart="12dp"
        android:layout_marginTop="4dp"
        android:gravity="center"
        android:padding="12dp"
        android:src="@drawable/ic_back" />


    <!--  customize scanning mask  -->
    <ImageView
        android:layout_width="match_parent"
        android:layout_height="match_parent"
        android:layout_centerInParent="true"
        android:layout_centerHorizontal="true"
        android:alpha="0.1"
        android:background="#FF000000" />

    <!--  customize scanning viewfinder  -->
    <ImageView
        android:id="@+id/scan_view_finder"
        android:layout_width="300dp"
        android:layout_height="300dp"
        android:layout_centerInParent="true"
        android:layout_centerHorizontal="true"
        android:background="@drawable/scanningframe" />


    <ImageView
        android:id="@+id/imgSelect"
        android:layout_width="40dp"
        android:layout_height="wrap_content"
        android:layout_alignParentTop="true"
        android:layout_alignParentEnd="true"
        android:layout_marginTop="15dp"
        android:layout_marginEnd="15dp"
        android:contentDescription="@null"
        android:src="@drawable/ic_select_img" />
</RelativeLayout>
ScanActivity
class ScanActivity : AppCompatActivity() {
    companion object {
        private const val SCAN_FRAME_SIZE = 300
    }

    private var remoteView: RemoteView? = null
    var mScreenWidth = 0
    var mScreenHeight = 0

    private val mBinding by lazy {
        ActivityScanBinding.inflate(layoutInflater)
    }

    override fun onCreate(savedInstanceState: Bundle?) {
        super.onCreate(savedInstanceState)
        setContentView(mBinding.root)

        //1.get screen density to caculate viewfinder's rect
        val dm = resources.displayMetrics
        //2.get screen size
        val density = dm.density
        mScreenWidth = dm.widthPixels
        mScreenHeight = dm.heightPixels
        val scanFrameSize = (SCAN_FRAME_SIZE * density)
        //3.calculate viewfinder's rect,it's in the middle of the layout
        //set scanning area(Optional, rect can be null,If not configure,default is in the center of layout)
        val rect = Rect()
        apply {
            rect.left = (mScreenWidth / 2 - scanFrameSize / 2).toInt()
            rect.right = (mScreenWidth / 2 + scanFrameSize / 2).toInt()
            rect.top = (mScreenHeight / 2 - scanFrameSize / 2).toInt()
            rect.bottom = (mScreenHeight / 2 + scanFrameSize / 2).toInt()
        }
        //initialize RemoteView instance, and set calling back for scanning result
        remoteView = RemoteView.Builder().setContext(this).setBoundingBox(rect)
            .setFormat(HmsScan.ALL_SCAN_TYPE).build()
        remoteView?.onCreate(savedInstanceState)
        remoteView?.setOnResultCallback { result ->
            if (result != null && result.isNotEmpty() && result[0] != null && !TextUtils.isEmpty(
                    result[0].getOriginalValue()
                )
            ) {
                val intent = Intent()
                intent.apply {
                    putExtra("scanResult", result[0])
                }
                setResult(Activity.RESULT_OK, intent)
                this.finish()
            }
        }
        // Add the defined RemoteView to the page layout.
        val params = FrameLayout.LayoutParams(
            LinearLayout.LayoutParams.MATCH_PARENT,
            LinearLayout.LayoutParams.MATCH_PARENT
        )
        mBinding.rim1.addView(remoteView, params)

        setOnClick()
    }

    private fun setOnClick() {
        mBinding.backImg.setOnClickListener{
//            finish()

            //控制闪光灯开启和关闭
            if (remoteView?.lightStatus == true) {
                remoteView?.switchLight()
                LogUtils.d("关闭闪光灯")
            } else {
                remoteView?.switchLight()
                LogUtils.d("打开闪光灯")
            }

        }
        mBinding.imgSelect.setOnClickListener {
            EasyPhotos.createAlbum(
                this, false, false,
                GlideEngine.getInstance()
            )
                .setFileProviderAuthority(BuildConfig.APPLICATION_ID)
                .setCount(1)
                .start(object : SelectCallback() {
                    override fun onResult(photos: ArrayList<Photo>?, isOriginal: Boolean) {
                        photos?.let {
                            val path = photos.first().path
                            if (TextUtils.isEmpty(path)) {
                                return
                            }
                            // Obtain the bitmap from the image path.
                            val bitmap = ScanUtil.compressBitmap(applicationContext, path)
                            // Call the decodeWithBitmap method to pass the bitmap.
                            val options =
                                HmsScanAnalyzerOptions.Creator()
                                    .setHmsScanTypes(HmsScan.ALL_SCAN_TYPE)
                                    .setPhotoMode(false)
                                    .create()
                            val result = ScanUtil.decodeWithBitmap(
                                applicationContext,
                                bitmap,
                                options
                            )
                            // Obtain the scanning result.
                            if (result != null && result.isNotEmpty()) {
                                val resultText = result.joinToString { it.originalValue }
                                Log.d("sTag", resultText)
                                Toast.makeText(
                                    applicationContext, resultText, Toast.LENGTH_SHORT
                                ).show()
                            }
                        }
                    }

                    override fun onCancel() {
                        Toast.makeText(
                            applicationContext,
                            "图片选取失败",
                            Toast.LENGTH_SHORT
                        )
                            .show()
                    }

                })
        }
    }

    //manage remoteView lifecycle
    override fun onStart() {
        super.onStart()
        remoteView?.onStart()
    }

    override fun onResume() {
        super.onResume()
        remoteView?.onResume()
    }

    override fun onPause() {
        super.onPause()
        remoteView?.onPause()
    }

    override fun onDestroy() {
        super.onDestroy()
        remoteView?.onDestroy()
    }

    override fun onStop() {
        super.onStop()
        remoteView?.onStop()
    }
}
三、使用三方库实现
使用三方库ZXingLite:https://github.com/jenly1314/ZXingLite
ZXingLite for Android 是ZXing的精简极速版,基于ZXing库优化扫码和生成二维码/条形码功能,扫码界面完全支持自定义;使用ZXingLite可快速实现扫码识别相关功能。
3.1 在Project的 build.gradle 或 setting.gradle 中添加远程仓库
repositories {
    //...
    mavenCentral()
}
在Module的 build.gradle 里面添加引入依赖项
implementation 'com.github.jenly1314:zxing-lite:3.2.0'
关于ZXingLite版本与编译的SDK版本要求
使用 v3.1.x 以上版本时,要求 compileSdkVersion >= 34
使用 v3.0.x 以上版本时,要求 compileSdkVersion >= 33
如果 compileSdkVersion < 33 请使用 v2.x版本
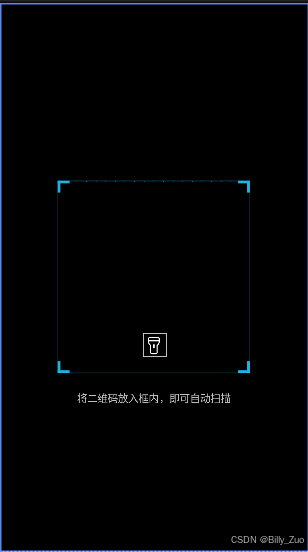
3.2 添加activity_scan_zxing_lite.xml页面布局
<?xml version="1.0" encoding="UTF-8"?>
<FrameLayout xmlns:android="http://schemas.android.com/apk/res/android"
    xmlns:app="http://schemas.android.com/apk/res-auto"
    android:layout_width="match_parent"
    android:layout_height="match_parent">

    <androidx.camera.view.PreviewView
        android:id="@+id/previewView"
        android:layout_width="match_parent"
        android:layout_height="match_parent" />

    <com.king.view.viewfinderview.ViewfinderView
        android:id="@+id/viewfinderView"
        android:layout_width="match_parent"
        android:layout_height="match_parent"
        app:vvLabelText="将二维码放入框内,即可自动扫描"
        app:vvLabelTextLocation="bottom"
        app:vvLaserStyle="grid" />

    <!--自定义扫描框-->
<!--    <com.kevin.sport.module.home.scan.QCfinderView-->
<!--        android:layout_width="match_parent"-->
<!--        android:layout_height="match_parent" />-->

    <ImageView
        android:id="@+id/ivFlashlight"
        android:layout_width="wrap_content"
        android:layout_height="wrap_content"
        android:layout_gravity="center"
        android:layout_marginTop="@dimen/camera_scan_flashlight_margin_top"
        android:contentDescription="@null"
        android:src="@drawable/camera_scan_flashlight_selector" />
</FrameLayout>
3.3 添加ScanZxingLiteActivity
class ScanZxingLiteActivity : BarcodeCameraScanActivity() {

    override fun initCameraScan(cameraScan: CameraScan<Result>) {
        super.initCameraScan(cameraScan)
        // 根据需要设置CameraScan相关配置
        cameraScan.setPlayBeep(true);
    }

    override fun createAnalyzer(): Analyzer<Result> {
        //初始化解码配置
        val decodeConfig =  DecodeConfig();
        decodeConfig.setHints(DecodeFormatManager.QR_CODE_HINTS)//如果只有识别二维码的需求,这样设置效率会更高,不设置默认为DecodeFormatManager.DEFAULT_HINTS
            .setFullAreaScan(false)//设置是否全区域识别,默认false
            .setAreaRectRatio(0.8f)//设置识别区域比例,默认0.8,设置的比例最终会在预览区域裁剪基于此比例的一个矩形进行扫码识别
            .setAreaRectVerticalOffset(0)//设置识别区域垂直方向偏移量,默认为0,为0表示居中,可以为负数
            .setAreaRectHorizontalOffset(0);//设置识别区域水平方向偏移量,默认为0,为0表示居中,可以为负数
        // BarcodeCameraScanActivity默认使用的MultiFormatAnalyzer,这里也可以改为使用QRCodeAnalyzer
        return  MultiFormatAnalyzer(decodeConfig);
    }

    override fun getLayoutId(): Int {
        //设置屏幕常亮
        window.addFlags(WindowManager.LayoutParams.FLAG_KEEP_SCREEN_ON)

        return R.layout.activity_scan_zxing_lite;
    }
    override fun onScanResultCallback(result: AnalyzeResult<Result>) {
        ToastUtils.showShort(result.result.text)
        // 停止分析
        cameraScan.setAnalyzeImage(false);
        // 返回结果
        val intent =  Intent();
        intent.putExtra(CameraScan.SCAN_RESULT, result.getResult().getText());
        setResult(Activity.RESULT_OK, intent);
        finish();
    }
}
清单文件AndroidManifest.xml中设置Activity主题
        <activity
            android:name=".module.home.scan.ScanZxingLiteActivity"
            android:exported="false"
            android:theme="@style/CameraScanTheme"/>
style
    <color name="camera_scan_navigation_bar_color">#00000000</color>
    <color name="camera_scan_status_bar_color">#00000000</color>
    <dimen name="camera_scan_flashlight_margin_top">90dp</dimen>
    <style name="CameraScanTheme" parent="Theme.AppCompat.Light.DarkActionBar">
        <item name="windowNoTitle">true</item>
        <item name="windowActionBar">false</item>
        <item name="colorPrimary">@android:color/black</item>
        <item name="colorPrimaryDark">@android:color/black</item>
        <item name="android:windowTranslucentStatus">true</item>
        <item name="android:windowTranslucentNavigation">true</item>
        <item name="android:statusBarColor">@color/camera_scan_status_bar_color</item>
        <item name="android:navigationBarColor">@color/camera_scan_navigation_bar_color</item>
    </style>
3.4 全屏扫二维码
class FullScreenQRCodeScanActivity : BarcodeCameraScanActivity() {

    override fun initUI() {
        super.initUI()

        // 设置取景框样式
        viewfinderView.setViewfinderStyle(ViewfinderView.ViewfinderStyle.POPULAR)

    }


    override fun initCameraScan(cameraScan: CameraScan<Result>) {
        super.initCameraScan(cameraScan)
        // 根据需要设置CameraScan相关配置
        cameraScan.setPlayBeep(true)
    }

    override fun createAnalyzer(): Analyzer<Result>? {
        // 初始化解码配置
        val decodeConfig = DecodeConfig().apply {
            // 如果只有识别二维码的需求,这样设置效率会更高,不设置默认为DecodeFormatManager.DEFAULT_HINTS
            hints = DecodeFormatManager.QR_CODE_HINTS
            // 设置是否全区域识别,默认false
            isFullAreaScan = true
        }
        // BarcodeCameraScanActivity默认使用的MultiFormatAnalyzer,这里可以改为使用QRCodeAnalyzer
        return QRCodeAnalyzer(decodeConfig)
    }

    /**
     * 布局ID;通过覆写此方法可以自定义布局
     *
     * @return 布局ID
     */
    override fun getLayoutId(): Int {
        return super.getLayoutId()
    }

    override fun onScanResultCallback(result: AnalyzeResult<Result>) {
        // 停止分析
        cameraScan.setAnalyzeImage(false)
        // 显示结果点
        displayResultPoint(result)

        // 返回结果
        val intent = Intent()
        intent.putExtra(CameraScan.SCAN_RESULT, result.result.text)
        setResult(Activity.RESULT_OK, intent)
        finish()
    }

    /**
     * 显示结果点
     */
    private fun displayResultPoint(result: AnalyzeResult<Result>) {
        var width = result.imageWidth
        var height = result.imageHeight

        val resultPoints = result.result.resultPoints
        val size = resultPoints.size
        if (size > 0) {
            var x = 0f
            var y = 0f
            resultPoints.forEach {
                x += it.x
                y += it.y
            }
            var centerX = x / size
            var centerY = y / size
            //将实际的结果中心点坐标转换成界面预览的坐标
            val point = PointUtils.transform(
        <activity
            android:name=".module.home.scan.FullScreenQRCodeScanActivity"
            android:exported="false"
            android:theme="@style/CameraScanTheme"/>

自定义全屏扫码布局activity_scan_zxing_full_custom.xml
<?xml version="1.0" encoding="UTF-8"?>
<FrameLayout xmlns:android="http://schemas.android.com/apk/res/android"
    xmlns:app="http://schemas.android.com/apk/res-auto"
    android:layout_width="match_parent"
    android:layout_height="match_parent">

    <androidx.camera.view.PreviewView
        android:id="@+id/previewView"
        android:layout_width="match_parent"
        android:layout_height="match_parent" />

    <com.king.view.viewfinderview.ViewfinderView
        android:id="@+id/viewfinderView"
        android:layout_width="match_parent"
        android:layout_height="match_parent" />

    <ImageView
        android:id="@+id/ivFlashlight"
        android:layout_width="wrap_content"
        android:layout_height="wrap_content"
        android:layout_gravity="center"
        android:layout_marginTop="@dimen/camera_scan_flashlight_margin_top"
        android:contentDescription="@null"
        android:src="@drawable/camera_scan_flashlight_selector" />
</FrameLayout>
修改getLayoutId()方法
    /**
     * 布局ID;通过覆写此方法可以自定义布局
     *
     * @return 布局ID
     */
    override fun getLayoutId(): Int {
        //设置屏幕常亮
        window.addFlags(WindowManager.LayoutParams.FLAG_KEEP_SCREEN_ON)
//        return super.getLayoutId()
        return R.layout.activity_scan_zxing_full_custom
    }


 847
847

 被折叠的 条评论
为什么被折叠?
被折叠的 条评论
为什么被折叠?
 到【灌水乐园】发言


