


Maven高级
1.多模块的拆分
拆分步骤
1.按照基本的三层进行拆分,再拆分其他的domain之类的次要类
2.每个模块都是Maven的web项目
3.在每个模块中删除对应不需要的坐标和配置文件(判断该类依赖谁)
4.maven可以依赖自定义工程(每个模块自己的坐标),当编译工程的时候要保证在仓库中有对应的模块(在自定义的模块中install一次)
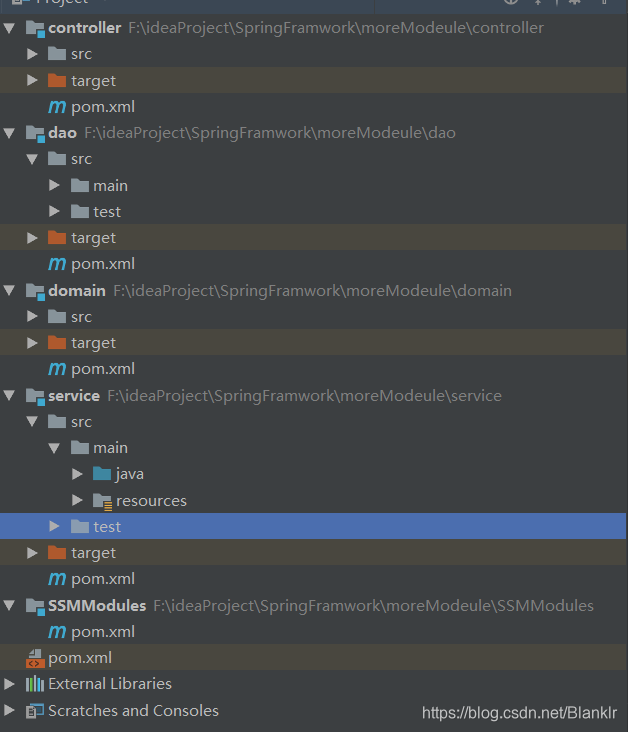
最终拆分之后的模块展示
额外拓展
1.在cmd中输出jps(需先安装JDK,并且配置环境)
作用 : 输出当前电脑正在使用的Java进程
2.在test中进行测试 优先读取测试中的resources文件,如果没有则找本模块中的文件
每一层的测试类都通过之后,就可以执行tomcat
注意:想要顺利开启tmcat,必须保证所有分支模块的jar包都已经被成功的install
并且controller层要打成war包
在进行测试的时候,对应的模块层级需要包含所有之前模块的xml文件
@RunWith(SpringJUnit4ClassRunner.class) //固定写法
//此处测试的是service层,所以需要导入dao,service两层的配置文件
@ContextConfiguration(locations = {"classpath:ApplicationContext-dao.xml","classpath:ApplicationContext-service.xml"})  //需要读入前面所需要用到的所有xml文件
@Component
public class MYbatisTest {
    @Autowired
    private StudentDao studentDao;

    @Autowired
    private StudentService studentService;

    //通过持久层测试
//    @Test
//    public void showT(){
//        List<Student> all = studentDao.findAll();
//        System.out.println(all);
//    }

    //通过业务层测试
    @Test
    public void showTstu(){
        List<Student> all = studentService.findAll();
        System.out.println(all);
    }

    //通过业务层测试
    @Test
    public void showTInstu(){
        Student student = new Student();
        student.setName("小花");
        GeneralResult result = studentService.insertStu(student);
//        GeneralResult result = studentService.deleteStu(494398858);
        System.out.println(result);
    }
}
2.聚合模块
作用:管理其他的分包,以达到批量项目的统一编译统一打包的目的【更好的使用生命周期来统一进行管理】
例如:如果有其中一个模块更改jar包,就可以通过聚合特性对四个都进行重新编译打包。避免jar包冲突和程序的莫名报错。
聚合步骤
1.创建父工程
2.定义为聚合模块
package标签 :pom(聚合) 如果没有写打包方式 默认jar
modules 标签:modelue(子模块)
3.聚合每一个子模块
是在POM文件的路径下开始的 所以要使用 …/
注意: 指定的每一个子模块的相对路径下 必须有一个pom才能被顺利引用
<?xml version="1.0" encoding="UTF-8"?>
<project xmlns="http://maven.apache.org/POM/4.0.0"
         xmlns:xsi="http://www.w3.org/2001/XMLSchema-instance"
         xsi:schemaLocation="http://maven.apache.org/POM/4.0.0 http://maven.apache.org/xsd/maven-4.0.0.xsd">
    <modelVersion>4.0.0</modelVersion>

    <groupId>com.itheima</groupId>
    <artifactId>SSMModules</artifactId>
    <version>1.0-SNAPSHOT</version>

    <!--定义该模块为聚合模块-->
    <packaging>pom</packaging>

    <!--把每一个模块聚合进来-->
    <modules>
        <module>../controller</module>
        <module>../dao</module>
        <module>../service</module>
        <module>../domain</module>
    </modules>
</project>
3.继承特性
作用: 制定统一的规则,子工程选择性使用 如依赖的版本等。
子工程
parent: 指定父依赖
relativepath :指定父的pom文件相对位置
<!--指定父工程-->
<parent>
    <groupId>com.itheima</groupId>
    <artifactId>SSMModules</artifactId>
    <version>1.0-SNAPSHOT</version>
    <!--指定父工程POM文件-->
    <relativePath>../SSMModules/pom.xml</relativePath>
</parent>
不可继承的资源
—artifactId 子工程自己的名字
<!--子工程-->
<artifactId>service</artifactId>
<!--指定打包方式-->
<packaging>jar</packaging>
父工程
可继承的资源
子必继承
dependencies
子可选继承
dependencyManagement 如果要指定版本等,那么子工程可以把版本的去掉。
注意:1.不管父类有没有依赖,子工程中也必须有对应的依赖包
2.即便有父工程,但是项目启动还是要使用controller来启动
build标签
子必继承
plugin
可选继承
pluginManagement
继承与聚合的共同使用(父工程)
<?xml version="1.0" encoding="UTF-8"?>
<project xmlns="http://maven.apache.org/POM/4.0.0"
         xmlns:xsi="http://www.w3.org/2001/XMLSchema-instance"
         xsi:schemaLocation="http://maven.apache.org/POM/4.0.0 http://maven.apache.org/xsd/maven-4.0.0.xsd">
    <modelVersion>4.0.0</modelVersion>

    <groupId>com.itheima</groupId>
    <artifactId>SSMModules</artifactId>
    <version>1.0-SNAPSHOT</version>

    <!--定义该模块为聚合模块-->
    <packaging>pom</packaging>

    <!--把每一个模块聚合进来-->
    <modules>
        <module>../controller</module>
        <module>../dao</module>
        <module>../service</module>
        <module>../domain</module>
    </modules>

    <!--定义父工程中的可选继承-->
    <dependencyManagement>
        <!--具体的依赖-->
        <dependencies>
            <!--添加自己的工程模块依赖-->
            <!--控制层-->
            <dependency>
                <groupId>com.itheima</groupId>
                <artifactId>controller</artifactId>
                <version>1.0-SNAPSHOT</version>
            </dependency>

            <!--持久层-->
            <dependency>
                <groupId>com.itheima</groupId>
                <artifactId>dao</artifactId>
                <version>1.0-SNAPSHOT</version>
            </dependency>

            <!--业务层-->
            <dependency>
                <groupId>com.itheima</groupId>
                <artifactId>service</artifactId>
                <version>1.0-SNAPSHOT</version>
            </dependency>

            <!--spring环境,提供给后面没有使用MVC的模块-->
            <dependency>
                <groupId>org.springframework</groupId>
                <artifactId>spring-context</artifactId>
                <version>5.1.9.RELEASE</version>
            </dependency>

            <!--springmvc环境-->
            <dependency>
                <groupId>org.springframework</groupId>
                <artifactId>spring-webmvc</artifactId>
                <version>5.1.9.RELEASE</version>
            </dependency>

            <!--mybatis环境-->
            <dependency>
                <groupId>org.mybatis</groupId>
                <artifactId>mybatis</artifactId>
                <version>3.5.3</version>
            </dependency>

            <!--mysql环境-->
            <dependency>
                <groupId>mysql</groupId>
                <artifactId>mysql-connector-java</artifactId>
                <version>5.1.47</version>
            </dependency>

            <!--spring整合jdbc-->
            <dependency>
                <groupId>org.springframework</groupId>
                <artifactId>spring-jdbc</artifactId>
                <version>5.1.9.RELEASE</version>
            </dependency>

            <!--spring整合mybatis-->
            <dependency>
                <groupId>org.mybatis</groupId>
                <artifactId>mybatis-spring</artifactId>
                <version>2.0.3</version>
            </dependency>

            <!--druid连接池-->
            <dependency>
                <groupId>com.alibaba</groupId>
                <artifactId>druid</artifactId>
                <version>1.1.16</version>
            </dependency>

            <!--分页插件坐标-->
            <dependency>
                <groupId>com.github.pagehelper</groupId>
                <artifactId>pagehelper</artifactId>
                <version>5.1.2</version>
            </dependency>

            <!--jackson相关坐标3个-->
            <dependency>
                <groupId>com.fasterxml.jackson.core</groupId>
                <artifactId>jackson-databind</artifactId>
                <version>2.9.0</version>
            </dependency>

            <!--servlet环境-->
            <dependency>
                <groupId>javax.servlet</groupId>
                <artifactId>javax.servlet-api</artifactId>
                <version>3.1.0</version>
                <scope>provided</scope>
            </dependency>


            <!--其他组件-->
            <!--junit单元测试-->
            <dependency>
                <groupId>junit</groupId>
                <artifactId>junit</artifactId>
                <version>4.12</version>
            </dependency>
            <!--spring整合junit-->
            <dependency>
                <groupId>org.springframework</groupId>
                <artifactId>spring-test</artifactId>
                <version>5.1.9.RELEASE</version>
            </dependency>
        </dependencies>

    </dependencyManagement>

    <build>
        <!--提供可选插件功能-->
        <pluginManagement>
            <!--设置插件-->
            <plugins>
                <!--具体的插件配置-->
                <plugin>
                    <groupId>org.apache.tomcat.maven</groupId>
                    <artifactId>tomcat7-maven-plugin</artifactId>
                    <version>2.1</version>
                    <configuration>
                        <port>80</port>
                        <path>/</path>
                    </configuration>
                </plugin>
            </plugins>
        </pluginManagement>
    </build>

</project>
4.属性
同样是在父工程中进行定义。
在父中配置properties标签 可以在该标签中自定义标签来全局使用 一般是配合继承一起使用
此处定义的变量名,能不能用,最终还是要看仓库里有没有对应的jar包
如果要修改工程中的版本。可以使用内置的变量${version}为子工程的版本进行定义。
每个项目的父工程 必须导入基本的三个属性 --内置属性
<?xml version="1.0" encoding="UTF-8"?>
<project xmlns="http://maven.apache.org/POM/4.0.0"
         xmlns:xsi="http://www.w3.org/2001/XMLSchema-instance"
         xsi:schemaLocation="http://maven.apache.org/POM/4.0.0 http://maven.apache.org/xsd/maven-4.0.0.xsd">
    <modelVersion>4.0.0</modelVersion>

    <groupId>com.itheima</groupId>
    <artifactId>SSMModules</artifactId>
    <version>1.0-SNAPSHOT</version>		//使用内置标签为每一个子模块的版本进行定义

    <!--定义该模块为聚合模块-->
    <packaging>pom</packaging>

    <!--把每一个模块聚合进来-->
    <modules>
        <module>../controller</module>
        <module>../dao</module>
        <module>../service</module>
        <module>../domain</module>
    </modules>

    <properties>
        			//基本的三个属性如下
        <project.build.sourceEncoding>UTF-8</project.build.sourceEncoding>
        <maven.compiler.source>1.8</maven.compiler.source>
        <maven.compiler.target>1.8</maven.compiler.target>
        <spring.version>5.1.9.RELEASE</spring.version>			//自定义标签
        <jdbc.url>jdbc:mysql://localhost:3306/db10</jdbc.url>   //自定义标签
    </properties>

    <!--定义父工程中的可选继承-->
    <dependencyManagement>
        <!--具体的依赖-->
        <dependencies>
            <!--添加自己的工程模块依赖-->
            <!--控制层-->
            <dependency>
                <groupId>com.itheima</groupId>
                <artifactId>controller</artifactId>
                <version>${version}</version> 		//内置标签
            </dependency>

            <!--持久层-->
            <dependency>
                <groupId>com.itheima</groupId>
                <artifactId>dao</artifactId>
                <version>${version}</version>    //内置标签
            </dependency>

            <!--业务层-->
            <dependency>
                <groupId>com.itheima</groupId>
                <artifactId>service</artifactId>
                <version>${version}</version>   //内置标签
            </dependency>

            <!--domain-->
            <dependency>
                 <groupId>com.itheima</groupId>
                 <artifactId>domain</artifactId>
                 <version>${version}</version>   //内置标签
            </dependency>


            <!--spring环境,提供给后面没有使用MVC的模块-->
            <dependency>
                <groupId>org.springframework</groupId>
                <artifactId>spring-context</artifactId>
                <version>${spring.version}</version>
            </dependency>

            <!--springmvc环境-->
            <dependency>
                <groupId>org.springframework</groupId>
                <artifactId>spring-webmvc</artifactId>
                <version>${spring.version}</version>
            </dependency>

            <!--mybatis环境-->
            <dependency>
                <groupId>org.mybatis</groupId>
                <artifactId>mybatis</artifactId>
                <version>3.5.3</version>
            </dependency>

            <!--mysql环境-->
            <dependency>
                <groupId>mysql</groupId>
                <artifactId>mysql-connector-java</artifactId>
                <version>5.1.47</version>
            </dependency>

            <!--spring整合jdbc-->
            <dependency>
                <groupId>org.springframework</groupId>
                <artifactId>spring-jdbc</artifactId>
                <version>${spring.version}</version>
            </dependency>

            <!--spring整合mybatis-->
            <dependency>
                <groupId>org.mybatis</groupId>
                <artifactId>mybatis-spring</artifactId>
                <version>2.0.3</version>
            </dependency>

            <!--druid连接池-->
            <dependency>
                <groupId>com.alibaba</groupId>
                <artifactId>druid</artifactId>
                <version>1.1.16</version>
            </dependency>

            <!--分页插件坐标-->
            <dependency>
                <groupId>com.github.pagehelper</groupId>
                <artifactId>pagehelper</artifactId>
                <version>5.1.2</version>
            </dependency>

            <!--jackson相关坐标3个-->
            <dependency>
                <groupId>com.fasterxml.jackson.core</groupId>
                <artifactId>jackson-databind</artifactId>
                <version>2.9.0</version>
            </dependency>

            <!--servlet环境-->
            <dependency>
                <groupId>javax.servlet</groupId>
                <artifactId>javax.servlet-api</artifactId>
                <version>3.1.0</version>
                <scope>provided</scope>
            </dependency>


            <!--其他组件-->
            <!--AOP-->
            <dependency>
                <groupId>org.aspectj</groupId>
                <artifactId>aspectjweaver</artifactId>
                <version>1.9.4</version>
            </dependency>

            <!--junit单元测试-->
            <dependency>
                <groupId>junit</groupId>
                <artifactId>junit</artifactId>
                <version>${spring.version}</version>
            </dependency>

            <!--spring整合junit-->
            <dependency>
                <groupId>org.springframework</groupId>
                <artifactId>spring-test</artifactId>
                <version>${spring.version}</version>
            </dependency>
        </dependencies>

    </dependencyManagement>
</project>
属性的6大类
1.自定义属性
<spring.version>5.1.9.RELEASE</spring.version>
2.内置属性
project.basedir怎么用?举例
<!--配置资源文件对应的信息-->
<resources>
    <resource>
        <directory>${project.basedir}/src/main/resources</directory>
        <filtering>true</filtering>
    </resource>
</resources>
3.settings系统属性
读取Maven的settings配置文件中的属性
例如: settings.locaRepository
读取java系统属性
在cmd中输入mvn help:system 可以获取系统属性或环境属性。
4.系统属性
通过如下格式 通过 = 的键值对来对应获取。
格式 ${key} 通过key 获取对应 value
5.环境变量
格式 ${env.key} 通过环境变量中的key 获取对应 value
比如可以获得 当前操作系统名称,字符集等。

5.版本管理
每个jar包都有自己的版本属性
snapshot 快照版本 表示该jar包还在开发中
release 完结版
6.资源配置
作用:对外部资源(如:jdbc.properties)进行统一配置
在build标签中配置 resource标签 :1.${project.basedir}/ 对当前模块都生效。
2.filtering 开启该设置,进行替换对应的外部文件
<?xml version="1.0" encoding="UTF-8"?>
<project xmlns="http://maven.apache.org/POM/4.0.0"
         xmlns:xsi="http://www.w3.org/2001/XMLSchema-instance"
         xsi:schemaLocation="http://maven.apache.org/POM/4.0.0 http://maven.apache.org/xsd/maven-4.0.0.xsd">
    <modelVersion>4.0.0</modelVersion>

    <groupId>com.itheima</groupId>
    <artifactId>SSMModules</artifactId>
    <version>1.0-SNAPSHOT</version>

    <!--定义该模块为聚合模块-->
    <packaging>pom</packaging>

    <!--把每一个模块聚合进来-->
    <modules>
        <module>../controller</module>
        <module>../dao</module>
        <module>../service</module>
        <module>../domain</module>
    </modules>


    <properties>
        <project.build.sourceEncoding>UTF-8</project.build.sourceEncoding>
        <maven.compiler.source>1.8</maven.compiler.source>
        <maven.compiler.target>1.8</maven.compiler.target>
        <spring.version>5.1.9.RELEASE</spring.version>
        <!--对外部文件设置变量名,以全局管理-->
        <jdbc.url>jdbc:mysql://localhost:3306/db10</jdbc.url>
    </properties>

	<build>
        <!--对外部配置文件设置过滤-->
           <resources>
            <resource>
                <directory>${project.basedir}/src/main/resources</directory>
                <filtering>true</filtering>
            </resource>
        </resources>
    </build>


</project>
jdbc.driver=com.mysql.jdbc.Driver
jdbc.url=${jdbc.url}   //使用自定义标签进行替换
jdbc.username=root
jdbc.password=root
7.多环境配置
为什么要使用多环境的配置?
在实际开发中,所有的配置都与开发环境是不一致的。
为了不经常对配置文件进行操作,就要使用多环境配置的方式提前对每一种环境都事先定义好。
两种方式
1.命令行 install -P 环境名 【tomcat7插件中配置】

2.在配置文件中配置默认选项。
可以配置多个环境,通过标签指定某一个为默认选择的环境
<profiles>
<!--生产环境-->
<profile>
<id>pro_1</id>
<properties>
<jdbc.url>jdbc:mysql://localhost:3306/db10</jdbc.url>
</properties>
<!--设置默认选项-->
<activation>
<activeByDefault>true</activeByDefault>
</activation>
</profile>
<!--调试环境-->
<profile>
<id>dev_1</id>
<properties>
<jdbc.url>jdbc:mysql://127.0.0.1/db10</jdbc.url>
</properties>
<!--<!–设置默认选项–>-->
<!--<activation>-->
<!--<activeByDefault>true</activeByDefault>-->
<!--</activation>-->
</profile>
</profiles>
8.跳过测试功能
1.指令
黑窗口中或terminal终端中 mvn 指令 -D skipTests
2.生命周期中屏蔽
idea中屏蔽
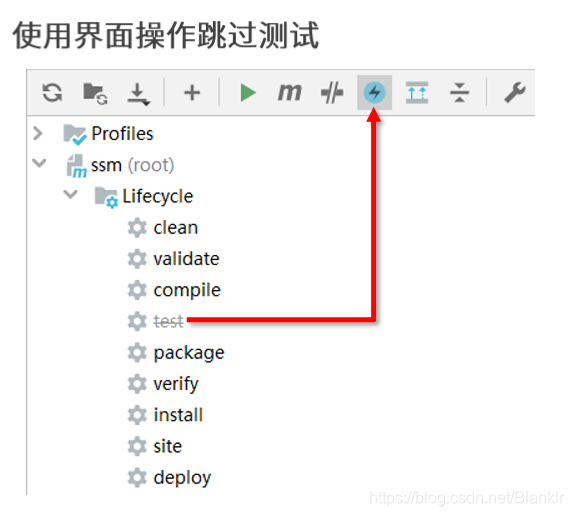
3.配置文件

9.私服
什么是私服?
是一个公司的内部服务器,整体管理jar包,所有人的可以把自己生成的jar包上传到私服,也可以从私服中获得对应需要的jar包,如果私服没有那么会连接到中央仓库进行下载再分发给其他服务器

私服的分类
宿主仓库
自己搭建的仓库称为宿主仓库,存储自主研发的jar包和收费jar包(收费的jar包在中央仓库不存在)
代理仓库
代理中央仓库,镜像地址,因为有些包是不允许存放进本地的,所有每次获取都需要从中央仓库中获取,为了方便断开与外界的联系,私服提供了一个代理仓库专门解决这种需求。
仓库组
由多个宿主仓库集成,是一个设计概念。为了避免多个版本之间jar包交叉使用,但是仓库又不同,带来的获取资源不方便的解决方案。

本地仓库访问私服
本地仓库从私服中获取资源
配置私服中的组地址,让私服从整个组中去搜索
本地仓库上传资源到私服
配置本地仓库地址,所有的东西最终都是在本地仓库存储


 253
253


 被折叠的 条评论
为什么被折叠?
被折叠的 条评论
为什么被折叠?
 到【灌水乐园】发言


