


一、简介及使用前配置
Retrofit 是对 OkHttp 的封装,是主流的网络框架。
Retrofit Github 主页:https://github.com/square/Retrofit
1. 使用 Retrofit 学习常见的网络请求
- GET 请求
- 普通 POST form 请求
Content- Type: application/x-www-form-urlencoded - 支持文件上传的 POST form 请求
Content-Type: multipart/form-data; boundary= - POST JSON 字符串
- 使用 Interceptor
- 添加 Header 信息
2. 注意事项
- 引入了 Retrofit 后,不需要单独再引入 OkHttp,否则可能版本冲突。
- 根据官网说明,需要使用 SDK21,JDK1.8. Retrofit requires at minimum Java 8+ or Android API 21+.
3. 添加依赖库以及网络权限
首先在 app/build.gradle 中添加依赖库 SDK 最低版本为21。(进入项目主页可以找到最新版本)
android {
	compileOptions {
        sourceCompatibility JavaVersion.VERSION_1_8
        targetCompatibility JavaVersion.VERSION_1_8
    }
}

dependencies {
	implementation'com.squareup.retrofit2:retrofit:2.9.0'
    implementation 'com.squareup.retrofit2:converter-gson:2.9.0'
    implementation'com.squareup.okhttp3:logging-interceptor:3.14.9'
}
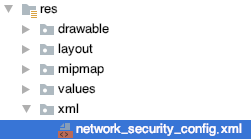
添加网络安全配置,在 res 目录下新建 xml 文件写入代码。以 Android 6.0(API 级别 23)及更低版本为目标平台的应用的默认配置如下所示。
具体可以参考:Android 开发者文档网络安全配置
<?xml version="1.0" encoding="utf-8"?>
<network-security-config>
    <base-config cleartextTrafficPermitted="true">
        <trust-anchors>
            <certificates src="system" />
            <certificates src="user" />
        </trust-anchors>
    </base-config>
</network-security-config>
在 AndroidManifest.xml 文件中声明权限
<uses-permission android:name="android.permission.INTERNET"/>

<application
	android:networkSecurityConfig="@xml/network_security_config">
</application>
4. 使用 Interceptor
Retrofit 也可以使用 Okhttp 中的 Interceptor 打印请求的Log信息。
查看 Retrofit 使用的 Okhttp 版本
打开 Externa Libraries
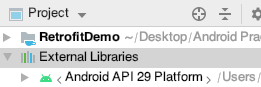
查找 Retrofit 库文件,打开目录

找到上级目录,查看 .pom 文件

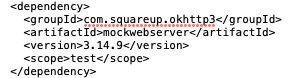
导入 logging-interceptor 依赖库,版本与 Retrofit 使用的 OkHttp 版本一致
dependencies {
	implementation("com.squareup.okhttp3:logging-interceptor:3.14.9")
}
在获取客户端时添加 Interceptor
//LoggingInterceptor配置
HttpLoggingInterceptor logging = new HttpLoggingInterceptor(new HttpLoggingInterceptor.Logger() {
    @Override
    public void log(@NotNull String s) {
        Log.d("Interceptor", s);
    }
});
//设置log等级
logging.setLevel(HttpLoggingInterceptor.Level.BODY);

client = new OkHttpClient.Builder()
	    //.connectTimeout()
        .addInterceptor(logging)//添加拦截器,打印请求结果
        .build();
二、Retrofit 的使用
Retrofit 使用流程
- 创建接口,接口中创建方法
- 方法以及参数上添加注解
- 通过 Retrofit 对象得到接口代理对象
- 通过代理对象执行
1. GET 请求
根据接收到的数据,创建一个 POJO 用于接收数据
public class Result {

    public int errorCode;
    public String errorMsg;
    public Data data;

	public static class Data{
        public String ip;
        public String params;
        public HashMap<String,String> headers;
    }

    public String toString() {
        return this.errorCode + ",\n"
                + this.data.ip + ",\n"
                + this.errorMsg + ",\n"
                + this.data.headers + ",\n"
                + this.data.params;
    }
}
创建一个接口,用于定义网络请求
public interface IApi {

	//这里的参数使用注解传递
    @GET("getmethod")
    //返回值为CAll,泛型参数传入POJO类
    Call<Result> get(@Query("username") String username);

	//可以定义多参数的方法
    //@GET("movie")
    //Call<Result> getType(@Query("type") String TypeName, @Query("title") String titleName);
}
创建一个 RetrofitImpl 类,用于创建 Retrofit 的实例
public class RetrofitImpl {

    private static RetrofitImpl sInstance = new RetrofitImpl();
    private Retrofit mRetrofit;

    public static RetrofitImpl getInstance() {
        return sInstance;
    }

    public static Retrofit getRetrofit() {
        return sInstance.mRetrofit;
    }

    private RetrofitImpl() {

        HttpLoggingInterceptor logging = new HttpLoggingInterceptor(new HttpLoggingInterceptor.Logger() {
            @Override
            public void log(String message) {
                Log.d("David", message);
            }
        });
        logging.setLevel(HttpLoggingInterceptor.Level.BODY);
        OkHttpClient okHttpClient = new OkHttpClient.Builder()
//                .connectTimeout()
                .addInterceptor(logging)
                .build();

        mRetrofit = new Retrofit.Builder()
                .client(okHttpClient)
                // 解析JSON数据
                .addConverterFactory(GsonConverterFactory.create())
                .baseUrl("http://www.imooc.com/api/okhttp/")
                .build();
    }
}
实现网络请求功能
//创建网络请求接口的实例,并调用接口中的方法获取 Call 对象
IApi api = RetrofitImpl.getRetrofit().create(IApi.class);
//进行网络请求
api.get("David").enqueue(new Callback<Result>() {
    @Override
    public void onResponse(Call<Result> call, Response<Result> response) {
        Result result = response.body();
        mTvContent.setText(result.toString());
    }

    @Override
    public void onFailure(Call<Result> call, Throwable t) {
        Toast.makeText(MainActivity.this, "网络错误", Toast.LENGTH_SHORT).show();
    }
});
根据上方的代码可知,Retrofit 会根据 baseUrl、 @GET 注解和 @Query 注解自动拼接成地址。
例如:http://www.imooc.com/api/okhttp/getmethod?username=David
2. POST/FormUrlEncoded 请求
添加 Header 信息
Retrofit 可以使用注解 @HEAD 来添加 Header 信息。
在 IApi 接口中定义 post 方法
@POST("postmethod")
@FormUrlEncoded
Call<Result> post(@Header("author") String author, @Field("username") String username);
IApi api = RetrofitImpl.getRetrofit().create(IApi.class);
api.post("author-david", "David").enqueue(new Callback<Result>() {
    @Override
    public void onResponse(Call<Result> call, Response<Result> response) {
        Result result = response.body();
        mTvContent.setText(result.toString());
    }

    @Override
    public void onFailure(Call<Result> call, Throwable t) {
        Toast.makeText(MainActivity.this, "网络错误", Toast.LENGTH_SHORT).show();
    }
});
3. POST/Multipart 请求
同样地,在 IApi 接口中定义 postMultipart 方法
@POST("postmethod")
@Multipart
Call<Result> postMultipart(@Header("author") String author,@Part("username") RequestBody username);
这里使用了 MediaType 方法,可以参考 MediaType 参数类型
纯文本:text/plain
html解析:text/html
json : application/json
xml : application/xml
png : image/png
jpg : image/jpeg
gif : imge/gif
IApi api = RetrofitImpl.getRetrofit().create(IApi.class);
MediaType mediaType = MediaType.get("text/plain; charset=utf-8");
RequestBody username = RequestBody.create(mediaType, "David");

api.postMultipart("author-david", username)
	.enqueue(new Callback<Result>() {
	    @Override
	    public void onResponse(Call<Result> call, Response<Result> response) {
	        Result result = response.body();
	        mTvContent.setText(result.toString());
	    }

	    @Override
	    public void onFailure(Call<Result> call, Throwable t) {
	        Toast.makeText(MainActivity.this, "网络错误", Toast.LENGTH_SHORT).show();
	    }
	});
4. POST/JSON 请求
在 IApi 接口中定义 postJson 方法
@POST("postjson")
Call<Result> postJson(@Header("author") String author,@Body RequestBody jsonBody);
IApi api = RetrofitImpl.getRetrofit().create(IApi.class);
MediaType mediaType = MediaType.get("application/json; charset=utf-8");
RequestBody username = RequestBody.create(mediaType,
	"{\"username\":\"David\",\"age\":22}");

api.postJson("author-david", username)
	.enqueue(new Callback<Result>() {
	    @Override
	    public void onResponse(Call<Result> call, Response<Result> response) {
	        Result result = response.body();
	        mTvContent.setText(result.toString());
	    }

	    @Override
	    public void onFailure(Call<Result> call, Throwable t) {
	        Toast.makeText(MainActivity.this, "网络错误", Toast.LENGTH_SHORT).show();
	    }
	});
三、所用注解的解释
Retrofit注解分为三类。分别是Http请求方法注解、标记类注解和参数类注解。
1.Http请求方式注解
8种:GET 、POST、 PUT、 DELETE、 HEAD、 PATCH、 OPTIONS 和 HTTP。前7中分别代表Http的请求方法,Http则可以替换以上7中,也可以拓展请求方法。
2.标记类注解
3种:FormUrlEncode、Multipart 和 Streaming。
3.参数类注解
10种:Header、Headers、Body、Path、Field、FieldMap、Part、PartMap、Query、QueryMap 和 URL。
详细可以参考:Retrofit 注解说明
参考学习文章:
Android 主流开源框架(四)Retrofit 使用详解


 711
711


 被折叠的 条评论
为什么被折叠?
被折叠的 条评论
为什么被折叠?
 到【灌水乐园】发言


