


Java多线程
1. 多线程的创建


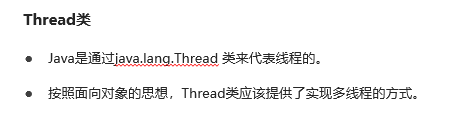
1.1 方式一:继承Thread类

/**
 目标:多线程的创建方式一:继承Thread类实现。
 */
public class Test {
    public static void main(String[] args) {
        // 3、new一个新线程对象
        Thread t = new MyThread();
        // 4、调用start方法启动线程(执行的还是run方法)
        t.start();

        for (int i = 0; i < 5; i++) {
            System.out.println("主线程执行输出:" + i);
        }

    }
}

/**
 1、定义一个线程类继承Thread类
 */
class MyThread extends Thread{
    /**
     2、重写run方法,里面是定义线程以后要干啥
     */
    @Override
    public void run() {
        for (int i = 0; i < 5; i++) {
            System.out.println("子线程执行输出:" + i);
        }
    }
}
/** 输出结果如下:
 子线程执行输出:0
 主线程执行输出:0
 子线程执行输出:1
 主线程执行输出:1
 子线程执行输出:2
 主线程执行输出:2
 子线程执行输出:3
 主线程执行输出:3
 子线程执行输出:4
 主线程执行输出:4
 */

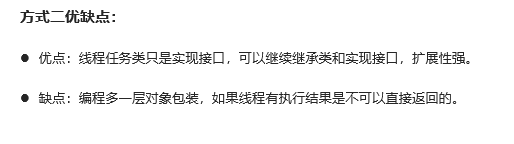
1.2 实现Runnable接口

/**
 目标:学会线程的创建方式二,理解它的优缺点。
 */
public class Test {
    public static void main(String[] args) {
        // 3、创建一个任务对象
        Runnable target = new MyRunnable();
        // 4、把任务对象交给Thread处理
        Thread t = new Thread(target);
        // Thread t = new Thread(target, "1号");
        // 5、启动线程
        t.start();

        for (int i = 0; i < 10; i++) {
            System.out.println("主线程执行输出:" + i);
        }
    }
}

/**
 1、定义一个线程任务类 实现Runnable接口
 */
class MyRunnable implements Runnable {
    /**
     2、重写run方法,定义线程的执行任务的
     */
    @Override
    public void run() {
        for (int i = 0; i < 10; i++) {
            System.out.println("子线程执行输出:" + i);
        }
    }
}
/** 输出结果如下:
 主线程执行输出:0
 子线程执行输出:0
 主线程执行输出:1
 子线程执行输出:1
 主线程执行输出:2
 子线程执行输出:2
 主线程执行输出:3
 子线程执行输出:3
 主线程执行输出:4
 子线程执行输出:4
 主线程执行输出:5
 子线程执行输出:5
 主线程执行输出:6
 主线程执行输出:7
 主线程执行输出:8
 主线程执行输出:9
 子线程执行输出:6
 子线程执行输出:7
 子线程执行输出:8
 子线程执行输出:9
 */

/**
 目标:学会线程的创建方式二(匿名内部类方式实现,语法形式)
 */
public class Test {
    public static void main(String[] args) {
        Runnable target = new Runnable() {
            @Override
            public void run() {
                for (int i = 0; i < 3; i++) {
                    System.out.println("子线程1执行输出:" + i);
                }
            }
        };
        Thread t = new Thread(target);
        t.start();

        new Thread(new Runnable() {
            @Override
            public void run() {
                for (int i = 0; i < 3; i++) {
                    System.out.println("子线程2执行输出:" + i);
                }
            }
        }).start();

        new Thread(() -> {
            for (int i = 0; i < 3; i++) {
                System.out.println("子线程3执行输出:" + i);
            }
        }).start();

        for (int i = 0; i < 3; i++) {
            System.out.println("主线程执行输出:" + i);
        }
    }
}
/** 输出结果如下:
 子线程1执行输出:0
 子线程3执行输出:0
 主线程执行输出:0
 子线程2执行输出:0
 主线程执行输出:1
 子线程3执行输出:1
 子线程1执行输出:1
 子线程3执行输出:2
 主线程执行输出:2
 子线程2执行输出:1
 子线程1执行输出:2
 子线程2执行输出:2
 */
1.3 JDK 5.0新增:实现Callable接口


import java.util.concurrent.Callable;
import java.util.concurrent.FutureTask;

/**
 目标:学会线程的创建方式三:实现Callable接口,结合FutureTask完成。
 */
public class Test {
    public static void main(String[] args) {
        // 3、创建Callable任务对象
        Callable<String> call = new MyCallable(100);
        // 4、把Callable任务对象 交给 FutureTask 对象
        //  FutureTask对象的作用1: 是Runnable的对象(实现了Runnable接口),可以交给Thread了
        //  FutureTask对象的作用2: 可以在线程执行完毕之后通过调用其get方法得到线程执行完成的结果
        FutureTask<String> f1 = new FutureTask<>(call);
        // 5、交给线程处理
        Thread t1 = new Thread(f1);
        // 6、启动线程
        t1.start();


        Callable<String> call2 = new MyCallable(200);
        FutureTask<String> f2 = new FutureTask<>(call2);
        Thread t2 = new Thread(f2);
        t2.start();

        try {
            // 如果f1任务没有执行完毕,这里的代码会等待,直到线程1跑完才提取结果。
            String rs1 = f1.get();
            System.out.println("第一个结果:" + rs1);
        } catch (Exception e) {
            e.printStackTrace();
        }

        try {
            // 如果f2任务没有执行完毕,这里的代码会等待,直到线程2跑完才提取结果。
            String rs2 = f2.get();
            System.out.println("第二个结果:" + rs2);
        } catch (Exception e) {
            e.printStackTrace();
        }
    }
}

/**
 1、定义一个任务类 实现Callable接口  应该申明线程任务执行完毕后的结果的数据类型
 */
class MyCallable implements Callable<String>{
    private int n;
    public MyCallable(int n) {
        this.n = n;
    }

    /**
     2、重写call方法(任务方法)
     */
    @Override
    public String call() throws Exception {
        int sum = 0;
        for (int i = 1; i <= n ; i++) {
            sum += i;
        }
        return "子线程执行的结果是:" + sum;
    }
}
/** 输出结果如下:
 第一个结果:子线程执行的结果是:5050
 第二个结果:子线程执行的结果是:20100
 */

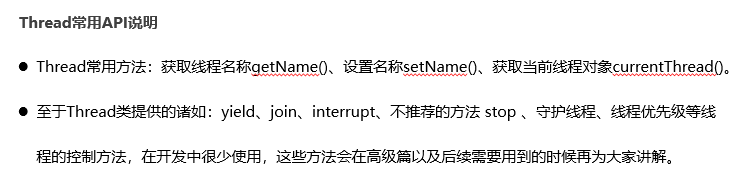
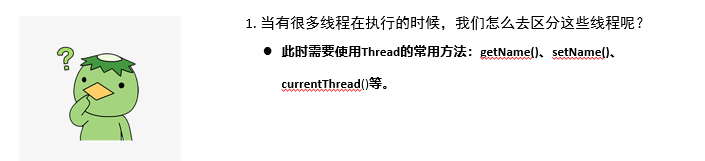
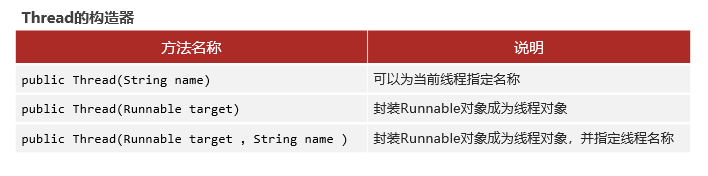
2. Thread的常用方法


public class Test {
    // main方法是由主线程负责调度的
    public static void main(String[] args) {
        Thread t1 = new MyThread("1号");
        // t1.setName("1号");
        t1.start();
        System.out.println(t1.getName());

        Thread t2 = new MyThread("2号");
        // t2.setName("2号");
        t2.start();
        System.out.println(t2.getName());

        // 哪个线程执行它,它就得到哪个线程对象(当前线程对象)
        // 主线程的名称就叫main
        Thread m = Thread.currentThread();
        System.out.println(m.getName());
        m.setName("最牛的线程");

        for (int i = 0; i < 5; i++) {
            System.out.println( m.getName() + "输出:" + i);
        }
    }
}
/**
 结果如下:
 1号
 2号
 main
 最牛的线程输出:0
 2号输出:0
 1号输出:0
 2号输出:1
 最牛的线程输出:1
 2号输出:2
 1号输出:1
 2号输出:3
 最牛的线程输出:2
 2号输出:4
 1号输出:2
 最牛的线程输出:3
 1号输出:3
 1号输出:4
 最牛的线程输出:4
 */

public class MyThread extends Thread{
    public MyThread() {
    }

    public MyThread(String name) {
        // 为当前线程对象设置名称,送给父类的有参数构造器初始化名称
        super(name);
    }

    @Override
    public void run() {
        for (int i = 0; i < 5; i++) {
            System.out.println( Thread.currentThread().getName() + "输出:" + i);
        }
    }
}

public class Test {
    // main方法是由主线程负责调度的
    public static void main(String[] args) throws Exception {
        for (int i = 1; i <= 5; i++) {
            System.out.println("输出:" + i);
            if(i == 3){
                // 让当前线程进入休眠状态
                // 段子:项目经理让我加上这行代码,如果用户愿意交钱,我就注释掉。
                Thread.sleep(3000);
            }
        }
    }
}
/**
 输出:1
 输出:2
 输出:3
 (过了3秒)
 输出:4
 输出:5
 */
3. 线程安全
3.1 概述


3.2 线程安全问题案例模拟

public class Test {
    public static void main(String[] args) {
        // 1、定义线程类,创建一个共享的账户对象
        Account acc = new Account("ICBC-111", 100000);

        // 2、创建2个线程对象,代表小明和小红同时进来了。
        new DrawThread(acc, "小明").start();
        new DrawThread(acc, "小红").start();
    }
}
/**
 小红来取钱成功,吐出:100000.0
 小明来取钱成功,吐出:100000.0
 小明取钱后剩余:-100000.0
 小红取钱后剩余:0.0
 */

/**
 取钱的线程类
 */
public class DrawThread extends Thread {
    // 接收处理的账户对象
    private Account acc;
    public DrawThread(Account acc,String name){
        super(name);
        this.acc = acc;
    }
    @Override
    public void run() {
        // 小明 小红:取钱
        acc.drawMoney(100000);
    }
}

public class Account {
    private String cardId;
    private double money; // 账户的余额

    public Account(){}

    public Account(String cardId, double money) {
        this.cardId = cardId;
        this.money = money;
    }

	/**
	 小明 小红
	 */
	public void drawMoney(double money) {
	    // 0、先获取是谁来取钱,线程的名字就是人名
	    String name = Thread.currentThread().getName();
	    // 1、判断账户是否够钱
	    if(this.money >= money){
	        // 2、取钱
	        System.out.println(name + "来取钱成功,吐出:" + money);
	        // 3、更新余额
	        this.money -= money;
	        System.out.println(name + "取钱后剩余:" + this.money);
	    }else {
	        // 4、余额不足
	        System.out.println(name +"来取钱,余额不足!");
	    }

	}

	public String getCardId() {
	    return cardId;
	}

	public void setCardId(String cardId) {
	    this.cardId = cardId;
	}

	public double getMoney() {
	    return money;
	}

	public void setMoney(double money) {
	    this.money = money;
	}

}
4. 线程同步
4.1 概述


4.2 方式一:同步代码块

public class Test {
    public static void main(String[] args) {
        // 测试线程安全问题
        // 1、创建一个共享的账户对象。
        Account acc = new Account("ICBC-111" , 100000);

        // 2、创建2个线程对象,操作同一个账户对象
        new DrawThread(acc, "小明").start();
        new DrawThread(acc,"小红").start();
    }
}
/**
 小明来取钱,吐出:100000.0
 小明取钱后,余额剩余:0.0
 小红来取钱,余额不足!
 */

/**
 线程类
 */
public class DrawThread extends Thread{
    private Account acc;
    public DrawThread(Account acc, String name){
        super(name);
        this.acc = acc;
    }

    @Override
    public void run() {
        // 小明 小红  : acc
        acc.drawMoney(100000);
    }
}

/**
 账户类:余额,卡号
 */
public class Account {
    private String cardId;
    private double money; // 余额 关键信息

    public Account() {}

    public Account(String cardId, double money) {
        this.cardId = cardId;
        this.money = money;
    }

    public String getCardId() {
        return cardId;
    }

    public void setCardId(String cardId) {
        this.cardId = cardId;
    }

    public double getMoney() {
        return money;
    }

    public void setMoney(double money) {
        this.money = money;
    }

    /** 静态方法使用字节码(类名.class)对象作为锁对象
    // 100个线程
    public static void run(){
        synchronized (Account.class){

        }
    }
     */

    /**
     小明 小红
     */
    public void drawMoney(double money) {
        // 1、拿到是谁来取钱
        String name = Thread.currentThread().getName();
        // 同步代码块 快捷键:选中代码块->Ctrl+Alt+T(我电脑不行,改成Alt+Y)->9
        // this == acc 共享账户
        synchronized (this) {
            // 2、判断余额是否足够
            if(this.money >= money){
                // 钱够了
                System.out.println(name+"来取钱,吐出:" + money);
                // 更新余额
                this.money -= money;
                System.out.println(name+"取钱后,余额剩余:" + this.money);
            }else{
                // 3、余额不足
                System.out.println(name+"来取钱,余额不足!");
            }
        }
    }
}

4.3 方式二:同步方法


public class Test {
    public static void main(String[] args) {
        // 测试线程安全问题
        // 1、创建一个共享的账户对象。
        Account acc = new Account("ICBC-111" , 100000);

        // 2、创建2个线程对象,操作同一个账户对象
        new DrawThread(acc, "小明").start();
        new DrawThread(acc,"小红").start();
    }
}
/**
 小明来取钱,吐出:100000.0
 小明取钱后,余额剩余:0.0
 小红来取钱,余额不足!
 */

/**
    账户类:余额,卡号
 */
public class Account {
    private String cardId;
    private double money; // 余额 关键信息

    public Account() {
    }

    public Account(String cardId, double money) {
        this.cardId = cardId;
        this.money = money;
    }

    public String getCardId() {
        return cardId;
    }

    public void setCardId(String cardId) {
        this.cardId = cardId;
    }

    public double getMoney() {
        return money;
    }

    public void setMoney(double money) {
        this.money = money;
    }

    /**
      小明 小红
       this == acc
     */
    public synchronized void drawMoney(double money) {
        // 1、拿到是谁来取钱
        String name = Thread.currentThread().getName();
        // 2、判断余额是否足够
        // 小明  小红
        if(this.money >= money){
            // 钱够了
            System.out.println(name+"来取钱,吐出:" + money);
            // 更新余额
            this.money -= money;
            System.out.println(name+"取钱后,余额剩余:" + this.money);
        }else{
            // 3、余额不足
            System.out.println(name+"来取钱,余额不足!");
        }
    }
}
4.4 方式三:Lock锁

public class Test {
    public static void main(String[] args) {
        // 测试线程安全问题
        // 1、创建一个共享的账户对象。
        Account acc = new Account("ICBC-111" , 100000);

        // 2、创建2个线程对象,操作同一个账户对象
        new DrawThread(acc, "小明").start();
        new DrawThread(acc,"小红").start();
    }
}
/**
 小明来取钱,吐出:100000.0
 小明取钱后,余额剩余:0.0
 小红来取钱,余额不足!
 */

/**
 账户类:余额,卡号
 */
public class Account {
    private String cardId;
    private double money; // 余额 关键信息
    // final修饰后:锁对象是唯一和不可替换的,非常专业
    private final Lock lock = new ReentrantLock();

    public Account() {
    }

    public Account(String cardId, double money) {
        this.cardId = cardId;
        this.money = money;
    }

    public String getCardId() {
        return cardId;
    }

    public void setCardId(String cardId) {
        this.cardId = cardId;
    }

    public double getMoney() {
        return money;
    }

    public void setMoney(double money) {
        this.money = money;
    }

    /**
     小明 小红
     */
    public void drawMoney(double money) {
        // 1、拿到是谁来取钱
        String name = Thread.currentThread().getName();
        // 2、判断余额是否足够
        // 小明  小红
        lock.lock(); // 上锁
        try {
            if(this.money >= money){
                // 钱够了
                System.out.println(name+"来取钱,吐出:" + money);
                // 更新余额
                this.money -= money;
                System.out.println(name+"取钱后,余额剩余:" + this.money);
            }else{
                // 3、余额不足
                System.out.println(name+"来取钱,余额不足!");
            }
        } finally {
            lock.unlock(); // 解锁
        }
    }
}
5. 线程通信


public class Test {
    public static void main(String[] args) {
        // 1、生产者线程:负责不断接收打进来的电话
        CallThread call = new CallThread();
        call.start();

        // 2、消费者线程:客服,每个客服每次接听一个电话
        ReceiveThread r1 = new ReceiveThread();
        r1.start();
    }
}
/**
 完毕了~~~~~
 成功接入一个用户,等待分发~~~~
 Thread-1此电话已经分发给客服并接听完毕了~~~~~
 成功接入一个用户,等待分发~~~~
 Thread-1此电话已经分发给客服并接听完毕了~~~~~
 成功接入一个用户,等待分发~~~~
 Thread-1此电话已经分发给客服并接听完毕了~~~~~
 */

public class CallSystem {
    // 定义一个变量记录当前呼入进来的电话。
    public static int number = 0; // 最多只接听一个。

    /* 接入电话
     */
    public synchronized static void call() {
        try {
            number++;
            System.out.println("成功接入一个用户,等待分发~~~~");

            // 唤醒别人 : 1个
            CallSystem.class.notify();
            // 让当前线程对象进入等待状态。
            CallSystem.class.wait();

        } catch (InterruptedException e) {
            e.printStackTrace();
        }
    }

    /**
     分发电话
     */
    public synchronized static void receive() {
        try {
            String name = Thread.currentThread().getName();
            if(number == 1){
                System.out.println(name + "此电话已经分发给客服并接听完毕了~~~~~");
                number--;
                // 唤醒别人 : 1个
                CallSystem.class.notify();
                CallSystem.class.wait(); // 让当前线程等待
            }else {
                // 唤醒别人 : 1个
                CallSystem.class.notify();
                CallSystem.class.wait(); // 让当前线程等待
            }
        } catch (InterruptedException e) {
            e.printStackTrace();
        }
    }
}

public class CallThread extends Thread{
    @Override
    public void run() {
        // 不断的打入电话
        while (true){
            CallSystem.call();
        }
    }
}

public class ReceiveThread extends Thread{
    @Override
    public void run() {
        while (true){
            CallSystem.receive();
        }
    }
}
6. 线程池 (重点)
6.1 概述


6.2 线程池实现的API、参数说明


6.3 线程池处理Runnable任务


public class Test {
    public static void main(String[] args) {
        // 1、创建线程池对象
        /** ThreadPoolExecutor构造器的参数
                 public ThreadPoolExecutor(int corePoolSize,
                 int maximumPoolSize,
                 long keepAliveTime,
                 TimeUnit unit,
                 BlockingQueue<Runnable> workQueue,
                 ThreadFactory threadFactory,
                 RejectedExecutionHandler handler)
         */
        ExecutorService pool = new ThreadPoolExecutor(3, 5 ,
                6, TimeUnit.SECONDS, new ArrayBlockingQueue<>(5) , Executors.defaultThreadFactory(),
                new ThreadPoolExecutor.AbortPolicy() );

        // 2、给任务线程池处理。
        Runnable target = new MyRunnable();
        pool.execute(target);
        pool.execute(target);
        pool.execute(target);

        pool.execute(target);
        pool.execute(target);
        pool.execute(target);
        pool.execute(target);
        pool.execute(target);

        // 创建临时线程
        pool.execute(target);
        pool.execute(target);
        // 不创建,拒绝策略被触发!!!
        // pool.execute(target);

        // 关闭线程池(开发中一般不会使用)。
        // pool.shutdownNow(); // 立即关闭,即使任务没有完成,会丢失任务的!
        pool.shutdown(); // 会等待全部任务执行完毕之后再关闭(建议使用的)
    }
}
/**
 pool-1-thread-3输出了:HelloWorld ==> 0
 pool-1-thread-1输出了:HelloWorld ==> 0
 pool-1-thread-5输出了:HelloWorld ==> 0
 pool-1-thread-2输出了:HelloWorld ==> 0
 pool-1-thread-4输出了:HelloWorld ==> 0
 pool-1-thread-2输出了:HelloWorld ==> 1
 pool-1-thread-1输出了:HelloWorld ==> 1
 pool-1-thread-3输出了:HelloWorld ==> 1
 pool-1-thread-1输出了:HelloWorld ==> 2
 pool-1-thread-2输出了:HelloWorld ==> 2
 pool-1-thread-5输出了:HelloWorld ==> 1
 pool-1-thread-4输出了:HelloWorld ==> 1
 pool-1-thread-5输出了:HelloWorld ==> 2
 pool-1-thread-4输出了:HelloWorld ==> 2
 pool-1-thread-2输出了:HelloWorld ==> 3
 pool-1-thread-1输出了:HelloWorld ==> 3
 pool-1-thread-3输出了:HelloWorld ==> 2
 pool-1-thread-1输出了:HelloWorld ==> 4
 pool-1-thread-2输出了:HelloWorld ==> 4
 pool-1-thread-4输出了:HelloWorld ==> 3
 pool-1-thread-5输出了:HelloWorld ==> 3
 pool-1-thread-5输出了:HelloWorld ==> 4
 pool-1-thread-4输出了:HelloWorld ==> 4
 pool-1-thread-3输出了:HelloWorld ==> 3
 pool-1-thread-3输出了:HelloWorld ==> 4
 pool-1-thread-1本任务与线程绑定了,线程进入休眠了~~~
 pool-1-thread-5本任务与线程绑定了,线程进入休眠了~~~
 pool-1-thread-2本任务与线程绑定了,线程进入休眠了~~~
 pool-1-thread-4本任务与线程绑定了,线程进入休眠了~~~
 pool-1-thread-3本任务与线程绑定了,线程进入休眠了~~~
 */

public class MyRunnable implements Runnable{
    @Override
    public void run() {
        for (int i = 0; i < 5; i++) {
            System.out.println(Thread.currentThread().getName() + "输出了:HelloWorld ==> "  + i);
        }
        try {
            System.out.println(Thread.currentThread().getName() + "本任务与线程绑定了,线程进入休眠了~~~");
            Thread.sleep(10000000);
        } catch (Exception e) {
            e.printStackTrace();
        }
    }
}
6.4 线程池处理Callable任务

public class Test {
    public static void main(String[] args) throws Exception {
        // 1、创建线程池对象
        /**
         public ThreadPoolExecutor(int corePoolSize,
         int maximumPoolSize,
         long keepAliveTime,
         TimeUnit unit,
         BlockingQueue<Runnable> workQueue,
         ThreadFactory threadFactory,
         RejectedExecutionHandler handler)
         */
        ExecutorService pool = new ThreadPoolExecutor(3, 5 ,
                6, TimeUnit.SECONDS, new ArrayBlockingQueue<>(5) , Executors.defaultThreadFactory(),
                new ThreadPoolExecutor.AbortPolicy() );

        // 2、给任务线程池处理。
        Future<String> f1 = pool.submit(new MyCallable(100));
        Future<String> f2 = pool.submit(new MyCallable(200));
        Future<String> f3 = pool.submit(new MyCallable(300));
        Future<String> f4 = pool.submit(new MyCallable(400));
        Future<String> f5 = pool.submit(new MyCallable(500));

        System.out.println(f1.get());
        System.out.println(f2.get());
        System.out.println(f3.get());
        System.out.println(f4.get());
        System.out.println(f5.get());
    }
}
/**
 pool-1-thread-1执行 1-100的和,结果是:5050
 pool-1-thread-2执行 1-200的和,结果是:20100
 pool-1-thread-3执行 1-300的和,结果是:45150
 pool-1-thread-3执行 1-400的和,结果是:80200
 pool-1-thread-2执行 1-500的和,结果是:125250
 */

public class MyCallable implements Callable<String> {
    private int n;
    public MyCallable(int n) {
        this.n = n;
    }

    /**
     2、重写call方法(任务方法)
     */
    @Override
    public String call() throws Exception {
        int sum = 0;
        for (int i = 1; i <= n ; i++) {
            sum += i;
        }
        return Thread.currentThread().getName()
                + "执行 1-" + n+ "的和,结果是:" + sum;
    }
}
6.5 Executors工具类实现线程池

public class Test {
    public static void main(String[] args) throws Exception {
        // 1、创建固定线程数据的线程池
        ExecutorService pool = Executors.newFixedThreadPool(3);

        pool.execute(new MyRunnable());
        pool.execute(new MyRunnable());
        pool.execute(new MyRunnable());
        pool.execute(new MyRunnable()); // 已经没有多余线程了
    }
}
/**
 pool-1-thread-1输出了:HelloWorld ==> 0
 pool-1-thread-3输出了:HelloWorld ==> 0
 pool-1-thread-2输出了:HelloWorld ==> 0
 pool-1-thread-3输出了:HelloWorld ==> 1
 pool-1-thread-1输出了:HelloWorld ==> 1
 pool-1-thread-3输出了:HelloWorld ==> 2
 pool-1-thread-2输出了:HelloWorld ==> 1
 pool-1-thread-3输出了:HelloWorld ==> 3
 pool-1-thread-1输出了:HelloWorld ==> 2
 pool-1-thread-3输出了:HelloWorld ==> 4
 pool-1-thread-2输出了:HelloWorld ==> 2
 pool-1-thread-1输出了:HelloWorld ==> 3
 pool-1-thread-2输出了:HelloWorld ==> 3
 pool-1-thread-1输出了:HelloWorld ==> 4
 pool-1-thread-2输出了:HelloWorld ==> 4
 pool-1-thread-1本任务与线程绑定了,线程进入休眠了~~~
 pool-1-thread-3本任务与线程绑定了,线程进入休眠了~~~
 pool-1-thread-2本任务与线程绑定了,线程进入休眠了~~~
 */


7. 定时器


public class Test {
    public static void main(String[] args) {
        // 1、创建Timer定时器
        Timer timer = new Timer();  // 定时器本身就是一个单线程。
        // 2、调用方法,处理定时任务
        timer.schedule(new TimerTask() {
            @Override
            public void run() {
                System.out.println(Thread.currentThread().getName() + "执行AAA~~~" + new Date());
//                try {
//                    Thread.sleep(5000);
//                } catch (InterruptedException e) {
//                    e.printStackTrace();
//                }
            }
        }, 0, 2000);

        timer.schedule(new TimerTask() {
            @Override
            public void run() {
                System.out.println(Thread.currentThread().getName() + "执行BB~~~"+ new Date());
                System.out.println(10/0); //这个进程挂了,后面任务就轮不到了(Timer单线程的缺点)
            }
        }, 0, 2000);

        timer.schedule(new TimerTask() {
            @Override
            public void run() {
                System.out.println(Thread.currentThread().getName() + "执行CCC~~~"+ new Date());
            }
        }, 0, 3000);
    }
}
/**
 Timer-0执行AAA~~~Fri Dec 17 12:16:55 CST 2021
 Timer-0执行BB~~~Fri Dec 17 12:16:55 CST 2021
 Exception in thread "Timer-0" java.lang.ArithmeticException: / by zero
    at com.buluchacha.Test$2.run(Test.java:30)
    at java.base/java.util.TimerThread.mainLoop(Timer.java:566)
    at java.base/java.util.TimerThread.run(Timer.java:516)
 */

public class Test {
    public static void main(String[] args) {
        // 1、创建ScheduledExecutorService线程池,做定时器
        ScheduledExecutorService pool = Executors.newScheduledThreadPool(3);

        // 2、开启定时任务
        pool.scheduleAtFixedRate(new TimerTask() {
            @Override
            public void run() {
                System.out.println(Thread.currentThread().getName() + "执行输出:AAA  ==》 " + new Date());
                try {
                    Thread.sleep(100000);
                } catch (InterruptedException e) {
                    e.printStackTrace();
                }
            }
        }, 0, 2, TimeUnit.SECONDS);


        pool.scheduleAtFixedRate(new TimerTask() {
            @Override
            public void run() {
                System.out.println(Thread.currentThread().getName() + "执行输出:BBB  ==》 " + new Date());
                System.out.println(10 / 0);
            }
        }, 0, 2, TimeUnit.SECONDS);


        pool.scheduleAtFixedRate(new TimerTask() {
            @Override
            public void run() {
                System.out.println(Thread.currentThread().getName() + "执行输出:CCC  ==》 " + new Date());
            }
        }, 0, 2, TimeUnit.SECONDS);
    }
}
/**
 pool-1-thread-1执行输出:AAA  ==》 Fri Dec 17 12:23:34 CST 2021
 pool-1-thread-2执行输出:BBB  ==》 Fri Dec 17 12:23:34 CST 2021
 pool-1-thread-3执行输出:CCC  ==》 Fri Dec 17 12:23:34 CST 2021
 pool-1-thread-3执行输出:CCC  ==》 Fri Dec 17 12:23:36 CST 2021
 pool-1-thread-3执行输出:CCC  ==》 Fri Dec 17 12:23:38 CST 2021
 ...
 */
8. 并发、并行


9. 线程的生命周期


 被折叠的 条评论
为什么被折叠?
被折叠的 条评论
为什么被折叠?
 到【灌水乐园】发言


