


 本文介绍了如何使用FastReport.NET库设计报告单,包括添加数据源、设置单元格自动高度,并提供了代码示例展示如何注册数据源、预览及打印报告单。详细步骤从代码注册数据源到报告单模板的设计,帮助开发者实现报告单的自定义打印功能。
FastReport.NET官方下载地址: https://www.fast-report.com/en/download/fast-report-net/
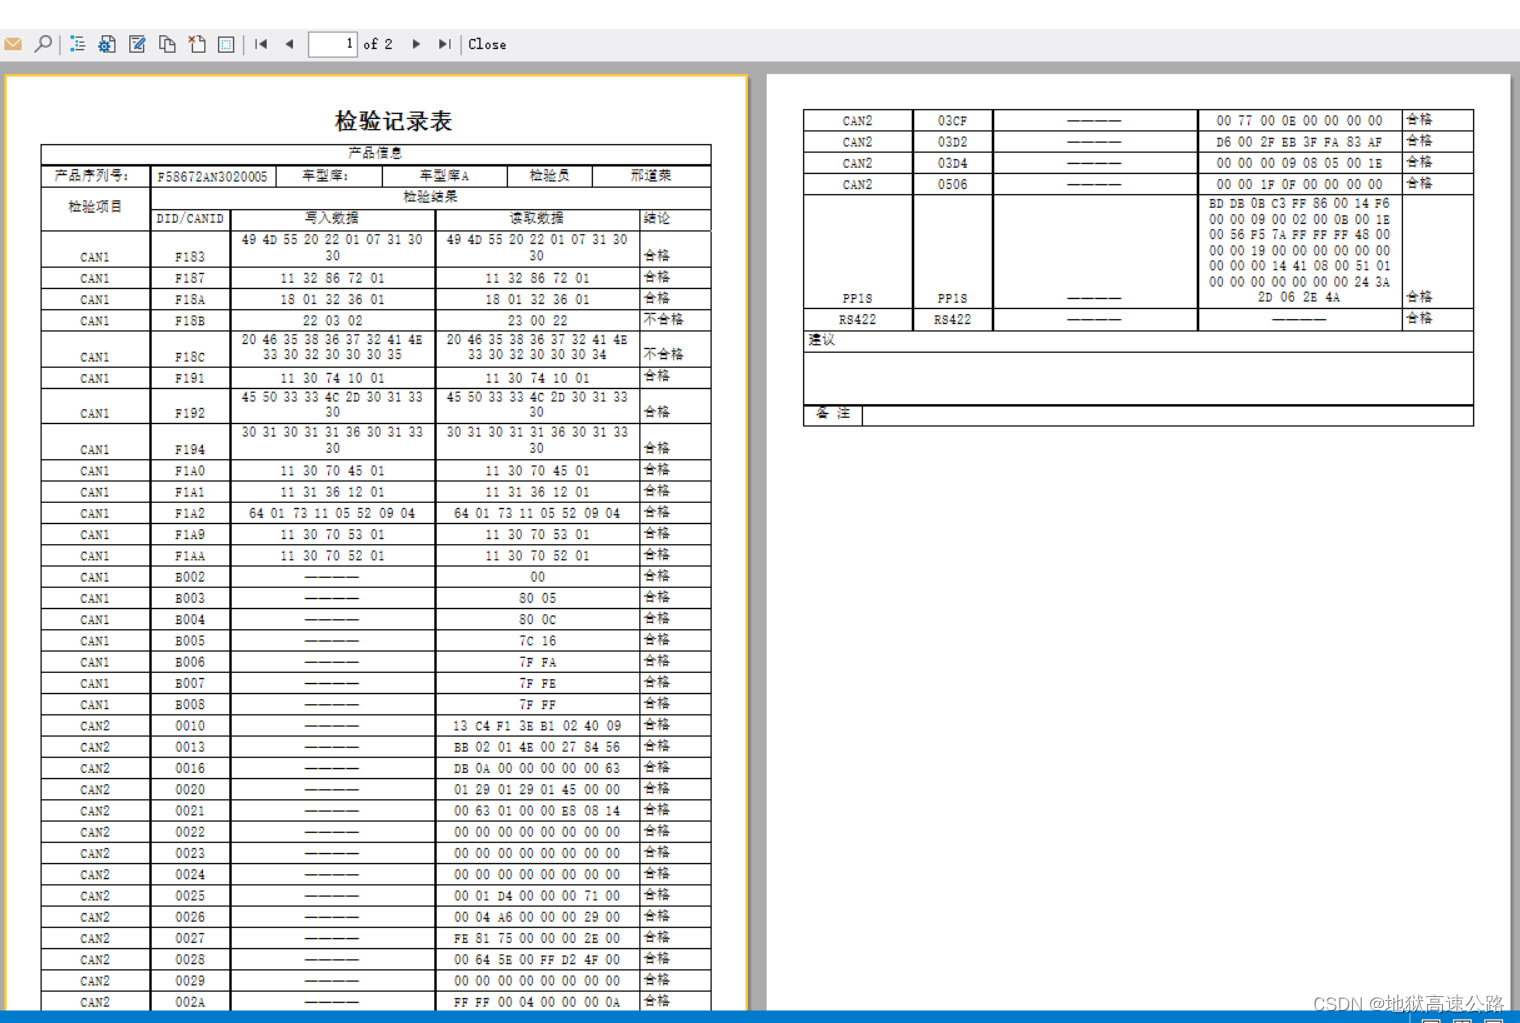
要打印的报告单格式如下:
一、设计报告单
安装完FastReport.NET后,就可以设计报告单,要设计的报告单格式如下: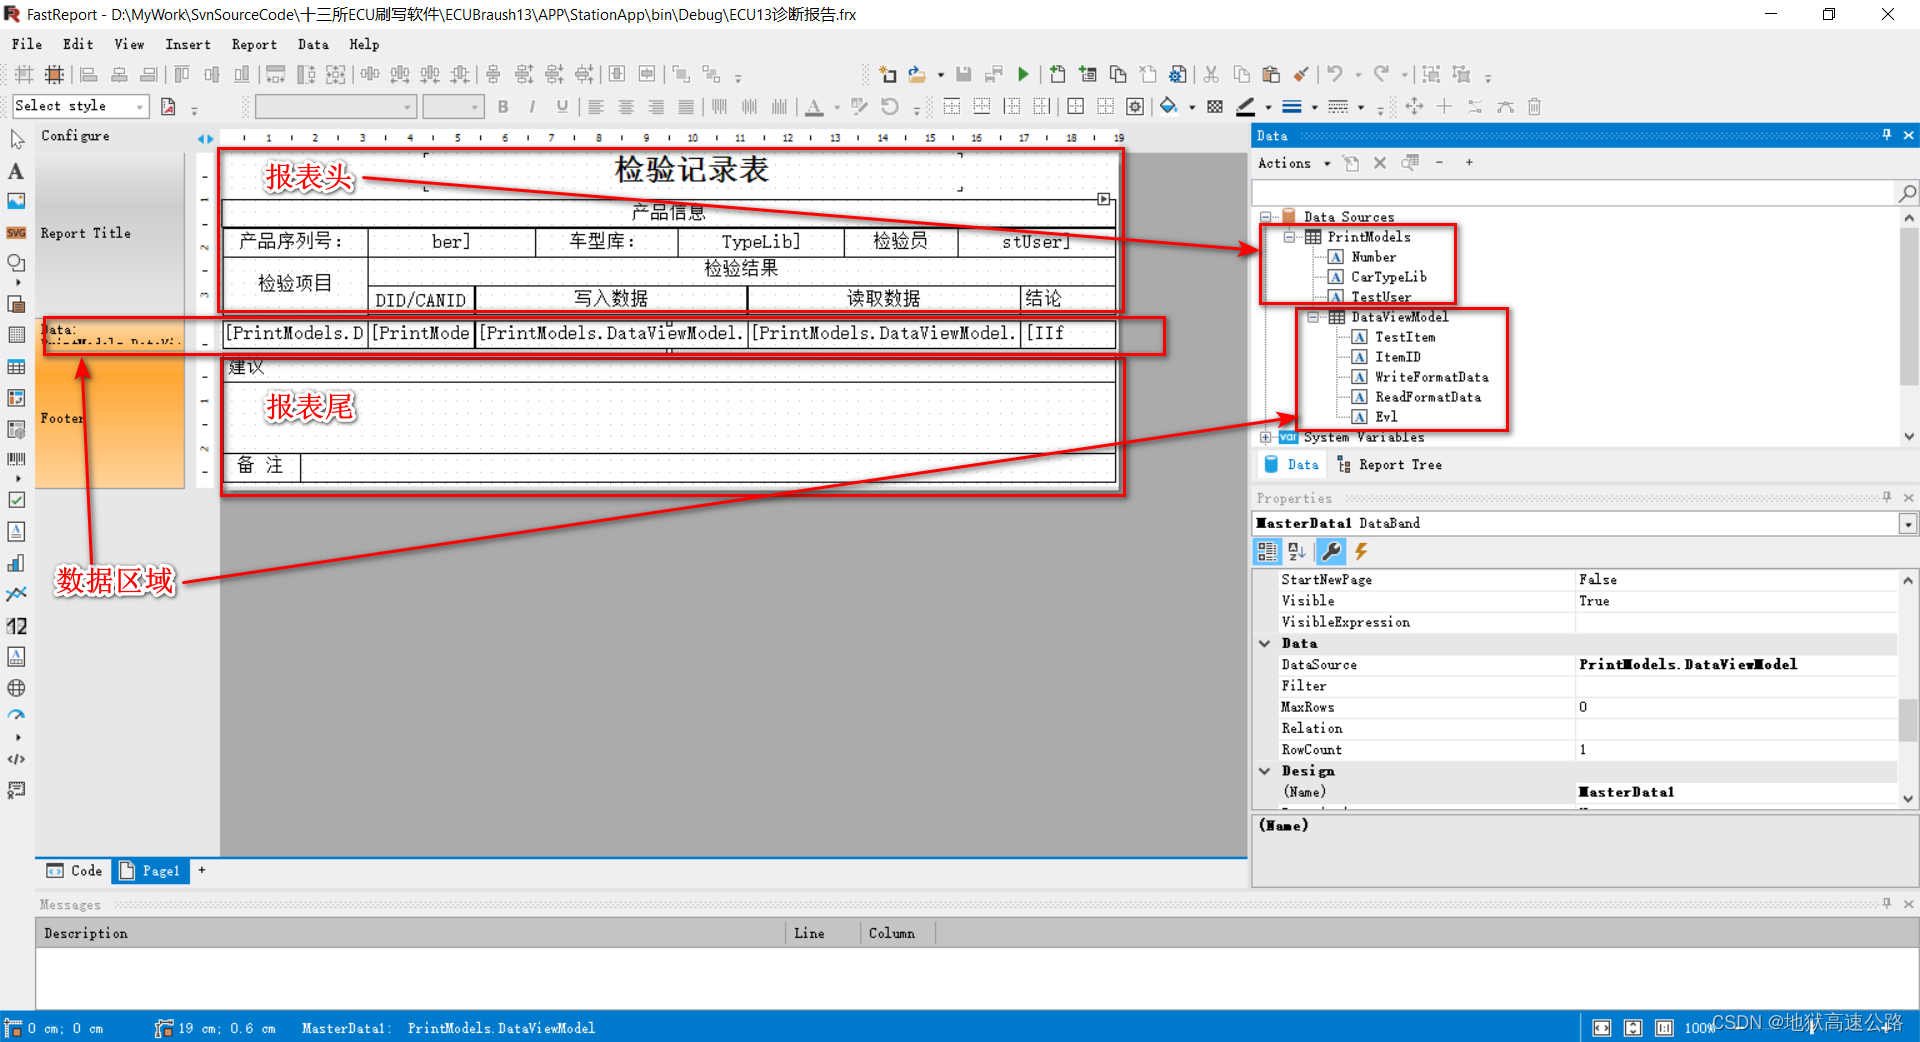
1.给报告单添加数据源Data Source
1.1 代码中注册数据源
首先应该在项目中引用FastReport.dll,然后使用代码给报告单注册数据,如下:
using FastReport; // 引用FastReport命名空间

/// <summary>
/// 打印报告列表实体类
/// </summary>
private class DataViewModel
{
	public string TestItem { get; set; }
	public string ItemID { get; set; }
	public string WriteFormatData { get; set; }
	public string ReadFormatData { get; set; }
	public string Evl { get; set; }
}

/// <summary>
/// 打印报告实体类
/// </summary>
private class PrintModel
{
	public string Number { get; set; }
	public string CarTypeLib { get; set; }
	public string TestUser { get; set; }
	public List<DataViewModel> DataViewModel { get; set; }
}

// 报告单数据源
List<PrintModel> printModels = new List<PrintModel>(); // 数据源
printModels.Add(model);
// 调用FastReport打印报告单
try
{
	Report report = new Report();
	report.Load(Application.StartupPath + "\\ECU13诊断报告.frx"); // 加载报告单模板
	report.RegisterData(printModels, "PrintModels"); // 注册Data Source数据源
	//report.Show(); // 报告单预览模式
	report.Design(); // 报告单编辑模式
	report.Dispose();
}
catch (Exception ex)
{
	MessageBoxEx.Show($"打印失败!{ex.ToString()}", "错误", MessageBoxButtonsEx.OK, MessageBoxIconEx.Error);
}
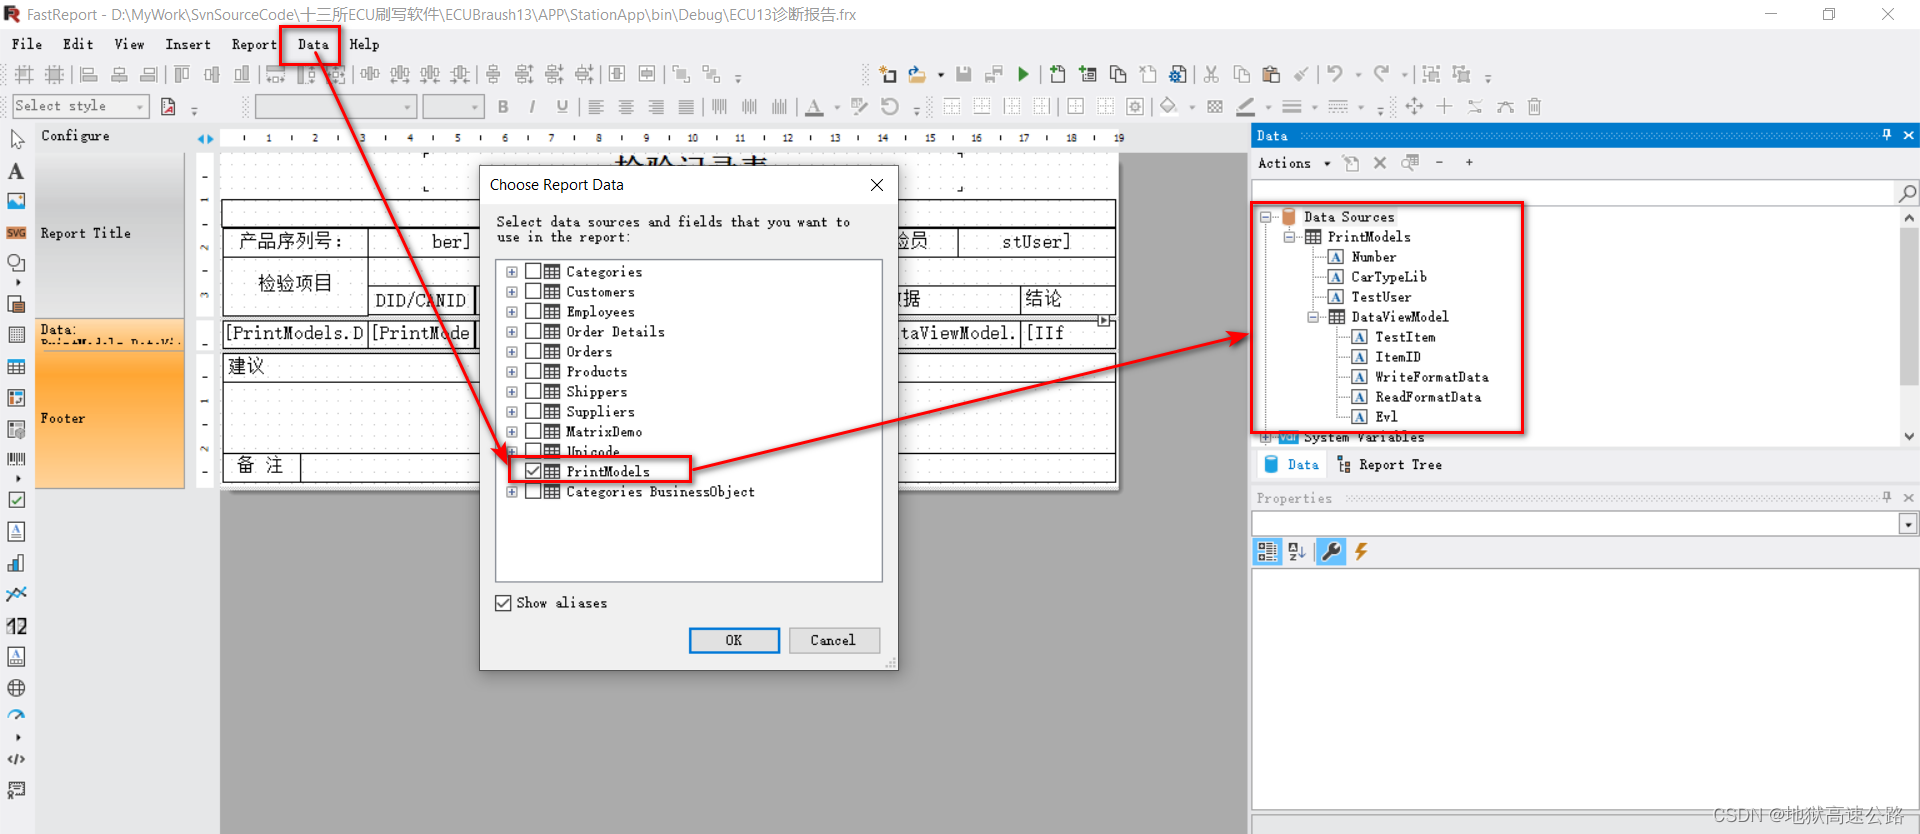
1.2 报告单中选择数据源
在代码中注册数据源用编辑模式打开报告单模板后,选择“Data” >> “Choose Report Data…” >> “OK”,就完成了数据源的添加。如下:
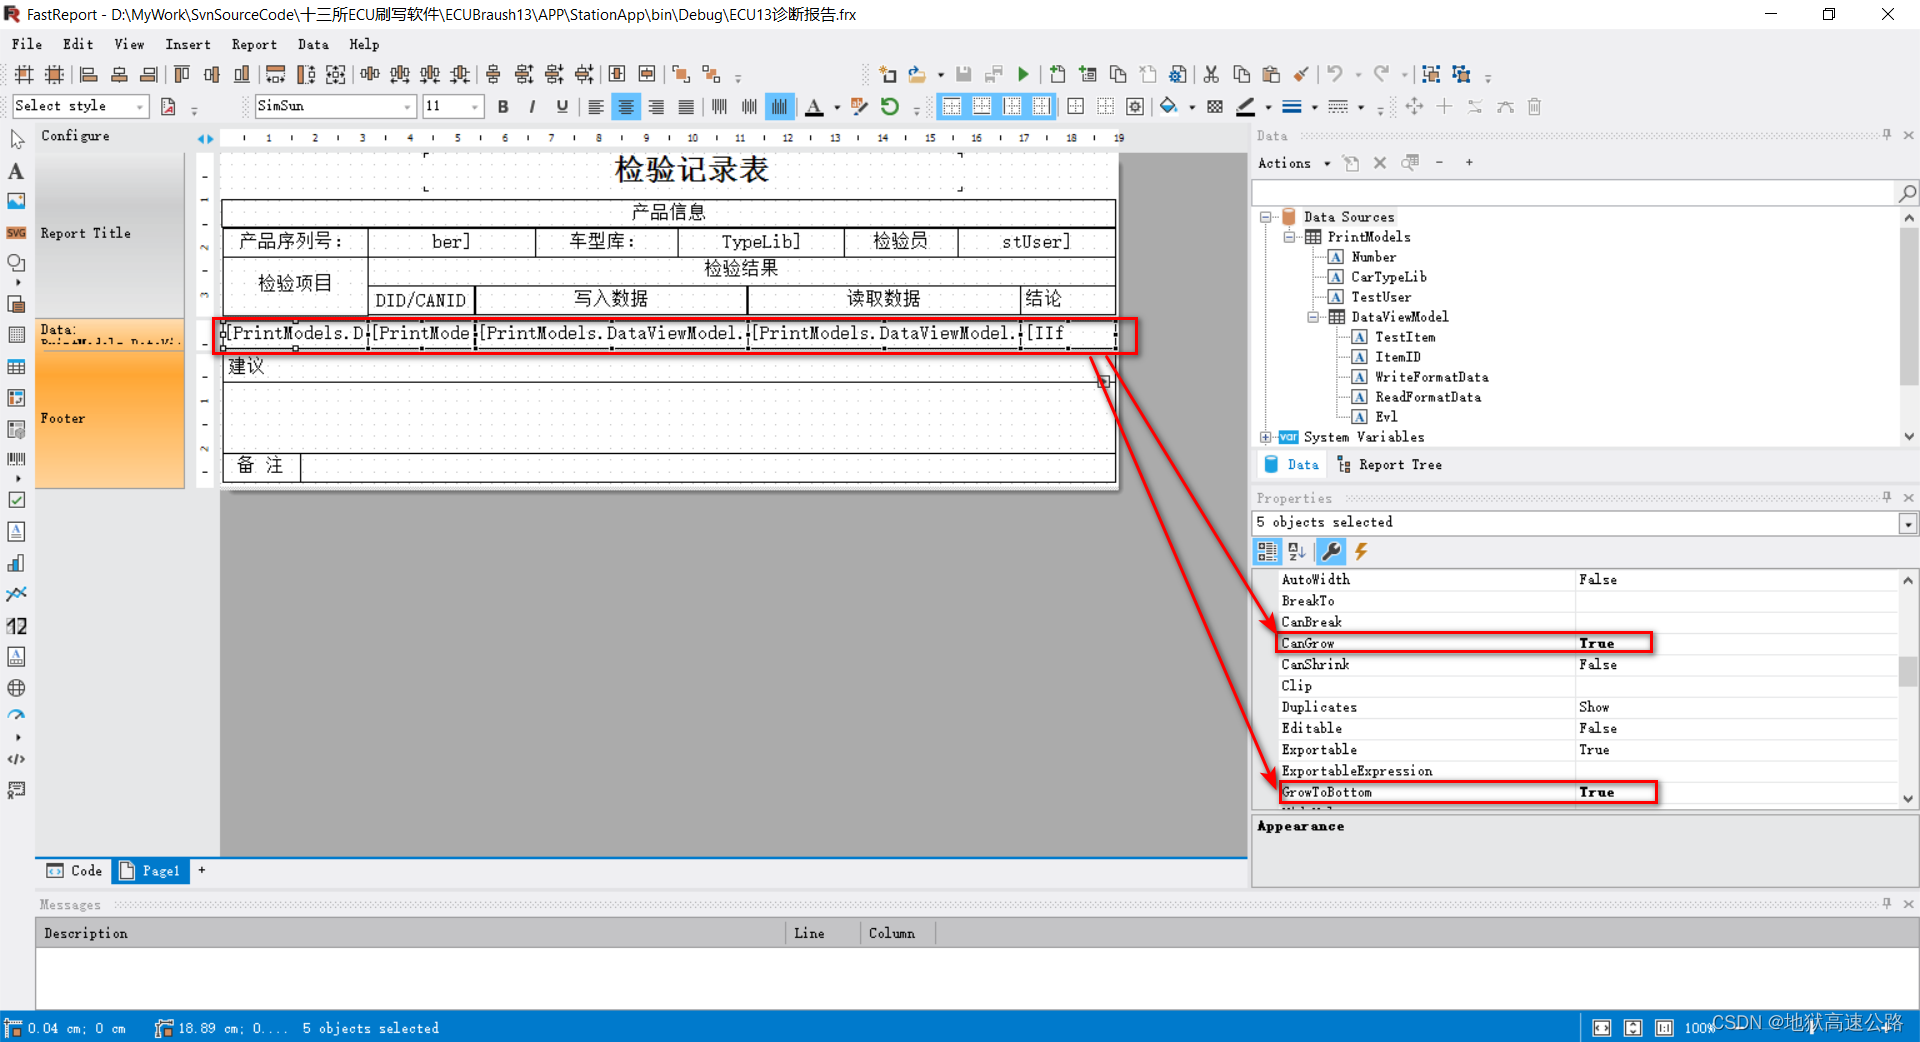
2.设置数据区域的单元格自动高度
选中要设置自动高度的单元格,在属性中设置“CanGrow”和“GrowToBottom”为“True”,如下:
二、打印报告单代码示例
打印时需获取要打印的数据,组织打印数据的格式,向报告单中注册数据等,代码中有详细的注释。如下:
/// <summary>
/// 打印按钮点击事件
/// </summary>
/// <param name="sender"></param>
/// <param name="e"></param>
private void btnPrint_Click(object sender, EventArgs e)
{
	if (dgvTestRecord.CurrentRow == null)
	{
		MessageBoxEx.Show("请先选择一条检测记录进行打印!", "提示", MessageBoxButtonsEx.OK, MessageBoxIconEx.Information);
		return;
	}
	DialogResult dialogResult = MessageBoxEx.Show($"确定要打印序列号为{dgvTestRecord.CurrentRow.Cells["Number"].Value}的报告单吗?",
		"询问", MessageBoxButtonsEx.YesNo, MessageBoxIconEx.Question);
	if (dialogResult == DialogResult.Yes)
	{
		Conditions conditions = GetQueryConditions(); // 自定义的类,封装查询条件
		conditions["Number"] = dgvTestRecord.CurrentRow.Cells["Number"].Value.ToString();
		conditions["TestTimes"] = dgvTestRecord.CurrentRow.Cells["TestTimes"].Value.ToString();
		var lst = ecu13TestRecord.GetList(conditions, orderby: "testendtime asc").ToList(); // 获取要打印的数据
		// 组织报告单打印模板需要的数据
		PrintModel model = new PrintModel
		{
			Number = dgvTestRecord.CurrentRow.Cells["Number"].Value.ToString(),
			CarTypeLib = dgvTestRecord.CurrentRow.Cells["CarTypeLib"].Value.ToString(),
			TestUser = dgvTestRecord.CurrentRow.Cells["TestUser"].Value.ToString(),
			DataViewModel = lst.Select(x => new DataViewModel
			{
				TestItem = x.testitem,
				ItemID = x.itemid,
				WriteFormatData = x.testitem == "CAN2" ? "————" : x.writeformatdata,
				ReadFormatData = x.readformatdata,
				Evl = x.evl
			}).ToList()
		};
		// 报告单数据源
		List<PrintModel> printModels = new List<PrintModel>();
		printModels.Add(model);
		// 调用FastReport打印报告单
		try
		{
			Report report = new Report();
			report.Load(Application.StartupPath + "\\ECU13诊断报告.frx");
			report.RegisterData(printModels, "PrintModels");
			report.Show(); // 报告单预览模式
			//report.Design(); // 报告单设计模式
			report.Dispose();
		}
		catch (Exception ex)
		{
			MessageBoxEx.Show($"打印失败!{ex.ToString()}", "错误", MessageBoxButtonsEx.OK, MessageBoxIconEx.Error);
		}
	}
}


 1万+
1万+

 被折叠的 条评论
为什么被折叠?
被折叠的 条评论
为什么被折叠?
 到【灌水乐园】发言


