


一、LinearLayout线性布局
线性布局,即各个模块按照水平或者垂直方向进行排列。通过前几章的学习,大家也大致熟悉了线性布局了,下面的代码,想必大家也都能看懂。最外层的线性布局内部包含了两个线性布局。
layout_width、layout_height表示该线性布局的宽高;
match_parent、wrap_content分别表示匹配上级布局的宽高和模块中内容匹配宽高,即能够刚好完整显示内容。
orientation即表示线性布局的分布方式,vertical表示垂直排列,horizontal表示水平,如果不写该属性,默认为水平排布模式。
<?xml version="1.0" encoding="utf-8"?>
<LinearLayout xmlns:android="http://schemas.android.com/apk/res/android"
    android:layout_width="match_parent"
    android:layout_height="150dp"
    android:orientation="vertical">

    <LinearLayout
        android:layout_width="match_parent"
        android:layout_height="wrap_content"
        android:orientation="horizontal">

        <TextView
            android:layout_width="0dp"
            android:layout_height="wrap_content"
            android:layout_weight="1"
            android:text="horizontal one!"
            android:textSize="20sp"
            android:layout_margin="7dp"/>

        <TextView
            android:layout_width="0dp"
            android:layout_height="wrap_content"
            android:layout_weight="1"
            android:text="horizontal two!"
            android:textSize="20sp"
            android:layout_margin="7dp"/>
    </LinearLayout>

    <LinearLayout
        android:layout_width="wrap_content"
        android:layout_height="match_parent"
        android:orientation="vertical">

        <TextView
            android:layout_width="wrap_content"
            android:layout_height="0dp"
            android:layout_weight="1"
            android:text="vertical one!"
            android:textSize="20sp"
            android:layout_margin="7dp"/>

        <TextView
            android:layout_width="wrap_content"
            android:layout_height="0dp"
            android:layout_weight="2"
            android:text="vertical two!"
            android:textSize="20sp"
            android:layout_margin="7dp"/>
    </LinearLayout>

</LinearLayout>
在最外层的垂直线性布局中包含了两个线性布局,一个水平排列,一个垂直排列,它们内部分别定义了两个TextView显示内容。在水平布局中,定义两个TextView的宽都为0dp,然后定义了权重layout_weight都为1,这样这两个TextView就会根据权重即1/(1+1)=1/2来分配宽度,从效果也可以看到这两个模块平分了宽。而在垂直布局中,则定义了两个TextView的高为0dp,且权重一个为1,一个为2,这样它们则会根据权重1/(1+2)和2/(1+2)来分配高度。效果图如下所示。

二、RelativeLayout相对布局
相对布局表示模块与模块之间的相对位置,如一个模块相对于上一级的左边对齐、右边对齐、位于中间等等;或者一个模块相对于另一个模块位于其左边对齐、右边对齐、顶部或底部等等。
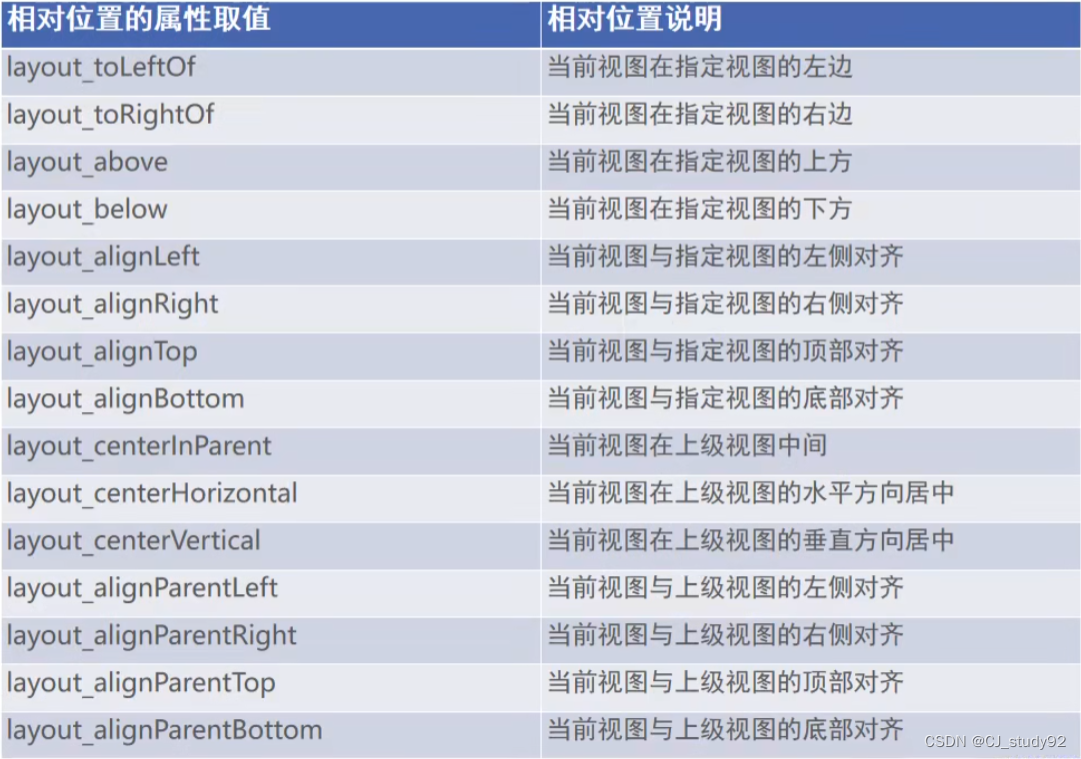
属性较多,我这里就简单列举几个,剩下的大家自己去训练。
<?xml version="1.0" encoding="utf-8"?>
<RelativeLayout xmlns:android="http://schemas.android.com/apk/res/android"
android:layout_width="match_parent"
android:layout_height="200dp">
<TextView
android:id="@+id/centerinparent"
android:layout_width="wrap_content"
android:layout_height="wrap_content"
android:text="centerinparent"
android:layout_centerInParent="true"/>
<TextView
android:layout_width="wrap_content"
android:layout_height="wrap_content"
android:text="centerhorizontal"
android:layout_centerHorizontal="true"/>
<TextView
android:layout_width="wrap_content"
android:layout_height="wrap_content"
android:text="centervertical"
android:layout_centerVertical="true"/>
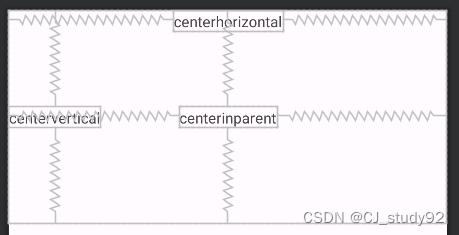
</RelativeLayout>上面的代码中,定义了一个相对布局(RelativeLayout),在布局中定义了3个TextView,分别位于上一级(即相对布局)的中心、水平中心、垂直中心。效果如下所示。因此,定义某模块相对于上一级视图的某一相对位置,就将该属性定义为true。
<?xml version="1.0" encoding="utf-8"?>
<RelativeLayout xmlns:android="http://schemas.android.com/apk/res/android"
android:layout_width="match_parent"
android:layout_height="200dp">
<TextView
android:id="@+id/centerinparent"
android:layout_width="wrap_content"
android:layout_height="50dp"
android:layout_centerInParent="true"
android:gravity="center"
android:text="centerinparent"
android:layout_margin="7dp"/>
<TextView
android:layout_width="wrap_content"
android:layout_height="wrap_content"
android:layout_toRightOf="@id/centerinparent"
android:text="right" />
<TextView
android:layout_width="wrap_content"
android:layout_height="wrap_content"
android:layout_alignTop="@id/centerinparent"
android:layout_toRightOf="@id/centerinparent"
android:text="right_top" />
<TextView
android:layout_width="wrap_content"
android:layout_height="wrap_content"
android:layout_alignBottom="@id/centerinparent"
android:layout_toLeftOf="@id/centerinparent"
android:text="left_bottom" />
<TextView
android:layout_width="wrap_content"
android:layout_height="wrap_content"
android:text="above_left"
android:layout_above="@id/centerinparent"
android:layout_alignLeft="@id/centerinparent"/>
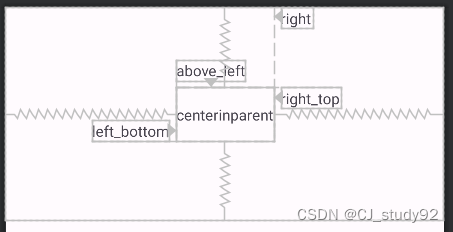
</RelativeLayout>如上代码所示,展示的是模块相对于另一模块的相对位置,首先定义了一个模块(centerinparent)位于相对布局中的中心位置,而其他模块则相对于中心模块的相对位置,如位于其右侧、右侧顶部对齐、左侧底部对齐、上侧左边对齐。效果如下所示。其中,定义相对于某一模块的相对位置,就将对应的属性赋值某一模块的id,如("@id/centerinparent")。
引用某模块就采用@id/ ,增加id则采用@+id/
三、 GridLayout网格布局
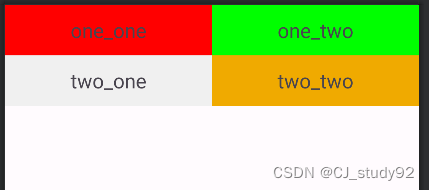
网格布局,就如excel网格一样,定义几行几列,内容就根据网格排列。代码如下所示,定义网格布局,并设置网格行数(rowCount)和列数(columnCount)。记住:网格分布是从左往右,从上往下排布。
<?xml version="1.0" encoding="utf-8"?>
<GridLayout xmlns:android="http://schemas.android.com/apk/res/android"
android:layout_width="match_parent"
android:layout_height="match_parent"
android:columnCount="2"
android:rowCount="2">
<TextView
android:layout_width="0dp"
android:layout_columnWeight="1"
android:layout_height="50dp"
android:text="one_one"
android:textSize="20dp"
android:background="#ff0000"
android:gravity="center"/>
<TextView
android:layout_width="0dp"
android:layout_columnWeight="1"
android:layout_height="50dp"
android:text="one_two"
android:textSize="20dp"
android:background="#00ff00"
android:gravity="center"/>
<TextView
android:layout_width="0dp"
android:layout_columnWeight="1"
android:layout_height="50dp"
android:text="two_one"
android:textSize="20dp"
android:background="#f0f0f0"
android:gravity="center"/>
<TextView
android:layout_width="0dp"
android:layout_columnWeight="1"
android:layout_height="50dp"
android:text="two_two"
android:textSize="20dp"
android:background="#f0aa00"
android:gravity="center"/>
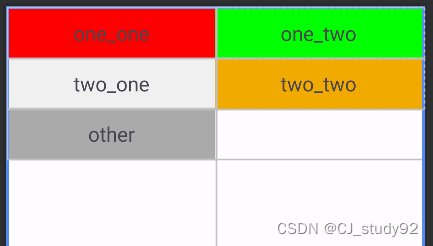
</GridLayout>我们在网格分布中定义了4个TextView模块,并设置列权重,这样每行的模块就会根据权重分配宽度。此外还设置了其下级内容的对齐方式(gravity="center")。效果如下所示
你可能会好奇,如果继续增加模块会怎样,那我们再加一个模块看看,如下所示。因此,当模块数超过所定义的数量,其会根据列数自动增加行数。
四、ScrollView滚动视图
当我们要显示的内容在手机显示区域内无法完全显示时,就可以考虑采用滚动视图,相信大家在使用手机时经常遇见滚动视图。代码如下所示,滚动视图分为水平滚动(HorizontalScrollView)和垂直滚动(ScrollView)。
在使用水平滚动时,其宽度属性设置为wrap_content,这样就可以在水平方向上放入更多需要显示的东西,并通过滚动来查看内容。在水平滚动视图中添加了一个线性布局,该布局要与之对应,方向为水平排布(没写orientation属性,默认为水平)。在线性布局中增加了两个TextView,设置宽度为300dp,这样就导致两个水平分布的模块超出屏幕的范围,因此可以靠滚动视图来显示。
而在使用垂直滚动时,其高度设置为wrap_content,这样就可以在垂直方向上放入更多需要显示的东西。注意,在其中的线性布局要设置其排布方向为vertical。
<?xml version="1.0" encoding="utf-8"?>
<LinearLayout xmlns:android="http://schemas.android.com/apk/res/android"
    android:layout_width="match_parent"
    android:layout_height="match_parent"
    android:orientation="vertical">

    <HorizontalScrollView
        android:layout_width="wrap_content"
        android:layout_height="200dp" >

        <LinearLayout
            android:layout_width="wrap_content"
            android:layout_height="match_parent">

            <TextView
                android:layout_width="300dp"
                android:layout_height="match_parent"
                android:background="#ff00ff"/>

            <TextView
                android:layout_width="300dp"
                android:layout_height="match_parent"
                android:background="#ffff00" />

        </LinearLayout>
    </HorizontalScrollView>

    <ScrollView
        android:layout_width="match_parent"
        android:layout_height="wrap_content">

        <LinearLayout
            android:layout_width="match_parent"
            android:layout_height="wrap_content"
            android:orientation="vertical">

            <TextView
                android:layout_width="match_parent"
                android:layout_height="400dp"
                android:background="#ff0000"/>

            <TextView
                android:layout_width="match_parent"
                android:layout_height="400dp"
                android:background="#0000ff"/>
        </LinearLayout>
    </ScrollView>

</LinearLayout>
五、总结
通过本章的学习,我们掌握了三种常用的布局和一个滚动视图:LinearLayout线性布局、RelativeLayout相对布局、GridLayout网格布局、ScrollView滚动视图。


 8113
8113


 被折叠的 条评论
为什么被折叠?
被折叠的 条评论
为什么被折叠?
 到【灌水乐园】发言


