


对AOP的理解
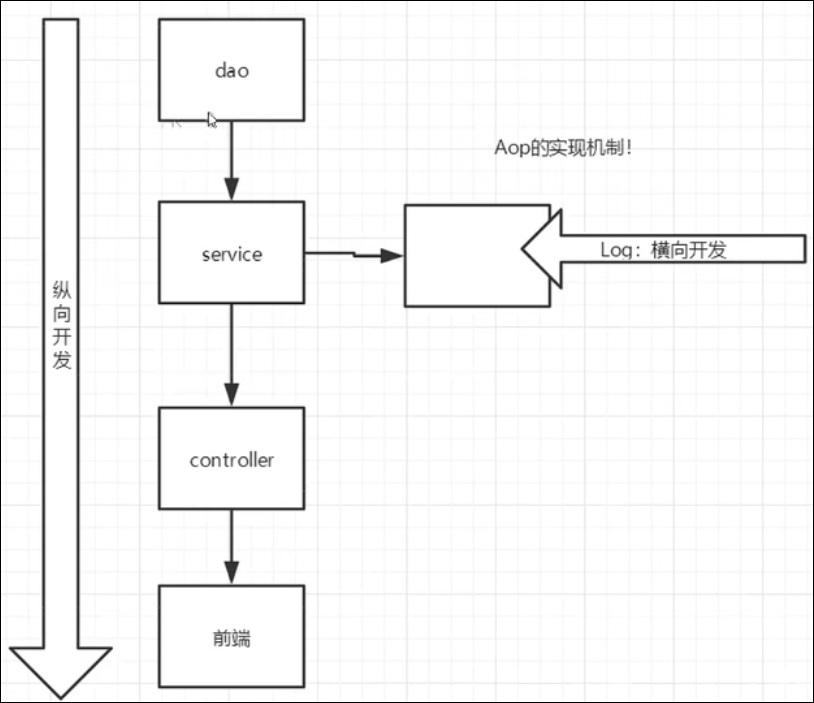
常规情况下我们开发都是围绕框架进行纵向开发,但是如果我们想在原有的基础上增加一些其他的拓展业务,这个时候就需要面向切面将某个业务恒插进去,因此面向切面编程就诞生了!
一、面向切面编程的原理
二、AOP在Spring中的作用
AOP在Spring中提供声明式事务:允许用户自定义切面(自定义拓展业务的类)
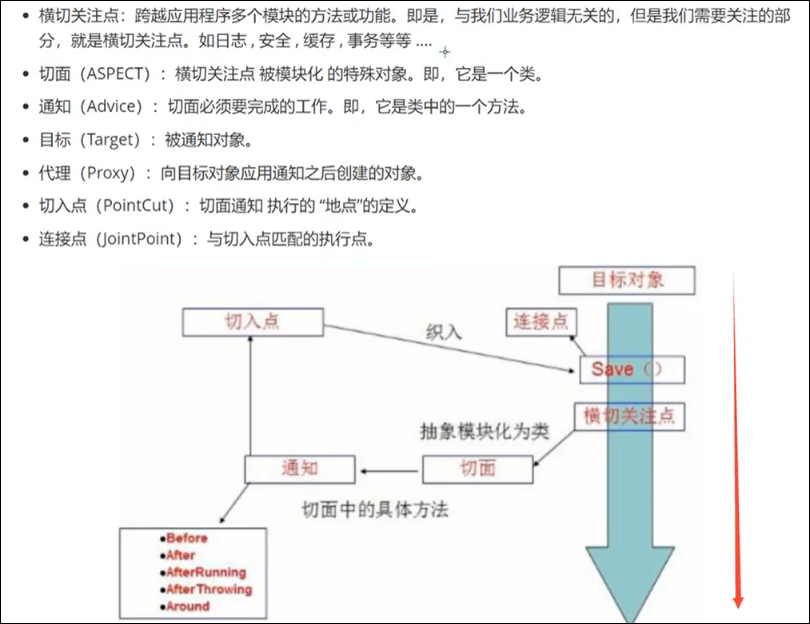
AOP中设计的一些关键词:
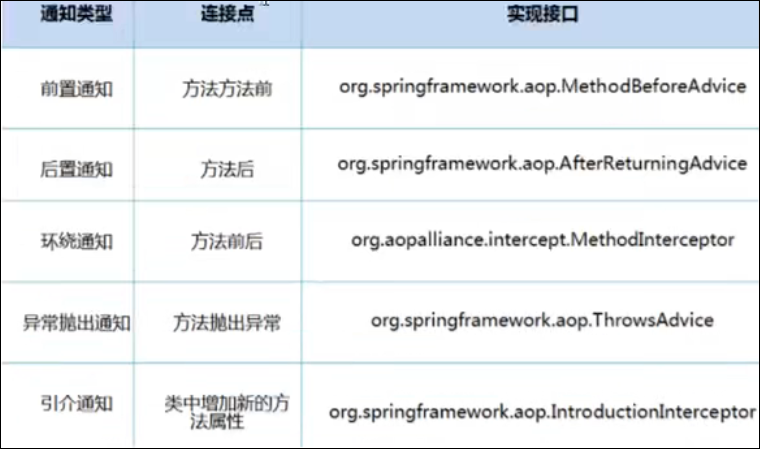
在Spring中,通过Advice定义横切逻辑,Spring中支持5种类型的Advice(方法):
AOP实现方式(方式一中带有使用AOP的依赖)
实现方式一:使用Spring API接口实现
一、编写service接口
//定义Service接口
public interface UserService {
    public void add();
    public void delete();
    public void update();
    public void select();
}
二、编写接口实现类
public class UserServiceImpl implements UserService{
    @Override
    public void add() {
        System.out.println("增加用户");
    }

    @Override
    public void delete() {
        System.out.println("删除用户");

    }

    @Override
    public void update() {
        System.out.println("修改用户");

    }

    @Override
    public void select() {
        System.out.println("查询用户");

    }
}
三、编写前后日志增强,注意,在Spring中已经帮我们写好了接口,我们直接实现接口重写方法即可
1、前置日志增强
//前置日志增强:实现MethodBeforeAdvice接口
public class BeforeLog implements MethodBeforeAdvice {

    //method: 要执行的目标对象的方法
    //objects:参数
    //o:目标对象
    @Override
    public void before(Method method, Object[] objects, Object o) throws Throwable {
        System.out.println(method.getClass().getName() + "方法的" + method.getName() + "被执行了");
    }
}
2、后置日志增强
//后置日志增强:实现AfterReturningAdvice接口
public class AfterLog implements AfterReturningAdvice {

    //o:返回值
    @Override
    public void afterReturning(Object o, Method method, Object[] objects, Object o1) throws Throwable {
        System.out.println("执行了" + method.getName() + "方法,返回结果为:" + o);
    }
}
四、想要实现AOP必须先导入AOP织入依赖
<!-- 想用AOP必须要导入这个依赖 -->
<dependency>
    <groupId>org.aspectj</groupId>
    <artifactId>aspectjweaver</artifactId>
    <version>1.9.4</version>
</dependency>
五、在applicationContext.xml核心配置文件中导入AOP约束
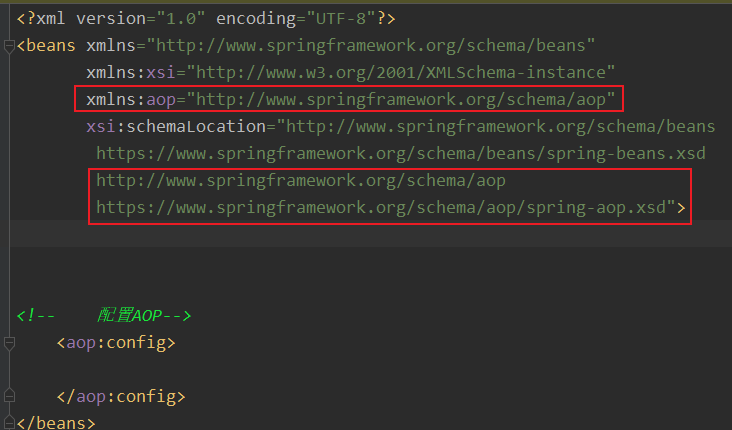
六、applicationContext.xml中注册Bean、配置aop
<!--    注册Bean-->
<bean id="afterLog" class="com.guohui.service.log.AfterLog"/>
<bean id="beforeLog" class="com.guohui.service.log.BeforeLog"/>
<bean id="userService" class="com.guohui.service.UserServiceImpl"/>
<!-- 方式一:使用原生的Spring API接口-->
<!-- 配置AOP,需要现在上面导入AOP的约束-->
<aop:config>
<!-- 配置切入点,配置将来的方法或者类切入的目标地点,里面要写一个expression表达式:execution(修饰词 返回值 类名 方法名 参数),其中*表示所有的都可以,(..)表示所有的参数-->
<aop:pointcut id="pointcut" expression="execution(* com.guohui.service.UserServiceImpl.*(..))"/>
<!-- 配置环绕增加,前后日志要用advisor关键字配置到切入点的前后-->
<aop:advisor advice-ref="beforeLog" pointcut-ref="pointcut"/>
<aop:advisor advice-ref="afterLog" pointcut-ref="pointcut"/>
</aop:config>七、测试
public class MyTest {
    @Test
    public void test(){
        ApplicationContext context = new ClassPathXmlApplicationContext("applicationContext.xml");
        //动态代理,根本是动态代理的接口,所以我们将实现类传进来,但是类型要写接口类型
        UserService userService = (UserService) context.getBean("userService");
        userService.add();
    }
}
八、控制台

九、总结
方式一,首先要将要切入的方法,实现对应的接口(前置或者后置日志增强),在applicationContext.xml中对切入点和环绕增强进行配置,里面的一些关键字和表达式需要记住,最后测试的时候,注意动态代理本质上代理的是接口,所以我们最后通过getBean一定要获得接口类型的对象,调用接口中的方法,才能完成AOP的切入!
实现方式二:自定义实现AOP 自定义切面
一、省略掉了之前中的LogAfter和LogBefore类,直接自定义一个切面类
//自定义切面类
public class DiyPoint {
    //自定义通知:就是类中的方法
    public void before(){
        System.out.println("=======方法执行前========");
    }

    public void after(){
        System.out.println("=======方法执行后========");
    }
}
二、在applicationContext.xml中进行配置切面
<!--    方式二:自定义类实现AOP切入-->

<!--    注册自定义的切面类-->
<bean id="diy" class="com.guohui.diy.DiyPoint"/>

<!--    配置切面-->
<aop:config>
    <!--        自定义切面,ref:表示引用的类-->
    <aop:aspect ref="diy">
        <!--            配置切入点,用来标记切入的方法的目标位置-->
        <aop:pointcut id="pointcut" expression="execution(* com.guohui.service.UserServiceImpl.*(..))"/>
        <!--            切入点之前执行的方法,method要写自定义切面中的通知(即方法),pointcut-ref表示要切入的目标点-->
        <aop:before method="before" pointcut-ref="pointcut"/>
        <!--            切入点之后执行的方法,method要写自定义切面中的通知(即方法),pointcut-ref表示要切入的目标点-->
        <aop:after method="after" pointcut-ref="pointcut"/>
    </aop:aspect>
</aop:config>
三、测试
@Test
public void test(){
ApplicationContext context = new ClassPathXmlApplicationContext("applicationContext.xml");
//动态代理,根本是动态代理的接口,所以我们将实现类传进来,但是类型要写接口类型
UserService userService = (UserService) context.getBean("userService");
userService.add();
}
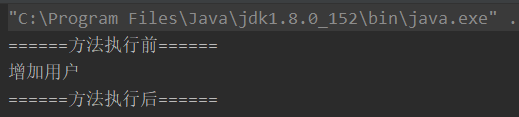
}四、控制台
五、总结
使用方式二,可以不用实现过多的接口就可以是现在切入点前后增加方法,只需要自定义切面类,在applicationContext.xml中对切入点和切面以及通知(即切面中的方法)进行配置即可。
实现方式三:注解实现AOP
一、运用注解自定义切面类
用到的注解是@Aspect
//方式三:使用注解实现AOP
//注解@Aspect就是将该类标记成一个切面类
@Aspect
public class AnnotationPointCut {

    //自定义方法前增强,用@Before,里面的参数就是切入点的表达式execution
    @Before("execution(* com.guohui.service.UserServiceImpl.*(..))")
    public void before(){
        System.out.println("======方法执行前======");
    }
    //方法后置增强
    @After("execution(* com.guohui.service.UserServiceImpl.*(..))")
    public void after(){
        System.out.println("======方法执行后======");
    }
    //环绕增强
    @Around("execution(* com.guohui.service.UserServiceImpl.*(..))")
    public void around(){

    }
}
二、在applicationContext.xml核心配置文件中对切面类进行注册,并且开启注解支持
<!--    方式三:使用注解实现AOP-->
<!--    注册自定义的注解切面类-->
<bean id="annotationPointCut" class="com.guohui.diy.AnnotationPointCut"/>
<!--    开启注解支持,区别于spring注解开发的注解支持"<context:annotation-config/>"
这里直接导入<aop:aspectj-autoproxy/>即开启了注解支持
-->
<aop:aspectj-autoproxy/>
三、测试
public class MyTest {
    @Test
    public void test(){
        ApplicationContext context = new ClassPathXmlApplicationContext("applicationContext.xml");
        //动态代理,根本是动态代理的接口,所以我们将实现类传进来,但是类型要写接口类型
        UserService userService = (UserService) context.getBean("userService");
        userService.add();
    }
}
四、控制台
五、总结
注解的使用,简化了配置文件或者实现接口的开发方式,代码简洁明了,不过这三种的实现方式都是基于动态代理的模式,代理接口拓展业务,注解开发也不是很完美,我们需要在每个通知(切面类中的方法)上都要写好切入点的表达式,比较繁琐,现在开发中一般使用方式二或者方式三,仁者见仁智者见智!
至此,你已经深刻的掌握了关于Spring中的AOP思想以及怎么使用AOP,后续会继续更新关于Spring的技术栈,欢迎交流和指正!


 359
359


 被折叠的 条评论
为什么被折叠?
被折叠的 条评论
为什么被折叠?
 到【灌水乐园】发言


