


本步骤目标
在完成 Spring 的框架雏形后,现在我们可以通过单元测试进行手动操作 Bean 对象的定义、注册和属性填充,以及最终获取对象调用方法。但这里会有一个问题,就是如果实际使用这个 Spring 框架,是不太可能让用户通过手动方式创建的,而是最好能通过配置文件的方式简化创建过程。需要完成如下操作:
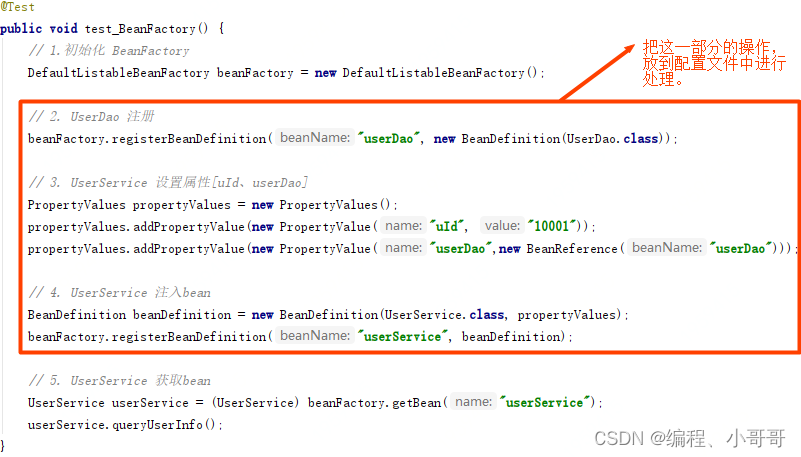
接下来的步骤就是添加能解决 Spring 配置的读取、解析、注册Bean的操作。
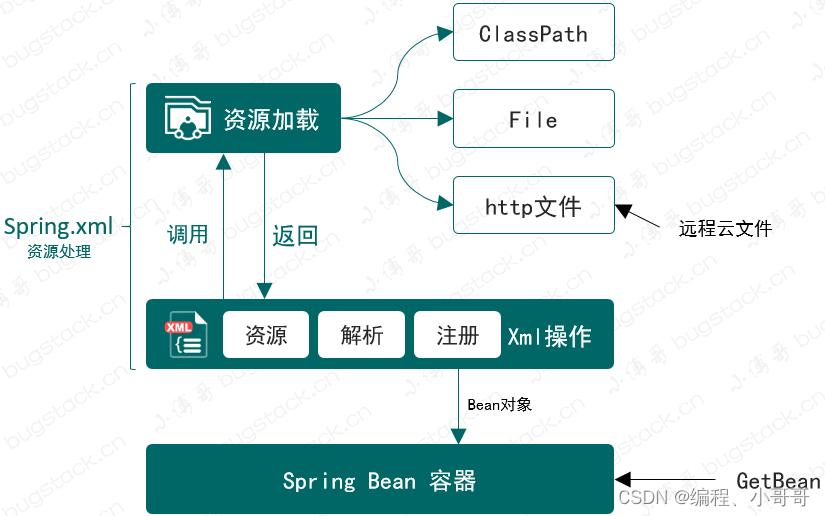
设计流程:
以下实战开始

上述的Resource的接口 同样在
1: Spring 框架下创建 core.io 核心包,在这个包中主要用于处理资源加载流。
2:定义 Resource 接口,提供获取 InputStream 流的方法,接下来再分别3实现三种不同的流文件操作:classPath、FileSystem、URL。
ClassPathResource的方式
package core.io;

import cn.hutool.core.lang.Assert;
import util.ClassUtils;

import java.io.FileNotFoundException;
import java.io.IOException;
import java.io.InputStream;

public class ClassPathResource implements Resource {
    private String path;

    private ClassLoader classLoader;

    public ClassPathResource(String path) {
        this(path, (ClassLoader) null);
    }

    public ClassPathResource(String path, ClassLoader classLoader) {
        Assert.notNull(path, "Path must not be null");
        this.path = path;
        this.classLoader = (classLoader != null ? classLoader : ClassUtils.getDefaultClassLoader());
    }


    @Override
    public InputStream getInputStream() throws IOException {
        InputStream is = classLoader.getResourceAsStream(path);
        if (is == null) {
            throw new FileNotFoundException(
                    this.path + " cannot be opened because it does not exist");
        }
        return is;
    }
}
实现是用于通过 ClassLoader 读取ClassPath 下的文件信息,具体的读取过程主要是:classLoader.getResourceAsStream(path)
FileSystem的方式
package core.io;

import java.io.File;
import java.io.FileInputStream;
import java.io.IOException;
import java.io.InputStream;

public class FileSystemResource implements Resource {
    private File file;

    private String path;

    public FileSystemResource(File file) {
        this.file = file;
        this.path = file.getPath();
    }

    public FileSystemResource(String path) {
        this.file = new File(path);
        this.path = path;
    }


    @Override
    public InputStream getInputStream() throws IOException {

        return new FileInputStream(this.file);
    }

    public String getPath() {
        return this.path;
    }
}
通过指定文件路径的方式读取文件信息,会读取一些txt、excel文件输出到控制台。
Url的方式
package core.io;

import cn.hutool.core.lang.Assert;

import java.io.IOException;
import java.io.InputStream;
import java.net.HttpURLConnection;
import java.net.URL;
import java.net.URLConnection;

public class UrlResource implements Resource {
    private final URL url;

    public UrlResource(URL url) {
        Assert.notNull(url, "URL must not be null");
        this.url = url;
    }

    @Override
    public InputStream getInputStream() throws IOException {
        URLConnection con = this.url.openConnection();
        try {
            return con.getInputStream();
        } catch (IOException ex) {
            if (con instanceof HttpURLConnection) {
                ((HttpURLConnection) con).disconnect();
            }
            throw ex;
        }
    }

}
通过 HTTP 的方式读取云服务的文件,我们也可以把配置文件放到 GitHub 或者 Gitee 上。
包装资源加载器
为什么要包装?
按照资源加载的不同方式,资源加载器可以把这些方式集中到统一的类服务下进行处理,外部用户只需要传递资源地址即可,简化使用。
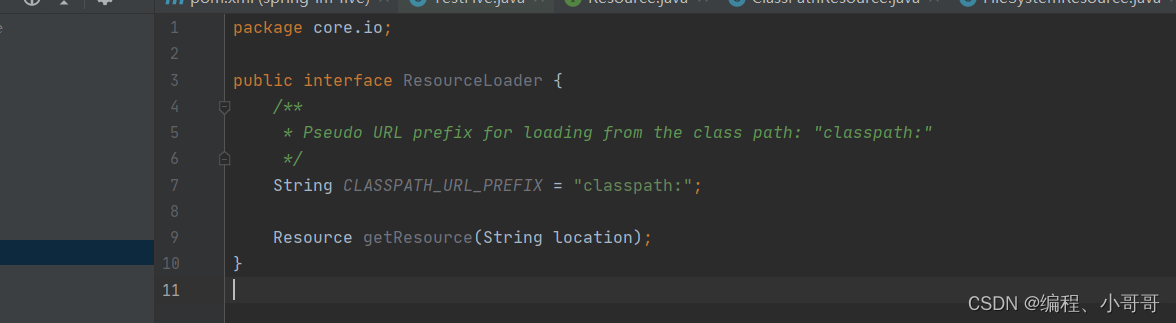
ResourceLoader
定义接口的实现
public class DefaultResourceLoader implements ResourceLoader {
    @Override
    public Resource getResource(String location) {
        Assert.notNull(location, "Location must not be null");
        if (location.startsWith(CLASSPATH_URL_PREFIX)) {
            return new ClassPathResource(location.substring(CLASSPATH_URL_PREFIX.length()));
        } else {
            try {
                URL url = new URL(location);
                return new UrlResource(url);
            } catch (MalformedURLException e) {
                return new FileSystemResource(location);
            }
        }
    }
}
Bean定义读取接口

这里需要注意 getRegistry()、getResourceLoader(),都是用于提供给后面三个方法的工具,加载和注册,这两个方法的实现会包装到抽象类中,以免污染具体的接口实现方法
Bean定义抽象类实现 AbstractBeanDefinitionReader
package beans.factory.support;

import core.io.DefaultResourceLoader;
import core.io.ResourceLoader;

public abstract class AbstractBeanDefinitionReader implements BeanDefinitionReader {

    private final BeanDefinitionRegistry registry;

    private ResourceLoader resourceLoader;

    protected AbstractBeanDefinitionReader(BeanDefinitionRegistry registry) {
        this(registry, new DefaultResourceLoader());
    }

    public AbstractBeanDefinitionReader(BeanDefinitionRegistry registry, ResourceLoader resourceLoader) {
        this.registry = registry;
        this.resourceLoader = resourceLoader;
    }

    @Override
    public BeanDefinitionRegistry getRegistry() {
        return registry;
    }

    @Override
    public ResourceLoader getResourceLoader() {
        return resourceLoader;
    }
}
这样在接口 BeanDefinitionReader 的具体实现类中,就可以把解析后的 XML 文件中的 Bean 信息,注册到 Spring 容器去了。以前我们是通过单元测试使用,调用 BeanDefinitionRegistry 完成Bean的注册,现在可以放到 XMl 中操作了
解析XML处理Bean注册
package beans.factory.xml;

import beans.BeansException;
import beans.PropertyValue;
import beans.factory.config.BeanDefinition;
import beans.factory.config.BeanReference;
import beans.factory.support.AbstractBeanDefinitionReader;
import beans.factory.support.BeanDefinitionRegistry;
import cn.hutool.core.util.StrUtil;
import cn.hutool.core.util.XmlUtil;
import core.io.Resource;
import core.io.ResourceLoader;
import org.w3c.dom.Document;
import org.w3c.dom.Element;
import org.w3c.dom.Node;
import org.w3c.dom.NodeList;

import java.io.IOException;
import java.io.InputStream;

public class XmlBeanDefinitionReader extends AbstractBeanDefinitionReader {
    public XmlBeanDefinitionReader(BeanDefinitionRegistry registry) {
        super(registry);
    }

    public XmlBeanDefinitionReader(BeanDefinitionRegistry registry, ResourceLoader resourceLoader) {
        super(registry, resourceLoader);
    }

    @Override
    public void loadBeanDefinitions(Resource resource) throws BeansException {
        try {
            try (InputStream inputStream = resource.getInputStream()) {
                doLoadBeanDefinitions(inputStream);
            }
        } catch (IOException | ClassNotFoundException e) {
            throw new BeansException("IOException parsing XML document from " + resource, e);
        }
    }

    protected void doLoadBeanDefinitions(InputStream inputStream) throws ClassNotFoundException {
        Document doc = XmlUtil.readXML(inputStream);
        Element root = doc.getDocumentElement();
        NodeList childNodes = root.getChildNodes();

        for (int i = 0; i < childNodes.getLength(); i++) {
            // 判断元素
            if (!(childNodes.item(i) instanceof Element)) continue;
            // 判断对象
            if (!"bean".equals(childNodes.item(i).getNodeName())) continue;

            // 解析标签
            Element bean = (Element) childNodes.item(i);
            String id = bean.getAttribute("id");
            String name = bean.getAttribute("name");
            String className = bean.getAttribute("class");
            // 获取 Class,方便获取类中的名称
            Class<?> clazz = Class.forName(className);
            // 优先级 id > name
            String beanName = StrUtil.isNotEmpty(id) ? id : name;
            if (StrUtil.isEmpty(beanName)) {
                beanName = StrUtil.lowerFirst(clazz.getSimpleName());
            }

            // 定义Bean
            BeanDefinition beanDefinition = new BeanDefinition(clazz);
            // 读取属性并填充
            for (int j = 0; j < bean.getChildNodes().getLength(); j++) {
                if (!(bean.getChildNodes().item(j) instanceof Element)) continue;
                if (!"property".equals(bean.getChildNodes().item(j).getNodeName())) continue;
                // 解析标签:property
                Element property = (Element) bean.getChildNodes().item(j);
                String attrName = property.getAttribute("name");
                String attrValue = property.getAttribute("value");
                String attrRef = property.getAttribute("ref");
                // 获取属性值:引入对象、值对象
                Object value = StrUtil.isNotEmpty(attrRef) ? new BeanReference(attrRef) : attrValue;
                // 创建属性信息
                PropertyValue propertyValue = new PropertyValue(attrName, value);
                beanDefinition.getPropertyValues().addPropertyValue(propertyValue);
            }
            if (getRegistry().equals(beanName)) {
                throw new BeansException("Duplicate beanName[" + beanName + "] is not allowed");
            }
            // 注册 BeanDefinition
            getRegistry().registerBeanDefinition(beanName, beanDefinition);
        }
    }

    @Override
    public void loadBeanDefinitions(Resource... resources) throws BeansException {
        for (Resource resource : resources) {
            loadBeanDefinitions(resource);
        }
    }

    @Override
    public void loadBeanDefinitions(String location) throws BeansException {
        ResourceLoader resourceLoader = getResourceLoader();
        Resource resource = resourceLoader.getResource(location);
        loadBeanDefinitions(resource);
    }

}
XmlBeanDefinitionReader 类最核心的内容就是对 XML 文件的解析
loadBeanDefinitions 方法,处理资源加载,这里新增加了一个内部方法:doLoadBeanDefinitions,它主要负责解析 xml
在 doLoadBeanDefinitions 方法中,主要是对xml的读取 XmlUtil.readXML(inputStream) 和元素 Element 解析。在解析的过程中通过循环操作,以此获取 Bean 配置以及配置中的 id、name、class、value、ref 信息。
最终把读取出来的配置信息,创建成 BeanDefinition 以及 PropertyValue,最终把完整的 Bean 定义内容注册到 Bean 容器:getRegistry().registerBeanDefinition(beanName, beanDefinition)
以下为测试阶段
<?xml version="1.0" encoding="UTF-8"?>
<beans>

    <bean id="userDao" class="test.UserDao"/>

    <bean id="userService" class="test.UserService">
        <property name="id" value="1"/>
        <property name="userDao" ref="userDao"/>
    </bean>

</beans>
# Config File
system.key=OLpj9823dZ
这里有两份配置文件,一份用于测试资源加载器,另外 spring.xml 用于测试整体的 Bean 注册功能。
测试资源加载
private DefaultResourceLoader resourceLoader;

    @Before
    public void init() {
        resourceLoader = new DefaultResourceLoader();
    }

    @Test
    public void test_classpath() throws IOException {
        Resource resource = resourceLoader.getResource("classpath:important.properties");
        InputStream inputStream = resource.getInputStream();
        String content = IoUtil.readUtf8(inputStream);
        System.out.println(content);
    }

    @Test
    public void test_file() throws IOException {
        Resource resource = resourceLoader.getResource("src/test/resources/important.properties");
        InputStream inputStream = resource.getInputStream();
        String content = IoUtil.readUtf8(inputStream);
        System.out.println(content);
    }

    @Test
    public void test_url() throws IOException {
        // 网络原因可能导致GitHub不能读取,可以放到自己的Gitee仓库。读取后可以从内容中搜索关键字;OLpj9823dZ
        Resource resource = resourceLoader.getResource("https://github.com/fuzhengwei/small-spring/blob/main/important.properties");
        InputStream inputStream = resource.getInputStream();
        String content = IoUtil.readUtf8(inputStream);
        System.out.println(content);
    }
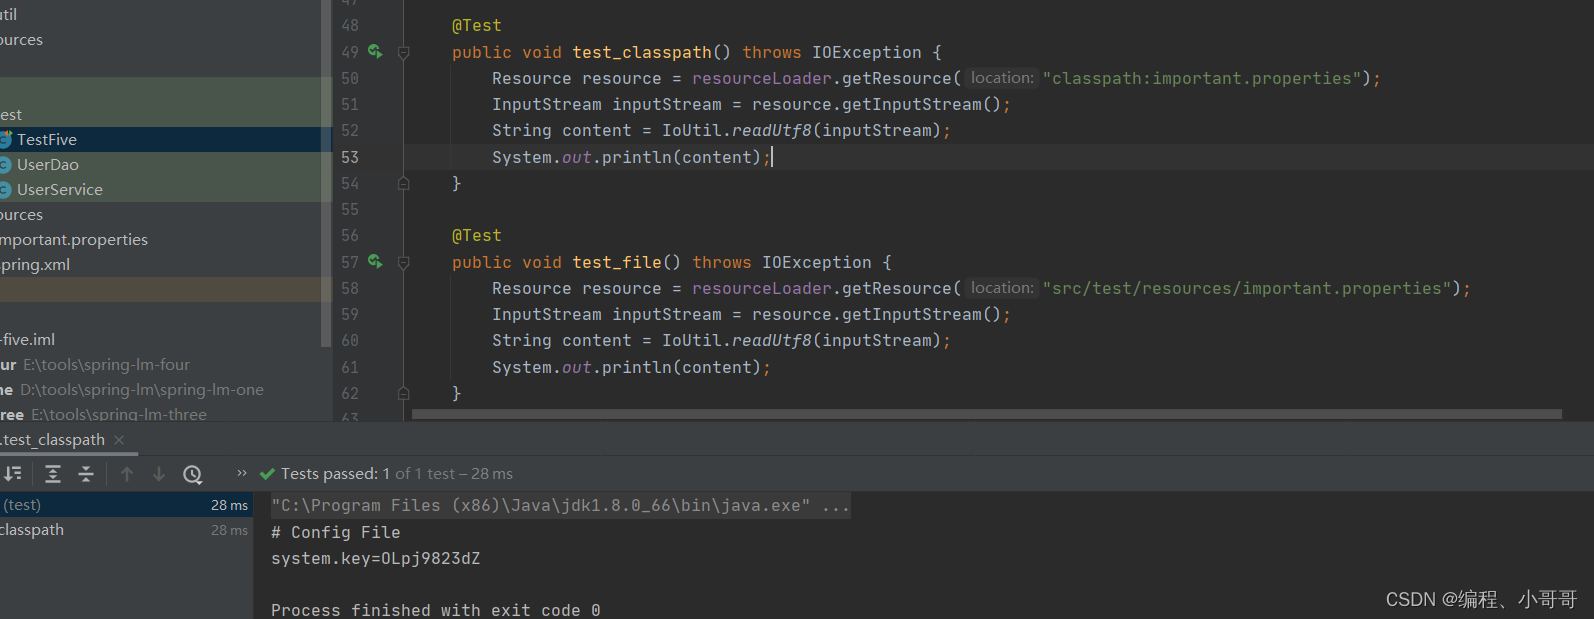
这三个方法:test_classpath、test_file、test_url,分别用于测试加载 ClassPath、FileSystem、Url 文件,URL文件在Github,可能加载时会慢
测试配置文件注册bean

总结
以配置文件为入口解析和注册 Bean 信息,最终再通过 Bean 工厂获取 Bean 以及做相应的调用操作。
以上是第五步->手撕spring源码之资源加载器解析到注册 关注老哥带你上高速 后续继续完成手写spring源码。


 747
747


 被折叠的 条评论
为什么被折叠?
被折叠的 条评论
为什么被折叠?
 到【灌水乐园】发言


