


1.案例
先创建news文件夹shift加鼠标右键打开命令窗口,输入composer create-project --prefer-dist laravel/laravel news,成功以后 cd ./news进入news文件夹
1.1创建名为news的数据库
PS F:\developer\laravel> composer create-project --prefer-dist laravel/larave/ news
1.2 数据库迁移
配置数据库连接
首先在 .env 中配置数据库连接信息
DB_CONNECTION=mysql
DB_HOST=127.0.0.1
DB_PORT=3306
DB_DATABASE=news
DB_USERNAME=root
DB_PASSWORD=root
1.3创建数据库迁移文件
运行如下命令,创建数据库迁移文件
php artisan make:migration create_post_table
用visualcode打开news文件夹打开如下操作添加
use Illuminate\Support\Facades\Schema;

1.4编辑数据库迁移文件
 public function up()
    {
        Schema::create('post', function (Blueprint $table) {
            $table->increments('id');
            $table->string("title")->default('');
            $table->string("content")->default('');
            $table->timestamps();
        });
    }
1.5运行数据库迁移文件
运行如下命令,执行数据库迁移文件
php artisan migrate
可能会出现如下的错误提示
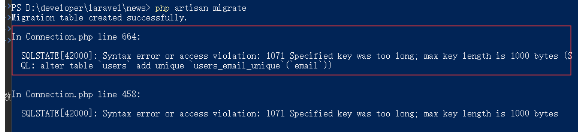
错误原因在于laravel 框架赋予字段你的默认长度超过了mysql数据库允许的字段的最大长度,解决方法是设置 laravel 框架中字段的默认长度不要超过mysql 的长度
在 app\providers 目录下的 AppServiceProvider 文件中的 boot 函数中,加入如下代码
public function boot()
    {
        // 设置字段默认长度
        Schema::defaultStringLength(200);
    }
重新运行如下的命令
php artisan migrate
又出现错误如下
SQLSTATE[42S01]: Base table or view already exists: 1050 Table 'users' already exists
原因在于数据库中已经存在响应的表了,删除这些表,然后重新执行数据库迁移文件
1.6如何添加新的字段
现在想为 Post 表添加一个字段

up生成表 down 删除表
string类型会转为varchar类型
代码修改好后,重新运行数据库迁移
php artisan migrate
提示没有迁移任何内容
解决方案是在数据库中删除 post 表,并将 migrations 表中的对应数据删除,然后重新运行数据库迁移即可
1.7再创建新的表
创建数据库迁移文件
php artisan make:migration post_type_table
修改数据库迁移文件
class PostTypeTable extends Migration
{
    /**
     * Run the migrations.
     *
     * @return void
     */
    public function up()
    {
        Schema::create('post_type', function (Blueprint $table) {
            $table->increments('id');
            $table->string("title")->default('');
            $table->timestamps();
        });
    }

    /**
     * Reverse the migrations.
     *
     * @return void
     */
    public function down()
    {
        Schema::dropIfExists('post_type');
    }
}
执行数据库迁移
php artisan migrate
2.展示文章新闻
2.1创建控制器
php artisan make:controller PostController
编写控制器中的 index 方法
// 展示文章列表
public function index()
{
    $posts=Post::all();
    return view('post/index',['posts'=>$posts]);
}
配置路由
use Illuminate\Support\Facades\Route;

Route::get('/posts','\App\HttP\Controllers\PostController@index');
创建视图
在 views 目录下创建 post 目录,然后再post目录下创建 index.blade.php 文件
<div class="container">
<a href="/posts/add">添加文章</a>

<h2>文章列表</h2>
<table class="table">
<tr>
  <th>编号</th>
  <th>标题</th>
  <th>内容</th>
  <th>创建时间</th>
  <th>操作</th>
</tr>
@foreach($posts as $item)
<tr>
  <td>{{$item->id}}</td>
  <td>{{$item->title}}</td>
  <td>{{$item->content}}</td>
  <td>{{$item->created_at}}</td>
  <td>
  <a href="" class="btn btn-info">编辑</a>
  <a href="" class="btn btn-danger">删除</a>
  </td>
</tr>

@endforeach
</table>
</div>
2.2 新增数据
注意:以后新增数据要分两个方法进行,一个方法用于展示新增数据的视图;一个方法用于将表达数据源保存到数据库中
add方法
此 方法用于展示新增数据的视图
// 展示添加文章的界面
public function add(){
    return view('post/add');
}
配置路由
// 展示用于添加文章的界面
Route::get('/posts/add','\App\HttP\Controllers\PostController@add');
创建视图 add
<!DOCTYPE html>
<html lang="en">
<head>
  <meta charset="UTF-8">
  <meta name="viewport" content="width=device-width, initial-scale=1.0">
  <meta http-equiv="X-UA-Compatible" content="ie=edge">
  <title>Document</title>
  <link href="https://cdn.bootcss.com/twitter-bootstrap/3.3.7/css/bootstrap.min.css" rel="stylesheet">
  <style>
  .box{
    margin-top: 100px;
  }

  </style>
</head>
<body>
<div class="container box">
<form action="/posts" method="post" class="form-horizontal">
  <div class="form-group">
    <label for="title" class="col-sm-2 control-label">标题</label>
    <div class="col-sm-10">
      <input type="text" name="title" id="title" class="form-control">
    </div>
  </div>
  <div class="form-group">
    <label for="content" class="col-sm-2 control-label">内容</label>
    <div class="col-sm-10">
    <textarea class="form-control" name="content" id="content" rows="3"></textarea>
    </div>
  </div>
  <div class="form-group">
    <div class="col-sm-offset-2 col-sm-10">
      <button type="submit" class="btn btn-default">保 存</button>
    </div>
  </div>
</form>
</div>

</body>
</html>
store方法
此方法用于新增数据
// 新增文章
    public function store(){
        return 'store';
    }
配置路由
// 新增文章数据
Route::post('/posts','\App\HttP\Controllers\PostController@stroe');
CSRF
表单中数据如数据,点击保存后,会出现如下错误
mark
解决方案,在新增文章的表单中,加入如下代码
mark
解释:
CSRF:跨站请求伪造,是一种利用服务器对客户端的信任,发起攻击方式
创建模型
php artisan make:model Post
然后修改 store 方法代码,实现新增数据
 public function store()
    {
        $model = new Post();
        $model->title = request('title');
        $model->content = request('content');
        $res = $model->save();
        if ($res) {
            return redirect('/posts');
        } else {
            return redirect('/posts/add');
        }
    }
2.3 编辑文章
两个方法
展示待编辑ide数据
更新数据
展示待编辑数据
创建 edite 方法
 // 展示待编辑的数据
    public function edite(Post $post){
        return view('post/edite',['post'=>$post]);
    }
配置路由
// 展示待编辑数据
Route::get('/posts/{post}/edite','\App\HttP\Controllers\PostController@edite');
更新 index 视图
mark
创建 edite 视图
直接将 add 视图拷贝过来,为表单控件设置 value 属性即可
<!DOCTYPE html>
<html lang="en">
<head>
  <meta charset="UTF-8">
  <meta name="viewport" content="width=device-width, initial-scale=1.0">
  <meta http-equiv="X-UA-Compatible" content="ie=edge">
  <title>Document</title>
  <link href="https://cdn.bootcss.com/twitter-bootstrap/3.3.7/css/bootstrap.min.css" rel="stylesheet">
  <style>
  .box{
    margin-top: 100px;
  }

  </style>
</head>
<body>
<div class="container box">
<form action="/posts" method="post" class="form-horizontal">
{{csrf_field()}}
  <div class="form-group">
    <label for="title" class="col-sm-2 control-label">标题</label>
    <div class="col-sm-10">
      <input type="text" name="title" id="title" class="form-control" value="{{$post->title}}">
    </div>
  </div>
  <div class="form-group">
    <label for="content" class="col-sm-2 control-label">内容</label>
    <div class="col-sm-10">
    <textarea class="form-control" name="content" id="content" rows="3">
{{$post->content}}
    </textarea>
    </div>
  </div>
  <div class="form-group">
    <div class="col-sm-offset-2 col-sm-10">
      <button type="submit" class="btn btn-default">保 存</button>
    </div>
  </div>
</form>
</div>

</body>
</html>


 1147
1147


 被折叠的 条评论
为什么被折叠?
被折叠的 条评论
为什么被折叠?
 到【灌水乐园】发言


