


Bean的生命周期
1、 什么是Bean的生命周期
Spring其实就是一个管理Bean对象的工厂。它负责对象的创建,对象的销毁等。
所谓的生命周期就是:对象从创建开始到最终销毁的整个过程。
什么时候创建Bean对象?
创建Bean对象的前后会调用什么方法?
Bean对象什么时候销毁?
Bean对象的销毁前后调用什么方法?
2、为什么要知道Bean的生命周期
其实生命周期的本质是:在哪个时间节点上调用了哪个类的哪个方法。
我们需要充分的了解在这个生命线上,都有哪些特殊的时间节点。
只有我们知道了特殊的时间节点都在哪,到时我们才可以确定代码写到哪。
我们可能需要在某个特殊的时间点上执行一段特定的代码,这段代码就可以放到这个节点上。当生命线走到这里的时候,自然会被调用。
3、Bean的生命周期之5步
Bean生命周期的管理,可以参考Spring的源码:AbstractAutowireCapableBeanFactory类的doCreateBean()方法**。**
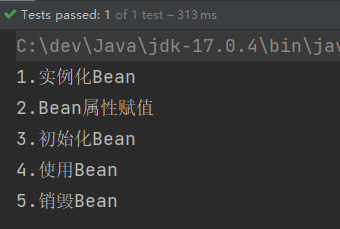
Bean生命周期可以粗略的划分为五大步:
- 第一步:实例化Bean
- 第二步:Bean属性赋值
- 第三步:初始化Bean
- 第四步:使用Bean
- 第五步:销毁Bean

编写测试程序:
定义一个Bean
package com.powernode.spring6.bean;

/**
 * @author 动力节点
 * @version 1.0
 * @className User
 * @since 1.0
 **/
public class User {
    private String name;

    public User() {
        System.out.println("1.实例化Bean");
    }

    public void setName(String name) {
        this.name = name;
        System.out.println("2.Bean属性赋值");
    }

    public void initBean(){
        System.out.println("3.初始化Bean");
    }

    public void destroyBean(){
        System.out.println("5.销毁Bean");
    }

}
<?xml version="1.0" encoding="UTF-8"?>
<beans xmlns="http://www.springframework.org/schema/beans"
       xmlns:xsi="http://www.w3.org/2001/XMLSchema-instance"
       xsi:schemaLocation="http://www.springframework.org/schema/beans http://www.springframework.org/schema/beans/spring-beans.xsd">

    <!--
    init-method属性指定初始化方法。
    destroy-method属性指定销毁方法。
    -->
    <bean id="userBean" class="com.powernode.spring6.bean.User" init-method="initBean" destroy-method="destroyBean">
        <property name="name" value="zhangsan"/>
    </bean>

</beans>
package com.powernode.spring6.test;

import com.powernode.spring6.bean.User;
import org.junit.Test;
import org.springframework.context.ApplicationContext;
import org.springframework.context.support.ClassPathXmlApplicationContext;

/**
 * @author 动力节点
 * @version 1.0
 * @className BeanLifecycleTest
 * @since 1.0
 **/
public class BeanLifecycleTest {
    @Test
    public void testLifecycle(){
        ApplicationContext applicationContext = new ClassPathXmlApplicationContext("spring.xml");
        User userBean = applicationContext.getBean("userBean", User.class);
        System.out.println("4.使用Bean");
        // 只有正常关闭spring容器才会执行销毁方法
        ClassPathXmlApplicationContext context = (ClassPathXmlApplicationContext) applicationContext;
        context.close();
    }
}
执行结果:
需要注意的:
- 第一:只有正常关闭spring容器,bean的销毁方法才会被调用。
- 第二:ClassPathXmlApplicationContext类才有close()方法。
- 第三:配置文件中的init-method指定初始化方法。destroy-method指定销毁方法。
4、Bean生命周期之7步
在以上的5步中,第3步是初始化Bean
如果你还想在初始化前和初始化后添加代码,可以加入“Bean后处理器”。
编写一个类实现BeanPostProcessor类,并且重写before和after方法:
注意,在jdk8中,BeanPostProcessor中的before方法和after方法被修改为default方法了,不需要重写,这里重写只是为了更加明确的知道bean的生命周期的具体步骤
BeanPostProcessor的源码
//
// Source code recreated from a .class file by IntelliJ IDEA
// (powered by FernFlower decompiler)
//

package org.springframework.beans.factory.config;

import org.springframework.beans.BeansException;
import org.springframework.lang.Nullable;

//Nullable表示可空的

public interface BeanPostProcessor {
    @Nullable
    default Object postProcessBeforeInitialization(Object bean, String beanName) throws BeansException {
        return bean;
    }

    @Nullable
    default Object postProcessAfterInitialization(Object bean, String beanName) throws BeansException {
        return bean;
    }
}
具体的代码实现步骤:
package com.cxy.spring6.lifecycle.bean;

import org.springframework.beans.BeansException;
import org.springframework.beans.factory.config.BeanPostProcessor;

/**
 * @Title: LogPostProcesstor
 * @Package com.cxy.spring6.lifecycle.bean
 * @Author: CXY
 * @Copyright CXY
 * @CreateTime: 2022/11/15 16:12
 */

public class LogPostProcesstor implements BeanPostProcessor{
    @Override
    public Object postProcessBeforeInitialization(Object bean, String beanName) throws BeansException {
        System.out.println("执行了before方法");
        return BeanPostProcessor.super.postProcessBeforeInitialization(bean, beanName);
    }

    @Override
    public Object postProcessAfterInitialization(Object bean, String beanName) throws BeansException {
        System.out.println("执行了after方法");
        return BeanPostProcessor.super.postProcessAfterInitialization(bean, beanName);
    }
}
在spring.xml文件中配置“Bean后处理器”:
<!--配置Bean后处理器。这个后处理器将作用于当前配置文件中所有的bean。-->
<bean class="com.powernode.spring6.bean.LogBeanPostProcessor"/>
一定要注意:在spring.xml文件中配置的Bean后处理器将作用于当前配置文件中所有的Bean。
执行测试程序:
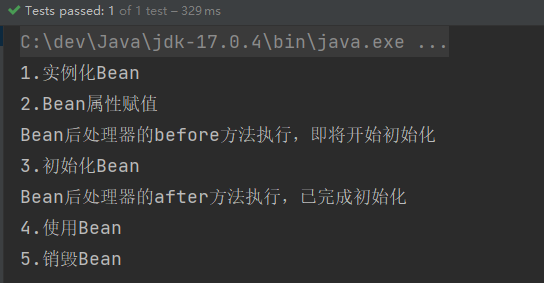
如果加上Bean后处理器的话,Bean的生命周期就是7步了:

5、 Bean生命周期之10步
如果根据源码跟踪,可以划分更细粒度的步骤,10步:
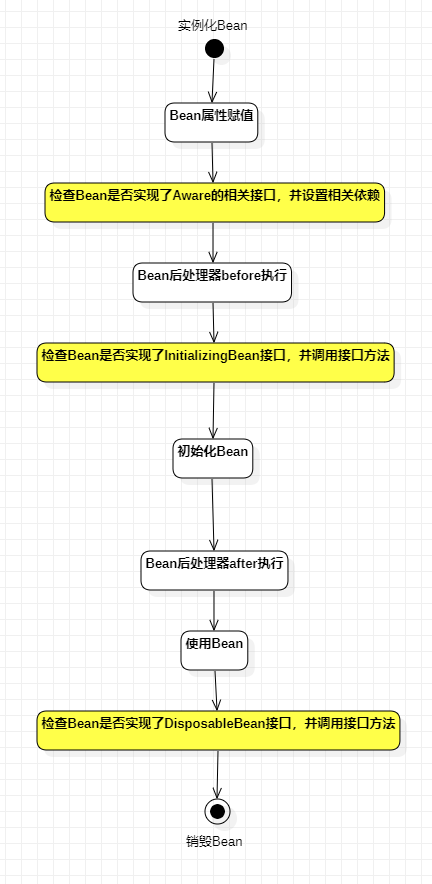
上图中检查Bean是否实现了Aware的相关接口是什么意思?
Aware相关的接口包括:BeanNameAware、BeanClassLoaderAware、BeanFactoryAware
- 当Bean实现了BeanNameAware,Spring会将Bean的名字传递给Bean。
- 当Bean实现了BeanClassLoaderAware,Spring会将加载该Bean的类加载器传递给Bean。
- 当Bean实现了BeanFactoryAware,Spring会将Bean工厂对象传递给Bean。
测试以上10步,可以让User类实现5个接口,并实现所有方法:
- BeanNameAware
- BeanClassLoaderAware
- BeanFactoryAware
- InitializingBean
- DisposableBean
代码如下:
package com.powernode.spring6.bean;

import org.springframework.beans.BeansException;
import org.springframework.beans.factory.*;

/**
 * @author 动力节点
 * @version 1.0
 * @className User
 * @since 1.0
 **/
public class User implements BeanNameAware, BeanClassLoaderAware, BeanFactoryAware, InitializingBean, DisposableBean {
    private String name;

    public User() {
        System.out.println("1.实例化Bean");
    }

    public void setName(String name) {
        this.name = name;
        System.out.println("2.Bean属性赋值");
    }

    public void initBean(){
        System.out.println("6.初始化Bean");
    }

    public void destroyBean(){
        System.out.println("10.销毁Bean");
    }

    @Override
    public void setBeanClassLoader(ClassLoader classLoader) {
        System.out.println("3.类加载器:" + classLoader);
    }

    @Override
    public void setBeanFactory(BeanFactory beanFactory) throws BeansException {
        System.out.println("3.Bean工厂:" + beanFactory);
    }

    @Override
    public void setBeanName(String name) {
        System.out.println("3.bean名字:" + name);
    }

    @Override
    public void destroy() throws Exception {
        System.out.println("9.DisposableBean destroy");
    }

    @Override
    public void afterPropertiesSet() throws Exception {
        System.out.println("5.afterPropertiesSet执行");
    }
}
package com.powernode.spring6.bean;

import org.springframework.beans.BeansException;
import org.springframework.beans.factory.config.BeanPostProcessor;

/**
 * @author 动力节点
 * @version 1.0
 * @className LogBeanPostProcessor
 * @since 1.0
 **/
public class LogBeanPostProcessor implements BeanPostProcessor {
    @Override
    public Object postProcessBeforeInitialization(Object bean, String beanName) throws BeansException {
        System.out.println("4.Bean后处理器的before方法执行,即将开始初始化");
        return bean;
    }

    @Override
    public Object postProcessAfterInitialization(Object bean, String beanName) throws BeansException {
        System.out.println("7.Bean后处理器的after方法执行,已完成初始化");
        return bean;
    }
}
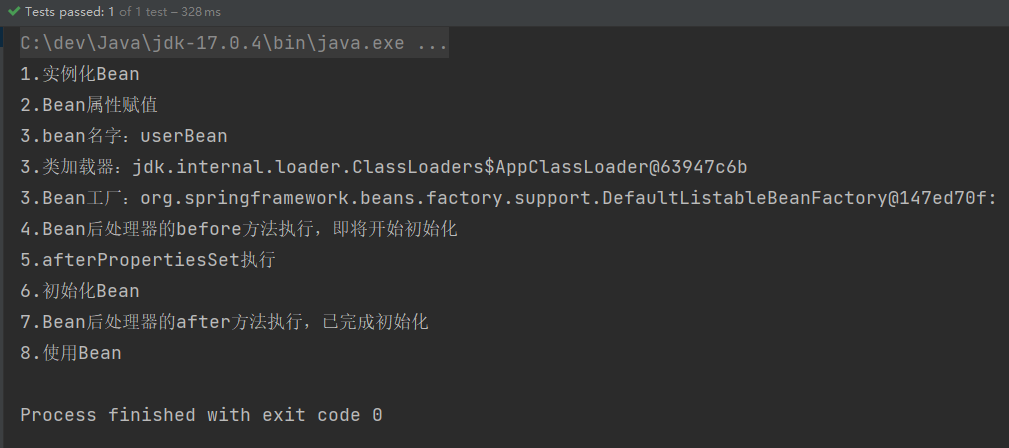
执行结果:
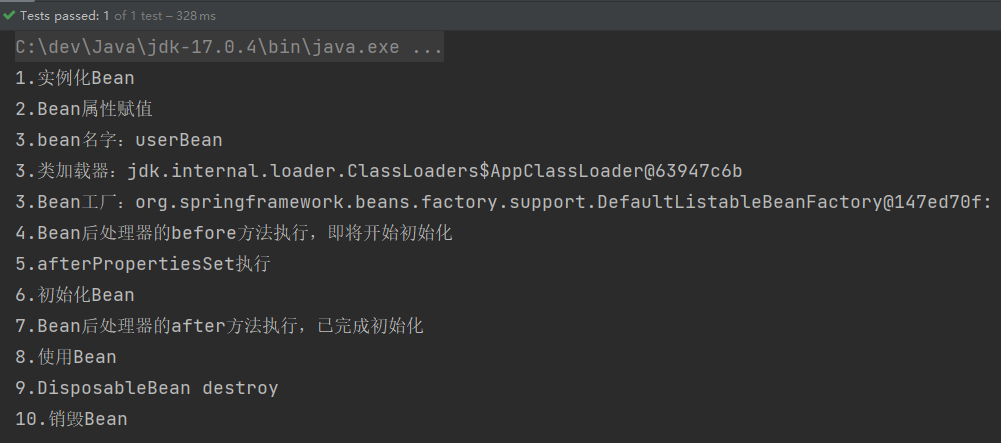
通过测试可以看出来:
- InitializingBean的方法早于init-method的执行。
- DisposableBean的方法早于destroy-method的执行。
对于SpringBean的生命周期,掌握之前的7步即可。够用。
6、 Bean的作用域不同,管理方式不同
Spring 根据Bean的作用域来选择管理方式。
- 对于singleton作用域的Bean,Spring 能够精确地知道该Bean何时被创建,何时初始化完成,以及何时被销毁;
- 而对于 prototype 作用域的 Bean,Spring 只负责创建,当容器创建了 Bean 的实例后,Bean 的实例就交给客户端代码管理,Spring 容器将不再跟踪其生命周期。
我们把之前User类的spring.xml文件中的配置scope设置为prototype:
<?xml version="1.0" encoding="UTF-8"?>
<beans xmlns="http://www.springframework.org/schema/beans"
       xmlns:xsi="http://www.w3.org/2001/XMLSchema-instance"
       xsi:schemaLocation="http://www.springframework.org/schema/beans http://www.springframework.org/schema/beans/spring-beans.xsd">

    <!--
    init-method属性指定初始化方法。
    destroy-method属性指定销毁方法。
    -->
    <bean id="userBean" class="com.powernode.spring6.bean.User" init-method="initBean" destroy-method="destroyBean" scope="prototype">
        <property name="name" value="zhangsan"/>
    </bean>

    <!--配置Bean后处理器。这个后处理器将作用于当前配置文件中所有的bean。-->
    <bean class="com.powernode.spring6.bean.LogBeanPostProcessor"/>

</beans>
执行测试程序:
通过测试一目了然。只执行了前8步,第9和10都没有执行。
7、自己new的对象如何让Spring管理
有些时候可能会遇到这样的需求,某个java对象是我们自己new的,然后我们希望这个对象被Spring容器管理,怎么实现?
package com.powernode.spring6.bean;
/**
* @author 动力节点
* @version 1.0
* @className User
* @since 1.0
**/
public class User {
}
package com.powernode.spring6.test;
import com.powernode.spring6.bean.User;
import org.junit.Test;
import org.springframework.beans.factory.support.DefaultListableBeanFactory;
/**
* @author 动力节点
* @version 1.0
* @className RegisterBeanTest
* @since 1.0
**/
public class RegisterBeanTest {
@Test
public void testBeanRegister(){
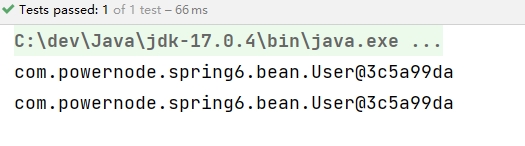
// 自己new的对象
User user = new User();
System.out.println(user);
// 创建 默认可列表BeanFactory 对象
DefaultListableBeanFactory factory = new DefaultListableBeanFactory();
// 注册Bean
factory.registerSingleton("userBean", user);
// 从spring容器中获取bean
User userBean = factory.getBean("userBean", User.class);
System.out.println(userBean);
}
}
执行结果:
以上内容均来自于动力节点老杜的spring6的课程笔记
b站动力节点老杜spring6之Bean的生命周期


 4万+
4万+


 被折叠的 条评论
为什么被折叠?
被折叠的 条评论
为什么被折叠?
 到【灌水乐园】发言


