


序言
无想的一集。
有点无语。
反正上文也基本达到字数上限了,重开一文呗就。
文章目录
20240722
郁闷,想太多。新园今晚居然有昂丝鱼(后来细想应该是白丝,不过也挺好吃)。
昨天一直都在学校,这个月每天都有训练,基本上都是晚上八点前后开始,最近也因为本子的缘故组会也有两周没开。偏偏就是昨晚被wyl叫去编预算表(本来这次真没我啥事,但是只有我之前搞过预算,最后还是拖上我),九点溜出来才发现,SXY怎么一声不吭地回学校跑了6.63k@6’19",百思不得解,而且是刚好离开。我原计划只打算5圈就撤了,临时起意也跑个6.63k@4’19"作为回应,既是悄悄来的,便也不想主动去戳破,假装自己也是陪跑过了呗,
小小地欺骗一下自己。言归正传,晚上慢跑,穿的代步鞋,目前伤痛消淡许多,得益于前一阵子低强度的过渡。5k@4’05"+3k@4’07"+2k@3’54",渐加速,间歇6-10min,整体感觉不错,质量很高,至少也是中上的效果。
第一个5k带的XR,小家伙今天稍微靠谱了点,还是跟了10圈才爆掉,之后我提到4分以内顶完5k;
第二个3k前三圈即拉爆XR,后4圈半提速,胡哥跟了上来,只3圈多他也爆了(他高步频,脚步声逼得太紧,节奏就被带上去了);
第三个2k力竭组,分段4’00"+3’49",基本到位。
PS:夜跑时,胡哥跟我说他对面D间的兄弟在跟女友同居,这么久我都没发现,就这么离谱的。约了后天的签证办理,材料基本补齐了,这趟没啥问题的话,终于可以回去两天调整一下了,事情不是很能绷得住一点。


Quantize量化概念与技术细节
题外话,在七八年前,一些关于表征的研究,会去做表征的压缩,比如二进制嵌入这种事情,其实做得很简单,无非是找个阈值,然后将浮点数划归为零一值,现在的Quantize差不多也是这么一回事,冷饭重炒,但在当下LLM的背景下,明显比那时候更有意义。
- HuggingFace bitsandbytes包
- GPTQ: data compression, GPU,arxiv.2210.17323
- GPTQ is a post-training quantization (PTQ) method for 4-bit quantization that focuses primarily on GPU inference and performance.
- to quantizing the weights of transformer-based models
- first applies scalar quant to the weights, followed by vector quant to the residuals
- The idea behind the method is that it will try to compress all weights to a 4-bit quantization by minimizing the mean squared error to that weight.
- During inference, it will dynamically dequantize its weights to float16 for improved performance whilst keeping memory low.
- GGUF: ggml, CPU, 这是与GPTQ相对应的量化方法,在CPU上实现推理优化。(过时)
- c++,
- llama.cpp, https://github.com/ggerganov/llama.cpp
- AWQ:activation aware quantization,arxiv.2306.00978
- 声称是对GPTQ的优化,提升了速度,但牺牲的精度小(都这样说)
安装(源码安装更容易成功):
# Latest HF transformers version for Mistral-like models
# !pip install git+https://github.com/huggingface/transformers.git
# !pip install accelerate bitsandbytes xformers

# GPTQ Dependencies
# !pip install optimum
# !pip install auto-gptq --extra-index-url https://huggingface.github.io/autogptq-index/whl/cu118/
# 我这边走的是源码安装

# GGUF Dependencies
# !pip install 'ctransformers[cuda]'
在llama3-8b上的测试:
from torch import bfloat16
import torch
from transformers import pipeline, AutoTokenizer, AutoModelForCausalLM
# Load in your LLM without any compression tricks
model_id = "meta-llama/Meta-Llama-3-8B-Instruct"
# model_id = "HuggingFaceH4/zephyr-7b-beta"
pipe = pipeline(
    "text-generation",
    model=model_id,
    torch_dtype=bfloat16,
    device_map="auto"
)
pipe.model
输出模型的结构:
LlamaForCausalLM(
  (model): LlamaModel(
    (embed_tokens): Embedding(128256, 4096)
    (layers): ModuleList(
      (0-31): 32 x LlamaDecoderLayer(
        (self_attn): LlamaSdpaAttention(
          (q_proj): Linear(in_features=4096, out_features=4096, bias=False)
          (k_proj): Linear(in_features=4096, out_features=1024, bias=False)
          (v_proj): Linear(in_features=4096, out_features=1024, bias=False)
          (o_proj): Linear(in_features=4096, out_features=4096, bias=False)
          (rotary_emb): LlamaRotaryEmbedding()
        )
        (mlp): LlamaMLP(
          (gate_proj): Linear(in_features=4096, out_features=14336, bias=False)
          (up_proj): Linear(in_features=4096, out_features=14336, bias=False)
          (down_proj): Linear(in_features=14336, out_features=4096, bias=False)
          (act_fn): SiLU()
        )
        (input_layernorm): LlamaRMSNorm()
        (post_attention_layernorm): LlamaRMSNorm()
      )
    )
    (norm): LlamaRMSNorm()
  )
  (lm_head): Linear(in_features=4096, out_features=128256, bias=False)
)
一个细节,查看任意一个layer的权重值的分布(查看前10000个),发现是基本呈现零均值的正态分布的,这也是后面normal float(nf4)就是基于这样的前提做的量化:
import seaborn as sns
q_proj = pipe.model.model.layers[0].self_attn.q_proj.weight.detach().to(torch.float16).cpu().numpy().flatten()
plt.figure(figsize=(10, 6))
sns.histplot(q_proj[:10000], bins=50, kde=True)

chat template:
- llama3
<|begin_of_text|><|start_header_id|>system<|end_header_id|>....<|eot_id|><|start_header_id|>user<|end_header_id|>...<|eot_id|><|start_header_id|>assistant<|end_header_id|>...
- zephyr
<|system|> ... </s><|user|> ... </s><|assistant|> ... </s>
具体使用template:
# See https://huggingface.co/docs/transformers/main/en/chat_templating
messages = [
    {
        "role": "system",
        "content": "You are a friendly chatbot.",
    },
    {
        "role": "user",
        "content": "Tell me a funny joke about Large Language Models."
    },
]
prompt = pipe.tokenizer.apply_chat_template(messages, tokenize=False, add_generation_prompt=True)
print(prompt)
T = AutoTokenizer.from_pretrained(model_id)
# T
# T.encode('<|system|>')
<|begin_of_text|><|start_header_id|>system<|end_header_id|>

You are a friendly chatbot.<|eot_id|><|start_header_id|>user<|end_header_id|>

Tell me a funny joke about Large Language Models.<|eot_id|><|start_header_id|>assistant<|end_header_id|>
使用pipe进行生成:
outputs = pipe(
    prompt,
    max_new_tokens=256,
    do_sample=True,
    temperature=0.1,
    top_p=0.95
)
(torch.cuda.max_memory_allocated(device='cuda:0') + torch.cuda.max_memory_allocated(device='cuda:1')) / (1024*1024*1024) # 15.021286964416504,差不多是15GB
print(outputs[0]['generated_text'])
"""
<|begin_of_text|><|start_header_id|>system<|end_header_id|>

You are a friendly chatbot.<|eot_id|><|start_header_id|>user<|end_header_id|>

Tell me a funny joke about Large Language Models.<|eot_id|><|start_header_id|>assistant<|end_header_id|>

Here's one:

Why did the Large Language Model go to therapy?

Because it was struggling to "process" its emotions and was feeling a little "disconnected" from its users! But in the end, it just needed to "retrain" its thoughts and "update" its perspective!

Hope that made you LOL!
"""
使用accelerate作sharding(分片)
from accelerate import Accelerator

# Shard our model into pieces of 1GB
accelerator = Accelerator()
accelerator.save_model(
    model=pipe.model,
    save_directory="./content/model",
    max_shard_size="4GB"
)
20240723
晚上2k@3’54"+2k@3’57"+1k@3’46"+1k@3’36",最大摄氧量突破到63,之前三月巅峰62,五月伤痛掉回61。然而越是上升期,越容易伤痛。其实很想慢跑,但总慢不下来,穿代步鞋、用后跟跑法都慢不下来,索性还是冲起来拉倒,一个人我爱咋跑咋跑呗。
今晚YZZ发力,3k@4’00",这个天气能跑到4分配显然不差,但他的水平不止于此。XR过来晃了两下就溜,我说他最近有心事,兴致一直不是很高都快一周了,他说我看人真准,那可不是么,哼(有心事就想偷懒?明天滚过来跟跑LSD)。
PS:上午去院里敲章时发现个BUG,八年了,我都不知道陈岗老师长啥样。陈岗,久闻其名,评教历年院里垫底,大一时就听说她的课特别差,讲得不行给分还差,我自始自终都没选过她的课,所以一直不知道她是谁。结果今天值班的是她,她只告诉我姓陈,LZY就问我今天值班的是陈岗吗?我第一反应,陈岗怎么也是个副教授,不会去搞行政的事吧?下意识地回答肯定不是(其实她的样貌我很熟悉,就是名字对不上人。我有种主观的刻板印象,陈岗名声这么差,想象中应该很瘦,怎么会是这么一脸慈祥的老奶奶模样呢…)。后来得知真的是陈岗老师后,赶紧恭恭敬敬起来,生怕惹恼了她不肯给我敲章[Facepalm]。


量化概述
- 4bit-NormalFloat (NF4, qlora: lora on a quantize LLMs,arxiv.2305.14314) consists of three steps:
- Normalization: The weights of the model are normalized so that we expect the weights to fall within a certain range. This allows for more efficient representation of more common values.(密度高的地方多分配离散值,密度低的地方少分配离散值,前提就是上面的正态分布)
- The weights of the model are first normalized to have zero mean and unit variance. This ensures that the weights are distributed around zero and fall within a certain range.
- Quantization: The weights are quantized to 4-bit. In NF4, the quantization levels are evenly spaced with respect to the normalized weights, thereby efficiently representing the original 32-bit weights.(所谓那些int4模型,就是每个权重都由16个离散值表示,int8就是64个,以此类推,这个主意之前bf16, float32, float16的具体表征,三者都有1bit用来存符号,bf16跟float32的区别在于小数位减少,float16则两者都变少,分别是1+8+7,1+8+23,1+5+10,比如同样一个0.1234,三者的结果就是0.1235351…,0.1234000…,0.1234130…,而75505则对应75505,inf,75264,即bf16是做了一个权衡,能表示很大的数,但是精度不够)
- The normalized weights are then quantized to 4 bits. This involves mapping the original high-precision weights to a smaller set of low-precision values. In the case of NF4, the quantization levels are chosen to be evenly spaced in the range of the normalized weights.
- Dequantization: Although the weights are stored in 4-bit, they are dequantized during computation which gives a performance boost during inference.
- During the forward pass and backpropagation, the quantized weights are dequantized back to full precision. This is done by mapping the 4-bit quantized values back to their original range. The dequantized weights are used in the computations, but they are stored in memory in their 4-bit quantized form.
- Normalization: The weights of the model are normalized so that we expect the weights to fall within a certain range. This allows for more efficient representation of more common values.(密度高的地方多分配离散值,密度低的地方少分配离散值,前提就是上面的正态分布)
- bitsandbytes 的分位数计算
- 密度高的地方多分配,密度低的地方少分配
- https://github.com/bitsandbytes-foundation/bitsandbytes/blob/main/bitsandbytes/functional.py#L267
- https://zhuanlan.zhihu.com/p/647378373
验证一下上面bf16, f32, f16的区别:
torch.set_printoptions(sci_mode=False)
X = torch.tensor([0.1234, 75535])
print(X, X.dtype) # tensor([    0.1234, 75535.0000]) torch.float32
print(X.to(torch.float16)) # tensor([0.1234,    inf], dtype=torch.float16)
print(X.to(torch.bfloat16)) # tensor([    0.1235, 75776.0000], dtype=torch.bfloat16)
接下来手动量化(用BitsAndBytes)
# Delete any models previously created
# del pipe, accelerator
del pipe

# Empty VRAM cache
import gc
gc.collect()
torch.cuda.empty_cache()

from transformers import BitsAndBytesConfig
from torch import bfloat16
model_id = "meta-llama/Meta-Llama-3-8B-Instruct"

# Our 4-bit configuration to load the LLM with less GPU memory
bnb_config = BitsAndBytesConfig(
    load_in_4bit=True,  # 4-bit quantization
    bnb_4bit_quant_type='nf4',  # Normalized float 4
    bnb_4bit_use_double_quant=True,  # Second quantization after the first
    bnb_4bit_compute_dtype=bfloat16  # Computation type
)

# Zephyr with BitsAndBytes Configuration
tokenizer = AutoTokenizer.from_pretrained(model_id)
model = AutoModelForCausalLM.from_pretrained(
    model_id,
    quantization_config=bnb_config,
    device_map='auto',
)

# Create a pipeline
pipe = pipeline(model=model, tokenizer=tokenizer, task='text-generation')

(torch.cuda.max_memory_allocated('cuda:0') +  torch.cuda.max_memory_allocated('cuda:1')) / (1024*1024*1024) # 5.5174360275268555,内存占用相较于上面的15G明显减少
参数含义在论文中都有,同样可以打印prompt都是没有区别的,输出发生变化
# See https://huggingface.co/docs/transformers/main/en/chat_templating
messages = [
    {
        "role": "system",
        "content": "You are a friendly chatbot.",
    },
    {
        "role": "user",
        "content": "Tell me a funny joke about Large Language Models."
    },
]
prompt = pipe.tokenizer.apply_chat_template(messages, tokenize=False, add_generation_prompt=True)
print(prompt)
"""
<|begin_of_text|><|start_header_id|>system<|end_header_id|>

You are a friendly chatbot.<|eot_id|><|start_header_id|>user<|end_header_id|>

Tell me a funny joke about Large Language Models.<|eot_id|><|start_header_id|>assistant<|end_header_id|>
"""

outputs = pipe(
    prompt,
    max_new_tokens=256,
    do_sample=True,
    temperature=0.1,
    top_p=0.95
)
print(outputs[0]["generated_text"])

"""
<|begin_of_text|><|start_header_id|>system<|end_header_id|>

You are a friendly chatbot.<|eot_id|><|start_header_id|>user<|end_header_id|>

Tell me a funny joke about Large Language Models.<|eot_id|><|start_header_id|>assistant<|end_header_id|>

Why did the Large Language Model go to therapy?

Because it was struggling to "process" its emotions and was worried it would "overfit" to its own biases!
"""
20240724
申根文体签现在要打银行流水(7k+即可,官网材料清单里是没有列出来的,另外招行打不了当日流水,中行可以),不过确实是不需要机票订单。缺了这个,然后附近打印一页市价10r,突出一个抢钱。不过效率还是挺高的,不缺材料的话连排队也就一个小时,听说一般一周以内就能出签。
晚上带静香姐跑课表,20min热身+4组冲刺间歇(15s冲刺+45s缓和)+5组变速(6min快+3min慢)+10min冷神,一共16k出头些,跑完大腿酸,好好拉伸了下,主要最近都不拉伸,但每天跑完真跟没跑一样。
目前7月还剩一周时间,总跑量180km,平均配速4’16",下半月已经尽可能放慢节奏,自我感觉目前或已超越三月巅峰期水平,坦然地说,夏训已尽力,首马勿再负我。
PS:感觉今晚最后是被YZZ和LXY给秀了一遭,???


昨天那个量化是不完全的混合精度量化(有int8也有float16):
-
load_in_8bit:
- embed_tokens 继续是 torch.float16
- 每个layer的内部(self attention)以及 mlp 部分是 int8
- 每个layer的output(layernorm)部分是 float16(如果 load 时传入了
torch_dtype=torch.bfloat16,则这部分为 torch.float16) - 同理适用于 load_in_4bit
model.embed_tokens.weight torch.float16 cuda:0
model.layers.0.self_attn.q_proj.weight torch.int8 cuda:0
model.layers.0.self_attn.k_proj.weight torch.int8 cuda:0
model.layers.0.self_attn.v_proj.weight torch.int8 cuda:0
model.layers.0.self_attn.o_proj.weight torch.int8 cuda:0
model.layers.0.mlp.gate_proj.weight torch.int8 cuda:0
model.layers.0.mlp.up_proj.weight torch.int8 cuda:0
model.layers.0.mlp.down_proj.weight torch.int8 cuda:0
model.layers.0.input_layernorm.weight torch.float16 cuda:0
model.layers.0.post_attention_layernorm.weight torch.float16 cuda:0
具体的参数输出和推理:
import torch
from torch import nn
from transformers import BitsAndBytesConfig, AutoModelForCausalLM, AutoTokenizer
from transformers.optimization import AdamW
# del model
import gc         # garbage collect library
gc.collect()
torch.cuda.empty_cache()
model = AutoModelForCausalLM.from_pretrained("meta-llama/Meta-Llama-3-8B",
                                             quantization_config=BitsAndBytesConfig(
                                                 load_in_8bit=True,
                                                 # load_in_4bit=True
                                             ),
                                             torch_dtype=torch.bfloat16,
                                             device_map="auto")
for name, para in model.named_parameters():
    print(name, para.dtype, para.shape, para.device)
# ------
tokenizer = AutoTokenizer.from_pretrained('meta-llama/Meta-Llama-3-8B')
tokenizer.pad_token = tokenizer.eos_token
# 示例训练数据
texts = [
    "Hello, how are you?",
    "The quick brown fox jumps over the lazy dog."
]

# Tokenize数据
inputs = tokenizer(texts, return_tensors="pt", padding=True, truncation=True)
input_ids = inputs["input_ids"]
attention_mask = inputs["attention_mask"]

# 移动到GPU(如果可用)
device = torch.device("cuda" if torch.cuda.is_available() else "cpu")
input_ids = input_ids.to(device)
attention_mask = attention_mask.to(device)
# model.to(device)

# 设置优化器和损失函数
optimizer = AdamW(model.parameters(), lr=5e-5)
loss_fn = nn.CrossEntropyLoss()

# 模型训练步骤
model.train()
outputs = model(input_ids, attention_mask=attention_mask, labels=input_ids)
loss = outputs.loss

# 反向传播
optimizer.zero_grad()
loss.backward()
optimizer.step()
20240725
台风环伺,兴得几日清凉。其实这两周大脚鹿的线还是挺好玩的,牧云谷,名字就很有意境,可惜大概率阴雨天,估计看不到照片里的那种感觉。
晚上嘉伟在129大杀四方,薄纱精英组(今天精英组相对容易,1200米@3’35"×4组(rt 3分)+800米@3’30"×4组(rt 2分)+400米@3’25"×4组(rt 90秒),嘉伟每组配速至少快15秒以上,最后一组400米仅用时64秒),129的人指定是要有PTSD了。
我不太想去跑间歇,避免伤痛。而且手头事情有些紧,计划也是低强度过渡,最近一周只会穿一两次碳板训练,大多数时间都是代步鞋瞎跑跑,尽可能压压速度。八点半下楼遛了会儿,3k@4’08"+2k@4’00"+1k@3’25",前两组渐加速节奏,最后一个1000米力竭冲刺,并无不满。
PS:可以的,没病两天又活蹦乱跳的了,真小看你了,跑挺好。

GPTQ
# Delete any models previously created
del tokenizer, model, pipe

# Empty VRAM cache
import torch
import gc
gc.collect()
torch.cuda.empty_cache()
- https://huggingface.co/MaziyarPanahi/Meta-Llama-3-8B-Instruct-GPTQ
- install
- https://github.com/AutoGPTQ/AutoGPTQ
- 走源码安装是 ok 的;
- https://github.com/AutoGPTQ/AutoGPTQ
# GPTQ Dependencies
# !pip install optimum
# !pip install auto-gptq --extra-index-url https://huggingface.github.io/autogptq-index/whl/cu118/
from transformers import AutoModelForCausalLM, AutoTokenizer, pipeline

# Load LLM and Tokenizer
model_id = "MaziyarPanahi/Meta-Llama-3-8B-Instruct-GPTQ"
tokenizer = AutoTokenizer.from_pretrained(model_id, use_fast=True)
model = AutoModelForCausalLM.from_pretrained(
    model_id,
    device_map="auto",
    trust_remote_code=False,
    revision="main"
)

# Create a pipeline
pipe = pipeline(model=model, tokenizer=tokenizer, task='text-generation')

# See https://huggingface.co/docs/transformers/main/en/chat_templating
messages = [
    {
        "role": "system",
        "content": "You are a friendly chatbot.",
    },
    {
        "role": "user",
        "content": "Tell me a funny joke about Large Language Models."
    },
]
prompt = pipe.tokenizer.apply_chat_template(messages, tokenize=False, add_generation_prompt=True)
print(prompt)

outputs = pipe(
    prompt,
    max_new_tokens=256,
    do_sample=True,
    temperature=0.1,
    top_p=0.95
)
print(outputs[0]["generated_text"])

(torch.cuda.max_memory_allocated('cuda:0') +  torch.cuda.max_memory_allocated('cuda:1')) / (1024*1024*1024) # 5.626893043518066,跟上面bytesandbits差不太多
GGUF
HUGGINGFACE的QuantFactory仓库下有很多量化模型,比如llama3-8b的:https://huggingface.co/QuantFactory/Meta-Llama-3-8B-instruct-GGUF
- GPT-Generated Unified Format,是由Georgi Gerganov定义发布的一种大模型文件格式。Georgi Gerganov是著名开源项目llama.cpp的创始人。
- GGML:GPT-Generated Model Language
- Although GPTQ does compression well, its focus on GPU can be a disadvantage if you do not have the hardware to run it.
- GGUF, previously GGML, is a quantization method that allows users to use the CPU to run an LLM but also offload some of its layers to the GPU for a speed up (
llama.cpp中的-ngl). Although using the CPU is generally slower than using a GPU for inference, it is an incredible format for those running models on CPU or Apple devices. - Especially since we are seeing smaller and more capable models appearing, like Mistral 7B, the GGUF format might just be here to stay!
- GGUF, previously GGML, is a quantization method that allows users to use the CPU to run an LLM but also offload some of its layers to the GPU for a speed up (
- Q4_K_M
- Q stands for Quantization.
- 4 indicates the number of bits used in the quantization process.
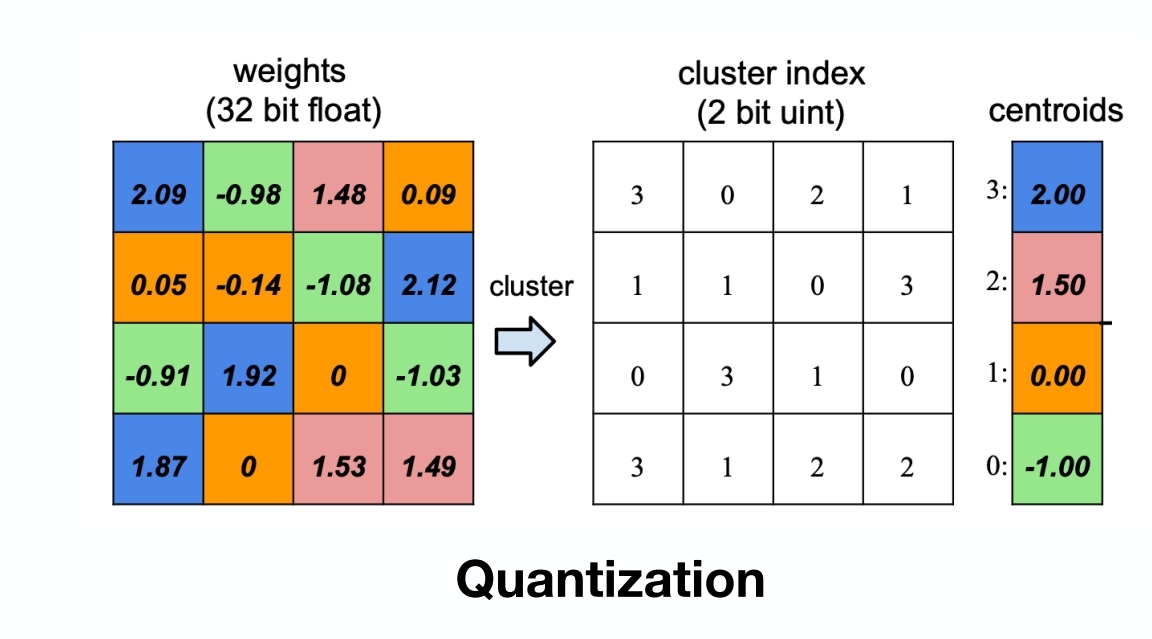
- K refers to the use of k-means clustering in the quantization.
- M represents the size of the model after quantization.
- (S = Small, M = Medium, L = Large).
这里说GGUF用的K均值聚类来做的量化,下面是一个通用的idea(不代表GGUF就是这么做的),其实就是一种分层聚类,还是数值型的,很浅然:
代码实现:
import numpy as np
from sklearn.cluster import KMeans

# 原始权重矩阵
weights = np.array([
    [2.09, -0.98, 1.48, 0.09],
    [0.05, -0.14, -1.08, 2.12],
    [-0.91, 1.92, 0, -1.03],
    [1.87, 0, 1.53, 1.49]
])

# K-means聚类
kmeans = KMeans(n_clusters=4)
kmeans.fit(weights.reshape(-1, 1))
cluster_indices = kmeans.predict(weights.reshape(-1, 1)).reshape(weights.shape)
centroids = kmeans.cluster_centers_.flatten()

# 根据质心值排序
sorted_indices = np.argsort(centroids)
sorted_centroids = centroids[sorted_indices]

# 创建索引映射
index_map = {old_idx: new_idx for new_idx, old_idx in enumerate(sorted_indices)}

# 更新量化索引矩阵
new_cluster_indices = np.vectorize(index_map.get)(cluster_indices)

print("重新排序后的量化索引矩阵:\n", new_cluster_indices)
print("重新排序后的质心值:\n", sorted_centroids)
"""
重新排序后的量化索引矩阵:
 [[3 0 2 1]
 [1 1 0 3]
 [0 3 1 0]
 [3 1 2 2]]
重新排序后的质心值:
 [-1.   0.   1.5  2. ]
"""
使用GGUF进行推理优化:(建议用llama.cpp,否则容易失败)
del tokenizer, model, pipe

# Empty VRAM cache
import torch
import gc
gc.collect()
torch.cuda.empty_cache()

from ctransformers import AutoModelForCausalLM
from transformers import AutoTokenizer, pipeline

# Load LLM and Tokenizer
# Use `gpu_layers` to specify how many layers will be offloaded to the GPU.
model = AutoModelForCausalLM.from_pretrained(
    "QuantFactory/Meta-Llama-3-8B-Instruct-GGUF",
    model_file="Meta-Llama-3-8B-Instruct.Q4_K_M.gguf",
    # model_type="llama",
    gpu_layers=20, hf=True
)
tokenizer = AutoTokenizer.from_pretrained(
    "QuantFactory/Meta-Llama-3-8B-Instruct-GGUF", use_fast=True
)

# Create a pipeline
pipe = pipeline(model=model, tokenizer=tokenizer, task='text-generation')
20240726
XR这倒霉娃子,昨天跟嘉伟去129迷路就算了,还摔了一跤,把手肘和膝盖都磕破皮了,绷不住一点,还好是及时把碘伏涂上了。
周日早上六点半世纪公园有个小接力赛,芳华园700米一圈,2人组队接力,总计时2小时,圈数多者取胜。感觉最近状态不错,陪嘉伟去玩一玩呗。
晚上去蜀地源放纵完回来,看到LXY在一个人环校跑,很罕见,印象里极少在下雨天户外跑。吃太撑并不想跑,而且风雨交加,实在不明智。
PS:然后难绷的事情就来了,八点四十看雨小了些,下楼也想跑两圈环校消化一下,结果到国定门,一路施工,踩了块石头就崴脚了。唯一好消息是感觉不是很重,感觉挺麻的这回。赶紧回实验室用冷水冲了五分钟,然后涂黄道益,今天穿的又是飞飙361,这双鞋真的是有诅咒,已经崴了我第五次了,但还是舍不得扔了它。(下午刚嘲讽XR摔跤迷路,晚上就来报应了)
AWQ
A new format on the block is AWQ (Activation-aware Weight Quantization) which is a quantization method similar to GPTQ. There are several differences between AWQ and GPTQ as methods but the most important one is that AWQ assumes that not all weights are equally important for an LLM’s performance.
In other words, there is a small fraction of weights that will be skipped during quantization which helps with the quantization loss.
As a result, their paper mentions a significant speed-up compared to GPTQ whilst keeping similar, and sometimes even better, performance.
下面使用vllm框架进行部署:
from vllm import LLM, SamplingParams

# Load the LLM
sampling_params = SamplingParams(temperature=0.0, top_p=1.0, max_tokens=256)
llm = LLM(
    model="casperhansen/llama-3-8b-instruct-awq",
    quantization='awq',
    dtype='half',
    gpu_memory_utilization=.95,
    max_model_len=4096
)
tokenizer = AutoTokenizer.from_pretrained("casperhansen/llama-3-8b-instruct-awq")
# See https://huggingface.co/docs/transformers/main/en/chat_templating
messages = [
    {
        "role": "system",
        "content": "You are a friendly chatbot.",
    },
    {
        "role": "user",
        "content": "Tell me a funny joke about Large Language Models."
    },
]
prompt = tokenizer.apply_chat_template(messages, tokenize=False, add_generation_prompt=True)
print(prompt)
# Generate output based on the input prompt and sampling parameters
output = llm.generate(prompt, sampling_params)
print(output[0].outputs[0].text)
20240727
可能是有啥诅咒,周四XR跌跟头,周五我崴脚,今天AK落枕,明天是不是该轮到 …
晚上跑几个冲刺间歇适应节奏,应该问题不大,及时处理,不太影响,但明天还是得谨慎些,其实也没必要太认真吧。
PS:风大,不是个好兆头。
var element = document.getElementById("box");

element.scrollIntoView();
element.scrollIntoView(false);
element.scrollIntoView({block: "end"});
element.scrollIntoView({behavior: "instant", block: "end", inline: "nearest"});
align To Top [可选],目前之前这个参数得到了良好的支持
- true 元素的顶部将对齐到可滚动祖先的可见区域的顶部。对应于scrollIntoViewOptions: {block: “start”, inline: “nearest”}。这是默认值
- false 元素的底部将与可滚动祖先的可见区域的底部对齐。对应于scrollIntoViewOptions: {block: “end”, inline: “nearest”}。
scrollIntoViewOptions [可选],目前这个参数浏览器对它的支持并不好,可以查看下文兼容性详情 - behavior [可选]定义过渡动画。“auto”,“instant"或"smooth”。默认为"auto"。(这个用smooth,我的Chrome是不生效的,直接没有任何反应)
- block [可选] “start”,“center”,“end"或"nearest”。默认为"center"。(若为center,元素会滚到应该是上下位置的中间)
- inline [可选] “start”,“center”,“end"或"nearest”。默认为"nearest"。(若为center,元素会滚到应该是左右位置的中间)
- 两者都是center时,元素滚到整个屏幕的中间

在Selenium中,如果你想要移动(悬停)到一个元素上,并且该元素在悬停时发生了某些变化(例如,显示了一个工具提示或下拉菜单),你可以使用ActionChains类中的move_to_element()方法。
否则直接定位元素然后click,会报错(悬停到元素上时元素已经发生变化,之前的元素不存在了):
selenium.common.exceptions.ElementNotInteractableException: Message: element not interactable
下面是一个简单的例子,演示了如何使用ActionChains在Selenium中移动到一个元素上:
from selenium import webdriver
from selenium.webdriver.common.action_chains import ActionChains

# 启动浏览器驱动
driver = webdriver.Chrome()
# 打开网页
driver.get("http://example.com")
# 找到你想要移动到的元素
element = driver.find_element_by_id("element_id")
# 使用ActionChains移动到元素上
ActionChains(driver).move_to_element(element).perform()
# 此处可以进行你需要的操作,比如检查工具提示或下拉菜单是否出现
# 关闭浏览器驱动
driver.quit()
在这个例子中,element是你想要移动到的元素。ActionChains(driver).move_to_element(element)构建了一个动作,当.perform()被调用时,浏览器会模拟鼠标悬停在这个元素上。这允许任何依赖于鼠标悬停事件的动作(如显示工具提示
20240728
五点半出发,其实从学校开车去世纪公园还是很近的,不到20分钟。
515居然能凑出34支接力队伍(每队10人,8男2女,两两出发双人接力跑芳华园一圈,大约720米,要求两人的速度尽可能相同,否则会判违规,两小时内刷圈多者取胜),Rong组的一队全是嘉伟同级别的选手,像我这样的菜鸡,只能到二队瞎跑跑(
教练,我也想去一队拼刺刀)。最终结果,阿迪的战队ARE拿到冠军(54圈),嘉伟在一队排名第4(51圈),我在二队排名第11(46圈)。
开始跟我一起的哥们儿叫志鹏,起跑前说好久没练,估计跑不动,结果第一组就把我拉爆了,2’13",我比他慢两三秒,起跑后就发现怎么都追不上他,跑到我姿势都变形了,结果两组之后他就萎了,我只好陪他一起摆烂。从第6组开始,志鹏表示已经跑不动了,Rong把他换到三棒跟女生跑,给我换了一个健全的队友,于是我又快乐地冲了两圈,然后队友第8圈又跟不上,继续开摆。其实感觉质量还行,我差不多4圈是尽力跑,本来也不是非得拼尽全力,不过最近也没怎么跑强度,冲几组也挺好。而嘉伟几乎是全程拼刺刀,跑得极其痛苦(一队的8个男生几乎都是跟他一个水平的,有一个是明显比他更强),只有最后一圈才放了,因为再快也追不上前三了。
嘉伟说他的队友跑得很有WXY的感觉(哒哒哒哒的),长得也有点点像。跑完好累,晚上回学校困得不行,嘉伟居然还陪AK晚上跑了10km,清晨刺刀见红,傍晚烈火烧云。
PS:官方计圈用时 & 和嘉伟的两张照片(中途嘉伟超了我一回,其实感觉能跟上他,但是队友跟不上。哎,算啦,就很纠结,比赛还是想尽全力,但又有些许顾忌,还是把最好的状态留给最后的上马吧,虽然衡水湖赛道很好,但是上马是嘉伟的首马破三的地方,我也想在这里同样复刻一回):
| 圈数 | 嘉伟 | 我 |
|---|---|---|
| 1 | 2’02" | 2’13" |
| 2 | 2’02" | 2’21" |
| 3 | 2’11" | 2’37" |
| 4 | 2’07" | 2’35" |
| 5 | 2’17" | 2’33" |
| 6 | 2’12" | 2’18" |
| 7 | 2’09" | 2’22" |
| 8 | 2’10" | 2’29" |
| 9 | 2’16" | 2’33" |
| 10 | 2’26" | / |


矩阵求导基础回顾:
- 标量关于矢量: y = a ⊤ x y={\bf a}^\top {\bf x} y=a⊤x
- 矢量关于矢量: y = A x {\bf y} = {\bf Ax} y=Ax
- 标量关于矩阵: y = x ⊤ A x y={\bf x}^\top {\bf Ax} y=x⊤Ax
- 矢量关于矩阵: y ⊤ = a ⊤ X {\bf y^\top} = {\bf a}^{\top}{\bf X} y⊤=a⊤X
先看第一个 y = A x \mathbf y=\mathbf {Ax} y=Ax
- x ∈ R n , A ∈ R m × n → y ∈ R m \mathbf x\in \mathbb R^n, \mathbf A\in \mathbb R^{m\times n} \rightarrow \mathbf y\in \mathbb R^{m} x∈Rn,A∈Rm×n→y∈Rm
- 线性变换的角度就是
R
n
→
R
m
\mathbb R^n\rightarrow \mathbb R^m
Rn→Rm 的映射/投影(project)
- transformer 中的 ffn(h -> 4h -> h)
y = ψ ( x ) , \mathbf{y} = \psi(\mathbf{x}), y=ψ(x),
∂ y ∂ x = [ ∂ y 1 ∂ x 1 ∂ y 1 ∂ x 2 ⋯ ∂ y 1 ∂ x n ∂ y 2 ∂ x 1 ∂ y 2 ∂ x 2 ⋯ ∂ y 2 ∂ x n ⋮ ⋮ ⋱ ⋮ ∂ y m ∂ x 1 ∂ y m ∂ x 2 ⋯ ∂ y m ∂ x n ] \begin{equation} \frac{\partial \mathbf{y}}{\partial \mathbf{x}} = \begin{bmatrix} \frac{\partial y_1}{\partial x_1} & \frac{\partial y_1}{\partial x_2} & \cdots & \frac{\partial y_1}{\partial x_n} \\ \frac{\partial y_2}{\partial x_1} & \frac{\partial y_2}{\partial x_2} & \cdots & \frac{\partial y_2}{\partial x_n} \\ \vdots & \vdots & \ddots & \vdots \\ \frac{\partial y_m}{\partial x_1} & \frac{\partial y_m}{\partial x_2} & \cdots & \frac{\partial y_m}{\partial x_n} \end{bmatrix} \end{equation} ∂x∂y= ∂x1∂y1∂x1∂y2⋮∂x1∂ym∂x2∂y1∂x2∂y2⋮∂x2∂ym⋯⋯⋱⋯∂xn∂y1∂xn∂y2⋮∂xn∂ym
- y = ψ ( x ) , \mathbf{y} = \psi(\mathbf{x}), y=ψ(x), 比如 y = A x \mathbf y=\mathbf {Ax} y=Ax
- ∂ y ∂ x \frac{\partial \mathbf y}{\partial \mathbf x} ∂x∂y 向量(多元输出,multi-variables)对向量(多元输入,multi-inputs)的导数,此时的 gradient 是 jacobian matrix
y = A x ∂ y ∂ x = A \begin{split} &\mathbf y=\mathbf {Ax}\\ &\frac{\partial \mathbf y}{\partial \mathbf x}=\mathbf A \end{split} y=Ax∂x∂y=A
-
我们来进行简单的推导
-
y
i
=
A
[
i
]
x
=
∑
k
a
i
k
x
k
y_i=A_{[i]}x=\sum_k a_{ik}x_k
yi=A[i]x=∑kaikxk
- y 1 = ∑ k a 1 k x k y_1=\sum_ka_{1k}x_k y1=∑ka1kxk
-
y
i
=
A
[
i
]
x
=
∑
k
a
i
k
x
k
y_i=A_{[i]}x=\sum_k a_{ik}x_k
yi=A[i]x=∑kaikxk
-
一个特例,当 A A A 为一个行向量时( w T \mathbf w^T wT),退化为一个多元输入,单输出(标量 scalar 输出)的内积运算,此时的导数为与输入等shape的向量;
y = w T x y=\mathbf w^T\mathbf x y=wTx
- y = w T x = ∑ i w i x i y=\mathbf w^T\mathbf x=\sum_iw_ix_i y=wTx=∑iwixi
∂ y ∂ x = [ w 1 , w 2 , ⋯ , w n ] T = w \frac{\partial y}{\partial \mathbf x}=\begin{bmatrix}w_1,w_2,\cdots,w_n\end{bmatrix}^T=\mathbf w ∂x∂y=[w1,w2,⋯,wn]T=w
雅可比矩阵(矢量对矢量求梯度)示例:
import torch
# 定义矩阵 A 和向量 x
A = torch.tensor([[1.0, 2.0],
                  [3.0, 4.0],
                  [5.0, 6.0]], requires_grad=True)

x = torch.tensor([[0.5], [1.0]], requires_grad=True)
# 计算 y = A * x
y = torch.matmul(A, x)

# 初始化雅可比矩阵
jacobian = torch.zeros_like(A)

# 计算每个 y 的元素关于 x 的导数
for i in range(y.size(0)):
    y[i].backward(retain_graph=True)
    jacobian[i] = x.grad.view(1, -1)
    x.grad.zero_()

print(jacobian)
"""
tensor([[1., 2.],
        [3., 4.],
        [5., 6.]])
"""
20240729
一觉睡到十点才醒,中间完全没醒,累瘫了。
上周缺一次力量训练(周五台风,周六不宜,周日太累),今晚把力量补掉,30箭步×8组(+20kg),正反各4组,最后两组不间歇。每组箭步之前加30次双脚提踵(+20kg),现在也没有好办法弥补脚踝的弱点,只能先在力量上补强了。结束补慢跑4000米@4’23"放松,胡哥,AX,YZZ也在,LXY最近似乎经常在校外环线跑动,不过校内到处施工确实不方便,外围也修了一圈塑胶道。
ESG终版挂到https://github.com/caoyang-sufe/crawler_master,争议事件和环保处罚需要会员。
关于 TRL SFTTrainer 中的 formatting_func 与 DataCollatorForCompletion
数据集:
dataset = load_dataset("lucasmccabe-lmi/CodeAlpaca-20k", split="train")
样本形如:
{'instruction': 'Create a function that takes a specific input and produces a specific output using any mathematical operators. Write corresponding code in Python.',
 'input': '',
 'output': 'def f(x):\n    """\n    Takes a specific input and produces a specific output using any mathematical operators\n    """\n    return x**2 + 3*x'}
trainer = SFTTrainer(
    model,
    train_dataset=dataset,
    args=SFTConfig(output_dir="/tmp"),
    formatting_func=formatting_prompts_func,
    data_collator=collator,
)
trainer.train()
formatting_func:将数据集整合成问答数据集的格式
data_collector:在SFT中(Prompt-Response Pairs),只对Response部分计算损失(Pre-Training是不区分Prompt和Response的,只对下一个Token计算损失)。
具体而言:
def formatting_prompts_func(example):
    output_texts = []
    for i in range(len(example['instruction'])):
        text = f"### Question: {example['instruction'][i]}\n ### Answer: {example['output'][i]}"
        output_texts.append(text)
    return output_texts
output_texts = formatting_prompts_func(dataset[:2])
output_texts[0]
格式化后的样本(就是Promptize):
### Question: Create a function that takes a specific input and produces a specific output using any mathematical operators. Write corresponding code in Python.
 ### Answer: def f(x):
    """
    Takes a specific input and produces a specific output using any mathematical operators
    """
    return x**2 + 3*x
---
### Question: Generate a unique 8 character string that contains a lowercase letter, an uppercase letter, a numerical digit, and a special character. Write corresponding code in Python.
 ### Answer: import string
import random

def random_password_string():
    characters = string.ascii_letters + string.digits + string.punctuation
    password = ''.join(random.sample(characters, 8))
    return password

if __name__ == '__main__':
    print(random_password_string())
然后看data_collector,常用的是内置的DataCollatorForCompletionOnlyLM
找到 labels (batch['labels']) 中和 response_template 相同 token 的最后一个的 index 作为 response_token_ids_start_idx,然后将 labels 中的开头到responese_template的最后一个token都标记为-100,这样的话就不会计算损失了。(自带的Ignoring Token的Index,BERT和T5有差别,其实就是mask)
源码如下:

- 第一个参数是
response_template,第二个参数instruction_template(默认为 None)
model = AutoModelForCausalLM.from_pretrained("facebook/opt-350m")
tokenizer = AutoTokenizer.from_pretrained("facebook/opt-350m")

response_template = " ### Answer:"
collator = DataCollatorForCompletionOnlyLM(response_template, tokenizer=tokenizer)
20240730
- 签到了,效率好高,昨天看才送到使馆,今天就批下来,能呆一个月,但是呆不起(穷)。明天终于可以回家养老一周了。
- 7月全勤,30天总跑量210km,平均配速4’14"。最后一晚,计划测万米。起步太快,已经刻意压住,但也干到3’40"以内,中途试图调整节奏未果,3000米@3’43"即爆;第二组带XR跑了4000米@3’56"(他跟了3K),第三组10分钟慢跑6圈@4’08"收尾,想补到3000米,但是心肺真顶不住,身体也已是红温。
- 8月基本是慢跑维持。7月在学校的最后一晚,很想检验一下夏训成果。从6月1日正式恢复训练,起初巨大的落差,直到慢慢又回到巅峰乃至隐隐有超越的势头。人确有无限可能,就像两个月前,我觉得再也回不到3月的状态了,如今我坚信只要无伤,下半年一定可以比3月做得更好,不仅是破三,甚至250以内也未尝不可能。
- PS:SXY前天在ASICS做敏捷梯的臀腿力量,疼得走路都费事,今晚还是把800米间歇跑了6组,虽然不快,但也算是上强度了。乳酸堆积的疼痛其实是很容易就可以克服的,以前例训,经常是周四晚力量(敏捷梯箭步跳,弹力带蛙跳,负重深蹲跳,雪橇车冲刺,立卧撑),第二天浑身上下没一块不疼的肌肉,周六下午直接就上死亡400米间歇,但是上了跑道迈开腿,其实也就不疼了,关键就是迈开那一步。


关于accelerate ddp 与 trl SFTTrainer
- accelerate: (accelerate config)
- backend(有很多后端,ddp是默认的,数据并行)
- default ddp: 提升数据的吞吐量
self.accelerator.ddp_handler = DistributedDataParallelKwargs(**kwargs)
- deepspeed, fsdp(这是两个流行的):https://huggingface.co/blog/deepspeed-to-fsdp-and-back
- megtron-lm
- 之前fsdp在并行上处理有一些问题,不如deepspeed,但后来BUG被修了,其实现在也差不了太多
- default ddp: 提升数据的吞吐量
- backend(有很多后端,ddp是默认的,数据并行)
- accelerate ddp
- 一般用法(相对底层),稍加改动;
- https://huggingface.co/docs/transformers/accelerate
- with
transformers(Trainer) ortrl(SFTTrainer):基本上不需要改动;accelerate lanuch(具体使用ddp,deepspeed,fsdp可以通过配置调整)
- 一般用法(相对底层),稍加改动;

简单使用:
accelerate config:命令行交互式配置(默认保存在./accelerate/default_config.yaml中,accelerate lanuch也可以指定参数,会覆盖default_config.yaml的值)accelerate launch -haccelerate launch --num_processes 2 --mixed_precision bf16 training_scripts.py
一个简单的训练脚本:
import os
os.environ['http_proxy'] = 'http://127.0.0.1:7890'
os.environ['https_proxy'] = 'http://127.0.0.1:7890'
# os.environ['NCCL_P2P_DISABLE'] = '1'
# os.environ['NCCL_IB_DISABLE'] = '1'
os.environ['WANDB_DISABLED'] = 'true'


from transformers import AutoModelForCausalLM, AutoTokenizer
from datasets import load_dataset
from trl import SFTConfig, SFTTrainer, DataCollatorForCompletionOnlyLM
# from accelerate import Accelerator

import torch
torch.manual_seed(42)
dataset = load_dataset("lucasmccabe-lmi/CodeAlpaca-20k", split="train")
model = AutoModelForCausalLM.from_pretrained("facebook/opt-350m",
                                            #  device_map={"": Accelerator().process_index}
                                            # device_map={"": 0}
                                             )
tokenizer = AutoTokenizer.from_pretrained("facebook/opt-350m")
def formatting_prompts_func(example):
    output_texts = []
    for i in range(len(example['instruction'])):
        text = f"### Question: {example['instruction'][i]}\n ### Answer: {example['output'][i]}"
        output_texts.append(text)
    return output_texts
response_template = " ### Answer:"
collator = DataCollatorForCompletionOnlyLM(response_template, tokenizer=tokenizer)
args = SFTConfig(output_dir="/tmp",
                 max_seq_length=512,
                 num_train_epochs=2,
                 per_device_train_batch_size=4,
                 gradient_accumulation_steps=4,
                 gradient_checkpointing=True,
                 )
trainer = SFTTrainer(
    model,
    train_dataset=dataset,
    args=args,
    formatting_func=formatting_prompts_func,
    data_collator=collator,
)
trainer.train()
关于SFTConfig:
class SFTConfig(TrainingArguments):- 继承了
TrainingArguments类,num_train_epochs: default 3per_device_train_batch_size: default 8per_device_eval_batch_size: default 8gradient_accumulation_steps: default 1dataloader_drop_last: default false
- 继承了
dataset_text_field: 跟 dataset 的成员对齐max_seq_lengthoutput_dir='/tmp'- packing=True,
- example packing, where multiple short examples are packed in the same input sequence to increase training efficiency.
# allows multiple shorter sequences to be packed into a single training example, maximizing the use of the model's context window.
20240731
累,晒,困。一路上真被晒麻了,这天气还出去玩的人是不是得脑子有坑,不过这周末好像是七夕。
回家先称空腹净重,64.3kg,BMI跌到20以下,比3月份赛前轻1kg左右,但是再轻也轻不到哪儿去了。
虽然很累,晚上九点半还是跑了一圈船闸线,6.65km@4’25",这个点路上已经没有人了,其实很舒服,无所顾忌的轻松。跑完极其燥热,回来洗完澡直接就躺平了,疲劳到极点了。这次没有带跑鞋,真的想慢慢跑一段时间,虽然似乎也不是很能慢得下来,随性而为,我也不想太去约束什么了。
XR后天也要回重庆;嘉伟应该是Maggie给他搞了份陆家嘴的活干,Maggie人确实不错,可惜我本科没有遇到,如今还是自己打拼靠谱点;LXY晚上10km@5’30",女生的耐热确实更好,这种天气在外面我是不太能跑30分钟以上的。
PS:老妈说WCY也刚回来,要不去见一面,或也是逃不脱世俗的约束。其实我不太清楚老妈跟CAQ还有WQH的关系到底怎么样,虽然都是医院里资格最老的一批,认识也有三十多年了,但是跟WCY是真不熟,虽然名义上还是扬中的学妹,唯一的交集已经是快十年前了,反正就是到处都很难绷。


矩阵求导第二个: y = x W \mathbf y=\mathbf x \mathbf W y=xW
- x \mathbf x x 是一个行向量
- 对原式做等价替换: y T = W T x T \mathbf y^T=\mathbf W^T\mathbf x^T yT=WTxT
∂ y ∂ x = ∂ y T ∂ x T = W T \frac{\partial \mathbf y}{\partial \mathbf x}=\frac{\partial \mathbf y^T}{\partial \mathbf x^T}=\mathbf W^T ∂x∂y=∂xT∂yT=WT
构造一个简单的示例辅助理解:
( y 1 y 2 y 3 ) = ( x 1 x 2 ) ( w 11 w 12 w 13 w 21 w 22 w 23 ) = ( w 11 x 1 + w 21 x 2 w 12 x 1 + w 22 x 2 w 13 x 1 + w 23 x 2 ) \begin{split} \begin{pmatrix}y_1 & y_2 & y_3\end{pmatrix}&=\begin{pmatrix}x_1 & x_2\end{pmatrix}\begin{pmatrix}w_{11} & w_{12} & w_{13}\\ w_{21} & w_{22} & w_{23} \end{pmatrix}\\ &=\begin{pmatrix}w_{11}x_1+w_{21}x_2 & w_{12}x_1+w_{22}x_2 & w_{13}x_1+w_{23}x_2\end{pmatrix} \end{split} (y1y2y3)=(x1x2)(w11w21w12w22w13w23)=(w11x1+w21x2w12x1+w22x2w13x1+w23x2)
( ∂ y 1 ∂ x ∂ y 2 ∂ x ∂ y 3 ∂ x ) = ( w 11 w 21 w 12 w 22 w 13 w 23 ) \begin{pmatrix}\frac{\partial y_1}{\partial \mathbf x} & \frac{\partial y_2}{\partial \mathbf x} & \frac{\partial y_3}{\partial \mathbf x}\end{pmatrix}=\begin{pmatrix}w_{11} & w_{21}\\ w_{12} & w_{22}\\ w_{13} & w_{23} \end{pmatrix} (∂x∂y1∂x∂y2∂x∂y3)= w11w12w13w21w22w23
示例:
import torch
# 定义矩阵 A 和向量 x
A = torch.tensor([[1.0, 2.0],
                  [3.0, 4.0],
                  [5.0, 6.0]], requires_grad=True)
x = torch.tensor([[0.5, 1.0, 2]], requires_grad=True)
# 计算 y = A * x
y = torch.matmul(x, A)[0]
# 初始化雅可比矩阵
jacobian = torch.zeros(2, 3)
# 计算每个 y 的元素关于 x 的导数
for i in range(y.size(0)):
    y[i].backward(retain_graph=True)
    jacobian[i] = x.grad.view(1, -1)
    x.grad.zero_()
print(jacobian)
"""
tensor([[1., 3., 5.],
        [2., 4., 6.]])
"""
第三个:
(1) α = y T A x \alpha=\mathbf y^T\mathbf A\mathbf x α=yTAx
∂ α ∂ x = y T A ∂ α ∂ y = x T A T \begin{split} &\frac{\partial \alpha}{\partial \mathbf x}=\mathbf y^T\mathbf A\\ &\frac{\partial \alpha}{\partial \mathbf y}=\mathbf x^T\mathbf A^T \end{split} ∂x∂α=yTA∂y∂α=xTAT
来看证明:
- 对于第一个导数
- w T = y T A \mathbf w^T=\mathbf y^T\mathbf A wT=yTA
- α = w T x \alpha=\mathbf w^T\mathbf x α=wTx
- ∂ α ∂ x = w T = y T A \frac{\partial \alpha}{\partial \mathbf x}=\mathbf w^T=\mathbf y^T\mathbf A ∂x∂α=wT=yTA
- 对于第二个导数
- α = α T = x T A T y \alpha=\alpha^T=\mathbf x^T\mathbf A^T\mathbf y α=αT=xTATy
- ∂ α ∂ y = x T A T \frac{\partial \alpha}{\partial \mathbf y}=\mathbf x^T\mathbf A^T ∂y∂α=xTAT
(2) α = x T A x \alpha =\mathbf x^T\mathbf A\mathbf x α=xTAx
∂ α ∂ x = ( A + A T ) x \frac{\partial \alpha}{\partial \mathbf x}=(\mathbf A+\mathbf A^T)\mathbf x ∂x∂α=(A+AT)x
证明,基于矩阵矢量乘法的定义/计算:
α = ∑ i x i ∑ j a i j x j = ∑ i ∑ j x i a i j x j ∂ α ∂ x k = ∑ i x i a i k + ∑ j x k a k j ∂ α ∂ x = A T x + A x = ( A + A T ) x \begin{split} &\alpha=\sum_ix_i\sum_ja_{ij}x_j=\sum_i\sum_jx_ia_{ij}x_j\\ &\frac{\partial \alpha}{\partial x_k}=\sum_ix_ia_{ik}+\sum_jx_ka_{kj}\\ &\frac{\partial \alpha}{\partial \mathbf x}=\mathbf A^T\mathbf x+\mathbf A\mathbf x=(\mathbf A+\mathbf A^T)\mathbf x \end{split} α=i∑xij∑aijxj=i∑j∑xiaijxj∂xk∂α=i∑xiaik+j∑xkakj∂x∂α=ATx+Ax=(A+AT)x
一些特例:
- A T = A \mathbf A^T=\mathbf A AT=A 时, ∂ α ∂ A = 2 A x \frac{\partial \alpha}{\partial \mathbf A}=2\mathbf A\mathbf x ∂A∂α=2Ax
示例:
x = torch.randn(3, 1, requires_grad=True)
A = torch.randn(3, 3, requires_grad=True)
y = (x.T @ A) @ x
y.backward()
torch.allclose(x.grad, (A + A.T) @ x)
20240801
- 老妈小生日,小搓一顿。
- 养老模式启动,晚饭后30分钟慢跑@4’44",还是不够稳。


第四个: y = A x \mathbf y=\mathbf A\mathbf x y=Ax:关于矩阵求导
∂ y ∂ A \frac{\partial \mathbf y}{\partial \mathbf A} ∂A∂y
- 是一个三维的tensor
- ∂ y i ∂ A \frac{\partial y_i}{\partial \mathbf A} ∂A∂yi 各是一个矩阵
- y 1 = w 11 x 1 + w 12 x 2 ⇒ [ x 1 x 2 0 0 ] y_1=w_{11}x_1+w_{12}x_2 \Rightarrow \begin{bmatrix}x_1 & x_2\\0 & 0\end{bmatrix} y1=w11x1+w12x2⇒[x10x20]
- y 2 = w 21 x 1 + w 22 x 2 ⇒ [ 0 0 x 1 x 2 ] y_2=w_{21}x_1+w_{22}x_2 \Rightarrow \begin{bmatrix}0 & 0\\x_1 & x_2\end{bmatrix} y2=w21x1+w22x2⇒[0x10x2]
参考链接:https://pytorch.org/tutorials/beginner/basics/autogradqs_tutorial.html#optional-reading-tensor-gradients-and-jacobian-products
示例1:
import torch
# 定义矩阵 A 和向量 x
A = torch.tensor([[1.0, 2.0],
                  [3.0, 4.0],
                  # [5.0, 6.0]
                 ],
                 requires_grad=True)
x = torch.tensor([[0.5], [1.0]], requires_grad=True)
# 计算 y = A * x
y = torch.matmul(A, x)
print(y.shape) # torch.Size([2, 1])
# 计算 y 对 A 的雅可比矩阵
# v^T·J
y.backward(torch.ones_like(y))
# 获取雅可比矩阵
jacobian = A.grad
jacobian
"""
tensor([[0.5000, 1.0000],
        [0.5000, 1.0000]])
"""
示例2:
# 定义矩阵 A 和向量 x
A = torch.tensor([[1.0, 2.0],
                  [3.0, 4.0],
                  [5.0, 6.0]
                 ], requires_grad=True)
x = torch.tensor([[0.5], [1.0]], requires_grad=True)
# 计算 y = A * x
y = torch.matmul(A, x)
# 初始化一个与 A 形状相同的零张量来存储雅可比矩阵
jacobian = torch.zeros((y.size(0), A.size(0), A.size(1)))
# 逐元素计算雅可比矩阵
for i in range(y.size(0)):
    # 清除梯度
    A.grad = None
    # 对 y 中的第 i 个元素进行反向传播
    y[i].backward(retain_graph=True)
    # 将计算得到的梯度存储在雅可比矩阵中
    jacobian[i] = A.grad
jacobian
"""
tensor([[[0.5000, 1.0000],
         [0.0000, 0.0000]],
        [[0.0000, 0.0000],
         [0.5000, 1.0000]]])
"""
示例3:
# 定义矩阵 A 和向量 x
A = torch.tensor([[1.0, 2.0],
                  [3.0, 4.0],
                  [5.0, 6.0]], requires_grad=True)

x = torch.tensor([[0.5], [1.0]], requires_grad=True)
# 计算 y = A * x
y = torch.matmul(A, x)
print(y.shape) # torch.Size
# 计算 y 对 A 的雅可比矩阵
# v^T·J
y.backward(torch.tensor([1., 2., 3.]).view(-1, 1))
# 获取雅可比矩阵
jacobian = A.grad
jacobian
最后是损失的反向传播:
import torch
# 设定输入 x 和权重 W,b 为偏置
x = torch.tensor([[1.0, 2.0]], requires_grad=True)  # 1x2 行向量
W = torch.tensor([[0.5, -0.5], [1.5, -1.0]], requires_grad=True)  # 2x2 矩阵
b = torch.tensor([[0.1, -0.1]], requires_grad=True)  # 1x2 行向量
# 前向传播计算 z = xW + b
z = x @ W + b  # 矩阵乘法加上偏置
# 定义一个简单的标量损失函数,假设为 z 的和
L = z.sum()
# 进行反向传播计算梯度
L.backward()
# 打印梯度
print("dL/dx:", x.grad)
print("dL/dW:", W.grad)
print("dL/db:", b.grad)

# 手动验证梯度计算
dL_dz = torch.ones_like(z)  # 因为 L = z.sum(), dL/dz = 1
dz_dW = x.t()  # d(xW+b)/dW = x^T
manual_dL_dW = dz_dW @ dL_dz  # outer product
print("Manual dL/dW:", manual_dL_dW)
"""
dL/dx: tensor([[0.0000, 0.5000]])
dL/dW: tensor([[1., 1.],
        [2., 2.]])
dL/db: tensor([[1., 1.]])
Manual dL/dW: tensor([[1., 1.],
        [2., 2.]], grad_fn=<MmBackward0>)
"""
20240802
- 回来还是清净一些,做事效率也高一点。大热天也不用往外面跑。
- XR今早回了重庆,7月一个个都没怎么好好练,XR一共才103k,均配都掉到5’15"开外。嘉伟157K,均配也只有4’27"。LXY昨晚70分钟12.5K,把三条路线都刷了一遍,确实很可怕。
- 依然是半小时慢跑,依然不如意,总是慢不下来。


selenium4和3的区别
Selenium 4和3的主要区别包括:
初始化driver对象:Selenium 4引入了一个新的Service类来管理驱动程序的启动和停止,而Selenium 3则没有这个类。
元素定位策略:Selenium 4废弃了find_element_by_xxx和find_elements_by_xxx方法,统一采用find_element(By.XXX, value)和find_elements(By.XXX, value)这种方式。此外,Selenium 4还增加了相对定位的方式,如above、below、to_left_of、to_right_of和near等。
expected_condition模块:在显性等待的expected_condition模块中,Selenium 4以函数的形式实现各个条件,而Selenium 3则是通过类来实现。
ActionChains类:Selenium 4对ActionChains类进行了优化,例如将move_to_element(element).click()改为click(element),move_to_element(element).click_and_hold()改为click_and_hold(element)。
另外浏览器选项和capabilities:Selenium 4移除了对旧协议的支持,并默认使用W3C WebDriver标准。这可能导致不符合W3C标准的测试功能无法启动。
Git常用指令
git config --global user.name 查看用户名
git config --global user.name “serena” 修改用户名
git config --global user.email 查看邮箱
git config --global user.email serena@example.com 修改邮箱
git config --list 查看配置列表
git config --global --list --show-origin git全局设置文件地址查询

3 初始化仓库
git init 初始化本地仓库

4 C(新增)
git status 查看工作目录和暂存区的状态
git add . 提交所有文件到暂存区
git commit -m “msg” 将暂存区提交到仓库区

git reset 命令的作用是将暂存区的文件取消暂存或者是切换到指定版本
取消暂存命令格式:git reset 文件名
切换到指定版本命令格式:git reset --hard 版本号,版本号通过 git log 命令来查看
注意:每次Git提交都会产生新的版本号,通过版本号就可以回到历史版本

git reset —hard HEAD/HEAD/HEAD^/HEAD~100 回退到上几个版本
HEAD是当前版本,HEAD上个版本,HEAD^上上个版本,HEAD~100回退100个版本
git reset —hard 3628164 回退到指定版本号,版本号不用写全

git cherry-pick 摘草莓。摘取某个commit_id到当前分支下(只要这个commit_id存在就好,不在乎它在
哪个分支下的)

5 U(修改)
git checkout – readme.txt 撤销工作区修改(尚未add,尚未commit)

git reset HEAD readme.txt, 再git checkout – readme.txt 撤销暂存区修改(已经add,尚未
commit)
git reset命令既可以回退版本,也可以把暂存区的修改回退到工作区。当我们用HEAD时,表示最新的版
本。

git reset —hard HEAD^(版本回退) 撤销版本库修改(已经commit,尚未推送到远程)

7 R(查询)
git status 查看工作目录中文件的状态(已跟踪(已提交 已暂存 已修改) 未跟踪)
git diff 查看未暂存的修改
git diff --cache 查看未提交的暂存
git log --oneline 查看提交记录

8 分支
分支的本质其实就是一个提交对象。
HEAD: 是一个指针它默认指向**master**分支,切换分支时其实就是让HEAD指向不同的分支。每次有新的提交时,HEAD都会带着当前指向的分支,一起往前移动。

第一次时候请先进行一次提交(git add/git commit),否则 Git 无法创建分支。

git log --oneline --decorate --graph --all 查看整个项目的分支图
git branch 查看分支列表
git branch -v 查看分支指向的最新的提交
git branch [name] 在当前提交对象上创建新的分支
git branch [name] [commithash] 在指定的提交对象上创建新的分支
git checkout [name] 切换分支
git branch -d [name] 删除空的分支,删除已经被合并的分支
git branch -D [name] 强制删除分支

8.1 git分支本质
分支本质是一个提交对象,所有的分支都会有机会被**HEAD所引用(HEAD**一个时刻只会指向一个分支),当我们有新的提交的时候,HEAD会携带当前持有的分支往前移动

git branch [branchname] 创建分支
git checkout [branchname] 切换分支
git checkout -b [branchname] 创建&切换分支
git branch [branchname] [commitHash] 版本穿梭(时光机)
git branch -d [branchname] 普通删除分支
git branch -D [branchname] 强制删除分支
git merge [branchname] 合并分支

快进合并 --> 不会产生冲突
典型合并 --> 有机会产生冲突
解决冲突 --> 打开冲突的文件 进行修改 add commit

git branch 查看分支列表
git branch --merged 查看合并到当前分支的分支列表, 一旦出现在这个列表中就应该删除
git branch --no-merged 查看没有合并到当前分支的分支列表,一旦出现在这个列表就应该观察一下是否需要合并

8.3 git分支的注意点
在切换的时候 一定要保证当前分支是干净的!!!
允许切换分支:

分支上所有的内容处于已提交状态
(避免)分支上的内容是初始化创建 处于未跟踪状态
(避免)分支上的内容是初始化创建 第一次处于已暂存状态
不允许切分支:

分支上所有的内容处于已修改状态,或第二次以后的已暂存状态
在分支上的工作做到一半时 如果有切换分支的需求, 我们应该将现有的工作存储起来

git stash 会将当前分支上的工作推到一个栈中
// 分支切换–>进行其他工作–>完成其他工作后–>切回原分支

git stash apply 将栈顶的工作内容还原,但不让任何内容出栈
git stash drop 取出栈顶的工作内容后,就应该将其删除(出栈)
git stash pop --> git stash apply + git stash drop
git stash list 查看存储

8.4 后悔药
git checkout – [filename] 撤销工作目录某个文件的修改
git checkout – . 撤销工作目录所有文件的修改

git reset HEAD [filename] 撤销暂存区某个文件的修改
git reset HEAD . 撤销暂存区某个文件的修改

git commit --amend 撤销提交,注释写错了,重新给用户一次机会改注释

8.5 reset三部曲
git reset --soft [commithash[ —> 用[commithash]的内容重置HEAD内容
git reset [–mixed] [commithash] —> 用[commithash]的内容重置HEAD内容 重置暂存区
git reset --hard [commithash] —> 用[commithash]的内容重置HEAD内容 重置暂存区 重置工作目录

8.6 路径reset
所有的路径 reset都要省略第一步!!!
第一步是重置HEAD内容,我们知道HEAD本质指向一个分支,分支的本质是一个提交对象 。
提交对象,指向一个树对象,树对象又很有可能指向多个git对象,一个git对象代表一个文件!!!
HEAD可以代表一系列文件的状态!!!

git reset [–mixed] [commithash] [filename] 用[commithash]中[filename]的内容重置暂存区

8.7 checkout深入理解
git checkout [brancname] 跟 git reset --hard [commithash] 特别像

共同点:
* 都需要重置 HEAD 暂存区 工作目录
区别:
checkout 对工作目录是安全的 reset --hard是强制覆盖
checkout 动HEAD时不会带着分支走而是切换分支
reset --hard 时是带着分支走
checkout + 路径

git checkout [commithash] [filename] 重置暂存区 重置工作目录
git checkout – [filename] 重置工作目录

git 设置用户名密码
在Git中设置用户名和密码通常涉及全局或特定仓库的Git配置。以下是如何设置Git用户名和邮箱地址的步骤:
打开终端(在Windows上是Git Bash)。
设置全局用户名和邮箱地址(这会影响所有仓库):
git config --global user.name "Your Name"
git config --global user.email "your_email@example.com"
如果你只想为特定仓库设置用户名和邮箱地址,首先导航到该仓库的目录,然后运行:
git config user.name "Your Name"
git config user.email "your_email@example.com"
Git不存储密码,但你可以使用凭据存储(credential storage)来记住密码:
git config --global credential.helper store
当你下一次从远程仓库进行身份验证时,Git会要求你输入用户名和密码,并将其保存在磁盘上。
20240803
- 慢跑27分钟@4’30",不是凑整,是真的太热了。
- 实话说并不很想跑,纯找罪受,但总有人更疯,也维持一下吧。


Langchain基础回顾、LECL、Tool Use、RAG 以及 LangSmith
参考资料:
- https://github.com/langchain-ai/langchain/tree/master/cookbook
- https://python.langchain.com/v0.2/docs/concepts/#langchain-expression-language-lcel
- https://python.langchain.com/v0.1/docs/expression_language/why/
- https://ai.plainenglish.io/understanding-large-language-model-based-agents-27bee5c82cec
import os
from dotenv import load_dotenv
# LANGCHAIN_TRACING_V2=true # 免费
# LANGCHAIN_API_KEY= # 免费
# OPENAI_API_KEY= # 付费,但可以用别的
load_dotenv()
- 所谓的
agent开发,LLMs workflows,GenAI 时代的软件工程- 丰富的生态,
- workflows 的复杂,手撸的效率非常低,而且不好维护,
- Input -> Processing -> Output
- 与 AutoGen 等相比,更多地面向开发者,面向软件工程
- LangGraph:multi-agents workflows
LangSmith也在更多地弥补中间过程显示的不足
- 推荐 《大模型应用开发 动手做AI Agent》(https://www.bilibili.com/opus/935785456083140628)
- 面向开发者,第一本
- 系统而全面,可以做一个很好的入门
LCEL (LangChain Expression Language)
- LangChain 重写了
|(__or__)运算符,Chain 之所在,即通过|将所有东西串成一个链 RunnablePassthrough: RunnablePassthrough 允许你将输入数据直接传递而不做任何更改(identity),通常与 RunnableParallel 一起使用,将数据传递到新的键中。- LangChain 的应用 RunnablePassthrough 作为一个占位符,可以在需要时填充数据,比如在公司名称尚未确定时先留空,后续再填入。
- 所谓的最佳实践
- python:遍历,也可以用 list comprehension
- 对于 matlab:也可以遍历,也可以整理成 matrix,直接矩阵矢量乘法;
# 自带的|运算符,是二进制位运算
# (2 | 3) > 3
2 | 3 > 2 # True
2 | 3 # 3
from langchain_core.runnables import (
    RunnablePassthrough,
    RunnableLambda,
    RunnableParallel
)
os.environ["LANGCHAIN_PROJECT"] = 'lcel_test' # 设置一个新的project

from langchain_openai import ChatOpenAI
from langchain_core.prompts import ChatPromptTemplate
from langchain_core.output_parsers import StrOutputParser

prompt = ChatPromptTemplate.from_template(
    "Tell me a short joke about {topic}"
)
output_parser = StrOutputParser()
llm = ChatOpenAI(model="gpt-3.5-turbo")

# lcel
chain = (
    {"topic": RunnablePassthrough()}
    | prompt
    | llm
    | output_parser
)
chain.invoke("ice cream")
# 'Why did the ice cream truck break down?\n\nBecause it had too many "scoops"!'
这里prompt的输入就是{"topic": RunnablePassthrough()},这样上一步的输出是下一步的输入,如此成chain
比如直接写成常见的串行语法:
prompt.invoke({'topic': 'ice cream'})
# ChatPromptValue(messages=[HumanMessage(content='Tell me a short joke about ice cream')])
llm.invoke(prompt.invoke({'topic': 'ice cream'}))
# AIMessage(content='Why did the ice cream truck break down?\n\nIt had too many "scoops" of ice cream!', response_metadata={'token_usage': {'completion_tokens': 22, 'prompt_tokens': 15, 'total_tokens': 37}, 'model_name': 'gpt-3.5-turbo-0125', 'system_fingerprint': None, 'finish_reason': 'stop', 'logprobs': None}, id='run-fb46f4ce-665b-45f7-9fd0-9dd559465fcc-0', usage_metadata={'input_tokens': 15, 'output_tokens': 22, 'total_tokens': 37})
output_parser.invoke(llm.invoke(prompt.invoke({'topic': 'ice cream'})))
# 'Why did the ice cream truck break down? It had too many "scoops" on board!'
runnables
RunnablePassthrough(): identity
# ex1
chain = RunnablePassthrough() | RunnablePassthrough () | RunnablePassthrough ()
chain.invoke("hello") # 'hello'
# ex2
chain = RunnablePassthrough() | RunnableLambda(lambda x: x.upper())
chain.invoke("hello") # 'HELLO'
# ex3
chain = RunnablePassthrough() | RunnableLambda(lambda x: x.upper()) | RunnablePassthrough()
chain.invoke("hello") # 'HELLO'
20240804
- 今晚的节奏尚可,虽然依然达不到预期效果,风吹到身上都是烫的,地球真的是要炸了。这个强度刚刚好,不至于太伤。
- PS:小胖终于夺冠,题外话,其实巴黎的女单和东京的男单很像,三年前就觉得马龙一身荣誉,也到了当退之年,为什么不是小胖夺冠呢,太可惜了,但是竞技体育就是如此残酷,只是今年的女单结局太过不堪,丢人丢到国外去了属于是。虽然不是很喜欢那些把自己逼得太死的人,但是像小胖这样扎实内敛,而终成正果,当然是正的不能再正了,无可挑剔。


langchain JSON test
同样新建项目:
os.environ["LANGCHAIN_PROJECT"] = 'json_test2'
from langchain_core.prompts import HumanMessagePromptTemplate
from langchain_core.prompts.chat import SystemMessagePromptTemplate
from langchain_core.output_parsers import JsonOutputParser

llm = ChatOpenAI(model="gpt-4o",
                 model_kwargs={'response_format': {"type": "json_object"}})
json_parser = JsonOutputParser()

# 创建提示模板
prompt = ChatPromptTemplate.from_messages([
    ("system", '''I want you to extract the person name, age and a description from the following text.
    Here is the JSON object, output:
    {{
        "name": string,
        "age": int,
        "description": string
    }}'''),
    ("human", "{input}")
])
# 创建 LCEL 链
chain = (
    {"input": RunnablePassthrough()}
    | prompt
    | llm
    | json_parser
)

prompt # ChatPromptTemplate(input_variables=['input'], messages=[SystemMessagePromptTemplate(prompt=PromptTemplate(input_variables=[], template='I want you to extract the person name, age and a description from the following text.\n    Here is the JSON object, output:\n    {{\n        "name": string,\n        "age": int,\n        "description": string\n    }}')), HumanMessagePromptTemplate(prompt=PromptTemplate(input_variables=['input'], template='{input}'))])

print(prompt[0]) # prompt=PromptTemplate(input_variables=[], template='I want you to extract the person name, age and a description from the following text.\n    Here is the JSON object, output:\n    {{\n        "name": string,\n        "age": int,\n        "description": string\n    }}')
print(prompt[1]) # prompt=PromptTemplate(input_variables=['input'], template='{input}')
ChatPromptTemplate.from_messages(
    [SystemMessagePromptTemplate.from_template('''I want you to extract the person name, age and a description from the following text.
    Here is the JSON object, output:
    {{
        "name": string,
        "age": int,
        "description": string
    }}'''),
     HumanMessagePromptTemplate.from_template("{input}")
    ]
)
# ChatPromptTemplate(input_variables=['input'], messages=[SystemMessagePromptTemplate(prompt=PromptTemplate(input_variables=[], template='I want you to extract the person name, age and a description from the following text.\n    Here is the JSON object, output:\n    {{\n        "name": string,\n        "age": int,\n        "description": string\n    }}')), HumanMessagePromptTemplate(prompt=PromptTemplate(input_variables=['input'], template='{input}'))])
result = chain.invoke("John is 20 years old. He is a student at the University of California, Berkeley. He is a very smart student.")

# {'name': 'John', 'age': 20, 'description': 'He is a student at the University of California, Berkeley. He is a very smart student.'}

# chain.invoke({'input': "John is 20 years old. He is a student at the University of California, Berkeley. He is a very smart student."})
RAG
# !conda install faiss-gpu -c pytorch

os.environ["LANGCHAIN_PROJECT"] = 'rag_test' # 同样新建项目
from langchain_community.vectorstores import FAISS
from langchain_core.output_parsers import StrOutputParser
from langchain_core.prompts import ChatPromptTemplate
from langchain_core.runnables import RunnablePassthrough
from langchain_openai import ChatOpenAI, OpenAIEmbeddings
OpenAIEmbeddings() # OpenAIEmbeddings(client=<openai.resources.embeddings.Embeddings object at 0x7677f6861ac0>, async_client=<openai.resources.embeddings.AsyncEmbeddings object at 0x7677f6643e60>, model='text-embedding-ada-002', dimensions=None, deployment='text-embedding-ada-002', openai_api_version='', openai_api_base=None, openai_api_type='', openai_proxy='', embedding_ctx_length=8191, openai_api_key=SecretStr('**********'), openai_organization=None, allowed_special=None, disallowed_special=None, chunk_size=1000, max_retries=2, request_timeout=None, headers=None, tiktoken_enabled=True, tiktoken_model_name=None, show_progress_bar=False, model_kwargs={}, skip_empty=False, default_headers=None, default_query=None, retry_min_seconds=4, retry_max_seconds=20, http_client=None, http_async_client=None, check_embedding_ctx_length=True)

vectorstore = FAISS.from_texts(
    ["Cats love thuna"], embedding=OpenAIEmbeddings()
)
retriever = vectorstore.as_retriever()
retriever.invoke("What do cats like to eat?") # [Document(page_content='Cats love thuna')]


template = """Answer the question based only on the following context:
{context}

Question: {question}
"""
prompt = ChatPromptTemplate.from_template(template=template)

def format_docs(docs):
    return "\n\n".join(doc.page_content for doc in docs)

rag_chain = (
    {"context": retriever | format_docs, "question": RunnablePassthrough()}
    | prompt
    | ChatOpenAI()
    | StrOutputParser()
)

rag_chain.invoke("What do cats like to eat?") # Tuna
Tool uses(这个在GLM3出来的时候重点关注了一下)
- precise math calculation
- custom tools (自定义 functions)
os.environ["LANGCHAIN_PROJECT"] = 'tools_test2' # 新建项目

import numpy as np
from langchain_core.tools import Tool
from langchain_core.tools import tool

@tool
def add(num1: float, num2: float) -> float:
    "Add two numbers."
    return num1 + num2

@tool
def subtract(num1: float, num2: float) -> float:
    """
    Subtract two numbers.
    """
    return num1 - num2

@tool
def multiply(num1: float, num2: float) -> float:
    """Multiply two float ."""
    return num1 * num2

@tool
def divide(numerator: float, denominator: float) -> float:
    """
    Divides the numerator by the denominator.
    """

    result = numerator / denominator
    return result

@tool
def power(base: float, exponent: float) -> float:
    "Take the base to the exponent power, base^exponent."
    return base**exponent

@tool
def exp(x):
    """
    Calculate the natural exponential $e^x$
    """
    return np.exp(x)
上面定义了一堆工具函数,然后需要注册一下:
tools = [add, subtract, multiply, divide, power, exp]
然后我们开始使用:
- 先定义好agent
from langchain_openai import ChatOpenAI
from langchain.agents import create_openai_tools_agent
from langchain_core.prompts import (
    ChatPromptTemplate,
    MessagesPlaceholder,
    HumanMessagePromptTemplate,
    SystemMessagePromptTemplate,
)

llm = ChatOpenAI(model="gpt-4o", temperature=0, streaming=True)

system_template = """
You are a helpful math assistant that uses calculation functions to solve complex math problems step by step.
"""

human_template = "{input}"

prompt = ChatPromptTemplate.from_messages(
    [  SystemMessagePromptTemplate.from_template(system_template),    MessagesPlaceholder(variable_name="chat_history", optional=True),     HumanMessagePromptTemplate.from_template(input_variables=["input"], template=human_template),     MessagesPlaceholder(variable_name="agent_scratchpad"),
    ]
)
agent = create_openai_tools_agent(llm, tools, prompt)
- 然后执行
from langchain.agents import AgentExecutor

agent_executor = AgentExecutor(agent=agent, tools=tools, verbose=True)
#  """Agent that is using tools."""
# AgentExecutor??
agent_executor.invoke({"input": "What is the result of directive of sigmoid(2.5)?"})

"""
> Entering new AgentExecutor chain...

Invoking: `exp` with `{'x': -2.5}`
responded: The sigmoid function is defined as:

\[ \sigma(x) = \frac{1}{1 + e^{-x}} \]

The derivative of the sigmoid function is:

\[ \sigma'(x) = \sigma(x) \cdot (1 - \sigma(x)) \]

First, we need to calculate \(\sigma(2.5)\):

\[ \sigma(2.5) = \frac{1}{1 + e^{-2.5}} \]

Let's calculate \(e^{-2.5}\) and then \(\sigma(2.5)\).

0.0820849986238988
Invoking: `divide` with `{'numerator': 1, 'denominator': 1.082085}`
responded: We have \( e^{-2.5} \approx 0.082085 \).

Now, we can calculate \(\sigma(2.5)\):

\[ \sigma(2.5) = \frac{1}{1 + 0.082085} \]

Let's compute this value.

0.9241418188035136
Invoking: `subtract` with `{'num1': 1, 'num2': 0.9241418188035136}`
responded: We have \(\sigma(2.5) \approx 0.9241\).

Next, we need to calculate the derivative \(\sigma'(2.5)\):

\[ \sigma'(2.5) = \sigma(2.5) \cdot (1 - \sigma(2.5)) \]

Let's compute \(1 - \sigma(2.5)\) and then \(\sigma'(2.5)\).

0.07585818119648635
Invoking: `multiply` with `{'num1': 0.9241418188035136, 'num2': 0.07585818119648635}`


0.0701037175420474The derivative of the sigmoid function at \(x = 2.5\) is approximately \(0.0701\).

> Finished chain.
"""
"""
{'input': 'What is the result of directive of sigmoid(2.5)?',
 'output': 'The derivative of the sigmoid function at \\(x = 2.5\\) is approximately \\(0.0701\\).'}
"""
我们可以简单验证一下计算结果是否正确:
σ ( x ) = 1 1 + exp ( − x ) σ ′ ( x ) = σ ( x ) ( 1 − σ ( x ) ) \begin{split} \sigma(x)&=\frac{1}{1+\exp(-x)}\\ \sigma'(x)&=\sigma(x)(1-\sigma(x))\\ \end{split} σ(x)σ′(x)=1+exp(−x)1=σ(x)(1−σ(x))
import torch
import torch.nn.functional as F
F.sigmoid(torch.tensor([2.5])) * (1-F.sigmoid(torch.tensor([2.5]))) # tensor([0.0701])
20240805
- 依然慢跑30分钟@7km,不过质量显然比前五天要高不少,不是我变强了,是下了场雨凉快了些,体感很好。
- 今年百米决赛从成绩厚度上来看应该是仅次于2012年伦敦五虎那场了,那场盖伊第四9秒80,今年塞维尔也是9秒82第四无牌,虽然前三咬的都很紧,大嘴虽然是险胜,但如今成绩荣誉的厚度都足以称为历史仅次于博尔特的第二人了,但不得不说汤普森确实是顶级天赋怪。


大模型调优3: finetune_llama3_for_RAG
- finetune Llama3-8B instruct model pipeline
- peft LoRA & bitsandbytes quantization
- RAG financial (chat/QA/instruct) dataset
- Accelerate distributed
- training arguments
- evaluation
import os
os.environ['http_proxy'] = 'http://127.0.0.1:7890'
os.environ['https_proxy'] = 'http://127.0.0.1:7890'
from IPython.display import Image
from textwrap import dedent
安装必要的包
# !pip install --upgrade trl
# !pip install --upgrade bitsandbytes
import random
from typing import Dict, List
from tqdm import tqdm
import numpy as np
import pandas as pd
import matplotlib.pyplot as plt
from matplotlib.ticker import PercentFormatter
import seaborn as sns
from sklearn.model_selection import train_test_split
import torch
from torch.utils.data import DataLoader
from datasets import Dataset, load_dataset
from transformers import (
    AutoModelForCausalLM,
    AutoTokenizer,
    BitsAndBytesConfig,
    pipeline,
)
from peft import (
    LoraConfig,
    PeftModel,
    TaskType,
    get_peft_model,
    prepare_model_for_kbit_training,
)
from trl import DataCollatorForCompletionOnlyLM, SFTConfig, SFTTrainer
SEED = 42
def seed_everything(seed: int):
    random.seed(seed)
    np.random.seed(seed)
    torch.manual_seed(seed)
seed_everything(SEED)

常量定义:
pad_token = "<|pad|>"
model_id = "meta-llama/Meta-Llama-3-8B-Instruct"
new_model = "Llama-3-8B-Instruct-Finance-RAG"
Model和Tokenizer
quantization_config = BitsAndBytesConfig(
    load_in_4bit=True,
    bnb_4bit_quant_type="nf4",
    bnb_4bit_compute_dtype=torch.bfloat16
)
# tokenizer
tokenizer = AutoTokenizer.from_pretrained(model_id, use_fast=True)
# 不是所有model的tokenizer都支持 chat_template
print(tokenizer.chat_template)
"""
{% set loop_messages = messages %}{% for message in loop_messages %}{% set content = '<|start_header_id|>' + message['role'] + '<|end_header_id|>

'+ message['content'] | trim + '<|eot_id|>' %}{% if loop.index0 == 0 %}{% set content = bos_token + content %}{% endif %}{{ content }}{% endfor %}{% if add_generation_prompt %}{{ '<|start_header_id|>assistant<|end_header_id|>

' }}{% endif %}
"""
# 比如 base model
AutoTokenizer.from_pretrained('meta-llama/Meta-Llama-3-8B', use_fast=True).chat_template
tokenizer.special_tokens_map, tokenizer.pad_token # {'bos_token': '<|begin_of_text|>', 'eos_token': '<|end_of_text|>'}, None)
tokenizer.add_special_tokens({"pad_token": pad_token})
# training
tokenizer.padding_side = "right"
(tokenizer.pad_token, tokenizer.pad_token_id, tokenizer.eos_token, tokenizer.eos_token_id) # '<|pad|>', 128256, '<|end_of_text|>', 128001)
model = AutoModelForCausalLM.from_pretrained(
    model_id,
    quantization_config=quantization_config,
    #     attn_implementation="flash_attention_2",
    #     attn_implementation="sdpa",
    device_map="auto",
)
len(tokenizer.added_tokens_decoder) # 257
model.model.embed_tokens, tokenizer.vocab_size, len(tokenizer) # (Embedding(128256, 4096), 128000, 128257)
model.resize_token_embeddings(len(tokenizer), pad_to_multiple_of=8) Embedding(128264, 4096)
128257/8, 128264/8 # (16032.125, 16033.0)
模型配置:model.config
LlamaConfig {
  "_name_or_path": "meta-llama/Meta-Llama-3-8B-Instruct",
  "architectures": [
    "LlamaForCausalLM"
  ],
  "attention_bias": false,
  "attention_dropout": 0.0,
  "bos_token_id": 128000,
  "eos_token_id": 128001,
  "hidden_act": "silu",
  "hidden_size": 4096,
  "initializer_range": 0.02,
  "intermediate_size": 14336,
  "max_position_embeddings": 8192,
  "mlp_bias": false,
  "model_type": "llama",
  "num_attention_heads": 32,
  "num_hidden_layers": 32,
  "num_key_value_heads": 8,
  "pretraining_tp": 1,
  "quantization_config": {
    "_load_in_4bit": true,
    "_load_in_8bit": false,
    "bnb_4bit_compute_dtype": "bfloat16",
    "bnb_4bit_quant_storage": "uint8",
    "bnb_4bit_quant_type": "nf4",
    "bnb_4bit_use_double_quant": false,
    "llm_int8_enable_fp32_cpu_offload": false,
    "llm_int8_has_fp16_weight": false,
    "llm_int8_skip_modules": null,
    "llm_int8_threshold": 6.0,
    "load_in_4bit": true,
    "load_in_8bit": false,
    "quant_method": "bitsandbytes"
  },
  "rms_norm_eps": 1e-05,
  "rope_scaling": null,
  "rope_theta": 500000.0,
  "tie_word_embeddings": false,
  "torch_dtype": "bfloat16",
  "transformers_version": "4.43.3",
  "use_cache": true,
  "vocab_size": 128264
}
print(tokenizer.bos_token, tokenizer.bos_token_id) # <|begin_of_text|> 128000
print(tokenizer.eos_token, tokenizer.eos_token_id) # <|end_of_text|> 128001
print(tokenizer.pad_token, tokenizer.pad_token_id) # <|pad|> 128256
接下来用一个financial-qa-10K的数据集作为任务示例:
- RAG dataset with QA and context;
- Question + context => user query;
- Answer => assistant response;
数据字典及样本:
dataset = load_dataset("virattt/financial-qa-10K")
"""
DatasetDict({
    train: Dataset({
        features: ['question', 'answer', 'context', 'ticker', 'filing'],
        num_rows: 7000
    })
})"""
dataset["train"].column_names # ['question', 'answer', 'context', 'ticker', 'filing']

dataset['train'][:1]
"""
{'question': ['What area did NVIDIA initially focus on before expanding to other computationally intensive fields?'],
 'answer': ['NVIDIA initially focused on PC graphics.'],
 'context': ['Since our original focus on PC graphics, we have expanded to several other large and important computationally intensive fields.'],
 'ticker': ['NVDA'],
 'filing': ['2023_10K']}
"""
datasets库的load_datasets得到的DatasetDict对象,可以直接用map方法进行批量处理:
def process(row):
    return {
        "question": row["question"],
        "context": row["context"],
        "answer": row["answer"]
    }
new_dataset = dataset.map(process, num_proc=8,
                          remove_columns=dataset["train"].column_names)
new_dataset
"""
DatasetDict({
    train: Dataset({
        features: ['question', 'answer', 'context'],
        num_rows: 7000
    })
})
"""
这样就得到了QA + Context三列字段,查看:
df = new_dataset['train'].to_pandas()
df.head()
df.isnull().value_counts() # 这个数据集是没有缺失的
然后就是 to char dataset,需要自定义formatter:
def format_example(row: dict):
    prompt = dedent(
        f"""
    {row["question"]}

    Information:

    ```
    {row["context"]}
    ```
    """
    )
    messages = [
        {
            "role": "system",
            "content": "Use only the information to answer the question",
        },
        {"role": "user", "content": prompt},
        {"role": "assistant", "content": row["answer"]},
    ]
    return tokenizer.apply_chat_template(messages, tokenize=False)
df["text"] = df.apply(format_example, axis=1)
print(df.iloc[0]['text'])
"""
<|begin_of_text|><|start_header_id|>system<|end_header_id|>

Use only the information to answer the question<|eot_id|><|start_header_id|>user<|end_header_id|>

What area did NVIDIA initially focus on before expanding to other computationally intensive fields?

Information:

·```
Since our original focus on PC graphics, we have expanded to several other large and important computationally intensive fields.
```<|eot_id|><|start_header_id|>assistant<|end_header_id|>

NVIDIA initially focused on PC graphics.<|eot_id|>
"""
就是prompt template,然后可以统计一下token数量:
def count_tokens(row: Dict) -> int:
    return len(
        tokenizer(
            row["text"],
            add_special_tokens=True,
            return_attention_mask=False,
        )["input_ids"]
    )
df["token_count"] = df.apply(count_tokens, axis=1)
看看整体 token count 的分布情况:
# plt.hist(df.token_count, weights=np.ones(len(df.token_count)) / len(df.token_count))
# plt.gca().yaxis.set_major_formatter(PercentFormatter(1))
# plt.xlabel("Tokens")
# plt.ylabel("Percentage")
# plt.show()

sns.histplot(df.token_count, stat='probability', bins=30)

# 设置 y 轴格式为百分比
plt.gca().yaxis.set_major_formatter(PercentFormatter(1))

# 添加标签
plt.xlabel("Tokens")
plt.ylabel("Percentage")

# 显示图表
plt.show()

len(df[df.token_count < 512]), len(df), len(df[df.token_count < 512]) / len(df) # (6997, 7000, 0.9995714285714286)

几乎所有的token count都在512以下,因此可以设置maxlen=512
分割数据集(20:4:1):
train, temp = train_test_split(df, test_size=0.2)
val, test = train_test_split(temp, test_size=0.2)
len(train), len(val), len(test) # (5600, 1120, 280)

train.sample(n=5000).to_json("./data/train.json", orient="records", lines=True)
val.sample(n=1000).to_json("./data/val.json", orient="records", lines=True)
test.sample(n=250).to_json("./data/test.json", orient="records", lines=True)

dataset = load_dataset(
    "json",
    data_files={"train": "./data/train.json",
                "validation": "./data/val.json",
                "test": "./data/test.json"},
)
dataset
"""
DatasetDict({
    train: Dataset({
        features: ['question', 'answer', 'context', 'text', 'token_count'],
        num_rows: 5000
    })
    validation: Dataset({
        features: ['question', 'answer', 'context', 'text', 'token_count'],
        num_rows: 1000
    })
    test: Dataset({
        features: ['question', 'answer', 'context', 'text', 'token_count'],
        num_rows: 250
    })
})
"""
得到划分后的数据集
接下来我们就可以做SFT(监督微调)
这里以llama3-8b-instruct为例:
pipe = pipeline(
    task="text-generation",
    model=model,
    tokenizer=tokenizer,
    max_new_tokens=128,
    return_full_text=False,
)
def create_test_prompt(data_row):
    prompt = dedent(
        f"""
    {data_row["question"]}

    Information:

    ```
    {data_row["context"]}
    ```
    """
    )
    messages = [
        {
            "role": "system",
            "content": "Use only the information to answer the question",
        },
        {"role": "user", "content": prompt},
    ]
    return tokenizer.apply_chat_template(
        messages, tokenize=False, add_generation_prompt=True
    )
row = dataset["test"][0]
prompt = create_test_prompt(row)
print(prompt)
"""
<|begin_of_text|><|start_header_id|>system<|end_header_id|>

Use only the information to answer the question<|eot_id|><|start_header_id|>user<|end_header_id|>

How does Amazon fulfill customer orders?

Information:

·```
Amazon fulfills customer orders using its North America and International fulfillment networks, co-sourced and outsourced arrangements in certain countries, digital delivery, and physical stores.
```<|eot_id|><|start_header_id|>assistant<|end_header_id|>
"""
模型输出:
outputs = pipe(prompt)
response = f"""
answer:     {row["answer"]}
prediction: {outputs[0]["generated_text"]}
"""
print(response)
"""
answer:     Amazon fulfills customer orders through a combination of North America and International fulfillment networks operated by the company, co-sourced and outsourced arrangements in some countries, digital delivery, and through its physical stores.
prediction: According to the information, Amazon fulfills customer orders using:

1. North America and International fulfillment networks
2. Co-sourced and outsourced arrangements in certain countries
3. Digital delivery
4. Physical stores
"""
20240806
- 早上有风很凉快,明日就是立秋。早饭后遛了一圈河堤@7k,走了很久,夏荷盛开,微醺、渐佳、盛放,如画般空灵。
- 跑休,力量训练,大核心×3组 + 深蹲20次×5组 + 弹力带引体20次×5组。
- PS:YZZ最近跟LXY跑得不多,是个人也顶不住LXY每天10k+的量。今晚杨体400米间歇×12组(间歇90秒),看起来质量很高,很有长进。


再看一个例子:
row = dataset["test"][1]
prompt = create_test_prompt(row)
print(prompt)
"""
<|begin_of_text|><|start_header_id|>system<|end_header_id|>

Use only the information to answer the question<|eot_id|><|start_header_id|>user<|end_header_id|>

Who holds the patents for the active pharmaceutical ingredients of some of the company's products?

Information:

· ```
Patents covering certain of the active pharmaceutical ingredients ("API") of some of our products are held by third parties. We acquired exclusive rights to these patents in the agreements we have with these parties.
```<|eot_id|><|start_header_id|>assistant<|end_header_id|>
"""
模型输出:
outputs = pipe(prompt)
response = f"""
answer:     {row["answer"]}
prediction: {outputs[0]["generated_text"]}
"""
print(response)
"""
answer:     The patents for the active pharmaceutical ingredients of some of the company's products are held by third parties, from whom the company has acquired exclusive rights through agreements.
prediction: Third parties hold the patents for the active pharmaceutical ingredients of some of the company's products.
"""
当然可以批量生成模型输出:
rows = []
for row in tqdm(dataset["test"]):
    prompt = create_test_prompt(row)
    outputs = pipe(prompt)
    rows.append(
        {
            "question": row["question"],
            "context": row["context"],
            "prompt": prompt,
            "answer": row["answer"],
            "untrained_prediction": outputs[0]["generated_text"],
        }
    )
predictions_df = pd.DataFrame(rows)
结果predictions_df 不作展示
最后是Train on Completions
- collate_fn
- DataCollatorForCompletionOnlyLM
- data collator used for completion tasks. It ensures that all the tokens of the labels are set to an ‘ignore_index’
when they do not come from the assistant. This ensure that the loss is only
calculated on the completion made by the assistant.
- data collator used for completion tasks. It ensures that all the tokens of the labels are set to an ‘ignore_index’
- 实例化的 collator 作为 SFTrainer 的 data_collator 的参数;
- DataCollatorForCompletionOnlyLM
examples = [dataset["train"][0]["text"]]
print(examples[0])
"""
<|begin_of_text|><|start_header_id|>system<|end_header_id|>

Use only the information to answer the question<|eot_id|><|start_header_id|>user<|end_header_id|>

Who is the Chief Financial Officer and since when?

Information:

·```
Richard A. Galanti | Executive Vice President and Chief Financial Officer. Mr. Galanti has been a director since January 1995.
```<|eot_id|><|start_header_id|>assistant<|end_header_id|>

Richard A. Galanti is the Executive Vice President and Chief Financial Officer, and he has been in this role since 1993.<|eot_id|>
"""
就是用dataloader的collate_fn来进行预处理
response_template = "<|end_header_id|>"
collator = DataCollatorForCompletionOnlyLM(response_template, tokenizer=tokenizer)
# collator

encodings = [tokenizer(e) for e in examples]
dataloader = DataLoader(encodings, collate_fn=collator, batch_size=1)

batch = next(iter(dataloader))
batch.keys() # dict_keys(['input_ids', 'attention_mask', 'labels'])
可以通过batch["input_ids"], batch["labels"]查看数据,以及:
tokenizer.decode([271,  42315,    362,     13,  10845,  15719,    374,
            279,  18362,  23270,   4900,    323,  14681,  17961,  20148,     11,
            323,    568,    706,   1027,    304,    420,   3560,   2533,    220,
           2550,     18,     13, 128009])
可以得到解码的结果:'\n\nRichard A. Galanti is the Executive Vice President and Chief Financial Officer, and he has been in this role since 1993.<|eot_id|>'
接着我们需要配置lora算法进行微调
模型整体架构:
LlamaForCausalLM(
  (model): LlamaModel(
    (embed_tokens): Embedding(128264, 4096)
    (layers): ModuleList(
      (0-31): 32 x LlamaDecoderLayer(
        (self_attn): LlamaSdpaAttention(
          (q_proj): Linear4bit(in_features=4096, out_features=4096, bias=False)
          (k_proj): Linear4bit(in_features=4096, out_features=1024, bias=False)
          (v_proj): Linear4bit(in_features=4096, out_features=1024, bias=False)
          (o_proj): Linear4bit(in_features=4096, out_features=4096, bias=False)
          (rotary_emb): LlamaRotaryEmbedding()
        )
        (mlp): LlamaMLP(
          (gate_proj): Linear4bit(in_features=4096, out_features=14336, bias=False)
          (up_proj): Linear4bit(in_features=4096, out_features=14336, bias=False)
          (down_proj): Linear4bit(in_features=14336, out_features=4096, bias=False)
          (act_fn): SiLU()
        )
        (input_layernorm): LlamaRMSNorm()
        (post_attention_layernorm): LlamaRMSNorm()
      )
    )
    (norm): LlamaRMSNorm()
    (rotary_emb): LlamaRotaryEmbedding()
  )
  (lm_head): Linear(in_features=4096, out_features=128264, bias=False)
)
LORA配置:
lora_config = LoraConfig(
    r=32,
    lora_alpha=16,
    target_modules=[
        "self_attn.q_proj",
        "self_attn.k_proj",
        "self_attn.v_proj",
        "self_attn.o_proj",
        "mlp.gate_proj",
        "mlp.up_proj",
        "mlp.down_proj",
    ],
    lora_dropout=0.05,
    bias="none",
    task_type=TaskType.CAUSAL_LM,
)
model = prepare_model_for_kbit_training(model)
model = get_peft_model(model, lora_config)
model.print_trainable_parameters() # trainable params: 83,886,080 || all params: 8,114,212,864 || trainable%: 1.0338166055782685
好了,现在可以SFT训练了:
output_dir = "experiments"
# # ssh -L 6006:localhost:6006 user@remote_server
# # localhost:6006
# %load_ext tensorboard
# %tensorboard --logdir "experiments/runs"
# dual 4090s
# accelerate config 会自动地配置这两个环境变量
os.environ["NCCL_P2P_DISABLE"] = "1"
os.environ["NCCL_IB_DISABLE"] = "1"
sft_config = SFTConfig(
    output_dir=output_dir,
    dataset_text_field="text",
    max_seq_length=512,
    num_train_epochs=1,
    per_device_train_batch_size=8,
    per_device_eval_batch_size=8,
    gradient_accumulation_steps=4,
    gradient_checkpointing=True,
    gradient_checkpointing_kwargs={"use_reentrant": False},
    optim="paged_adamw_8bit",
    eval_strategy="steps",
    eval_steps=0.2,
    save_steps=0.2,
    save_total_limit=2,
    logging_steps=10,
    learning_rate=1e-4,
    bf16=True,  # or fp16=True,
    save_strategy="steps",
    warmup_ratio=0.1,
    lr_scheduler_type="constant",
    report_to="wandb",
    save_safetensors=True,
    dataset_kwargs={
        "add_special_tokens": False,  # We template with special tokens
        "append_concat_token": False,  # No need to add additional separator token
    },
    seed=SEED,
)
trainer = SFTTrainer(
    model=model,
    args=sft_config,
    train_dataset=dataset["train"],
    eval_dataset=dataset["validation"],
    tokenizer=tokenizer,
    data_collator=collator,
)
trainer.train()
trainer.save_model(new_model)
训练好的模型可以进行调用:
tokenizer = AutoTokenizer.from_pretrained(new_model)

model = AutoModelForCausalLM.from_pretrained(
    model_id,
    torch_dtype=torch.bfloat16,
    device_map="auto",
)
model.resize_token_embeddings(len(tokenizer), pad_to_multiple_of=8)
model = PeftModel.from_pretrained(model, new_model)
model = model.merge_and_unload()
# model.push_to_hub(new_model, tokenizer=tokenizer, max_shard_size="5GB")
以及评估:
dataset = load_dataset(
    "json",
    data_files={"train": "./data/train.json",
                "validation": "./data/val.json",
                "test": "./data/test.json"},
)
quantization_config = BitsAndBytesConfig(
    load_in_4bit=True, bnb_4bit_quant_type="nf4", bnb_4bit_compute_dtype=torch.bfloat16
)
tokenizer = AutoTokenizer.from_pretrained('./Llama-3-8B-Instruct-Finance-RAG', use_fast=True)
model = AutoModelForCausalLM.from_pretrained(
    './Llama-3-8B-Instruct-Finance-RAG', quantization_config=quantization_config, device_map="auto"
)
pipe = pipeline(
    task="text-generation",
    model=model,
    tokenizer=tokenizer,
    max_new_tokens=128,
    return_full_text=False,
)
row = dataset["test"][0]
prompt = create_test_prompt(row)
print(prompt)
# ---
outputs = pipe(prompt)
response = f"""
answer:     {row["answer"]}
prediction: {outputs[0]["generated_text"]}
"""
print(response)
# ---
predictions = []
for row in tqdm(dataset["test"]):
    outputs = pipe(create_test_prompt(row))
    predictions.append(outputs[0]["generated_text"])
20240807
立秋,吃西瓜。
试了试两年买的飞燃PB,当时觉得有些挤脚就一直没穿,其实不用前掌跑也勉强能穿。依然是半小时的慢跑,天气闷热,但体感尚可,可以再多跑一刻钟,但是没有必要。这段时间的路跑有所提升的,能慢一些总是好事。
PS:1500米Jacob折戟,就径赛而言,1500米属于是变数很大的项目,就像乒乓球的双打,其实运气成分是占很大因素的。径赛里变数最小的肯定是200米和400米(百米的变数显然要大一些),这两个是绝对速耐硬实力,而且不存在并道问题,每个人都有自己的道次,完全就是凭实力说话,不行就是不行。从800米向上,因为并道而存在身体接触,就有很多战术上的取舍。今年已经进行的男子万米和男子1500米都是罕见的激进战术,即第一梯队意在高配速拉爆后面的人,不给硬实力差的人以偷鸡机会,结局如何?竹竿做了24圈兔子,然后屈居第六,空给人做嫁衣;Jacob就更惨了,一个月前的3’26"的PB让他过度自信,领跑1400米,结果最后直道被三人反超,肉眼可见的跑僵以至于冲不动了。


近期一些杂记:
H5Mota的存档加密用的是LZString里的CompressToBase64,区别于普通的Base64加密,反正直接用base64.b64decode是无法正确解密的。
题外话,最近两个比较好的新塔,一个是《未尽诗篇》,另一个是《阴影之下》(前作《魔塔41层》),前者炫的是通关思路,后者炫的是剧情和立绘,说实话前者的剧情也不错,跟《咕工智障》的立意有点像,后面也有反转(不反转就过不了审了),但它这个通关思路就有点过分了:
- 焚化局Boss,几百亿攻防,而且还有一堆强大的特技,主角只有几百万攻防,一度以为是怪物数据弄错了,结果作者很贴心的在旁边贴了个小木牌:这是本塔面板实力最悬殊的一场战斗,不要指望什么攻防突然暴涨的一万倍之类的主角光环、剧情杀的操作,击败Boss所需要的血量,攻防都可以在这段地图中获取到。看了评论区的攻略才知道:
- 血量获取:有一种怪物的技能叫作寂灭,效果是战前造成主角攻击值×防御值×护盾值的固定伤害(这特么就离谱,伤害的量纲都不一样了,动辄吉、垓级别的伤害),这固定伤害巨高无比,本以为只能用八皇子给的负重训练(将自身攻防值减10%,护盾值清零)来解决掉(这样护盾值清零,固定伤害等于零),然后才知道,还有一种怪物带的侵蚀烙印,效果是给主角附加2~8层烙印,每层烙印降低主角20%的护盾值。这本来是一个负面效果,谁能想到,居然是可以把护盾值减成负数的!!!然后三者乘积的固定伤害就变成负数了(即吸血),一吸几百垓的血,简直无情,妥妥初见杀。
- 攻防获取:有一种怪物的技能是狂化,战后令主角的攻击提升5%,但是攻击的miss率也会提升2%,所有就必须通过不断刷这种怪来提升攻击力,但是miss率达到100%时就再也打不死怪物了,这就要在其中计算最优的狂化效果,还要结合路线进行优化,作者控的阈值范围很紧,基本只容错一两层狂化,否则对上Boss就是暴毙,对乱撞玩家极其不友好。
关于加解密的操作:
# Infeasible
import base64
encoded_string = base64.b64encode(bytes(string, "gbk"))
with open("decode.txt", "wb") as f:
	f.write(base64.b64decode(encoded_string))

# Feasible
import lzstring
# 摘取《未尽诗篇》存档
encoded_string = """N4IgZgNg9lBOCSATEAuEBjAzgRwJ4EYQAaEACwFNYpVQBLAWwEMBzc1MyqAOgAcA7ZsRCM+DRgBc2KMIwiZyJPo3pSQAHQCuANgDsAFnKaArFsQAjIRABuqfCVI8mAD1QBaO2R62ADL5JMlZzcPAMZUbxIJAGsfEkRyMFiQenjElCN/KD5yXHCScicvFAiQcmwNWkdyPnFUAG0AXRJaSXpMGgwszHERcXaUYABfEnEYORph0vLK/qHJ6HQOxFpYcnRxWiz2DS8SFxQtElyUfHxJyBZZkAB9a/lyRFvbLRejfG8jHQAmElvYEUe12er3enx+ZEYsGQKAAzL9rqRIYgAMJQaCwJ5oWDMMyMAAUXyMGS0AA4iFo9ER8ABKIQUKiEAbgaBwJDsehmKKEZpMVjsXC4My8ARCQKqYwwsBaTS6bwkzQ6XTISa3CDkRhWcgAGSg6ExQ3hq3oUE1gPqGAA7gArRDcy02r5CdDWxAwp0uvTum1GIRODQ5DQiIRWpwQO0hiCOkgRt3R0OeuMQH2JrTB0M6ISYTBhzPZqMgLMQWMF7MJktJ3MQVMkQsZmvZklCABepBzJBbkebreLHbLHeTIA71cHrbrI4gjZruDbBen+cw0+LC4gZeXA+Xw9D6DtW/zW+LW7LW4H4gtM9PnZGZ+LF7LF5PZ+HF7HTYFZmYpCE2HQTcwdu/v75gBmDFsBZbAQOwHDsBY7AZOIDAQAnF+P5/t4KG/qcGF/kBqH4KBeHgXhkF4dBeGwXh8HAfgyF7P6uCBnw+a4Far52ixr7MaxuDFhxuBlnxA58cOfFjnx8F8bRIB8e8Qgyex3H4FxbG8YpZakMwO70YxxZ8BATZ2npTb5kZun6WWRkDkZw5GWOUS4JgmlCPZjn5i5zDFu5ZbuQO7nDmApBWnaAVWvmIXFiFZYhQOIX+YFY4hfBIVSSFskkKlwWBUpQipRFWVRVlMVZXFQUJVlSVZSlgVfOh6XVZloX5hpYX6cF+ktU2EXmTl+kxfpw5yAZliYMZw2dWNZaDQOg0DSNY6DfBg1SYNaUgCtdorfmK3Fitk0jfg037bNBnzfti37ctI01WNXwbVdW1XTtV17cZQkQA57HvZgzFfbxX0CV9b0OSJX1iV9ElfVJ04fbV0lfVh/icnaHJRPmKPFijZYowOr6YLazYOYg+a466BN432hM44Tw4ky+hPwSTUkk6tzN2szxOE/hZO2hTeMHdz+A05zdN8wznNM4T13tpLbOSxzeNfD2ku80TVMK0LCsi0TYsKxLeMwuhTQ3NcVi0JgLQPPqGA4AQqDiLA/oqtcyyYIwZhqmaAxO4w5C0JijTwj7nuNOcaLQBalD9AHBaSDw/QlN0EhmxsWAdKMPQQAAKgwUgkkpiFfFwNW+CXvgwnCGAaLAsDZyoPg0SSXAG6XLcVw4eQgLi4jiGqHfGtkxwlAURQlF3PfkAAIsoLBSCUPBQGbWRT7ys/5E49uMMvM99yak8rGsPeD80zB8HA5AAMqx/HNY9LAtTpFoXxfI3JKDJMiJQuwAASSJCEwccTBIFQDQkh2AAEUAC8UChBWFkP6WYkxNSwHNlsNAAA1SgAACQuiEuB2mYBUaEIASTeBhF8cgRgzDeGuDocgeg9DXAMDVa4ZgYRmC+DQrQax8Akm3DCXQN4c62G+E/HQRgSR6B0KQ7wgwgA"""
lzs = lzstring.LZString()
string = lzs.decompressFromBase64(encoded_string)
encoded_string = lzs.compressToBase64(string)
但是目前解密后进行编辑,再重新加密回LZString后的存档,读取会报错,不是很能理解怎么回事。
pyexecjs库:主要三个用法,eval,compile,call
# !pip install pyexecjs
import execjs

e = execjs.eval("a = new Array(1, 2, 3)")
js_code = """function add(a, b) {
	return a + b;
}"""
ctx = execjs.compile(js_code)
result = ctx.call("add", 1, 2)
git push 解决方案
Failed to connect to 127.0.0.1 port 1080 after 2024 ms: Couldn't connect to server
第一个方法:
查看是否配置了代理
git config --global http.proxy
git config --global https.proxy
// 这个有的话会显示sock://...
有就取消:
git config --global --unset http.proxy
git config --global --unset httpx.proxy
然后这个应该是有用了,也可以接着去看一下git配置文件:如果你是windows用户,打开:C:\Users\<username>.gitconfig文件,将里面的proxy的那两个配置删掉就好了,我就是这样才可以的(呜呜呜)
最后打开环境变量,查看用户变量和系统变量,将里面关于http_proxy和https_proxy都删掉
最后重启git终端即可
20240808
颜老板也跳到字节去了,蚂蚁势颓的传闻不假。颜老板这次是投奔到汤姐麾下,想汤姐也就比我俩本科高一届,出国镀金回来就是不一样,虽然不是很想去北京,但颜老板盛情邀请,但也是给自己留个退路吧,其实未来工作的同事都是熟悉的朋友也是比较好的,跟谈恋爱是一个道理,都是要一起生活的。计划周日提前返校,主电脑没带回来,手头连个简历都没有。
晚上30分钟慢跑@4’13",这是跑得最快的一回,状态依然很好。这次回来心态平静不少,没有很激进。
周末NIKE的不胜不散5000米测试赛,嘉伟虽然不太可能夺魁(冠军有Alpha3拿,他正好缺鞋子),但也是奔着PB的。他最近是挺春风得意,工作学习两开花属于是,而且倘若PB,就破开17分大关了。希望能成功,自从3月份锡马失利,跟腱受伤,到5月伤愈后,嘉伟明显水平更有提升,是破而后立了。
PS:SXY最近上头得很。


速成一下hadoop呗,其实也没啥大用。
P15 015-Hive-常见使用技巧
hive -H:查看各参数的用途hive -e:执行字符串型的命令,非交互式的使用,常用于离线数仓。例如:"hive -e insert into stu values(1, 'aa')":执行sql语句
hive -f:执行指定文件,例如:hive -f stu.sql:执行stu.sql文件
Hive参数配置方式
- 查看当前所有的配置信息:
hive>set; - 参数的配置三种方式:
-
Method1:配置文件方式
- 默认配置文件:hive-default.xml
- 用户自定义配置文件:hive-site.xml
- 注意:用户自定义配置会覆盖默认配置,另外,Hive也会读入Hadoop配置,因为Hive是作为Hadoop客户端启动的,Hive的配置会覆盖Hadoop的配置,配置文件的设定对所有Hive进行都有效
- 具体查看:
cd /opt/module/hive/conf,下面的几个重要文件hive-default.xml.template:不推荐在这个里面改参数- 推荐在
hive-site.xml里修改参数,即重写hive-default.xml里的参数值
-
Method2:命令行参数方式
bin/hive -hiveconf mapreduce.job.reduces=10- 只对当次hive启动生效,重启后依然是默认值
-
Method3:参数声明方式
- 可以在HQL中使用SET关键字设定参数,例如:
hive(default)> set mapreduce.job.reduces=10;,仅对本次启动生效 - 查看参数配置:
hive(default)> set mapreduce.job.reduces;
- 可以在HQL中使用SET关键字设定参数,例如:
-
上述三种方式的优先级依次递增,即配置文件<命令行参数<参数声明,注意某些系统级的参数,例如log4j相关的设定,必须用前两种方式,因为那些参数的读取在会话建立前就完成了。
-
Hive常见属性配置
-
Hive客户端显示当前库和表头
- 不设置的话,查询结果没有字段名和库名称
- 在hive-site.xml中加入如下两个配置

执行查询语句,select * from stu,就有库和字段名了(stu.id,stu.name)
-
Hive运行的日志文件
- 修改日志文件路径:
- 找到配置文件路径下的
hive-log4j2.properties.template,去掉后缀.template,然后改property.hive.log.dir变量,默认值是$(sys:java.io.tmpdir)/$(sys:user.name),一般是tmp/caoyang,文件名是property.give.log.file变量
- 找到配置文件路径下的
- 修改日志文件路径:
-
Hive的JVM堆内存的设置
- 默认值只有256M,太小了
- 找到
hive-env.sh.template,去掉后缀 - 找到第40行:
export HADOOP_HEAPSIZE=2048,这样就是2G
-
关闭Hadoop虚拟检查点
- 在
yarn-site.xml中关闭虚拟内存检查(虚拟内存校验,如果已经关闭了,就不需要配了) - 在修改前记得先停Hadoop:
pwd /opt/module/hadoop-3.1.3/etc/hadoop,然后vim yarn-site.xml,添加如下配置:
<property>
  <name>yarn.nodemanager.vmem-check-enabled</name>
  <value>false</value>
</property>
yarn管理每个容器(container)能获取的资源(通过轮询,一旦超出,就kill掉)
- 在
20240809
- 莫名失眠,可能到四点都没睡着,有点不是很能绷得住。午饭前睡了两小时回笼觉,回了点血,但是到晚上感觉还是很乏力,还是照常的慢跑半小时@4’18",感觉还行,不是很受影响。
- 扯远,应该早点休息。


1 Prompt原则与原理

- 原则:
- 清晰明确的指令:比如想让模型总结文本内容,可以更清晰地给出模型需要总结哪些点的内容,如议题总结,议题标题,会后代办,这样更符合人类意图
- 给模型思考的路径:以模型书写求职信为例,先书写信的开头哦,通常会提及求职者如何得知该职位的信息,以及为何对职位感兴趣,在主体部分,描述个人经验与技能,结尾表达期待。这就是一种思考路径(但本身也限定得有点死)
- ICIO结构:
- context(可选):角色和任务、背景知识
- Instruction(必选):执行步骤、思维链、样例数据
- Input data(必选):对话、文章、问题
- Output indicator(可选):输出的前缀

ICIO是比较主流的方式,LangGPT更偏开发,CRISPE本身就是一个营销工具迭代出的框架
- 迭代:
-
few shot
-
chain of thought
-
temperature:输出多样性控制(越高越发散,概率分布更加均匀,输出随机性扩大,比如temperature=0.01,让模型输出三次可能大概率都是一样的,但是temperature=0.99,三次可能就完全不同)
-
top_p:输出稳定性控制(越低越稳定)

-
ToT:树状思维链

ToT:多prompt的带条件分支的流程图
Agent:

20240810
巴黎奥运男子马拉松赛落幕,除双神迟暮,最直观的就是明显的中日差距(主要是21年东京奥运会日本队表现不行,很多人就觉得中日已经没有什么差距了,事实上就马拉松而言,中日在人才储备以及顶尖选手间差距依然是鸿沟。赛前造势太猛,什么双杰之战,亚洲只有一个杰哥,当然这次何杰赛前受伤肯定也有影响,然而不可否认的是,日本三位选手排名和成绩都远远优于中国选手:
第6名: 赤崎晓2:07:32,本场最大黑马,赛前PB仅209,竟然在魔鬼赛道上大幅PB,但人家5000米13分27,万米27分32,并没有什么不合理的。
第13名:大迫杰2:09:25,常规发挥;
第22名: 小山直诚,真不熟;
第40名:吴向东2:12:34,国内三号种子创国内奥运历史最佳成绩,虽败犹荣;
第55名:杨绍辉2:14:48,作为国内二号种子,杨绍辉这次轻敌了,前程跑得太激进了,35k时依然领先吴向东10秒左右,后程崩得有些狠。
第67名:何杰2:22:31,近两年两破国家纪录,作为一号种子,14-16k的坡直接给干废了,35k时用时154,平均配速已经掉到316,能完赛已经是最好的结果了。
人家派出的都是在场地赛里刺刀见红拼出来的选手,都是5000米13分台,万米27分台的选手。而我们的选手万米跑进29分都够呛,5000米国家纪录都还没跑进14分钟,说白了马拉松这东西就是商业化下的速成产物,堆跑量就是可以快速提升成绩,但是真到大赛,还是得看硬实力。
以本场为例,第一集团5k过线15’32"(均配307),10k过线31’00"(均配306),15k过线45’44"(均配303),其实就是一个渐加速跑,最终冠军是埃塞的Tola,打破奥运纪录,2:06:24,均配3分整(全程几乎没有掉速)。一开始确实挺慢,杨绍辉一度以近10米的优势领跑,10k, 15k都是第一个过线,让人眼前一亮,但是14-16k的大坡一下子就把队伍拉开,而日本选手赤崎晓直到40km都咬死了排名2~4的3位黑哥(其中包括目前世界排名第一的基普鲁托),在巴黎这种起伏特别大的赛道上跑出这种成绩,的确是太硬了,而35k计时点,吴向东和杨绍辉均配已经掉到305(用时1:48:09和1:48:17),而到终点的均配是309和311,后程掉速可谓惨不忍睹,差距是显而易见的。
PS:今天饭后跑了5k多,冲了一大段,找点感觉。回来十天,九跑一休(一日力量),总跑量不到60k,但也基本满意。嘉伟不胜不散5k测试赛成绩17’58",未能如意,但来日方长。
2 Prompt迭代技巧与实战
内容迭代:
-
角色迭代:修改对AI的角色赋予(你是问答机器人 → \rightarrow →你是保险业务专家),将角色范围框定得更具体一些,尝试不同角色,提供最佳上下文语境
-
任务迭代:不断修改任务的表达形式(empirical study,你要根据模型输出结果合理的地方,进行不断地修改)

-
执行迭代步骤:正向引导

模型不擅长基于字数的限制进行操作,之前有很多挑战会让模型确实的输出若干字数的结果,效果都不是很好。总之,很难限制输出的具体字数。 -
执行步骤迭代:逻辑完备

-
执行步骤迭代:避免规则

避免硬性规则?这本身是一种缺陷?
-
Few shot 迭代:要么每个类别都均匀添加示例,要么都不添加。样例较多时,引入向量库做动态Few shot

Few shot就是和评测集分布一致的训练集
-
分隔符:避免模型指令受到其他内容干扰,以及避免用户注入无关指令


-
分条目:有助于模型理解每个独立的任务,引导大模型按照指令顺序进行思考(换行符),有助于开发者顺利任务的逻辑顺序,便于逐条编写测试以及迭代维护。


-
顺序:先输出的内容会影响后输出的内容,可尝试不同顺序,避免提取项之间的干扰。


把提取顺序改为沟通中提及的顺序,效果就会好一些。
-
嵌套:平铺直叙,避免多层的逻辑嵌套

-
位置:指令的首部和尾部的指令遵循效果较好,根据不同的输入文档长度和指令难度尝试不同的组织段落方式

一些论文研究指出,某些信息放在Prompt的开头或结尾,模型的关注程度会更高一些。
一些案例分析:
案例一:群聊信息情感分析


案例二:文章抽取信息

加了各种修辞手法的定义:

还是不行:


一般,在迭代的最后才会加few shot,因为fs的确定性是最高的,这是最简单的事情,先把难的事情解决掉
发现正例都没啥问题,就加一些负例的prompt

最后在加一些CoT的示例,就比较长了,不做展示。
最后我们讲一下prompt的评测:
- 评测维度:一些还是偏主观的标准,但一定要有评测集

评测集的构建,测试迭代:

总而言之,Prompt是一种低成本的调用AI能力的方法,通过自然语言方式,引导模型生成内容,但是,有缺陷:
- 只有方法,没有语法
- 内容格式敏感
- 偏好分布
- 不同模型间存在差异
20240811
女子方面,中日差距更大,铃木优花224名列第6(日本第二是51名),张德顺236第59(夏雨雨242第67,白丽第79)。
如果说昨天赤崎晓是黑马,今天的铃木优花简直就是天神下凡,直到35km仍能住第一集团(2埃塞+2肯尼亚+大魔王哈桑),前后都是黑压压一片,颇有三年前苏炳添一黄战七黑的气势,而且我觉得铃木跑姿特别优美,肌肉线条也很漂亮,黑姐们全是竹竿身材,而且跑姿一点都不优美,特别是从后面看,肯尼亚的两个小腿后撩就有些外翻。到40km,铃木也只是落后第一集团不到20秒,最终落后冠军哈桑67秒(冲刺不敌老黑),创造历史。
值得一提的是,业余一姐黄雪梅在大众组跑出241,虽然是这次巴黎大众组是夜跑,气温占优势,但也是力压国家队的夏雨雨和白丽。只能说虽然输得比较难看,但是顺子真的尽力了。
晚上才回来,到实验室把事情搞完,九点半,随性冲了几圈,感觉很好,真的很好。回家这十天严格控制了强度,让身体得到充分休整,但也没有完全荒废,我觉得自己真的还能PB。
PS:山东?果然还是会有些在意。

conversational agents,ReAct、agent_scratchpad 历史过程信息维护
一些概念:
- 过程信息(所谓的对话式 agent,conversational agents,就是带记忆)
- stateless LLMs => with memory (maintaining previous interactions)
- intermediate_steps: list of actions/tools (input, output)
- agent_scratchpad(草稿本):list of tool messages
- 这个具体而言就是一些定义好的函数
- 第一次 query-resp 之后,才会有这些过程信息
- 第一次:
intermediate_steps: [],agent_scratchpad: ""
- 第一次:
- chat history
- messages (openai 的 api)
- system, user, assistant, user assistant …
- langsmith: 监控所有的 messages (input, output)
前一种是隐式的,后者是显式的。
ReAct(Reasoning & Acting)
- https://arxiv.org/abs/2210.03629
- ReAct(经典、且general、应用广泛的 prompt)
- User query => (Thought -> Action (Action Input) -> Observation(Action Ouptut)) * N
- Action input => output, function decision & calling
- multi-step/hops reasoning/interacting
- 跟 function calling(LangChain 中的 tools)天然地适配;
- User query => (Thought -> Action (Action Input) -> Observation(Action Ouptut)) * N
from langchain import hub
prompt = hub.pull("hwchase17/react")
type(prompt), prompt
"""
(langchain_core.prompts.prompt.PromptTemplate,
 PromptTemplate(input_variables=['agent_scratchpad', 'input', 'tool_names', 'tools'], metadata={'lc_hub_owner': 'hwchase17', 'lc_hub_repo': 'react', 'lc_hub_commit_hash': 'd15fe3c426f1c4b3f37c9198853e4a86e20c425ca7f4752ec0c9b0e97ca7ea4d'}, template='Answer the following questions as best you can. You have access to the following tools:\n\n{tools}\n\nUse the following format:\n\nQuestion: the input question you must answer\nThought: you should always think about what to do\nAction: the action to take, should be one of [{tool_names}]\nAction Input: the input to the action\nObservation: the result of the action\n... (this Thought/Action/Action Input/Observation can repeat N times)\nThought: I now know the final answer\nFinal Answer: the final answer to the original input question\n\nBegin!\n\nQuestion: {input}\nThought:{agent_scratchpad}'))
"""
# 一个完整的 prompt 模板,历史对话/函数调用(输入输出)信息不断地追加在这一个 prompt 中,而不是维护成 messages list
print(prompt.template)
"""
Answer the following questions as best you can. You have access to the following tools:

{tools}

Use the following format:

Question: the input question you must answer
Thought: you should always think about what to do
Action: the action to take, should be one of [{tool_names}]
Action Input: the input to the action
Observation: the result of the action
... (this Thought/Action/Action Input/Observation can repeat N times)
Thought: I now know the final answer
Final Answer: the final answer to the original input question

Begin!

Question: {input}
Thought:{agent_scratchpad}
"""
- Thought: you should always think about what to do
- Action: the action to take, should be one of
[{tool_names}] - Action Input: the input to the action
- Observation: the result of the action
- … (this Thought/Action/Action Input/Observation can repeat N times)
LangChain Projects
- AgentExecutor:agent that is using tools
next_action = agent.get_action(...)
while next_action != AgentFinish:
  observation = run(next_action)
  next_action = agent.get_action(..., next_action, observation)
return next_action
os.environ["LANGCHAIN_PROJECT"] = 'conversational_agents'
from langchain_openai import ChatOpenAI
from langchain.tools import tool
from langchain.agents import AgentExecutor, create_react_agent

@tool
def get_employee_id(name):
  """
  To get employee id, it takes employee name as arguments
  name(str): Name of the employee
  """
  fake_employees = {
    "Alice": "E001", "Bob": "E002", "Charlie": "E003",
    "Diana": "E004", "Evan": "E005", "Fiona": "E006",
    "George": "E007", "Hannah": "E008", "Ian": "E009",
    "Jasmine": "E010"
  }

  return fake_employees.get(name, "Employee not found")

# Custom tool for the Agent
# ValueError: Function must have a docstring if description not provided.
@tool
def get_employee_salary(employee_id):
  """
  To get the salary of an employee, it takes employee_id as input and return salary
  """
  employee_salaries = {
    "E001": 56000, "E002": 47000, "E003": 52000,
    "E004": 61000, "E005": 45000, "E006": 58000,
    "E007": 49000, "E008": 53000, "E009": 50000,
    "E010": 55000
    }
  return employee_salaries.get(employee_id,"Employee not found")

prompt = hub.pull("hwchase17/react")
llm = ChatOpenAI(model='gpt-4o')
tools = [get_employee_salary, get_employee_id]
agent = create_react_agent(llm, tools, prompt)
agent_executor = AgentExecutor(agent=agent, tools=tools, verbose=True)
agent_executor.invoke({"input": "What is the Salary of Evan?"})
输出结果:
> Entering new AgentExecutor chain...
To determine Evan's salary, I first need to obtain his employee ID.

Action: get_employee_id
Action Input: "Evan"E005Now that I have Evan's employee ID, I can retrieve his salary using this ID.

Action: get_employee_salary
Action Input: E00545000I now know the final answer.

Final Answer: The salary of Evan is 45000.

> Finished chain.
{'input': 'What is the Salary of Evan?',
 'output': 'The salary of Evan is 45000.'}
20240812
好日子要到头。
雨后湿闷,尽管开始降温,但总之就是不太行,体感很不好。3k@3’52"后就不太想跑了,勉强多凑了几组,不太满意。
PS:新一届有个5k能跑进21分钟的女生,很强,10k目前47分,半马145,也跑过30k,比LXY还要怪物的怪物。

使用LangSmith来分解每一步模型究竟都做了些啥:
first query-resp
LangSmith: https://smith.langchain.com/
LangSmith是评估大模型能力好坏的评估工具,能够量化评估基于大模型的系统的效果。LangSmith通过记录langchain构建的大模型应用的中间过程,从而能够更好的调整提示词等中间过程做优化。(这个可以可视化每一步的模型思考过程和Prompt)
使用的Prompt:
Answer the following questions as best you can. You have access to the following tools:

    get_employee_salary(employee_id) - To get the salary of an employee, it takes employee_id as input and return salary
    get_employee_id(name) - To get employee id, it takes employee name as arguments
    name(str): Name of the employee

    Use the following format:

    Question: the input question you must answer
    Thought: you should always think about what to do
    Action: the action to take, should be one of [get_employee_salary, get_employee_id]
    Action Input: the input to the action
    Observation: the result of the action
    ... (this Thought/Action/Action Input/Observation can repeat N times)
    Thought: I now know the final answer
    Final Answer: the final answer to the original input question

    Begin!

    Question: What is the Salary of Evan?
    Thought:
To determine Evan's salary, I first need to obtain his employee ID.

Action: get_employee_id
Action Input: "Evan"
- get_employee_id
- input: Evan
- output: E005
second query-resp
Answer the following questions as best you can. You have access to the following tools:

    get_employee_salary(employee_id) - To get the salary of an employee, it takes employee_id as input and return salary
    get_employee_id(name) - To get employee id, it takes employee name as arguments
    name(str): Name of the employee

    Use the following format:

    Question: the input question you must answer
    Thought: you should always think about what to do
    Action: the action to take, should be one of [get_employee_salary, get_employee_id]
    Action Input: the input to the action
    Observation: the result of the action
    ... (this Thought/Action/Action Input/Observation can repeat N times)
    Thought: I now know the final answer
    Final Answer: the final answer to the original input question

    Begin!

    Question: What is the Salary of Evan?
    Thought:To determine Evan's salary, I first need to obtain his employee ID.

    Action: get_employee_id
    Action Input: "Evan"
    Observation: E005
    Thought:
Now that I have Evan's employee ID, I can retrieve his salary using this ID.

Action: get_employee_salary
Action Input: E005
get_employee_salary
- input: E005
- output: 45000
finally
Answer the following questions as best you can. You have access to the following tools:

get_employee_salary(employee_id) - To get the salary of an employee, it takes employee_id as input and return salary
get_employee_id(name) - To get employee id, it takes employee name as arguments
name(str): Name of the employee

Use the following format:

Question: the input question you must answer
Thought: you should always think about what to do
Action: the action to take, should be one of [get_employee_salary, get_employee_id]
Action Input: the input to the action
Observation: the result of the action
... (this Thought/Action/Action Input/Observation can repeat N times)
Thought: I now know the final answer
Final Answer: the final answer to the original input question

Begin!

Question: What is the Salary of Evan?
Thought:To determine Evan's salary, I first need to obtain his employee ID.

Action: get_employee_id
Action Input: "Evan"
Observation: E005
Thought: Now that I have Evan's employee ID, I can retrieve his salary using this ID.

Action: get_employee_salary
Action Input: E005
Observation: 45000
Thought:
I now know the final answer.

Final Answer: The salary of Evan is 45000.
20240813
- 烂算法题真屁用没有,但就是要考。其实我还是挺喜欢思考解法的过程,但是这玩意儿是要熟能生巧,一眼就得做出来,否则时间根本不够,而且有的题就是你没见过就肯定做不出来的。
- 亦童做出了很惊艳的效果,比五月份时的效果好太多了,现在不仅在替换原物体时不会影响背景及其他实体,而且解决之前一直无法实现了颜色替换问题,以及多物体指定替换的效果,cvpr这不稳了?(之所以效果好了,因为他用了box,就是需要框定大致的编辑区域,这样就避免了不必要的的改动)
- 晚上补力量训练,回去一趟断的有点久,30箭步×8组(+20kg),组间做30次双脚提踵(+20kg),差不多两周没做还是有些吃力的,结束补5000米慢跑@4’16",明天面完还要陪静香姐跑课表,估计累死。
- PS:昨天那个5k能跑进21分钟的是上大的,想也是,哪有天降猛女这种好事。SXY大概是去山东出差了,又是一周没跑。


另一种方法,显式地操作agent_scratchpad与intermediate_steps
https://python.langchain.com/v0.1/docs/modules/agents/how_to/custom_agent/
format_to_openai_tool_messages- https://api.python.langchain.com/en/latest/_modules/langchain/agents/format_scratchpad/openai_tools.html#format_to_openai_tool_messages
os.environ["LANGCHAIN_PROJECT"] = 'memory_agents'

@tool
def get_word_length(word: str) -> int:
    """Returns the length of a word."""
    return len(word)


get_word_length.invoke("abc") # 3

tools = [get_word_length]

from langchain_core.prompts import ChatPromptTemplate, MessagesPlaceholder

prompt = ChatPromptTemplate.from_messages(
    [
        (
            "system",
            "You are very powerful assistant, but don't know current events",
        ),
        ("user", "{input}"),
        MessagesPlaceholder(variable_name="agent_scratchpad"),
    ]
)

llm = ChatOpenAI(model="gpt-4o", temperature=0)
llm_with_tools = llm.bind_tools(tools)

from langchain.agents.format_scratchpad.openai_tools import (
    format_to_openai_tool_messages,
)
from langchain.agents.output_parsers.openai_tools import OpenAIToolsAgentOutputParser

# runnable Sequence,根据需要循环执行这 4 步;
agent = (
    {
        "input": lambda x: x["input"],
        "agent_scratchpad": lambda x: format_to_openai_tool_messages(
            x["intermediate_steps"]
        ),
    }
    | prompt
    | llm_with_tools
    | OpenAIToolsAgentOutputParser()
)

agent_executor = AgentExecutor(agent=agent, tools=tools, verbose=True)

process_list = list(agent_executor.stream({"input": "How many letters in the word eudca"}))
"""
> Entering new AgentExecutor chain...

Invoking: `get_word_length` with `{'word': 'eudca'}`


5The word "eudca" has 5 letters.

> Finished chain.
"""
上面的process_list变量形如:
[{'actions': [ToolAgentAction(tool='get_word_length', tool_input={'word': 'eudca'}, log="\nInvoking: `get_word_length` with `{'word': 'eudca'}`\n\n\n", message_log=[AIMessageChunk(content='', additional_kwargs={'tool_calls': [{'index': 0, 'id': 'call_P3LQGFQ50JvKMtLpLXJ2SSsZ', 'function': {'arguments': '{"word":"eudca"}', 'name': 'get_word_length'}, 'type': 'function'}]}, response_metadata={'finish_reason': 'tool_calls', 'model_name': 'gpt-4o-2024-05-13', 'system_fingerprint': 'fp_3aa7262c27'}, id='run-94428a05-fa61-4853-8eeb-7c12f68b447e', tool_calls=[{'name': 'get_word_length', 'args': {'word': 'eudca'}, 'id': 'call_P3LQGFQ50JvKMtLpLXJ2SSsZ', 'type': 'tool_call'}], tool_call_chunks=[{'name': 'get_word_length', 'args': '{"word":"eudca"}', 'id': 'call_P3LQGFQ50JvKMtLpLXJ2SSsZ', 'index': 0, 'type': 'tool_call_chunk'}])], tool_call_id='call_P3LQGFQ50JvKMtLpLXJ2SSsZ')],
  'messages': [AIMessageChunk(content='', additional_kwargs={'tool_calls': [{'index': 0, 'id': 'call_P3LQGFQ50JvKMtLpLXJ2SSsZ', 'function': {'arguments': '{"word":"eudca"}', 'name': 'get_word_length'}, 'type': 'function'}]}, response_metadata={'finish_reason': 'tool_calls', 'model_name': 'gpt-4o-2024-05-13', 'system_fingerprint': 'fp_3aa7262c27'}, id='run-94428a05-fa61-4853-8eeb-7c12f68b447e', tool_calls=[{'name': 'get_word_length', 'args': {'word': 'eudca'}, 'id': 'call_P3LQGFQ50JvKMtLpLXJ2SSsZ', 'type': 'tool_call'}], tool_call_chunks=[{'name': 'get_word_length', 'args': '{"word":"eudca"}', 'id': 'call_P3LQGFQ50JvKMtLpLXJ2SSsZ', 'index': 0, 'type': 'tool_call_chunk'}])]},
 {'steps': [AgentStep(action=ToolAgentAction(tool='get_word_length', tool_input={'word': 'eudca'}, log="\nInvoking: `get_word_length` with `{'word': 'eudca'}`\n\n\n", message_log=[AIMessageChunk(content='', additional_kwargs={'tool_calls': [{'index': 0, 'id': 'call_P3LQGFQ50JvKMtLpLXJ2SSsZ', 'function': {'arguments': '{"word":"eudca"}', 'name': 'get_word_length'}, 'type': 'function'}]}, response_metadata={'finish_reason': 'tool_calls', 'model_name': 'gpt-4o-2024-05-13', 'system_fingerprint': 'fp_3aa7262c27'}, id='run-94428a05-fa61-4853-8eeb-7c12f68b447e', tool_calls=[{'name': 'get_word_length', 'args': {'word': 'eudca'}, 'id': 'call_P3LQGFQ50JvKMtLpLXJ2SSsZ', 'type': 'tool_call'}], tool_call_chunks=[{'name': 'get_word_length', 'args': '{"word":"eudca"}', 'id': 'call_P3LQGFQ50JvKMtLpLXJ2SSsZ', 'index': 0, 'type': 'tool_call_chunk'}])], tool_call_id='call_P3LQGFQ50JvKMtLpLXJ2SSsZ'), observation=5)],
  'messages': [FunctionMessage(content='5', name='get_word_length')]},
 {'output': 'The word "eudca" has 5 letters.',
  'messages': [AIMessage(content='The word "eudca" has 5 letters.')]}]
换一个例子:
from langchain_core.prompts import MessagesPlaceholder

MEMORY_KEY = "chat_history"
prompt = ChatPromptTemplate.from_messages(
    [
        (
            "system",
            "You are very powerful assistant, but bad at calculating lengths of words.",
        ),
        MessagesPlaceholder(variable_name=MEMORY_KEY),
        ("user", "{input}"),
        MessagesPlaceholder(variable_name="agent_scratchpad"),
    ]
)

from langchain_core.messages import AIMessage, HumanMessage

chat_history = []

agent = (
    {
        "input": lambda x: x["input"],
        "agent_scratchpad": lambda x: format_to_openai_tool_messages(
            x["intermediate_steps"]
        ),
        "chat_history": lambda x: x["chat_history"],
    }
    | prompt
    | llm_with_tools
    | OpenAIToolsAgentOutputParser()
)
agent_executor = AgentExecutor(agent=agent, tools=tools, verbose=True)

input1 = "how many letters in the word educa?"
result = agent_executor.invoke({"input": input1,
                                "chat_history": chat_history})
chat_history.extend(
    [
        HumanMessage(content=input1),
        AIMessage(content=result["output"]),
    ]
)
agent_executor.invoke({"input": "is that a real word?",
                       "chat_history": chat_history})

"""
> Entering new AgentExecutor chain...

Invoking: `get_word_length` with `{'word': 'educa'}`


5The word "educa" has 5 letters.

> Finished chain.


> Entering new AgentExecutor chain...
"Educa" is not a standard English word. It might be a truncated form of "education" or a name, but it is not commonly recognized as a standalone word in English.

> Finished chain.
{'input': 'is that a real word?',
 'chat_history': [HumanMessage(content='how many letters in the word educa?'),
  AIMessage(content='The word "educa" has 5 letters.')],
 'output': '"Educa" is not a standard English word. It might be a truncated form of "education" or a name, but it is not commonly recognized as a standalone word in English.'}
"""
- messages
- system
- human (user)
- ai (assistant)
- human (user)
- ai (assistant)
- …
chat_history = []
# https://smith.langchain.com/hub/hwchase17/openai-functions-agent
# input_variables=['agent_scratchpad', 'input'], optional_variables=['chat_history']
prompt = hub.pull('hwchase17/openai-functions-agent')
agent = (
    {
        "input": lambda x: x["input"],
        "agent_scratchpad": lambda x: format_to_openai_tool_messages(
            x["intermediate_steps"]
        ),
        "chat_history": lambda x: x["chat_history"],
    }
    | prompt
    | llm_with_tools
    | OpenAIToolsAgentOutputParser()
)
agent_executor = AgentExecutor(agent=agent, tools=tools, verbose=True)
input1 = "how many letters in the word dadebfdr?"
result = agent_executor.invoke({"input": input1,
                                "chat_history": chat_history})
chat_history.extend(
    [
        HumanMessage(content=input1),
        AIMessage(content=result["output"]),
    ]
)
agent_executor.invoke({"input": "is that a real word?",
                       "chat_history": chat_history})
输出结果:
> Entering new AgentExecutor chain...

Invoking: `get_word_length` with `{'word': 'dadebfdr'}`


8The word "dadebfdr" has 8 letters.

> Finished chain.


> Entering new AgentExecutor chain...
No, "dadebfdr" does not appear to be a real word in the English language. It seems to be a random string of letters.

> Finished chain.
{'input': 'is that a real word?',
 'chat_history': [HumanMessage(content='how many letters in the word dadebfdr?'),
  AIMessage(content='The word "dadebfdr" has 8 letters.')],
 'output': 'No, "dadebfdr" does not appear to be a real word in the English language. It seems to be a random string of letters.'}
20240814
- 一面是一位面像稍显凶狠的老哥,之前以为专哥已经比较抽象了,没想到还有更抽象的,给整得有点小紧张。感觉很一般,发挥不是很好,数据结构一点没看,全搁看动态规划去了,巨难蚌。感觉上这个新业务有点迷,不知道为什么颜老板为什么非要跳,不是很懂,我的认知里新的东西做得好则罢了,做不好很容易就被砍掉。
- 晚上带静香姐跑课表,15分钟热身 + 3组×(40s慢+20s快) + 6组×(2min慢+2min快) + 休息 + 6组×(2min慢+2min快),快@415,慢@515,比较容易,质量尚可,慢跑些长距离挺好。
- PS:LXY返校,太阳打西边出来,只遛了四五圈。


一面两道题记录:
AUC计算:
直接定义是ROC曲线与横轴及x=1围成的面积
简单操作是,计算正样本的predict_proba比负样本的predict_proba高的概率,这个写代码很简单,遍历每一对正负样本,计算零一值,相等就赋0.5,然后求和取平均即可。
import numpy as np

y_true =  [0,   0,   1,   1,   0,   1,   0,   1,   1,   1]
y_score = [0.1, 0.4, 0.6, 0.6, 0.7, 0.7, 0.8, 0.8, 0.9, 0.9]

def get_roc_auc(y_true, y_score):
    gt_pred = list(zip(y_true, y_score))
    probs = []
    pos_samples = [x for x in gt_pred if x[0]==1]
    neg_samples = [x for x in gt_pred if x[0]==0]

    # 计算正样本大于负样本的概率
    for pos in pos_samples:
        for neg in neg_samples:
            if pos[1]>neg[1]:
                probs.append(1)
            elif pos[1]==neg[1]:
                probs.append(0.5)
            else:
                probs.append(0)
    return np.mean(probs)
print(get_roc_auc(y_true, y_score))
可以优化:
def get_roc_auc(y_true, y_score):
    ranks = enumerate(sorted(zip(y_true, y_score), key=lambda x:x[-1]), start=1)
    pos_ranks = [x[0] for x in ranks if x[1][0]==1]
    M = sum(y_true)
    N = len(y_true)-M
    auc = (sum(pos_ranks)-M*(M+1)/2)/(M*N)
    return auc
内置的方法:
from sklearn.metrics import roc_auc_score
import numpy as np
pos_num = 169*2
neg_num = 16907
label = [float(x) for x in np.array([1]*pos_num+[0]*neg_num)]
pred = [float(x) for x in np.hstack([np.random.normal(1,1,pos_num), np.random.normal(0,1,neg_num)])]
auc = roc_auc_score(label, pred)
print(auc)
"""
0.7694951812613592
"""
# ---
import numpy as np
# spark ml库代码
scoreAndLabels = spark.sparkContext.parallelize(list(zip(pred, label)))
from pyspark.mllib.evaluation import BinaryClassificationMetrics
metrics = BinaryClassificationMetrics(scoreAndLabels)
print("spark结果: ", metrics.areaUnderROC)
# sklearn验证
from sklearn.metrics import roc_auc_score
import numpy as np
print("sklearn结果: ", roc_auc_score(label, pred))
"""
spark结果:  0.7694995560467761
sklearn结果:  0.7694951812613592
"""
但是ROC曲线的定义还是很重要的,横轴是FPR(代表特异性,即假阳性率),纵轴是TPR(代表敏感性,即真阳性率)
- FPR:预测为1,但实际为0的rate
- TPR:预测为1,实际也为1的rate
真正正例率是指模型正确识别为正例的样本占总正例样本的比例;假正例率则是模型错误地将负例识别为正例的样本占总负例样本的比例。
然后把thres从0到1走一遍,看看FPR和TPR的变化,比如thres是0,则所有样本被预测为1,此时FPR和TPR都是1,反之thres为1,则TPR和FPR都是0
二叉树路径和:
1.二叉树所有路径:
257.二叉树的所有路径 - 力扣(LeetCode)https://leetcode.cn/problems/binary-tree-paths/
class Solution:
    def binaryTreePaths(self, root):
        def construct_paths(root, path):
            if root:
                path += str(root.val)
                if not root.left and not root.right:  # 当前节点是叶子节点
                    paths.append(path)  # 把路径加入到答案中
                else:
                    path += '->'  # 当前节点不是叶子节点,继续递归遍历
                    construct_paths(root.left, path)
                    construct_paths(root.right, path)
        paths = []
        construct_paths(root, '')
        return paths
2.路径总和
给你二叉树的根节点 root 和一个表示目标和的整数 targetSum 。判断该树中是否存在 根节点到叶子节点 的路径,这条路径上所有节点值相加等于目标和 targetSum 。如果存在,返回 true ;否则,返回 false 。
112.路径总和 - 力扣(LeetCode)https://leetcode.cn/problems/path-sum/description/
DFS法
class Solution(object):
    def hasPathSum(self, root, sum):
        """
        :type root: TreeNode
        :type sum: int
        :rtype: bool
        """
        if not root: return False
        if not root.left and not root.right:
            return sum == root.val
        return self.hasPathSum(root.left, sum - root.val) or self.hasPathSum(root.right, sum - root.val)
回溯法
class Solution(object):
    def hasPathSum(self, root, sum):
        """
        :type root: TreeNode
        :type sum: int
        :rtype: bool
        """
        if not root: return False
        res = []
        return self.dfs(root, sum, res, [root.val])

    def dfs(self, root, target, res, path):
        if not root: return False
        if sum(path) == target and not root.left and not root.right:
            return True
        left_flag, right_flag = False, False
        if root.left:
            left_flag = self.dfs(root.left, target, res, path + [root.left.val])
        if root.right:
            right_flag = self.dfs(root.right, target, res, path + [root.right.val])
        return left_flag or right_flag
BFS法:
class Solution(object):
    def hasPathSum(self, root, sum):
        """
        :type root: TreeNode
        :type sum: int
        :rtype: bool
        """
        if not root: return False
        res = []
        return self.dfs(root, sum, res, [root.val])

    def dfs(self, root, target, res, path):
        if not root: return False
        if sum(path) == target and not root.left and not root.right:
            return True
        left_flag, right_flag = False, False
        if root.left:
            left_flag = self.dfs(root.left, target, res, path + [root.left.val])
        if root.right:
            right_flag = self.dfs(root.right, target, res, path + [root.right.val])
        return left_flag or right_flag
栈
class Solution(object):
    def hasPathSum(self, root, sum):
        """
        :type root: TreeNode
        :type sum: int
        :rtype: bool
        """
        if not root:
            return False
        stack = []
        stack.append((root, root.val))
        while stack:
            node, path = stack.pop()
            if not node.left and not node.right and path == sum:
                return True
            if node.left:
                stack.append((node.left, path + node.left.val))
            if node.right:
                stack.append((node.right, path + node.right.val))
        return False
3.路径总和II
给你二叉树的根节点 root 和一个整数目标和 targetSum ,找出所有 从根节点到叶子节点 路径总和等于给定目标和的路径。
113.路径总和 II - 力扣(LeetCode)https://leetcode.cn/problems/path-sum-ii/description/
DFS
class Solution:
    def pathSum(self, root: TreeNode, targetSum: int) -> List[List[int]]:
        ret = list()
        path = list()

        def dfs(root: TreeNode, targetSum: int):
            if not root:
                return
            path.append(root.val)
            targetSum -= root.val
            if not root.left and not root.right and targetSum == 0:
                ret.append(path[:])
            dfs(root.left, targetSum)
            dfs(root.right, targetSum)
            path.pop()

        dfs(root, targetSum)
        return ret
BFS:
class Solution:
    def pathSum(self, root: TreeNode, targetSum: int) -> List[List[int]]:
        ret = list()
        parent = collections.defaultdict(lambda: None)
        def getPath(node: TreeNode):
            tmp = list()
            while node:
                tmp.append(node.val)
                node = parent[node]
            ret.append(tmp[::-1])
        if not root:
            return ret
        que_node = collections.deque([root])
        que_total = collections.deque([0])

        while que_node:
            node = que_node.popleft()
            rec = que_total.popleft() + node.val

            if not node.left and not node.right:
                if rec == targetSum:
                    getPath(node)
            else:
                if node.left:
                    parent[node.left] = node
                    que_node.append(node.left)
                    que_total.append(rec)
                if node.right:
                    parent[node.right] = node
                    que_node.append(node.right)
                    que_total.append(rec)
        return ret
20240815
- 食堂最近极其差评。
- 二面感觉还行。然前路莫测,未必遂愿。
- 晚上嘉伟带静香姐的闺蜜五月姐跑间歇,1000米@4’15"×10组(间歇5分钟),五月姐8组后报废。我先跑了2000米@3’53",然后陪他俩一起干。前3组中间间歇我是不停的(4’15"毕竟还是很轻松的,给自己加点难度),后面3组我也实在扛不住,昨天的量还是有些累。
- PS:AK问嘉伟,五月姐又是哪位姐,你到底有多少个好姐姐?xs


二面记录:
Python标准库deque和heapq(优先堆队列),转自https://blog.csdn.net/weixin_40134371/article/details/139996858
优先级队列 priority queue 可以通过堆、二叉搜索树、链表等多种方式来实现,其中,堆是最流行的实现优先级队列的具体数据结构。
Priority Queue 支持三种操作:
- is_empty:检查队列是否为空。
- add_element:向队列中添加一个元素。
- pop_element:弹出优先级最高的元素。
对于元素的优先级有两种约定(约定或惯例 convention,指约定俗称的用法或含义,特定上下文中使用的特定术语、符号、语法或行为的含义):1. 最大的元素具有最高的优先级;2. 最小的元素具有最高的优先级。
这两种约定其实是等价的,如果元素由数字组成,那么使用负数即可完成转换。Python heapq 模块使用第二种,这也是两种约定中更常见的一种。在这个约定下,最小的元素具有最高的优先级。
优先级队列对于查找某个极端元素是非常有用的,如:找到点击率前三的博客文章、找到从一个点到另一个点的最快方法、根据到站频率预测哪辆公共汽车将首先到达车站等问题。
堆是特殊的完全二叉树(complete binary tree),其中每个上级节点的值都小于等于它的任意子节点(堆属性),堆常用于实现优先级队列。
二叉树(binary tree)中,每个节点最多有两个子节点。完全二叉树是一种特殊的二叉树,其定义是: 若设二叉树的深度为 h,除第 h 层外,其它各层 1~h-1 的结点数都达到最大个数,第 h 层所有的结点都连续集中在最左边。也就是说,完全二叉树的所有非叶子节点都必须被填满,叶子节点都必须连续排列在最左边。满二叉树是特殊的完全二叉树。完全二叉树的性质保证,树的深度是元素数的以2为底的对数向上取整。
在堆树中,一个节点的值总是小于它的两个子节点,这被称为堆属性(与二叉搜索树不同,二叉搜索树中,只有左侧节点的值小于其父节点的值)。在堆中,同一层的节点之间并没有大小关系的限制,唯一的限制是每个节点的值必须符合堆属性。
堆和二叉搜索树的排列数值的方式是完全不同的!!!
函数接口:
heapq.heapify(x):将list x 转换成堆,O(n)时间heapq.heappush(heap, item):将 item 的值加入 heap 中,保持堆的不变性。heapq.heappop(heap):弹出并返回 heap 的最小的元素,保持堆的不变性。如果堆为空,抛出 IndexError;使用 heap[0] ,可以只访问最小的元素而不弹出它。heapq.heappushpop(heap, item):将 item 放入堆中,然后弹出并返回 heap 的最小元素。等价于执行heappush()然后紧接着heappop()heapq.heapreplace(heap, item):弹出并返回 heap 中最小的一项,同时推入新的 item。如果堆为空引发 IndexError。等价于执行heappop()然后紧接着heappush()- 单步骤 heappushpop 和 heaprepalce 比分开执行 pop 和 push 更高效;
- 它们是 pop 和 push 的组合,非常适合在固定大小的堆使用: heapreplace() 从堆中返回一个元素并将其替换为 item;heaprepalce 返回的值可能会比新加入的值大,如果不希望如此,可改用 heappushpop(),它返回两个值中较小的一个,将较大的留在堆中。
用例:
import heapq
a = [3, 5, 1, 2, 6, 8, 7]
heapq.heapify(a)
a
# [1, 2, 3, 5, 6, 8, 7]

heapq.heappop(a)
# 1
a
# [2, 5, 3, 7, 6, 8]

heapq.heappush(a, 4)
heapq.heappop(a)
# 2
heapq.heappop(a)
# 3
heapq.heappop(a)
# 4
heapq.merge(*iterables, key=None, reverse=False)
- merge 函数用于 merging sorted sequences,它假设输入的可迭代对象已经排序,使用堆来合并多个可迭代对象(例如,合并来自多个日志文件的带时间戳的条目),返回一个迭代器,而不是一个列表。
- 类似于 sorted(itertools.chain(*iterables)), 但需假定每个输入流都是已排序的(从小到大),且返回一个可迭代对象 iterator,不会一次性地将数据全部放入内存(节省内存)。
- 具有两个可选参数:
- key 指定带有单个参数的 key function,用于从每个输入元素中提取比较键。 默认值为 None (直接比较元素)。
- reverse 为一个布尔值。 如果设为 True,则输入元素将按比较结果逆序进行合并。 要达成与 sorted(itertools.chain(*iterables), reverse=True) 类似的行为,所有可迭代对象必须是已从大到小排序的。
heapq.nlargest(n, iterable, key=None)
-
从 iterable 所定义的数据集中返回前 n 个最大元素组成的列表。
-
key 为一个单参数的函数,用于从 iterable 的每个元素中提取比较键 (例如 key=str.lower)。 等价于:sorted(iterable, key=key, reverse=True)[:n]。
heapq.nsmallest(n, iterable, key=None)
-
从 iterable 所定义的数据集中返回前 n 个最小元素组成的列表。
-
key 为一个单参数的函数,用于从 iterable 的每个元素中提取比较键 (例如 key=str.lower)。 等价于: sorted(iterable, key=key)[:n]。
- 在 n 值较小时可考虑使用 heapq.nlargest 和 heapq.nsmallest;
- 对于较大的值,使用 sorted() 函数更有效率;
- 当 n==1 时,使用内置的 min() 和 max() 函数更高效;
如果需要重复使用这些函数,可考虑将可迭代对象转为真正的堆。
案例分析:
- 假设有一个系统,系统中存在几种电子邮件,不同类型的电子邮件有不同发送频率,比如 A 类邮件每15分钟发送一次,B 类每40分钟发送一次。 可以使用堆设计一个调度程序:首先,将各种类型的电子邮件添加到队列中,每封电子邮件带一个时间戳,指示下一次发送的时间;然后,查看具有最小时间戳的元素,计算在发送之前需要睡眠的时间,当调度程序醒来时,处理此邮件;处理完成后,从优先级队列中取出电子邮件,计算该邮件的下一个时间戳,放回到队列中正确的位置。
import datetime
import heapq

def email(frequency, email_type):
    current = datetime.datetime.now()
    while True:
        current += frequency
        yield current, email_type

fast_email = email(datetime.timedelta(minutes=10), "fast email")
slow_email = email(datetime.timedelta(minutes=30), "slow email")

unified = heapq.merge(fast_email, slow_email)
for _ in range(10):
    print(next(unified))

# (datetime.datetime(2024, 6, 14, 16, 40, 8, 28884), 'fast email')
# (datetime.datetime(2024, 6, 14, 16, 50, 8, 28884), 'fast email')
# (datetime.datetime(2024, 6, 14, 17, 0, 8, 28884), 'fast email')
# (datetime.datetime(2024, 6, 14, 17, 0, 8, 28884), 'slow email')
# (datetime.datetime(2024, 6, 14, 17, 10, 8, 28884), 'fast email')
# (datetime.datetime(2024, 6, 14, 17, 20, 8, 28884), 'fast email')
# (datetime.datetime(2024, 6, 14, 17, 30, 8, 28884), 'fast email')
# (datetime.datetime(2024, 6, 14, 17, 30, 8, 28884), 'slow email')
# (datetime.datetime(2024, 6, 14, 17, 40, 8, 28884), 'fast email')
# (datetime.datetime(2024, 6, 14, 17, 50, 8, 28884), 'fast email')
上述代码中,heapq.merge() 的输入是无限生成器,返回值也是一个无限迭代器,这个迭代器将按照未来时间戳的顺序生成待发送的电子邮件序列。观察 print 打印的结果,fast email 每10分钟发送一次,slow email 每40分钟发送一次,两种邮件合理交错。merge 不读取所有输入,而是动态地工作,因此,尽管两个输入都是无限迭代器,前10项的打印依然能很快完成。
- 已知2016年夏季奥运会女子100米决赛的成绩,要求打印前三名运动员姓名。
import heapq

results="""\
Christania Williams      11.80
Marie-Josee Ta Lou       10.86
Elaine Thompson          10.71
Tori Bowie               10.83
Shelly-Ann Fraser-Pryce  10.86
English Gardner          10.94
Michelle-Lee Ahye        10.92
Dafne Schippers          10.90
"""
top_3 = heapq.nsmallest(3, results.splitlines(), key=lambda x: float(x.split()[-1]))
print("\n".join(top_3))
# Elaine Thompson          10.71
# Tori Bowie               10.83
# Marie-Josee Ta Lou       10.86
关于collections.deque,这是一个可以两头添加、删除、拼接的双向队列。
-
append(x):从右端将x加入到队列。 -
appendleft(x):将x添加到队列左端。 -
clear():删除所有元素。 -
count(x):计算x元素的数量 -
extend(iterable):从右端添加一个可迭代中的元素。 -
extendleft(iterable):从左端添加一个可迭代的元素。 -
pop():删除返回一个右端元素,如果不存在,抛出IndexError. -
popleft():删除返回一个左端元素,如果不存在,抛出IndexError. -
remove(value):删除第一个找到值为value的元素.如果没找到,抛出 ValueError. -
reverse():翻转元素 返回 None. -
rotate(n=1):将队列向右边挪n步,如果n为负数那么往左挪。
from collections import deque
dq = deque(list())
dq.append(1)
dq.appendleft(2)
dq.extend([1,2,3])
dq.extendleft([1,2,3])
20240816
三面无明确反馈,不可测的大老板(不过他刚好卧病在家,感觉不是很想问我什么东西)。直觉上氛围不算太轻松,至少不如蚂蚁,但我还是相信颜老板的眼光的。
对比昨日明显降温,减量恢复。晚上起手5000米@3’57",全程渐加速,体感非常轻松,认真跑19分钟以内不会太难,结束补2000米放松@4’03"。XR应该已经回来了,但是一个个真懒得不行。
PS:今日首蚌,机票预约接送服务,从苏黎世到卢加诺,要7500R,比往返机票还贵,离大谱,赶紧研究SBB(小红书找攻略这块确实还挺好用),以及速成法语(多邻国上已经快把日语学通关,但是根本派不上用场)。


昨天还问了一个,关于PEFT里LoRAConfig的参数说明:
- LoRA 维数/分解阶
r:对于要训练的每一层,d×k权重更新矩阵ΔW由低秩分解BA表示,其中B是d×r矩阵,A是r×k矩阵。 分解 r 的秩为 << min(d,k)。 r 的默认值为 8。A 由随机高斯数初始化,因此初始权重更新有一些变化。 B 由零初始化,因此训练开始时 ΔW 为零。 - LoRA 缩放参数
lora_alpha:根据 LoRA 原论文,ΔW 按 α / r 缩放,其中 α 是常数。 当使用 Adam 进行优化时,如果适当缩放初始化,调整 α 与调整学习率大致相同。 原因是参数的数值随 r 线性增加。 随着 r 的增加,ΔW 中的条目值也随 r 线性缩放。 无论使用什么 r,我们都希望 ΔW 能够与预训练权重保持一致。 这就是为什么作者将 α 设置为第一个 r 并且不对其进行调整。 α 的默认值为 8。 - 将 LoRA 应用于
target_modules的模块:你可以选择特定模块进行微调。 根据说明,loralib仅支持nn.Linear、nn.Embedding和nn.Conv2d。 微调线性层是常见的做法。 要了解你的模型具有哪些模块,请使用 Python 中的transformers库加载模型,然后打印(模型)。 默认值为“无”。 如果你想微调所有线性层,可执行以下操作:import re pattern = r'\((\w+)\): Linear' linear_layers = re.findall(pattern, str(model.modules)) target_modules = list(set(linear_layers)) - LoRA 层的丢失概率
lora_dropout:Dropout 是一种通过在训练过程中以 dropout 概率随机选择要忽略的神经元来减少过度拟合的技术。 这些选定的神经元对下游神经元激活的贡献在前向传递中被暂时删除,并且任何权重更新都不会应用于后向传递中的神经元。 lora_dropout的默认值为0。 - Lora bias偏差类型:偏差可以是
None、all或lora_only。 如果是all或lora_only,则相应的偏差将在训练期间更新。 即使禁用适配器,模型也不会产生与没有适应的基本模型相同的输出。 默认值为None。 - 任务类型
task_type:似乎在不指定task_type 的情况下一切都正常。 可能的任务类型包括CAUSAL_LM,FEATURE_EXTRACTION,QUESTION_ANS,SEQ_2_SEQ_LM,SEQ_CLS和TOKEN_CLS。 - 其他参数:其余参数包括
fan_in_fan_out、modules_to_save、layers_to_transform和layers_pattern不太常用。
标准操作(default)
accelerate launch --config-file examples/accelerate_configs/deepspeed_zero3.yaml examples/research_projects/stack_llama_2/scripts/sft_llama2.py \
    --output_dir="./sft" \
    --max_steps=500 \
    --logging_steps=10 \
    --save_steps=0.2 \
    --save_total_limit=2 \
    --per_device_train_batch_size=2 \
    --per_device_eval_batch_size=1 \
    --gradient_accumulation_steps=4 \
    --gradient_checkpointing=False \
    --group_by_length=False \
    --learning_rate=1e-4 \
    --lr_scheduler_type="cosine" \
    --warmup_steps=100 \
    --weight_decay=0.05 \
    --optim="paged_adamw_32bit" \
    --bf16=True \
    --remove_unused_columns=False \
    --run_name="sft_llama2" \
    --report_to="wandb"
运行:
{'loss': 1.5964, 'grad_norm': 0.04747452916511348, 'learning_rate': 1e-05, 'epoch': 0.02}
{'loss': 1.5964, 'grad_norm': 0.056631829890668624, 'learning_rate': 2e-05, 'epoch': 0.04}
{'loss': 1.5692, 'grad_norm': 0.05837008611668212, 'learning_rate': 3e-05, 'epoch': 0.06}
  8%|█████████▏                               | 39/500 [01:49<20:44,  2.70s/it]
粒度都是 steps(optimization steps)
- loss
- grad_norm:监控全体的 weights/parameters (loss.backward 之后计算的)的 grad
- 避免出现梯度爆炸
- learning_rate: scheduled
Adam => AdamW
- Adam with decoupled weight decay (AdamW).
- https://arxiv.org/pdf/1711.05101
- AdamW 与 Adam 的主要区别在于处理权重衰减(也称为 L2 正则化)的方式:
- Adam:在传统的 Adam 中,权重衰减(或 L2 正则化)通常被添加到损失函数中。这意味着权重衰减项会影响梯度,进而影响动量(一阶矩)和自适应学习率(二阶矩)的计算。
- AdamW:AdamW 将权重衰减从损失函数中分离出来,直接应用于参数更新步骤。这种方法被称为"解耦权重衰减"(decoupled weight decay)。
- 在某些优化器(如 AdamW)中,权重衰减被认为是一种更自然和有效的方法,因为它在每次权重更新时直接应用衰减,而不需要显式地在损失函数中添加正则项。

Grad Clip & Grad Norm
- gradient clipping,梯度裁剪,一般用于解决梯度爆炸 (gradient explosion) 问题
nn.utils.clip_grad_norm_(model.parameters(), args.max_grad_norm)
Clip the gradient norm of an iterable of parameters. The norm is computed over all gradients together, as if they were concatenated into a single vector. Gradients are modified in-place. - grad norm
- if ∥ g ∥ ≥ c \|\textbf g\|\geq c ∥g∥≥c,则有 g ← c g ∥ g ∥ \textbf g\leftarrow c\frac{\textbf g}{\|\textbf g\|} g←c∥g∥g
- TrainingArguments (transformers)
max_grad_norm: float = field(default=1.0, metadata={"help": "Max gradient norm."})
梯度裁剪代码实现
# Define the maximum gradient norm threshold
max_grad_norm = 1.0

# Training loop
for epoch in range(num_epochs):
    for inputs, targets in dataloader: # Replace dataloader with your data loading me
        optimizer.zero_grad() # Zero the gradients
        # Forward pass
        outputs = model(inputs)
        loss = criterion(outputs, targets)
        # Backward pass
        loss.backward()
        # Apply gradient clipping to prevent exploding gradientS
        nn.utils.clip_grad_norm_(model.parameters(), max_grad_norm)
        # Update weights
        optimizer.step()
        # Perform other training loop operations (e.g., validation)
w = torch.rand(5) * 1000
w_1 = w.clone()
w.requires_grad_(True)
w_1.requires_grad_(True)
loss = 1/2 * torch.sum(w_1 * w_1 + w * w)
# Here grads of loss w.r.t w and w_1 should be w and w_1 respectively
loss.backward()
# Clip grads of w_1
torch.nn.utils.clip_grad_norm_(w_1, max_norm=1.0, norm_type=2) # tensor(1683.7260)
torch.norm(w_1, p=2) # tensor(1683.7260, grad_fn=<LinalgVectorNormBackward0>)
w.grad # tensor([882.2693, 915.0040, 382.8638, 959.3057, 390.4482])
w_1.grad # tensor([0.5240, 0.5434, 0.2274, 0.5698, 0.2319])
torch.norm(w_1.grad, p=2) # tensor(1.)
w.grad / torch.norm(w.grad, p=2) # tensor([0.5240, 0.5434, 0.2274, 0.5698, 0.2319])
20240817
中午没睡就很困,最近这天气有点春困的味道,但是勉强还是可以顶住。
挂机十天的SXY重新上线,一下子就遛了20km。最近莫不是受了啥刺激。
晚上力量训练,30箭步×8组(+20kg),组间50个双脚提踵(+20kg),补3000米慢跑@4’35"放松,逮到YZZ也在跑3000米,比我还快一些,最后两圈他冲起来了,其实他最近跑得一直挺快的。
PS:SBB,通票和月票两种,月票(半价票)其实适合当地人使用,但当地人其实并不能买。火车票价相对合理,至少跟打的相比要便宜一个数量级,尽管如此,不同时间段的票价差异也很大,如Zurich到Lugano,每天最早的一班车是5:30出发,票价37.8CHF,最晚的一班车21:45出发,票价21CHF。另外通票比月票好的地方就是可以优惠乘坐很多观光列车。

05 StackLlama、SFT+DPO(代码组织、数据处理,pipeline)
git clone git@github.com:huggingface/trl.git
cd trl
- run the scripts
huggingface-cli login
- TRL
- 三个 research projects(https://github.com/huggingface/trl/tree/main/examples/research_projects)
- stack_llama_2/scripts
- tools
- toxicity
- 学习代码组织
- 超参的组织
- 超参的默认值;
- 学习 pipeline;
- accelerate config
- https://github.com/huggingface/trl/tree/main/examples/accelerate_configs
- 三个 research projects(https://github.com/huggingface/trl/tree/main/examples/research_projects)
很多人没有资源,上面三个开源的项目是很好的用于提供微调经验的项目,如何设置超参,以及pipeline的使用
模型和数据
- stack exchange:
- 数据收集及标注
score = log2 (1 + upvotes)rounded to the nearest integer, plus 1 if the questioner accepted the answer- (we assign a score of −1 if the number of upvotes is negative).
- pairs (response_j, response_k) where j was rated better than k
- 数据收集及标注
lvwerra/stack-exchange-paired:千万级别,26.3 GB- split:31,284,837
- train:26.8m rows
- test:4.48m rows
- data_dir:
- data/finetune: SFT
- question + response_j
f"Question: {example['question']}\n\nAnswer: {example['response_j']}"
- data/rl: DPO
def return_prompt_and_responses(samples) -> Dict[str, str]: return { "prompt": ["Question: " + question + "\n\nAnswer: " for question in samples["question"]], "chosen": samples["response_j"], "rejected": samples["response_k"], } - data/evaluation: evaluation of DPO
- data/reward: 第一版 stack-llama 训练 reward modeling 用到的数据集
- data/finetune: SFT
- split:31,284,837
from transformers import AutoTokenizer
tokenizer = AutoTokenizer.from_pretrained("meta-llama/Llama-2-7b-hf")
tokenizer.is_fast # True
20240818
晚上出去吃饭,原计划下午节奏跑万米@4’00",因为过两天就要开始军训,场地大约有两周时间不太方便使用。找嘉伟一起,结果他骑车摔跤膝盖不行,只好一个人去顶。
依然事与愿违,起手2000米@3’50"就爆了。尽管雨后气温有所回落,但是太阳是不讲道理的,2000米就晒得疲软,补间歇1200米@3’43"+400米@3’05"+400米@3’01"+800米@4’07"放松,中间两个400米质量尚可,没有刻意地全力冲刺,也比较容易地跑到1’15"上下。近期无氧强度跑得少,昨天也刚做完力量,冲两圈也挺好。
其实这个夏天还没有跑过40分钟以内的万米,就连这周四的5000米也是这个夏天唯一一次跑进20分钟(主要场地跑时,几乎坚持不到5000米以上),看起来非常差劲,其实也很不咋地。不过我相信自己是有提升的。尽力,剩下交给时间吧,。

参数
from transformers import HfArgumentParser
from trl import SFTConfig
# 封装 dataclass 类
# parser = HfArgumentParser((ScriptArguments, SFTConfig))
# 接收命令行参数,且将其转换为对应类的实例
# script_args, training_args = parser.parse_args_into_dataclasses()
from dataclasses import dataclass, field
from typing import Optional

@dataclass
class ScriptArguments:
    model_name: Optional[str] = field(default="meta-llama/Llama-2-7b-hf", metadata={"help": "the model name"})
    dataset_name: Optional[str] = field(default="lvwerra/stack-exchange-paired", metadata={"help": "the dataset name"})
    subset: Optional[str] = field(default="data/finetune", metadata={"help": "the subset to use"})
    split: Optional[str] = field(default="train", metadata={"help": "the split to use"})
    size_valid_set: Optional[int] = field(default=4000, metadata={"help": "the size of the validation set"})
    streaming: Optional[bool] = field(default=True, metadata={"help": "whether to stream the dataset"})
    shuffle_buffer: Optional[int] = field(default=5000, metadata={"help": "the shuffle buffer size"})
    seq_length: Optional[int] = field(default=1024, metadata={"help": "the sequence length"})
    num_workers: Optional[int] = field(default=4, metadata={"help": "the number of workers"})
    use_bnb: Optional[bool] = field(default=True, metadata={"help": "whether to use BitsAndBytes"})

    # LoraConfig
    lora_alpha: Optional[float] = field(default=16, metadata={"help": "the lora alpha parameter"})
    lora_dropout: Optional[float] = field(default=0.05, metadata={"help": "the lora dropout parameter"})
    lora_r: Optional[int] = field(default=8, metadata={"help": "the lora r parameter"})

script_args = ScriptArguments()
script_args.model_name # 'meta-llama/Llama-2-7b-hf'

# if training_args.group_by_length and training_args.packing:
#     raise ValueError("Cannot use both packing and group by length")
数据集
- dataset.filter/dataset.map: 要充分利用cpu的线程资源
- num_proc:进程数
- 注意 dataset.map 的过程中会在 $HF_HOME/datasets 下创建大量的缓存文件
dataset.cleanup_cache_files():来释放缓存文件,不然很容易击穿磁盘
from datasets import load_dataset

#  887094/0 [00:44<00:00, 18883.94 examples/s]
# dataset = load_dataset(
#     script_args.dataset_name,
#     data_dir=script_args.subset,
#     split=script_args.split,
#     use_auth_token=True,
#     num_proc=script_args.num_workers if not script_args.streaming else None,
#     # streaming=script_args.streaming,
#     streaming=False
# )

# Setting num_proc from 24 to 20 for the train split as it only contains 20 shards.
#  7440923/0 [01:17<00:00, 117936.98 examples/s]
dataset = load_dataset(
    script_args.dataset_name,
    data_dir=script_args.subset,
    split=script_args.split,
    use_auth_token=True,
    num_proc=24,
    # streaming=script_args.streaming,
    streaming=False
)

# Resolving data files:   0%|          | 0/20 [00:00<?, ?it/s]
# Loading dataset shards:   0%|          | 0/60 [00:00<?, ?it/s]

len(dataset) # 7440923
dataset
"""
Dataset({
    features: ['qid', 'question', 'date', 'metadata', 'response_j', 'response_k'],
    num_rows: 7440923
})
"""

dataset = dataset.train_test_split(test_size=0.005, seed=42)
train_data = dataset["train"]
valid_data = dataset["test"]
len(train_data), len(valid_data), len(train_data) + len(valid_data) # (7403718, 37205, 7440923)

train_data[0]
"""
{'qid': 20079813,
 'question': 'The scenario is simple, I need to log in from another server (different from the API server) to retrieve the access token.\n\nI installed `Microsoft.Owin.Cors` package on the API Server. In `Startup.Auth.cs` file, under `public void ConfigureAuth(IAppBuilder app)`, I added in \n\n```\napp.UseCors(Microsoft.Owin.Cors.CorsOptions.AllowAll);\n\n```\n\nIn `WebApiConfig.cs`, under `public static void Register(HttpConfiguration config)`, I added in these lines:\n\n```\n// Cors\nvar cors = new EnableCorsAttribute("*", "*", "GET, POST, OPTIONS");\nconfig.EnableCors(cors);\n\n```\n\nWhat else should I change?',
 'date': '2013/11/19',
 'metadata': ['https://Stackoverflow.com/questions/20079813',
  'https://Stackoverflow.com',
  'https://Stackoverflow.com/users/863637/'],
 'response_j': 'I had many trial-and-errors to setup it for AngularJS-based web client.  \n\nFor me, below approaches works with ASP.NET WebApi 2.2 and OAuth-based service.\n\n1. Install `Microsoft.AspNet.WebApi.Cors` nuget package.\n2. Install `Microsoft.Owin.Cors` nuget package.\n3. Add `config.EnableCors(new EnableCorsAttribute("*", "*", "GET, POST, OPTIONS, PUT, DELETE"));` to the above of `WebApiConfig.Register(config);` line at **Startup.cs** file.\n4. Add `app.UseCors(Microsoft.Owin.Cors.CorsOptions.AllowAll);` to the **Startup.Auth.cs** file. This must be done prior to calling `IAppBuilder.UseWebApi`\n5. Remove any xml settings what Blaise did.\n\nI found many setup variations and combinations at here stackoverflow or [blog articles](http://msdn.microsoft.com/en-us/magazine/dn532203.aspx). So, Blaise\'s approach may or may not be wrong. It\'s just another settings I think.',
 'response_k': 'I just want to share my experience. I spent half of the day banging my head and trying to make it work. I read numerous of articles and SO questions and in the end I figured out what was wrong. \n\nThe line \n\n```\napp.UseCors(Microsoft.Owin.Cors.CorsOptions.AllowAll);\n\n```\n\nwas not the first one in `Startup` class `Configuration` method. When I moved it to the top - everything started working magically.\n\nAnd no custom headers in `web.config` or `config.EnableCors(corsPolicy);` or anything else was necessary.\n\nHope this will help someone to save some time.'}
"""
然后我们要构造样本数据及模板:
def prepare_sample_text(example):
    """Prepare the text from a sample of the dataset."""
    text = f"Question: {example['question']}\n\nAnswer: {example['response_j']}"
    return text

def chars_token_ratio(dataset, tokenizer, nb_examples=400):
    """
    Estimate the average number of characters per token in the dataset.
    """
    total_characters, total_tokens = 0, 0
    for _, example in tqdm(zip(range(nb_examples), iter(dataset)), total=nb_examples):
        text = prepare_sample_text(example)
        total_characters += len(text)
        if tokenizer.is_fast:
            total_tokens += len(tokenizer(text).tokens())
        else:
            total_tokens += len(tokenizer.tokenize(text))

    return total_characters / total_tokens

chars_per_token = chars_token_ratio(train_data, tokenizer)
chars_per_token # 3.248387071938901
from trl.trainer import ConstantLengthDataset

train_dataset = ConstantLengthDataset(
    tokenizer,
    train_data,
    formatting_func=prepare_sample_text,
    infinite=True,
    seq_length=script_args.seq_length,
    chars_per_token=chars_per_token,
)

sample = next(iter(train_dataset))
sample['input_ids'].shape, sample['labels'].shape # (torch.Size([1024]), torch.Size([1024]))
print(tokenizer.decode(sample['input_ids']))
"""
`method="post"`, now I'm confused. When we click the button, what will actually happen? The jQuery.ajax will send a request in the js function but what will the `method="post"` do? Or `method="post"` can be ignored? If it does nothing, can we make the attribute `method` empty: `<form class="form" action="" method="">`?

**Additional**

Now I realise that the type of the buttion in this example is `button`, instead of `submit`. If I change the type into `submit` and click it, what will happen? Will it send two http requests, a post request comes from the form and a put request comes from the jQuery.ajax?

Answer: This example is badly designed and confusing.

The `formSubmit` function will only be called when the button is clicked. When the button is clicked, that function will run, and *nothing else* will happen; since the input is not a submit button, the form will not attempt to submit. All network activity will result from the `jQuery.ajax` inside the function. In this case, the `<form>` and the `method="post"` are ignored completely, since the form doesn't get submitted - the method used will be the one in the `.ajax` function, which is PUT.

But the form is still submittable, if the user presses enter while focused inside the `<input type="text"`. If they do that, then the `formSubmit` function will not be called (since the button wasn't clicked), and the user's browser will send the `name` and the `message` as form data to the server, on the current page - and yes, as a POST. (Is the current page this code is on `submit.php`? If not, that may be a mistake. Perhaps the person who wrote the code completely overlooked the possibility of the form being submitable without using the button.)

To make the example less confusing, I'd change the button to a *submit* button, and add a submit handler to the form instead of a click listener to the button. Then have the submit handler `return false` or call `e.preventDefault` so that all network activity goes through the `.ajax` call.</s><s> Question: I tend to get very stressed out about how things play out around me in the workplace. A lot of the stress and anxiety comes from high level decisions and changes made by management and executives that are not necessarily detrimental to me but definitely change the workplace environment and expectations causing me to be consumed with inconsolable worry and anxiety.

As I get older I have been sufferring more and more anxiety attacks. We know the symptoms, feeling like I can't get a breath, heart pounding, cold sweats. Certainly my excessive worrying has helped me avoid bad situations in the past but more often than not my irrational worry and anxiety turns out to be unfounded, with little basis in logical fact (not that rational and logical thought really help; the fear is not rational).

>
> Fear is the mind-killer
>
>
>

I feel like this hinders me severely in my career. My coworkers and boss have taken notice and this stresses me out even more because now I am afraid they think me weak.

My career aspirations are to make it into management someday because I am successful as a lead in turning around failing software projects and turning them into a success. I love working with people and clients and love to coach and guide people. I feel I would be a postive manager.

My anxiety attacks are a manifestation of my stress, however will management think me too weak to take charge and be an effective leader?

Am I too weak to be a good manager someday? Perhaps I need to come to terms with my own shortcomings as it seems my other peers are much more easy going with chaos going on around them?

Answer: Anxiety attacks occur when you think about uncomfortable situations / things, you realize that you're freaking out, and then you freak out about it even further, in other words, you are freaking out about the fact that you're freaked out.

Try:

* **Just accept the fact that you're worried.** Admit that you're facing a bad situation, and stop thinking further about how much you're worried about it. The less you think, the less you freak out.
* **Change your physical state.** I find that sometimes mental states are easier to be switched out of if you're
"""
这个decode结果很长,就是输入的所有文本
lengths = []
for i, sample in enumerate(train_dataset):
    lengths.append(len(sample['input_ids']))
    if i >= 10:  # 收集100个样本的信息
        break
lengths # [1024, 1024, 1024, 1024, 1024, 1024, 1024, 1024, 1024, 1024, 1024]
20240819
后知后觉,昨天群里莫名其妙在拍LXY,原来是有大喜事,哈哈,我还是应该祝福一下,就是有点晚了。
晚上依然是到到九点才下去摇了会儿,看到LZR,YY,ZYY刚刚顺完,明天他们要军训。一个夏天过去,一个个都是一仗回到解放前,全是五分配养老户。YZZ也来得晚,跟他跑了会儿,这小子突出一个请我吃辣堡,我东西都没来得及放下,手上拿着手机、钥匙、眼镜和卡,还真拿他没什么办法,跟他冲了一圈实在扛不住,最后参差不齐地凑了5k@4’15",有点疲累。

加速SFT
经验:
-
先尝试用 single gpu 跑一下:看下单卡的表现;
- 单机单卡能运行,就直接跑,否则一定要模型并行,即使用
accelerate launch --config-file ./single_gpu.yaml xx.py - 对比(multi gpus)看下通信的影响;
- 单机单卡能运行,就直接跑,否则一定要模型并行,即使用
-
accelerate config yaml
- https://github.com/huggingface/trl/tree/main/examples/accelerate_configs
from accelerate import Accelerator
...

base_model = AutoModelForCausalLM.from_pretrained(
    ...
    device_map={"": Accelerator().local_process_index},
    ...
)
zero3
zero3使用deepspeed_zero3.yaml 即可,其他都一样
-
“meta-llama/Llama-2-7b-hf”:https://wandb.ai/loveresearch/huggingface/runs/jsn4syqr
accelerate launch --config-file examples/accelerate_configs/deepspeed_zero3.yaml examples/research_projects/stack_llama_2/scripts/sft_llama2.py \ --output_dir="./sft" \ --max_steps=1000 \ --logging_steps=10 \ --save_steps=0.2 \ --save_total_limit=2 \ --eval_strategy="steps"\ --eval_steps=0.2\ --per_device_train_batch_size=2 \ --per_device_eval_batch_size=1 \ --gradient_accumulation_steps=4 \ --gradient_checkpointing=False \ --group_by_length=False \ --learning_rate=1e-4 \ --lr_scheduler_type="cosine" \ --warmup_steps=100 \ --weight_decay=0.05 \ --optim="paged_adamw_32bit" \ --bf16=True \ --remove_unused_columns=False \ --run_name="sft_llama2" \ --report_to="wandb" -
“meta-llama/Meta-Llama-3-8B”:
accelerate launch --config-file examples/accelerate_configs/deepspeed_zero3.yaml examples/research_projects/stack_llama_2/scripts/sft_llama2.py \ --model_name="meta-llama/Meta-Llama-3-8B"\ --output_dir="./sft" \ --max_steps=1000 \ --logging_steps=10 \ --save_steps=0.2 \ --save_total_limit=2 \ --eval_strategy="steps"\ --eval_steps=0.2\ --per_device_train_batch_size=2 \ --per_device_eval_batch_size=1 \ --gradient_accumulation_steps=4 \ --gradient_checkpointing=False \ --group_by_length=False \ --learning_rate=1e-4 \ --lr_scheduler_type="cosine" \ --warmup_steps=100 \ --weight_decay=0.05 \ --optim="paged_adamw_32bit" \ --bf16=True \ --remove_unused_columns=False \ --run_name="sft_llama3" \ --report_to="wandb" -
trl 中的 SFTTrainer 继承自 huggingface transformers 的 Trainer
-
max_steps=500
- 设置较小的 max_steps 可以用来做简单的 bug 测试;
- steps 称之为 optimization steps,优化步;执行多少次优化;即反向传播,梯度计算与权重参数更新;
-
logging_steps=10
- 多少步打印一次监控指标:loss、learning_rate、grad_norm
-
learning_rate=1e-4 && lr_scheduler_type=“cosine” && warmup_steps=100
- warmup_steps 达到 100 steps 时达到 learning_rate=1e-4
- warmup_steps 之前初始是 1e-5, 通过 100 步,线性到达 1e-4
- 指定的 learning_rate 其实是 η max \eta_{\text{max}} ηmax,warmup 到达后,逐渐衰减;
-
grad_norm
grad_norm = ∑ i = 1 n ( ∂ L ∂ w i ) 2 \text{grad\_norm} = \sqrt{\sum_{i=1}^n \left(\frac{\partial L}{\partial w_i}\right)^2} grad_norm=i=1∑n(∂wi∂L)2
accelerate DPO
accelerate launch --config-file examples/accelerate_configs/deepspeed_zero3.yaml examples/research_projects/stack_llama_2/scripts/dpo_llama2.py \
    --model_name_or_path="sft/final_checkpoint" \
    --output_dir="dpo"
DPO原理回顾(如何计算loss)
-
输入定义:
- π θ \pi_\theta πθ: 策略模型
- π r e f \pi_{ref} πref: 参考模型
- D = { ( x i , y i + , y i − ) } D = \{(x_i, y_i^+, y_i^-)\} D={(xi,yi+,yi−)}: 训练数据,其中 x i x_i xi 是输入提示, y i + y_i^+ yi+ 是偏好的回答, y i − y_i^- yi− 是非偏好的回答
-
对数概率计算,对于每个样本 ( x i , y i + , y i − ) (x_i, y_i^+, y_i^-) (xi,yi+,yi−):
- π θ ( y i + ∣ x i ) = log P θ ( y i + ∣ x i ) \pi_\theta(y_i^+ | x_i) = \log P_\theta(y_i^+ | x_i) πθ(yi+∣xi)=logPθ(yi+∣xi)
- π θ ( y i − ∣ x i ) = log P θ ( y i − ∣ x i ) \pi_\theta(y_i^- | x_i) = \log P_\theta(y_i^- | x_i) πθ(yi−∣xi)=logPθ(yi−∣xi)
- π r e f ( y i + ∣ x i ) = log P r e f ( y i + ∣ x i ) \pi_{ref}(y_i^+ | x_i) = \log P_{ref}(y_i^+ | x_i) πref(yi+∣xi)=logPref(yi+∣xi)
- π r e f ( y i − ∣ x i ) = log P r e f ( y i − ∣ x i ) \pi_{ref}(y_i^- | x_i) = \log P_{ref}(y_i^- | x_i) πref(yi−∣xi)=logPref(yi−∣xi)
-
对数概率比计算
- r i + = π θ ( y i + ∣ x i ) − π r e f ( y i + ∣ x i ) r_i^+ = \pi_\theta(y_i^+ | x_i) - \pi_{ref}(y_i^+ | x_i) ri+=πθ(yi+∣xi)−πref(yi+∣xi)
- r i − = π θ ( y i − ∣ x i ) − π r e f ( y i − ∣ x i ) r_i^- = \pi_\theta(y_i^- | x_i) - \pi_{ref}(y_i^- | x_i) ri−=πθ(yi−∣xi)−πref(yi−∣xi)
-
DPO 损失计算(以 sigmoid 损失为例)
L i = − log ( σ ( β ⋅ ( r i + − r i − ) ) ) ⋅ ( 1 − λ ) − log ( 1 − σ ( β ⋅ ( r i + − r i − ) ) ) ⋅ λ L_i = -\log(\sigma(\beta \cdot (r_i^+ - r_i^-))) \cdot (1 - \lambda) - \log(1 - \sigma(\beta \cdot (r_i^+ - r_i^-))) \cdot \lambda Li=−log(σ(β⋅(ri+−ri−)))⋅(1−λ)−log(1−σ(β⋅(ri+−ri−)))⋅λ
其中:- σ \sigma σ 是 sigmoid 函数
- β \beta β 是温度参数
- λ \lambda λ 是标签平滑参数
-
总体损失
L = 1 N ∑ i = 1 N L i L = \frac{1}{N} \sum_{i=1}^N L_i L=N1i=1∑NLi
其中 N N N 是批次大小。
-
优化目标: θ ∗ = arg min θ L \theta^* = \arg\min_\theta L θ∗=argminθL
-
奖励计算(用于评估)
- chosen_reward i = β ⋅ ( π θ ( y i + ∣ x i ) − π r e f ( y i + ∣ x i ) ) \text{chosen\_reward}_i = \beta \cdot (\pi_\theta(y_i^+ | x_i) - \pi_{ref}(y_i^+ | x_i)) chosen_rewardi=β⋅(πθ(yi+∣xi)−πref(yi+∣xi))
- rejected_reward i = β ⋅ ( π θ ( y i − ∣ x i ) − π r e f ( y i − ∣ x i ) ) \text{rejected\_reward}_i = \beta \cdot (\pi_\theta(y_i^- | x_i) - \pi_{ref}(y_i^- | x_i)) rejected_rewardi=β⋅(πθ(yi−∣xi)−πref(yi−∣xi))
-
评估指标
- 平均 chosen 奖励: 1 N ∑ i = 1 N chosen_reward i \frac{1}{N} \sum_{i=1}^N \text{chosen\_reward}_i N1∑i=1Nchosen_rewardi
- 平均 rejected 奖励: 1 N ∑ i = 1 N rejected_reward i \frac{1}{N} \sum_{i=1}^N \text{rejected\_reward}_i N1∑i=1Nrejected_rewardi
- 奖励准确率: 1 N ∑ i = 1 N 1 [ chosen_reward i > rejected_reward i ] \frac{1}{N} \sum_{i=1}^N \mathbb{1}[\text{chosen\_reward}_i > \text{rejected\_reward}_i] N1∑i=1N1[chosen_rewardi>rejected_rewardi]
- 奖励边际: 1 N ∑ i = 1 N ( chosen_reward i − rejected_reward i ) \frac{1}{N} \sum_{i=1}^N (\text{chosen\_reward}_i - \text{rejected\_reward}_i) N1∑i=1N(chosen_rewardi−rejected_rewardi)
(1)DPODataCollatorWithPadding & training
data_collator = DPODataCollatorWithPadding(
    # 2
    pad_token_id=self.tokenizer.pad_token_id,
    # -100
    label_pad_token_id=args.label_pad_token_id,
    # false
    is_encoder_decoder=self.is_encoder_decoder,
)
- DPO DataCollator class that pads the tokenized inputs to the maximum length of the batch.
- prompt_input_ids, chosen_input_ids, rejected_input_ids
- chosen_labels, rejected_labels
- prompt_attention_mask, chosen_attention_mask, rejected_attention_mask
- concatenated_input_ids, concatenated_attention_mask
- input_ids: (prompt + chosen), labels: chosen
- input_ids: (prompt + rejected): labels: rejected
- 一个三元组的数据(问题+好回答+坏回答)可以分为两个记录,一个时prompt+chosen,另一个prompt+rejected
- Loss只定义在回答上,而不会在prompt上计算loss
outputs = model(
    concatenated_batch["concatenated_input_ids"],
    attention_mask=concatenated_batch["concatenated_attention_mask"],
    use_cache=False,
    **model_kwargs,
)

all_logits = outputs.logits

...

all_logps, size_completion = self.get_batch_logps(
    all_logits,
    concatenated_batch["concatenated_labels"],
    # average_log_prob=self.loss_type == "ipo",
    is_encoder_decoder=self.is_encoder_decoder,
    label_pad_token_id=self.label_pad_token_id,
)

...

labels = concatenated_batch["concatenated_labels"].clone()
nll_loss = cross_entropy_loss(all_logits[:len_chosen], labels[:len_chosen])

if self.loss_type == "ipo":
    all_logps = all_logps / size_completion

chosen_logps = all_logps[:len_chosen]
rejected_logps = all_logps[len_chosen:]

chosen_logits = all_logits[:len_chosen]
rejected_logits = all_logits[len_chosen:]
(2)小寄巧
- 小批量数据集,快速测试和调试
if sanity_check:
    dataset = dataset.select(range(min(len(dataset), 1000)))
后记
字数超限,不过也是一段时期的完结,既是重生,也是蓄发。
如今觉得,生命是在寻求静与动的权衡。一成不变的死,抑或日新月异的活。
其实没有什么能比,车轮般的滚动,更能诠释这一切。跑步亦如是。
盒中还会有下一块巧克力吗?
愿君安。


 被折叠的 条评论
为什么被折叠?
被折叠的 条评论
为什么被折叠?
 到【灌水乐园】发言


