


文章目录
- [AI硬件科普] 内存/显存带宽,从 NVIDIA 到苹果 M4
- [工具使用] tmux 会话管理及会话持久性
- [A100 02] GPU 服务器压力测试,gpu burn,cpu burn,cuda samples
- [A100 01] A100 服务器开箱,超微平台,gpu、cpu、内存、硬盘等信息查看
- [显卡驱动] lspci 显卡是否在槽位,显卡基本信息
- 关于CUDA_VISIBLE_DEVICES的一些操作
- 02 双卡4090 gpu-burn,cpu-burn,cuda-samples 性能测试
- [性能测试] 03 单 4090 BERT、GPT2、T5 TFLOPS 测试及对比 3090TI
- [性能测试] 04 双4090 BERT、GPT性能测试(megatron-lm、apex、deepspeed)
- [内网穿透] 穿透内网gpu服务器(jupyter lab 服务),namesilo、cloudflare 托管
装机系列
https://www.bilibili.com/video/BV1PYfpYdEPx
[AI硬件科普] 内存/显存带宽,从 NVIDIA 到苹果 M4
https://www.bilibili.com/video/BV1Y9DAYwEvg
内存带宽(memory bandwidth),内存位宽(memory bus width)
一些显卡的数据可以在wikipedia找:https://en.wikipedia.org/wikiAmpere/(microarchitecture}
-
内存带宽计算公式:
- 内存带宽 = 频率 * 位宽/8
-
内存频率:MT/s(GT/s) 与 Gbps
- MT/s:Mega Transfers per Second
- MT/s 表示每秒的传输次数。
- 如果每次传输传输 1 位的数据,那么 1 MT/s = 1 Mbps。
- 如果每次传输传输的是 8 位(即 1 字节)的数据,那么 1 MT/s = 8 Mbps。
- MT/s 表示每秒的传输次数。
- Gbps:Gigabits per Second
- MT/s:Mega Transfers per Second
-
NVIDIA GeForce RTX 4090:
- 显存类型:24 GB GDDR6X。
- 显存位宽:384 位。
- 显存频率:21 Gbps。
-
A100:显存位宽达到了 5120位;
- 显存类型:HBM(high bandwidth memory)
-
M4 series
- https://en.wikipedia.org/wiki/Apple_M4
- M4:LPDDR5X 7500 MT/s
- 内存位宽:64bit*2 = 128位 (16*8)
- 2表示的RAM的双通道;
- 内存带宽计算:
- 7500*64*2/8/1000 = 120GB/s
- 内存位宽:64bit*2 = 128位 (16*8)
- M4 pro/max:LPDDR5X 8533 MT/s
- M4 pro:
- 内存位宽:64bit * 4 = 256bits (16 * 16)
- 4 表示的 RAM 的4通道
- 内存带宽
- 8533 * 64 * 4 / 8 / 1000 = 273GB/s
- 内存位宽:64bit * 4 = 256bits (16 * 16)
- M4 max:
- 内存位宽:128 * {3, 4} = {384, 512}bits (24 * 16, 32 * 16)
- 3 表示的 RAM 的 3 通道(3颗粒);
- 内存带宽:
- 8533 * 128 * 3 / 8 / 1000 = 410 GB/s
- 8533 * 128 * 4 / 8 / 1000 = 546 GB/s
- 内存位宽:128 * {3, 4} = {384, 512}bits (24 * 16, 32 * 16)
- M4 pro:
f'{21 * 384 / 8}GB/s' # '1008.0GB/s'
7500 * 64*2 / 8 / 1000 # 120.0
8533 * 64 * 4 / 8 / 1000 # 273.056
8533 * 128 * 3 / 8 / 1000 # 409.584
128 * 4 # 512
8533 * 128 * 4 / 8 / 1000 # 546.112
- 内存带宽似乎也能追上相对高端的GPU芯片;
- 核心数量和整体并行计算能力上与专门的深度学习 GPU(如 NVIDIA A100 或 H100)相比存在差距。
- cuda、cuda cores
- 专用硬件加速:NVIDIA 和其他高端 GPU 提供 Tensor Cores 等专用单元,加速矩阵运算和深度学习的计算效率。这些特性在 M4 Max 上可能无法完全匹配。
内存通道
- 内存的非对称双通道,笔记本电脑一般两个内存通道(双通道内存)
- 比如一根16gb内存跟一根8gb内存,
- 如果想16gb升级成24gb
- 原厂一根16gb,然后再买一个 8gb
- 如果原厂是两根8gb,则需要买一根16gb替换其中一根8gb
segment fault (core dump)
“Segment fault (core dumped)” 是程序运行时的一个错误,通常发生在程序试图访问未被允许的内存区域时。它是由操作系统通过内存保护机制检测到的,并终止程序执行,同时产生一个内存转储文件(即 core dump),用于调试。
[工具使用] tmux 会话管理及会话持久性
- 终端复用器(terminal multiplexer)
- 安装:
sudo apt-get install tmuxtmux -V
- 进入 tmux 模式:terminal 中输入 tmux 回车
- Ctrl +b:激活控制台
- ":上下
- %:左右
- o:切换窗口;
- x:关闭当前窗口;
- Ctrl +b:激活控制台
!tmux -V
显示 # tmx 3.2a
Session会话管理:
- 创建会话:
tmux new -s 0827- 比如启动某服务
- 退出会话:
ctrl + b->d(detatch) - 进入会话:
tmux attach -t 0827- -t:target
- 查看会话:
tmux ls
其他操作:
- 设置鼠标触摸板支持
tmux set mouse on
tmux attach -t 3
[A100 02] GPU 服务器压力测试,gpu burn,cpu burn,cuda samples
-
两种方式
- 源码:https://github.com/wilicc/gpu-burn
git clone https://github.com/wilicc/gpu-burn cd gpu-burn make ./gpu_burn ./gpu_burn 60 ./gpu_burn -tc 300 (major >= 7)- tar.gz:http://wili.cc/blog/gpu-burn.html
tar -zxvf xx.tar.gz -C cd xx make -
也可以指定卡去跑
export CUDA_VISIBLE_DEVICES=1
./gpu_burn 100
- 4090 (tc)
2.7% proc'd: 880 (145963 Gflop/s) - 880 (146466 Gflop/s) errors: 0 - 0 temps: 46 C - 46 C
- 3090ti (tc)
55350 Gflop/s
- A100-40GB (tc)
100.0% proc'd: 32568 (118649 Gflop/s) - 33534 (122261 Gflop/s) errors: 0 - 0
cpuburn
-
https://patrickmn.com/projects/cpuburn/
- 解压直接
./cpuburn;
Burning 152 CPUs/cores- 测试cpu传感器温度
# 安装 sudo apt install lm-sensors # 配置,yes sudo sensors-detect watch -n 1 sensors # 也可以查看系统监视器(system monitor) - 解压直接
cuda-samples
# 安装 cmake
sudo apt install cmake -y

git clone https://github.com/NVIDIA/cuda-samples.git
# git clone git@github.com:NVIDIA/cuda-samples.git
cd cuda-samples
# git checkout tags/v12.0
# conda deactivate
make
-
references
- https://docs.nvidia.com/cuda/demo-suite/index.html
-
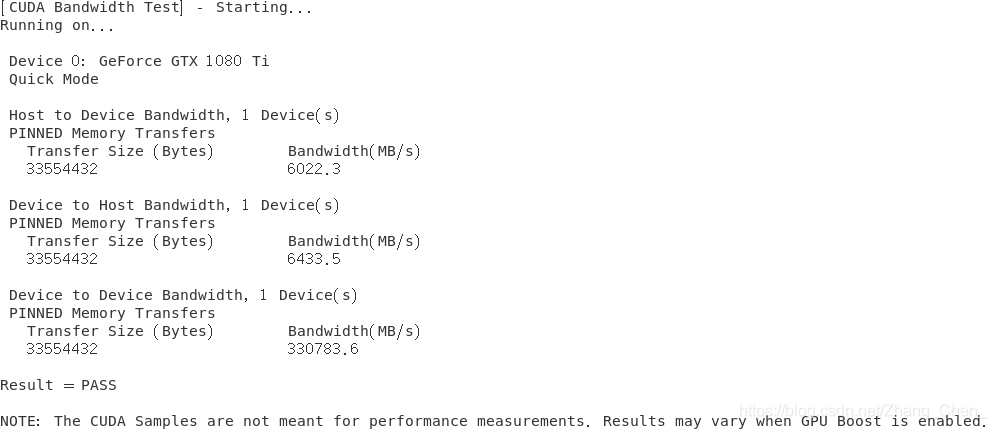
cuda-samples/Samples/1_Utilities/deviceQuery:设备查询;bandwidthTest:测试带宽;./bandwidthTest -device=all
-
cuda-samples/Samples/5_Domain_Specific/p2pBandwidthLatencyTest:两块gpu,卡间p2p带宽;- P2P技术允许两个GPU直接相互通信,而不需要通过CPU
deviceQuery
- cuda driver version / runtime version
- cuda capability major/minor version number
- cuda cores
- 4090: 16384 cuda cores, A100: 6912
- memory bus width
- 4090: 384-bit, A100: 5120-bit
from fractions import Fraction
Fraction(16384, 6912) # Fraction(64, 27)
16384 / 6912 # 2.370370370370370
bandwithTest(带宽测试)
- 不同类型的内存传输
- 主机到设备(host to device,即CPU及其内存传输到设备(GPU内存))
- 设备到主机(device to host,从设备(GPU内存)回传到主机(系统内存))
- 设备到设备(device to device,两个GPU之间直接传输数据的性能)
1080ti

[A100 01] A100 服务器开箱,超微平台,gpu、cpu、内存、硬盘等信息查看
- 参考资料
- https://infohub.delltechnologies.com/static/media/client/7phukh/DAM_d6ac0280-3398-47e3-8ad8-075751746a0b.pdf
- https://nigelcannings.medium.com/unlocking-maximum-inference-capability-a-deep-dive-into-llama2-70b-on-an-80gb-a100-gpu-2ab1158d6b0b
配置清单
- 超微(supermicro)7049GP原厂平台
- https://www.youtube.com/watch?v=C-ygJ3bcMSs
- Dual-socket Intel Xeon Scalable
- Support up to 4X GPUs
- 2U/4U 表示的是平放时的高度;
- 处理器(CPU)的至强铂金 8374B *2 总计 76核心 152线程
- 至强铂金:Xeon Platinum
- 内存是 ddr4 3200MHZ 64G*8根 =512G
- 显卡是 Nvidia A100-40GB * 2
- PCI-e, nvlink
- 硬盘是 三星 2T M.2 NVME
超微平台
gpus
-
Nvidia A100-40GB,
-
nvidia-smi topo -p2p p -
nvidia-smi topo -m -
https://www.youtube.com/watch?v=flxBD-YwXmM
- NVIDIA NVLink Bridge 3-Slot on NVIDIA RTX A6000
- NVLink桥接器的物理尺寸和所需的插槽空间
- NVIDIA NVLink Bridge 3-Slot on NVIDIA RTX A6000
cpu
-
lscpu- Socket(s): CPU插槽(物理CPU)的数量,表述 CPU 的物理插槽;
- CPU(s): 显示逻辑CPU的总数。(152) (
nproc: the number of processing units available) - On-line CPU(s) list: 在线的CPU编号列表。(0-151)
-
注意区别核心数(Cores,物理的)和线程数(Threads,逻辑的,逻辑处理线程,是操作系统能够进行调度的最小执行单元。)
- CPU(s): 显示逻辑CPU的总数,总的线程数;
- 152
- Core(s) per socket: 这个数字表示每个CPU插槽(socket)中的核心数(Cores)
38
- Thread(s) per core: 这个数字表示每个核心支持的线程数。
- 38*2*2 = 152
- CPU(s): 显示逻辑CPU的总数,总的线程数;
其他
-
内存条(RAM):内存可选得话 ddr4 3200MHZ 规格的: 16G 32G 64G 128G 256G都可以
- 可以插16根
-
sudo dmidecode --type memory -
sudo dmidecode --type memory | grep -i type -
sudo dmidecode --type memory | grep -i size -
sudo dmidecode --type memory | grep -i speed -
free -h:使用情况 -
硬盘:nvme 的安装(https://www.youtube.com/shorts/2s34x-mt1wk)
lsblk:/dev/nvme0n1p1:- nvme 表示设备使用NVMe协议,
- 0 通常是指控制器编号,
- n1 表示第一个NVMe设备(n后面的数字代表设备编号),
- 而p1 表示设备的第一个分区(p后面的数字代表分区编号)。
/dev/nvme0n1p2
- 查看操作系统安装所在的磁盘分区
findmnt -n -o SOURCE /
df -h:磁盘使用情况- 查看硬盘品牌及型号
sudo apt install smartmontools
sudo smartctl -a /dev/nvme0n1p1 | grep Model
其他照片

[显卡驱动] lspci 显卡是否在槽位,显卡基本信息
-
nvcc
- 有可能的路径是
~/anaconda3/bin/nvcc
- 有可能的路径是
-
注意 nvidia driver 与 cuda 是两个不同的东西
- 先安装 dirver 再安装 cuda,两者的版本关系是:https://docs.nvidia.com/cuda/cuda-toolkit-release-notes/index.html
1 驱动问题
NVIDIA-SMI has failed because it couldn’t communicate with the NVIDIA driver. Make sure that the latest NVIDIA driver is installed and running.
显卡是否在槽位(显卡有没有掉)
!lspci | grep -i nvidia
18:00.0 VGA compatible controller: NVIDIA Corporation Device 2684 (rev a1)
18:00.1 Audio device: NVIDIA Corporation Device 22ba (rev a1)
8a:00.0 VGA compatible controller: NVIDIA Corporation Device 2684 (rev a1)
8a:00.1 Audio device: NVIDIA Corporation Device 22ba (rev a1)
- 一共2个GPU,每个GPU都有一个相应的VGA兼容控制器和一个音频设备。
- NVIDIA Corporation Device 2684: 4090
- NVIDIA Corporation Device 2204: 3090
- https://admin.pci-ids.ucw.cz//mods/PC/10de/
- NVIDIA Corporation Device 2684: 4090
- 18:00.0: PCI 总线(bus)
- rev al: rev,revision,硬件的修订标识符
rev ff: 有时并不表示传统意义上的硬件版本或修订- 硬件故障或通信问题
- 设备未正确安装或识别
- 设备处于省电模式或未激活状态
#PCI 是一种计算机总线标准,用于连接主板上的微处理器和外围设备。
!lspci | grep -i memory
运动结果:
00:1f.2 Memory controller: Intel Corporation C620 Series Chipset Family Power Management Controller (rev 0a)
51:00.0 Non-Volatile memory controller: Samsung Electronics Co Ltd Device a80c
驱动安装的几种方式
- software update
sudo systemctl disable --now unattended-upgrades
- sudo apt install nvidia-driver-xxx
ubuntu-drivers devices
- 安装包安装:
xx.run- https://www.nvidia.com/download/index.aspx#
命令行安装
$ which nvidia-detector
$ nvidia-detector
$ sudo apt install nvidia-driver-545
- 535 is good (stable)
- https://ubuntuforums.org/showthread.php?t=2494826&p=14177421&highlight=
安装包安装
-
屏蔽开源驱动nouveau
sudo vim /etc/modprobe.d/blacklist.conf
blacklist nouveau options nouveau modeset=0 -
保存再终端更新内核命令
sudo update-initramfs -u sudo apt update sudo apt install gcc g++ make -
重启电脑
-
先按Ctrl + Alt + F3到控制台,关闭当前图形环境
sudo telinit 3: 切换runlevel;
-
下载驱动:
https://www.nvidia.com/download/index.aspx# -
sudo chmod a+x NVIDIA-Linux-x86_64-xxx.run -
sudo sh NVIDIA-Linux-x86_64-xxx.run -no-opengl-files -
最后重新启动图形环境
关于CUDA_VISIBLE_DEVICES的一些操作
TrainingArguments&TrainerTrainingArguments中的n_gpu一般是self._n_gpu = torch.cuda.device_count()
# 必须置于 import torch 之前
# 准确地说在 torch.cuda 的调用之前
import os
os.environ['CUDA_VISIBLE_DEVICES'] = '0'
from device_utils import print_device_info
print_device_info()
# 0 NVIDIA GeForce RTX 4090
终端命令
!CUDA_VISIBLE_DEVICES=0 python device_utils.py⇒0 NVIDIA GeForce RTX 4090!CUDA_VISIBLE_DEVICES=0,1 python device_utils.py⇒0 NVIDIA GeForce RTX 4090; 1 NVIDIA GeForce RTX 4090# update 1220 !CUDA_VISIBLE_DEVICES=0 python -c 'import torch; print(torch.cuda.get_device_capability())'⇒(8, 9)
02 双卡4090 gpu-burn,cpu-burn,cuda-samples 性能测试
gpuburn
-
两种方式
- 源码:https://github.com/wilicc/gpu-burn
git clone https://github.com/wilicc/gpu-burn cd gpu-burn make- tar.gz:http://wili.cc/blog/gpu-burn.html
tar -zxvf xx.tar.gz -C cd xx make -
4090
2.7% proc'd: 880 (145963 Gflop/s) - 880 (146466 Gflop/s) errors: 0 - 0 temps: 46 C - 46 C
-
3090ti
55350 Gflop/s
cpuburn
- https://patrickmn.com/projects/cpuburn/
- 解压直接
./cpuburn;
- 解压直接
关于cuda-samples
git clone https://github.com/NVIDIA/cuda-samples.git
# git clone git@github.com:NVIDIA/cuda-samples.git
cd cuda-samples
git checkout tags/v12.0
conda deactivate
make
-
references
- https://docs.nvidia.com/cuda/demo-suite/index.html
-
cuda-samples/Samples/1_Utilities/deviceQuery:设备查询;bandwidthTest:测试带宽;./bandwidthTest -device=all
-
cuda-samples/Samples/5_Domain_Specific/p2pBandwidthLatencyTest:两块gpu,卡间p2p带宽;

[性能测试] 03 单 4090 BERT、GPT2、T5 TFLOPS 测试及对比 3090TI
- 单位
- K:10^3, 1e3, 千,thousand
- M: 10^6, 1e6, 百万,million
- G: 10^9, 1e9, 10亿,billion
- T: 10^12, 1e12, 万亿,trillion
- TFLOPS, TFLOPs
- TFLOPs:复数概念,多少个浮点数运算
- TFLOPS:速度概念,每秒多少个浮点数运算
- transformer layer: BERT, GPT2, T5
- (multi head attn) + ffn
- multi head attn
- 兼容 self attention 和 cross attention
- 而 cross attn 只出现在 encoder + decoder 都有的情况
- 参考(李沐大神)
- https://www.bilibili.com/video/BV1LT411F77M
- https://github.com/mli/transformers-benchmarks/blob/main/micro_bench.ipynb
Mirco-Benchmarking for Transformers
This notebook benchmarks the most time consuming components in BERT, GPT-2 and T5 to help you understand its performance. Let’s first check our libraries and hardware. If your GPUs are recent models, please make sure your CUDA version is also recent, which may greatly affect the performance.
import torch
print('Pytorch version\t:', torch.__version__)
print('CUDA version\t:', torch.version.cuda)
print('GPU\t\t:',torch.cuda.get_device_name())
"""
Pytorch version	: 2.0.0+cu118
CUDA version	: 11.8
GPU		: NVIDIA GeForce RTX 4090
"""
Let’s first define a walltime method to benchmark Pytorch statements by at least 3 seconds.
import inspect
from collections import defaultdict
import pandas as pd
from torch.utils import benchmark

pd.options.display.precision = 3

def var_dict(*args):
    callers_local_vars = inspect.currentframe().f_back.f_locals.items()
    return dict([(name, val) for name, val in callers_local_vars if val is arg][0]
                for arg in args)

def walltime(stmt, arg_dict, duration=3):
    return benchmark.Timer(stmt=stmt, globals=arg_dict).blocked_autorange(
        min_run_time=duration).median
Last install huggingface from source code.
# 安装最新版本的 transformer(最新版本,源码安装)
from IPython.display import clear_output

!git clone git@github.com:huggingface/transformers.git
!cd transformers; pip install .

clear_output()
import transformers
print(transformers.__version__) # 4.30.0.dev0
Matrix Multiplication
Matrix multiplication is the most used operator in Transformers. Its performance is crucial. Let’s test the TFLOPS we can achieve on square matrices.
- TFLOPS:每s运行了多少次 tf(浮点运算),速度概念
- TFLOPs:复数的概念
-
c
n
⋅
n
=
a
n
⋅
n
⋅
b
n
⋅
n
c_{n\cdot n}=a_{n\cdot n}\cdot b_{n\cdot n}
cn⋅n=an⋅n⋅bn⋅n
- 我们从结果(
c
n
⋅
n
c_{n\cdot n}
cn⋅n)出发,它的每一个位置(entry),都是由
n
n
n 次乘法 +
n
n
n 次加法(准确地说是
n
−
1
n-1
n−1 次加法)组成(矢量内积)
- n+(n-1) = 2n-1 == 2n
- ( n + n ) ⋅ n ⋅ n = 2 n 3 (n+n)\cdot n\cdot n=2n^3 (n+n)⋅n⋅n=2n3
- 我们从结果(
c
n
⋅
n
c_{n\cdot n}
cn⋅n)出发,它的每一个位置(entry),都是由
n
n
n 次乘法 +
n
n
n 次加法(准确地说是
n
−
1
n-1
n−1 次加法)组成(矢量内积)
- 更高的 tflops:更大的矩阵乘法,float32 => float16
- float16
- cuBLAS,使用 tensor cores;
# dict of dict
from tqdm import tqdm
matmul_tflops = defaultdict(lambda: {})
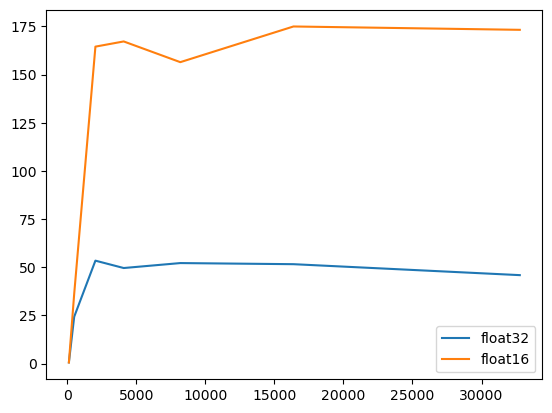
for n in tqdm([128, 512, 2*1024, 4*1024, 8*1024, 16*1024, 32*1024]):
for dtype in (torch.float32, torch.float16):
a = torch.randn(n, n, dtype=dtype).cuda()
b = torch.randn(n, n, dtype=dtype).cuda()
t = walltime('a @ b', var_dict(a, b))
matmul_tflops[f'n={n}'][dtype] = 2*n**3 / t / 1e12
del a, b
pd.DataFrame(matmul_tflops)
n=128	n=512	n=2048	n=4096	n=8192	n=16384	n=32768
torch.float32	0.592	24.036	53.795	49.005	52.182	51.423	45.631
torch.float16	0.573	35.177	164.255	166.949	156.083	173.988	172.340
import matplotlib.pyplot as plt
xs = [128, 512, 2*1024, 4*1024, 8*1024, 16*1024, 32*1024]
plt.plot(xs, list(map(lambda x: matmul_tflops[f'n={x}'][torch.float32], xs)))
plt.plot(xs, list(map(lambda x: matmul_tflops[f'n={x}'][torch.float16], xs)))
plt.legend(['float32', 'float16'])
print('torch.float32', 53.795/42.056)
print('torch.float16', 173.988/81.314)
"""
torch.float32 1.279127829560586
torch.float16 2.1397053397938857
"""
You can see that the performance increases with the matrix size. If your GPU has Tensor Cores, you will see a big performance jump when switching from 32-bit floating points to 16-bit floating points.
Next you can find the theory TFLOPS of your GPU from Wikipedia, for example, Nvidia Tesla, Nvidia Quadro, RTX 40xx, RTX 30xx, and RTX 20xx. Here we list several cards, with their memory information.
| Model | Memory (GB) | Memory Bandwidth (GB/sec) | FP32 TFLOPS | FP16 TFLOPS |
|---|---|---|---|---|
| A100 | 80 | 2039 | 19.5 | 312 |
| V100 | 16 | 900 | 15.7 | 125 |
| A6000 | 48 | 768 | 38 | 150 |
| RTX 3090 TI | 24 | 1008 | 40 | 160 |
| RTX 4090 | 24 | 1008 | 82 | 330 |
If the best TFLOPS number you got is still far away from the theory TFLOPS of your GPU, the performance is likely bottlenecked by the memory bandwidth. To illustrate it, let’s benchmark a simple elemental-wise multiplication to show both its TFLOPS with memory bandwidth.
- 深度学习中的按元素(element wise)运算:
- 一个layer的输出,经过 activate function;
- 权重的更新;
vector = defaultdict(lambda: {})
# *4
for n in [1024*64, 1024*256, 1024*1024, 1024*1024*4, 1024*1024*16, 1024*1024*64]:
    a = torch.randn(n).cuda()
    t = walltime('a * 1.2', var_dict(a))
    vector[n]['TFLOPS'] = n / t / 1e12
    # float32: 4 Byte;
    # 读写:两个操作;
    vector[n]['GB/s'] = (4*2) * n / t / 1e9

pd.DataFrame(vector)
	    65536	262144	1048576	4194304	16777216	67108864
TFLOPS	0.009	0.043	0.173	0.472	0.115	0.115
GB/s	70.541	343.917	1385.415	3777.138	920.339	921.202
You can see that even for large vectors, the TFLOPS is far far way from GPU peak performance, while the bandwidth may be quite close to its theoretical number.
The matrix multiplication performance is a main topic in HPC. There are a large number of research papers. Unfortunately the backend library, cuBLAS, is not open sourced. You may check cutlass, which claimed similar performance as cuBLAS, for some implementation details.
BERT Layer
The main body of a Transformer model is a stacking of Transformer blocks. Let’s benchmark the performance of a single block. In BERT, it is often called a BERT layer. Let’s construct one such layer from the BERT large model. We use 16-bit floating points for better performance.
from transformers import AutoConfig, BertLayer

config = AutoConfig.from_pretrained("bert-large-uncased")
layer = BertLayer(config).half().cuda()
# multihead attention: 64*16
print(config.hidden_size) # 1024
Then define a function to benchmark both forward and forward with backward performance using different sequence lengths and batch sizes.
- input_shape: (b, s, h)
- ffn:
- 两层 mlp,h=>4h=>h
- h->4h
- (b, h)*(h, 4h) => (b, 4h)
- (b*4h)(2*h) == 8*b*h*h
- 4h->h
- (b, 4h)*(4h, h) => (b, h)
- (b*h)*(2*4*h) == 8*b*h*h
- 16*b*h*h
- 16*b*s*h*h
- h->4h
- 两层 mlp,h=>4h=>h
- attn:假如有 n 个头,每个头的维度:h/n(Q,K,V)
- 三步
- 第一步先做投影,
- Q: (s, h) * (h, h/n) ==> (s, h/n)
- s*(h/n)*(2h)
- K: (s, h) * (h, h/n) ==> (s, h/n)
- s*(h/n)*(2h)
- V: (s, h) * (h, h/n) ==> (s, h/n)
- s*(h/n)*(2h)
- s*(h/n)*(2h)*3 = 6*(h*h/n)*s
- Q: (s, h) * (h, h/n) ==> (s, h/n)
- 再计算 attn_score: (Q*K^T)*V
- (s, h/n) * (h/n, s) => (s, s)
- s*s*(2h/n)
- (s,s)*(s, h/n) => (s, h/n)
- (s*h/n)*(2s)
- s*s*(2h/n) + (s*h/n)*(2s) = 4*(h/n)*s*s
- (s, h/n) * (h/n, s) => (s, s)
- n个(h/n) concat 为 h,做一次投影 (s, h) => (s, h)
- (6*(h*h/n)*s + 4*(h/n)*s*s) * n = 6*s*h*h + 4*h*s*s
- (s, h) * (h, h) => (s, h)
- s*h*(2*h) = 2*s*h*h
- 6*s*h*h + 4*h*s*s + 2*s*h*h = 8*s*h*h + 4*h*s*s
- 第一步先做投影,
- 三步
def layer_benchmark(layer, hidden_size, seq_lens, batch_sizes, cross_attention=False):
    h = hidden_size
    results = defaultdict(lambda: {})
    encoder_state = 'encoder_hidden_states=X' if cross_attention else ''
    for s in seq_lens:
        for b in batch_sizes:
            ffn = 16*b*s*h*h / 1e12  # TFLOPs for the Feed-Forward Network
            atten = (4*b*h*s*s + 8*b*s*h*h) / 1e12  # TFLOPs for attention
            forward = ffn + (2 if cross_attention else 1) * atten

            X = torch.randn(b, s, h).half().cuda()
            results[f'batch={b}'][f'fwd seq_len={s}'] = forward / walltime(
                f'layer(X, {encoder_state})', var_dict(layer, X))
            results[f'batch={b}'][f'fwd+bwd seq_len={s}'] = 3 * forward / walltime(
                f'layer(X, {encoder_state})[0].sum().backward()', var_dict(layer, X))
    return pd.DataFrame(results)
In BERT pre-training, we often train with a sequence of 128 (stage 1) or 512 (stage 2). Let’s test its performance.
layer_benchmark(layer, config.hidden_size, [128, 512], [2, 4, 8, 16, 32, 64, 128])
	 batch=2	batch=4	batch=8	batch=16	batch=32	batch=64	batch=128
fwd seq_len=128	11.511	13.321	45.993	53.099	107.170	110.394	97.590
fwd+bwd seq_len=128	3.129	6.341	12.523	25.068	49.649	99.831	102.060
fwd seq_len=512	29.852	82.675	76.396	73.583	71.270	68.964	69.280
fwd+bwd seq_len=512	13.490	26.978	53.157	80.533	76.346	78.427	78.398
110.394/56.488 ⇒ 1.9542911768871265
No surprise that a large batch size helps. But the best number is below the matrix multiplication TFLOPS. Let’s find why.
We first benchmark the first dense layer in the Feed-Forward Network (FFN) in the layer.
# ffn 中的其中一层 mlp, h=>4h
layer.intermediate.dense # Linear(in_features=1024, out_features=4096, bias=True)
h, b, s = config.hidden_size, 64, 128
X = torch.randn(b, s, h).half().cuda()

'Dense layer TFLOPS: %.3f' % (8*b*s*h*h / 1e12 / walltime(
    'layer.intermediate.dense(X)', var_dict(layer, X))) # 'Dense layer TFLOPS: 160.980'
The number is pretty good. Then run this dense layer with the GeLU activation.
# ffn 中的其中一层 mlp
layer.intermediate
'Dense+Activation TFLOPS: %.3f' % (8*b*s*h*h / 1e12 / walltime(
    'layer.intermediate(X)', var_dict(layer, X))) # 'Dense+Activation TFLOPS: 126.240'
Even the activation function has a ignorable complexity, it brings down the TFLOPS. We pointed out the reason before, the elemental-wise operation of the activation function is bounded by the memory bandwidth.
Now test the whole FFN.
ffn = 16*b*s*h*h / 1e12
'FFN TFLOPS: %.3f'%(ffn / walltime(
    'layer.output(layer.intermediate(X),X)', var_dict(layer, X))) # 'FFN TFLOPS: 135.765'
The other part in the BERT layer is the multi-head self-attention.
att = (4*b*h*s*s + 8*b*s*h*h) / 1e12
'Attention TFLOPS: %.3f'%(
    att / walltime('layer.attention(X)', var_dict(layer, X))) # 'Attention TFLOPS: 81.950'
Even though the main computation part of the attention block is still matrix multiplication, it has more memory bounded operators compared to FFN. So you see a lower TFLOPS.
att / ffn ⇒ 0.53125
The ratio of complexity between attention and FFN depends on the BERT configuration. The overall performance is a weighted sum between the FLOPS of these two components.
GPT-2网络块
Next let’s evaluate gpt2-medium, which has a similar architecture has bert-large, i.e. 24 layers with a 1024 hidden size. GPT2 is trained with a 1024 sequence length.
from transformers.models.gpt2.modeling_gpt2 import GPT2Block

config = AutoConfig.from_pretrained("gpt2-medium")
layer = GPT2Block(config, layer_idx=0).half().cuda()
layer_benchmark(layer, config.n_embd, [512, 1024], [2, 4, 8, 16, 32, 64])
batch=2	batch=4	batch=8	batch=16	batch=32	batch=64
fwd seq_len=512	25.072	49.734	56.900	49.412	48.346	47.935
fwd+bwd seq_len=512	12.614	25.118	49.785	54.885	53.958	54.169
fwd seq_len=1024	44.208	43.629	39.372	38.740	38.568	38.427
fwd+bwd seq_len=1024	27.067	44.980	44.579	43.975	44.094	44.113
56.900/36.595 ⇒ 1.5548572209318212
You can see that, despite GPT-2 and BERT has the same complexity, GPT-2 has slightly worse TFLOPS when using the same batch size and sequence length. Also using a larger sequence length 1024 further harms the performance.
T5 Layer
T5 has both encoder and decoder, let’s first benchmark the decoder, whose performance is similar to BERT.
from transformers.models.t5.modeling_t5 import T5Block

config = AutoConfig.from_pretrained("t5-large")
config.use_cache = False
config.is_decoder = False
config.is_encoder_decoder = False

encoder = T5Block(config).half().cuda()
layer_benchmark(encoder, config.d_model, [512], [2, 4, 8, 16, 32, 64, 128])
	batch=2	batch=4	batch=8	batch=16	batch=32	batch=64	batch=128
fwd seq_len=512	19.052	50.302	47.720	45.154	43.313	41.821	41.524
fwd+bwd seq_len=512	10.798	21.681	41.511	52.429	49.602	49.603	49.468
The decoder has an additional cross attention, which increases the time complexity and also hurts TFLOPS.
config.is_decoder = True
decoder = T5Block(config).half().cuda()
layer_benchmark(decoder, config.d_model, [512], [2, 4, 8, 16, 32, 64, 128], cross_attention=True)
	batch=2	batch=4	batch=8	batch=16	batch=32	batch=64	batch=128
fwd seq_len=512	29.277	40.767	38.341	36.989	35.458	34.330	34.084
fwd+bwd seq_len=512	9.257	18.400	36.701	42.897	40.398	40.718	40.643
总之,为了实现Transformer层的最佳性能,需要使用快速的数据类型和大批量。为了进一步改进,可能需要重写代码。例如,将多个内核融合为一个内核。
[性能测试] 04 双4090 BERT、GPT性能测试(megatron-lm、apex、deepspeed)
-
参考:
- https://www.bilibili.com/video/BV1fG411G7eH/
- https://github.com/mli/transformers-benchmarks/blob/main/transformers.ipynb
-
相关依赖安装
- transformers 需要源码安装
git clone https://github.com/huggingface/transformers cd transformers; git checkout v4.28.1; pip install . - apex:https://github.com/NVIDIA/apex (Amp: Automatic Mixed Precision & Distributed Training)
git clone https://github.com/NVIDIA/apex cd apex pip install -v --disable-pip-version-check --no-cache-dir --global-option="--cpp_ext" --global-option="--cuda_ext" ./- pytorch 的 cuda 版本要与系统的 cuda 版本保持一致
cat ~/.zshrc/cat ~/.bashrc
- pytorch 的 cuda 版本要与系统的 cuda 版本保持一致
- Megatron-LM(威震天)
nvidia-smi --query-gpu=compute_cap --format=csvgit clone https://github.com/NVIDIA/Megatron-LM- 不知道大家会不会遇到编译错误;(我是调了相当长的时间)
- https://github.com/NVIDIA/Megatron-LM/pull/278/commits/dbb60b340a573a9041a259ff8f5694f00c454950#diff-bfa34484f90b83cb7a198b32db71f6f52290dd3e4769acc09489e58eb69c174f
- 同样地,在通过 deepspeed 执行 ZeRO 的时候还是会遇到编译错误
- https://github.com/microsoft/DeepSpeed/issues/607
- 不知道大家会不会遇到编译错误;(我是调了相当长的时间)
- 其他
pip install datasets evaluate accelerate deepspeed psutil
- transformers 需要源码安装
-
运行过程监控(老师傅都是听gpu风扇声音)
$ watch -n 1 nvidia-smi
$ nvtop
$ tail -f log.txt
- 模型训练相关
- mlm(masked language model):bert
- denoising model
- clm:gpt
- casual language model
- mlm(masked language model):bert
本节主要检验BERT和GPT在单卡和多卡上的训练性能
1.1 配置
import torch
import transformers
print('Pytorch version\t:', torch.__version__)
print('CUDA version\t:', torch.version.cuda)
print('transformers version\t:', transformers.__version__)

for i in range(torch.cuda.device_count()):
    print(f'GPU{i}\t\t:',torch.cuda.get_device_name(i))

"""
Pytorch version	: 2.0.1
CUDA version	: 11.7
transformers version	: 4.28.1
GPU0		: NVIDIA GeForce RTX 4090
GPU1		: NVIDIA GeForce RTX 4090
"""
Next install packages we need beyond pytorch. Note that both deepspeed and megatron-lm need nvcc to build custom operators. Make sure you have a complete CUDA installation rather than just runtime.
1.2 实验
The Exp class stores both hyperparameters and performance results for one experiment.
import torch
torch.cuda.is_bf16_supported() # True
import os
import re
import json

import matplotlib.pyplot as plt
from dataclasses import dataclass, asdict
from transformers import AutoConfig, PretrainedConfig

@dataclass
class Exp:
    name: str           # Experiment name
    model: str          # huggingface model name
    batch_size: int     # batch size per GPU
    seq_len: int = None # input sequence length

    ## Improve speed / reduce memory
    # BF16是brain float的简称(来源于google brain)。
    # 不同于普通的单精度浮点数FP16(i.e., torch.float16),BF16是介于FP16和FP32之间的一种浮点数格式。
    # BF16的指数位比FP16多,跟FP32一样,不过小数位比较少。
    bf16: bool = False  # Faster, less memory. Recommend if GPU supports
    fp16: bool = False  # Faster, less memory, but need to scale loos.
                        # Recommend if BF16 is not available.
    optim: str = 'adamw_hf'  # Optimization method
    grad_ckpt: bool = False  # save memory with an extra forward
    grad_accum: int = 1      # accumulate gradients for better performance
    steps: int = 20          # number of parameter updates

    ## Multi-GPUs
    gpus: str = '0'          # GPUs to use. "0,1" means use GPU 0 and 1
    tensor_para: int = 1     # Tensor parallelism
    deepspeed: bool = False  # if or not use deepspeed
    ds_config: str = ''      # deepspeed config

    def __post_init__(self):
        model_conf = AutoConfig.from_pretrained(self.model)
        get = lambda *keys: max([getattr(model_conf, k) if hasattr(model_conf, k) else 0 for k in keys])
        self.num_layers = get('num_hidden_layers', 'n_layer')
        self.num_gpus = len(self.gpus.split(','))

        # 不同的模型,等价的参数
        self.hidden_size = get('hidden_size', 'n_embd', 'd_model')
        self.vocab_size = get('vocab_size')

        self.num_heads = get('num_attention_heads', 'n_head')
        if self.seq_len is None:
            self.seq_len = get('max_position_embeddings', 'n_ctx')

        n, h, s, v = self.num_layers, self.hidden_size, self.seq_len, self.vocab_size
        att, ffn, embed = 4*h*s**2 + 8*s*h**2, 16*s*h**2, 2*s*h*v
        # (b, s)(s, v)
        forward = n*(att+ffn) + embed
        # TFLOPs to train one example
        self.tflops = (4 * forward if self.grad_ckpt else 3 * forward) / 1e12
        if self.deepspeed:
            self.launcher = 'deepspeed'
        else:
            self.launcher = f'torchrun --nproc_per_node {self.num_gpus}'

    def print_results(self):
        print('Total samples / second\t: %.1f' % self.samples_per_sec)
        print('Per GPU memory (GB)\t: %.1f'% self.gpu_mem)
        print('Per GPU TFLOPs\t\t: %.1f' % (self.samples_per_sec * self.tflops / self.num_gpus))
The following function visualize results among different experiments.
%config InlineBackend.figure_formats = ['svg']

def compare(exps):
    fig, ax = plt.subplots(ncols=3, figsize=(9,len(exps)/2))
    x = list(range(len(exps)))
    for i, (y, l) in enumerate((
        ([e.samples_per_sec for e in exps], 'Samples / sec'),
        ([e.samples_per_sec * e.tflops / e.num_gpus for e in exps], 'per GPU TFLOPS'),
        ([e.gpu_mem for e in exps], 'per GPU memory (GB)'))):
        ax[i].barh(x, y, align='center', height=0.6, color=plt.get_cmap('Set1')(x))
        ax[i].invert_yaxis()
        ax[i].set_xlabel(l)
        if i == 0:
            ax[i].set_yticks(x, labels=[e.name for e in exps])
        else:
            ax[i].set_yticklabels([])
    plt.show()
1.3 BERT + 单卡 + HuggingFace
We use the masked langunage modeling task from Huggingface to evaluate BERT training. hf_bert runs the experiment and saves the log into log.txt. hf_log parses results from the log.
def hf_bert(exp):
    cmd = f'''export CUDA_VISIBLE_DEVICES={exp.gpus}; \
{exp.launcher} transformers/examples/pytorch/language-modeling/run_mlm.py \
--config_name {exp.model} --tokenizer_name {exp.model} \
--dataset_name wikitext --dataset_config_name wikitext-2-raw-v1 \
--do_train --max_seq_length {exp.seq_len} \
--per_device_train_batch_size {exp.batch_size} \
--fp16 {exp.fp16} --bf16 {exp.bf16} \
--optim {exp.optim} --max_steps {exp.steps} \
--gradient_accumulation_steps {exp.grad_accum} \
--gradient_checkpointing {exp.grad_ckpt} \
--output_dir /tmp/bert/ --overwrite_output_dir yes --skip_memory_metrics False'''
    if exp.deepspeed:
        cmd += f' --deepspeed {exp.ds_config}'
    cmd += ' > log.txt 2>&1'
    print(cmd)
    os.system(cmd)
    return hf_log(exp, 'log.txt')

def hf_log(exp, log_filename):
    with open(log_filename) as f:
        lines = f.readlines()
    for l in lines:
        if 'CUDA out of memory' in l:
            print('Out of GPU memory, try a smaller batch size')
            return None
        if '{\'train_runtime' in l:
            metrics = json.loads(l.replace('\'', '\"'))
            exp.gpu_mem = (metrics['init_mem_cpu_peaked_delta'] + \
                    metrics['train_mem_gpu_alloc_delta'] + metrics['train_mem_gpu_peaked_delta']) / 1e9
            exp.samples_per_sec = metrics['train_samples_per_second']
            return exp
    print(f'Failed. Check "{log_filename}" to find error')
    return None
First, let’s train BERT large using its phase-2 sequence length 512. We choose the largest batch size that can fit into GPU memory for a good performance. In default, it uses fp32 (or tf32 if your GPU supports).
- run_mlm.py 模型训练相关的参数
--config_name--tokenizer_name--dataset_name--dataset_config_name--do_train--max_seq_length
- torchrun 的分布式参数:
bert_single = hf_bert(Exp('HF 32-bit', 'bert-large-uncased', batch_size=8))
bert_single.print_results()
"""
export CUDA_VISIBLE_DEVICES=0; torchrun --nproc_per_node 1 transformers/examples/pytorch/language-modeling/run_mlm.py --config_name bert-large-uncased --tokenizer_name bert-large-uncased --dataset_name wikitext --dataset_config_name wikitext-2-raw-v1 --do_train --max_seq_length 512 --per_device_train_batch_size 8 --fp16 False --bf16 False --optim adamw_hf --max_steps 20 --gradient_accumulation_steps 1 --gradient_checkpointing False --output_dir /tmp/bert/ --overwrite_output_dir yes --skip_memory_metrics False > log.txt 2>&1
Total samples / second	: 9.0
Per GPU memory (GB)	: 20.9
Per GPU TFLOPs		: 10.0
"""
Now switch to bf16 that offers a better performance. It also allows us to use a larger batch size, which further improves performance.
bert_half = hf_bert(Exp('HF 16-bit', 'bert-large-uncased', batch_size=11,`
compare([bert_single, bert_half])
"""
export CUDA_VISIBLE_DEVICES=0; torchrun --nproc_per_node 1 transformers/examples/pytorch/language-modeling/run_mlm.py --config_name bert-large-uncased --tokenizer_name bert-large-uncased --dataset_name wikitext --dataset_config_name wikitext-2-raw-v1 --do_train --max_seq_length 512 --per_device_train_batch_size 11 --fp16 False --bf16 True --optim adamw_hf --max_steps 20 --gradient_accumulation_steps 1 --gradient_checkpointing False --output_dir /tmp/bert/ --overwrite_output_dir yes --skip_memory_metrics False > log.txt 2>&1
<Figure size 900x100 with 3 Axes>
"""
You may be surprised that using 16-bit floating points doesn’t reduce memory size by half under the same hyperparameters. That’s because
the memory usage is mainly due to three parts: model parameters, layer outputs in the forward path (activations) and workspace memory used by backend libraries. 16-bit floats do not save memory related to model parameters because model updating is running with 32-bit. For one model parameter:
- with 32-bit, we use 4 bytes for the 32-bit weight, 4 bytes for the 32-bit gradient, 8 bytes for the two momentums in Adam, a total of 16 bytes
- with 32-bit, we use 2 bytes for the 16-bit weight, 2 bytes for the 16-bit gradient (some implementation uses 32-bit gradient), 4 bytes for the master 32-bit weight, and 8 bytes for the two momentums in adam, with a total of 16 bytes
The memory saving is due to all activations are stored in 16-bit. As the activation size is linear to the batch size and sequence length, using 16-bit could allow you to double batch size or sequence length.
GPUs using old architectures before Ampere do not support bf16, you could try to use fp16 via changing the above code to fp16=True. It often offers same performance as bf16, but may require you to tune the loss scaling.
As we shown in the micro-benchmarks, the model updating that involving multiple vector operators could be expensive. If you have apex installed, we can use an faster implementation.
bert_half_fused = hf_bert(Exp(
    'HF 16-bit, fused-adam', 'bert-large-uncased', batch_size=11, bf16=True, optim='adamw_apex_fused'))
compare([bert_single, bert_half, bert_half_fused])
"""
export CUDA_VISIBLE_DEVICES=0; torchrun --nproc_per_node 1 transformers/examples/pytorch/language-modeling/run_mlm.py --config_name bert-large-uncased --tokenizer_name bert-large-uncased --dataset_name wikitext --dataset_config_name wikitext-2-raw-v1 --do_train --max_seq_length 512 --per_device_train_batch_size 11 --fp16 False --bf16 True --optim adamw_apex_fused --max_steps 20 --gradient_accumulation_steps 1 --gradient_checkpointing False --output_dir /tmp/bert/ --overwrite_output_dir yes --skip_memory_metrics False > log.txt 2>&1
<Figure size 900x150 with 3 Axes>
"""
To further reduce the optimization overhead, we can accumulate the gradients multiple times before updating weight. If we accumulate 4 times, then it leads to an 4x larger effective batch size. It may be too big for the fine tuning task, but often not a problem for pre-training.
bert_half_fused_accum = hf_bert(Exp(
    'HF 16-bit, fused-adam\ngrad_accum=4', 'bert-large-uncased', batch_size=11, bf16=True,
    optim='adamw_apex_fused', grad_accum=4, steps=5))
compare([bert_single, bert_half, bert_half_fused, bert_half_fused_accum])
"""
export CUDA_VISIBLE_DEVICES=0; torchrun --nproc_per_node 1 transformers/examples/pytorch/language-modeling/run_mlm.py --config_name bert-large-uncased --tokenizer_name bert-large-uncased --dataset_name wikitext --dataset_config_name wikitext-2-raw-v1 --do_train --max_seq_length 512 --per_device_train_batch_size 11 --fp16 False --bf16 True --optim adamw_apex_fused --max_steps 5 --gradient_accumulation_steps 4 --gradient_checkpointing False --output_dir /tmp/bert/ --overwrite_output_dir yes --skip_memory_metrics False > log.txt 2>&1
<Figure size 900x200 with 3 Axes>
"""
If your model is too big so not sufficient memory is left for activations, we can throw away them and then re-compute when needed. It can be also used to increase the micro batch size.
bert_half_fused_accum_ckpt = hf_bert(Exp(
    'HF 16-bit, fused-adam\ngrad_accum=4, grad_ckpt', 'bert-large-uncased', batch_size=62, bf16=True,
    optim='adamw_apex_fused', grad_accum=4, grad_ckpt=True, steps=5))
compare([bert_single, bert_half, bert_half_fused, bert_half_fused_accum, bert_half_fused_accum_ckpt])
"""
export CUDA_VISIBLE_DEVICES=0; torchrun --nproc_per_node 1 transformers/examples/pytorch/language-modeling/run_mlm.py --config_name bert-large-uncased --tokenizer_name bert-large-uncased --dataset_name wikitext --dataset_config_name wikitext-2-raw-v1 --do_train --max_seq_length 512 --per_device_train_batch_size 62 --fp16 False --bf16 True --optim adamw_apex_fused --max_steps 5 --gradient_accumulation_steps 4 --gradient_checkpointing True --output_dir /tmp/bert/ --overwrite_output_dir yes --skip_memory_metrics False > log.txt 2>&1
<Figure size 900x250 with 3 Axes>
"""
Though it furthers improve TFLOPS, but decreases the number of samples per second because of the extra forward. So use it only when the model is very big you cannot use an effective batch size.
1.4 BERT + 单卡 + Megatron-LM
Though HuggingFace is the most popular package for transformers, it’s not the fastest one. Here let’s use Megatron-LM from Nvidia. First download vocab and a sample dataset.
Define the function to run BERT and parse its log.
# 放到 ./data
!wget -nc https://s3.amazonaws.com/models.huggingface.co/bert/bert-large-uncased-vocab.txt
!wget -nc https://github.com/mli/transformers-benchmarks/raw/main/data/bert-sample_text_sentence.bin
!wget -nc https://github.com/mli/transformers-benchmarks/raw/main/data/bert-sample_text_sentence.idx
def megatron_bert(exp):
    cmd = f'''export CUDA_DEVICE_MAX_CONNECTIONS=1; \
{exp.launcher} Megatron-LM/pretrain_bert.py \
--num-layers {exp.num_layers} --hidden-size {exp.hidden_size} \
--num-attention-heads {exp.num_heads} \
--tensor-model-parallel-size {exp.tensor_para} \
--micro-batch-size {exp.batch_size} \
--seq-length {exp.seq_len} --max-position-embeddings {exp.seq_len} \
--train-iters {exp.steps} \
--data-path ./data/bert-sample_text_sentence \
--vocab-file ./data/bert-large-uncased-vocab.txt \
--data-impl mmap --lr 0.00015 --log-interval 5'''
    if exp.bf16: cmd += ' --bf16'
    if exp.fp16: cmd += ' --fp16'
    cmd += ' > log.txt 2>&1'
    print(cmd)
    os.system(cmd)
    return megatron_log(exp, 'log.txt')

def megatron_log(exp, log_filename):
    with open(log_filename) as f:
        text = f.read()
    # Find the last number after the key, returns 0 if not exists
    query = lambda key: float(next(iter(
        reversed(re.findall(key+': +([\d\.]+)', text))), 0))
    if 'CUDA out of memory' in text:
        print('Out of GPU memory, try a smaller batch size')
        return
    iter_time = query('elapsed time per iteration \(ms\)')
    if iter_time == 0:
        print(f'Failed. Check "{log_filename}" to find error')
        return
    exp.samples_per_sec = query('global batch size') / iter_time * 1e3
    exp.gpu_mem = query('max allocated')/1e3
    print('Time breakdown\t\t: forward+backward %.2f, communication %.2f, optimizer %.2f' %(
        (query('forward-compute')+query('backward-compute')) / iter_time,
        query('backward-params-all-reduce') / iter_time, query('optimizer') / iter_time))
    return exp
Run BERT large again.
!pip install pybind11
mega_bert = megatron_bert(Exp('Megatron BERT', 'bert-large-uncased', batch_size=12, bf16=True))
compare([bert_half_fused_accum, mega_bert])
"""
export CUDA_DEVICE_MAX_CONNECTIONS=1; torchrun --nproc_per_node 1 Megatron-LM/pretrain_bert.py --num-layers 24 --hidden-size 1024 --num-attention-heads 16 --tensor-model-parallel-size 1 --micro-batch-size 12 --seq-length 512 --max-position-embeddings 512 --train-iters 20 --data-path ./data/bert-sample_text_sentence --vocab-file ./data/bert-large-uncased-vocab.txt --data-impl mmap --lr 0.00015 --log-interval 5 --bf16 > log.txt 2>&1
Time breakdown		: forward+backward 0.00, communication 0.00, optimizer 0.00
<Figure size 900x100 with 3 Axes>
"""
Note that Megatron allows to use a larger batch size and outperforms Huggingface even without gradient accumulation. One reason is the highly efficient custom kernels that not only improve performance but also reduce memory usage.
1.5 GPT-2 + 单卡
Next we train language model with GPT-2. First define the function to use HuggingFace.
def hf_gpt(exp):
    cmd = f'''export CUDA_VISIBLE_DEVICES={exp.gpus}; \
{exp.launcher} transformers/examples/pytorch/language-modeling/run_clm.py \
--config_name {exp.model} --tokenizer_name {exp.model} \
--dataset_name wikitext --dataset_config_name wikitext-2-raw-v1 \
--do_train --per_device_train_batch_size {exp.batch_size} \
--block_size {exp.seq_len} --learning_rate 2e-5 \
--max_steps {exp.steps} --optim {exp.optim} \
--fp16 {exp.fp16} --bf16 {exp.bf16} \
--gradient_accumulation_steps {exp.grad_accum} \
--gradient_checkpointing {exp.grad_ckpt} \
--output_dir /tmp/gpt/ --overwrite_output_dir yes --skip_memory_metrics False'''
    if exp.deepspeed:
        cmd += f' --deepspeed {exp.ds_config}'
    cmd += ' > log.txt 2>&1'
    print(cmd)
    os.system(cmd)
    return hf_log(exp, 'log.txt')
We use gpt2-medium whose architecture is similar to bert-large. GPT-2 models uses a larger sequence length 1024.
hf_gpt2 = hf_gpt(Exp(
    "HF GPT2", "gpt2-medium", batch_size=2, bf16=True, optim='adamw_apex_fused', grad_accum=4))
hf_gpt2.print_results()
"""
export CUDA_VISIBLE_DEVICES=0; torchrun --nproc_per_node 1 transformers/examples/pytorch/language-modeling/run_clm.py --config_name gpt2-medium --tokenizer_name gpt2-medium --dataset_name wikitext --dataset_config_name wikitext-2-raw-v1 --do_train --per_device_train_batch_size 2 --block_size 1024 --learning_rate 2e-5 --max_steps 20 --optim adamw_apex_fused --fp16 False --bf16 True --gradient_accumulation_steps 4 --gradient_checkpointing False --output_dir /tmp/gpt/ --overwrite_output_dir yes --skip_memory_metrics False > log.txt 2>&1
Total samples / second	: 6.3
Per GPU memory (GB)	: 19.0
Per GPU TFLOPs		: 15.7
"""
Let’s try Megatron’s implementation.
def megatron_gpt(exp):
    global_batch_size = exp.batch_size * exp.num_gpus * exp.grad_accum / exp.tensor_para
    cmd = f'''export CUDA_DEVICE_MAX_CONNECTIONS=1; {exp.launcher} Megatron-LM/pretrain_gpt.py \
--num-layers {exp.num_layers} --hidden-size {exp.hidden_size} \
--num-attention-heads {exp.num_heads} \
--tensor-model-parallel-size {exp.tensor_para} \
--micro-batch-size {exp.batch_size} --global-batch-size {int(global_batch_size)} \
--seq-length {exp.seq_len} --max-position-embeddings {exp.seq_len} \
--train-iters {exp.steps} --data-path ./data/gpt2-sample_text_document \
--vocab-file ./data/gpt2-vocab.json --merge-file ./data/gpt2-merges.txt \
--data-impl mmap --lr 0.00015 --log-interval 5 '''
    cmd += '--bf16 ' if exp.bf16 else ''
    cmd += '--fp16 ' if exp.fp16 else ''
    cmd += ' > log.txt 2>&1'
    print(cmd)
    os.system(cmd)
    return megatron_log(exp, 'log.txt')
Downloads data for Megatron
Again, Megatron allows a larger batch size and outperforms Huggingface.
# 放在 ./data
!wget -nc https://s3.amazonaws.com/models.huggingface.co/bert/gpt2-vocab.json
!wget -nc https://s3.amazonaws.com/models.huggingface.co/bert/gpt2-merges.txt
!wget -nc https://github.com/mli/transformers-benchmarks/raw/main/data/gpt2-sample_text_document.bin
!wget -nc https://github.com/mli/transformers-benchmarks/raw/main/data/gpt2-sample_text_document.idx
mega_gpt2 = megatron_gpt(Exp("Megatron GPT2", "gpt2-medium", 5, bf16=True))
compare([mega_bert, hf_gpt2, mega_gpt2])
"""
export CUDA_DEVICE_MAX_CONNECTIONS=1; torchrun --nproc_per_node 1 Megatron-LM/pretrain_gpt.py --num-layers 24 --hidden-size 1024 --num-attention-heads 16 --tensor-model-parallel-size 1 --micro-batch-size 5 --global-batch-size 5 --seq-length 1024 --max-position-embeddings 1024 --train-iters 20 --data-path ./data/gpt2-sample_text_document --vocab-file ./data/gpt2-vocab.json --merge-file ./data/gpt2-merges.txt --data-impl mmap --lr 0.00015 --log-interval 5 --bf16  > log.txt 2>&1
Time breakdown		: forward+backward 0.00, communication 0.00, optimizer 0.00
<Figure size 900x150 with 3 Axes>
"""
1.6 多卡 + 数据并行
Let’s first check how GPUs are connected.
# 3090ti
!nvidia-smi topo -m
You can use we have two GPUs connected by NVLinks. Besides, they are also connected through PCIe 4.0 x8.
You can use the p2pBandwidthLatencyTest tool to get a rough estimation of the bandwidth. Here are our results:
Unidirectional P2P=Disabled Bandwidth Matrix (GB/s)
   D\D     0      1
     0 891.84   6.23
     1   6.23 893.88
Unidirectional P2P=Enabled Bandwidth (P2P Writes) Matrix (GB/s)
   D\D     0      1
     0 883.27  52.77
     1  52.89 894.39
Bidirectional P2P=Disabled Bandwidth Matrix (GB/s)
   D\D     0      1
     0 884.77   9.20
     1   9.24 900.06
Bidirectional P2P=Enabled Bandwidth Matrix (GB/s)
   D\D     0      1
     0 885.52 101.36
     1 101.52 900.84
Now let’s run GPT-2 with Megatron on two GPUs, which use data parallelism in default. (You can replace with hf_gpt as well.)
!nvidia-smi topo -m

GPU0	GPU1	CPU Affinity	NUMA Affinity
GPU0	 X 	SYS	0-63		N/A
GPU1	SYS	 X 	0-63		N/A

Legend:

  X    = Self
  SYS  = Connection traversing PCIe as well as the SMP interconnect between NUMA nodes (e.g., QPI/UPI)
  NODE = Connection traversing PCIe as well as the interconnect between PCIe Host Bridges within a NUMA node
  PHB  = Connection traversing PCIe as well as a PCIe Host Bridge (typically the CPU)
  PXB  = Connection traversing multiple PCIe bridges (without traversing the PCIe Host Bridge)
  PIX  = Connection traversing at most a single PCIe bridge
  NV#  = Connection traversing a bonded set of # NVLinks
cuda-samples/Samples/5_Domain_Specific/p2pBandwidthLatencyTest
P2P Connectivity Matrix
     D\D     0     1
     0	     1     0
     1	     0     1
Unidirectional P2P=Disabled Bandwidth Matrix (GB/s)
   D\D     0      1
     0 911.08  21.89
     1  22.46 920.74
Unidirectional P2P=Enabled Bandwidth (P2P Writes) Matrix (GB/s)
   D\D     0      1
     0 913.21  22.43
     1  22.50 922.92
Bidirectional P2P=Disabled Bandwidth Matrix (GB/s)
   D\D     0      1
     0 917.94  31.30
     1  31.36 923.43
Bidirectional P2P=Enabled Bandwidth Matrix (GB/s)
   D\D     0      1
     0 918.58  31.35
     1  31.35 923.10
P2P=Disabled Latency Matrix (us)
   GPU     0      1
     0   1.31  10.24
     1  18.22   1.39

   CPU     0      1
     0   2.02   5.24
     1   5.12   1.98
P2P=Enabled Latency (P2P Writes) Matrix (us)
   GPU     0      1
     0   1.31  18.50
     1  12.55   1.39

   CPU     0      1
     0   2.03   5.13
     1   5.17   1.97
dp_gpt2 = megatron_gpt(Exp("Megatron GPT2, 2 GPUs", "gpt2-medium", batch_size=5, bf16=True, gpus='0,1'))
compare([mega_gpt2, dp_gpt2])
export CUDA_DEVICE_MAX_CONNECTIONS=1; torchrun --nproc_per_node 2 Megatron-LM/pretrain_gpt.py --num-layers 24 --hidden-size 1024 --num-attention-heads 16 --tensor-model-parallel-size 1 --micro-batch-size 5 --global-batch-size 10 --seq-length 1024 --max-position-embeddings 1024 --train-iters 20 --data-path ./data/gpt2-sample_text_document --vocab-file ./data/gpt2-vocab.json --merge-file ./data/gpt2-merges.txt --data-impl mmap --lr 0.00015 --log-interval 5 --bf16 > log.txt 2>&1
Time breakdown : forward+backward 0.00, communication 0.00, optimizer 0.00
From the time breakdown, you can see the communication takes 10%, which is almost 0 on a single GPU. It leads to a reduced per GPU TFLOPS.
If we disable NVLink to use PCIe instead, the performance decreases.
os.environ["NCCL_P2P_DISABLE"] = "1"
dp_gpt2_nonvlink = megatron_gpt(Exp(
    "Megatron GPT2, 2 GPUs\nno nvlink", "gpt2-medium", 5, bf16=True, gpus='0,1'))
os.environ["NCCL_P2P_DISABLE"] = "0"
compare([mega_gpt2, dp_gpt2, dp_gpt2_nonvlink])
"""
export CUDA_DEVICE_MAX_CONNECTIONS=1; torchrun --nproc_per_node 2 Megatron-LM/pretrain_gpt.py --num-layers 24 --hidden-size 1024 --num-attention-heads 16 --tensor-model-parallel-size 1 --micro-batch-size 5 --global-batch-size 10 --seq-length 1024 --max-position-embeddings 1024 --train-iters 20 --data-path ./data/gpt2-sample_text_document --vocab-file ./data/gpt2-vocab.json --merge-file ./data/gpt2-merges.txt --data-impl mmap --lr 0.00015 --log-interval 5 --bf16  > log.txt 2>&1
Time breakdown		: forward+backward 0.00, communication 0.00, optimizer 0.00
<Figure size 900x150 with 3 Axes>
"""
One improvement idea is using gradient accumulation to reduce communication frequency.
dp_gpt2_accum = megatron_gpt(Exp(
    "Megatron GPT2, 2 GPUs\ngrad_accum=4", "gpt2-medium", 5, bf16=True, gpus='0,1', grad_accum=4))
compare([mega_gpt2, dp_gpt2, dp_gpt2_nonvlink, dp_gpt2_accum])
"""
export CUDA_DEVICE_MAX_CONNECTIONS=1; torchrun --nproc_per_node 2 Megatron-LM/pretrain_gpt.py --num-layers 24 --hidden-size 1024 --num-attention-heads 16 --tensor-model-parallel-size 1 --micro-batch-size 5 --global-batch-size 40 --seq-length 1024 --max-position-embeddings 1024 --train-iters 20 --data-path ./data/gpt2-sample_text_document --vocab-file ./data/gpt2-vocab.json --merge-file ./data/gpt2-merges.txt --data-impl mmap --lr 0.00015 --log-interval 5 --bf16  > log.txt 2>&1
Time breakdown		: forward+backward 0.00, communication 0.00, optimizer 0.00
<Figure size 900x200 with 3 Axes>
"""
A 4 accumulation reduce the communication cost from 10% to 3%. It helps more when using PCIe, the cost reduces from 37% to 14%.
os.environ["NCCL_P2P_DISABLE"] = "1"
dp_gpt2_accum_nonvlink = megatron_gpt(Exp(
    "Megatron GPT2, 2 GPUs\ngrad_accum=4, no nvlink", "gpt2-medium",
    5, bf16=True, gpus='0,1', grad_accum=4))
os.environ["NCCL_P2P_DISABLE"] = "0"
compare([mega_gpt2, dp_gpt2, dp_gpt2_nonvlink, dp_gpt2_accum, dp_gpt2_accum_nonvlink])
"""
export CUDA_DEVICE_MAX_CONNECTIONS=1; torchrun --nproc_per_node 2 Megatron-LM/pretrain_gpt.py --num-layers 24 --hidden-size 1024 --num-attention-heads 16 --tensor-model-parallel-size 1 --micro-batch-size 5 --global-batch-size 40 --seq-length 1024 --max-position-embeddings 1024 --train-iters 20 --data-path ./data/gpt2-sample_text_document --vocab-file ./data/gpt2-vocab.json --merge-file ./data/gpt2-merges.txt --data-impl mmap --lr 0.00015 --log-interval 5 --bf16  > log.txt 2>&1
Time breakdown		: forward+backward 0.00, communication 0.00, optimizer 0.00
<Figure size 900x250 with 3 Axes>
"""
多卡 + 张量并行
Different to data parallelism (DP) that splits data, tensor parallelism (TP) partitions each layer into multiple GPUs. So we can use a larger batch size per GPU.
tp_gpt2 = megatron_gpt(Exp(
    "Megatron GPT2, 2 GPUs, TP", "gpt2-medium", 10, bf16=True, gpus='0,1', tensor_para=2))
compare([dp_gpt2, tp_gpt2])
"""
export CUDA_DEVICE_MAX_CONNECTIONS=1; torchrun --nproc_per_node 2 Megatron-LM/pretrain_gpt.py --num-layers 24 --hidden-size 1024 --num-attention-heads 16 --tensor-model-parallel-size 2 --micro-batch-size 10 --global-batch-size 10 --seq-length 1024 --max-position-embeddings 1024 --train-iters 20 --data-path ./data/gpt2-sample_text_document --vocab-file ./data/gpt2-vocab.json --merge-file ./data/gpt2-merges.txt --data-impl mmap --lr 0.00015 --log-interval 5 --bf16  > log.txt 2>&1
Time breakdown		: forward+backward 0.00, communication 0.00, optimizer 0.00
<Figure size 900x100 with 3 Axes>
"""
TP offers a similar performance as DP. But note that communication happens in both forward and backward for TP, the time breakdown doesn’t show the communication cost correctly. It also means gradient accumulation helps TP little.
tp_gpt2_accum = megatron_gpt(Exp(
    "Megatron GPT2, 2 GPUs, TP\ngrad_accum=4", "gpt2-medium", 10, bf16=True, gpus='0,1',
    tensor_para=2, grad_accum=4, steps=10))
compare([dp_gpt2, dp_gpt2_accum, tp_gpt2, tp_gpt2_accum])
"""
export CUDA_DEVICE_MAX_CONNECTIONS=1; torchrun --nproc_per_node 2 Megatron-LM/pretrain_gpt.py --num-layers 24 --hidden-size 1024 --num-attention-heads 16 --tensor-model-parallel-size 2 --micro-batch-size 10 --global-batch-size 40 --seq-length 1024 --max-position-embeddings 1024 --train-iters 10 --data-path ./data/gpt2-sample_text_document --vocab-file ./data/gpt2-vocab.json --merge-file ./data/gpt2-merges.txt --data-impl mmap --lr 0.00015 --log-interval 5 --bf16  > log.txt 2>&1
Time breakdown		: forward+backward 0.00, communication 0.00, optimizer 0.00
<Figure size 900x200 with 3 Axes>
"""
One benefit of TP is that we can run very large model that’s impossible for DP (at least without gradient accumulation). Let’s try a 1.3B GPT.
tp_gpt_neo_accum = megatron_gpt(Exp(
    "Megatron GPT-Neo-1.3B, 2 GPUs, TP\ngrad_accum=4", "EleutherAI/gpt-neo-1.3B", 1, bf16=True, gpus='0,1',
    tensor_para=2, grad_accum=4, steps=10))
compare([tp_gpt2_accum, tp_gpt_neo_accum])
"""
export CUDA_DEVICE_MAX_CONNECTIONS=1; torchrun --nproc_per_node 2 Megatron-LM/pretrain_gpt.py --num-layers 24 --hidden-size 2048 --num-attention-heads 16 --tensor-model-parallel-size 2 --micro-batch-size 1 --global-batch-size 4 --seq-length 2048 --max-position-embeddings 2048 --train-iters 10 --data-path ./data/gpt2-sample_text_document --vocab-file ./data/gpt2-vocab.json --merge-file ./data/gpt2-merges.txt --data-impl mmap --lr 0.00015 --log-interval 5 --bf16  > log.txt 2>&1
Time breakdown		: forward+backward 0.00, communication 0.00, optimizer 0.00
<Figure size 900x100 with 3 Axes>
"""
多卡 + ZeRO
Similar to TP, ZeRO also enables run very large model. Here we try Zero-2.
zero2_gpt_neo_accum = hf_gpt(Exp(
    "HF GPT-Neo-1.3B, 2 GPUs, zero-2\ngrad_accum=16", "EleutherAI/gpt-neo-1.3B", 1, bf16=True, gpus='0,1',
    optim='adamw_apex_fused', grad_accum=16,
    steps=5, deepspeed=True,  ds_config='transformers/tests/deepspeed/ds_config_zero2.json'))
compare([tp_gpt_neo_accum, zero2_gpt_neo_accum])
"""
export CUDA_VISIBLE_DEVICES=0,1; deepspeed transformers/examples/pytorch/language-modeling/run_clm.py --config_name EleutherAI/gpt-neo-1.3B --tokenizer_name EleutherAI/gpt-neo-1.3B --dataset_name wikitext --dataset_config_name wikitext-2-raw-v1 --do_train --per_device_train_batch_size 1 --block_size 2048 --learning_rate 2e-5 --max_steps 5 --optim adamw_apex_fused --fp16 False --bf16 True --gradient_accumulation_steps 16 --gradient_checkpointing False --output_dir /tmp/gpt/ --overwrite_output_dir yes --skip_memory_metrics False --deepspeed transformers/tests/deepspeed/ds_config_zero2.json > log.txt 2>&1
<Figure size 900x100 with 3 Axes>
"""
结论
- 为了获得良好的性能,需要使用足够大的batch,以获得更好的操作性能,并降低通信和参数更新的成本比。所有大GPU内存大小、减少的精度数据类型、内核融合、梯度累积和梯度检查点都有帮助。尽管过大的批处理大小会影响收敛,特别是对于使用数百个GPU进行微调或预训练。
- 如果模型适合单卡,则数据并行性工作良好。否则,可以使用张量并行性和ZeRO。
[内网穿透] 穿透内网gpu服务器(jupyter lab 服务),namesilo、cloudflare 托管
本期 code:https://github.com/chunhuizhang/full_stack/blob/main/tutorials/%E6%9C%8D%E5%8A%A1%E5%99%A8/%E5%9F%9F%E5%90%8D-%E5%85%AC%E7%BD%91ip-cloudflare.ipynb
如何在外网访问内网的GPU服务器?(非常具有现实意义)
- 客户端 vs. 内网服务器
- 比如 ip:192.168.xx.xx (192.168.101.16)
- 此时需要再中间加一台中转服务器(具有公网ip)
- 客户端, 中转服务器, 内网服务器
- 公网只是桥梁而已,两个内网通过这个公网来通信,进而实现两个内网的通信。
- 是流量受公网服务器带宽限制,传文件受不了
- 公网ip的服务器,ip 测试
- https://xiaogoucloud.xyz/cart?fid=21
- 服务器ip 线路测试
- https://github.com/zhanghanyun/backtrace
- 三网回程路由测试:移动联通电信;
- 延迟测试
- 站长工具
https://www.bilibili.com/video/BV17B4y1G7Co/
- https://github.com/fatedier/frp
- FRP:fast reverse proxy
- 配置
- frps.ini:bind port
- frpc.ini:配置中转服务器的公网ip;
- 中转服务器以及内网服务器上都需要安装 frp
- 中转服务器启动:frps(作为 server 端)
./frps -c frps.ini
- 内网服务器启动:frpc(作为 client 端)
./frpc -c frpc.ini
- 中转服务器启动:frps(作为 server 端)
- 此时真正的终端,
ssh -p 6000 root@中转服务器- 中转服务器会自动把 ssh 请求转发到内网服务器(中转服务器 frp 的客户端)
这里一个preliminary,如何在本地访问服务器上运行的jupyter server?参考anaconda文档:

即下面的https://www.bilibili.com/video/BV1Ye4y1P7bw
- 环境
- 内网(192.168.xx.xx)gpu server
- https://www.bilibili.com/video/BV1A54y1F7kN/
- host 一个 jupyter lab 的服务:
- localhost:8080
jupyter lab --ip=0.0.0.0 --port=8080 --allow-root --LabApp.extension_manager=pypi --no-browser --NotebookApp.token='' --NotebookApp.password='' --NotebookApp.allow_origin='*' > jupyter.log 2>&1 &- https://www.bilibili.com/video/BV1Ye4y1P7bw/
- 终端:macbook pro,移动的,外网环境
- 内网(192.168.xx.xx)gpu server
- 本期我们的目标是
- 外网环境(通过域名的方式),穿透内网(gpu server)的 jupyter lab 服务
- jupyter lab 支持 terminal (gpu server 的命令行模式)
- 不只是 jupyter lab
- 你可以再内网里边 host 任意的 http 服务;
- videolingo、ollama、blog
- 你可以再内网里边 host 任意的 http 服务;
- 外网环境(通过域名的方式),穿透内网(gpu server)的 jupyter lab 服务
- 工具
- namesilo: 申请域名,填写 cloudflare 分配的域名服务器(DNS);
- cloudflare:
- 分配域名服务器;
- 管理域名
- 配置 tunnel,进行内网穿透;
- namesilo 和 cloudflare 的操作参考
- https://www.bilibili.com/video/BV1H4421X7Wg/
- 查看域名解析
- https://www.whatsmydns.net/
- 查看域名信息
- https://lookup.icann.org/en
- https://www.godaddy.com/whois
1 域名(domain)
- 顶级域名TLD(top-level domain)
- www.baidu.com,com 就是 TLD
- jupyter.wkdns.life
- life:顶级域名
- wkdns.life:域名(namesilo 申请的)
- jupyter:子域名(subdomain)
- DNS 服务商
- cloudflare (CF)
1.1 低成本获取域名的方式
- 域名购买地址
- Namesilo,支持支付宝付费;
- https://www.namesilo.com/
- https://www.namesilo.com/account_domains.php
- wdkns.life
- Namesilo,支持支付宝付费;
- 域名托管到 cf
- https://dash.cloudflare.com/
- 添加域
- cloudflare 可以为域名分配两个域名服务器,替换 namesilo 的 nameserver
- cheryl.ns.cloudflare.com
- elliot.ns.cloudflare.com
- https://dash.cloudflare.com/
- 立即检查域名服务器,可能会有较久的延迟;
- 带有星标时,托管完成;
2 内网穿透
https://www.bilibili.com/video/BV1H4421X7Wg
- cloudflare tunnel 实现免费的内网穿透;
- Zero Trust
- Networks => Tunnels => Add a tunnel => Cloudflared
jupyter- 按照提示
- 在要被穿透的内网服务器上执行相关的安装指令;
- connectors:状态已链接;
- next
- subdomain:
jupyter - domain:
wdkns.life - type: http
- url: localhost:8080
jupyter.wdkns.life=>http://localhost:8080
- subdomain:
- 保存成功后回到 tunnel 的首页;
- 状态显示
正常:配置完全成功;
- 状态显示
- 注意内网
jupyter lab --ip=0.0.0.0 --port=8080 --allow-root --LabApp.extension_manager=pypi --no-browser --NotebookApp.token='' --NotebookApp.password='' --NotebookApp.allow_origin='*' > jupyter.log 2>&1 &
2.1 cloudflared
sudo systemctl restart cloudflared: 重启守护进程(daemon)sudo cloudflared service uninstall- 删除隧道;


 被折叠的 条评论
为什么被折叠?
被折叠的 条评论
为什么被折叠?
 到【灌水乐园】发言


