


 本文详细介绍MotionLayout的原理和使用方法,包括MotionScene、StateSet、ConstraintSet和Transition等核心概念,以及如何通过KeyFrameSet自定义动画路径。
简介
MotionLayout
MotionLayout 是一种布局类型,可帮助管理应用中的运动和控件动画。MotionLayout 是 ConstraintLayout 的子类,在其丰富的布局功能基础之上构建而成,可向后兼容 API 级别 14。
MotionLayout 缩小了布局转换与复杂运动处理之间的差距,同时在属性动画框架、TransitionManager 和 CoordinatorLayout 之间提供了各种功能。
除了描述布局之间的转换之外,MotionLayout 还能够为任何布局属性添加动画效果。此外,它本身就支持可交互转换。也就是说,可以根据某个条件(例如用户触控输入)立即显示转换中的任意点。MotionLayout 还支持关键帧(KeyFrame),从而实现完全自定义的转换以满足需求。
MotionLayout 是完全声明性的,也就是说可以使用 XML 描述任何转换,无论复杂程度如何。
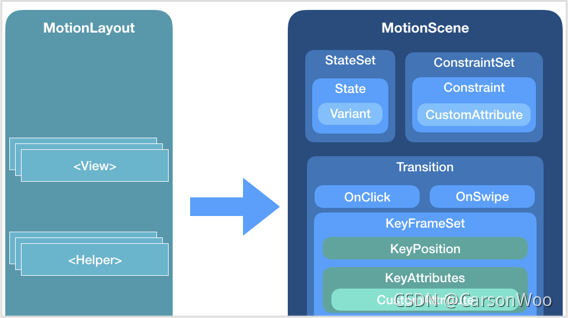
以上即为MotionLayout的结构图,MotionLayout并没有将运动的过程定义在layout文件中,而是以独立的xml文件(根标签为MotionScene)来对运动进行定义。
MotionScene
如图所示,主要有三个主要成员类:
- StateSet
状态集,主要用于存储当前布局内各运动View的一些状态,存在与ConstraintSet的相互转换。 - ConstraintSet
约束集,直接在xml中引入,用以对View进行约束属性控制。一般存在起始态(start)与终止态(end),可以理解为定义了运动的初始与结束的View的布局状态。 - Transition
运动的过渡过程,是启用动画时必须定义的元素。内部的各种属性标签后续会有提到,可以理解为有了这种过渡的设置,才有对应的插值器来改变每一帧View的位置/属性值,从而执行动画。
快速接入
// constraintlayout2.0+版本导入后 开箱即用
implementation ‘androidx.constraintlayout:constraintlayout:2.0.3’
只要将ConstraintLayout的版本库升级到2.0+了,就已经无感接入了MotionLayout的能力。
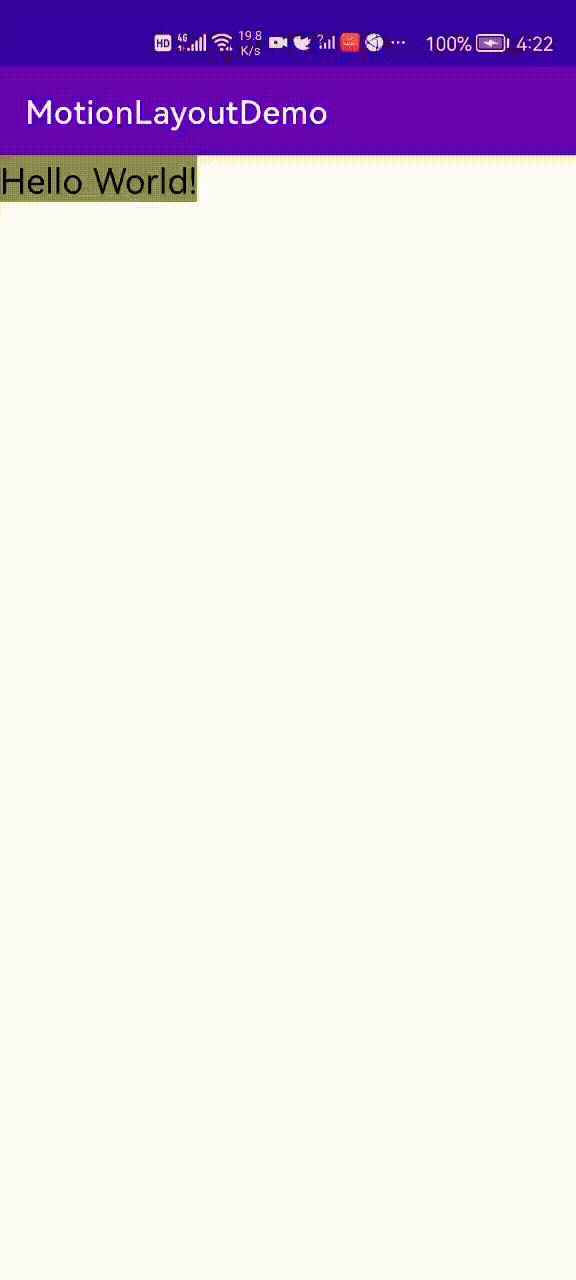
// res/layout/activity_sample.xml 布局文件
<androidx.constraintlayout.motion.widget.MotionLayout
    xmlns:android="http://schemas.android.com/apk/res/android"
    xmlns:app="http://schemas.android.com/apk/res-auto"
    xmlns:tools="http://schemas.android.com/tools"
    android:id="@+id/mol"
    android:layout_width="match_parent"
    android:layout_height="match_parent"
    app:layoutDescription="@xml/activity_sample_scene"
    tools:context=".SampleActivity">

    <TextView
        android:id="@+id/text"
        android:layout_width="wrap_content"
        android:layout_height="wrap_content"
        android:text="Hello World!"
        android:textColor="#000"
        android:textSize="22sp" />

</androidx.constraintlayout.motion.widget.MotionLayout>
// res/xml/activity_sample_scene.xml 场景运动描述文件
<MotionScene xmlns:android="http://schemas.android.com/apk/res/android"
xmlns:app="http://schemas.android.com/apk/res-auto">
<ConstraintSet android:id="@+id/start">
<Constraint android:id="@+id/text"
android:layout_width="wrap_content"
android:layout_height="wrap_content"
app:layout_constraintTop_toTopOf="parent"
app:layout_constraintLeft_toLeftOf="parent"
/>
</ConstraintSet>
<ConstraintSet android:id="@+id/end">
<Constraint android:id="@id/text"
android:layout_width="wrap_content"
android:layout_height="wrap_content"
app:layout_constraintBottom_toBottomOf="parent"
app:layout_constraintRight_toRightOf="parent"/>
</ConstraintSet>
<Transition
app:constraintSetEnd="@id/end"
app:constraintSetStart="@+id/start"
app:duration="1000">
<OnSwipe app:touchAnchorId="@id/text"
app:touchAnchorSide="right"
app:dragDirection="dragRight" />
</Transition>
</MotionScene>其实MotionLayout和普通的ConstraintLayout在布局上没有啥区别,因为MotionLayout继承自后者,故在不指定layoutDescription时,所使用的布局约束属性是通用的。但一旦指定layoutDescription后,这里要注意,该属性指向的场景文件内的所有布局属性/参数属性都会覆盖原有布局。
这里定义好后,我们可以看下目前的例子。
这个时候,假设我想改变运动路径怎么办?各位看官别急,Google官方早就想到了这一点,于是推出了KeyFrameSet定义,即关键帧集。
KeyFrameSet
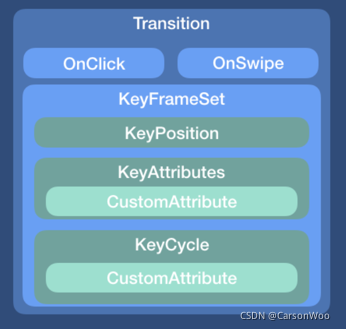
关键帧集允许我们定义好几个属性,这里简单介绍几个比较常用的。
- KeyPosition
关键帧位置点,用以控制该点的位置,使动画在运行到该帧时到达定义的点位。 - KeyAttributes
关键帧属性点,用以设置该点的view属性/自定义属性。 - KeyCycle
关键帧周期点,用以定义周期运动的波幅及波形。
KeyPosition
位置关键帧允许你对一个控件的运动路径进行操纵。
- motionTarget 操作的控件id
- framePosition 帧进度
- keyPositionType 坐标系 后续会提到
- percentX 相对x轴偏移百分比
- percentY 相对y轴偏移百分比
修改一下运动路径文件,就得到了以下的效果。
// res/xml/activity_sample_scene.xml
<MotionScene xmlns:android="http://schemas.android.com/apk/res/android"
  xmlns:app="http://schemas.android.com/apk/res-auto">

    ...

    <Transition
        app:constraintSetEnd="@id/end"
        app:constraintSetStart="@+id/start"
        app:duration="1000">

        <OnSwipe app:touchAnchorId="@id/text"
            app:touchAnchorSide="right"
            app:dragDirection="dragRight" />

        <KeyFrameSet>

            <KeyPosition
                app:motionTarget="@id/text"
                app:framePosition="30"
                app:percentX="0.8"
                app:percentY="0.1"
                app:keyPositionType="parentRelative" />

            <KeyPosition
                app:motionTarget="@id/text"
                app:framePosition="70"
                app:percentX="0.2"
                app:percentY="0.9"
                app:keyPositionType="parentRelative" />


        </KeyFrameSet>

    </Transition>
</MotionScene>
KeyPositionType 坐标系
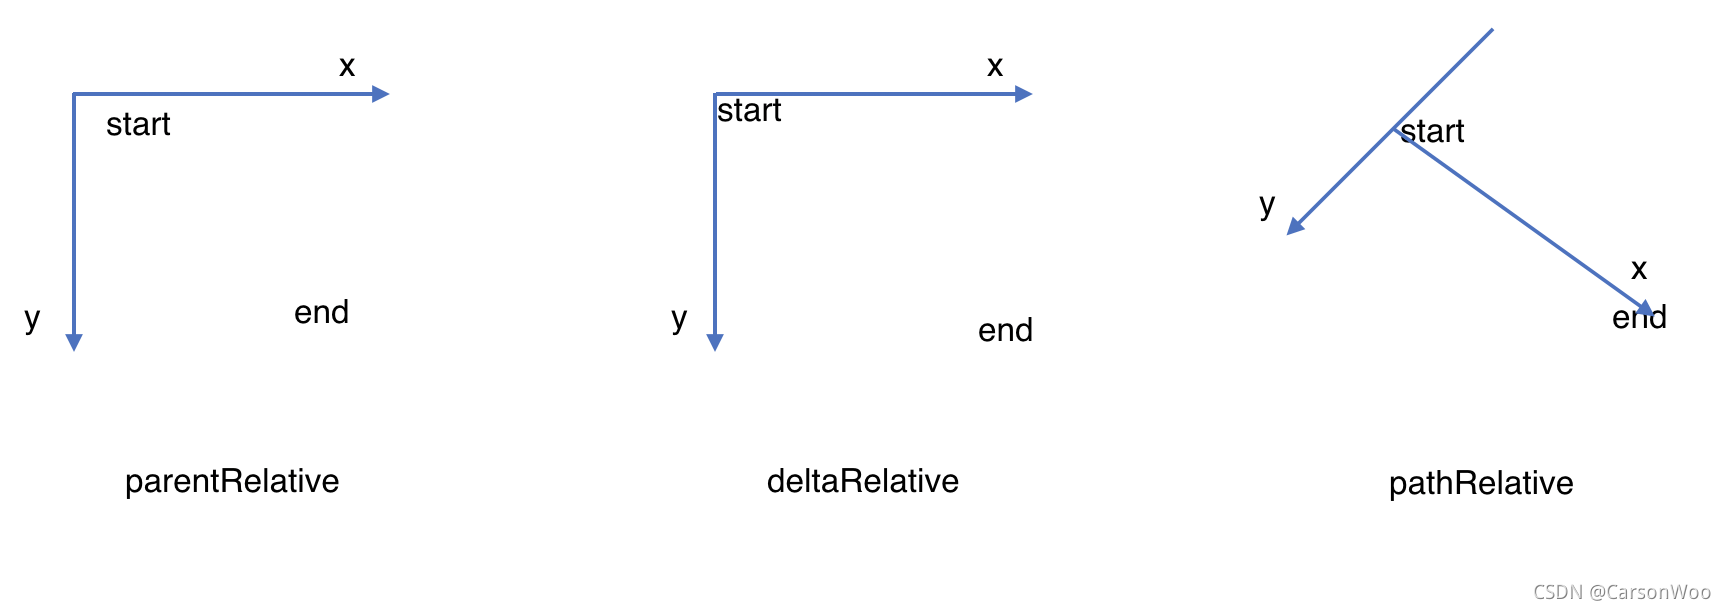
- parentRelative 是以父容器维度来定义坐标系,对应着Android View坐标系。
- deltaRelative 是以状态起始点作为坐标原点,x、y轴仍对应着Android View坐标系。
- pathRelative 是以起始点与结束点两点间的连线作为坐标横轴,并平分y轴来划分坐标系。
KeyAttributes
见名知义,这是用来定义运动路径上某个点的属性变更,包含alpha、scale、rotation等矩阵变换,还包含了一些自定义属性的定义,原理和属性动画一致,也是通过反射来设置属性值,这里以例子来说明,就不再赘述了。
KeyCycle
即关键周期点,可用于做周期动画。
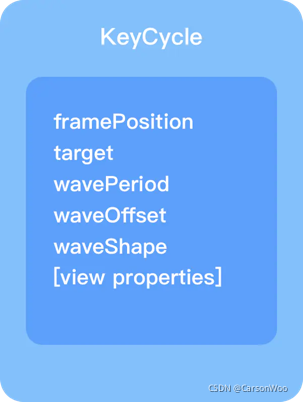
- wavePeriod 即波动周期 这里0.5为一个循环周期
- waveOffset 属性偏移量
- waveShape 波形类型,可供选择现有库有sin、cos、bounce等,更多可参考官方文档:https://developer.android.com/reference/androidx/constraintlayout/motion/widget/MotionLayout#keycycle
这里同样以例子来说明。
// res/xml/activity_main_scene.xml
<MotionScene xmlns:android="http://schemas.android.com/apk/res/android"
    xmlns:app="http://schemas.android.com/apk/res-auto">

    <ConstraintSet android:id="@+id/start">
        <Constraint android:id="@+id/button"
            android:layout_width="64dp"
            android:layout_height="64dp"
            android:layout_marginStart="8dp"
            app:layout_constraintBottom_toBottomOf="parent"
            app:layout_constraintStart_toStartOf="parent"
            app:layout_constraintTop_toTopOf="parent">

            <CustomAttribute
                app:attributeName="background"
                app:customReference="@drawable/shape_circle" />

        </Constraint>
    </ConstraintSet>

    <ConstraintSet android:id="@+id/end">
        <Constraint android:id="@id/button"
            android:layout_width="64dp"
            android:layout_height="64dp"
            android:layout_marginRight="20dp"
            app:layout_constraintBottom_toBottomOf="parent"
            app:layout_constraintRight_toRightOf="parent"
            app:layout_constraintTop_toTopOf="parent">

            <CustomAttribute
                app:attributeName="background"
                app:customReference="@drawable/shape_circle" />

        </Constraint>
    </ConstraintSet>

    <Transition
        app:constraintSetEnd="@id/end"
        app:constraintSetStart="@+id/start"
        app:duration="2000">
        <OnClick
            app:touchAnchorId="@+id/button" />

        <KeyFrameSet>

            <KeyCycle
                app:motionTarget="@+id/button"
                app:framePosition="100"
                android:translationY="-50dp"
                app:wavePeriod="1"
                app:waveShape="sin"
                app:waveOffset="3"
                android:elevation="0.5dp"
                android:rotation="0" />

        </KeyFrameSet>
    </Transition>
</MotionScene>
原理浅析
这里MotionLayout动画的实现原理其实就和我们定义自定义View动画时的原理一致,就是不断地对各子View内部进行一系列插值运算更改其位置和属性,并适时重绘来完成的。
下面我们首先来看下调用的过程中的关键方法。
/**
* This overrides ConstraintLayout and only accepts a MotionScene.
*
* @param motionScene The resource id, or 0 to reset the MotionScene.
*/
@Override
public void loadLayoutDescription(int motionScene) {
if (motionScene != 0) {
try {
// 根据motionScene的资源文件id来标识创建MotionScene对象
mScene = new MotionScene(getContext(), this, motionScene);
// 初始化两个状态
if (mCurrentState == UNSET && mScene != null) {
mCurrentState = mScene.getStartId();
mBeginState = mScene.getStartId();
mEndState = mScene.getEndId();
}
if (Build.VERSION.SDK_INT < Build.VERSION_CODES.KITKAT || isAttachedToWindow()) {
try {
if (Build.VERSION.SDK_INT >= Build.VERSION_CODES.JELLY_BEAN_MR1) {
Display display = getDisplay();
mPreviouseRotation = (display == null) ? 0 : display.getRotation();
}
if (mScene != null) {
// 获取scene文件中的约束集 并对原有布局约束进行覆盖
ConstraintSet cSet = mScene.getConstraintSet(mCurrentState);
mScene.readFallback(this);
if (mDecoratorsHelpers != null) {
for (MotionHelper mh : mDecoratorsHelpers) {
mh.onFinishedMotionScene(this);
}
}
if (cSet != null) {
cSet.applyTo(this);
}
mBeginState = mCurrentState;
}
onNewStateAttachHandlers();
if (mStateCache != null) {
if (mDelayedApply) {
post(new Runnable() {
@Override
public void run() {
mStateCache.apply();
}
});
} else {
mStateCache.apply();
}
} else {
if (mScene != null && mScene.mCurrentTransition != null) {
if (mScene.mCurrentTransition.getAutoTransition() == MotionScene.Transition.AUTO_ANIMATE_TO_END) {
// 如果当前默认自动完成运动过程,那么就执行动画。
transitionToEnd();
setState(TransitionState.SETUP);
setState(TransitionState.MOVING);
}
}
}
} catch (Exception ex) {
throw new IllegalArgumentException("unable to parse MotionScene file", ex);
}
} else {
mScene = null;
}
} catch (Exception ex) {
throw new IllegalArgumentException("unable to parse MotionScene file", ex);
}
} else {
mScene = null;
}
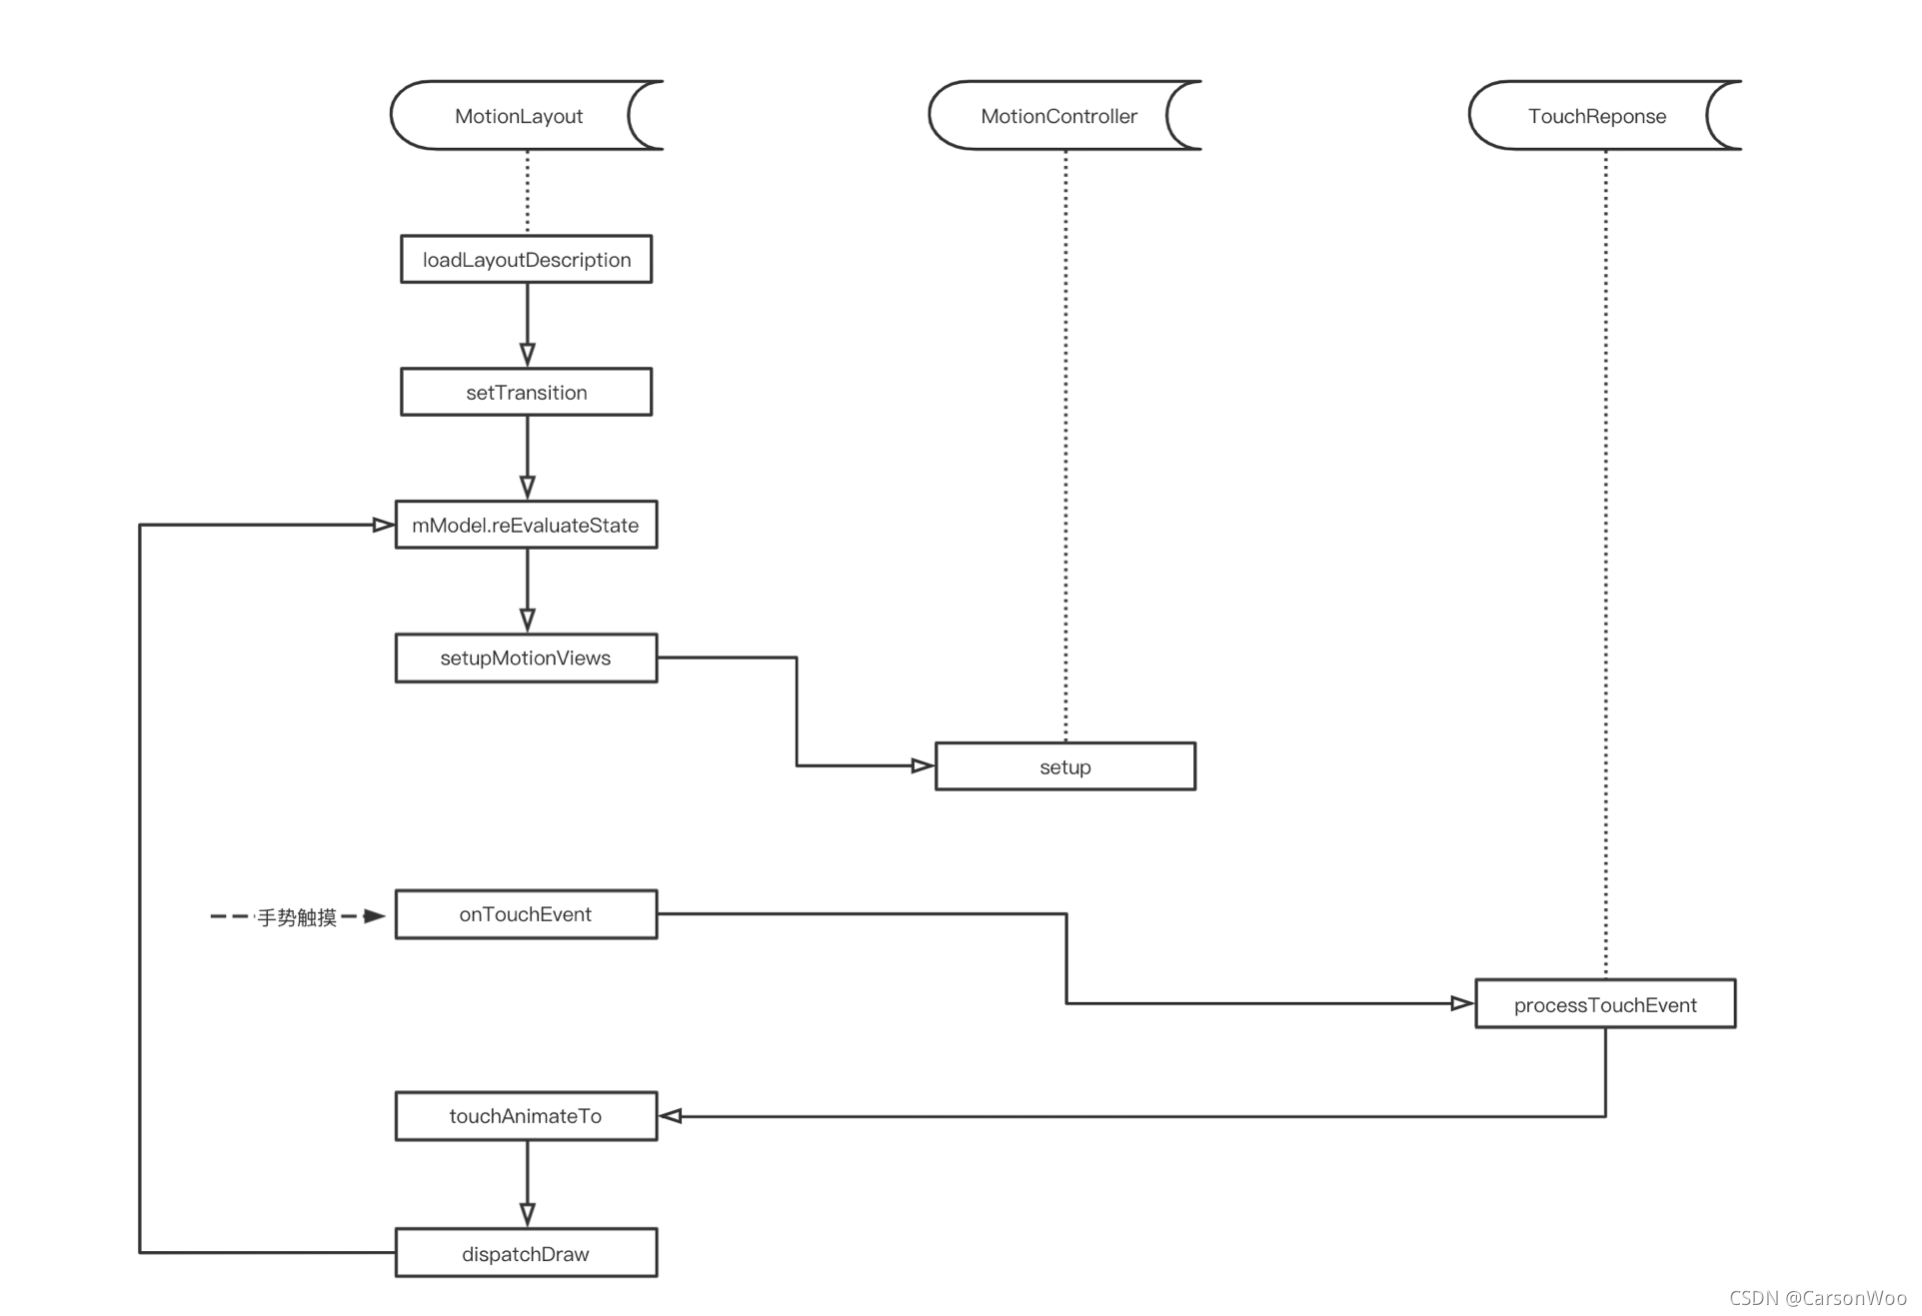
}这里MotionLayout在loadLayoutDescription方法执行时,会把定义的约束集向原有布局覆盖,且创建好对应的MotionScene并初始化各类参数以备后续使用;同时,会对该状态以StateCache的结构进行缓存。
在StateCache中,会通过apply方法中调用setTransition来对运动进行初始化。
/**
 * Set a transition explicitly between two constraint sets
 *
 * @param beginId the id of the start constraint set
 * @param endId   the id of the end constraint set
 */
public void setTransition(int beginId, int endId) {
    if (!isAttachedToWindow()) {
        if (mStateCache == null) {
            mStateCache = new StateCache();
        }
        mStateCache.setStartState(beginId);
        mStateCache.setEndState(endId);
        return;
    }

    if (mScene != null) {
        mBeginState = beginId;
        mEndState = endId;
        mScene.setTransition(beginId, endId);
		// 初始化内部类Model
        mModel.initFrom(mLayoutWidget, mScene.getConstraintSet(beginId), mScene.getConstraintSet(endId));
		// 进行估值计算并重绘 内部会调用#reEvaluate方法
        rebuildScene();
        mTransitionLastPosition = 0;
        transitionToStart();
    }
}
在内部类Model中,通过reEvaluate方法,最终会在setupMotionViews方法中给每个View创建一个对应的MotionController,用以对运动过程每个View进行进度控制以及View的插值计算。由此可以推断出,MotionLayout的子View都必须有id标识。
而MotionLayout的强大之处还在于可以在用户触摸时,响应到动画的进度执行,原因就在于其触摸事件被捕获并交由TouchResponse进行处理。
public boolean onTouchEvent(MotionEvent event) {
    if (mScene != null && mInteractionEnabled && mScene.supportTouch()) {
        MotionScene.Transition currentTransition = mScene.mCurrentTransition;
        if (currentTransition != null && !currentTransition.isEnabled()) {
            return super.onTouchEvent(event);
        }
		// 交由内部TouchResponse来进行消费
        mScene.processTouchEvent(event, getCurrentState(), this);
        return true;
    }
    return super.onTouchEvent(event);
}最终会调用TouchResponse的processTouchEvent方法来对拖动进度进行计算,并回调给MotionLayout最终通过调用touchAnimateTo方法来进行重绘更新。
分析过后,大致的流程图如下所示。
FurtherMore
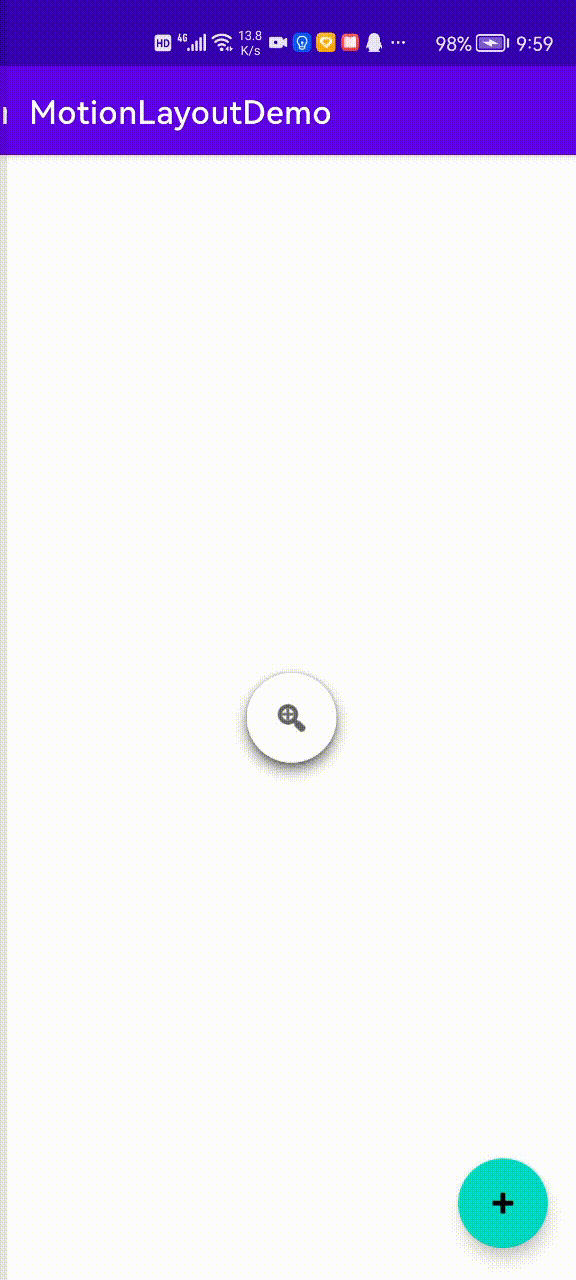
这里笔者也通过MotionLayout做了一些扩展菜单的小demo,比起以前通过自定义View的方式实现,代码量足足省了几百行有余,可谓真香!
https://github.com/android/views-widgets-samples/tree/master/ConstraintLayoutExamples
这里是官方推荐的一些Demo,可以发现MotionLayout的强大不仅仅在于自身动画的实现,还可以与其他控件进行联动从而实现一些惊艳的效果~


 被折叠的 条评论
为什么被折叠?
被折叠的 条评论
为什么被折叠?
 到【灌水乐园】发言


