


一、安装
安装方式:
pip install pytest安装完成后可以查看版本:
pytest --version二、例子
1.当前处于「qwe」目录下,创建test00.py文件,创建一个方法、一个用例
# content of test_sample.py
def func(x):
    return x + 1

def test_answer():
    assert func(3) == 4
2、执行 pytest qwe/test00.py

pytest 使用 . 标识测试成功(PASSED)。
三、基础语法
1、@pytest.mark.marker,只运行有对应标识的测试用例。
test11.py
import pytest


@pytest.mark.aa
def test1():
    assert len('hello') == 5

@pytest.mark.aa
@pytest.mark.bb
def test2():
    assert 3 > 1


def test3():
    assert (1 + 1) == 2
pytest.ini

运行:
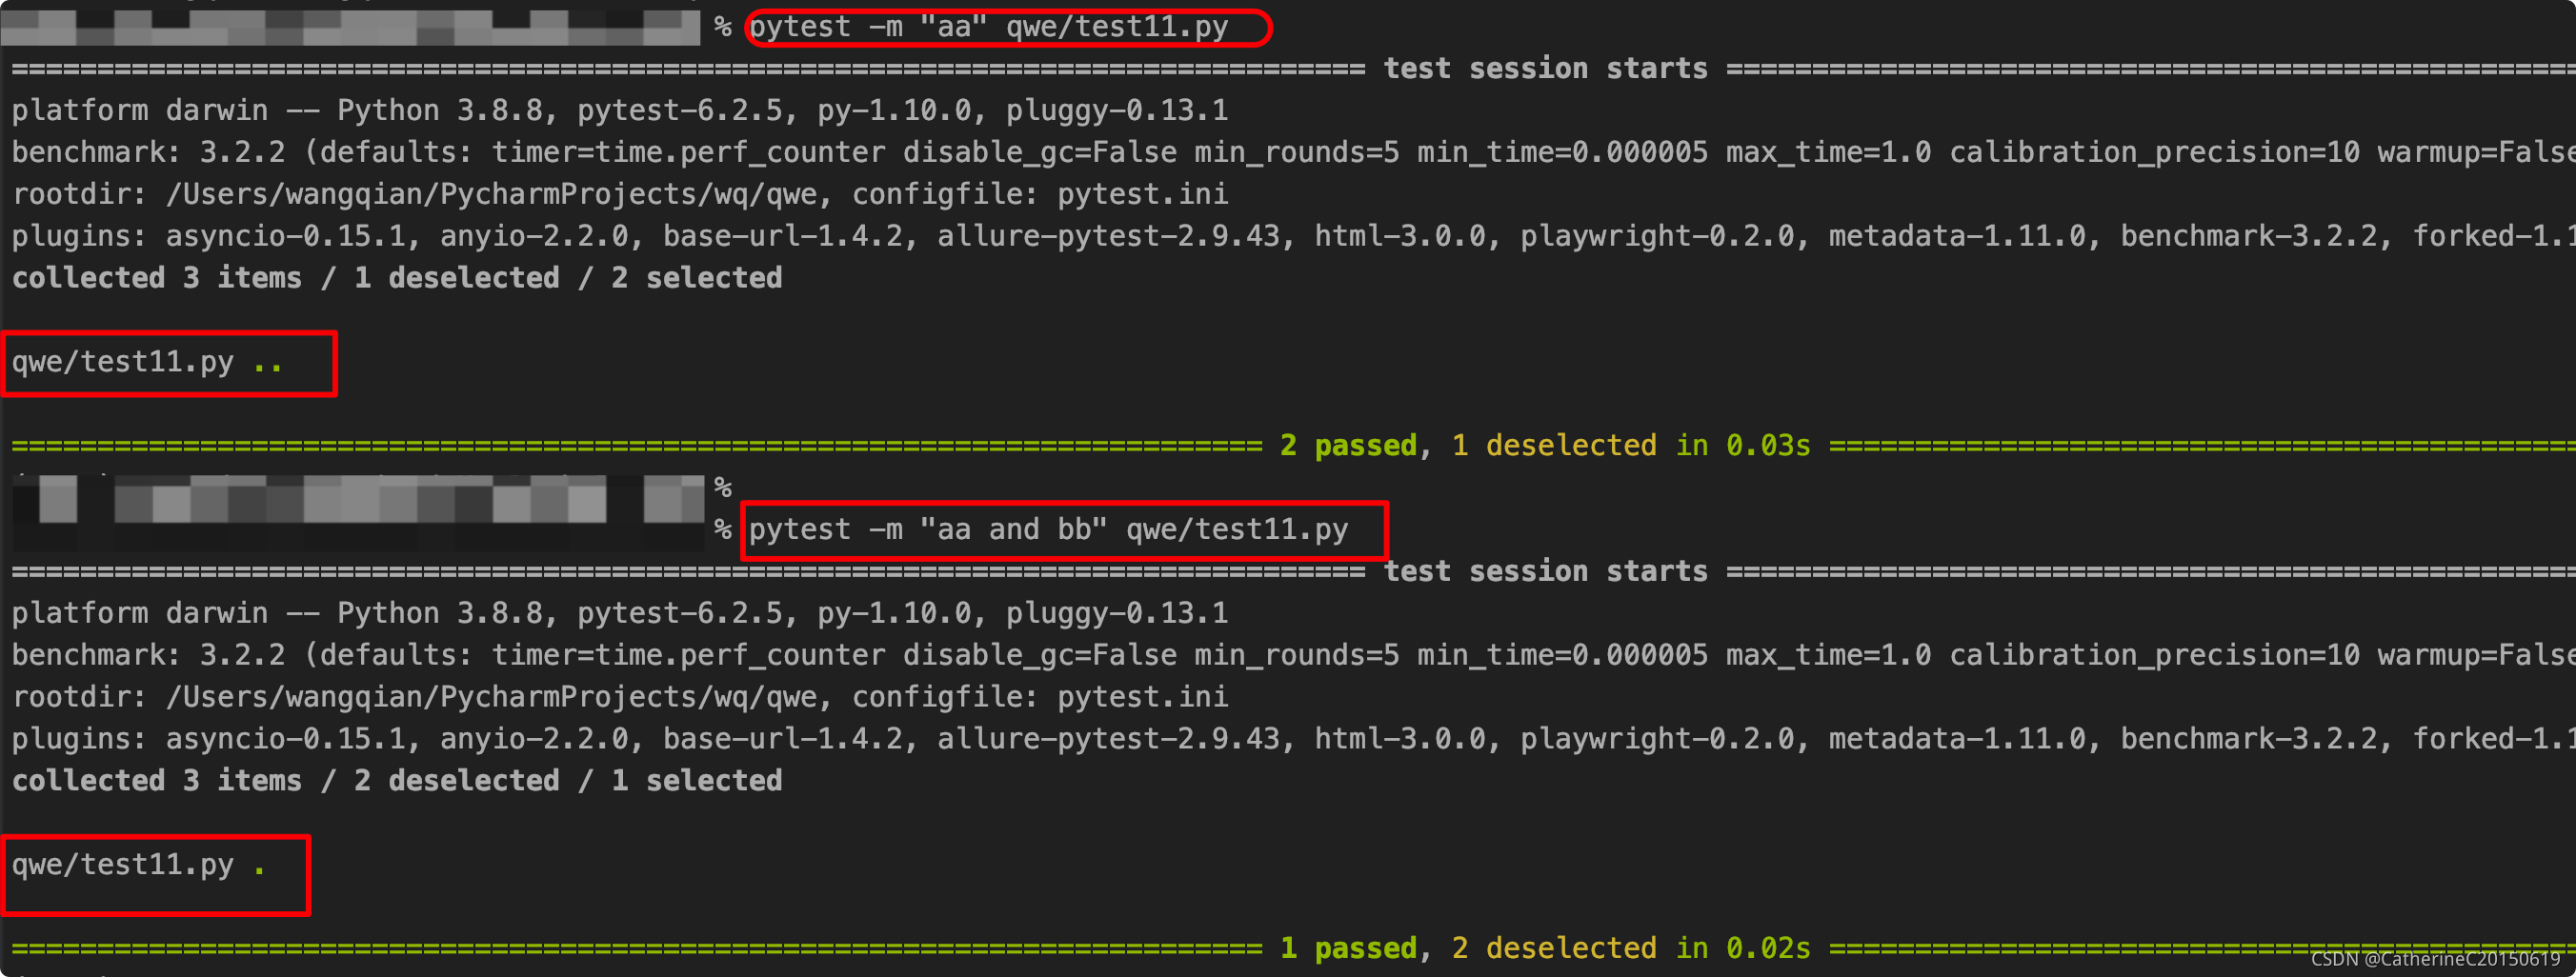
运行多个标识时,表达式支持and、or、not 。
2、@pytest.mark.skip ,@pytest.mark.skipif,执行时跳过某个测试用例。
test22.py
import pytest


def test1():
    assert len('hello') == 5


@pytest.mark.skip(reason='因为xxx所以跳过这个测试')
def test2():
    assert 3 > 1


@pytest.mark.skipif(condition='2>1', reason='原因是 2>1')
def test3():
运行:
3、@pytest.mark.parametrize,测试用例参数化。
test33.py
import pytest


@pytest.mark.parametrize('a',['hi','haha','zoo'])
def test1(a):
    assert len(a) < 5

@pytest.mark.parametrize('s1,s2',[('cc','vv')])
def test2(s1,s2):
    assert len(s1+s2) < 5


@pytest.mark.parametrize('num1,num2',[('1+9',10),('2+0',2)])
def test3(num1,num2):
    assert eval(num1) == num2
运行:
4、@pytest.mark.run(order=x) ,x表示数字
控制用例执行顺序的方法,需安装pytest-ordering。
数字形式: 小数、整数、负数
执行顺序:由小到大,由正到负,未标记 的在正数后,负数前执行
如: 1,2,3,无标记,-3,-2,-1
5、@pytest.fixture(),固件。
很多时候需要在测试前进行预处理(如新建数据库连接),并在测试完成进行清理(关闭数据库连接)。
当有大量重复的这类操作,最佳实践是使用固件来自动化所有预处理和后处理。
Pytest 使用 yield 关键词将固件分为两部分,yield 之前的代码属于预处理,会在测试前执行;yield 之后的代码属于后处理,将在测试完成后执行。
以下测试模拟数据库查询,使用固件来模拟数据库的连接关闭:
test44.py
import pytest


@pytest.fixture()
def db():
    print("connection successful")
    yield
    print("connection closed")

def search_user(user_id):
    d={'001': 'xiaoming'}
    return d[user_id]


def test_search(db):
    assert search_user('001') == 'xiaoming'
执行时使用 -s 阻止消息被吞::
pytest 使用作用域来进行指定固件的使用范围。
在定义固件时,通过 scope 参数声明作用域,可选项有:
function: 函数级,每个测试函数都会执行一次固件;class: 类级别,每个测试类执行一次,所有方法都可以使用;module: 模块级,每个模块执行一次,模块内函数和方法都可使用;session: 会话级,一次测试只执行一次,所有被找到的函数和方法都可用。
test55.py
import pytest

@pytest.fixture(scope='function')
def func_scope():
    pass


@pytest.fixture(scope='module')
def mod_scope():
    pass


@pytest.fixture(scope='session')
def sess_scope():
    pass


@pytest.fixture(scope='class')
def class_scope():
    pass


def test_multi_scope(sess_scope,mod_scope,func_scope):
    pass
执行结果如下,可以清楚看到各固件的作用域和执行顺序:
对于类使用作用域,需要使用 pytest.mark.usefixtures (对函数和方法也适用):
# test_scope.py

@pytest.mark.usefixtures('class_scope')
class TestClassScope:
    def test_1(self):
        pass

    def test_2(self):
        pass
执行结果如下,可见所有测试函数都在固件作用范围内:
$ pytest --setup-show tests/fixture/test_scope.py::TestClassScope
============================= test session starts =============================
platform win32 -- Python 3.6.4, pytest-3.6.1, py-1.5.2, pluggy-0.6.0
rootdir: F:\self-repo\learning-pytest, inifile:
collected 2 items

tests\fixture\test_scope.py
    SETUP    C class_scope
        tests/fixture/test_scope.py::TestClassScope::()::test_1 (fixtures used: class_scope).
        tests/fixture/test_scope.py::TestClassScope::()::test_2 (fixtures used: class_scope).
    TEARDOWN C class_scope

========================== 2 passed in 0.03 seconds ===========================
目前为止,所有固件的使用都是手动指定,或者作为参数,或者使用 usefixtures。
如果我们想让固件自动执行,可以在定义时指定 autouse 参数。
下面是两个自动计时固件,一个用于统计每个函数运行时间(function 作用域),一个用于计算测试总耗时(session 作用域):
# test_autouse.py

DATE_FORMAT = '%Y-%m-%d %H:%M:%S'


@pytest.fixture(scope='session', autouse=True)
def timer_session_scope():
    start = time.time()
    print('\nstart: {}'.format(time.strftime(DATE_FORMAT, time.localtime(start))))

    yield

    finished = time.time()
    print('finished: {}'.format(time.strftime(DATE_FORMAT, time.localtime(finished))))
    print('Total time cost: {:.3f}s'.format(finished - start))


@pytest.fixture(autouse=True)
def timer_function_scope():
    start = time.time()
    yield
    print(' Time cost: {:.3f}s'.format(time.time() - start))
注意下面的两个测试函数并都没有显式使用固件:
def test_1():
    time.sleep(1)


def test_2():
    time.sleep(2)
执行测试可看到,固件自动执行并完成计时任务:
$ pytest -s tests/fixture/test_autouse.py
============================= test session starts =============================
platform win32 -- Python 3.6.4, pytest-3.6.1, py-1.5.2, pluggy-0.6.0
rootdir: F:\self-repo\learning-pytest, inifile:
collected 2 items

tests\fixture\test_autouse.py
start: 2018-06-12 10:16:27
. Time cost: 1.003s.
. Time cost: 2.003s.
finished: 2018-06-12 10:16:30
Total time cost: 3.016s.


========================== 2 passed in 3.11 seconds ===========================
四、pytest.ini
[pytest]
addopts = -v -s --html=report/html/report.html --self-contained-html --alluredir=report/allure --clean-alluredir --reruns=10

testpaths = ./py_test/scripts
python_files= test_rerun.py
python_classes = Test*
python_function = test*
xfail_strict = true
addopts: OPTS 命令行参数集
-s:表示输出调试信息,包括 print打印的信息
-v:显示更详细的信息
-vs:这两个参数一起用
-n :支持多线程或者分布式运行测试用例
     如:pytest -vs ./testcase/test_login.py -n 2
--html : pytest-html测试报告位置 (需安装pytest-html)
--alluredir : allure生成文件位置 (需安装allure-pytest)
--clean-alluredir : 清除上次生成的文件
--reruns : 失败重跑  (需安装pytest-rerunfailure)
-p no:warnings  : 取消警告
--ff : 先执行上次失败的用例
--lf : 只执行上次失败的用例
-x : 遇到测试用例fail,就结束测试
--maxfail=num:遇到num条测试用例fail, 就结束测试
-k :根据测试用例的部分字符串指定测试用例
  	如:pytest -vs ./testcase -k “ao”
参考至:


 5973
5973


 被折叠的 条评论
为什么被折叠?
被折叠的 条评论
为什么被折叠?
 到【灌水乐园】发言


