


一.bean的生命周期
首先我们看一下最原始的BeanFactory接口是怎么描述的
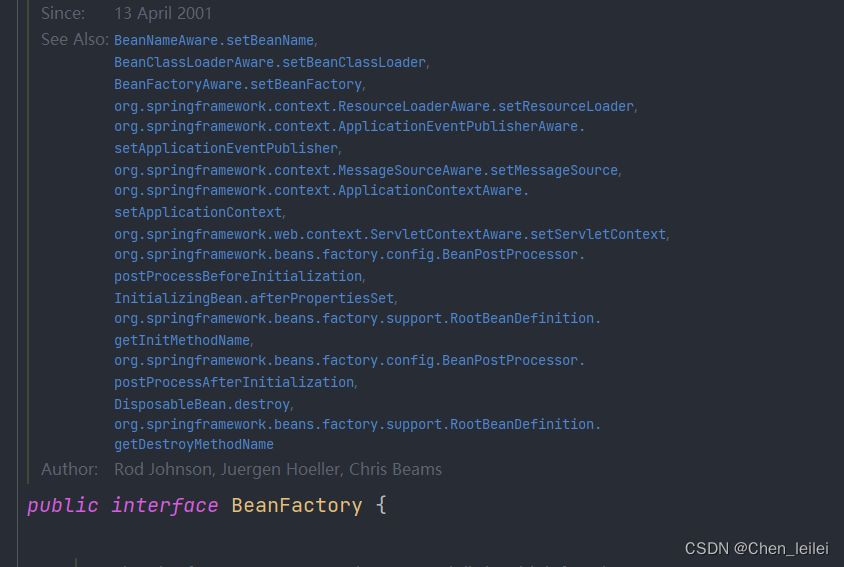
大家可以看到BeanFactory列举了很多接口,他们代表了Bean的生命周期,我们结合spring代码来看看这些接口是什么时候调用的
下面我们看一下AbstractAutowireCapableBeanFactory抽象类里面的doCreateBean方法
protected Object doCreateBean(final String beanName, final RootBeanDefinition mbd, final Object[] args)
			throws BeanCreationException {

		// Instantiate the bean.
		BeanWrapper instanceWrapper = null;
		if (mbd.isSingleton()) {
			instanceWrapper = this.factoryBeanInstanceCache.remove(beanName);
		}
		if (instanceWrapper == null) {
 //创建一个bean的实例
			instanceWrapper = createBeanInstance(beanName, mbd, args);
		}
		final Object bean = (instanceWrapper != null ? instanceWrapper.getWrappedInstance() : null);
		Class<?> beanType = (instanceWrapper != null ? instanceWrapper.getWrappedClass() : null);
		mbd.resolvedTargetType = beanType;

		// Allow post-processors to modify the merged bean definition.
		synchronized (mbd.postProcessingLock) {
			if (!mbd.postProcessed) {
				try {
					applyMergedBeanDefinitionPostProcessors(mbd, beanType, beanName);
				}
				catch (Throwable ex) {
					throw new BeanCreationException(mbd.getResourceDescription(), beanName,
							"Post-processing of merged bean definition failed", ex);
				}
				mbd.postProcessed = true;
			}
		}

		// Eagerly cache singletons to be able to resolve circular references
		// even when triggered by lifecycle interfaces like BeanFactoryAware.
		boolean earlySingletonExposure = (mbd.isSingleton() && this.allowCircularReferences &&
				isSingletonCurrentlyInCreation(beanName));
		if (earlySingletonExposure) {
			if (logger.isDebugEnabled()) {
				logger.debug("Eagerly caching bean '" + beanName +
						"' to allow for resolving potential circular references");
			}
			addSingletonFactory(beanName, new ObjectFactory<Object>() {
				@Override
				public Object getObject() throws BeansException {
					return getEarlyBeanReference(beanName, mbd, bean);
				}
			});
		}

		// Initialize the bean instance.
		Object exposedObject = bean;
		try {
//第二步填充bean属性
			populateBean(beanName, mbd, instanceWrapper);
			if (exposedObject != null) {
//第三步,初始化bean
				exposedObject = initializeBean(beanName, exposedObject, mbd);
			}
		}
		catch (Throwable ex) {
			if (ex instanceof BeanCreationException && beanName.equals(((BeanCreationException) ex).getBeanName())) {
				throw (BeanCreationException) ex;
			}
			else {
				throw new BeanCreationException(
						mbd.getResourceDescription(), beanName, "Initialization of bean failed", ex);
			}
		}

		if (earlySingletonExposure) {
			Object earlySingletonReference = getSingleton(beanName, false);
			if (earlySingletonReference != null) {
				if (exposedObject == bean) {
					exposedObject = earlySingletonReference;
				}
				else if (!this.allowRawInjectionDespiteWrapping && hasDependentBean(beanName)) {
					String[] dependentBeans = getDependentBeans(beanName);
					Set<String> actualDependentBeans = new LinkedHashSet<String>(dependentBeans.length);
					for (String dependentBean : dependentBeans) {
						if (!removeSingletonIfCreatedForTypeCheckOnly(dependentBean)) {
							actualDependentBeans.add(dependentBean);
						}
					}
					if (!actualDependentBeans.isEmpty()) {
						throw new BeanCurrentlyInCreationException(beanName,
								"Bean with name '" + beanName + "' has been injected into other beans [" +
								StringUtils.collectionToCommaDelimitedString(actualDependentBeans) +
								"] in its raw version as part of a circular reference, but has eventually been " +
								"wrapped. This means that said other beans do not use the final version of the " +
								"bean. This is often the result of over-eager type matching - consider using " +
								"'getBeanNamesOfType' with the 'allowEagerInit' flag turned off, for example.");
					}
				}
			}
		}

		// Register bean as disposable.
		try {
			registerDisposableBeanIfNecessary(beanName, bean, mbd);
		}
		catch (BeanDefinitionValidationException ex) {
			throw new BeanCreationException(
					mbd.getResourceDescription(), beanName, "Invalid destruction signature", ex);
		}

		return exposedObject;
	}
第一步 创建了一个Bean的实例,这个时候@Autowired注解的属性还没有注入进来
instanceWrapper = createBeanInstance(beanName, mbd, args);第二步 填充bean的属性
populateBean(beanName, mbd, instanceWrapper);第三步 初始化bean
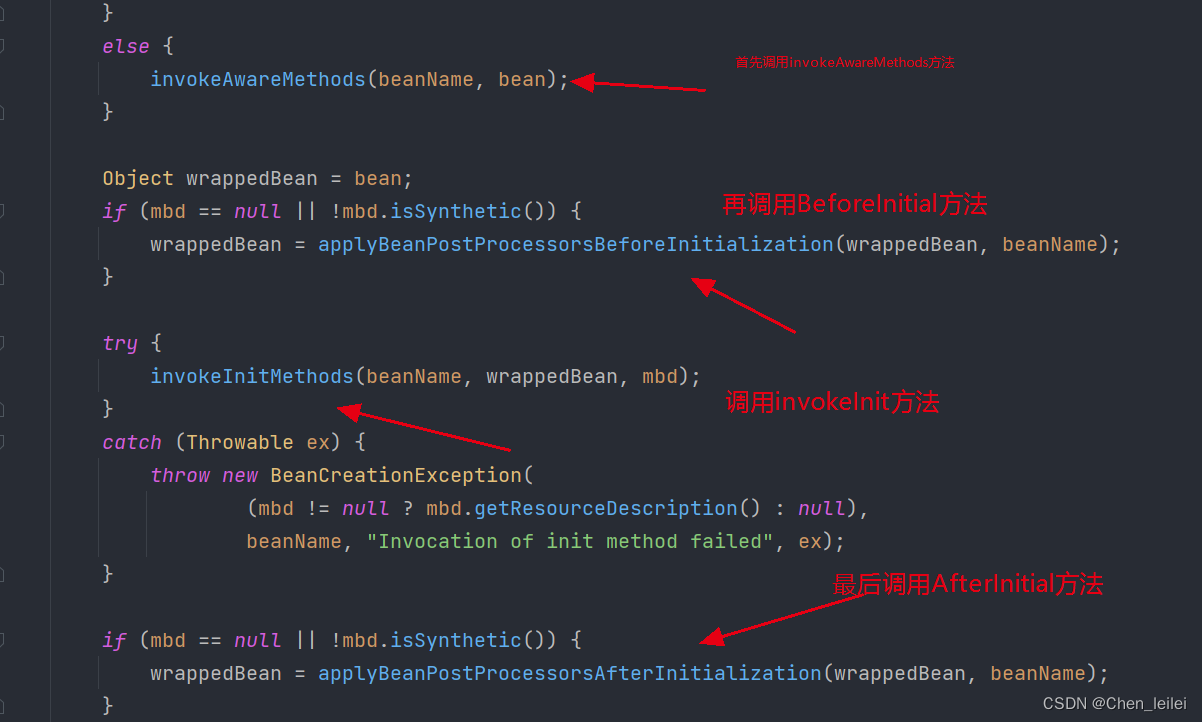
exposedObject = initializeBean(beanName, exposedObject, mbd);我们主要是看这个初始化bean的过程,点进去看看
protected Object initializeBean(final String beanName, final Object bean, RootBeanDefinition mbd) {
		if (System.getSecurityManager() != null) {
			AccessController.doPrivileged(new PrivilegedAction<Object>() {
				@Override
				public Object run() {
					invokeAwareMethods(beanName, bean);
					return null;
				}
			}, getAccessControlContext());
		}
		else {
			invokeAwareMethods(beanName, bean);
		}

		Object wrappedBean = bean;
		if (mbd == null || !mbd.isSynthetic()) {
			wrappedBean = applyBeanPostProcessorsBeforeInitialization(wrappedBean, beanName);
		}

		try {
			invokeInitMethods(beanName, wrappedBean, mbd);
		}
		catch (Throwable ex) {
			throw new BeanCreationException(
					(mbd != null ? mbd.getResourceDescription() : null),
					beanName, "Invocation of init method failed", ex);
		}

		if (mbd == null || !mbd.isSynthetic()) {
			wrappedBean = applyBeanPostProcessorsAfterInitialization(wrappedBean, beanName);
		}
		return wrappedBean;
	}
(1) invokeAwareMethods方法
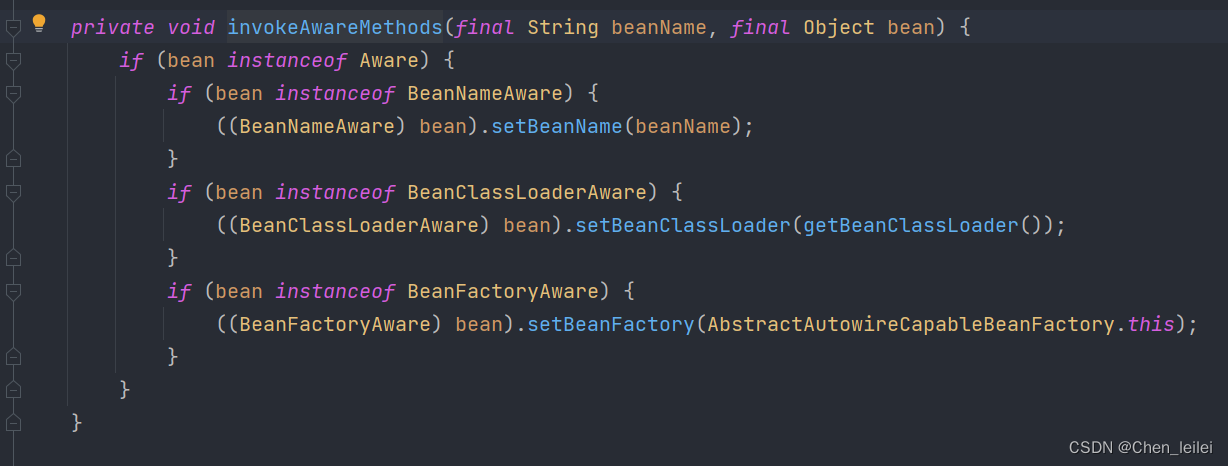
如果bean 实现了上面的接口,就会调用set xx各种方法
(2)applyBeanPostProcessorsBeforeInitialization方法
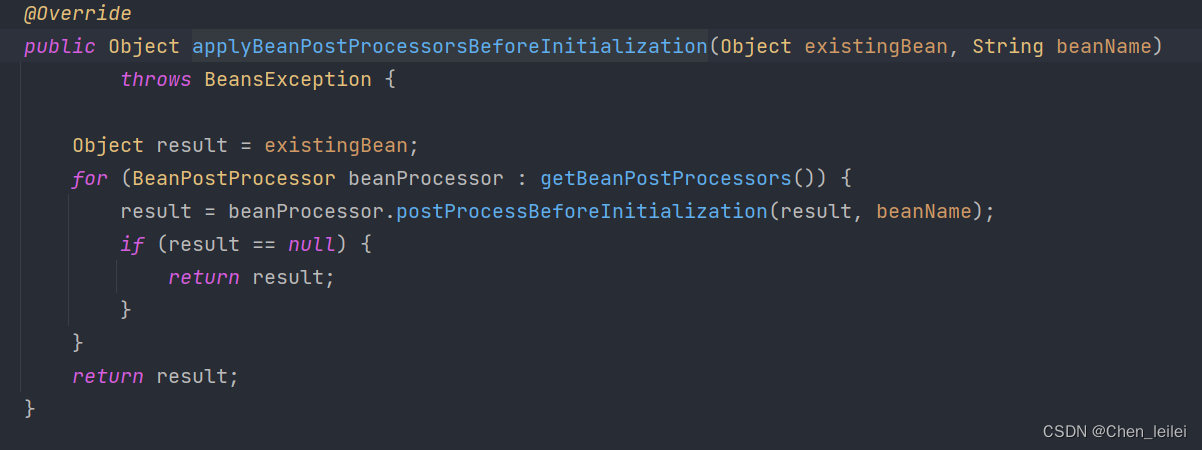
如果多个类实现BeanPostProcessor接口,那么多个实现类都会执行postProcessBeforeInitialization方法,可以看到是for循环依次执行的,还有一个注意的点就是如果加载A类到spring容器中,A类也重写了BeanPostProcessor接口的postProcessBeforeInitialization方法,这时要注意A类的postProcessBeforeInitialization方法并不会得到执行,因为A类还未加载完成,还未完全放到spring的singletonObjects一级缓存中。
(3)invokeInitMethods方法
protected void invokeInitMethods(String beanName, final Object bean, RootBeanDefinition mbd)
			throws Throwable {

		boolean isInitializingBean = (bean instanceof InitializingBean);
		if (isInitializingBean && (mbd == null || !mbd.isExternallyManagedInitMethod("afterPropertiesSet"))) {
			if (logger.isDebugEnabled()) {
				logger.debug("Invoking afterPropertiesSet() on bean with name '" + beanName + "'");
			}
			if (System.getSecurityManager() != null) {
				try {
					AccessController.doPrivileged(new PrivilegedExceptionAction<Object>() {
						@Override
						public Object run() throws Exception {
							((InitializingBean) bean).afterPropertiesSet();
							return null;
						}
					}, getAccessControlContext());
				}
				catch (PrivilegedActionException pae) {
					throw pae.getException();
				}
			}
			else {
				((InitializingBean) bean).afterPropertiesSet();
			}
		}

		if (mbd != null) {
			String initMethodName = mbd.getInitMethodName();
			if (initMethodName != null && !(isInitializingBean && "afterPropertiesSet".equals(initMethodName)) &&
					!mbd.isExternallyManagedInitMethod(initMethodName)) {
				invokeCustomInitMethod(beanName, bean, mbd);
			}
		}
	}
发现如果实现了InitializingBean接口,重写了afterPropertiesSet方法,则会调用afterPropertiesSet方法,最后还会调用是否指定了init-method,可以通过标签,或者@Bean注解的initMethod指定
(4)applyBeanPostProcessorsAfterInitialization方法
和第(2)是一样的
综上我们梳理一下bean的生命流程
1.首先实例化Bean
包含两部分:
(1) 调用AbstractAutowireCapableBeanFactory类的createBeanInstance方法实例化bean
(2).此时bean只是被实例化,并没有进行属性填充
2.填充bean属性
(1)如果bean的属性有@Autowired属性要注入的属性,则会进行属性填充
(2)进行属性填充的前提是保证属性实例已经存在spring容器中,如果不存在则会先去加载属性,(三级缓存)
3.初始化bean
1.调用invokeAwareMethods方法
判断是否实现了BeanNameAware,BeanClassLoaderAware接口,BeanFactoryAware接口, 如果实现了,调用对应的set方法
2.调用applyBeanPostProcessorsBeforeInitialization方法
2.1 循环调用实现了BeanPostProcessor接口的postProcessBeforeInitialization方法,由于Spring自带ApplicationContextAwareProcessor类重写postProcessBeforeInitialization方法,则有限循环到ApplicationContextAwareProcessor的postProcessBeforeInitialization方法
2.2 执行到ApplicationContextAwareProcessor的postProcessBeforeInitialization方法,会检查是否实现Aware接口,这里关注的是Aware接口的ApplicationContextAware,如果实现了额则会调用setApplicationContext方法
2.3 再循环调用我们自动逸的BeanPostProcessor接口,调用postProcessBeforeInitilization方法
3.3调用invokeInitMethods方法
1.实现InitializingBean接口 调用afterPropertiesSet方法
2.指定init-method方法 调用init-method方法
3.4调用appluBeanPostProcessorsAfterInitialization方法 循环调用实现了BeanPostProcessor接口的postProcessAfterInitialization方法
4.销毁bean


 1万+
1万+


 被折叠的 条评论
为什么被折叠?
被折叠的 条评论
为什么被折叠?
 到【灌水乐园】发言


