


文章目录
前言
本篇文章介绍使用vue+element-ui+express框架,结合MySQL数据库实现简单的登录跳转功能
更新:2023年06月15日。代码格式化,整体逻辑不变
一、前期准备
- node.js环境(14.17.6)
- npm包管理工具(8.3.0)
二、初始化vue项目
1.全局安装vue
在vscode中创建项目文件夹vue-login,在命令行中执行命令。
npm install -g vue@2.9.6
2.全局安装vue-cli脚手架
npm install -g vue-cli
3.基于webpack初始化项目
vue init webpack project-name
安装选项:需要安装vue-router

cd project-name
npm run dev
三、引入相关库和依赖
1.安装依赖
在项目的package.json文件中找到“dependencies”:

加入以下依赖:
    "axios": "^0.24.0",
    "element-ui": "^2.15.6",
    "express": "^4.17.1",
    "mysql": "^2.18.1",
    "scss": "^0.2.4"
命令行输入:npm install ,安装依赖。
2.引入相关依赖
在main.js中引入相关依赖:
import ElementUI from 'element-ui'
import 'element-ui/lib/theme-chalk/index.css'
import SIdentify from './components/Identify'; //自定义组件
import axios from 'axios'
Vue.component("SIdentify", SIdentify);// 验证码

window.axios = require('axios');
window.axios.defaults.headers.common['X-Requested-With'] = 'XMLHttpRequest'

Vue.prototype.$http = axios    //全局注册,使用方法:this.$http
Vue.use(ElementUI)
四、创建组件
1.Login.vue
1.在src的component下创建登录页Login.vue
<template>
  <div id="img">
    <div class="ms-title">实验室环境监测系统</div>
    <div class="ms-login">
      <div class="login">
        <!-- <h3 style="text-align: center;">登录界面</h3> -->
        <el-form :model="ruleForm" :rules="rules" ref="ruleForm" class="demo-ruleForm">
          <el-form-item prop="userName">
            <el-input placeholder="请输入账号" v-model="ruleForm.userName" autocomplete="off" clearable>
            </el-input> </el-form-item><br />
          <el-form-item prop="password">
            <el-input placeholder="请输入密码" type="password" v-model="ruleForm.password" autocomplete="off" show-password
              clearable></el-input> </el-form-item><br />
          <el-form-item prop="validateCode">
            <el-input v-model="ruleForm.validateCode" class="validate-code" placeholder="验证码"></el-input>
            <div class="code" @click="refreshCode">
              <s-identify :identifyCode="identifyCode"></s-identify>
            </div>
          </el-form-item><br />
          <div class="site">
            <el-form-item>
              <el-button type="primary" @click="submitForm('ruleForm')">登陆</el-button>
              <el-button @click="resetForm('ruleForm')">重置</el-button>
              <el-button @click="registForm('ruleForm')">注册</el-button>
            </el-form-item>
          </div>
        </el-form>
      </div>
    </div>
    <div id="master">
      <!-- 底部备案号查询(仅进行域名备案,官方代码) -->
      <div class="footer">
        <a target="_blank" href="http://www.beian.gov.cn/portal/registerSystemInfo?recordcode=41102402000277">
          <p> xxxx备案号 </p>
        </a>
      </div>
    </div>
  </div>
</template>

<script>
import axios from "axios";
export default {
  name: "login",
  data()
  {
    var validateAccount = (rule, value, callback) =>
    {
      if (value === "") {
        return callback(new Error("账号不能为空"));
      } else {
        callback();
      }
    };
    var validatePassword = (rule, value, callback) =>
    {
      if (value === "") {
        callback(new Error("请输入密码"));
      } else {
        callback();
      }
    };
    var validateCode = (rule, value, callback) =>
    {
      if (value !== this.identifyCode) {
        callback(new Error("请输入正确的验证码"));
      } else {
        callback();
      }
    };

    return {
      identifyCodes: "1234567890",
      identifyCode: "",
      ruleForm: {
        userName: "",
        password: "",
        validateCode: "",
      },
      rules: {
        userName: [
          {
            validator: validateAccount,
            trigger: "blur",
          },
        ],
        password: [
          {
            validator: validatePassword,
            trigger: "blur",
          },
        ],
        validateCode: [
          {
            // required: true,
            // message: '请输入验证码',
            validator: validateCode,
            trigger: "blur",
          },
        ],
      },
    };
  },
  methods: {
    submitForm(formName)
    {
      this.$refs[formName].validate((valid) =>
      {
        if (valid) {
          sessionStorage.setItem("ms_username", this.ruleForm.userName);
          // alert('submit!');
          axios
            .get("/api/user/login", {
              params: {
                userName: this.ruleForm.userName,
                password: this.ruleForm.password,
              },
            })
            .then((res) =>
            {
              console.log(res);
              if (res.data.state == 1) {
                // replace代替push,防止回退
                this.$router.replace({ path: "/second" });
                this.$message({
                  message: "登陆成功",
                  type: "success",
                });
              } else if (res.data.state !== 1) {
                //this.$router.push({path: '/login'})
                this.$message({
                  message: "账号或密码错误,请重新输入",
                  type: "error",
                });
              }
            });
        }
        else {
          this.$message.error("登录失败");
          return false;
        }
      });
    },
    resetForm(formName)
    {
      this.$refs[formName].resetFields();
    },
    registForm()
    {
      this.$router.push("/register");
    },
    randomNum(min, max)
    {
      return Math.floor(Math.random() * (max - min) + min);
    },
    refreshCode()
    {
      this.identifyCode = "";
      this.makeCode(this.identifyCodes, 4);
    },
    makeCode(o, l)
    {
      for (let i = 0; i < l; i++) {
        this.identifyCode +=
          this.identifyCodes[this.randomNum(0, this.identifyCodes.length)];
      }
      console.log(this.identifyCode);
    },
  },
  mounted()
  {
    this.identifyCode = "";
    this.makeCode(this.identifyCodes, 4);
  },
  beforeDestroy()
  {
    document.querySelector("body").removeAttribute("style");
  },
};
</script>

<style scoped>
#master {
  position: absolute;

  left: 50%;

  bottom: 0;

  text-align: center;
}

.footer {
  width: 300px;
  margin: 0 auto;
  padding: 20px 0;
  margin-left: -150px;
}

.footer a {
  display: inline-block;
  text-decoration: none;
  height: 20px;
  line-height: 20px;
}

.footer p {
  float: left;
  height: 20px;
  line-height: 20px;
  margin: 0px 0px 0px 5px;
  color: #939393;
}

#img {
  /* background: url('./img4.jpeg'); */
  /* background: url('./img41.jpg'); */

  width: 100%;
  height: 100%;
  position: fixed;
  background-size: 100% 100%;
}

.login-info>>>.el-col {
  background-color: #e5e8ec;
  padding: 2% 5% 0% 2%;
}

.ms-title {
  position: absolute;
  top: 50%;
  width: 100%;
  margin-top: -240px;
  text-align: center;
  font-size: 30px;
  color: #108bf0d4;
}

.login {
  margin-top: 100px;
}

.ms-login {
  position: absolute;
  left: 50%;
  top: 50%;
  width: 300px;
  height: 400px;
  margin: -280px 0 0 -190px;
  padding: 40px;
  border-radius: 22px;
  background: hsl(204, 20%, 95%);
  box-shadow: #78a1bb 0px 0px 15px;
  opacity: 0.7;
}

.code {
  width: 112px;
  height: 35px;
  border: 1px solid #ccc;
  float: right;
  border-radius: 2px;
}

.validate-code {
  width: 136px;
  float: left;
}

.register {
  font-size: 14px;
  line-height: 30px;
  color: #999;
  cursor: pointer;
  float: right;
}

.site {
  position: relative;
  display: flex;
  justify-content: space-around;
}

el-input {
  width: 100px;
}
</style>
2.验证码Identify组件:
<template>
  <div class="s-canvas">
    <canvas id="s-canvas" :width="contentWidth" :height="contentHeight"></canvas>
  </div>
</template>
<script>
  export default{
    name: 'SIdentify',
    props: {
      identifyCode: {
        type: String,
        default: '1234'
      },
      fontSizeMin: {
        type: Number,
        default: 16
      },
      fontSizeMax: {
        type: Number,
        default: 40
      },
      backgroundColorMin: {
        type: Number,
        default: 180
      },
      backgroundColorMax: {
        type: Number,
        default: 240
      },
      colorMin: {
        type: Number,
        default: 50
      },
      colorMax: {
        type: Number,
        default: 160
      },
      lineColorMin: {
        type: Number,
        default: 40
      },
      lineColorMax: {
        type: Number,
        default: 180
      },
      dotColorMin: {
        type: Number,
        default: 0
      },
      dotColorMax: {
        type: Number,
        default: 255
      },
      contentWidth: {
        type: Number,
        default: 112
      },
      contentHeight: {
        type: Number,
        default: 38
      }
    },
    methods: {
      // 生成一个随机数
      randomNum (min, max) {
        return Math.floor(Math.random() * (max - min) + min)
      },
      // 生成一个随机的颜色
      randomColor (min, max) {
        let r = this.randomNum(min, max)
        let g = this.randomNum(min, max)
        let b = this.randomNum(min, max)
        return 'rgb(' + r + ',' + g + ',' + b + ')'
      },
      drawPic () {
        let canvas = document.getElementById('s-canvas')
        let ctx = canvas.getContext('2d')
        ctx.textBaseline = 'bottom'
        // 绘制背景
        ctx.fillStyle = this.randomColor(this.backgroundColorMin, this.backgroundColorMax)
        ctx.fillRect(0, 0, this.contentWidth, this.contentHeight)
        // 绘制文字
        for (let i = 0; i < this.identifyCode.length; i++) {
          this.drawText(ctx, this.identifyCode[i], i)
        }
        this.drawLine(ctx)
        this.drawDot(ctx)
      },
      drawText (ctx, txt, i) {
        ctx.fillStyle = this.randomColor(this.colorMin, this.colorMax)
        ctx.font = this.randomNum(this.fontSizeMin, this.fontSizeMax) + 'px SimHei'
        let x = (i + 1) * (this.contentWidth / (this.identifyCode.length + 1))
        let y = this.randomNum(this.fontSizeMax, this.contentHeight - 5)
        var deg = this.randomNum(-45, 45)
        // 修改坐标原点和旋转角度
        ctx.translate(x, y)
        ctx.rotate(deg * Math.PI / 180)
        ctx.fillText(txt, 0, 0)
        // 恢复坐标原点和旋转角度
        ctx.rotate(-deg * Math.PI / 180)
        ctx.translate(-x, -y)
      },
      drawLine (ctx) {
        // 绘制干扰线
        for (let i = 0; i < 8; i++) {
          ctx.strokeStyle = this.randomColor(this.lineColorMin, this.lineColorMax)
          ctx.beginPath()
          ctx.moveTo(this.randomNum(0, this.contentWidth), this.randomNum(0, this.contentHeight))
          ctx.lineTo(this.randomNum(0, this.contentWidth), this.randomNum(0, this.contentHeight))
          ctx.stroke()
        }
      },
      drawDot (ctx) {
        // 绘制干扰点
        for (let i = 0; i < 100; i++) {
          ctx.fillStyle = this.randomColor(0, 255)
          ctx.beginPath()
          ctx.arc(this.randomNum(0, this.contentWidth), this.randomNum(0, this.contentHeight), 1, 0, 2 * Math.PI)
          ctx.fill()
        }
      }
    },
    watch: {
      identifyCode () {
        this.drawPic()
      }
    },
    mounted () {
      this.drawPic()
    }
  }
</script>
3.router的index.js中引入组件
import HelloWorld from '@/components/HelloWorld'
import Login from '@/components/Login'
4.修改路由跳转
mode:'history',
  routes: [
    {
      path: '/',
      name: 'Login',
      component: Login
    },
    {
      path:'/second',
      name:'HelloWorld',
      component:HelloWorld
    }
  ]
5.创建后端服务
1.项目根目录下创建server文件夹
2.server下创建api文件夹,创建userApi.js文件:
// express框架编写各类接口。
// 包括登录注册、用户查询、历史数据查询、删除户、修改密码等

const express = require('express');
const router = express.Router();
const DBHelper = require('../utils/DBHelper');


// 验证用户名和密码
router.get('/login', (req, res) => {
  // let params = req.body;
  // 定义查询的信息为前端请求带过来的参数。
  var userName = req.query.userName;
  var password = req.query.password;
  var sqlStr = "select * from user where userName='" + userName + "' and password='" + password + "'";
  var conn = new DBHelper().getConn();

  conn.query(sqlStr, (err, result) => {

    let state = {}
    if (result.length != 0) {
      state.state = 1;
      res.json(state);
      res.end()
    } else {
      state.state = 0;
      res.json(state);
      console.log(result)
    }
  });

});
module.exports = router;
3.server文件夹下创建utils文件夹,utils中创建数据库连接文件DBHelper.js:
// 数据库配置参数,连接阿里云服务器数据库,用户名密码等。
// 数据库连接助手
const mysql = require('mysql');

class DBHelper{
    // 获取数据库连接
    getConn(){
        let conn = mysql.createConnection({
            // 数据库连接配置
            // 新建数据库连接时的 主机名或ID地址 内容
            host: '',      //服务器名或ip
            user: '',
            database: '',      // 数据库名
            password: '',   // root 密码
            port: '',
            // 设置以字符换的形式展示。不会出现时区少8小时问题。
            dateStrings:true
        });
        conn.connect();
        return conn;
    }
}
module.exports = DBHelper;
4.server目录下创建index.js
// node后端服务器
const http = require('http');
const badyParser = require('body-parser');
const express = require('express');
const userApi = require('./api/userApi');
const DBHelper = require('./utils/DBHelper');

let conn = new DBHelper().getConn();

let app = express();
let server = http.createServer(app);

app.use(badyParser.json());
app.use(badyParser.urlencoded({
    extended: false
}));
// 后端api路由
app.use('/api/user', userApi);
server.listen(3000, () => {
    console.log(' success!! ')
})
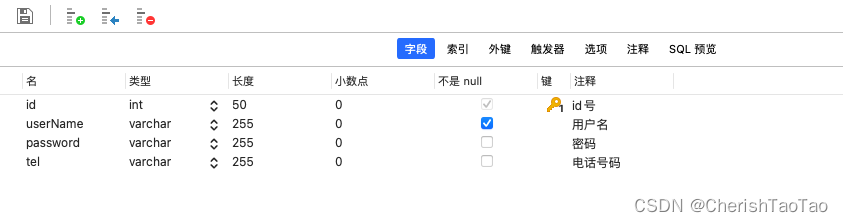
5.数据库结构:
五、解决跨域问题
1.找到项目的config文件夹下的index.js文件
2.配置dev中的proxyTable:
    proxyTable: {
      '/api': {
        target: 'http://127.0.0.1:3000/api/',
        changeOrigin: true,
        pathRewrite: {//路径重写
          '^/api': ''
        }
      }
    }
六、验证登录
1.运行项目
npm run dev
2.验证登录
浏览器访问:

3.登陆跳转成功

总结
1.至此,vue中结合MySQL数据库的验证登录跳转的功能成功实现。
2.不足之处多多指正。


 8970
8970


 到【灌水乐园】发言


