


目录
使用create-vue搭建
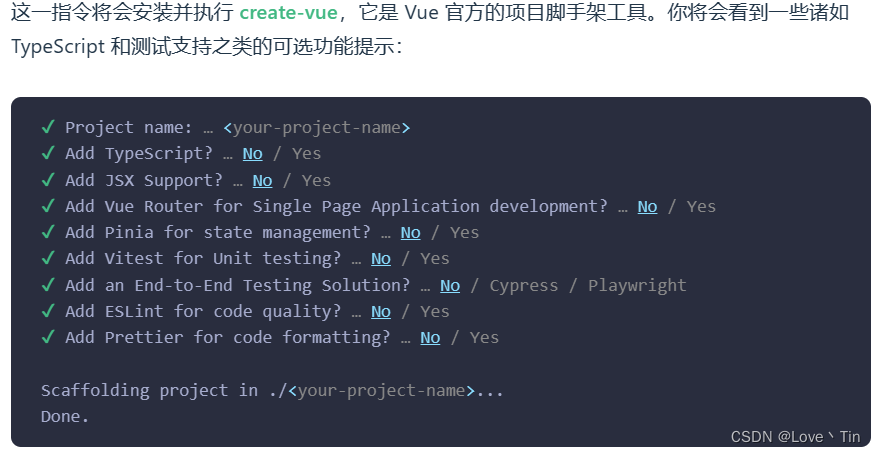
create-vue是Vue官方新的脚手架工具,底层切换到了 vite(下一代前端工具链),为开发提供极速响应
1、使用create-vue创建项目
2、项目目录和关键文件
- vite.config.js - 项目的配置文件 基于vite的配置
- package.json - 项目包文件 核心依赖项变成了 Vue3.x 和 vite
- main.js - 入口文件 createApp函数创建应用实例
- index.html - 单页入口 提供id为app的挂载点
- app.vue - 根组件 SFC单文件组件 script - template - style
- 变化一:脚本script和模板template顺序调整
- 变化二:模板template不再要求唯一根元素
- 变化三:脚本script添加setup标识支持组合式API
3、关于底层构建工具
vite 的基本使用
1. 创建 vite 创建 vue 3的项目
npm init vue@latest
npm init vue@latest 是使用 Vite 构建工具创建 Vue 项目的命令 ,不需要开发者自行添加和配置其他功能和组件,只需要按步骤选择。
按照顺序执行如下的命令,即可基于 vite 创建 vue 3.x 的工程化项目:
npm init vite-app 项目名称
npm init vite-app 是用来创建一个新的 Vite.js 项目的,它会在当前目录下创建一个新的项目目录,并自动安装 Vite.js 相关的依赖。这个命令是基于 Vite.js 的,执行后会生成一个最基础的项目结构和配置文件,需要开发者自行添加和配置其他功能和组件。
Vue CLI 5 开始,默认情况下使用 Vite 作为底层构建工具,但是你仍然可以选择使用 webpack
使用 webpack 创建vue3项目
npm create vue@latest 这命令创建的 Vue.js 项目默认使用 webpack 作为构建工具
按步骤创建就好
npm create vue@latest 和 npm init vite-app 的作用和用法不同,它们适用于不同的场景。如果你想要创建一个完整的 Vue.js 项目,可以使用 npm create vue@latest 命令;如果你想要创建一个基于 Vite.js 的项目,可以使用 npm init vite-app 命令。
2. 梳理项目的结构
- node_modules 目录用来存放第三方依赖包
- public 是公共的静态资源目录
- src 是项目的源代码目录(程序员写的所有代码都要放在此目录下)
- .gitignore 是 Git 的忽略文件
- index.html 是 SPA 单页面应用程序中唯一的 HTML 页面
- package.json 是项目的包管理配置文件
- assets 目录用来存放项目中所有的静态资源文件(css、fonts等)
- components 目录用来存放项目中所有的自定义组件
- App.vue 是项目的根组件
- index.css 是项目的全局样式表文件
- main.js 是整个项目的打包入口文件
组合式API
1、组合式API - setup选项
<script setup> 语法糖
2、组合式API - reactive和ref函数
<script setup>
//导入
import { reactive } from 'vue'
//执行函数 传入参数 变量接收
const state = reactive(对象类型数据)
</script><script setup>
//导入
import { reactive } from 'vue'
//执行函数 传入参数 变量接收
const state = reactive(简单类型或复杂类型数据)
</script>3、组合式API - computed
计算属性基本思想和Vue2的完全一致,组合式API下的计算属性只是修改了写法
<script setup>
//导入
import { computed } from 'vue'

const computedstate = computed(()=> {
 return基于响应式数据做计算的值
})
</script>
4、组合式API - watch
1、基础使用 - 侦听单个数据
<script setup>
//导入
import { ref watch } from 'vue'
const count  = ref(0)

watch(count,(newValue,oldValue) => {
console.log('count发生了变化')
})
</script>
2、基础使用 - 侦听多个数据
<script setup>
//导入
import { ref watch } from 'vue'
const count  = ref(0)
const name = ref('zs')

watch(
[count,name]
([newValue,newName],[oldValue,oldName]) => {
console.log('count或者name发生了变化')
})
</script>3、immediate(立即执行)
<script setup>
//导入
import { ref watch } from 'vue'
const count  = ref(0)

watch(count,(newValue,oldValue) => {
console.log('count发生了变化')
},{
immediate: true
})
</script>4、deep(深度侦听)
<script setup>
//导入
import { ref watch } from 'vue'
const state  = ref({count: 0})

const changCount = () => {
 state.value.count++
}

watch(count,() =>{
console.log('count变化了')
},{
deep: true
})
</script>
5、精确侦听对象的某个属性
把第一个参数写成函数的写法,返回要监听的具体属性
const info = ref({
name: 'zs',
age: 18
})
const changeAge = () =>{
 info.value.age = 20
}
watch(
() => info.value.age,
() => {
consle.log('age发生了变化')
)
总结:
5、组合式API - 生命周期函数
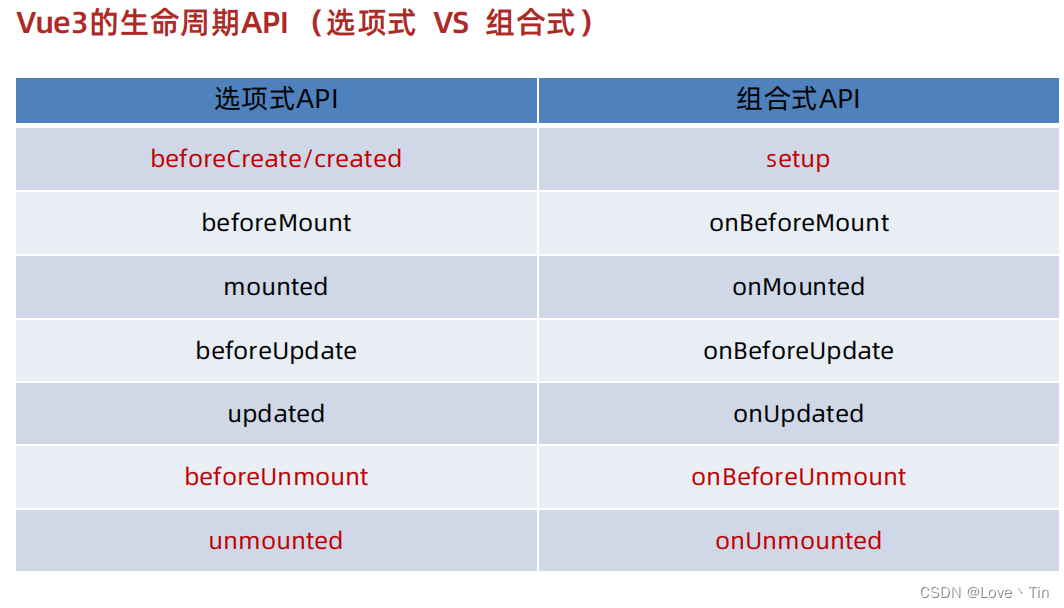
生命周期函数基本使用
<script setup>
import { onMounted } from 'vue'
onMounted(() => {
//自定义逻辑
})
</script><script setup>
import { onMounted } from 'vue'
onMounted(() => {
console.log('1')
})
onMounted(() => {
console.log('2')
})
</script>总结:
6、组合式API - 父子通信
组合式API下的父传子
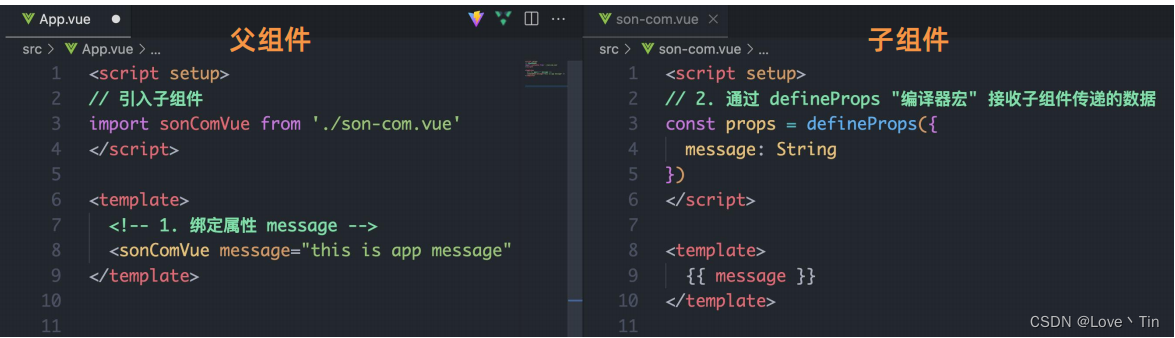
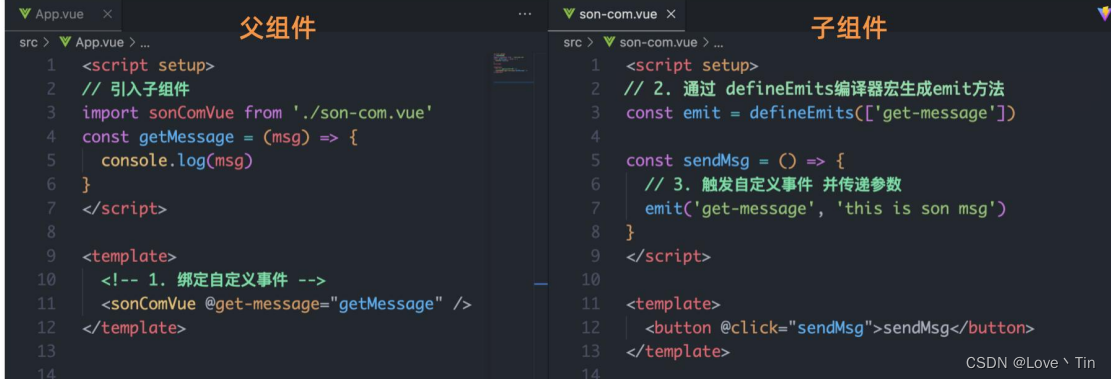
总结:
7、组合式API - 模版引用
<script setup>
import{ref}from"vue3
// 1.调用ref函数得到ref对象
 const h1Ref = ref(null)
</ script>

<template>
<!-- 2.通过ref标识绑定ref对象-->
<h1 ref= "h1Ref">我是dom标签h1</h1>
</template>

总结:
8、组合式API - provide和inject
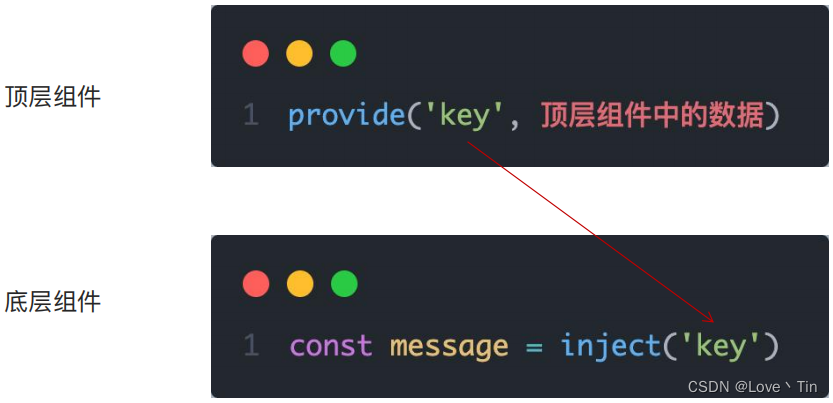
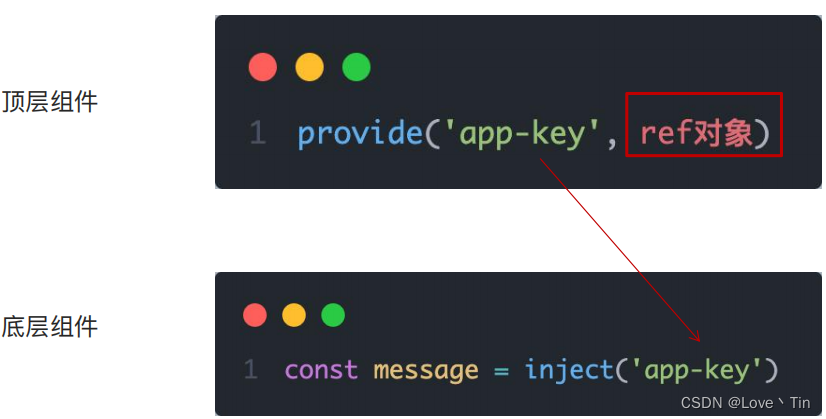
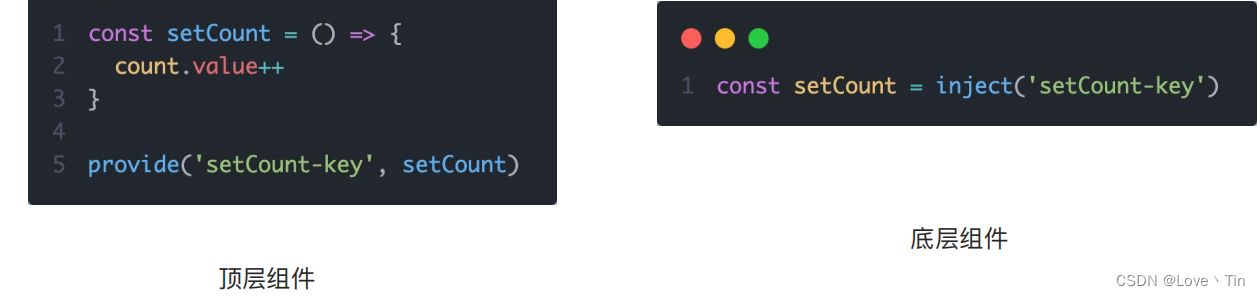
总结:
Pinia快速入门
1、什么是Pinia
2、添加Pinia到Vue项目
import { createApp } from 'vue'
import { createPinia } from 'pinia'
import App from './App.vue'

const pinia = createPinia()
const app = createApp(App)

app.use(pinia)
app.mount('#app')import { defineStore } from 'pinia'
export const useCounterStore = defineStore('counter', () => {
const count = ref(0)
function increment() {
count.value++
}
return { count, increment }
})<script setup>
import { useCounterStore } from '@/stores/counter'
const counter = useCounterStore()
</script>
<template>
<!-- 直接从 store 中访问 state -->
<div>
Current Count: {{ counter.count }}
</div>
</template>3、getters实现
export const useCounterStore = defineStore('counter', () => {
  const count = ref(0)
  function increment() {
    count.value++
  }
//定义getters
 const getCount = computed(()=> count.value * 2)

  return { count, increment ,getCount}
})
4、action如何实现异步
1- store中定义action
const API_URL = 'http://geek.itheima.net/v1_0/channels'

export const useCounterStore = defineStore('counter', ()=>{
  // 数据
  const list = ref([])
  // 异步action
  const loadList = async ()=>{
    const res = await axios.get(API_URL)
    list.value = res.data.data.channels
  }

  return {
    list,
    loadList
  }
})
2- 组件中调用action
<script setup>
    import { useCounterStore } from '@/stores/counter'
  const counterStore = useCounterStore()
  // 调用异步action
  counterStore.loadList()
</script>

<template>
    <ul>
    <li v-for="item in counterStore.list" :key="item.id">{{ item.name }}</li>
  </ul>
</template>import { storeToRefs } from 'pinia'
const counterStore = useCounterStore()
// 使用它storeToRefs包裹之后解构保持响应式
const { count } = storeToRefs(counterStore)Vue官方的 dev-tools 调试工具 对 Pinia直接支持,可以直接进行调试
总结:


 被折叠的 条评论
为什么被折叠?
被折叠的 条评论
为什么被折叠?
 到【灌水乐园】发言


