


提示:文章写完后,目录可以自动生成,如何生成可参考右边的帮助文档
目录
提示:以下是本篇文章正文内容,下面案例可供参考
一、概述
1.1 为什么要用自动化运维软件
因为服务器特别多的情况下,我们需要比shell更高效的管理工具
1.2 自动化运维
将日常IT运维中大量的重复性工作,小到简单的日常检查、配置变更和软件安装,大到整个变更流程的组织调度,由过去的手工执行转为自动化操作,从而减少乃至消除运维中的延迟,实现“零延时”的IT运维。
1.3 自动化运维要注意的方面
(1)管理机与被管理机之间的连接方式
(2)服务器分组(主机清单)
(3)自动化运维的管理分类
文件目录管理
用户与组管理
软件安装与卸载
服务启停与开机自启动
1.4 自动化运维主要关注的方面
假如管理很多台服务器,主要关注以下几个方面:
1. 管理机与被管理机的连接(管理机如何将管理指令发送给被管理机)
2. 服务器信息收集 (如果被管理的服务器有centos7.5外还有其它linux发行版,如suse,ubuntu等。当你要做的事情在不同OS上有所不同,你需要收集信息,并将其分开处理)
3. 服务器分组(因为有些时候我要做的事情不是针对所有服务器,可能只针对某一个分组)
4. 管理内容的主要分类
文件目录管理(包括文件的创建,删除,修改,查看状态,远程拷贝等)
用户和组管理
cron时间任务管理
yum源配置与通过yum管理软件包
服务管理
远程执行脚本
远程执行命令
1.5 常见的开源自动化运维软件
puppet
基于ruby开发
saltstack
安装方便,需要维护管理机与被管理机的连接,走的zeromq协议。
优点: 管理机器多,速度快, 效率高
基于python开发
ansible
安装与连接方便,直接走ssh协议。
缺点: 管理机器特别多,效率较低
基于python开发
1.6 自动化运维软件一般安装在哪
一般安装在跳板机(堡垒机)整合使用
ansible主机清单
目的: 对管理的多台服务器进行分组
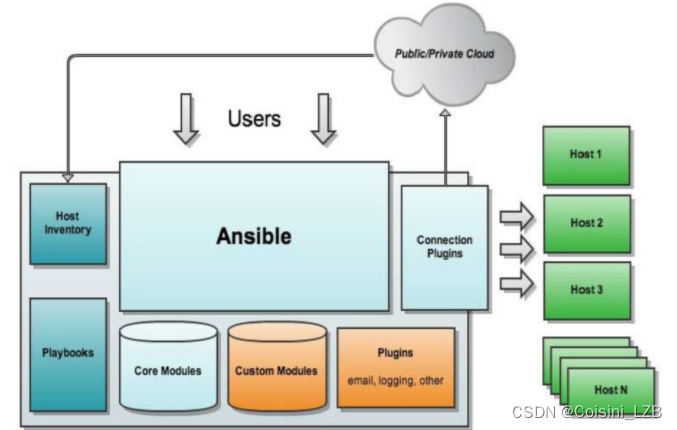
二、ansible
2.1 概念
ansible是一种由Python开发的自动化运维工具,集合了众多运维工具(puppet、cfengine、chef、func、fabric)的优点,实现了批量系统配置、批量程序部署、批量运行命令等功能。

2.2 特点
部署简单
默认使用ssh进行管理,基于python里的==paramiko==模块开发**
管理端和被管理端不需要启动服务
配置简单,功能强大,扩展性强
能过playbook(剧本)进行多个任务的编排
2.3 环境搭建
实验准备:三台机器,一台管理,两台被管理

1. 静态ip
管理:192.168.156.11
被管理的两台:192.168.156.12 192.168.156.13
2. 主机名及主机名互相绑定
所有主机都要配置主机名和 hosts文件
[root@localhost]# hostnamectl set-hostname hd1
[root@localhost]# bash
[root@hd1 ~]# cat /etc/hosts
127.0.0.1   localhost localhost.localdomain localhost4 localhost4.localdomain4
::1         localhost localhost.localdomain localhost6 localhost6.localdomain6
192.168.156.11 hd1
192.168.156.12 hd2
192.168.156.13 hd3
nd1:
 nd2:
nd2:
 nd3:
nd3:

3. 关闭防火墙, selinux
时间同步
[root@hd1 ~]# systemctl restart ntpd
[root@hd1 ~]# systemctl enable ntpd
4. 确认和配置yum源(需要epel源)
yum -y install epel-release
[root@localhost ~]# yum install -y epel-release
已加载插件:fastestmirror, langpacks
Loading mirror speeds from cached hostfile
 * base: mirrors.aliyun.com
 * extras: mirrors.bfsu.edu.cn
 * updates: mirrors.bfsu.edu.cn
base                                                                                              | 3.6 kB  00:00:00
extras                                                                                            | 2.9 kB  00:00:00
updates                                                                                           | 2.9 kB  00:00:00
(1/4): extras/7/x86_64/primary_db                                                                 | 250 kB  00:00:00
(2/4): base/7/x86_64/group_gz                                                                     | 153 kB  00:00:00
(3/4): base/7/x86_64/primary_db                                                                   | 6.1 MB  00:00:05
(4/4): updates/7/x86_64/primary_db                                                                |  22 MB  00:00:06
正在解决依赖关系
--> 正在检查事务
---> 软件包 epel-release.noarch.0.7-11 将被 安装
--> 解决依赖关系完成

依赖关系解决

=========================================================================================================================
 Package                          架构                       版本                       源                          大小
=========================================================================================================================
正在安装:
 epel-release                     noarch                     7-11                       extras                      15 k

事务概要
=========================================================================================================================
安装  1 软件包

总下载量:15 k
安装大小:24 k
Downloading packages:
警告:/var/cache/yum/x86_64/7/extras/packages/epel-release-7-11.noarch.rpm: 头V3 RSA/SHA256 Signature, 密钥 ID f4a80eb5: NOKEY
epel-release-7-11.noarch.rpm 的公钥尚未安装
epel-release-7-11.noarch.rpm                                                                      |  15 kB  00:00:00
从 file:///etc/pki/rpm-gpg/RPM-GPG-KEY-CentOS-7 检索密钥
导入 GPG key 0xF4A80EB5:
 用户ID     : "CentOS-7 Key (CentOS 7 Official Signing Key) <security@centos.org>"
 指纹       : 6341 ab27 53d7 8a78 a7c2 7bb1 24c6 a8a7 f4a8 0eb5
 软件包     : centos-release-7-9.2009.0.el7.centos.x86_64 (@anaconda)
 来自       : /etc/pki/rpm-gpg/RPM-GPG-KEY-CentOS-7
Running transaction check
Running transaction test
Transaction test succeeded
Running transaction
  正在安装    : epel-release-7-11.noarch                                                                             1/1
  验证中      : epel-release-7-11.noarch                                                                             1/1

已安装:
  epel-release.noarch 0:7-11

完毕!
2.4 实验过程
第1步: 管理机上安装ansible,被管理节点必须打开ssh服务
[root@localhost ~]# yum -y install ansible
已加载插件:fastestmirror, langpacks
Loading mirror speeds from cached hostfile
 * base: mirrors.ustc.edu.cn
 * epel: mirrors.bfsu.edu.cn
 * extras: mirrors.huaweicloud.com
 * updates: mirrors.huaweicloud.com
正在解决依赖关系
--> 正在检查事务
---> 软件包 ansible.noarch.0.2.9.27-1.el7 将被 安装
--> 正在处理依赖关系 python-httplib2,它被软件包 ansible-2.9.27-1.el7.noarch 需要
--> 正在处理依赖关系 python-jinja2,它被软件包 ansible-2.9.27-1.el7.noarch 需要
--> 正在处理依赖关系 python-paramiko,它被软件包 ansible-2.9.27-1.el7.noarch 需要
--> 正在处理依赖关系 python2-cryptography,它被软件包 ansible-2.9.27-1.el7.noarch 需要
--> 正在处理依赖关系 python2-jmespath,它被软件包 ansible-2.9.27-1.el7.noarch 需要
--> 正在处理依赖关系 sshpass,它被软件包 ansible-2.9.27-1.el7.noarch 需要
--> 正在检查事务
---> 软件包 python-jinja2.noarch.0.2.7.2-4.el7 将被 安装
--> 正在处理依赖关系 python-babel >= 0.8,它被软件包 python-jinja2-2.7.2-4.el7.noarch 需要
--> 正在处理依赖关系 python-markupsafe,它被软件包 python-jinja2-2.7.2-4.el7.noarch 需要
---> 软件包 python-paramiko.noarch.0.2.1.1-9.el7 将被 安装
--> 正在处理依赖关系 python2-pyasn1,它被软件包 python-paramiko-2.1.1-9.el7.noarch 需要
---> 软件包 python2-cryptography.x86_64.0.1.7.2-2.el7 将被 安装
--> 正在处理依赖关系 python-idna >= 2.0,它被软件包 python2-cryptography-1.7.2-2.el7.x86_64 需要
--> 正在处理依赖关系 python-cffi >= 1.4.1,它被软件包 python2-cryptography-1.7.2-2.el7.x86_64 需要
--> 正在处理依赖关系 python-enum34,它被软件包 python2-cryptography-1.7.2-2.el7.x86_64 需要
---> 软件包 python2-httplib2.noarch.0.0.18.1-3.el7 将被 安装
---> 软件包 python2-jmespath.noarch.0.0.9.4-2.el7 将被 安装
---> 软件包 sshpass.x86_64.0.1.06-2.el7 将被 安装
--> 正在检查事务
---> 软件包 python-babel.noarch.0.0.9.6-8.el7 将被 安装
---> 软件包 python-cffi.x86_64.0.1.6.0-5.el7 将被 安装
--> 正在处理依赖关系 python-pycparser,它被软件包 python-cffi-1.6.0-5.el7.x86_64 需要
---> 软件包 python-enum34.noarch.0.1.0.4-1.el7 将被 安装
---> 软件包 python-idna.noarch.0.2.4-1.el7 将被 安装
---> 软件包 python-markupsafe.x86_64.0.0.11-10.el7 将被 安装
---> 软件包 python2-pyasn1.noarch.0.0.1.9-7.el7 将被 安装
--> 正在检查事务
---> 软件包 python-pycparser.noarch.0.2.14-1.el7 将被 安装
--> 正在处理依赖关系 python-ply,它被软件包 python-pycparser-2.14-1.el7.noarch 需要
--> 正在检查事务
---> 软件包 python-ply.noarch.0.3.4-11.el7 将被 安装
--> 解决依赖关系完成

依赖关系解决

=========================================================================================================================
 Package                              架构                   版本                           源                      大小
=========================================================================================================================
正在安装:
 ansible                              noarch                 2.9.27-1.el7                   epel                    17 M
为依赖而安装:
 python-babel                         noarch                 0.9.6-8.el7                    base                   1.4 M
 python-cffi                          x86_64                 1.6.0-5.el7                    base                   218 k
 python-enum34                        noarch                 1.0.4-1.el7                    base                    52 k
 python-idna                          noarch                 2.4-1.el7                      base                    94 k
 python-jinja2                        noarch                 2.7.2-4.el7                    base                   519 k
 python-markupsafe                    x86_64                 0.11-10.el7                    base                    25 k
 python-paramiko                      noarch                 2.1.1-9.el7                    base                   269 k
 python-ply                           noarch                 3.4-11.el7                     base                   123 k
 python-pycparser                     noarch                 2.14-1.el7                     base                   104 k
 python2-cryptography                 x86_64                 1.7.2-2.el7                    base                   502 k
 python2-httplib2                     noarch                 0.18.1-3.el7                   epel                   125 k
 python2-jmespath                     noarch                 0.9.4-2.el7                    epel                    41 k
 python2-pyasn1                       noarch                 0.1.9-7.el7                    base                   100 k
 sshpass                              x86_64                 1.06-2.el7                     extras                  21 k

事务概要
=========================================================================================================================
安装  1 软件包 (+14 依赖软件包)

总下载量:21 M
安装大小:119 M
Downloading packages:
(1/15): python-enum34-1.0.4-1.el7.noarch.rpm                                                      |  52 kB  00:00:00
(2/15): python-cffi-1.6.0-5.el7.x86_64.rpm                                                        | 218 kB  00:00:01
(3/15): python-markupsafe-0.11-10.el7.x86_64.rpm                                                  |  25 kB  00:00:00
(4/15): python-babel-0.9.6-8.el7.noarch.rpm                                                       | 1.4 MB  00:00:02
(5/15): python-ply-3.4-11.el7.noarch.rpm                                                          | 123 kB  00:00:00
(6/15): python-pycparser-2.14-1.el7.noarch.rpm                                                    | 104 kB  00:00:00
(7/15): python-jinja2-2.7.2-4.el7.noarch.rpm                                                      | 519 kB  00:00:01
(8/15): python-paramiko-2.1.1-9.el7.noarch.rpm                                                    | 269 kB  00:00:00
(9/15): python2-cryptography-1.7.2-2.el7.x86_64.rpm                                               | 502 kB  00:00:00
(10/15): ansible-2.9.27-1.el7.noarch.rpm                                                          |  17 MB  00:00:05
(11/15): python2-httplib2-0.18.1-3.el7.noarch.rpm                                                 | 125 kB  00:00:00
(12/15): python2-jmespath-0.9.4-2.el7.noarch.rpm                                                  |  41 kB  00:00:00
(13/15): python2-pyasn1-0.1.9-7.el7.noarch.rpm                                                    | 100 kB  00:00:00
(14/15): sshpass-1.06-2.el7.x86_64.rpm                                                            |  21 kB  00:00:00
(15/15): python-idna-2.4-1.el7.noarch.rpm                                                         |  94 kB  00:00:08
-------------------------------------------------------------------------------------------------------------------------
总计                                                                                     2.4 MB/s |  21 MB  00:00:08
Running transaction check
Running transaction test
Transaction test succeeded
Running transaction
  正在安装    : python2-pyasn1-0.1.9-7.el7.noarch                                                                   1/15
  正在安装    : python-enum34-1.0.4-1.el7.noarch                                                                    2/15
  正在安装    : sshpass-1.06-2.el7.x86_64                                                                           3/15
  正在安装    : python2-httplib2-0.18.1-3.el7.noarch                                                                4/15
  正在安装    : python-babel-0.9.6-8.el7.noarch                                                                     5/15
  正在安装    : python2-jmespath-0.9.4-2.el7.noarch                                                                 6/15
  正在安装    : python-ply-3.4-11.el7.noarch                                                                        7/15
  正在安装    : python-pycparser-2.14-1.el7.noarch                                                                  8/15
  正在安装    : python-cffi-1.6.0-5.el7.x86_64                                                                      9/15
  正在安装    : python-markupsafe-0.11-10.el7.x86_64                                                               10/15
  正在安装    : python-jinja2-2.7.2-4.el7.noarch                                                                   11/15
  正在安装    : python-idna-2.4-1.el7.noarch                                                                       12/15
  正在安装    : python2-cryptography-1.7.2-2.el7.x86_64                                                            13/15
  正在安装    : python-paramiko-2.1.1-9.el7.noarch                                                                 14/15
  正在安装    : ansible-2.9.27-1.el7.noarch                                                                        15/15
  验证中      : python-idna-2.4-1.el7.noarch                                                                        1/15
  验证中      : python-markupsafe-0.11-10.el7.x86_64                                                                2/15
  验证中      : python-ply-3.4-11.el7.noarch                                                                        3/15
  验证中      : ansible-2.9.27-1.el7.noarch                                                                         4/15
  验证中      : python-paramiko-2.1.1-9.el7.noarch                                                                  5/15
  验证中      : python2-jmespath-0.9.4-2.el7.noarch                                                                 6/15
  验证中      : python-babel-0.9.6-8.el7.noarch                                                                     7/15
  验证中      : python2-httplib2-0.18.1-3.el7.noarch                                                                8/15
  验证中      : python-cffi-1.6.0-5.el7.x86_64                                                                      9/15
  验证中      : sshpass-1.06-2.el7.x86_64                                                                          10/15
  验证中      : python-jinja2-2.7.2-4.el7.noarch                                                                   11/15
  验证中      : python2-pyasn1-0.1.9-7.el7.noarch                                                                  12/15
  验证中      : python-enum34-1.0.4-1.el7.noarch                                                                   13/15
  验证中      : python-pycparser-2.14-1.el7.noarch                                                                 14/15
  验证中      : python2-cryptography-1.7.2-2.el7.x86_64                                                            15/15

已安装:
  ansible.noarch 0:2.9.27-1.el7

作为依赖被安装:
  python-babel.noarch 0:0.9.6-8.el7                         python-cffi.x86_64 0:1.6.0-5.el7
  python-enum34.noarch 0:1.0.4-1.el7                        python-idna.noarch 0:2.4-1.el7
  python-jinja2.noarch 0:2.7.2-4.el7                        python-markupsafe.x86_64 0:0.11-10.el7
  python-paramiko.noarch 0:2.1.1-9.el7                      python-ply.noarch 0:3.4-11.el7
  python-pycparser.noarch 0:2.14-1.el7                      python2-cryptography.x86_64 0:1.7.2-2.el7
  python2-httplib2.noarch 0:0.18.1-3.el7                    python2-jmespath.noarch 0:0.9.4-2.el7
  python2-pyasn1.noarch 0:0.1.9-7.el7                       sshpass.x86_64 0:1.06-2.el7

完毕!
ansible模块
[root@hd1 ~]# ansible --version
ansible 2.9.27
  config file = /etc/ansible/ansible.cfg
  configured module search path = [u'/root/.ansible/plugins/modules', u'/usr/share/ansible/plugins/modules']
  ansible python module location = /usr/lib/python2.7/site-packages/ansible
  executable location = /usr/bin/ansible
  python version = 2.7.5 (default, Oct 14 2020, 14:45:30) [GCC 4.8.5 20150623 (Red Hat 4.8.5-44)]
第2步: 实现master对agent的免密登录,只在master上做。(如果这一步不做,则在后面操作agent时都要加-k参数传密码;或者在主机清单里传密码)
[root@hd1 ~]# ssh-keygen
Generating public/private rsa key pair.
Enter file in which to save the key (/root/.ssh/id_rsa):
Created directory '/root/.ssh'.
Enter passphrase (empty for no passphrase):
Enter same passphrase again:
Your identification has been saved in /root/.ssh/id_rsa.
Your public key has been saved in /root/.ssh/id_rsa.pub.
The key fingerprint is:
SHA256:IGqDvSfCcyMWgl76x8/bNZP1CuzUMQm6bVpdxSfqE2Y root@hd1
The key's randomart image is:
+---[RSA 2048]----+
|                 |
|               . |
|    . .    .  . +|
|.o . . .  . ....o|
|+.=.    S.  E= . |
|+.+o      ++=.=  |
|.Booo    . %oo . |
|..=o.o. . B +..  |
|   .. .+.o . .   |
+----[SHA256]-----+
[root@hd1 ~]# ssh-copy-id -i 192.168.156.12
/usr/bin/ssh-copy-id: INFO: Source of key(s) to be installed: "/root/.ssh/id_rsa.pub"
The authenticity of host '192.168.156.12 (192.168.156.12)' can't be established.
ECDSA key fingerprint is SHA256:UYOTDfnPCXDYRisvqKkyxQEEiuZnt6vtyjxyIwTT10M.
ECDSA key fingerprint is MD5:43:59:03:5c:67:80:66:f1:84:6e:ab:9d:d9:1a:b4:90.
Are you sure you want to continue connecting (yes/no)? yes
/usr/bin/ssh-copy-id: INFO: attempting to log in with the new key(s), to filter out any that are already installed
/usr/bin/ssh-copy-id: INFO: 1 key(s) remain to be installed -- if you are prompted now it is to install the new keys
root@192.168.156.12's password:

Number of key(s) added: 1

Now try logging into the machine, with:   "ssh '192.168.156.12'"
and check to make sure that only the key(s) you wanted were added.

[root@hd1 ~]# ssh-copy-id -i 192.168.156.13
/usr/bin/ssh-copy-id: INFO: Source of key(s) to be installed: "/root/.ssh/id_rsa.pub"
The authenticity of host '192.168.156.13 (192.168.156.13)' can't be established.
ECDSA key fingerprint is SHA256:UYOTDfnPCXDYRisvqKkyxQEEiuZnt6vtyjxyIwTT10M.
ECDSA key fingerprint is MD5:43:59:03:5c:67:80:66:f1:84:6e:ab:9d:d9:1a:b4:90.
Are you sure you want to continue connecting (yes/no)? yes

/usr/bin/ssh-copy-id: INFO: attempting to log in with the new key(s), to filter out any that are already installed
/usr/bin/ssh-copy-id: INFO: 1 key(s) remain to be installed -- if you are prompted now it is to install the new keys
root@192.168.156.13's password:

Number of key(s) added: 1

Now try logging into the machine, with:   "ssh '192.168.156.13'"
and check to make sure that only the key(s) you wanted were added.
第3步: 在master上定义主机组,并测试连接性
![]()

[root@hd1 ~]# ansible -m ping group1
192.168.156.12 | SUCCESS => {
    "ansible_facts": {
        "discovered_interpreter_python": "/usr/bin/python"
    },
    "changed": false,
    "ping": "pong"
}
192.168.156.13 | SUCCESS => {
    "ansible_facts": {
        "discovered_interpreter_python": "/usr/bin/python"
    },
    "changed": false,
    "ping": "pong"
}
[root@hd1 ~]# ansible -m ping all
192.168.156.13 | SUCCESS => {
    "ansible_facts": {
        "discovered_interpreter_python": "/usr/bin/python"
    },
    "changed": false,
    "ping": "pong"
}
192.168.156.12 | SUCCESS => {
    "ansible_facts": {
        "discovered_interpreter_python": "/usr/bin/python"
    },
    "changed": false,
    "ping": "pong"
}
服务器分组
ansible通过一个主机清单功能来实现服务器分组。
Ansible的默认主机清单配置文件为/etc/ansible/hosts.
示例:
[nginx]                 组名
apache[1:10].aaa.com    表示apache1.aaa.com到apache10.aaa.com这10台机器
nginx[a:z].aaa.com      表示nginxa.aaa.com到nginxz.aaa.com共26台机器
10.1.1.[11:15]          表示10.1.1.11到10.1.1.15这5台机器
示例:
[nginx]
10.1.1.13:2222          表示10.1.1.13这台,但ssh端口为2222
示例: 定义10.1.1.12:2222这台服务器的别名为nginx1
nginx1 ansible_ssh_host=10.1.1.13 ansible_ssh_port=2222
示例: 没有做免密登录的服务器可以指定用户名与密码
nginx1 ansible_ssh_host=10.1.1.13 ansible_ssh_port=2222 ansible_ssh_user=root ansible_ssh_pass="123456"
示例: 利用别名来分组
nginx1 ansible_ssh_host=10.1.1.13 ansible_ssh_port=2222 ansible_ssh_user=root ansible_ssh_pass="123456" nginx2 ansible_ssh_host=10.1.1.12 [nginx] nginx1 nginx2
三、模块
ansible模块
ansible是基于模块工作的,本身没有批量部署的能力。真正具有批量部署的是ansible所运行的模块,ansible只是提供一种框架。
ansible支持的模块非常的多,我们并不需要把每个模块都记住,而只需要熟悉一些常见的模块,其它的模块在需要用到时再查询即可。
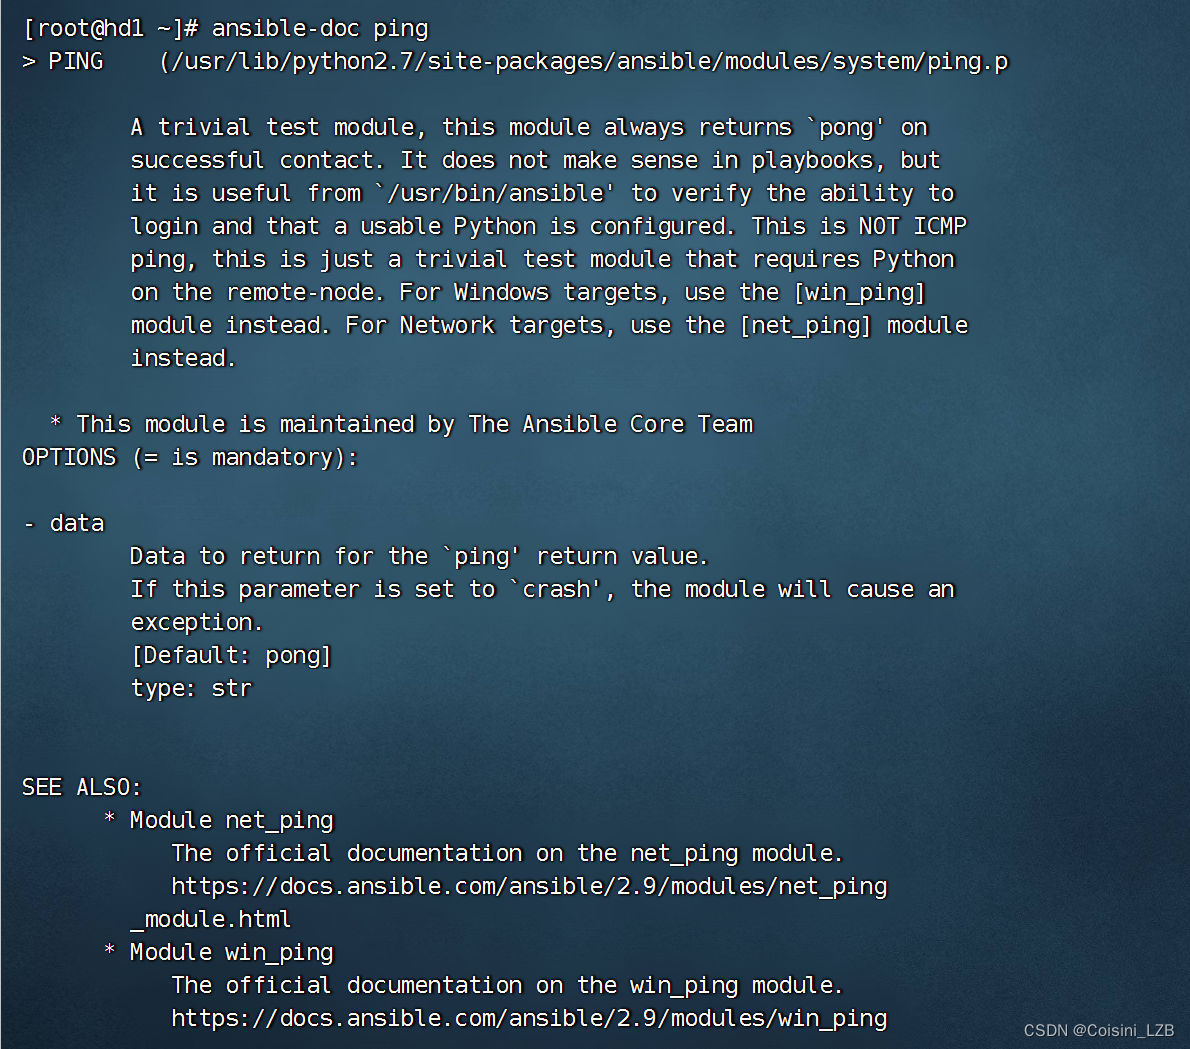
查看所有支持的模块
[root@hd1~]# ansible-doc -l
a10_server                                           Manage A10 Networks AX/SoftAX...
a10_server_axapi3                                    Manage A10 Networks AX/SoftAX...
a10_service_group                                    Manage A10 Networks AX/SoftAX...
a10_virtual_server                                   Manage A10 Networks AX/SoftAX...
aci_aaa_user                                         Manage AAA users (aaa:User)
.......
如果要查看ping模块的用法,使用下面命令(其它模块以此类推)
# ansible-doc ping
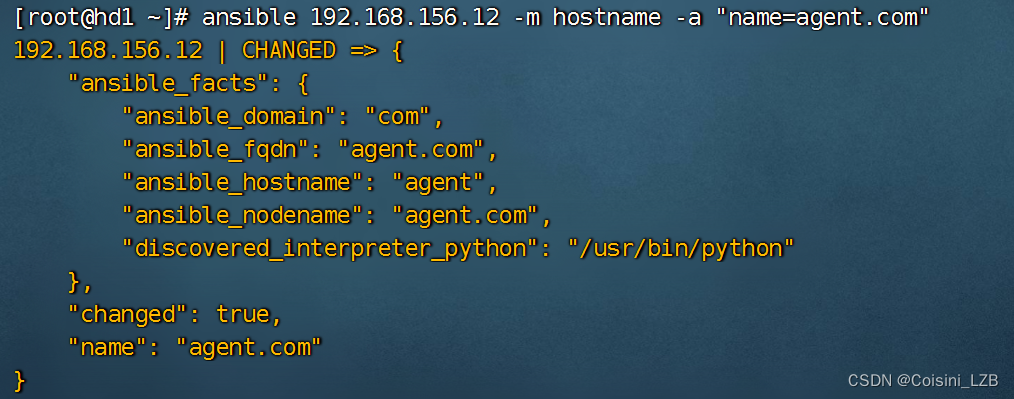
hostname模块
hostname模块用于修改主机名(注意: 它不能修改/etc/hosts文件)
将其中一远程机器主机名修改为agent1.com
ansible 10.1.1.12 -m hostname -a 'name=agent.com'
file模块(重点)
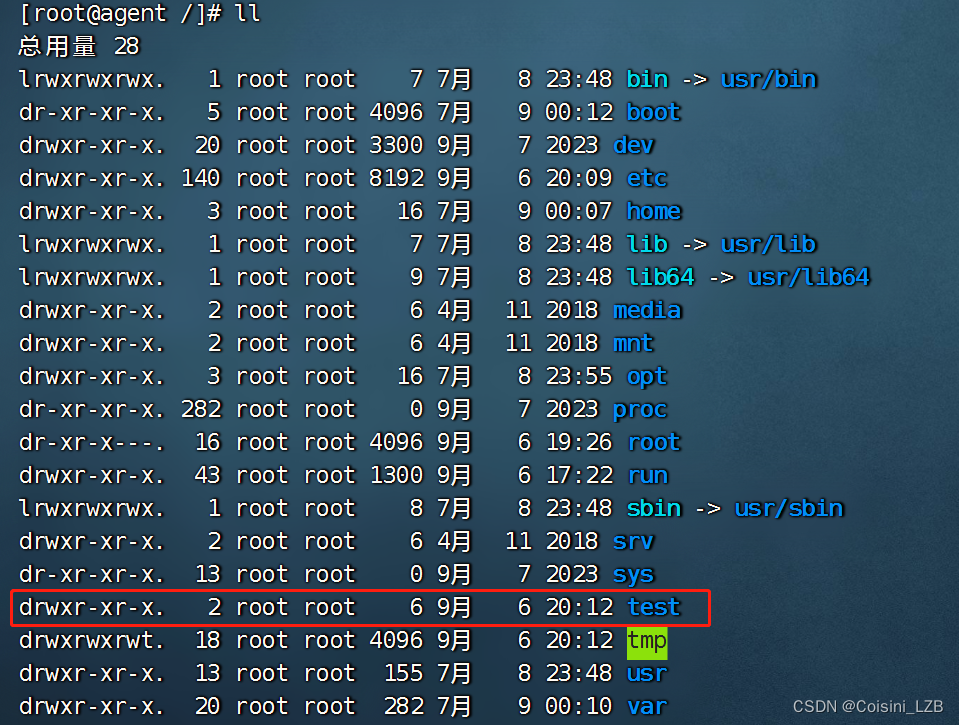
file模块用于对文件相关的操作(创建, 删除, 软硬链接等)
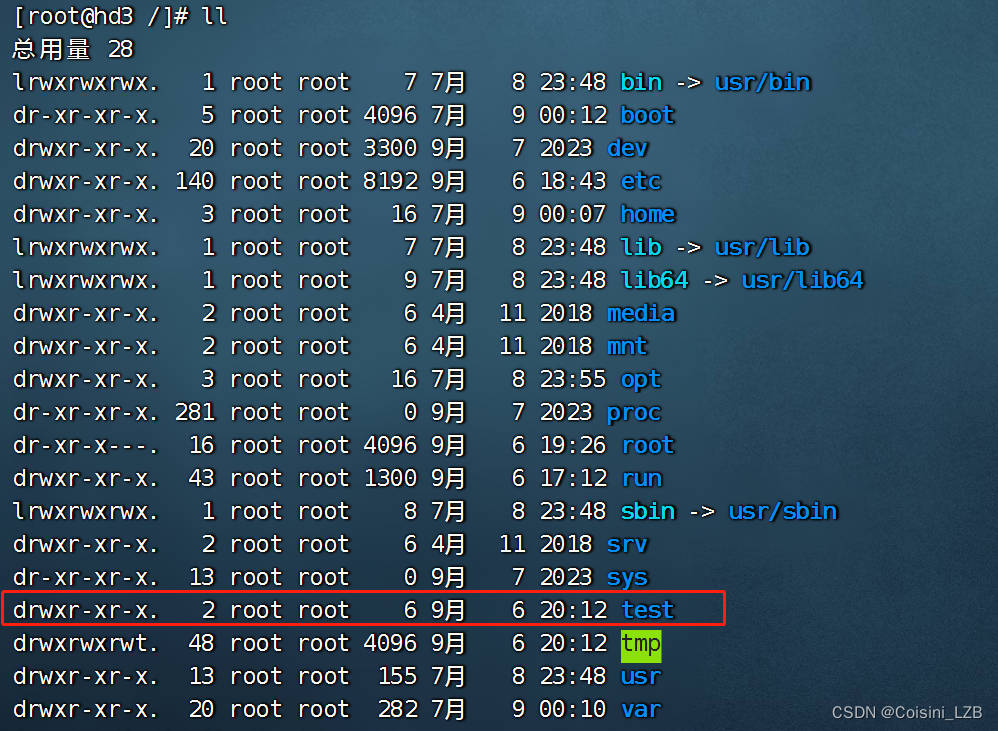
创建一个目录 : ansible group1 -m file -a 'path=/test state=directory'
[root@hd1 ~]# ansible group1 -m file -a "path=/test state=directory"
192.168.156.12 | CHANGED => {
    "ansible_facts": {
        "discovered_interpreter_python": "/usr/bin/python"
    },
    "changed": true,
    "gid": 0,
    "group": "root",
    "mode": "0755",
    "owner": "root",
    "path": "/test",
    "secontext": "unconfined_u:object_r:default_t:s0",
    "size": 6,
    "state": "directory",
    "uid": 0
}
192.168.156.13 | CHANGED => {
    "ansible_facts": {
        "discovered_interpreter_python": "/usr/bin/python"
    },
    "changed": true,
    "gid": 0,
    "group": "root",
    "mode": "0755",
    "owner": "root",
    "path": "/test",
    "secontext": "unconfined_u:object_r:default_t:s0",
    "size": 6,
    "state": "directory",
    "uid": 0
}
验证
创建一个文件 : ansible group1 -m file -a 'path=/test/111 state=touch'
root@hd1 ~]# ansible group1 -m file -a "path=/test/111 state=touch"
192.168.156.13 | CHANGED => {
    "ansible_facts": {
        "discovered_interpreter_python": "/usr/bin/python"
    },
    "changed": true,
    "dest": "/test/111",
    "gid": 0,
    "group": "root",
    "mode": "0644",
    "owner": "root",
    "secontext": "unconfined_u:object_r:default_t:s0",
    "size": 0,
    "state": "file",
    "uid": 0
}
192.168.156.12 | CHANGED => {
    "ansible_facts": {
        "discovered_interpreter_python": "/usr/bin/python"
    },
    "changed": true,
    "dest": "/test/111",
    "gid": 0,
    "group": "root",
    "mode": "0644",
    "owner": "root",
    "secontext": "unconfined_u:object_r:default_t:s0",
    "size": 0,
    "state": "file",
    "uid": 0
}
验证

递归修改owner,group,mode
ansible group1 -m file -a 'path=/test recurse=yes owner=bin group=daemon mode=1777'
[root@hd1 ~]# ansible group1 -m file -a "path=/test recurse=yes owner=bin group=daemon mode=1777"
192.168.156.12 | CHANGED => {
    "ansible_facts": {
        "discovered_interpreter_python": "/usr/bin/python"
    },
    "changed": true,
    "gid": 2,
    "group": "daemon",
    "mode": "01777",
    "owner": "bin",
    "path": "/test",
    "secontext": "unconfined_u:object_r:default_t:s0",
    "size": 17,
    "state": "directory",
    "uid": 1
}
192.168.156.13 | CHANGED => {
    "ansible_facts": {
        "discovered_interpreter_python": "/usr/bin/python"
    },
    "changed": true,
    "gid": 2,
    "group": "daemon",
    "mode": "01777",
    "owner": "bin",
    "path": "/test",
    "secontext": "unconfined_u:object_r:default_t:s0",
    "size": 17,
    "state": "directory",
    "uid": 1
}
验证


删除目录 absent 缺席的(连同目录里的所有文件)
ansible group1 -m file -a 'path=/test state=absent'
[root@hd1 ~]# ansible group1 -m file -a "path=/test state=absent"
192.168.156.13 | CHANGED => {
    "ansible_facts": {
        "discovered_interpreter_python": "/usr/bin/python"
    },
    "changed": true,
    "path": "/test",
    "state": "absent"
}
192.168.156.12 | CHANGED => {
    "ansible_facts": {
        "discovered_interpreter_python": "/usr/bin/python"
    },
    "changed": true,
    "path": "/test",
    "state": "absent"
}
创建文件并指定owner,group,mode等
ansible group1 -m file -a 'path=/tmp/111 state=touch owner=bin group=daemon mode=1777'
[root@hd1 ~]# ansible group1 -m file -a 'path=/tmp/111 state=touch owner=bin group=daemon mode=1777'
192.168.156.12 | CHANGED => {
    "ansible_facts": {
        "discovered_interpreter_python": "/usr/bin/python"
    },
    "changed": true,
    "dest": "/tmp/111",
    "gid": 2,
    "group": "daemon",
    "mode": "01777",
    "owner": "bin",
    "secontext": "unconfined_u:object_r:user_tmp_t:s0",
    "size": 0,
    "state": "file",
    "uid": 1
}
192.168.156.13 | CHANGED => {
    "ansible_facts": {
        "discovered_interpreter_python": "/usr/bin/python"
    },
    "changed": true,
    "dest": "/tmp/111",
    "gid": 2,
    "group": "daemon",
    "mode": "01777",
    "owner": "bin",
    "secontext": "unconfined_u:object_r:user_tmp_t:s0",
    "size": 0,
    "state": "file",
    "uid": 1
}
删除文件
master# ansible group1 -m file -a 'path=/tmp/111 state=absent'
[root@hd1 ~]# ansible group1 -m file -a 'path=/tmp/111 state=absent'
192.168.156.12 | CHANGED => {
    "ansible_facts": {
        "discovered_interpreter_python": "/usr/bin/python"
    },
    "changed": true,
    "path": "/tmp/111",
    "state": "absent"
}
192.168.156.13 | CHANGED => {
    "ansible_facts": {
        "discovered_interpreter_python": "/usr/bin/python"
    },
    "changed": true,
    "path": "/tmp/111",
    "state": "absent"
}
创建软链接文件
ansible group1 -m file -a 'src=/etc/fstab path=/tmp/fstab state=link'
[root@hd1 ~]# ansible group1 -m file -a 'src=/etc/fstab path=/tmp/fstab state=link'
192.168.156.12 | CHANGED => {
    "ansible_facts": {
        "discovered_interpreter_python": "/usr/bin/python"
    },
    "changed": true,
    "dest": "/tmp/fstab",
    "gid": 0,
    "group": "root",
    "mode": "0777",
    "owner": "root",
    "secontext": "unconfined_u:object_r:user_tmp_t:s0",
    "size": 10,
    "src": "/etc/fstab",
    "state": "link",
    "uid": 0
}
192.168.156.13 | CHANGED => {
    "ansible_facts": {
        "discovered_interpreter_python": "/usr/bin/python"
    },
    "changed": true,
    "dest": "/tmp/fstab",
    "gid": 0,
    "group": "root",
    "mode": "0777",
    "owner": "root",
    "secontext": "unconfined_u:object_r:user_tmp_t:s0",
    "size": 10,
    "src": "/etc/fstab",
    "state": "link",
    "uid": 0
}
创建硬链接文件
ansible group1 -m file -a 'src=/etc/fstab path=/tmp/fstab2 state=hard'
[root@hd1 ~]# ansible group1 -m file -a 'src=/etc/fstab path=/tmp/fstab2 state=hard'
192.168.156.12 | CHANGED => {
    "ansible_facts": {
        "discovered_interpreter_python": "/usr/bin/python"
    },
    "changed": true,
    "dest": "/tmp/fstab2",
    "gid": 0,
    "group": "root",
    "mode": "0644",
    "owner": "root",
    "secontext": "system_u:object_r:etc_t:s0",
    "size": 465,
    "src": "/etc/fstab",
    "state": "hard",
    "uid": 0
}
192.168.156.13 | CHANGED => {
    "ansible_facts": {
        "discovered_interpreter_python": "/usr/bin/python"
    },
    "changed": true,
    "dest": "/tmp/fstab2",
    "gid": 0,
    "group": "root",
    "mode": "0644",
    "owner": "root",
    "secontext": "system_u:object_r:etc_t:s0",
    "size": 465,
    "src": "/etc/fstab",
    "state": "hard",
    "uid": 0
}
stat模块(了解)
stat模块类似linux的stat命令,用于获取文件的状态信息。
获取/etc/fstab文件的状态信息
ansible group1 -m stat -a 'path=/etc/fstab'
[root@hd1 ~]# ansible group1 -m stat -a 'path=/etc/fstab'
192.168.156.12 | SUCCESS => {
    "ansible_facts": {
        "discovered_interpreter_python": "/usr/bin/python"
    },
    "changed": false,
    "stat": {
        "atime": 1694016149.685236,
        "attr_flags": "",
        "attributes": [],
        "block_size": 4096,
        "blocks": 8,
        "charset": "us-ascii",
        "checksum": "3a63ec3ba12baa96fe6719bc31b22731fbc2d13f",
        "ctime": 1694003717.553521,
        "dev": 64768,
        "device_type": 0,
        "executable": false,
        "exists": true,
        "gid": 0,
        "gr_name": "root",
        "inode": 16777282,
        "isblk": false,
        "ischr": false,
        "isdir": false,
        "isfifo": false,
        "isgid": false,
        "islnk": false,
        "isreg": true,
        "issock": false,
        "isuid": false,
        "mimetype": "text/plain",
        "mode": "0644",
        "mtime": 1688831255.966,
        "nlink": 2,
        "path": "/etc/fstab",
        "pw_name": "root",
        "readable": true,
        "rgrp": true,
        "roth": true,
        "rusr": true,
        "size": 465,
        "uid": 0,
        "version": "955456813",
        "wgrp": false,
        "woth": false,
        "writeable": true,
        "wusr": true,
        "xgrp": false,
        "xoth": false,
        "xusr": false
    }
}
192.168.156.13 | SUCCESS => {
    "ansible_facts": {
        "discovered_interpreter_python": "/usr/bin/python"
    },
    "changed": false,
    "stat": {
        "atime": 1694016150.7691061,
        "attr_flags": "",
        "attributes": [],
        "block_size": 4096,
        "blocks": 8,
        "charset": "us-ascii",
        "checksum": "3a63ec3ba12baa96fe6719bc31b22731fbc2d13f",
        "ctime": 1694003717.660331,
        "dev": 64768,
        "device_type": 0,
        "executable": false,
        "exists": true,
        "gid": 0,
        "gr_name": "root",
        "inode": 16777282,
        "isblk": false,
        "ischr": false,
        "isdir": false,
        "isfifo": false,
        "isgid": false,
        "islnk": false,
        "isreg": true,
        "issock": false,
        "isuid": false,
        "mimetype": "text/plain",
        "mode": "0644",
        "mtime": 1688831255.966,
        "nlink": 2,
        "path": "/etc/fstab",
        "pw_name": "root",
        "readable": true,
        "rgrp": true,
        "roth": true,
        "rusr": true,
        "size": 465,
        "uid": 0,
        "version": "955456813",
        "wgrp": false,
        "woth": false,
        "writeable": true,
        "wusr": true,
        "xgrp": false,
        "xoth": false,
        "xusr": false
    }
}
copy模块(重点)
copy模块用于对文件的远程拷贝操作(如把本地的文件拷贝到远程的机器上)
在master上准备一个文件,拷贝此文件到group1的所有机器上
[root@hd1 ~]# echo master > /tmp/222
[root@hd1 ~]# ansible group1 -m copy -a 'src=/tmp/222 dest=/tmp/333'
192.168.156.13 | CHANGED => {
    "ansible_facts": {
        "discovered_interpreter_python": "/usr/bin/python"
    },
    "changed": true,
    "checksum": "30f79bec32243c31dd91a05c0ad7b80f1e301aea",
    "dest": "/tmp/333",
    "gid": 0,
    "group": "root",
    "md5sum": "c963080767f45828c31f83ca5cd25d36",
    "mode": "0644",
    "owner": "root",
    "secontext": "unconfined_u:object_r:admin_home_t:s0",
    "size": 7,
    "src": "/root/.ansible/tmp/ansible-tmp-1694082238.6-32333-216155124507669/source",
    "state": "file",
    "uid": 0
}
192.168.156.12 | CHANGED => {
    "ansible_facts": {
        "discovered_interpreter_python": "/usr/bin/python"
    },
    "changed": true,
    "checksum": "30f79bec32243c31dd91a05c0ad7b80f1e301aea",
    "dest": "/tmp/333",
    "gid": 0,
    "group": "root",
    "md5sum": "c963080767f45828c31f83ca5cd25d36",
    "mode": "0644",
    "owner": "root",
    "secontext": "unconfined_u:object_r:admin_home_t:s0",
    "size": 7,
    "src": "/root/.ansible/tmp/ansible-tmp-1694082238.71-32331-202097380347300/source",
    "state": "file",
    "uid": 0
}
使用content参数直接往远程文件里写内容(会覆盖原内容)
[root@hd1 ~]# ansible group1 -m copy -a 'content="ha ha\n" dest=/tmp/333'192.168.156.12 | CHANGED => {
    "ansible_facts": {
        "discovered_interpreter_python": "/usr/bin/python"
    },
    "changed": true,
    "checksum": "92b543983c8ed2cb1ddccb1ea014a2b1d78eb38d",
    "dest": "/tmp/333",
    "gid": 0,
    "group": "root",
    "md5sum": "a2c8d6b872054293afd41061e93bc289",
    "mode": "0644",
    "owner": "root",
    "secontext": "unconfined_u:object_r:admin_home_t:s0",
    "size": 6,
    "src": "/root/.ansible/tmp/ansible-tmp-1694082329.66-34241-16644602234490/source",
    "state": "file",
    "uid": 0
}
192.168.156.13 | CHANGED => {
    "ansible_facts": {
        "discovered_interpreter_python": "/usr/bin/python"
    },
    "changed": true,
    "checksum": "92b543983c8ed2cb1ddccb1ea014a2b1d78eb38d",
    "dest": "/tmp/333",
    "gid": 0,
    "group": "root",
    "md5sum": "a2c8d6b872054293afd41061e93bc289",
    "mode": "0644",
    "owner": "root",
    "secontext": "unconfined_u:object_r:admin_home_t:s0",
    "size": 6,
    "src": "/root/.ansible/tmp/ansible-tmp-1694082329.25-34243-274972285491964/source",
    "state": "file",
    "uid": 0
}
注意:ansible中-a后面的参数里也有引号时,记得要单引双引交叉使用,如果都为双引会出现问题
使用force参数控制是否强制覆盖
如果目标文件已经存在,则不覆盖
[root@hd1 ~]# ansible group1 -m copy -a 'src=/tmp/222 dest=/tmp/333 force=no'
192.168.156.12 | SUCCESS => {
    "changed": false,
    "dest": "/tmp/333",
    "src": "/tmp/222"
}
192.168.156.13 | SUCCESS => {
    "changed": false,
    "dest": "/tmp/333",
    "src": "/tmp/222"
}
如果目标文件已经存在,则会强制覆盖
[root@hd1 ~]# ansible group1 -m copy -a 'src=/tmp/222 dest=/tmp/333 force=yes'
192.168.156.13 | CHANGED => {
    "ansible_facts": {
        "discovered_interpreter_python": "/usr/bin/python"
    },
    "changed": true,
    "checksum": "30f79bec32243c31dd91a05c0ad7b80f1e301aea",
    "dest": "/tmp/333",
    "gid": 0,
    "group": "root",
    "md5sum": "c963080767f45828c31f83ca5cd25d36",
    "mode": "0644",
    "owner": "root",
    "secontext": "unconfined_u:object_r:admin_home_t:s0",
    "size": 7,
    "src": "/root/.ansible/tmp/ansible-tmp-1694082949.04-47354-114876946059338/source",
    "state": "file",
    "uid": 0
}
192.168.156.12 | CHANGED => {
    "ansible_facts": {
        "discovered_interpreter_python": "/usr/bin/python"
    },
    "changed": true,
    "checksum": "30f79bec32243c31dd91a05c0ad7b80f1e301aea",
    "dest": "/tmp/333",
    "gid": 0,
    "group": "root",
    "md5sum": "c963080767f45828c31f83ca5cd25d36",
    "mode": "0644",
    "owner": "root",
    "secontext": "unconfined_u:object_r:admin_home_t:s0",
    "size": 7,
    "src": "/root/.ansible/tmp/ansible-tmp-1694082949.02-47353-180469275670345/source",
    "state": "file",
    "uid": 0
}
使用backup参数控制是否备份文件
backup=yes表示如果拷贝的文件内容与原内容不一样,则会备份一份
group1的机器上会将/tmp/333备份一份(备份文件命名加上时间),再远程拷贝新的文件为/tmp/333
[root@hd1 ~]# ansible group1 -m copy -a 'src=/etc/fstab dest=/tmp/333 backup=yes owner=daemon group=daemon mode=1777'
192.168.156.12 | CHANGED => {
    "ansible_facts": {
        "discovered_interpreter_python": "/usr/bin/python"
    },
    "backup_file": "/tmp/333.47177.2023-09-07@18:37:16~",
    "changed": true,
    "checksum": "3a63ec3ba12baa96fe6719bc31b22731fbc2d13f",
    "dest": "/tmp/333",
    "gid": 2,
    "group": "daemon",
    "md5sum": "d3fc2b88bf5e90530ca5793a59ca2f59",
    "mode": "01777",
    "owner": "daemon",
    "secontext": "unconfined_u:object_r:admin_home_t:s0",
    "size": 465,
    "src": "/root/.ansible/tmp/ansible-tmp-1694083033.2-49357-246671726366385/source",
    "state": "file",
    "uid": 2
}
192.168.156.13 | CHANGED => {
    "ansible_facts": {
        "discovered_interpreter_python": "/usr/bin/python"
    },
    "backup_file": "/tmp/333.46985.2023-09-07@18:37:16~",
    "changed": true,
    "checksum": "3a63ec3ba12baa96fe6719bc31b22731fbc2d13f",
    "dest": "/tmp/333",
    "gid": 2,
    "group": "daemon",
    "md5sum": "d3fc2b88bf5e90530ca5793a59ca2f59",
    "mode": "01777",
    "owner": "daemon",
    "secontext": "unconfined_u:object_r:admin_home_t:s0",
    "size": 465,
    "src": "/root/.ansible/tmp/ansible-tmp-1694083033.27-49358-35198328455539/source",
    "state": "file",
    "uid": 2
}
copy模块拷贝时要注意拷贝目录后面是否带"/"符号
/etc/yum.repos.d后面不带/符号,则表示把/etc/yum.repos.d整个目录拷贝到/tmp/目录下
ansible group1 -m copy -a 'src=/etc/yum.repos.d dest=/tmp/'
[root@hd1 ~]# ansible group1 -m copy -a 'src=/etc/yum.repos.d dest=/tmp/'
192.168.156.13 | CHANGED => {
    "changed": true,
    "dest": "/tmp/",
    "src": "/etc/yum.repos.d"
}
192.168.156.12 | CHANGED => {
    "changed": true,
    "dest": "/tmp/",
    "src": "/etc/yum.repos.d"
}
/etc/yum.repos.d/后面带/符号,则表示把/etc/yum.repos.d/目录里的所有文件拷贝到/tmp/目录下
ansible group1 -m copy -a 'src=/etc/yum.repos.d/ dest=/tmp/'
[root@hd1 ~]# ansible group1 -m copy -a 'src=/etc/yum.repos.d/ dest=/tmp/'
192.168.156.12 | CHANGED => {
    "changed": true,
    "dest": "/tmp/",
    "src": "/etc/yum.repos.d/"
}
192.168.156.13 | CHANGED => {
    "changed": true,
    "dest": "/tmp/",
    "src": "/etc/yum.repos.d/"
}
fetch模块
fetch模块与copy模块类似,但作用相反。用于把远程机器的文件拷贝到本地。
第1步: 在两台被管理机上分别创建一个同名文件(但内容不同)
agent1# echo agent1 > /tmp/1.txt
agent2# echo agent2 > /tmp/1.txt
第2步: 从master上fecth文件(因为group1里有2台机器,为了避免同名文件文件冲突,它使用了不同的目录)
master# ansible group1 -m fetch -a 'src=/tmp/1.txt dest=/tmp/'
192.168.156.12 | CHANGED => {
"changed": true,
"checksum": "d2911a028d3fcdf775a4e26c0b9c9d981551ae41",
"dest": "/tmp/192.156.156.12/tmp/1.txt", 192.156.156.12的在这里
"md5sum": "0d59da0b2723eb03ecfbb0d779e6eca5",
"remote_checksum": "d2911a028d3fcdf775a4e26c0b9c9d981551ae41",
"remote_md5sum": null
}
192.168.156.13 | CHANGED => {
"changed": true,
"checksum": "b27fb3c4285612643593d53045035bd8d972c995",
"dest": "/tmp/192.168.156.13/tmp/1.txt", 192.168.156.13的在这里
"md5sum": "cd0bd22f33d6324908dbadf6bc128f52",
"remote_checksum": "b27fb3c4285612643593d53045035bd8d972c995",
"remote_md5sum": null
}
第3步: 先删除上面fetch过来的, 然后尝试只fetch其中一台机器的,也会使用名称来做子目录区分
master# rm /tmp/192.168.156.* -rf
master# ansible 192.168.156.12 -m fetch -a 'src=/tmp/1.txt dest=/tmp/'
192.168.156.12 | CHANGED => {
"changed": true,
"checksum": "d2911a028d3fcdf775a4e26c0b9c9d981551ae41",
"dest": "/tmp/192.168.156.12/tmp/1.txt", 只fetch一个,也会这样命名
"md5sum": "0d59da0b2723eb03ecfbb0d779e6eca5",
"remote_checksum": "d2911a028d3fcdf775a4e26c0b9c9d981551ae41",
"remote_md5sum": null
}
注意: fetch模块不能从远程拷贝目录到本地
user模块
user模块用于管理用户账号和用户属性。
创建aaa用户,默认为普通用户,创建家目录
master# ansible group1 -m user -a ‘name=aaa state=present’
创建bbb系统用户,并且登录shell环境为/sbin/nologin
master# ansible group1 -m user -a ‘name=bbb state=present system=yes shell="/sbin/nologin"’
创建ccc用户, 使用uid参数指定uid, 使用password参数传密码
master# echo 123456 | openssl passwd -1 -stdin $1$DpcyhW2G$Kb/y1f.lyLI4MpRlHU9oq0 下一句命令注意一下格式,密码要用双引号引起来,单引号的话验证时会密码不正确 master# ansible group1 -m user -a 'name=ccc uid=2000 state=present password="$1$DpcyhW2G$Kb/y1f.lyLI4MpRlHU9oq0"'
创建一个普通用户叫hadoop,并产生空密码 密钥对
master# ansible group1 -m user -a 'name=hadoop generate_ssh_key=yes'
删除aaa用户,但家目录默认没有删除
master# ansible group1 -m user -a 'name=aaa state=absent'
删除bbb用户,使用remove=yes参数让其删除用户的同时也删除家目录
master# ansible group1 -m user -a 'name=bbb state=absent remove=yes'
group模块
group模块用于管理用户组和用户组属性。
创建组
master# ansible group1 -m group -a 'name=groupa gid=3000 state=present'
删除组(如果有用户的gid为此组,则删除不了)
master# ansible group1 -m group -a 'name=groupa state=absent'
cron模块
cron模块用于管理周期性时间任务
创建一个cron任务,不指定user的话,默认就是root(因为我这里是用root操作的)。 如果minute,hour,day,month,week不指定的话,默认都为*
master# ansible group1 -m cron -a 'name="test cron1" user=root job="touch /tmp/111" minute=*/2'
删除cron任务
master# ansible group1 -m cron -a 'name="test cron1" state=absent'
yum_repository模块
yum_repository模块用于配置yum仓库。
增加一个/etc/yum.repos.d/local.repo配置文件
master# ansible group1 -m yum_repository -a "name=local description=localyum baseurl=file:///mnt/ enabled=yes gpgcheck=no"
注意:此模块只帮助配置yum仓库,但如果仓库里没有软件包,安装一样会失败。所以可以手动去挂载光驱到/mnt目录
# mount /dev/cdrom /mnt
删除/etc/yum.repos.d/local.repo配置文件
master# ansible group1 -m yum_repository -a "name=local state=absent"
yum模块(重点)
yum模块用于使用yum命令来实现软件包的安装与卸载。
使用yum安装一个软件(前提:group1的机器上的yum配置都已经OK)
master# ansible group1 -m yum -a 'name=vsftpd state=present'
使用yum安装httpd,httpd-devel软件,state=latest表示安装最新版本
master# ansible group1 -m yum -a 'name=httpd,httpd-devel state=latest'
使用yum卸载httpd,httpd-devel软件
master# ansible group1 -m yum -a 'name=httpd,httpd-devel state=absent'
service模块(重点)
service模块用于控制服务的启动,关闭,开机自启动等。
启动vsftpd服务,并设为开机自动启动
master# ansible group1 -m service -a 'name=vsftpd state=started enabled=on'
关闭vsftpd服务,并设为开机不自动启动
master# ansible group1 -m service -a 'name=vsftpd state=stopped enabled=false'
script模块
script模块用于在远程机器上执行本地脚本。
在master上准备一个脚本
master# vim /tmp/1.sh
#!/bin/bash
mkdir /tmp/haha
touch /tmp/haha/{1..10}
在group1的远程机器里都执行master上的/tmp/1.sh脚本(此脚本不用给执行权限)
master# ansible group1 -m script -a '/tmp/1.sh'
扩展: 使用shell脚本实现在group1的被管理机里的mariadb里创建一个abc库
#!/bin/bash yum install mariadb-server -y &> /dev/null systemctl start mariadb systemctl enable mariadb mysql << EOF create database abc; quit EOF 把上面的脚本使用script模块在group1被管理机里执行即可
command与shell模块
两个模块都是用于执行linux命令的,这对于命令熟悉的工程师来说,用起来非常high。
shell模块与command模块差不多(command模块不能执行一些类似$HOME,>,<,|等符号,但shell可以)
master# ansible -m command group1 -a "useradd user2" master# ansible -m command group1 -a "id user2" master# ansible -m command group1 -a "cat /etc/passwd |wc -l" --报错 master# ansible -m shell group1 -a "cat /etc/passwd |wc -l" --成功 master# ansible -m command group1 -a "cd $HOME;pwd" --报错 master# ansible -m shell group1 -a "cd $HOME;pwd" --成功
注意: shell模块并不是百分之百任何命令都可以,比如vim或ll别名就不可以。不建议大家去记忆哪些命令不可以,大家只要养成任何在生产环境里的命令都要先在测试环境里测试一下的习惯就好。


 1617
1617


 被折叠的 条评论
为什么被折叠?
被折叠的 条评论
为什么被折叠?
 到【灌水乐园】发言


