


vue中总线Bus传值的哪些坑!
PS:动态组件中用总线Bus的坑
在我们的项目总难免会遇到用动态组件,这里就拿vue官方的例子为例,我们欲在组件中添加总线bus(其实官方推荐的vuex更好用,但是有时候我们只需要传一个小状态,不需要用vuex),首先要mian.js 中创建一个总线Bus(当然这里一般要把Bus封装一下放在一个单独的js中,这里单纯只是为了演示,就在main.js中创建一个全局的EventBus)
代码如下(示例):
import Vue from 'vue'
import App from './App'
import router from './router'

window.EventBus = new Vue()
/* eslint-disable no-new */
new Vue({
  el: '#app',
  router,
  components: { App },
  template: '<App/>'
})
然后我们在动态组件Tabhome中写个按钮触发emit事件,在触发的时候把我们想要传的值一并带过去。
代码如下(示例):
<template>
<div>
  <div>
    <button @click="handleClick">触发</button>
  </div>
</div>
</template>

<script>
export default {
  name: 'TabHome',
  data () {
    return {
      msg: 'home data  '
    }
  },
  methods: {
    handleClick () {
      window.EventBus.$emit('getData', this.msg)
    }
  }

}
</script>
然后我们在我们想在接受值的地方监听触发的这个函数,我这里拿TabPosts来监听Tabhome中触发的函数,注意这两个组件是动态组件,不是通过路由切换的,监听组件如下:
<template>
<div>
  {{post}}
</div>
</template>

<script>
export default {
  name: 'TabPosts',
  data () {
    return {
      post: 'tabposts',
    }
  },
  methods: {
    getData (msg) {
      this.post = msg
    }
  },
  mounted () {
      window.EventBus.$on('getData', (msg) => this.getData(msg))
  }
}
</script>
我们期望的结果当然是我们在tabhome中点击了按钮之后,当我们切换到TabPosts组件的时候,TabPosts中的值已经发生了改变,也就是从tabhome中传过来的值,但是情况远非我们想的这么简单,在监听函数中添加console你就会发现,第一次点击按钮,并切换到TabPosts组件的时候,不会打印任何东西,也就是没有触发mounted钩子。当你切回去tabhome组件再次点击按钮,然后再回到TabPosts组件,发现控制台有输出,但是随着来回切换次数的增多,控制台每次打印的数量也会随着你切换的次数一次递增,但是数据发生了改变,视图却没有改变。
这是为什么呢?这就是动态组件的坑,因为我用的是生命周期的钩子函数,监听函数要在触发函数之前存在 ,不然当然监听不到了。问题就出在生命周期函数这里。所以我们来在两个组件中加上所有的生命周期钩子并在里面输出识别信息。tabhome组件如下:
<template>
<div>
  <div>
    <button @click="handleClick">触发</button>
  </div>
</div>
</template>

<script>
export default {
  name: 'TabHome',
  data () {
    return {
      msg: 'home data  '
    }
  },
  methods: {
    handleClick () {
      window.EventBus.$emit('getData', this.msg)
    }
  },
  beforeCreate () {
    console.log('A beforecreate')
  },
  created () {
    console.log('A created')
  },
  beforeMount () {
    console.log('A beforemount')
  },
  mounted () {
    console.log('A mounted')
  },
  beforeUpdate () {
    console.log('A before update')
  },
  updated () {
    console.log('A updated')
  },
  beforeDestroy () {
    console.log('A before destroy')
  },
  destroyed () {
    console.log('A beforecreate')
  }

}
</script>
TabPosts组件如下(为了在控制台明显区分,在这里给TabPost组件打印的东西加上黄色的背景色):
<template>
<div>
  {{post}}
  <router-link to="/TabHome">return</router-link>
</div>
</template>

<script>
export default {
  name: 'TabPosts',
  data () {
    return {
      post: 'tabposts',
      number: 0
    }
  },
  methods: {
    getData (msg) {
      this.post = msg
    }
  },
  beforeCreate () {
    console.log('%c%s',
      'background: yellow;',
      'B beforecreate')
  },
  created () {
    console.log('%c%s',
      'background: yellow;',
      'B created')
  },
  beforeMount () {
    console.log('%c%s',
      'background: yellow;',
      'B beforemount')
  },
  mounted () {
    console.log('%c%s',
      'background: yellow;',
      'B mounted')
      window.EventBus.$on('getData', (msg) => this.getData(msg))
  },
  beforeUpdate () {
    console.log('%c%s',
      'background: yellow;',
      'B before update')
  },
  updated () {
    console.log('%c%s',
      'background: yellow;',
      'B updated')
  },
  beforeDestroy () {
    console.log('%c%s',
      'background: yellow;',
      'B before destroy')
  },
  destroyed () {
    console.log('%c%s',
      'background: yellow;',
      'B beforecreate!')
  }
}
</script>

<style scoped>

</style>
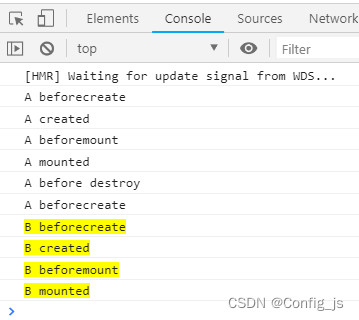
然后我们测试从动态组件tabhome到TabPosts组件的这个过程中控制台会打印出什么,结果如下图:

我们会发现,A组件(即是tabhome组件)和B组件(即是TabPosts组件)两个的生命周期函数没有交集也就是说触发emit的时候并没有监听到,所以视图不会改变。至于在动态组件中来回切换会增加触发次数,根据前人的经验,应该是在监听组件B中的beforeDestroy中添加EventBus.$off函数就好了,但是会发下加了这个off之后,就不会触发$on的监听函数了,至于为什么不会监听函数这其中的原因我也不太懂。
目前还没找到动态组件中实现总线Bus的好方法,大佬们有好方法欢迎指正!
组件之间的Bus总线传值
因为动态组件之间的坑,我放弃了用动态组件,改用路由切换的两个组件进行传值。在路由的index.js中加入路由信息
import Vue from 'vue'
import Router from 'vue-router'
import Home from '@/pages/Home'
import TabHome from '@/pages/Dynamic-component/components/TabHome'
import TabPosts from '@/pages/Dynamic-component/components/TabPosts'

Vue.use(Router)

export default new Router({
  routes: [
    {
      path: '/',
      name: 'Home',
      component: Home
    }, {
      path: '/tabhome',
      name: 'TabHome',
      component: TabHome
    }, {
      path: '/TabPosts',
      name: 'TabPosts',
      component: TabPosts
    }
  ]
})
但是这其中也有坑,我们由A(即tabhome)组件触发EventBus.$emit 函数,让B(即TabPosts)组件监听EventBus.$on,一般触发函数都会放到click函数中,也就是哪个事件需要就放到哪里,本例子放到click事件中。监听函数一般放到created或者mounted中,这里我放到了mounted中。
A(tabhome)组件代码如下:
<template>
<div>
  <div>
    <button @click="handleClick">触发</button>
  </div>
</div>
</template>

<script>
export default {
  name: 'TabHome',
  data () {
    return {
      msg: 'home data  '
    }
  },
  methods: {
    handleClick () {
      window.EventBus.$emit('getData', this.msg)
      this.$router.push('/TabPosts')
    }
  },
  beforeCreate () {
    console.log('A beforecreate')
  },
  created () {
    console.log('A created')
  },
  beforeMount () {
    console.log('A beforemount')
  },
  mounted () {
    console.log('A mounted')
  },
  beforeUpdate () {
    console.log('A before update')
  },
  updated () {
    console.log('A updated')
  },
  beforeDestroy () {
    console.log('A before destroy')
  },
  destroyed () {
    console.log('A beforecreate')
  }
}
</script>
B(TabPosts)组件的代码如下:
<template>
<div>
  {{post}}
  <router-link to="/TabHome">返回</router-link>
</div>
</template>

<script>
export default {
  name: 'TabPosts',
  data () {
    return {
      post: 'tabposts',
      number: 0
    }
  },
  methods: {
    getData (msg) {
      this.post = msg
    }
  },
  beforeCreate () {
    console.log('%c%s',
      'background: yellow;',
      'B beforecreate')
  },
  created () {
    console.log('%c%s',
      'background: yellow;',
      'B created')
  },
  beforeMount () {
    console.log('%c%s',
      'background: yellow;',
      'B beforemount')
  },
  mounted () {
    console.log('%c%s',
      'background: yellow;',
      'B mounted')
       window.EventBus.$on('getData', (msg) => this.getData(msg))
  },
  beforeUpdate () {
    console.log('%c%s',
      'background: yellow;',
      'B before update')
  },
  updated () {
    console.log('%c%s',
      'background: yellow;',
      'B updated')
  },
  beforeDestroy () {
    console.log('%c%s',
      'background: yellow;',
      'B before destroy')
  },
  destroyed () {
    console.log('%c%s',
      'background: yellow;',
      'B beforecreate!')
  }
}
</script>

<style scoped>

</style>
结果我们按照这个代码运行总是不成功,没有我们想要的效果,上面的代码我加了所有的生命周期的钩子函数,我们从A的按钮切换到B组件,注意留意控制台,当我们点击按钮通通过路由切换到B组件的时候,生命周期函数的变化,我们会发现如下的结果。
我们发现,在A销毁之前,B组件的beforeCreate ,created,和beforeMount这三个钩子函数先触发,之后才是A组件的销毁钩子的触发,因为总线Bus要求要先有监听在触发,才能成功监听,所以我们只能在A组件的beforeDestroy或者destroyed这两个生命周期钩子中触发函数$emit,同理也只能在B组中的beforeCreate ,created,和beforeMount这三个钩子函数中监听$on。
//tabhome (A)组件中在beforeDestroy中触发
beforeDestroy () {
    console.log('A before destroy')
    window.EventBus.$emit('getData', this.msg)
  }
//在TabPosts中的created中监听
created () {
    console.log('%c%s',
      'background: yellow;',
      'B created')
      console.log(1)
    window.EventBus.$on('getData', (msg) => this.getData(msg))
  }
这样我们想要的功能就实现了,实际动手做的细心的同学会发现:还是有之前重复触发的问题,还是会随着切换次数的增加而使监听函数触发的次数增加,解决这个问题就简单了。在我们用总线传值的时候要记得关闭监听,在B组件中的destroyed钩子中增加EventBus.$off方法即可,至此就没问题了。
//TabPosts组件
 destroyed () {
    console.log('%c%s',
      'background: yellow;',
      'B beforecreate!')
    window.EventBus.$off('getData')
  }


 724
724


 被折叠的 条评论
为什么被折叠?
被折叠的 条评论
为什么被折叠?
 到【灌水乐园】发言


