


前面已经讲了关于Hibernate和Struts2两个框架的基本内容了,如果不懂的可以看前面的文章哦,很明白从基础逐步进行延伸。下面的话,就用这篇文章来讲解一下关于Spring框架的基本知识。准备好了吗?
1:spring的搭建步骤
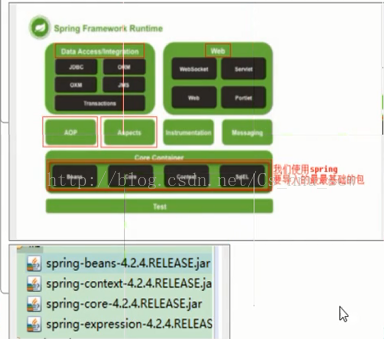
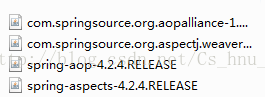
一:导包(4+2+1):四个基础包,2个日志包,一个web包
二:创建java对象
三:书写配置注册对象到容器(其中位置任意,建议放在src下,名字也取为applicationContext.xml)
2:spring的概念知识
(1)IOC(Inverse Of Control , 反转控制)知识点
概念:就是反转了对象的创建方式,从我们自己创建反转给程序(spring)
(2)DI(Denpendcy Injection , 依赖注入)
注入方式:set方式注入,构造方法注入,字段注入
注入类型:值类型注入(8大基本类型),引用类型注入(将依赖对象注入)
(3)BeanFactory接口
1)spring原始接口,针对原始接口的实现类功能较为单一;
2)BeanFactory接口实现类的容器特点是每次在获得对象时才创建对象
(4)ApplicationContext
每次容器启动时就会创建容器中配置的所有对象
加载文件的方式:第一:从类路径下加载,ClassPathXmlApplicationContext
第二:从硬盘的绝对路径:FileSystemXmlApplicationContext("d:/xxx/yy/zzz")
其中的(3)和(4)对比中,在web环境中,使用(4),而在资源匮乏的时候,可以使用(3)。
3:Bean元素
(1)基本知识点
<?xml version="1.0" encoding="UTF-8"?>
<beans xmlns:xsi="http://www.w3.org/2001/XMLSchema-instance" xmlns="http://www.springframework.org/schema/beans" xsi:schemaLocation="http://www.springframework.org/schema/beans http://www.springframework.org/schema/beans/spring-beans-4.2.xsd ">


	<!-- 将User对象交给spring容器管理 -->
	<!-- Bean元素:使用该元素描述需要spring容器管理的对象
			class属性:被管理对象的完整类名.
			name属性:给被管理的对象起个名字.获得对象时根据该名称获得对象.
					可以重复.可以使用特殊字符.
			id属性: 与name属性一模一样.
					名称不可重复.不能使用特殊字符.
			结论: 尽量使用name属性.
	  -->
	<bean  name="user" class="cn.itcast.bean.User" ></bean>
	<!-- 导入其他spring配置文件 -->
	<import resource="cn/itcast/b_create/applicationContext.xml"/>

</beans>
(2)scope属性(四种):
类型一:singleton(默认值):单例对象,被标识为单例类型,则在spring容器中,只会存在一个实例
类型二:prototype:多例模型,被标识为多例的对象,每次再获得才会得到对象,每次创建都是新的对象,整合structs2的时候,需要配置ActionBean为多例模式
类型三:request:web环境下,对象与request生命周期一样
类型四:session:web环境下,对象与session生命周期一样
(3)生命周期
<?xml version="1.0" encoding="UTF-8"?>
<beans xmlns:xsi="http://www.w3.org/2001/XMLSchema-instance" xmlns="http://www.springframework.org/schema/beans" xsi:schemaLocation="http://www.springframework.org/schema/beans http://www.springframework.org/schema/beans/spring-beans-4.2.xsd ">
	<bean  name="user" class="cn.itcast.bean.User"
		 init-method="init" destroy-method="destory" ></bean>
</beans>
1:当scope是单例(默认)的情况时候,就是当spring容器初始化的时候就进行Bean的初始化
2:当scope是prototype的时候,就是当调用getBean()方法的时候才进行Bean的初始化。
4:三种对象创建方式
(1)空参构造(创建一个对象默认会调用空参构造方法)
(2)静态工厂(了解)
(3)实例工厂(了解)
applicationContext配置文件:
<?xml version="1.0" encoding="UTF-8"?>
<beans xmlns:xsi="http://www.w3.org/2001/XMLSchema-instance" xmlns="http://www.springframework.org/schema/beans" xsi:schemaLocation="http://www.springframework.org/schema/beans http://www.springframework.org/schema/beans/spring-beans-4.2.xsd ">

	<!-- 创建方式1:空参构造创建  -->
	<bean  name="user" class="cn.itcast.bean.User"
		 init-method="init" destroy-method="destory" ></bean>
	<!-- 创建方式2:静态工厂创建
		  调用UserFactory的createUser方法创建名为user2的对象.放入容器
	 -->
	<bean  name="user2"
		class="cn.itcast.b_create.UserFactory"
		factory-method="createUser" ></bean>
	<!-- 创建方式3:实例工厂创建
		 调用UserFactory对象的createUser2方法创建名为user3的对象.放入容器
	 -->
	<bean  name="user3"
		factory-bean="userFactory"
		factory-method="createUser2" ></bean>

	<bean  name="userFactory"
		class="cn.itcast.b_create.UserFactory"   ></bean>
</beans>
上面其中的工厂类如下所示:
package cn.itcast.b_create;

import cn.itcast.bean.User;

public class UserFactory {

	public static User createUser(){

		System.out.println("静态工厂创建User");

		return new User();

	}

	public  User createUser2(){

		System.out.println("实例工厂创建User");

		return new User();

	}

}
5:属性注入(三种方式)
(1)set方法(掌握,最重要)
(2)构造函数(掌握)
(3)p名称空间注入(了解)
(4)spel注入(了解)
<?xml version="1.0" encoding="UTF-8"?>
<beans xmlns:xsi="http://www.w3.org/2001/XMLSchema-instance"
		xmlns="http://www.springframework.org/schema/beans"
		xmlns:p="http://www.springframework.org/schema/p"
		 xsi:schemaLocation="http://www.springframework.org/schema/beans http://www.springframework.org/schema/beans/spring-beans-4.2.xsd ">

	<!-- set方式注入: -->
	<bean  name="user" class="cn.itcast.bean.User" >
		<!--值类型注入: 为User对象中名为name的属性注入tom作为值 -->
		<property name="name" value="tom" ></property>
		<property name="age"  value="18" ></property>
		<!-- 引用类型注入: 为car属性注入下方配置的car对象 -->
		<property name="car"  ref="car" ></property>
	</bean>

	<!-- 将car对象配置到容器中 -->
	<bean name="car" class="cn.itcast.bean.Car" >
		<property name="name" value="兰博基尼" ></property>
		<property name="color" value="黄色" ></property>
	</bean>
<!-- ============================================================ -->
	<!-- 构造函数注入 -->
<bean name="user2" class="cn.itcast.bean.User" >
	<!-- name属性: 构造函数的参数名 -->
	<!-- index属性: 构造函数的参数索引 -->
	<!-- type属性: 构造函数的参数类型-->
	<constructor-arg name="name" index="0" type="java.lang.Integer" value="999"  ></constructor-arg>
	<constructor-arg name="car" ref="car" index="1" ></constructor-arg>
</bean>

<!-- ============================================================= -->

<!-- p名称空间注入, 走set方法
	1.导入P名称空间  xmlns:p="http://www.springframework.org/schema/p"
	2.使用p:属性完成注入
		|-值类型: p:属性名="值"
		|-对象类型: p:属性名-ref="bean名称"
 -->
	<bean  name="user3" class="cn.itcast.bean.User" p:name="jack" p:age="20" p:car-ref="car"  >
	</bean>

<!-- ============================================================= -->

<!--
	spel注入: spring Expression Language sping表达式语言
 -->
<bean  name="user4" class="cn.itcast.bean.User" >
		<property name="name" value="#{user.name}" ></property>
		<property name="age" value="#{user3.age}" ></property>
		<property name="car" ref="car" ></property>
</bean>
<!-- ============================================================= -->
<!-- 复杂类型注入 -->
<bean name="cb" class="cn.itcast.c_injection.CollectionBean" >
	<!-- 如果数组中只准备注入一个值(对象),直接使用value|ref即可
	<property name="arr" value="tom" ></property>
	-->
	<!-- array注入,多个元素注入 -->
	<property name="arr">
		<array>
			<value>tom</value>
			<value>jerry</value>
			<ref bean="user4" />
		</array>
	</property>

	<!-- 如果List中只准备注入一个值(对象),直接使用value|ref即可
	<property name="list" value="jack" ></property>-->
	<property name="list"  >
		<list>
			<value>jack</value>
			<value>rose</value>
			<ref bean="user3" />
		</list>
	</property>
	<!-- map类型注入 -->
	<property name="map"  >
		<map>
			<entry key="url" value="jdbc:mysql:///crm" ></entry>
			<entry key="user" value-ref="user4"  ></entry>
			<entry key-ref="user3" value-ref="user2"  ></entry>
		</map>
	</property>
	<!-- prperties 类型注入 -->
	<property name="prop"  >
		<props>
			<prop key="driverClass">com.jdbc.mysql.Driver</prop>
			<prop key="userName">root</prop>
			<prop key="password">1234</prop>
		</props>
	</property>
</bean>
</beans>
其中上面的User类,Car类和CollectionBean类代码如下:
User类:
package cn.itcast.bean;

public class User {


	public User() {
			System.out.println("User对象空参构造方法!!!!");
	}
	private String name;
	private Integer age;
	private Car car;


	public User(String name, Car car) {
		System.out.println("User(String name, Car car)!!");
		this.name = name;
		this.car = car;
	}

	public User(Car car,String name) {
		System.out.println("User(Car car,String name)!!");
		this.name = name;
		this.car = car;
	}

	public User(Integer name, Car car) {
		System.out.println("User(Integer name, Car car)!!");
		this.name = name+"";
		this.car = car;
	}

	public Car getCar() {
		return car;
	}
	public void setCar(Car car) {
		this.car = car;
	}
	public String getName() {
		return name;
	}
	public void setName(String name) {
		this.name = name;
	}
	public Integer getAge() {
		return age;
	}
	public void setAge(Integer age) {
		this.age = age;
	}

	public void init(){
		System.out.println("我是初始化方法!");
	}
	public void destory(){
		System.out.println("我是销毁方法!");
	}
	@Override
	public String toString() {
		return "User [name=" + name + ", age=" + age + ", car=" + car + "]";
	}

}
package cn.itcast.bean;

public class Car {
	private String  name;
	private String color;

	public String getName() {
		return name;
	}
	public void setName(String name) {
		this.name = name;
	}
	public String getColor() {
		return color;
	}
	public void setColor(String color) {
		this.color = color;
	}
	@Override
	public String toString() {
		return "Car [name=" + name + ", color=" + color + "]";
	}


}
package cn.itcast.c_injection;

import java.util.Arrays;
import java.util.List;
import java.util.Map;
import java.util.Properties;

public class CollectionBean {
	private Object[] arr;//数组类型注入
	private List list;//list/set 类型注入
	private Map map;//map类型注入
	private Properties prop;//properties类型注入

	public Object[] getArr() {
		return arr;
	}
	public void setArr(Object[] arr) {
		this.arr = arr;
	}
	public List getList() {
		return list;
	}
	public void setList(List list) {
		this.list = list;
	}
	public Map getMap() {
		return map;
	}
	public void setMap(Map map) {
		this.map = map;
	}
	public Properties getProp() {
		return prop;
	}
	public void setProp(Properties prop) {
		this.prop = prop;
	}
	@Override
	public String toString() {
		return "CollectionBean [arr=" + Arrays.toString(arr) + ", list=" + list + ", map=" + map + ", prop=" + prop
				+ "]";
	}


}
测试类的代码,也顺便贴出来,大家可以运行进行测试下:
package cn.itcast.c_injection;

import org.junit.Test;
import org.springframework.context.ApplicationContext;
import org.springframework.context.support.ClassPathXmlApplicationContext;

import cn.itcast.bean.User;

public class Demo {
	@Test
	public void fun1(){

		//1 创建容器对象
		ApplicationContext ac = new ClassPathXmlApplicationContext("cn/itcast/c_injection/applicationContext.xml");
		//2 向容器"要"user对象
		User u = (User) ac.getBean("user");
		//3 打印user对象
		System.out.println(u);

	}
	@Test
	public void fun2(){

		//1 创建容器对象
		ApplicationContext ac = new ClassPathXmlApplicationContext("cn/itcast/c_injection/applicationContext.xml");
		//2 向容器"要"user对象
		User u = (User) ac.getBean("user2");
		//3 打印user对象
		System.out.println(u);

	}

	@Test
	public void fun3(){

		//1 创建容器对象
		ApplicationContext ac = new ClassPathXmlApplicationContext("cn/itcast/c_injection/applicationContext.xml");
		//2 向容器"要"user对象
		User u = (User) ac.getBean("user3");
		//3 打印user对象
		System.out.println(u);

	}

	@Test
	public void fun4(){

		//1 创建容器对象
		ApplicationContext ac = new ClassPathXmlApplicationContext("cn/itcast/c_injection/applicationContext.xml");
		//2 向容器"要"user对象
		User u = (User) ac.getBean("user4");
		//3 打印user对象
		System.out.println(u);

	}

	@Test
	public void fun5(){

		//1 创建容器对象
		ApplicationContext ac = new ClassPathXmlApplicationContext("cn/itcast/c_injection/applicationContext.xml");
		//2 向容器"要"user对象
		CollectionBean cb = (CollectionBean) ac.getBean("cb");
		//3 打印user对象
		System.out.println(cb);

	}
}
PS:这里另外讲一点知识就是关于注解注入的问题。因为在实际开发中,一般都是通过注解来开发的,要不然XML文件就会显得很臃肿,所以就需要有注解的使用。对于注入的话,有两个注解@Resource和@Autowire,它们两者的差别在于:
区别:@Resource中有个属性name(可选),所以首先是会从spring容器中找到对应的名字的装配,如果不存在,然后才会找对应的类型进行注入;而@Autowire,它只会找对应的类型进行装配,进行注入。
6:保持容器中的对象的生命周期的方法
首先在web.xml文件中进行配置一个监听器,以便spring容易中获取对象保持单例
<!-- 可以让spring容器随项目的启动而创建,随项目的关闭而销毁 -->
  <listener>
  	<listener-class>org.springframework.web.context.ContextLoaderListener</listener-class>
  </listener>
  <!-- 指定加载spring配置文件的位置 -->
  <context-param>
  	<param-name>contextConfigLocation</param-name>
  	<param-value>classpath:applicationContext.xml</param-value>
  </context-param>
//获得spring容器=>从Application域获得即可

			//1 获得servletContext对象
			ServletContext sc = ServletActionContext.getServletContext();
			//2.从Sc中获得ac容器
			WebApplicationContext ac = WebApplicationContextUtils.getWebApplicationContext(sc);
			//3.从容器中获得CustomerService
			CustomerService cs = (CustomerService) ac.getBean("customerService");  //这个是需要将对象在spring配置文件中进行配置好的
7:使用注解配置spring
步骤:
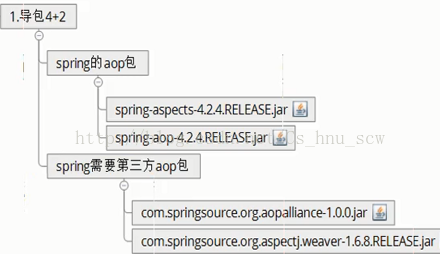
一:导包4+2+spring-aop包
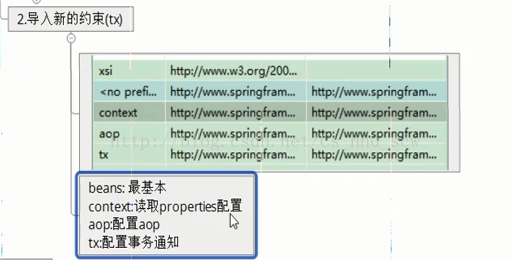
二:为主配置文件引入新的命名空间(约束)
三:开启使用注解代理配置文件(在spring的配置文件applicationContext.xml中配置)
<!-- 指定扫描cn.itcast.bean报下的所有类中的注解.
	 注意:扫描包时.会扫描指定报下的所有子孙包
 -->
<context:component-scan base-package="cn.itcast.bean"></context:component-scan>
四:在类中使用注解完成配置
//@Component("user")
//等价于在applicationContext.xml中配置<bean name="user" class="cn.itcast.bean.User"  />
public class User {
...........
}
知识点1:将对象注册到容器
//@Component("user")  //等价在spring配置文件中设置为:<bean name="user" class="cn.itcast.bean.User"  />
//	@Service("user") // service层
//	@Controller("user") // web层
	@Repository("user")// dao层
public class User {
.............
}
知识点2:修改对象的作用范围
//指定对象的作用范围
@Scope(scopeName="singleton")  //设置为单例   ,设置为prototype,则为多例
public class User {
..........
}
知识点3:值类型注入
public class User {
	private String name;
	@Value("18")  //设置年龄为18
	private Integer age;
}
知识点4:引用类型注入
	//@Autowired //方法一:自动装配
	//问题:如果匹配多个类型一致的对象.将无法选择具体注入哪一个对象.
	//@Qualifier("car2")//方法二:使用@Qualifier注解告诉spring容器自动装配哪个名称的对象

	@Resource(name="car")//方法三:手动注入,指定注入哪个名称的对象,推荐使用
	private Car car;
对应的要在相应的javabean中进行配置的设置
@Component("car")  //关键点,配置注解
public class Car {
	@Value("玛莎拉蒂")
	private String  name;
	@Value("呕吐绿")
	private String color;

	public String getName() {
		return name;
	}
	public void setName(String name) {
		this.name = name;
	}
	public String getColor() {
		return color;
	}
	public void setColor(String color) {
		this.color = color;
	}
	@Override
	public String toString() {
		return "Car [name=" + name + ", color=" + color + "]";
	}


}
知识点5:初始化和销毁方法
@PostConstruct //在对象被创建后调用.init-method
	public void init(){
		System.out.println("我是初始化方法!");
	}
	@PreDestroy //在销毁之前调用.destory-method
	public void destory(){
		System.out.println("我是销毁方法!");
	}
8:spring与junit整合(作用:节省编写测试代码的冗余行数)
步骤:
一:导包4+2+aop+test包
二:配置注释
//帮我们创建容器
@RunWith(SpringJUnit4ClassRunner.class)
//指定创建容器时使用哪个配置文件
@ContextConfiguration("classpath:applicationContext.xml")
三:进行测试
package cn.itcast.b_test;
import javax.annotation.Resource;
import org.junit.Test;
import org.junit.runner.RunWith;
import org.springframework.context.ApplicationContext;
import org.springframework.context.support.ClassPathXmlApplicationContext;
import org.springframework.test.context.ContextConfiguration;
import org.springframework.test.context.junit4.SpringJUnit4ClassRunner;

import cn.itcast.bean.User;
//帮我们创建容器
@RunWith(SpringJUnit4ClassRunner.class)
//指定创建容器时使用哪个配置文件
@ContextConfiguration("classpath:applicationContext.xml")
public class Demo {
	//将名为user的对象注入到u变量中
	@Resource(name="user")
	private User u;

	@Test
	public void fun1(){

		System.out.println(u);

	}
	@Test
	public void fun2(){

		System.out.println(u);

	}
}
9:Spring中的aop知识点
(1)spring中的aop概念-------简单点说,就是通过spring来实现动态代理对象。
比如具有代表性的例子:1)消除乱码的时候,用的filter
2)动态代理
3)intercepter(拦截器)中
(2)spring实现aop的原理
方法一:动态代理:
缺点:被代理的对象必须要实现接口,才能产生代理对象,如果没有接口将不能使用动态代理技术
方法二:cglib代理
该方法是第三方代理技术,对任何对象生成代理,代理的原理是对代理的对象进行继承代理。如果目标对象被final修饰,那么该类无法被cglib代理(其实这个在Hebinate中的对象的规则中,就有这一点限制)。
PS:在spring中,优先是执行动态代理,如果该类不能通过动态代理来实现,就会通过cglib代理还实现。
另外顺便提一下,关于动态代理到底是怎么回事,下面通过一个代码例子进行显示一下,一般的动态代理是如何实现,了解就好,因为用spring的话就不需要这么麻烦了(注意就是,要实现动态代理的那个类,就一定要实现一个接口,否则无法进行)
接口:(这个就随便写一下,就假设要实现增删改查)
public interface UserService {
	void save();
	void delete();
	void update();
	void find();
}
package cn.itcast.service;
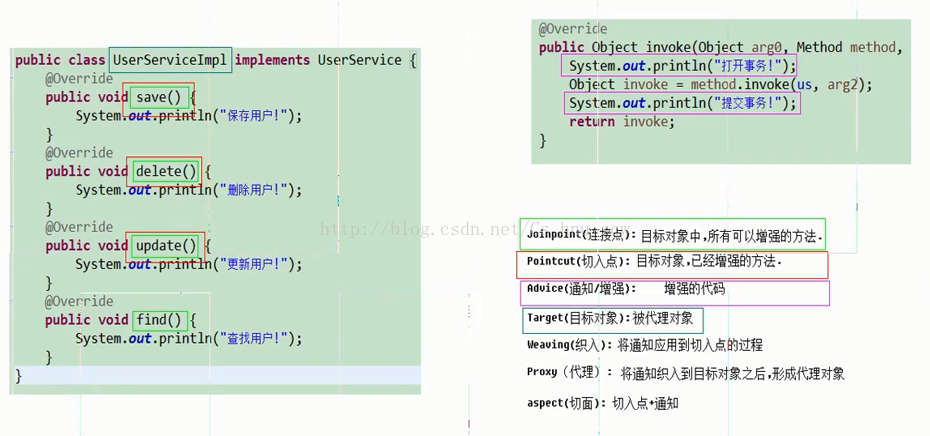
public class UserServiceImpl implements UserService {
@Override
public void save() {
System.out.println("保存用户!");
}
@Override
public void delete() {
System.out.println("删除用户!");
}
@Override
public void update() {
System.out.println("更新用户!");
}
@Override
public void find() {
System.out.println("查找用户!");
}
}
package cn.itcast.c_proxy;

import java.lang.reflect.InvocationHandler;
import java.lang.reflect.Method;
import java.lang.reflect.Proxy;

import cn.itcast.service.UserService;
import cn.itcast.service.UserServiceImpl;
//观光代码=>动态代理
public class UserServiceProxyFactory implements InvocationHandler {

	public UserServiceProxyFactory(UserService us) {
		super();
		this.us = us;
	}

	private UserService us;

	public UserService getUserServiceProxy(){
		//生成动态代理(参数一:类加载对象;参数二:实现类的接口;参数三:实现InvacationHandler接口的类,而我这里就通过该类自身来实现的!)
		UserService usProxy = (UserService) Proxy.newProxyInstance(UserServiceProxyFactory.class.getClassLoader(),
									UserServiceImpl.class.getInterfaces(),
									this);
		//返回
		return usProxy;

	}

	@Override
	public Object invoke(Object arg0, Method method, Object[] arg2) throws Throwable {
		System.out.println("打开事务!");
		Object invoke = method.invoke(us, arg2);
		System.out.println("提交事务!");
		return invoke;
	}

}
---------------------------------------------------------------------------------------------------------------------------------------------------------------------------------------------------------------------------------
cglib的手动实现:(针对上面的代码,只是把动态代理转成该方式来实现)package cn.itcast.c_proxy;
import java.lang.reflect.InvocationHandler;
import java.lang.reflect.Method;
import java.lang.reflect.Proxy;
import org.springframework.cglib.proxy.Callback;
import org.springframework.cglib.proxy.Enhancer;
import org.springframework.cglib.proxy.MethodInterceptor;
import org.springframework.cglib.proxy.MethodProxy;
import cn.itcast.service.UserService;
import cn.itcast.service.UserServiceImpl;
//观光代码=>cglib代理
public class UserServiceProxyFactory2 implements MethodInterceptor {
public UserService getUserServiceProxy(){
Enhancer en = new Enhancer();//帮我们生成代理对象
en.setSuperclass(UserServiceImpl.class);//设置对谁进行代理
en.setCallback(this);//代理要做什么
UserService us = (UserService) en.create();//创建代理对象
return us;
}
@Override
public Object intercept(Object prxoyobj, Method method, Object[] arg, MethodProxy methodProxy) throws Throwable {
//打开事务
System.out.println("打开事务!");
//调用原有方法
Object returnValue = methodProxy.invokeSuper(prxoyobj, arg);
//提交事务
System.out.println("提交事务!");
return returnValue;
}
}测试代码如下:
package cn.itcast.c_proxy;

import org.junit.Test;

import cn.itcast.service.UserService;
import cn.itcast.service.UserServiceImpl;

public class Demo {

	@Test
	//动态代理
	public void fun1(){
		UserService us = new UserServiceImpl();

		UserServiceProxyFactory factory = new UserServiceProxyFactory(us);

		UserService usProxy = factory.getUserServiceProxy();

		usProxy.save();

		//代理对象与被代理对象实现了相同的接口
		//代理对象 与 被代理对象没有继承关系
		System.out.println(usProxy instanceof UserServiceImpl );//false
	}

	@Test
	public void fun2(){         //cglib方式

		UserServiceProxyFactory2 factory = new UserServiceProxyFactory2();

		UserService usProxy = factory.getUserServiceProxy();

		usProxy.save();

		//判断代理对象是否属于被代理对象类型
		//代理对象继承了被代理对象=>true        这也就证明了上面提到的消息
		System.out.println(usProxy instanceof UserServiceImpl );//true
	}
}
(4)spring中的aop的操作
第一步:导包(4+2):其中的4就是最基础的那几个,前面也有提到
第二步:准备目标对象(简单点说,就是想通过aop操作来进行的事情)
比如上面例子中的该实现类:
public class UserServiceImpl implements UserService {
	@Override
	public void save() {
		System.out.println("保存用户!");
		//int i = 1/0;
	}
	@Override
	public void delete() {
		System.out.println("删除用户!");
	}
	@Override
	public void update() {
		System.out.println("更新用户!");
	}
	@Override
	public void find() {
		System.out.println("查找用户!");
	}
}
第三步:准备通知(编写通知类)
package cn.itcast.e_annotationaop;

import org.aspectj.lang.ProceedingJoinPoint;
import org.aspectj.lang.annotation.After;
import org.aspectj.lang.annotation.AfterReturning;
import org.aspectj.lang.annotation.AfterThrowing;
import org.aspectj.lang.annotation.Around;
import org.aspectj.lang.annotation.Aspect;
import org.aspectj.lang.annotation.Before;
import org.aspectj.lang.annotation.Pointcut;

//通知类
@Aspect
//表示该类是一个通知类
public class MyAdvice {
	@Pointcut("execution(* cn.itcast.service.*ServiceImpl.*(..))")
	public void pc(){}
	//前置通知
	//指定该方法是前置通知,并制定切入点
	@Before("MyAdvice.pc()")
	public void before(){
		System.out.println("这是前置通知!!");
	}
	//后置通知
	@AfterReturning("execution(* cn.itcast.service.*ServiceImpl.*(..))")
	public void afterReturning(){
		System.out.println("这是后置通知(如果出现异常不会调用)!!");
	}
	//环绕通知
	@Around("execution(* cn.itcast.service.*ServiceImpl.*(..))")
	public Object around(ProceedingJoinPoint pjp) throws Throwable {
		System.out.println("这是环绕通知之前的部分!!");
		Object proceed = pjp.proceed();//调用目标方法
		System.out.println("这是环绕通知之后的部分!!");
		return proceed;
	}
	//异常通知
	@AfterThrowing("execution(* cn.itcast.service.*ServiceImpl.*(..))")
	public void afterException(){
		System.out.println("出事啦!出现异常了!!");
	}
	//后置通知
	@After("execution(* cn.itcast.service.*ServiceImpl.*(..))")
	public void after(){
		System.out.println("这是后置通知(出现异常也会调用)!!");
	}
}
第四步:配置进行织入,将通知织入目标对象中
1)导入aop约束(这个百度就可以了。很简单,而且这个是spring框架等多种框架都需要知道的)
方法一:通过配置文件来实现
2)编写配置文件(自身习惯这样来编写,免得逻辑代码快过于混乱)
<?xml version="1.0" encoding="UTF-8"?>
<beans xmlns:xsi="http://www.w3.org/2001/XMLSchema-instance" xmlns="http://www.springframework.org/schema/beans" xmlns:context="http://www.springframework.org/schema/context" xmlns:aop="http://www.springframework.org/schema/aop" xsi:schemaLocation="http://www.springframework.org/schema/beans http://www.springframework.org/schema/beans/spring-beans-4.2.xsd http://www.springframework.org/schema/context http://www.springframework.org/schema/context/spring-context-4.2.xsd http://www.springframework.org/schema/aop http://www.springframework.org/schema/aop/spring-aop-4.2.xsd ">

<!-- 准备工作: 导入aop(约束)命名空间 -->
<!-- 1.配置目标对象 -->
	<bean name="userService" class="cn.itcast.service.UserServiceImpl" ></bean>
<!-- 2.配置通知对象 -->
	<bean name="myAdvice" class="cn.itcast.d_springaop.MyAdvice" ></bean>
<!-- 3.配置将通知织入目标对象 -->
	<aop:config>
		<!-- 配置切入点
			public void cn.itcast.service.UserServiceImpl.save()
			void cn.itcast.service.UserServiceImpl.save()
			* cn.itcast.service.UserServiceImpl.save()
			* cn.itcast.service.UserServiceImpl.*()

			* cn.itcast.service.*ServiceImpl.*(..)
			* cn.itcast.service..*ServiceImpl.*(..)
		-->
		<aop:pointcut expression="execution(* cn.itcast.service.*ServiceImpl.*(..))" id="pc"/>
		<aop:aspect ref="myAdvice" >
			<!-- 指定名为before方法作为前置通知 -->
			<aop:before method="before" pointcut-ref="pc" />
			<!-- 后置 -->
			<aop:after-returning method="afterReturning" pointcut-ref="pc" />
			<!-- 环绕通知 -->
			<aop:around method="around" pointcut-ref="pc" />
			<!-- 异常拦截通知 -->
			<aop:after-throwing method="afterException" pointcut-ref="pc"/>
			<!-- 后置 -->
			<aop:after method="after" pointcut-ref="pc"/>
		</aop:aspect>
	</aop:config>
</beans>package cn.itcast.d_springaop;
import javax.annotation.Resource;
import org.junit.Test;
import org.junit.runner.RunWith;
import org.springframework.context.ApplicationContext;
import org.springframework.context.support.ClassPathXmlApplicationContext;
import org.springframework.test.context.ContextConfiguration;
import org.springframework.test.context.junit4.SpringJUnit4ClassRunner;
import cn.itcast.bean.User;
import cn.itcast.service.UserService;
@RunWith(SpringJUnit4ClassRunner.class)
@ContextConfiguration("classpath:cn/itcast/d_springaop/applicationContext.xml")
public class Demo {
@Resource(name="userService")
private UserService us;
@Test
public void fun1(){
us.save();
}
}方法二:通过注解实现(了解)
步骤:(1)编写配置文件(其实这个也可以通过注解来实现,具体的看前面知识点有提到)
<?xml version="1.0" encoding="UTF-8"?>
<beans xmlns:xsi="http://www.w3.org/2001/XMLSchema-instance" xmlns="http://www.springframework.org/schema/beans" xmlns:context="http://www.springframework.org/schema/context" xmlns:aop="http://www.springframework.org/schema/aop" xsi:schemaLocation="http://www.springframework.org/schema/beans http://www.springframework.org/schema/beans/spring-beans-4.2.xsd http://www.springframework.org/schema/context http://www.springframework.org/schema/context/spring-context-4.2.xsd http://www.springframework.org/schema/aop http://www.springframework.org/schema/aop/spring-aop-4.2.xsd ">

<!-- 准备工作: 导入aop(约束)命名空间 -->
<!-- 1.配置目标对象 -->
	<bean name="userService" class="cn.itcast.service.UserServiceImpl" ></bean>
<!-- 2.配置通知对象 -->
	<bean name="myAdvice" class="cn.itcast.e_annotationaop.MyAdvice" ></bean>
<!-- 3.开启使用注解完成织入 -->
	<aop:aspectj-autoproxy></aop:aspectj-autoproxy>

</beans>
(2)编写通知类的注解
package cn.itcast.e_annotationaop;

import org.aspectj.lang.ProceedingJoinPoint;
import org.aspectj.lang.annotation.After;
import org.aspectj.lang.annotation.AfterReturning;
import org.aspectj.lang.annotation.AfterThrowing;
import org.aspectj.lang.annotation.Around;
import org.aspectj.lang.annotation.Aspect;
import org.aspectj.lang.annotation.Before;
import org.aspectj.lang.annotation.Pointcut;

//通知类
@Aspect
//表示该类是一个通知类
public class MyAdvice {
	@Pointcut("execution(* cn.itcast.service.*ServiceImpl.*(..))")
	public void pc(){}
	//前置通知
	//指定该方法是前置通知,并制定切入点
	@Before("MyAdvice.pc()")
	public void before(){
		System.out.println("这是前置通知!!");
	}
	//后置通知
	@AfterReturning("execution(* cn.itcast.service.*ServiceImpl.*(..))")
	public void afterReturning(){
		System.out.println("这是后置通知(如果出现异常不会调用)!!");
	}
	//环绕通知
	@Around("execution(* cn.itcast.service.*ServiceImpl.*(..))")
	public Object around(ProceedingJoinPoint pjp) throws Throwable {
		System.out.println("这是环绕通知之前的部分!!");
		Object proceed = pjp.proceed();//调用目标方法
		System.out.println("这是环绕通知之后的部分!!");
		return proceed;
	}
	//异常通知
	@AfterThrowing("execution(* cn.itcast.service.*ServiceImpl.*(..))")
	public void afterException(){
		System.out.println("出事啦!出现异常了!!");
	}
	//后置通知
	@After("execution(* cn.itcast.service.*ServiceImpl.*(..))")
	public void after(){
		System.out.println("这是后置通知(出现异常也会调用)!!");
	}
}
AOP实际开发用到的小例子:
(1)统计Action,Service,Dao每个类每个方法的使用次数
需求:在开发过程中,我们有时候需要统计一下执行某个类中的某个方法,它在一个调用过程中,执行了什么其他方法,并且执行每个方法的时间或者次数(用到的都是AOP),从而来进行性能的优化,所以这时候就使用AOP来进行分析就会得到比较好的处理。
(Action,service,dao的方法,我就不写了,自己按照开发模式来写就可以了),下面是AOP代理类的具体代码:
package com.hnu.scw.aop.xml.methodinvocation.count.aspect;
import java.util.HashMap;
import java.util.Map;
import org.aspectj.lang.JoinPoint;
public class MethodInvocationCount {
	private Map<String, Integer> count = new HashMap<String, Integer>();
	public void count(JoinPoint joinPoint){
		//获取的是目标类
		String targetClassName = joinPoint.getTarget().getClass().getSimpleName();
		//目标方法
		String targetMethodName = joinPoint.getSignature().getName();
		String key = targetClassName+":"+targetMethodName;
		if(count.containsKey(key)){
			Integer value = count.get(key);
			count.put(key, ++value);
		}else{
			count.put(key, 1);
		}
		System.out.println(targetClassName+"的"+targetMethodName+"方法被调用了"+count.get(key)+"次");
	}
}
package com.hnu.scw.aop.xml.methodinvocation.count.test;
import org.junit.Test;
import org.springframework.context.ApplicationContext;
import org.springframework.context.support.ClassPathXmlApplicationContext;
import com.itheima11.spring.aop.xml.methodinvocation.count.action.PersonAction;
import com.itheima11.spring.aop.xml.methodinvocation.count.service.PersonService;
public class MethodInvocationCountTest {
	@Test
	public void testCount(){
		ApplicationContext context =
				new ClassPathXmlApplicationContext("applicationContext.xml");
		PersonAction personAction = (PersonAction)context.getBean("personAction"); //这里用的是xml配置bean,当然如果用注解也是一样,并没什么影响
		personAction.savePerson();
		personAction.updatePerson();
		PersonService personService = (PersonService)context.getBean("personService");
		personService.savePerson();
	}
}
(2)权限验证------------------------这个功能在系统中是很重要的吧。实现方法也有很多种,这里就用AOP来实现
步骤的话,主要分为如下几个步骤:步骤:
1、准备service层和dao层的类和接口
2、准备权限类Privilege
3、准备注解@PrivilegeInfo
4、准备注解解析器@PrivilegeInfo(name='')
注解解析器应该把@PrivilegeInfo中的name属性的值解析出来
5、切面
环绕通知
6、spring的配置文件
7、客户端
代码:(service和dao层就不多说了吧,这个随便写个crud都行)
Action类:就是调一下service中的方法,从而来说明权限验证的功能
package com.hnu.scw.spring.aop.xml.privilege.action;
import com.hnu.scw.spring.aop.xml.privilege.service.PersonService;
public class PersonAction {
	private PersonService personService;

	public void setPersonService(PersonService personService) {
		this.personService = personService;
	}


	public void savePerson(){
		Object obj = this.personService.savePerson();//这个获取到调用了方法之后的返回值,在这里如果是error就表示权限验证失败了。
		System.out.println(obj);
	}
}
权限类:
package com.hnu.scw.spring.aop.xml.privilege.bean;
public class Privilege {
	private String name;

	public String getName() {
		return name;
	}

	public void setName(String name) {
		this.name = name;
	}

}package com.hnu.scw.spring.aop.xml.privilege.annotation;
import java.lang.annotation.ElementType;
import java.lang.annotation.Retention;
import java.lang.annotation.RetentionPolicy;
import java.lang.annotation.Target;
@Target(ElementType.METHOD)
@Retention(RetentionPolicy.RUNTIME)
public @interface PrivilegeInfo {
String name() default "";
}package com.hnu.scw.spring.aop.xml.privilege.annotation;
import java.lang.reflect.Method;
public class AnnotationParse {
public static String parse(Class targetClass,String methodName) throws Exception{
//目标方法
Method method = targetClass.getMethod(methodName);
String methodAccess = ""; //方法的权限的名称
//判断目标方法上面是否存在@PrivilegeInfo注解
//@Privilege(name="savePerson")
if(method.isAnnotationPresent(PrivilegeInfo.class)){
PrivilegeInfo privilegeInfo = method.getAnnotation(PrivilegeInfo.class);
methodAccess = privilegeInfo.name();
}
return methodAccess;
}
}package com.hnu.scw.spring.aop.xml.privilege.aspect;
import java.util.ArrayList;
import java.util.List;
import org.aspectj.lang.ProceedingJoinPoint;
import com.itheima11.spring.aop.xml.privilege.annotation.AnnotationParse;
import com.itheima11.spring.aop.xml.privilege.bean.Privilege;
public class AccessTargetMethod {
private List<Privilege> userPrivilege = new ArrayList<Privilege>();//模拟一下能够验证通过的权限有哪些
public List<Privilege> getUserPrivilege() {
return userPrivilege;
}
public Object accessMethod(ProceedingJoinPoint joinPoint) throws Throwable{
/*
* 得到目标类的class形式
* 得到目标方法
*/
Class targetClass = joinPoint.getTarget().getClass();
String targetMethodName = joinPoint.getSignature().getName();
String methodAccess = AnnotationParse.parse(targetClass, targetMethodName);
boolean flag = false;
for (Privilege privilege: userPrivilege) {
if(methodAccess.equals(privilege.getName())){//放行
flag = true;
break;
}
}
if(flag){//放行
return joinPoint.proceed();
}else{
return "error";
}
}
}
<?xml version="1.0" encoding="UTF-8"?>
<beans xmlns="http://www.springframework.org/schema/beans"
	   xmlns:aop="http://www.springframework.org/schema/aop"
       xmlns:xsi="http://www.w3.org/2001/XMLSchema-instance"
       xsi:schemaLocation="http://www.springframework.org/schema/beans
           http://www.springframework.org/schema/beans/spring-beans-4.2.xsd
           http://www.springframework.org/schema/aop
           http://www.springframework.org/schema/aop/spring-aop-4.2.xsd">
   <bean id="personDao" class="com.hnu.scw.spring.aop.xml.privilege.dao.impl.PersonDaoImpl"></bean>
   <bean id="personService" class="com.hnu.scw.spring.aop.xml.privilege.service.impl.PersonServiceImpl">
   	  <property name="personDao">
   	  	<ref bean="personDao"/>
   	  </property>
   </bean>

   <bean id="personAction" class="com.hnu.scw.spring.aop.xml.privilege.action.PersonAction">
   		<property name="personService">
   			<ref bean="personService"/>
   		</property>
   </bean>

   <bean id="accessMethod" class="com.hnu.scw.spring.aop.xml.privilege.aspect.AccessTargetMethod"></bean>

	<aop:config>
		<aop:pointcut
			expression="execution(* com.hnu.scw.spring.aop.xml.privilege.service.impl.*.*(..))"
				id="perform"/>
		<aop:aspect ref="accessMethod">
			<aop:around method="accessMethod" pointcut-ref="perform"/>
		</aop:aspect>
	</aop:config>
</beans>package com.hnu.scw.spring.aop.xml.privilege.test;
import java.util.List;
import org.junit.Test;
import org.springframework.context.ApplicationContext;
import org.springframework.context.support.ClassPathXmlApplicationContext;
import com.itheima11.spring.aop.xml.privilege.action.PersonAction;
import com.itheima11.spring.aop.xml.privilege.aspect.AccessTargetMethod;
import com.itheima11.spring.aop.xml.privilege.bean.Privilege;
import com.itheima11.spring.aop.xml.privilege.service.PersonService;
public class PrivilegeTest {
@Test
public void testPrivilege(){
ApplicationContext context =
new ClassPathXmlApplicationContext("applicationContext.xml");
//初始化用户的权限
AccessTargetMethod accessTargetMethod = (AccessTargetMethod)context.getBean("accessMethod");
List<Privilege> privileges = accessTargetMethod.getUserPrivilege();
Privilege privilege = new Privilege();
privilege.setName("savePerson");
privileges.add(privilege);
PersonAction personAction = (PersonAction)context.getBean("personAction");
personAction.savePerson();
}
}十:spring整合jdbc
概念:spring中提供了一个可以操作数据库的对象(JDBCTemplate JDBC模版对象),对象封装了jdbc技术
在这先提一下,如何用原始的方法进行操作,这个在基础中的连接池都有说过(就是非spring的开发代理模式)
public void fun1() throws Exception{

		//0 准备连接池
		ComboPooledDataSource dataSource = new ComboPooledDataSource();
		dataSource.setDriverClass("com.mysql.jdbc.Driver");
		dataSource.setJdbcUrl("jdbc:mysql:///testdata");
		dataSource.setUser("root");
		dataSource.setPassword("123456");
		//1 创建JDBC模板对象
		JdbcTemplate jt = new JdbcTemplate();
		jt.setDataSource(dataSource);
		//2 书写sql,并执行
		String sql = "insert into t_user values(null,'rose') ";
		jt.update(sql);

	}
好了,上面的内容是不是在基础学习中都有类似的印象呢?确实,其实JdbcTemplate类对象和基础中的QueryRunner是类似的。下面就把上面代码实现的功能通过spring容器来进行演示。
通过spring整合jdbc操作的步骤(用实际例子来进行分析):
(1)导包:4+2+spring-aop包+spring-test包+junit4+JDBC驱动包+c3p0连接池包+spring-jdbc包+spring-tx事务包
(2)编写dao接口
package cn.itcast.a_jdbctemplate;

import java.util.List;

import cn.itcast.bean.User;

public interface UserDao {

	//增
	void save(User u);
	//删
	void delete(Integer id);
	//改
	void update(User u);
	//查
	User getById(Integer id);
	//查
	int getTotalCount();
	//查
	List<User> getAll();
}
(3)编写实现接口类
package cn.itcast.a_jdbctemplate;

import java.sql.ResultSet;
import java.sql.SQLException;
import java.util.List;

import org.springframework.jdbc.core.JdbcTemplate;
import org.springframework.jdbc.core.RowMapper;
import org.springframework.jdbc.core.support.JdbcDaoSupport;

import cn.itcast.bean.User;
//使用JDBC模板实现增删改查
public class UserDaoImpl  implements UserDao {
	private JdbcTemplate js ;
	@Override
	public void save(User u) {
		String sql = "insert into t_user values(null,?) ";
		js.update(sql, u.getName());
	}
	@Override
	public void delete(Integer id) {
		String sql = "delete from t_user where id = ? ";
		js.update(sql,id);
	}
	@Override
	public void update(User u) {
		String sql = "update  t_user set name = ? where id=? ";
		js.update(sql, u.getName(),u.getId());
	}
	@Override
	public User getById(Integer id) {
		String sql = "select * from t_user where id = ? ";
		return js.queryForObject(sql,new RowMapper<User>(){
			@Override
			public User mapRow(ResultSet rs, int arg1) throws SQLException {
				User u = new User();
				u.setId(rs.getInt("id"));
				u.setName(rs.getString("name"));
				return u;
			}}, id);

	}
	@Override
	public int getTotalCount() {
		String sql = "select count(*) from t_user  ";
		Integer count = js.queryForObject(sql, Integer.class);
		return count;
	}

	@Override
	public List<User> getAll() {
		String sql = "select * from t_user  ";
		List<User> list = js.query(sql, new RowMapper<User>(){
			@Override
			public User mapRow(ResultSet rs, int arg1) throws SQLException {
				User u = new User();
				u.setId(rs.getInt("id"));
				u.setName(rs.getString("name"));
				return u;
			}});
		return list;
	}
	public void setJs(JdbcTemplate js){this.js = js;}

}
(4)编写配置文件
<?xml version="1.0" encoding="UTF-8"?>
<beans xmlns:xsi="http://www.w3.org/2001/XMLSchema-instance" xmlns="http://www.springframework.org/schema/beans" xmlns:context="http://www.springframework.org/schema/context" xsi:schemaLocation="http://www.springframework.org/schema/beans http://www.springframework.org/schema/beans/spring-beans-4.2.xsd http://www.springframework.org/schema/context http://www.springframework.org/schema/context/spring-context-4.2.xsd ">

<!-- 1.将连接池放入spring容器  (该连接池的配置不是通过properties来的,最原始的方法,通过properties的方法,在后面有写出来)-->
<bean name="dataSource" class="com.mchange.v2.c3p0.ComboPooledDataSource" >
	<property name="jdbcUrl" value="jdbc.mysql:///testdata" ></property>      //数据库名
	<property name="driverClass" value="com.mysql.jdbc.Driver" ></property>  //驱动类型
	<property name="user" value="root" ></property>   //用户数据库名
	<property name="password" value="123456" ></property> //密码
</bean>

<!-- 2.将JDBCTemplate放入spring容器 -->
<bean name="jdbcTemplate" class="org.springframework.jdbc.core.JdbcTemplate" >
	<property name="dataSource" ref="dataSource" ></property>
</bean>

<!-- 3.将UserDao放入spring容器 -->
<bean name="userDao" class="cn.itcast.a_jdbctemplate.UserDaoImpl" >
	<property name="js" ref="jdbcTemplate" ></property>
</bean>

</beans>
(5)进行测试方法类(当然这个在实际开发中,就不需要了,只是方便测试方法是否正确)
package cn.itcast.a_jdbctemplate;

import java.beans.PropertyVetoException;

import javax.annotation.Resource;

import org.junit.Test;
import org.junit.runner.RunWith;
import org.springframework.jdbc.core.JdbcTemplate;
import org.springframework.test.context.ContextConfiguration;
import org.springframework.test.context.junit4.SpringJUnit4ClassRunner;

import com.mchange.v2.c3p0.ComboPooledDataSource;

import cn.itcast.bean.User;

//演示JDBC模板
@RunWith(SpringJUnit4ClassRunner.class)
@ContextConfiguration("classpath:applicationContext.xml")
public class Demo {
		@Resource(name="userDao")
	private UserDao ud;

	@Test
	public void fun1() throws Exception{

		//0 准备连接池
		ComboPooledDataSource dataSource = new ComboPooledDataSource();
		dataSource.setDriverClass("com.mysql.jdbc.Driver");
		dataSource.setJdbcUrl("jdbc:mysql:///hibernate_32");
		dataSource.setUser("root");
		dataSource.setPassword("1234");
		//1 创建JDBC模板对象
		JdbcTemplate jt = new JdbcTemplate();
		jt.setDataSource(dataSource);
		//2 书写sql,并执行
		String sql = "insert into t_user values(null,'rose') ";
		jt.update(sql);

	}

	@Test
	public void fun2() throws Exception{
		User u = new User();
		u.setName("tom");
		ud.save(u);
	}
	@Test
	public void fun3() throws Exception{
		User u = new User();
		u.setId(2);
		u.setName("jack");
		ud.update(u);

	}

	@Test
	public void fun4() throws Exception{
		ud.delete(2);
	}

	@Test
	public void fun5() throws Exception{
		System.out.println(ud.getTotalCount());
	}

	@Test
	public void fun6() throws Exception{
		System.out.println(ud.getById(1));
	}

	@Test
	public void fun7() throws Exception{
		System.out.println(ud.getAll());
	}

}
上面这个例子,相对于实际开发中对数据库的操作基本上已经很齐全了,增删改查都有,如果有什么特别的需求的话,自己按照类似的形式进行编写就可以了,关键是要自己看得懂哪个API是适合什么操作的。。。
好了,下面把在配置文件中读取properties文件的方法也写出来(实际开发中更习惯这一种,因为如果要修改数据库,那么只需要该properties中的内容就可以了,比单独修改配置文件内容方便很多)
properties文件代码(命名为:db.properties):
jdbc.jdbcUrl=jdbc:mysql:///hibernate_32
jdbc.driverClass=com.mysql.jdbc.Driver
jdbc.user=root
jdbc.password=1234
PS:其中上面的jdbc只是用来一个前缀而已,防止与其他的关键字的内容发送冲突,这个可以根据自己的习惯来自由定义即可。
spring配置文件代码(等价上面的配置文件):
<?xml version="1.0" encoding="UTF-8"?>
<beans xmlns:xsi="http://www.w3.org/2001/XMLSchema-instance" xmlns="http://www.springframework.org/schema/beans" xmlns:context="http://www.springframework.org/schema/context" xsi:schemaLocation="http://www.springframework.org/schema/beans http://www.springframework.org/schema/beans/spring-beans-4.2.xsd http://www.springframework.org/schema/context http://www.springframework.org/schema/context/spring-context-4.2.xsd ">

<!-- 指定spring读取db.properties配置 -->
<context:property-placeholder location="classpath:db.properties"  />

<!-- 1.将连接池放入spring容器 -->
<bean name="dataSource" class="com.mchange.v2.c3p0.ComboPooledDataSource" >
	<property name="jdbcUrl" value="${jdbc.jdbcUrl}" ></property>
	<property name="driverClass" value="${jdbc.driverClass}" ></property>
	<property name="user" value="${jdbc.user}" ></property>
	<property name="password" value="${jdbc.password}" ></property>
</bean>


<!-- 2.将JDBCTemplate放入spring容器 -->
<bean name="jdbcTemplate" class="org.springframework.jdbc.core.JdbcTemplate" >
	<property name="dataSource" ref="dataSource" ></property>
</bean>

<!-- 3.将UserDao放入spring容器 -->
<bean name="userDao" class="cn.itcast.a_jdbctemplate.UserDaoImpl" >
	<property name="js" ref="jdbcTemplate" ></property>
</bean>


</beans>
十一:spring中的事务知识点
一:基本知识梳理
(1)事务特性:ACID------原子性,一致性,隔离性,持续性
(2)事务并发问题----------1:脏读(一个事务读取到另一个事务未提交的更新数据)不可重复读(在同一事务中,多次读取同一数据返回的结果有所不同)幻读(一个事务读取到另一个事务已提交的insert数据)
(3)事务隔离级别-------1:读未提交 2:读已提交 4:可重复读 8:串行化
(4)spring封装了事务管理代码:打开事务,提交事务,回滚事务
(5)spring提供了一个操作事务的接口:PlatformTransactionMnager接口。针对不同平台会提供不同的实现类。注意:在spring中玩事务管理,最为关键的核心对象就是TransactionManager对象
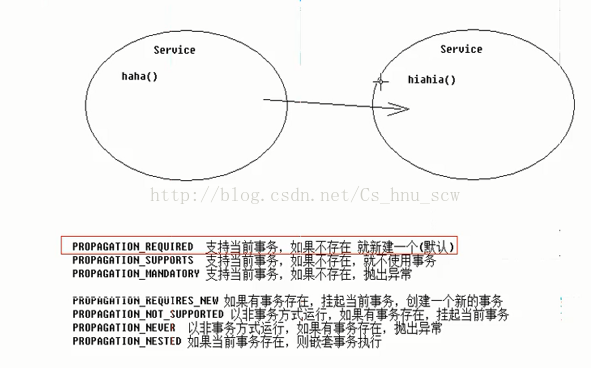
(6)spring管理事务的属性介绍:事务的隔离级别,是否只读(限制操作是否能修改数据库,true只读,false可操作),事务的传播行为(决定业务方法之间的调用,事务应该如何处理),其中的传播属性有如下所示:
二:搭建事务的环境(直接用代码分析)
Dao层内容:
public interface AccountDao {

	//加钱
	void increaseMoney(Integer id,Double money);
	//减钱
	void decreaseMoney(Integer id,Double money);
}
Dao层实现层:
import org.springframework.jdbc.core.support.JdbcDaoSupport;

public class AccountDaoImpl extends JdbcDaoSupport implements AccountDao  {

	@Override
	public void increaseMoney(Integer id, Double money) {

		getJdbcTemplate().update("update t_account set money = money+? where id = ? ", money,id);

	}

	@Override
	public void decreaseMoney(Integer id, Double money) {

		getJdbcTemplate().update("update t_account set money = money-? where id = ? ", money,id);
	}

}
Service层接口:
package cn.itcast.service;

public interface AccountService {

	//转账方法
	void transfer(Integer from,Integer to,Double money);

}
service实现:
package cn.itcast.service;

import org.springframework.transaction.TransactionStatus;
import org.springframework.transaction.annotation.Isolation;
import org.springframework.transaction.annotation.Propagation;
import org.springframework.transaction.annotation.Transactional;
import org.springframework.transaction.support.TransactionCallback;
import org.springframework.transaction.support.TransactionCallbackWithoutResult;
import org.springframework.transaction.support.TransactionTemplate;

import cn.itcast.dao.AccountDao;

@Transactional(isolation=Isolation.REPEATABLE_READ,propagation=Propagation.REQUIRED,readOnly=true)
public class AccountServiceImpl implements AccountService {

	private AccountDao ad ;

	@Override
	public void transfer(final Integer from,final Integer to,final Double money) {
				//减钱
				ad.decreaseMoney(from, money);
				//int i = 1/0;
				//加钱
				ad.increaseMoney(to, money);
	}
	public void setAd(AccountDao ad) {
		this.ad = ad;
	}
}
spring配置文件:
<?xml version="1.0" encoding="UTF-8"?>
<beans xmlns:xsi="http://www.w3.org/2001/XMLSchema-instance" xmlns="http://www.springframework.org/schema/beans" xmlns:context="http://www.springframework.org/schema/context" xmlns:aop="http://www.springframework.org/schema/aop" xmlns:tx="http://www.springframework.org/schema/tx" xsi:schemaLocation="http://www.springframework.org/schema/beans http://www.springframework.org/schema/beans/spring-beans-4.2.xsd http://www.springframework.org/schema/context http://www.springframework.org/schema/context/spring-context-4.2.xsd http://www.springframework.org/schema/aop http://www.springframework.org/schema/aop/spring-aop-4.2.xsd http://www.springframework.org/schema/tx http://www.springframework.org/schema/tx/spring-tx-4.2.xsd ">

<!-- 指定spring读取db.properties配置 -->
<context:property-placeholder location="classpath:db.properties"  />

<!-- 1.将连接池 -->
<bean name="dataSource" class="com.mchange.v2.c3p0.ComboPooledDataSource" >
	<property name="jdbcUrl" value="${jdbc.jdbcUrl}" ></property>
	<property name="driverClass" value="${jdbc.driverClass}" ></property>
	<property name="user" value="${jdbc.user}" ></property>
	<property name="password" value="${jdbc.password}" ></property>
</bean>

<!-- 2.Dao-->
<bean name="accountDao" class="cn.itcast.dao.AccountDaoImpl" >
	<property name="dataSource" ref="dataSource" ></property>
</bean>
<!-- 3.Service-->
<bean name="accountService" class="cn.itcast.service.AccountServiceImpl" >
	<property name="ad" ref="accountDao" ></property>
</bean>

</beans>
好了,上面就是比较正常的一个开发结构的代码了,但是不包含事务处理的内容,这时候运行的话,是能够正常运行的。但是如果在transfer方法中,出现异常,比如int i = 1/0;那么转账的总数就会出现问题了。
PS:默认的Spring容器中,只对unchecked类型的异常(非编译时异常,如NullPointException,ArryaryOutOfException)进行事务的回滚,而对于checked类型异常(编译时异常,如IOException)是不进行回滚的,但是可以通过进行设置回滚的类型,来进行修改的哦。。所以也就是下面所要讲解的知识点了。
(1)spring管理事务的方式(三种)
方法一:编码式(了解)
spring配置文件:(基于上面的配置文件,添加下面的内容)
<!-- 事务核心管理器,封装了所有事务操作. 依赖于连接池 -->
<bean name="transactionManager" class="org.springframework.jdbc.datasource.DataSourceTransactionManager" >
	<property name="dataSource" ref="dataSource" ></property>
</bean>
<!-- 事务模板对象 -->
<bean name="transactionTemplate" class="org.springframework.transaction.support.TransactionTemplate" >
	<property name="transactionManager" ref="transactionManager" ></property>
</bean>package cn.itcast.service;
import org.springframework.transaction.TransactionStatus;
import org.springframework.transaction.annotation.Isolation;
import org.springframework.transaction.annotation.Propagation;
import org.springframework.transaction.annotation.Transactional;
import org.springframework.transaction.support.TransactionCallback;
import org.springframework.transaction.support.TransactionCallbackWithoutResult;
import org.springframework.transaction.support.TransactionTemplate;
import cn.itcast.dao.AccountDao;
@Transactional(isolation=Isolation.REPEATABLE_READ,propagation=Propagation.REQUIRED,readOnly=true)
public class AccountServiceImpl implements AccountService {
private AccountDao ad ;
private TransactionTemplate tt;
@Override
public void transfer(final Integer from,final Integer to,final Double money) {
tt.execute(new TransactionCallbackWithoutResult() {
@Override
protected void doInTransactionWithoutResult(TransactionStatus arg0) {
//减钱
ad.decreaseMoney(from, money);
int i = 1/0;
//加钱
ad.increaseMoney(to, money);
}
});
}
public void setAd(AccountDao ad) {
this.ad = ad;
}
public void setTt(TransactionTemplate tt) {
this.tt = tt;
}
}方法二:xml配置(aop)(必须掌握)
步骤(1)导包4(基础包)+4(事务包)
(2)配置新的约束(tx)
(3)spring中xml配置通知
(4)spring中xml配置织入
<?xml version="1.0" encoding="UTF-8"?>
<beans xmlns:xsi="http://www.w3.org/2001/XMLSchema-instance" xmlns="http://www.springframework.org/schema/beans" xmlns:context="http://www.springframework.org/schema/context" xmlns:aop="http://www.springframework.org/schema/aop" xmlns:tx="http://www.springframework.org/schema/tx" xsi:schemaLocation="http://www.springframework.org/schema/beans http://www.springframework.org/schema/beans/spring-beans-4.2.xsd http://www.springframework.org/schema/context http://www.springframework.org/schema/context/spring-context-4.2.xsd http://www.springframework.org/schema/aop http://www.springframework.org/schema/aop/spring-aop-4.2.xsd http://www.springframework.org/schema/tx http://www.springframework.org/schema/tx/spring-tx-4.2.xsd ">

<!-- 指定spring读取db.properties配置 -->
<context:property-placeholder location="classpath:db.properties"  />

<!-- 事务核心管理器,封装了所有事务操作. 依赖于连接池 -->
<bean name="transactionManager" class="org.springframework.jdbc.datasource.DataSourceTransactionManager" >
	<property name="dataSource" ref="dataSource" ></property>
</bean>
<!-- 事务模板对象 -->
<bean name="transactionTemplate" class="org.springframework.transaction.support.TransactionTemplate" >
	<property name="transactionManager" ref="transactionManager" ></property>
</bean>

<!-- 配置事务通知 -->
<tx:advice id="txAdvice" transaction-manager="transactionManager" >
	<tx:attributes>
		<!-- 以方法为单位,指定方法应用什么事务属性
			isolation:隔离级别
			propagation:传播行为
			read-only:是否只读
		 -->
		<tx:method name="save*" isolation="REPEATABLE_READ" propagation="REQUIRED" read-only="false" />
		<tx:method name="persist*" isolation="REPEATABLE_READ" propagation="REQUIRED" read-only="false" />
		<tx:method name="update*" isolation="REPEATABLE_READ" propagation="REQUIRED" read-only="false" />
		<tx:method name="modify*" isolation="REPEATABLE_READ" propagation="REQUIRED" read-only="false" />
		<tx:method name="delete*" isolation="REPEATABLE_READ" propagation="REQUIRED" read-only="false" />
		<tx:method name="remove*" isolation="REPEATABLE_READ" propagation="REQUIRED" read-only="false" />
		<tx:method name="get*" isolation="REPEATABLE_READ" propagation="REQUIRED" read-only="true" />
		<tx:method name="find*" isolation="REPEATABLE_READ" propagation="REQUIRED" read-only="true" />
		<tx:method name="transfer" isolation="REPEATABLE_READ" propagation="REQUIRED" read-only="false" />
	</tx:attributes>
</tx:advice>


<!-- 配置织入 -->
<aop:config  >
	<!-- 配置切点表达式 -->
	<aop:pointcut expression="execution(* cn.itcast.service.*ServiceImpl.*(..))" id="txPc"/>
	<!-- 配置切面 : 通知+切点
		 	advice-ref:通知的名称
		 	pointcut-ref:切点的名称
	 -->
	<aop:advisor advice-ref="txAdvice" pointcut-ref="txPc" />
</aop:config>


<!-- 1.将连接池 -->
<bean name="dataSource" class="com.mchange.v2.c3p0.ComboPooledDataSource" >
	<property name="jdbcUrl" value="${jdbc.jdbcUrl}" ></property>
	<property name="driverClass" value="${jdbc.driverClass}" ></property>
	<property name="user" value="${jdbc.user}" ></property>
	<property name="password" value="${jdbc.password}" ></property>
</bean>

<!-- 2.Dao-->
<bean name="accountDao" class="cn.itcast.dao.AccountDaoImpl" >
	<property name="dataSource" ref="dataSource" ></property>
</bean>
<!-- 3.Service-->
<bean name="accountService" class="cn.itcast.service.AccountServiceImpl" >
	<property name="ad" ref="accountDao" ></property>
	<property name="tt" ref="transactionTemplate" ></property>
</bean>

</beans>
方法三:注解配置(aop)(必须掌握)
步骤:(1)和(2)与spring配置文件方式一样
(3)spring配置文件中开启使用注解管理aop事务
<?xml version="1.0" encoding="UTF-8"?>
<beans xmlns:xsi="http://www.w3.org/2001/XMLSchema-instance" xmlns="http://www.springframework.org/schema/beans" xmlns:context="http://www.springframework.org/schema/context" xmlns:aop="http://www.springframework.org/schema/aop" xmlns:tx="http://www.springframework.org/schema/tx" xsi:schemaLocation="http://www.springframework.org/schema/beans http://www.springframework.org/schema/beans/spring-beans-4.2.xsd http://www.springframework.org/schema/context http://www.springframework.org/schema/context/spring-context-4.2.xsd http://www.springframework.org/schema/aop http://www.springframework.org/schema/aop/spring-aop-4.2.xsd http://www.springframework.org/schema/tx http://www.springframework.org/schema/tx/spring-tx-4.2.xsd ">

<!-- 指定spring读取db.properties配置 -->
<context:property-placeholder location="classpath:db.properties"  />

<!-- 事务核心管理器,封装了所有事务操作. 依赖于连接池 -->
<bean name="transactionManager" class="org.springframework.jdbc.datasource.DataSourceTransactionManager" >
	<property name="dataSource" ref="dataSource" ></property>
</bean>
<!-- 事务模板对象 -->
<bean name="transactionTemplate" class="org.springframework.transaction.support.TransactionTemplate" >
	<property name="transactionManager" ref="transactionManager" ></property>
</bean>

<!-- 开启使用注解管理aop事务 -->
<tx:annotation-driven/>

<!-- 1.将连接池 -->
<bean name="dataSource" class="com.mchange.v2.c3p0.ComboPooledDataSource" >
	<property name="jdbcUrl" value="${jdbc.jdbcUrl}" ></property>
	<property name="driverClass" value="${jdbc.driverClass}" ></property>
	<property name="user" value="${jdbc.user}" ></property>
	<property name="password" value="${jdbc.password}" ></property>
</bean>

<!-- 2.Dao-->
<bean name="accountDao" class="cn.itcast.dao.AccountDaoImpl" >
	<property name="dataSource" ref="dataSource" ></property>
</bean>
<!-- 3.Service-->
<bean name="accountService" class="cn.itcast.service.AccountServiceImpl" >
	<property name="ad" ref="accountDao" ></property>
	<property name="tt" ref="transactionTemplate" ></property>
</bean>

</beans>package cn.itcast.service;
import org.springframework.transaction.TransactionStatus;
import org.springframework.transaction.annotation.Isolation;
import org.springframework.transaction.annotation.Propagation;
import org.springframework.transaction.annotation.Transactional;
import org.springframework.transaction.support.TransactionCallback;
import org.springframework.transaction.support.TransactionCallbackWithoutResult;
import org.springframework.transaction.support.TransactionTemplate;
import cn.itcast.dao.AccountDao;
@Transactional(isolation=Isolation.REPEATABLE_READ,propagation=Propagation.REQUIRED,readOnly=true)
public class AccountServiceImpl implements AccountService {
private AccountDao ad ;
private TransactionTemplate tt;
@Override
@Transactional(isolation=Isolation.REPEATABLE_READ,propagation=Propagation.REQUIRED,readOnly=false)
public void transfer(final Integer from,final Integer to,final Double money) {
//减钱
ad.decreaseMoney(from, money);
int i = 1/0;
//加钱
ad.increaseMoney(to, money);
}
public void setAd(AccountDao ad) {
this.ad = ad;
}
public void setTt(TransactionTemplate tt) {
this.tt = tt;
}
}PS:对于注解方法的使用,可以使用在类的开头,这样就表示类中的方法都使用该注解。。如果想对于某个方法改变注解的形式,那么就可以单独的重新写一个注解。这两种在代码中都有体现。
---------------
十二:Spring的基本开发模式
其实综合前面讲的这些内容,应该够基本的了解Spring的内容了,可能刚开始接触的时候会比较迷茫,感觉不是很懂,会觉得怎么那么多的东需要进行配置,然后还有这么多关联性的内容,但是当使用过后和认真分析过后,就会觉得Spring这个框架确实写得非常非常的好,看源码的时候就会发现里面很多Java的高阶知识,这在我其他的文章也会有提示到的哦。欢迎进行阅读。下面的话,就说一下Spring的一个基本的配置过程好了,这样的话,就有一个配置的基本流程,而不至于不知道从何做起。当然,这只是我个人的开发流程而已,只要适合自己就好了,主要还是要理解。。理解。。。再理解。。。。
(1)配置Bean元素
1:可以采取XML的单独配置
2:可以采取扫描和注解结合的形式进行配置
(2)配置资源扫描------------主要就是对properties文件的扫描,这个的话主要是用于进行数据库的方便
(3)配置需要动态管理的资源-------同样可以用XML或者注解的形式
(4)配置数据源-----可以有JDBC,C3P0。。。等等
(5)配置事务管理
好了呢。。。这些就是基本的spring的知识点啦,,,期待着我持续的更新哟。。还有其他的文章,欢迎大家一起学习交流呢!!!


 360
360

 被折叠的 条评论
为什么被折叠?
被折叠的 条评论
为什么被折叠?
 到【灌水乐园】发言


