


文章目录
6. Nginx虚拟主机
虚拟主机使用的是特殊的软硬件技术,它把一台运行在因特网上的服务器主机分成一台台“虚拟”的主机,每台虚拟主机都可以是一个独立的网站,可以具有独立的域名,
具有完整的Intemet服务器功能(WWW、FTP、Email等),同一台主机上的虚拟主机之间是完全独立的。从网站访问者来看,每一台虚拟主机和一台独立的主机完全一样。

nginx 支持多虚拟机,可以在一台机器上同时运行多个网站个功能

nginx 的多虚拟机,可以基于:
	基于域名的虚拟主机 : 不同的域名、相同的IP(此方式应用最广泛)
	基于端口的虚拟主机 : 不使用域名、IP来区分不同站点的内容,而是用不同的TCP端口号
	基于IP地址的虚拟主机 : 不同的域名、不同的IP ( 需要加网络接口 ,应用的不广泛) 基于IP地址

6.1 nginx 单虚拟主机配置
6.1.1 静态网站的搭建
# 在 nginx.conf 配置文件中定义虚拟主机
http{
	# 配置一个 server{} 标签就可以理解是一个虚拟机站点,配置 N 个就代表有 N 个站点
	# server{} 默认加载顺序是自上而下的匹配规则(前提是如果没有其他定义的情况下,如基于域名的匹配,基于端口的匹配)
	server{

	}
	# 编写第二个
	server{

	}
}


server {
		# 定义虚拟主机站点端口号,也是用户访问网站的入口
        listen       8088;
        # 域名配置,没有域名可以写 localhost 或者 _
     	# 过个域名之间使用空格隔开
     	# server_name www.mondaygarden.com www.baidu.com
        server_name  localhost;

		# 定义网站编码
        charset utf-8;

        #access_log  logs/host.access.log  main;

		# nginx 的路径匹配规则
		# 如下的规则是最低级匹配,任何 nginx 请求都会进入如下 localhost 的配置,去他所定义的路径下查找内容
        location / {
        	# 这个 root 是定义网页根目录的,这个 html 是以 nginx 安装的路径相对的
            root   html;
            # index关键词,定义 nginx 的首页文件名,默认在访问 nginx 根目录下时去访问这个文件
            index  index.html index.htm;
        }

        #error_page  404              /404.html;

        # redirect server error pages to the static page /50x.html
        #
        error_page   500 502 503 504  /50x.html;
        location = /50x.html {
            root   html;
        }

        # proxy the PHP scripts to Apache listening on 127.0.0.1:80
        #
        #location ~ \.php$ {
        #    proxy_pass   http://127.0.0.1;
        #}

        # pass the PHP scripts to FastCGI server listening on 127.0.0.1:9000
        #
        #location ~ \.php$ {
        #    root           html;
        #    fastcgi_pass   127.0.0.1:9000;
        #    fastcgi_index  index.php;
        #    fastcgi_param  SCRIPT_FILENAME  /scripts$fastcgi_script_name;
        #    include        fastcgi_params;
        #}

        # deny access to .htaccess files, if Apache's document root
        # concurs with nginx's one
        #
        #location ~ /\.ht {
        #    deny  all;
        #}
    }
6.2 案例1:多网卡多IP配置虚拟主机
6.2.1 增加一块网卡

# 查看 ip 地址
[root@nginx ~]# ifconfig
ens33: flags=4163<UP,BROADCAST,RUNNING,MULTICAST>  mtu 1500
        inet 192.168.169.152  netmask 255.255.255.0  broadcast 192.168.169.255
        inet6 fe80::b824:f1be:b7d:9555  prefixlen 64  scopeid 0x20<link>
        ether 00:0c:29:b1:2e:fe  txqueuelen 1000  (Ethernet)
        RX packets 91871  bytes 92509486 (88.2 MiB)
        RX errors 0  dropped 0  overruns 0  frame 0
        TX packets 34112  bytes 39677157 (37.8 MiB)
        TX errors 0  dropped 0 overruns 0  carrier 0  collisions 0

ens37: flags=4163<UP,BROADCAST,RUNNING,MULTICAST>  mtu 1500
        inet 192.168.169.137  netmask 255.255.255.0  broadcast 192.168.169.255
        inet6 fe80::6225:5b3c:6a17:dc90  prefixlen 64  scopeid 0x20<link>
        ether 00:0c:29:b1:2e:08  txqueuelen 1000  (Ethernet)
        RX packets 7  bytes 986 (986.0 B)
        RX errors 0  dropped 0  overruns 0  frame 0
        TX packets 11  bytes 1434 (1.4 KiB)
        TX errors 0  dropped 0 overruns 0  carrier 0  collisions 0

lo: flags=73<UP,LOOPBACK,RUNNING>  mtu 65536
        inet 127.0.0.1  netmask 255.0.0.0
        inet6 ::1  prefixlen 128  scopeid 0x10<host>
        loop  txqueuelen 1000  (Local Loopback)
        RX packets 1116266  bytes 280663165 (267.6 MiB)
        RX errors 0  dropped 0  overruns 0  frame 0
        TX packets 1116266  bytes 280663165 (267.6 MiB)
        TX errors 0  dropped 0 overruns 0  carrier 0  collisions 0
6.2.2 编辑配置文件,基于每个IP创建一个虚拟主机
# 因为在主配置文件中使用 include 添加的配置文件信息,所以这里可以在指定目录下新建 .conf 文件
vim /usr/local/nginx/conf/conf_file/ip.conf
server {
    listen       192.168.169.152:8080;
    server_name  localhost;
    charset utf-8;
    location / {
		root	html/ip_ens33;
        index   index.html;
    }
}

server {
    listen       192.168.169.137:8080;
    server_name  localhost;
    charset utf-8;

    location / {
        root    html/ip_ens37;
        index   index.html;
    }
}
mkdir -p /usr/local/nginx/html/ip_ens33
mkdir -p /usr/local/nginx/html/ip_ens37

echo "ens33" >> ip_ens33/index.html
echo "ens37" >> ip_ens37/index.html
# 检查配置文件是否正确
nginx -t

# 重新加载
nginx -s reload
- 测试:
192.168.169.137:8080

- 测试:
192.168.169.152:8080

6.3 案例2:单网卡多端口配置虚拟主机
# 修改配置文件
# 因为在主配置文件中使用 include 添加的配置文件信息,所以这里可以在指定目录下新建 .conf 文件
vim /usr/local/nginx/conf/conf_file/port.conf
server {
  listen 81;

  location / {
    root server {
    listen       81;
    server_name  localhost;
    charset utf-8;
    location / {
		root	html/port_81;
        index   index.html;
    }

}


server {
    listen       82;
    server_name  localhost;
    charset utf-8;

    location / {
        root    html/port_82;
        index   index.html;
    }

}
mkdir -p /usr/local/nginx/html/port_81
mkdir -p /usr/local/nginx/html/port_82

echo "port81" >> /usr/local/nginx/html/port_81/index.html
echo "port82" >> /usr/local/nginx/html/port_82/index.html
# 检查配置文件是否正确
nginx -t

# 重新加载
nginx -s reload
- 测试:
192.168.169.152:81

测试:
192.168.169.152:82

6.4 案例3:基于域名配置虚拟主机
# 修改配置文件
vim /usr/local/nginx/conf/conf_file/test1.conf
server {
  listen 8080;
  server_name test1.nginx.com;

  location / {
    root        html/test1;
    index       index.html;
  }
}


vim /usr/local/nginx/conf/conf_file/test2.conf
server {
  listen 8081;
  server_name test2.nginx.com;

  location / {
    root        html/test1;
    index       index.html;
  }
}
mkdir -p /usr/local/nginx/html/test1
mkdir -p /usr/local/nginx/html/test2

echo "test1" >> /usr/local/nginx/html/test1/index.html
echo "test2" >> /usr/local/nginx/html/test2/index.html
# 配置域名解析
[root@nginx ]# cat /etc/hosts
127.0.0.1   localhost localhost.localdomain localhost4 localhost4.localdomain4
::1         localhost localhost.localdomain localhost6 localhost6.localdomain6

192.168.169.152	test1.nginx.com
192.168.169.152 test2.nginx.com
# 配置 Windows 域名解析,本次测试使用
C:\Windows\System32\drivers\etc\hosts
192.168.169.152    test1.nginx.com
192.168.169.152    test2.nginx.com
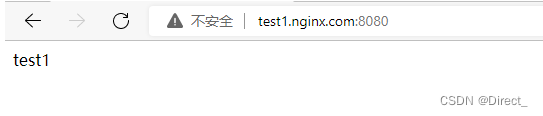
- 测试:
test1.nginx.com:8080
- 测试:
test1.nginx.com:8081

6.5 Nginx 虚拟主机日志定义
问题:
	因为每配置一个 server{} 站点,在访问时就会产生一个相对应的访问日志,如果访问不同站点的日志都存在一个 access.log 日志中不方便查看各个站点的访问信息
解决:
	在对应的 server{} 中添加 access_log		logs/test1.log
	server {
  		listen 80;
  		server_name		test1.nginx.com;
  		access_log		logs/test1.log;

  		location / {
    		root        html/test1;
    		index       index.html;
  		}
	}


 3549
3549


 被折叠的 条评论
为什么被折叠?
被折叠的 条评论
为什么被折叠?
 到【灌水乐园】发言


