


在之前的文章中我们经常使用MybatisPlus进行增删改查,可能有些小伙伴对mybatisplus不是很熟悉,今天特意出了一般入门级的教程,我自己也是一边学习一边写的,有什么地方写的不好的地方请留意指出。
1|0快速入门的小例子
1|1准备数据库和测试数据
#创建用户表
CREATE TABLE user (
    id BIGINT(20) PRIMARY KEY NOT NULL COMMENT '主键',
    name VARCHAR(30) DEFAULT NULL COMMENT '姓名',
    age INT(11) DEFAULT NULL COMMENT '年龄',
    email VARCHAR(50) DEFAULT NULL COMMENT '邮箱',
    manager_id BIGINT(20) DEFAULT NULL COMMENT '直属上级id',
    create_time DATETIME DEFAULT NULL COMMENT '创建时间',
    CONSTRAINT manager_fk FOREIGN KEY (manager_id)
        REFERENCES user (id)
)  ENGINE=INNODB CHARSET=UTF8;

#初始化数据:
INSERT INTO user (id, name, age, email, manager_id, create_time)
VALUES (1087982257332887553, '大boss', 40, 'boss@baomidou.com', NULL, '2019-01-11 14:20:20'),
			(1088248166370832385, '王天风', 25, 'wtf@baomidou.com', 1087982257332887553, '2019-02-05 11:12:22'),
			(1088250446457389058, '李艺伟', 28, 'lyw@baomidou.com', 1088248166370832385, '2019-02-14 08:31:16'),
			(1094590409767661570, '张雨琪', 31, 'zjq@baomidou.com', 1088248166370832385, '2019-01-14 09:15:15'),
			(1094592041087729666, '刘红雨', 32, 'lhm@baomidou.com', 1088248166370832385, '2019-01-14 09:48:16');
1|2配置数据库信息
在项目的resources目录下新建application.yml文件,内容如下:
spring: datasource: url: jdbc:mysql://localhost:3306/springboot?serverTimezone=GMT%2B8 username: root password: nomore532 driver-class-name: com.mysql.cj.jdbc.Driver mybatis-plus: configuration: log-impl: org.apache.ibatis.logging.stdout.StdOutImpl logging: level: root: warn com.demo01.Mapper: trace pattern: console: "%p%m%n"1|3新建实体类型
在项目根目录下新建一个包,名字为Entity,然后,新建一个名字为User.java的实体类型。
package com.demo01.Entity;


import lombok.Data;


import java.time.LocalDateTime;

@Data
public class User {

    //主键
    private Long id;
    //用户名
    private String name;
    //邮箱
    private String email;
    //年龄
    private  Integer age;
    //直属上级
    private  Long managerId;
    //创建时间
    private LocalDateTime createTime;
}
注意:@Data注解能在编译是自动生成get和set方法。
1|4新建Mapper包,并创建UserMapper接口类。
在项目的根目录下新建一个名为Mapper包,并创建UserMapper.java接口类,继承MyBatis-Plus的BaseMapper基类。
package com.demo01.Mapper;

import com.baomidou.mybatisplus.core.mapper.BaseMapper;
import com.demo01.Entity.User;

public interface UserMapper extends BaseMapper<User> {
}
注意:MyBatisPlus的BaseMapper基类需要存入一个泛型,这个泛型是要操作的实体类型。
1|5并在启动类型添加扫描路径
@SpringBootApplication
@MapperScan("com.demo01.Mapper")
public class Demo01Application {

    public static void main(String[] args) {
        SpringApplication.run(Demo01Application.class, args);
    }

}1|6新建测试方法
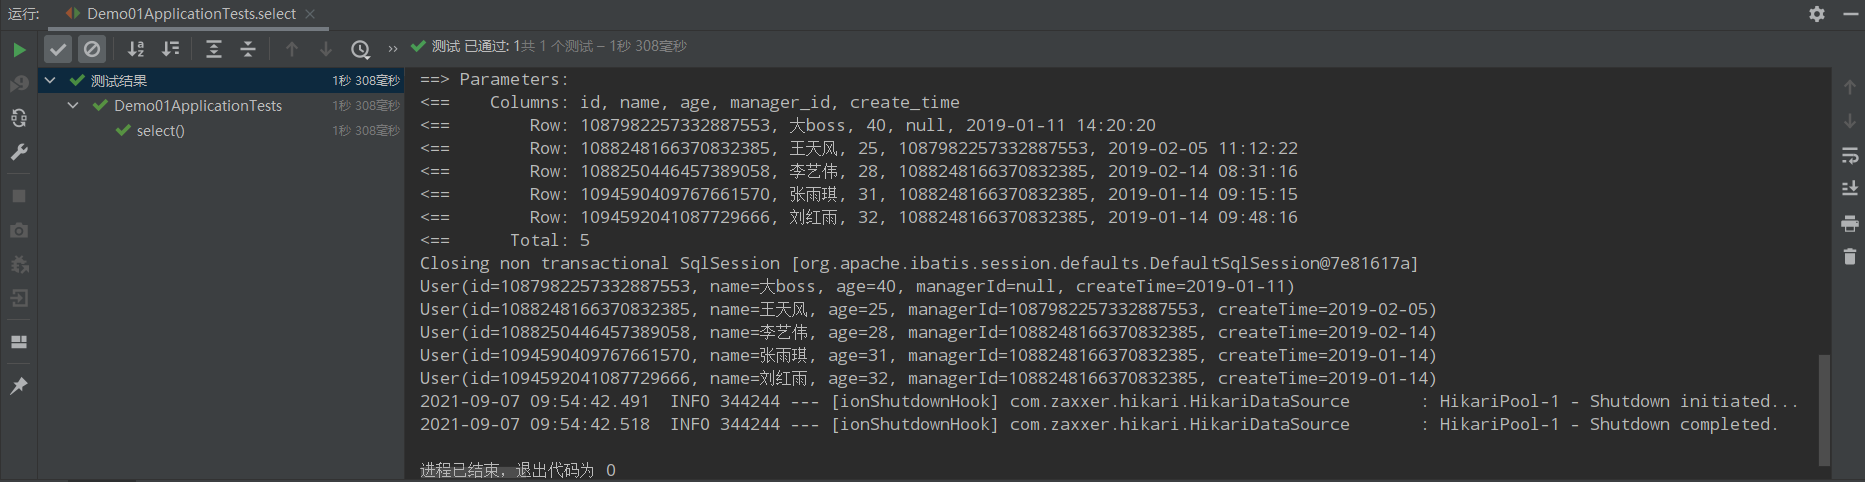
查询所有的用户信息
package com.demo01;


import com.demo01.Entity.User;
import com.demo01.Mapper.UserMapper;
import org.junit.jupiter.api.Test;
import org.springframework.beans.factory.annotation.Autowired;
import org.springframework.boot.test.context.SpringBootTest;


import java.util.List;


@SpringBootTest(classes = Demo01Application.class)
class Demo01ApplicationTests {

    @Autowired
    private UserMapper userMapper;

    @Test
    public void  select() {
        List<User> list = userMapper.selectList(null);
        list.forEach(System.out::println);
    }
}
运行结果如下:
2|0通用Mapper
2|1新增(Create)方法
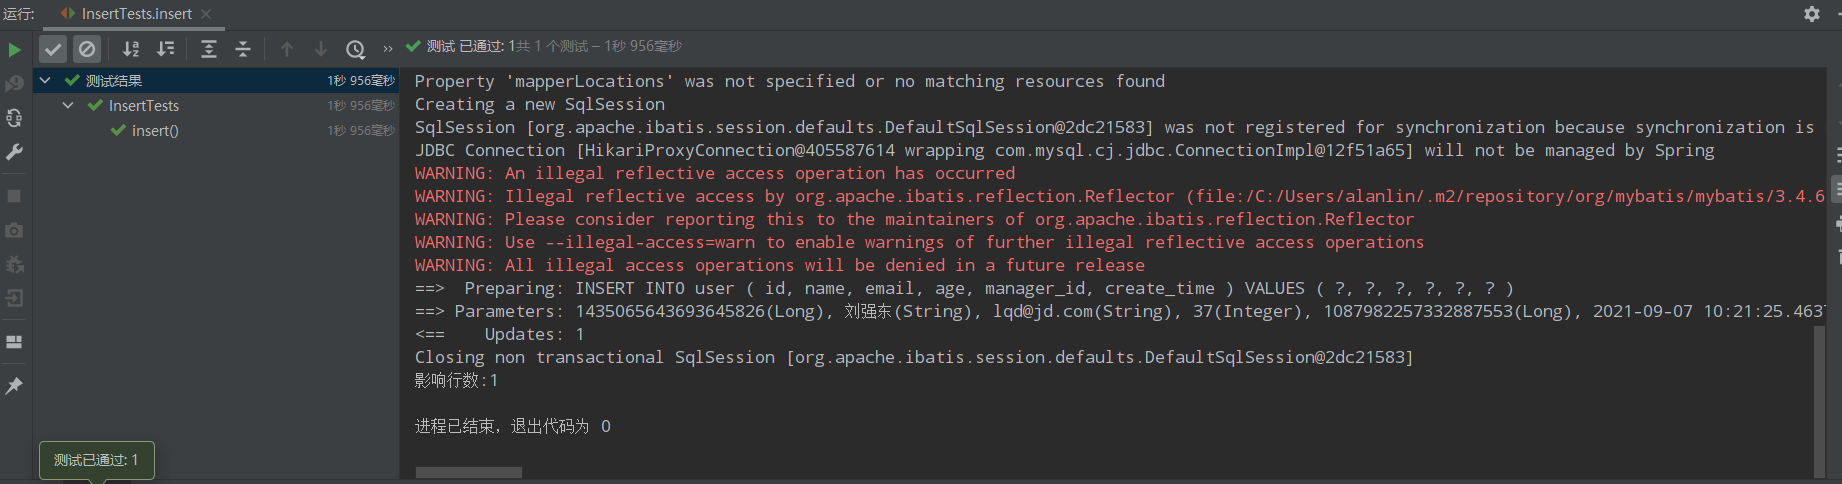
在测试目录下新建一个测试类,名字为InserTest.java,内容如下:
package com.demo01; import com.demo01.Entity.User; import com.demo01.Mapper.UserMapper; import org.junit.jupiter.api.Test; import org.springframework.beans.factory.annotation.Autowired; import org.springframework.boot.test.context.SpringBootTest; @SpringBootTest(classes = Demo01Application.class) class InsertTests { @Autowired private UserMapper userMapper; @Test public void insert(){ User user = new User(); user.setName("刘强东"); user.setAge(37); user.setEmail("lqd@jd.com"); user.setManagerId(1087982257332887553L); int rows = userMapper.insert(user); System.out.println("影响行数"+rows); } }
注意:insert方法需要的参数是一个实体,返回参数是影响行数
运行结果如下:
查数据库结构如下:
2|2常用注解
@TableName
描述:表名注解
| 属性 | 类型 | 必须指定 | 默认值 | 描述 |
|---|---|---|---|---|
| value | String | 否 | "" | 表名 |
| schema | String | 否 | "" | schema |
| keepGlobalPrefix | boolean | 否 | false | 是否保持使用全局的 tablePrefix 的值(如果设置了全局 tablePrefix 且自行设置了 value 的值) |
| resultMap | String | 否 | "" | xml 中 resultMap 的 id |
| autoResultMap | boolean | 否 | false | 是否自动构建 resultMap 并使用(如果设置 resultMap 则不会进行 resultMap 的自动构建并注入) |
| excludeProperty | String[] | 否 | {} | 需要排除的属性名(@since 3.3.1) |
@TableId
描述:主键注解
| 属性 | 类型 | 必须指定 | 默认值 | 描述 |
|---|---|---|---|---|
| value | String | 否 | "" | 主键字段名 |
| type | Enum | 否 | IdType.NONE | 主键类型 |
type的类型包括以下几种:
- AUTO:数据库ID自增。
- NONE:无状态,该类型为未设置主键类型(注解里等于跟随全局,全局里约等于 INPUT)
- INPUT:insert前自行set主键值
- ASSIGN_ID:分配ID(主键类型为Number(Long和Integer)或String)(since 3.3.0),使用接口
IdentifierGenerator的方法nextId(默认实现类为DefaultIdentifierGenerator雪花算法) - ASSIGN_UUID :分配UUID,主键类型为String(since 3.3.0),使用接口
IdentifierGenerator的方法nextUUID(默认default方法)
TableField
描述:字段注解(非主键)
详细的注解请查看MybatisPlus的官网
2|3排查非表字段的三种方式
- transient:不参与序列化
- static
- TableField(exist=false)
3|0MybatisPlus查询方法(Retrieve)
3|1普遍查询方法
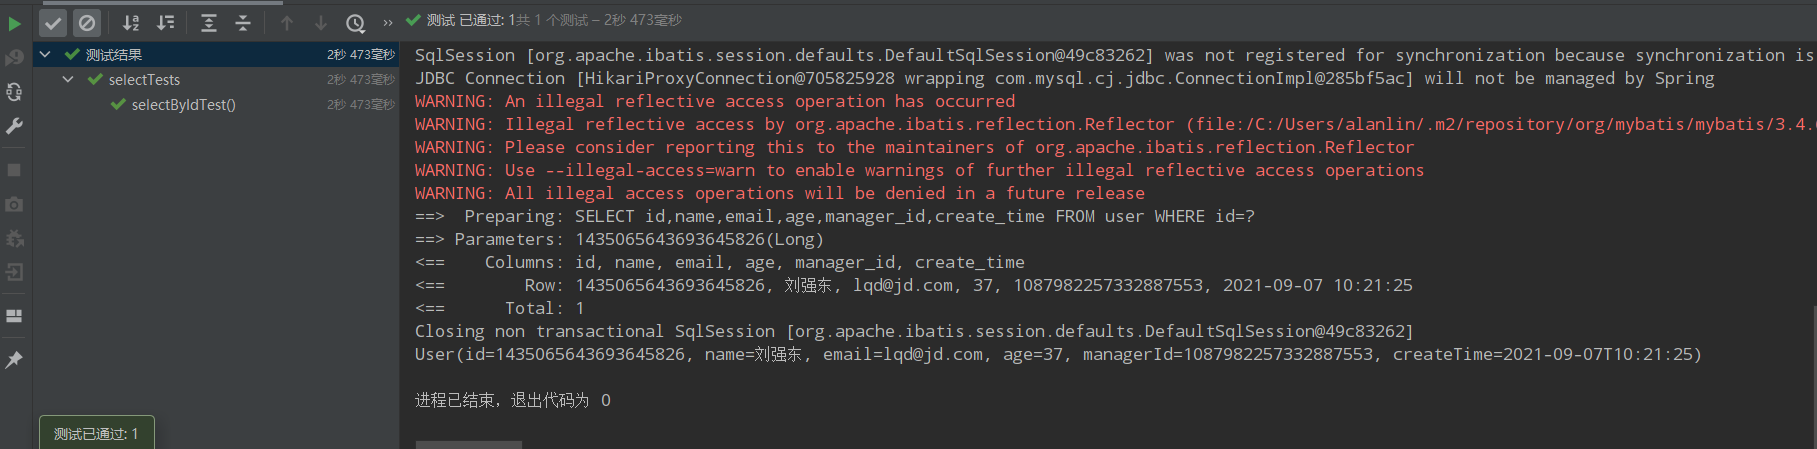
selectById
@Test public void selectByIdTest(){ User user = userMapper.selectById(1435065643693645826L); System.out.println(user); }
运行结果:
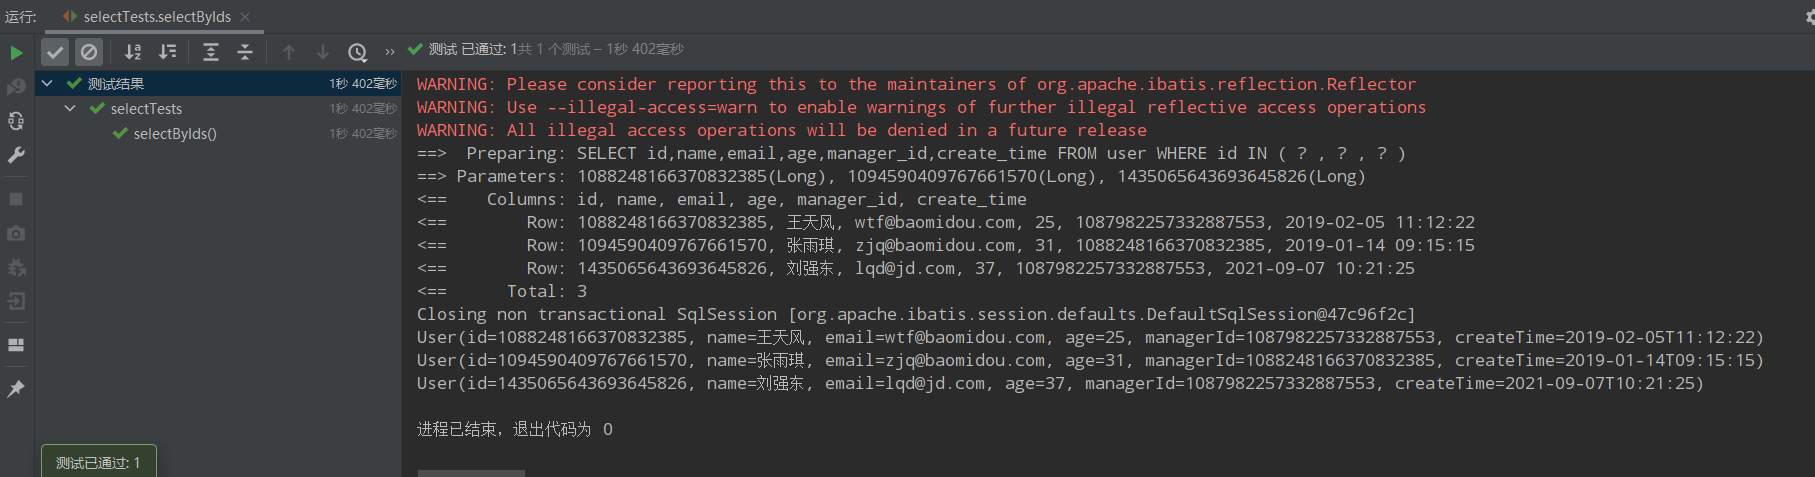
selectBatchIds
@Test public void selectByIds(){ List<Long> idsList = Arrays.asList( 1088248166370832385L, 1094590409767661570L, 1435065643693645826L ); List<User> users = userMapper.selectBatchIds(idsList); users.forEach(System.out::println); }
运行结果:
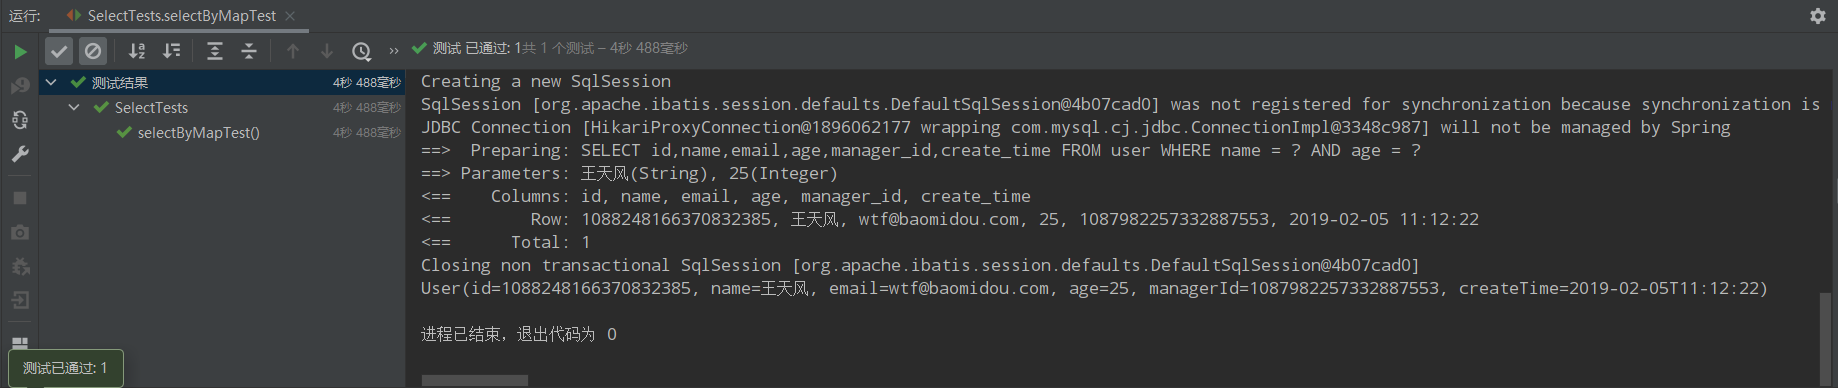
selectByMap
@Test public void selectByMapTest(){ //map.put("name","王天风") //map.put("age",25) //where name="王天风" and age=25 Map<String,Object> columnMap = new HashMap<>(); columnMap.put("name","王天风"); columnMap.put("age",25); List<User> users = userMapper.selectByMap(columnMap); users.forEach(System.out::println); }
注意:columnMap中的键是数据库中的字段,不是实体类型的属性。
运行结果:
3|2以条件构造器为参数的查询方法
selectList
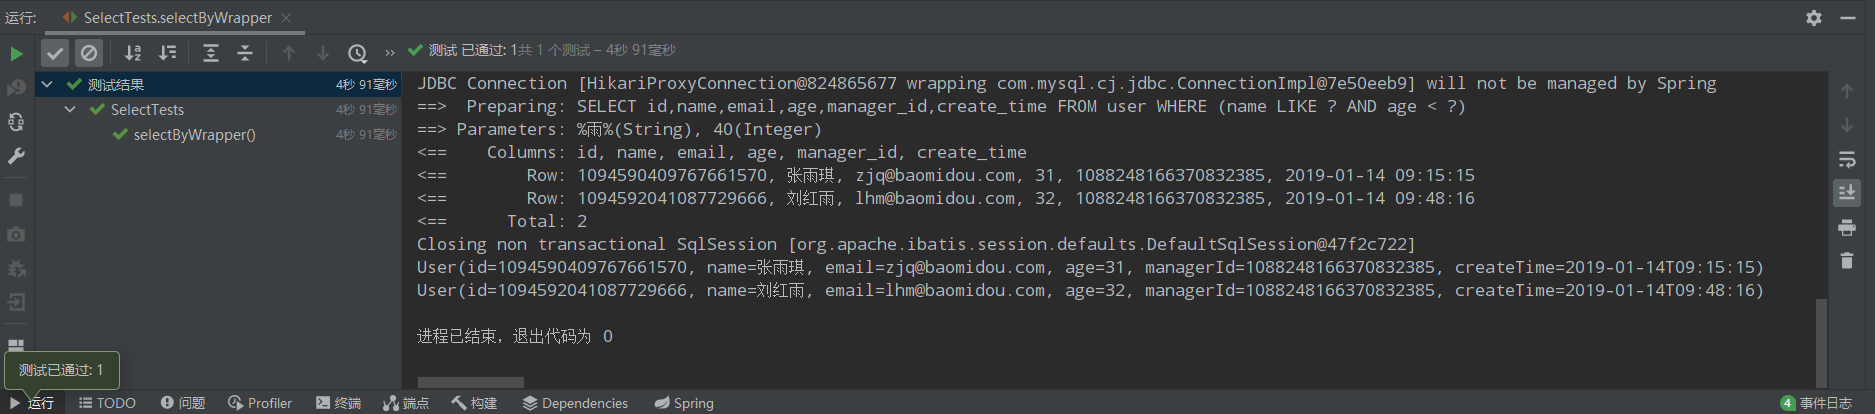
/** * 1、名字中包含雨并且年龄小于40 * name like '%雨%' and age<40 */ @Test public void selectByWrapper(){ QueryWrapper<User> queryWrapper = new QueryWrapper<>(); queryWrapper.like("name","雨").lt("age",40); List<User> users = userMapper.selectList(queryWrapper); users.forEach(System.out::println); }
运行结果
/** * 2、名字中包含雨年并且龄大于等于20且小于等于40并且email不为空 * name like '%雨%' and age between 20 and 40 and email is not null */ @Test public void selectByWrapper2(){ QueryWrapper<User> queryWrapper = new QueryWrapper<>(); queryWrapper.like("name","雨").between("age",20,40).isNotNull("email"); List<User> users = userMapper.selectList(queryWrapper); users.forEach(System.out::println); }
运行结果:

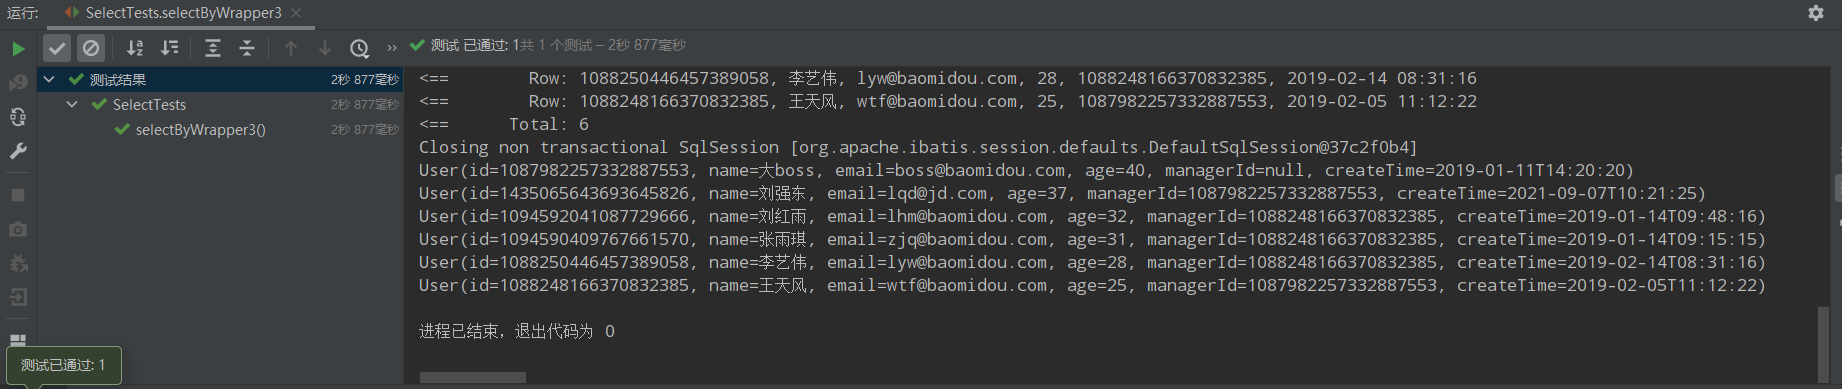
/*** * 3、名字为王姓或者年龄大于等于25,按照年龄降序排列,年龄相同按照id升序排列 * name like '王%' or age>=25 order by age desc,id asc */ @Test public void selectByWrapper3(){ QueryWrapper<User> queryWrapper = new QueryWrapper<>(); queryWrapper.likeRight("name","王").or().ge("age",25).orderByDesc("age").orderByAsc("id"); List<User> users = userMapper.selectList(queryWrapper); users.forEach(System.out::println); }
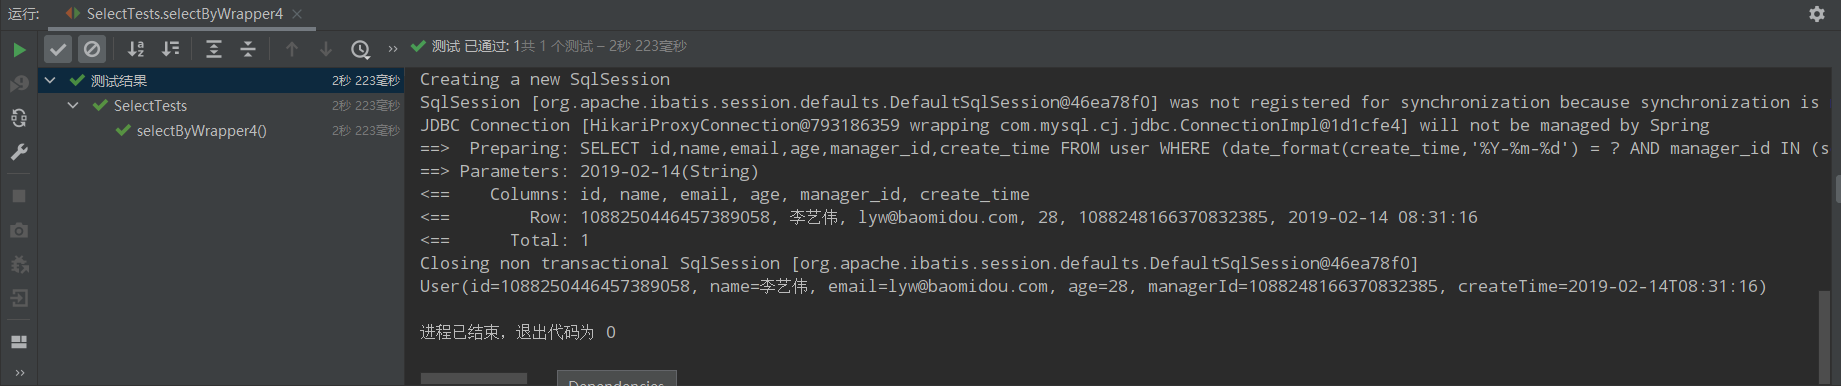
/** * 4、创建日期为2019年2月14日并且直属上级为名字为王姓 * date_format(create_time,'%Y-%m-%d')='2019-02-14' * and manager_id in (select id from user where name like '王%') */ @Test public void selectByWrapper4(){ QueryWrapper<User> queryWrapper = new QueryWrapper<>(); queryWrapper.apply("date_format(create_time,'%Y-%m-%d') = {0}","2019-02-14") .inSql("manager_id","select id from user where name like '王%'"); List<User> users = userMapper.selectList(queryWrapper); users.forEach(System.out::println); }
运行结果:
/** * 5、名字为王姓并且(年龄小于40或邮箱不为空) * name like '王%' and (age<40 or email is not null) */ @Test public void selectByWrapper5(){ QueryWrapper<User> queryWrapper = new QueryWrapper<>(); queryWrapper.likeRight("name","王").and(wq->wq.lt("age",40).or().isNotNull("email")); List<User> users = userMapper.selectList(queryWrapper); users.forEach(System.out::println); }
运行结果:

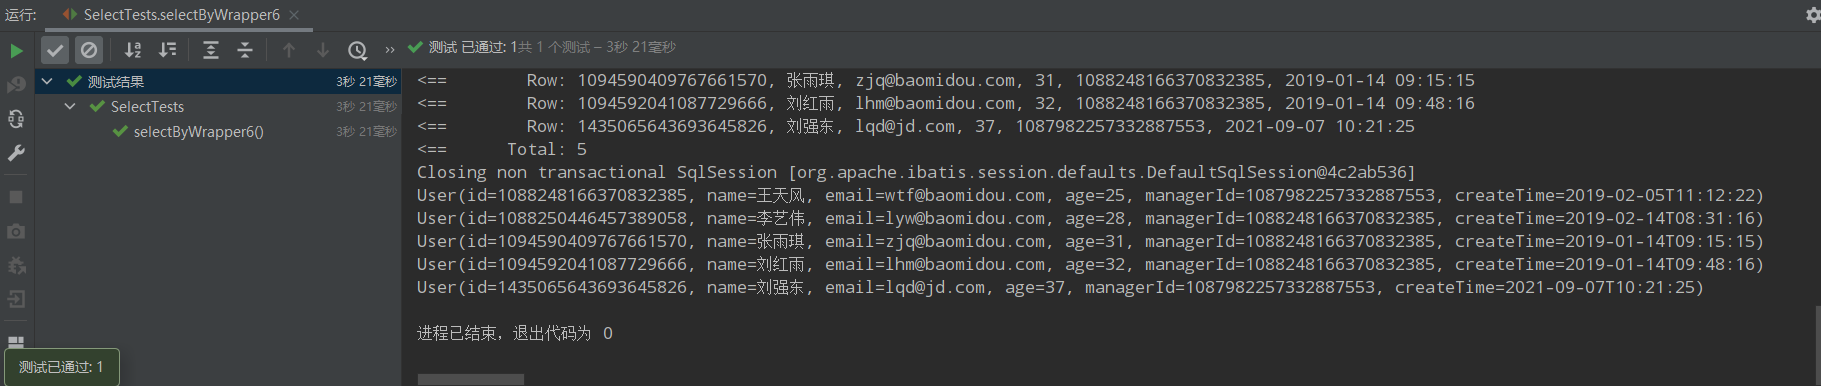
/** * 6、名字为王姓或者(年龄小于40并且年龄大于20并且邮箱不为空) * name like '王%' or (age<40 and age>20 and email is not null) */ @Test public void selectByWrapper6(){ QueryWrapper<User> queryWrapper = new QueryWrapper<>(); queryWrapper.likeRight("name","王").or(wq->wq.lt("age",40).gt("age",20).isNotNull("email")); List<User> users = userMapper.selectList(queryWrapper); users.forEach(System.out::println); }
运行结果:
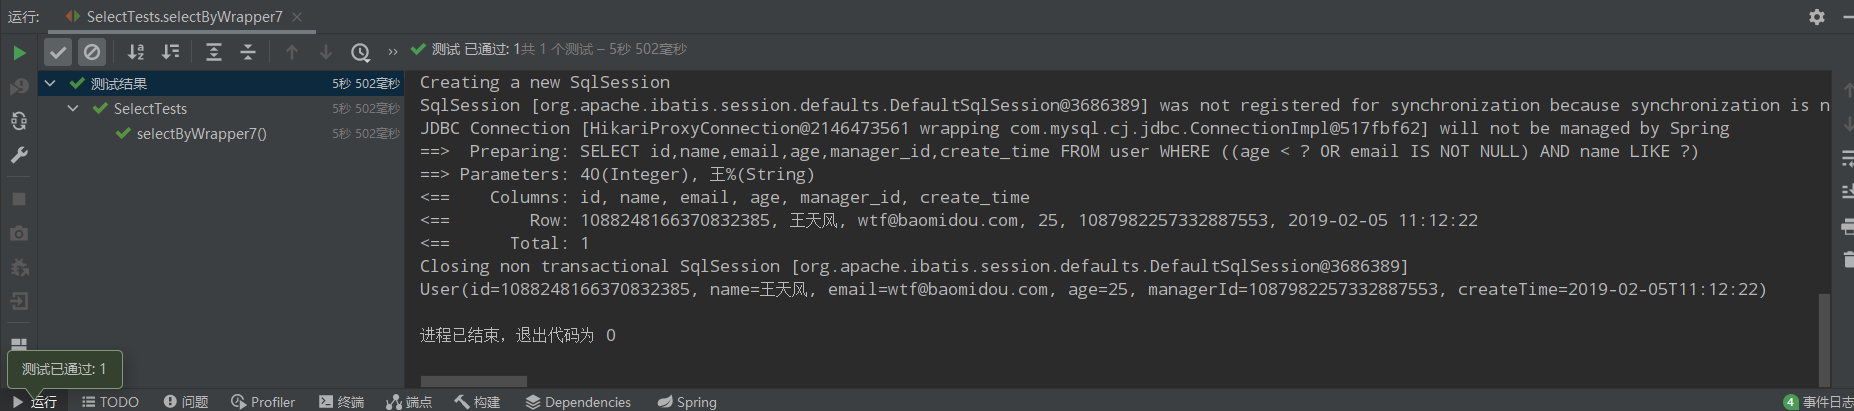
/** * 7、(年龄小于40或邮箱不为空)并且名字为王姓 * (age<40 or email is not null) and name like '王%' */ @Test public void selectByWrapper7(){ QueryWrapper<User> queryWrapper = new QueryWrapper<>(); //queryWrapper.and(wq->wq.lt("age",40).or().isNotNull("email")).and(wq->wq.likeRight("name","王")); queryWrapper.nested(wq->wq.lt("age",40).or().isNotNull("email")) .likeRight("name","王"); List<User> users = userMapper.selectList(queryWrapper); users.forEach(System.out::println); };
运行结果:
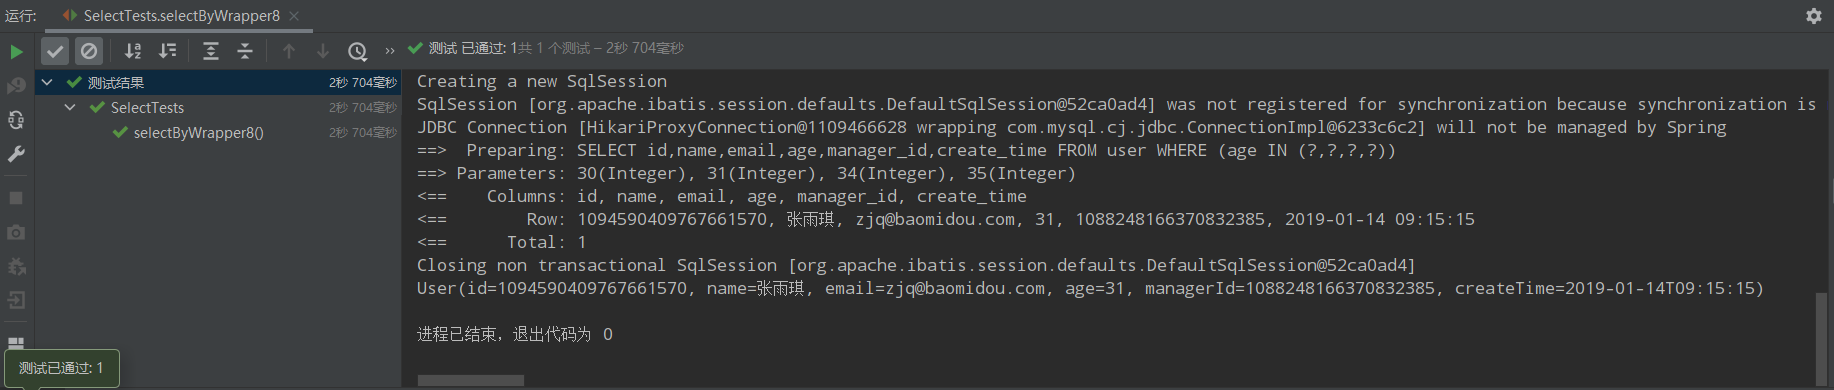
/** * 8、年龄为30、31、34、35 * age in (30、31、34、35) */ @Test public void selectByWrapper8(){ QueryWrapper<User> queryWrapper = new QueryWrapper<>(); queryWrapper.in("age",Arrays.asList(30,31,34,35)); List<User> users = userMapper.selectList(queryWrapper); users.forEach(System.out::println); }
运行结果:
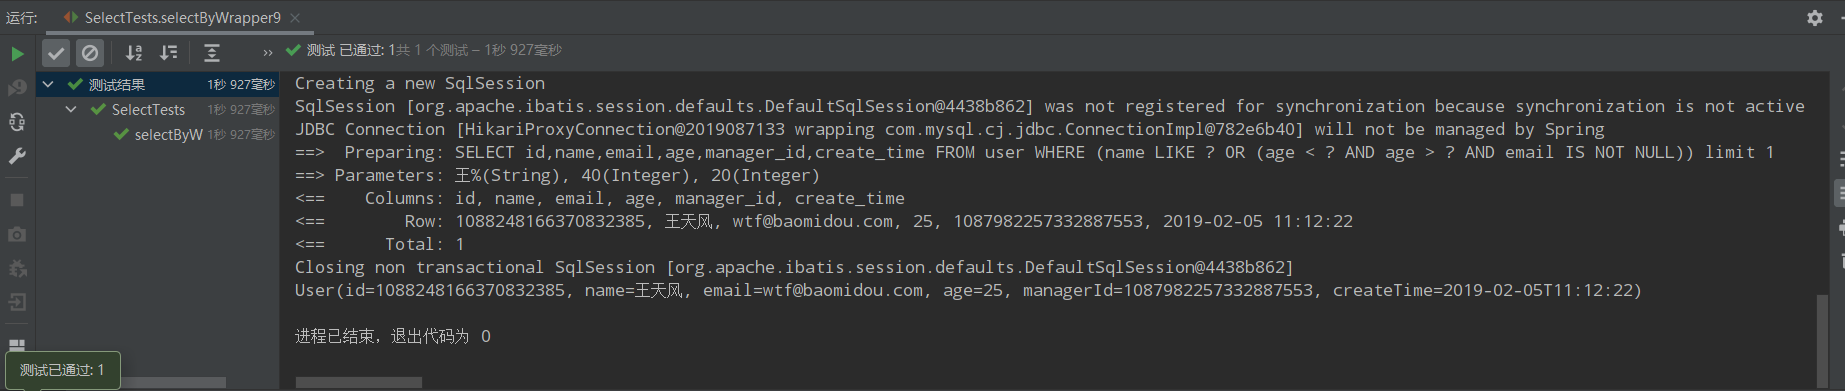
/** * 9、只返回满足条件的其中一条语句即可 * limit 1 */ @Test public void selectByWrapper9(){ QueryWrapper<User> queryWrapper = new QueryWrapper<>(); queryWrapper.likeRight("name","王").or(wq->wq.lt("age",40).gt("age",20).isNotNull("email")).last("limit 1"); List<User> users = userMapper.selectList(queryWrapper); users.forEach(System.out::println); }
运行结果:
3|3select中字段不全出现的处理方法
/** * 10、名字中包含雨并且年龄小于40(需求1加强版) * 第一种情况:select id,name * from user * where name like '%雨%' and age<40 * 第二种情况:select id,name,age,email * from user * where name like '%雨%' and age<40 */ @Test public void selectByWrapper10(){ QueryWrapper<User> queryWrapper = new QueryWrapper<>(); queryWrapper.select("id","name").like("name","雨").lt("age",40); List<User> users = userMapper.selectList(queryWrapper); users.forEach(System.out::println); } @Test public void selectByWrapper11(){ QueryWrapper<User> queryWrapper = new QueryWrapper<>(); queryWrapper.like("name","雨").lt("age",40) .select(User.class,info-> !info.getColumn().equals("create_time") && !info.getColumn().equals("manager_id")) ; List<User> users = userMapper.selectList(queryWrapper); users.forEach(System.out::println); }
运行结果:

3|4条件构造器中condition作用
condition作用是构造的条件中如何为true就加入,为false就不加入条件。
从AbstractWrapper<T, String, QueryWrapper<T>>的源码可以看到很多方法都有condition参数,它是一个布尔型的参数,意思就是是否将该sql语句(像in()、like())加在总sql语句上,如下图所示。

@Test public void testCondition() { String name="王"; String email=""; QueryWrapper<User> queryWrapper = new QueryWrapper<>(); queryWrapper.like(!StringUtils.isEmpty(name),"name",name) .like(!StringUtils.isEmpty(email),"email",email); List<User> users = userMapper.selectList(queryWrapper); users.forEach(System.out::println); }
运行结果:

3|5创建条件构造器是传入实体对象
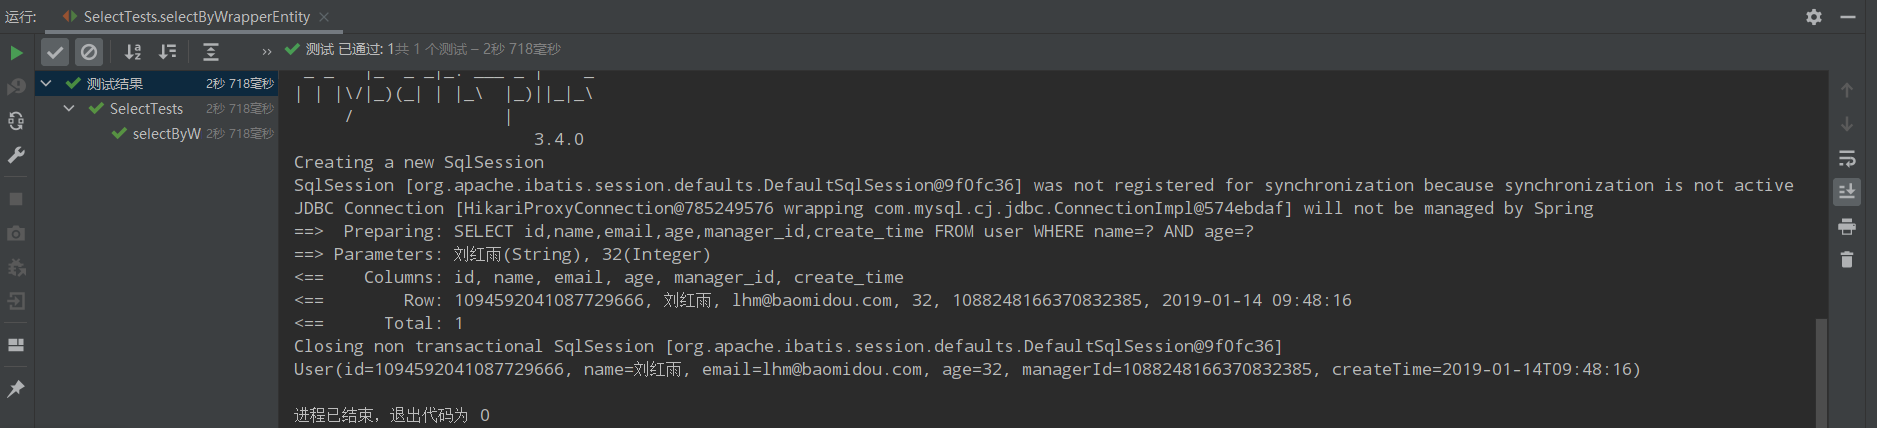
@Test public void selectByWrapperEntity(){ User whereuser = new User(); whereuser.setName("刘红雨"); whereuser.setAge(32); QueryWrapper<User> queryWrapper = new QueryWrapper<>(whereuser); List<User> users = userMapper.selectList(queryWrapper); users.forEach(System.out::println); }
默认情况下条件是等值,如下图,如果需要设置为like,需要在实体属性添加注解。
...省略... @TableField(condition = SqlCondition.LIKE) private String name; ...省略...
condition参数可以自定义。
运行结果:
3|6条件构造器中allEq用法
allEq(Map<R, V> params) allEq(Map<R, V> params, boolean null2IsNull) allEq(boolean condition, Map<R, V> params, boolean null2IsNull)
个别参数说明:
params:key为数据库字段名,value为字段值null2IsNull: 为true则在map的value为null时调用 isNull 方法,为false时则忽略value为null的
- 例1:
allEq({id:1,name:"老王",age:null})--->id = 1 and name = '老王' and age is null - 例2:
allEq({id:1,name:"老王",age:null}, false)--->id = 1 and name = '老王'
@Test public void selectAllEq(){ QueryWrapper<User> queryWrapper = new QueryWrapper<>(); Map<String,Object> params = new HashMap<String,Object>(); params.put("name","王天风"); params.put("age",25); queryWrapper.allEq(params); List<User> users = userMapper.selectList(queryWrapper); users.forEach(System.out::println); }
运行结果:

3|7其他条件构造器的使用方法
selectMaps
有些时候返回的结果不需要是整个实体类的属性,可能只需要某几个字段的数据,如下:
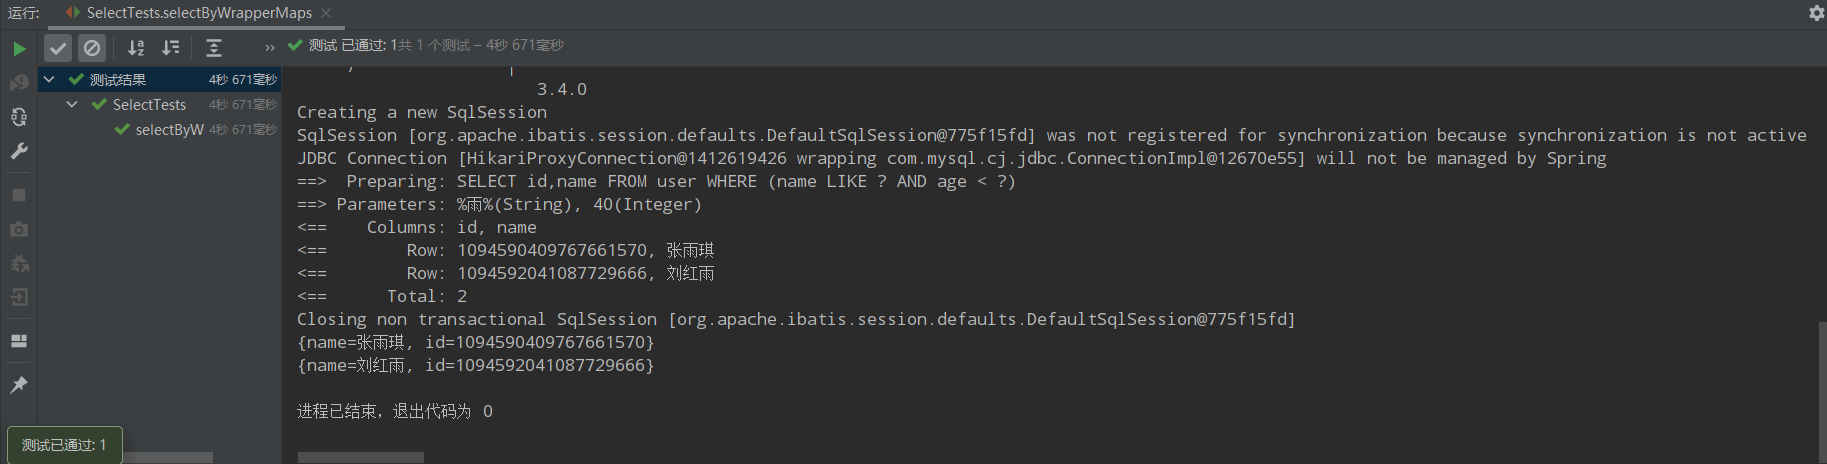
@Test public void selectByWrapperMaps(){ QueryWrapper<User> queryWrapper = new QueryWrapper<>(); queryWrapper.select("id","name").like("name","雨").lt("age",40); List<Map<String,Object>> users = userMapper.selectMaps(queryWrapper); users.forEach(System.out::println); }
运行结果:
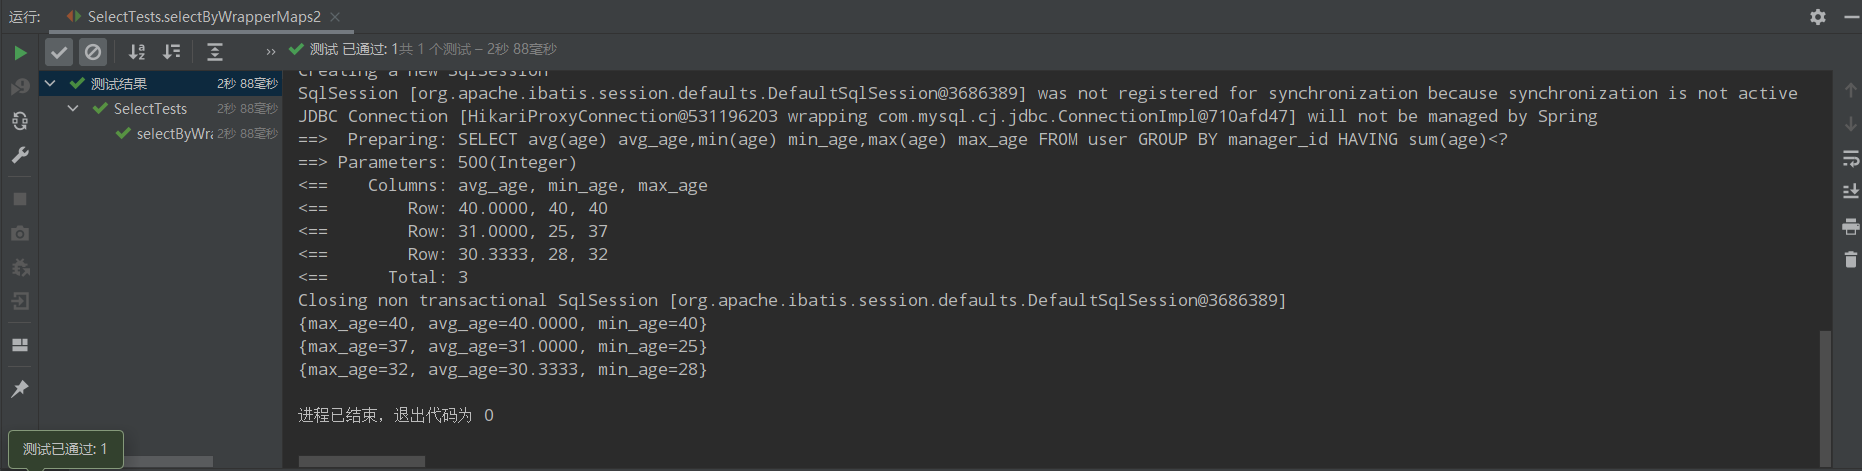
另外一种需求场景是统计查询。如下:
/** * 11、按照直属上级分组,查询每组的平均年龄、最大年龄、最小年龄。 * 并且只取年龄总和小于500的组。 * select avg(age) avg_age,min(age) min_age,max(age) max_age * from user * group by manager_id * having sum(age) <500 */ @Test public void selectByWrapperMaps2(){ QueryWrapper<User> queryWrapper = new QueryWrapper<>(); queryWrapper.select("avg(age) avg_age","min(age) min_age","max(age) max_age") .groupBy("manager_id").having("sum(age)<{0}",500); List<Map<String,Object>> users = userMapper.selectMaps(queryWrapper); users.forEach(System.out::println); }
运行结果:
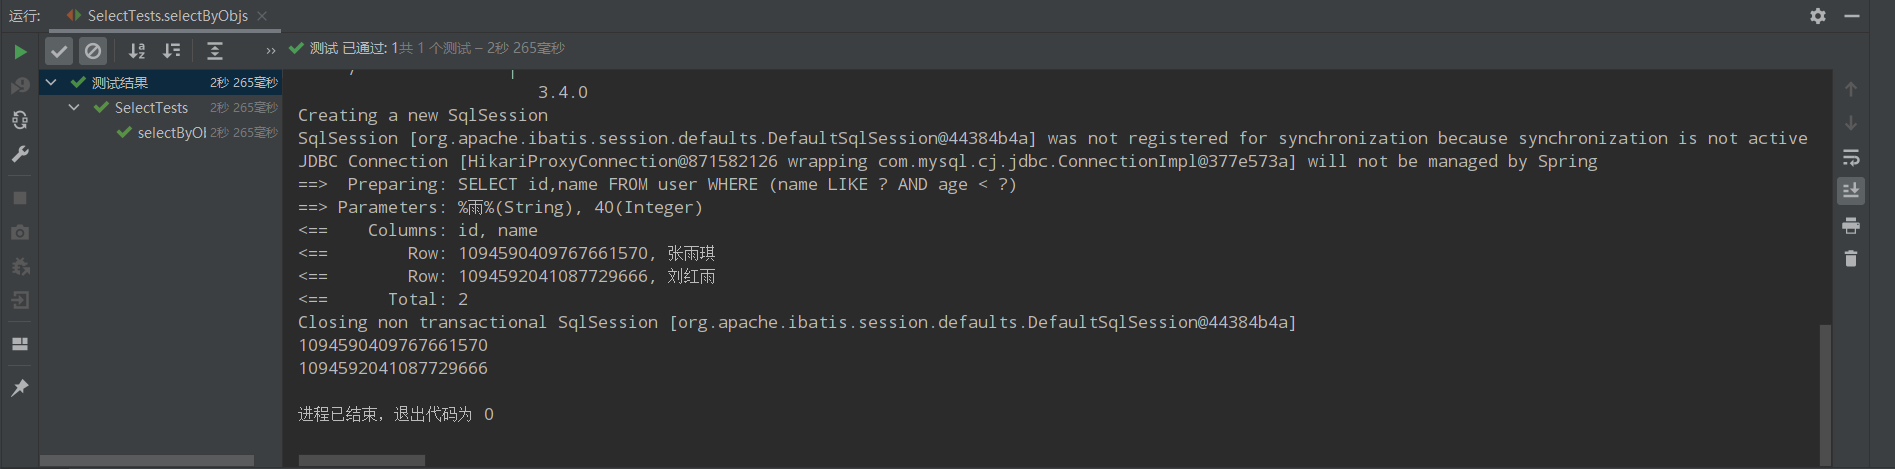
selectObjs
只返回第一列的数据。
@Test public void selectByObjs(){ QueryWrapper<User> queryWrapper = new QueryWrapper<>(); queryWrapper.select("id","name").like("name","雨").lt("age",40); List<Object> users = userMapper.selectObjs(queryWrapper); users.forEach(System.out::println); }
运行结果:
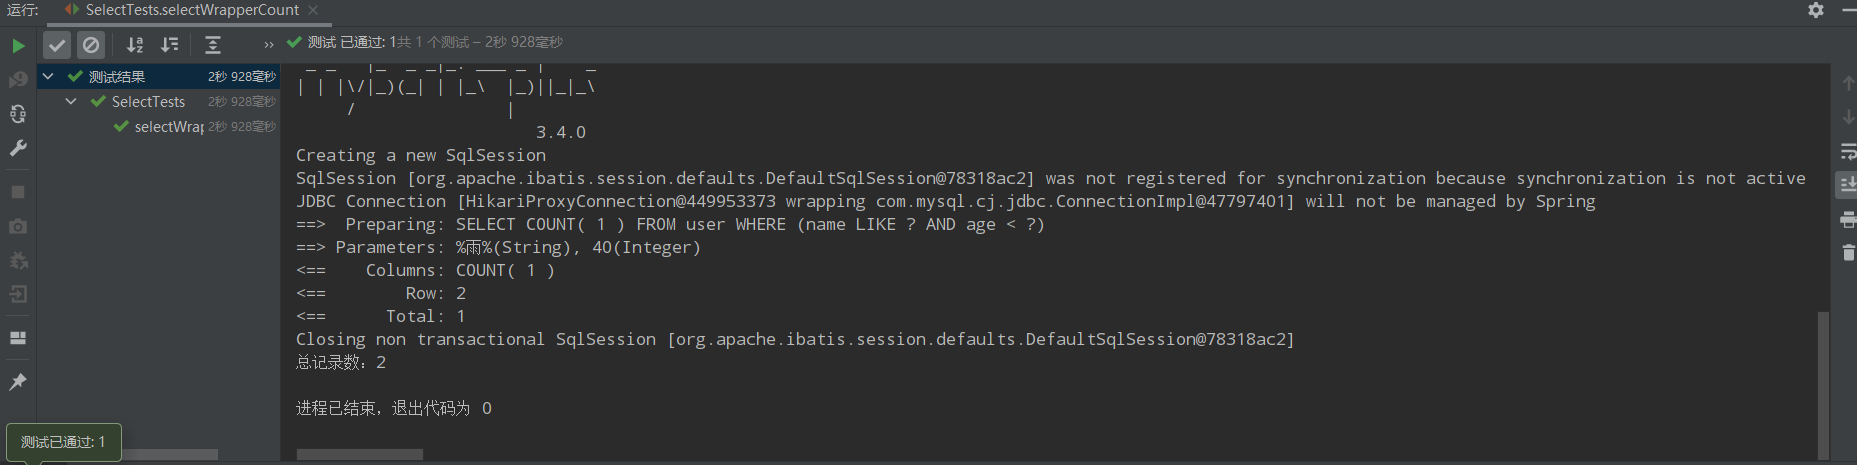
selectCount
查询总记录数
@Test public void selectWrapperCount(){ QueryWrapper<User> queryWrapper = new QueryWrapper<>(); queryWrapper.like("name","雨").lt("age",40); int rows = userMapper.selectCount(queryWrapper); System.out.println("总记录数:"+rows); }
运行结果:
3|8Lambda条件构造器
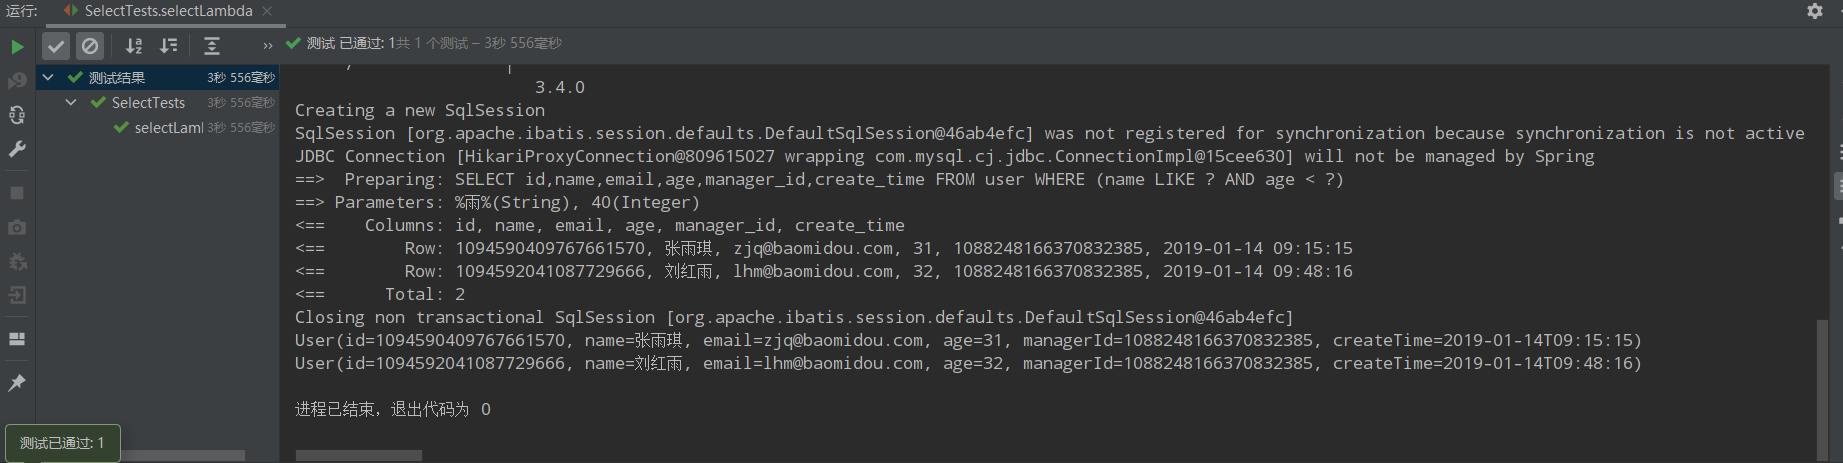
三种方法创建lambda条件构造器:LambdaQueryWrapper<User> lambda = ``new ``QueryWrapper<User>().lambda()``; ``LambdaQueryWrapper<User> userLambdaQueryWrapper = ``new ``LambdaQueryWrapper<User>()``; ``LambdaQueryWrapper<User> lambdaQuery =Wrappers.<User>``_lambdaQuery_``()``;
@Test public void selectLambda(){ //LambdaQueryWrapper<User> lambda = new QueryWrapper<User>().lambda(); //LambdaQueryWrapper<User> userLambdaQueryWrapper = new LambdaQueryWrapper<User>(); LambdaQueryWrapper<User> lambdaQuery =Wrappers.<User>lambdaQuery(); lambdaQuery.like(User::getName,"雨").lt(User::getAge,40); List<User> users = userMapper.selectList(lambdaQuery); users.forEach(System.out::println); }
运行结果:
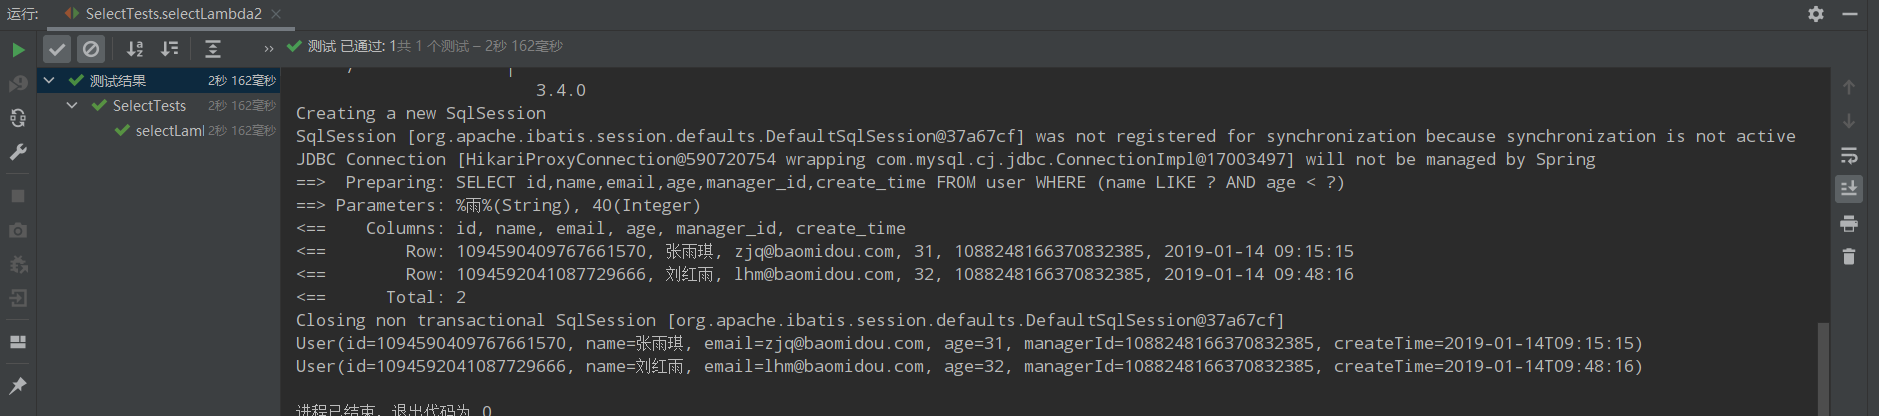
@Test public void selectLambda2(){ List<User> users = new LambdaQueryChainWrapper<User>(userMapper) .like(User::getName, "雨").lt(User::getAge, 40).list(); users.forEach(System.out::println); }
运行结果:
3|9使用条件构造器的自定义SQL
MP版本需要大于3.0.7
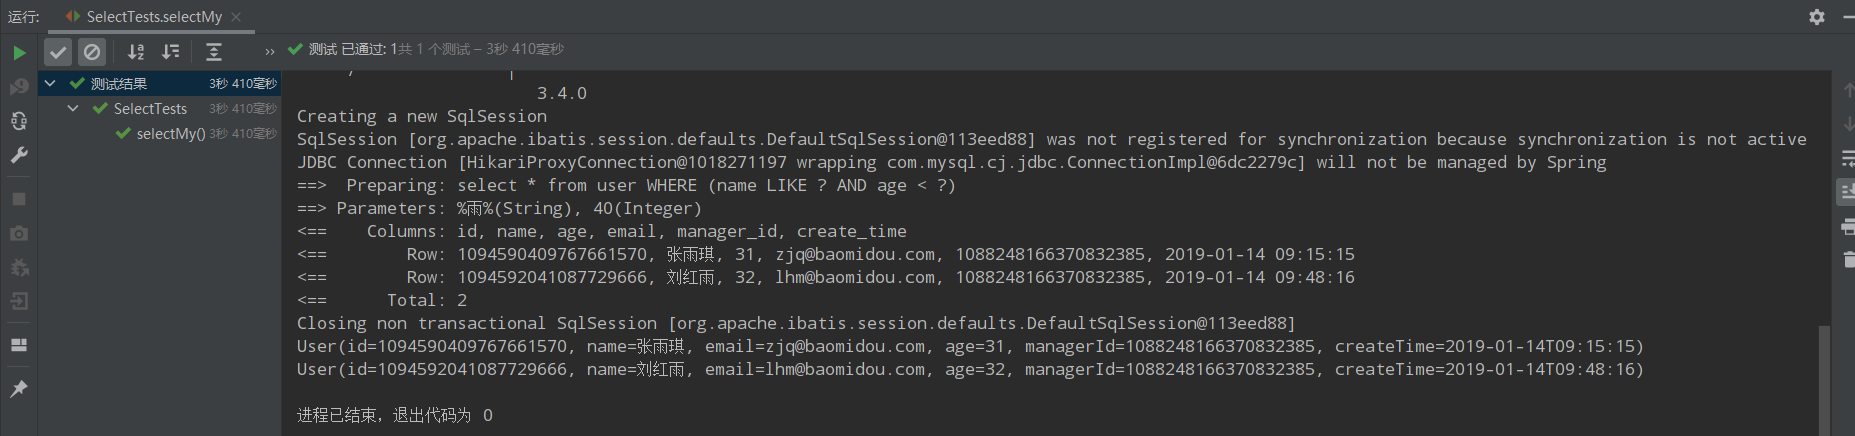
首先在UserMapper类中自定义方法。如下:
@Mapper public interface UserMapper extends BaseMapper<User> { @Select("select * from user ${ew.customSqlSegment}") List<User> selectAll(@Param(Constants.WRAPPER) Wrapper<User> wrappers); }
注意:${ew.customSqlSegment}名字是固定写法。
编写测试方法
@Test public void selectMy(){ LambdaQueryWrapper<User> lambdaQuery =Wrappers.<User>lambdaQuery(); lambdaQuery.like(User::getName,"雨").lt(User::getAge,40); List<User> users = userMapper.selectAll(lambdaQuery); users.forEach(System.out::println); }
运行结果如下:
3|10分页查询
MP分页插件实现物理分页
在项目目录中新建一个包,名字为config,并创建一个类,名字为MyBatisPlusConfig,内容如下:
package com.demo03.Config; import com.baomidou.mybatisplus.annotation.DbType; import com.baomidou.mybatisplus.extension.plugins.MybatisPlusInterceptor; import com.baomidou.mybatisplus.extension.plugins.inner.PaginationInnerInterceptor; import org.springframework.context.annotation.Bean; import org.springframework.context.annotation.Configuration; @Configuration public class MybatisPlusConfig { @Bean public MybatisPlusInterceptor mybatisPlusInterceptor() { MybatisPlusInterceptor interceptor = new MybatisPlusInterceptor(); interceptor.addInnerInterceptor(new PaginationInnerInterceptor(DbType.H2)); return interceptor; } }
编写测试实现方法
@Test public void selectPage(){ LambdaQueryWrapper<User> lambdaQuery =Wrappers.<User>lambdaQuery(); lambdaQuery.gt(User::getAge,20); Page<User> userPage = new Page<>(1, 2); Page<User> userPage1 = userMapper.selectPage(userPage, lambdaQuery); System.out.println(userPage1); }
3|11AR模式、主键策略和基本配置
AR模式
Active Record(活动记录),是一种领域模型模式,特点是一个模型类对应关系型数据库中的一个表,而模型类的一个实例对应表中的一行记录。简单来说,就是通过实体类操作数据库的增删改查。
使用前提需要实体类继承Model类。如下:
package com.demo03.Entity; import com.baomidou.mybatisplus.annotation.SqlCondition; import com.baomidou.mybatisplus.annotation.TableField; import com.baomidou.mybatisplus.extension.activerecord.Model; import lombok.Data; import lombok.EqualsAndHashCode; import java.time.LocalDateTime; @Data @EqualsAndHashCode(callSuper = false) public class User extends Model<User> { //主键 private Long id; //用户名 @TableField(condition = SqlCondition.LIKE) private String name; //邮箱 private String email; //年龄 private Integer age; //直属上级 private Long managerId; //创建时间 private LocalDateTime createTime; }
新建测试类
package com.demo03; import com.demo03.Entity.User; import com.demo03.Mapper.UserMapper; import org.junit.jupiter.api.Test; import org.springframework.beans.factory.annotation.Autowired; import org.springframework.boot.test.context.SpringBootTest; @SpringBootTest class ARTests { @Test public void insert(){ User user = new User(); user.setName("马云"); user.setAge(37); user.setEmail("jack@admin.com"); boolean rows = user.insert(); System.out.println("影响行数:"+rows); } }
3|12主键策略
MP定义了6中主键策略。
@Getter public enum IdType { /** * 数据库ID自增 */ AUTO(0), /** * 该类型为未设置主键类型(注解里等于跟随全局,全局里约等于 INPUT) */ NONE(1), /** * 用户输入ID * <p>该类型可以通过自己注册自动填充插件进行填充</p> */ INPUT(2), /* 以下3种类型、只有当插入对象ID 为空,才自动填充。 */ /** * 分配ID (主键类型为number或string), * 默认实现类 {@link com.baomidou.mybatisplus.core.incrementer.DefaultIdentifierGenerator}(雪花算法) * * @since 3.3.0 */ ASSIGN_ID(3), /** * 分配UUID (主键类型为 string) * 默认实现类 {@link com.baomidou.mybatisplus.core.incrementer.DefaultIdentifierGenerator}(UUID.replace("-","")) */ ASSIGN_UUID(4), /** * @deprecated 3.3.0 please use {@link #ASSIGN_ID} */ @Deprecated ID_WORKER(3), /** * @deprecated 3.3.0 please use {@link #ASSIGN_ID} */ @Deprecated ID_WORKER_STR(3), /** * @deprecated 3.3.0 please use {@link #ASSIGN_UUID} */ @Deprecated UUID(4); private final int key; IdType(int key) { this.key = key; } }
局部主键策略实现
在实体类主键通过TableId注解方式。
@TableId(type = IdType.AUTO) private Long id;
全局主键策略实现
在配置文件中配置全局主键ID。
mybatis-plus: global-config: db-config: id-type: auto


 5528
5528


 被折叠的 条评论
为什么被折叠?
被折叠的 条评论
为什么被折叠?
 到【灌水乐园】发言


