


在这个万物互联的时代,无线通信技术已经成为嵌入式系统中不可或缺的一部分。其中,Wi-Fi模块作为连接设备与网络的重要桥梁,其性能与兼容性显得尤为关键。Intel的AX210NGW Wi-Fi 6E模块作为一款高性能的无线网络适配器,不仅支持最新的Wi-Fi 6E标准和蓝牙5.3,还具备出色的传输速度和兼容性,为嵌入式系统的无线连接提供了强有力的支持。

AX210NGW Wi-Fi 6E模块
为了更好地满足客户对高性能嵌入式主控的应用需求,本文将详细介绍在飞凌嵌入式OK3576-C开发板上适配AX210NGW Wi-Fi 6E模块(以下简称模块)的方法,帮助开发者快速上手并充分发挥性能优势。
注:目前暂未对Wi-Fi模块的蓝牙功能进行适配,本文只讲解Wi-Fi功能的适配方式。
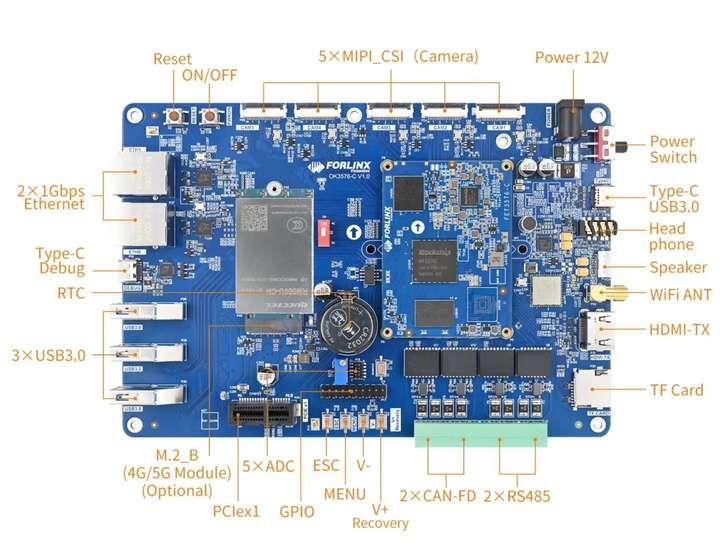
OK3576-C开发板接口图
首先,需要将Wi-Fi模块连接到飞凌嵌入式OK3576-C开发板上(Wi-Fi模块使用的是M.2 key A+E接口,但通过接口图看到OK3576-C开发板没有此接口,这时使用M.2转PCIe双频无线网卡转接卡进行转接就可以)。
进入内核目录开始配置:
forlinx@ubuntu20:~/3576$ cd kernel-6.1/
forlinx@ubuntu20:~/3576/kernel-6.1$ make menuconfig ARCH=arm64
按如下顺序进行选择:
Location:
  -> Device Drivers-> Network device support (NETDEVICES [=y])
      -> Wireless LAN (WLAN [=y])
        -> Intel devices (WLAN_VENDOR_INTEL [=y])
          -> Intel Wireless WiFi Next Gen AGN - Wireless-N/Advanced-N/Ultimate-N (iwlwifi)  (IWLWIFI [=m])
             -> Intel Wireless WiFi MVM Firmware support (IWLMVM [=m])
进行编译:
forlinx@ubuntu20:~/3576/kernel-6.1$ export CROSS_COMPILE=/home/forlinx/3576/prebuilts/gcc/linux-x86/aarch64/gcc-arm-10.3-2021.07-x86_64-aarch64-none-linux-gnu/bin/aarch64-none-linux-gnu-
forlinx@ubuntu20:~/3576/kernel-6.1$ export PATH=$PATH:/home/forlinx/3576/prebuilts/gcc/linux-x86/aarch64/gcc-arm-10.3-2021.07-x86_64-aarch64-none-linux-gnu/bin/
forlinx@ubuntu20:~/3576/kernel-6.1$ make ARCH=arm64 rk3576-evb1-v10-linux.img
最后将编译好的模块自行拷贝到OK3576-C开发板中,我们这里是将模块拷贝到 /root目录中了。模块在内核源码中的路径:
(1) drivers/net/wireless/intel/iwlwifi/iwlwifi.ko
(2) drivers/net/wireless/intel/iwlwifi/mvm/iwlmvm.ko
除此之外,还需要将Wi-Fi固件和STA脚本拷贝到/root目录中备用。
root@rk3576-buildroot:/root# ls
firmware.zip  fltest_wifi.sh  iwlmvm.ko  iwlwifi.ko
STA脚本可以参考以下内容,如自行创建脚本,记得要添加可执行权限。
#!/bin/sh
cnt1=`ps aux | grep hostapd | grep -v grep  | wc -l`
if [ "$cnt1" != "0" ];then
        killall hostapd > /dev/null
fi

ifconfig uap0 down

function usage()
{
    echo "Usage: -i <wifi> -s <ssid> -p <password>"
    echo "eg: ./wifi.sh -i mlan0 -s bjforlinx -p 12345678 "
    echo "eg: ./wifi.sh -i mlan0 -s bjforlinx -p NONE "
    echo " -i : mlan0 or mlan1"
    echo " -s : wifi ssid"
    echo " -p : wifi password or NONE"
}
function parse_args()
{
    while true; do
        case "$1" in
            -i ) wifi=$2;echo wifi $wifi;shift 2 ;;
            -s ) ssid=$2;echo ssid $ssid;shift 2 ;;
            -p ) pasw=$2;echo pasw $pasw;shift 2 ;;
            -h ) usage; exit 1 ;;
            * ) break ;;
        esac
    done
}


if [ $# != 6 ]
then
    usage;
    exit 1;
fi

parse_args $@

if [ -e /etc/wpa_supplicant.conf ]
then
    rm /etc/wpa_supplicant.conf
fi
    echo \#PSK/TKIP >> /etc/wpa_supplicant.conf
        echo ctrl_interface=/var/run/wpa_supplicant >>/etc/wpa_supplicant.conf
        echo ctrl_interface_group=0 >>/etc/wpa_supplicant.conf
        echo update_config=1 >>/etc/wpa_supplicant.conf
        echo network={ >>/etc/wpa_supplicant.conf
    echo ssid=\"$ssid\" >>/etc/wpa_supplicant.conf
        echo scan_ssid=1 >>/etc/wpa_supplicant.conf
    if [ $pasw == NONE ]
        then
                echo key_mgmt=NONE >>/etc/wpa_supplicant.conf
        else
                echo psk=\"$pasw\" >>/etc/wpa_supplicant.conf
                echo key_mgmt=WPA-EAP WPA-PSK IEEE8021X NONE >>/etc/wpa_supplicant.conf
        #       echo group=CCMP TKIP WEP104 WEP40 >>/etc/wpa_supplicant.conf
        fi
    echo } >>/etc/wpa_supplicant.conf
ifconfig -a|grep mlan0 |grep -v grep  > /dev/null
if [ $? -eq 0 ]
then
        ifconfig mlan0 down > /dev/null
fi
ifconfig -a|grep mlan1 |grep -v grep  > /dev/null
if [ $? -eq 0 ]then        ifconfig mlan1 down > /dev/nullfi
ifconfig -a|grep eth0 |grep -v grep  > /dev/nullif [ $? -eq 0 ]then        ifconfig eth0 down > /dev/nullfi
ifconfig -a|grep eth1 |grep -v grep  > /dev/nullif [ $? -eq 0 ]then        ifconfig eth1 down > /dev/nullfi
ifconfig -a|grep usb0 |grep -v grep  > /dev/nullif [ $? -eq 0 ]then        ifconfig usb0 down > /dev/nullfi
ps -fe|grep wpa_supplicant |grep -v grep > /dev/nullif [ $? -eq 0 ]then        kill -9 $(pidof wpa_supplicant)fi
sleep 1ifconfig $wifi up > /dev/null sleep 1
(wpa_supplicant -Dnl80211,wext -i$wifi -c/etc/wpa_supplicant.conf  >/dev/null) &echo "waiting..."sleep 3wpa_cli -i$wifi status |grep COMPLETED |grep -v grep >/dev/nullif [ $? -eq 0 ]then        dhcpcd -i $wifi        echo "Finshed!" else        echo "try to connect again..."        sleep 3        wpa_cli -i$wifi status |grep COMPLETED |grep -v grep >/dev/null                if [ $? -eq 0 ]                then                        dhcpcd -i $wifi                                echo "nameserver 114.114.114.114" > /etc/resolv.conf                        echo "Finshed!"                else                        echo "************************************************"                        echo "connect faild,please check the passward and ssid"                        kill -9 $(pidof wpa_supplicant)                        exit 1                fifi
接下来就需要将固件部署到板卡的/lib/firmware路径下:
root@rk3576-buildroot:/root# unzip firmware.zip -d /lib/root@rk3576-buildroot:/root# ls /lib/firmware/iwlwifi-ty-a0-gf-a0*/lib/firmware/iwlwifi-ty-a0-gf-a0-59.ucode/lib/firmware/iwlwifi-ty-a0-gf-a0-66.ucode/lib/firmware/iwlwifi-ty-a0-gf-a0-71.ucode/lib/firmware/iwlwifi-ty-a0-gf-a0-72.ucode/lib/firmware/iwlwifi-ty-a0-gf-a0-73.ucode/lib/firmware/iwlwifi-ty-a0-gf-a0-74.ucode/lib/firmware/iwlwifi-ty-a0-gf-a0-77.ucode/lib/firmware/iwlwifi-ty-a0-gf-a0-78.ucode/lib/firmware/iwlwifi-ty-a0-gf-a0-79.ucode/lib/firmware/iwlwifi-ty-a0-gf-a0-81.ucode/lib/firmware/iwlwifi-ty-a0-gf-a0-83.ucode/lib/firmware/iwlwifi-ty-a0-gf-a0-84.ucode/lib/firmware/iwlwifi-ty-a0-gf-a0-86.ucode/lib/firmware/iwlwifi-ty-a0-gf-a0-89.ucode/lib/firmware/iwlwifi-ty-a0-gf-a0.pnvm接下来就可以加载模块了:
root@rk3576-buildroot:/root# ifconfig wlp1s0wlp1s0 Link encap:Ethernet HWaddr 4C:49:6C:F0:99:7A BROADCAST MULTICAST MTU:1500 Metric:1 RX packets:0 errors:0 dropped:0 overruns:0 frame:0 TX packets:0 errors:0 dropped:0 overruns:0 carrier:0 collisions:0 txqueuelen:1000 RX bytes:0 (0.0 B) TX bytes:0 (0.0 B)如有上述信息,说明模块已经加载成功,即可看到网卡节点信息:
root@rk3576-buildroot:/root# ./fltest_wifi.sh -i wlp1s0 -s forlinx-wlan -p fl03123102650ifconfig: SIOCGIFFLAGS: No such devicewifi wlp1s0ssid forlinx-wlanpasw fl03123102650[ 2242.183049] rk_gmac-dwmac 2a220000.ethernet eth0: FPE workqueue stopwaiting...try to connect again...[ 2247.876030] wlp1s0: authenticate with ee:b9:70:81:7d:88[ 2247.883905] wlp1s0: send auth to ee:b9:70:81:7d:88 (try 1/3)[ 2248.015556] wlp1s0: send auth to ee:b9:70:81:7d:88 (try 2/3)[ 2248.119667] wlp1s0: send auth to ee:b9:70:81:7d:88 (try 3/3)[ 2248.172500] wlp1s0: authenticated[ 2248.175429] wlp1s0: associate with ee:b9:70:81:7d:88 (try 1/3)[ 2248.183347] wlp1s0: RX AssocResp from ee:b9:70:81:7d:88 (capab=0x1931 status=0 aid=42)[ 2248.192191] wlp1s0: associated[ 2248.218419] IPv6: ADDRCONF(NETDEV_CHANGE): wlp1s0: link becomes readymain: control_open: Connection refuseddhcpcd-10.0.4 startingdev: loaded udevDUID 00:01:00:01:c7:92:c8:aa:4c:49:6c:f0:99:7awlp1s0: connected to Access Point: forlinx-wlanwlp1s0: IAID 6c:f0:99:7awlp1s0: soliciting an IPv6 routerwlp1s0: rebinding lease of 192.168.81.206wlp1s0: NAK: from 192.168.80.1wlp1s0: soliciting a DHCP leasewlp1s0: offered 192.168.81.206 from 192.168.80.1wlp1s0: probing address 192.168.81.206/23wlp1s0: leased 192.168.81.206 for 28800 secondswlp1s0: adding route to 192.168.80.0/23wlp1s0: adding default route via 192.168.80.1forked to background, child pid 1185dhcpcd_fork_cb: truncated read 0 (expected 4)Finshed!下面开始测试STA模式:
root@rk3576-buildroot:/root# ./fltest_wifi.sh -i wlp1s0 -s forlinx-wlan -p fl03123102650ifconfig: SIOCGIFFLAGS: No such devicewifi wlp1s0ssid forlinx-wlanpasw fl03123102650[ 2242.183049] rk_gmac-dwmac 2a220000.ethernet eth0: FPE workqueue stopwaiting...try to connect again...[ 2247.876030] wlp1s0: authenticate with ee:b9:70:81:7d:88[ 2247.883905] wlp1s0: send auth to ee:b9:70:81:7d:88 (try 1/3)[ 2248.015556] wlp1s0: send auth to ee:b9:70:81:7d:88 (try 2/3)[ 2248.119667] wlp1s0: send auth to ee:b9:70:81:7d:88 (try 3/3)[ 2248.172500] wlp1s0: authenticated[ 2248.175429] wlp1s0: associate with ee:b9:70:81:7d:88 (try 1/3)[ 2248.183347] wlp1s0: RX AssocResp from ee:b9:70:81:7d:88 (capab=0x1931 status=0 aid=42)[ 2248.192191] wlp1s0: associated[ 2248.218419] IPv6: ADDRCONF(NETDEV_CHANGE): wlp1s0: link becomes readymain: control_open: Connection refuseddhcpcd-10.0.4 startingdev: loaded udevDUID 00:01:00:01:c7:92:c8:aa:4c:49:6c:f0:99:7awlp1s0: connected to Access Point: forlinx-wlanwlp1s0: IAID 6c:f0:99:7awlp1s0: soliciting an IPv6 routerwlp1s0: rebinding lease of 192.168.81.206wlp1s0: NAK: from 192.168.80.1wlp1s0: soliciting a DHCP leasewlp1s0: offered 192.168.81.206 from 192.168.80.1wlp1s0: probing address 192.168.81.206/23wlp1s0: leased 192.168.81.206 for 28800 secondswlp1s0: adding route to 192.168.80.0/23wlp1s0: adding default route via 192.168.80.1forked to background, child pid 1185dhcpcd_fork_cb: truncated read 0 (expected 4)Finshed!测试ping到飞凌嵌入式官网,查看是否可以正常上网:
root@rk3576-buildroot:/root# ifconfig wlp1s0wlp1s0 Link encap:Ethernet HWaddr 4C:49:6C:F0:99:7A inet addr:192.168.81.206 Bcast:192.168.81.255 Mask:255.255.254.0 inet6 addr: fe80::4e49:6cff:fef0:997a/64 Scope:Link UP BROADCAST RUNNING MULTICAST MTU:1500 Metric:1 RX packets:1547 errors:0 dropped:93 overruns:0 frame:0 TX packets:21 errors:0 dropped:0 overruns:0 carrier:0 collisions:0 txqueuelen:1000 RX bytes:150462 (146.9 KiB) TX bytes:3123 (3.0 KiB)root@rk3576-buildroot:/root# ping www.forlinx.com PING s-526319.gotocdn.com (211.149.226.120) 56(84) bytes of data.64 bytes from 211.149.226.120 (211.149.226.120): icmp_seq=1 ttl=54 time=45.9 ms64 bytes from 211.149.226.120 (211.149.226.120): icmp_seq=2 ttl=54 time=40.1 ms64 bytes from 211.149.226.120 (211.149.226.120): icmp_seq=3 ttl=54 time=39.8 ms64 bytes from 211.149.226.120 (211.149.226.120): icmp_seq=4 ttl=54 time=40.8 ms64 bytes from 211.149.226.120 (211.149.226.120): icmp_seq=5 ttl=54 time=40.5 ms^C--- s-526319.gotocdn.com ping statistics ---5 packets transmitted, 5 received, 0% packet loss, time 4007msrtt min/avg/max/mdev = 39.813/41.401/45.867/2.257 m可以看到ping飞凌嵌入式官网是正常的,这样小编就把STA模式配置好了。
那么,AP模式如何开启?接下来,我们就介绍一下如何配置AP模式。
第一步还是需要编写AP模式脚本。小编 将脚本放在了/usr/bin/目录中,文件名称为fltest_hostapd.sh ,同样的也需要配置可执行权限。
#!/bin/shcnt=`ps aux | grep wpa_supplicant | grep -v grep  | wc -l`if [ "${cnt}" != "0" ];then        killall wpa_supplicant > /dev/nullfi
cnt1=`ps aux | grep hostapd | grep -v grep  | wc -l`if [ "${cnt1}" != "0" ];then        killall hostapd > /dev/nullfi
/etc/init.d/S80dnsmasq stop
echo 1 > /proc/sys/net/ipv4/ip_forward#iptables -t nat -A POSTROUTING -o eth0 -j MASQUERADEsleep 1ifconfig wlp1s0 192.168.2.1
hostapd /etc/hostapd-2.4g.conf &#hostapd /etc/hostapd-5g.conf &/etc/init.d/S80dnsmasq start
以上就是fltest_hostapd.sh脚本的全部内容。在fltest_hostapd.sh脚本中,还用到了/etc/hostapd-2.4g.conf配置文件,以下是文件的配置内容:
interface=wlp1s0driver=nl80211channel=9hw_mode=gauth_algs=1ieee80211n=1wpa=1ssid=OK3576_WIFI_2.4G_AP //AP模式wifi名称wpa_passphrase=12345678 //AP模式WiFi密码wpa_key_mgmt=WPA-PSKwpa_pairwise=TKIPrsn_pairwise=CCMP下面还需要配置下dnsmasq.conf服务:
root@rk3576-buildroot:/root# vi /etc/dnsmasq.confinterface=wlp1s0bind-interfacesexcept-interface=lodhcp-range=192.168.2.100,192.168.2.254,12hdhcp-option=3,192.168.2.1dhcp-option=6,192.168.2.1有的朋友可能就要问了,在其他系统上使用的是udhcpd服务,为什么在这里使用的DNSmasq服务?下面就简单介绍一下这两个服务的区别:
(1)udhcpd 是来自 BusyBox 工具集的 DHCP 服务器程序。主要的功能是为本地网络设备分配动态IP地址、子网掩码、网关等信息。DHCP服务本身是不包含DNS转发或其他的网络服务。
(2)DNSmasq 是一个轻量级的 DNS 转发器和 DHCP 服务器软件。
① 可以将DNS查询的请求转发到上游DNS服务器,并缓存这些查询结果,目的是为了提高网络应用的响应速度。
② 做DHCP服务器时与第一条udhcpd服务功能相同,这里就不做重复介绍了。
此外,应用场景也不同,DNSmasq主要用于小型网络环境。易于配置和管理,如家庭网络、小型办公室和路由器中;而udhpcd服务适合用于嵌入式系统或者资源有限的环境中。
扩展知识介绍完毕,下面就开启AP模式:
root@rk3576-buildroot:/root# fltest_hostapd.sh [ 6470.256308] wlp1s0: deauthenticating from ee:b9:70:81:7d:88 by local choice (Reason: 3=DEAUTH_LEAVING)killall: hostapd: no process killedStopping dnsmasq: FAILStarting dnsmasq: OK[ 6471.641533] IPv6: ADDRCONF(NETDEV_CHANGE): wlp1s0: link becomes readywlp1s0: interface state UNINITIALIZED->ENABLEDwlp1s0: AP-ENABLED root@rk3576-buildroot:/root# ifconfig wlp1s0wlp1s0 Link encap:Ethernet HWaddr 4C:49:6C:F0:99:7A inet addr:192.168.2.1 Bcast:192.168.2.255 Mask:255.255.255.0 UP BROADCAST RUNNING MULTICAST MTU:1500 Metric:1 RX packets:50382 errors:0 dropped:2982 overruns:0 frame:0 TX packets:261 errors:0 dropped:0 overruns:0 carrier:0 collisions:0 txqueuelen:1000 RX bytes:4291281 (4.0 MiB) TX bytes:27170 (26.5 KiB)下面就是要使用手机连接飞凌嵌入式OK3576-C开发板的热点了。
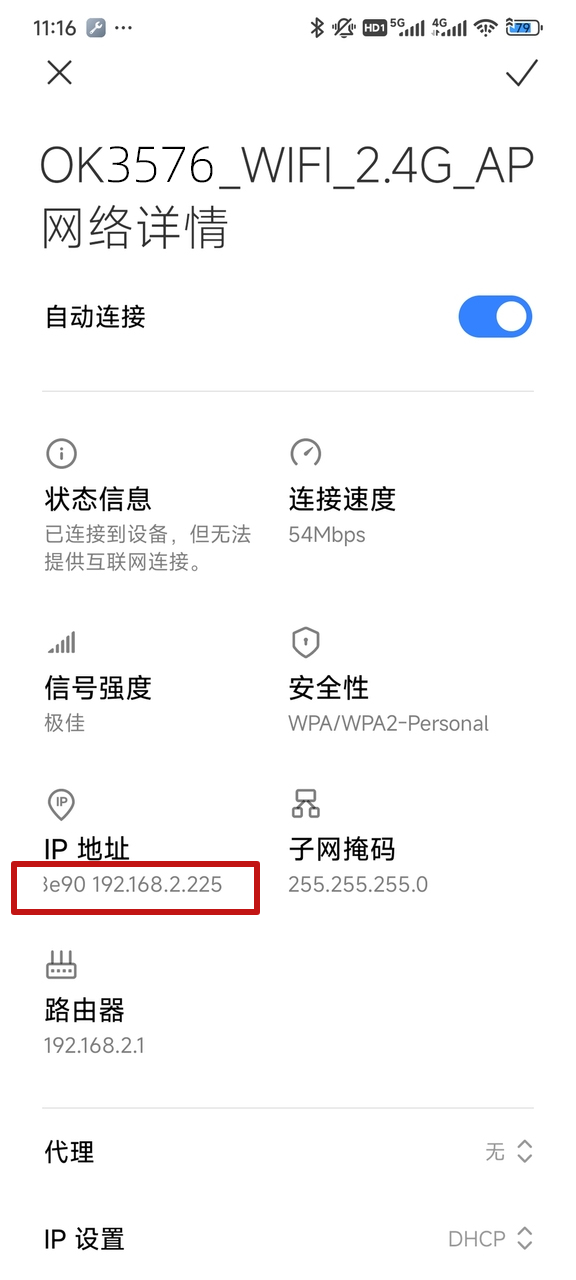
root@rk3576-buildroot:/root# ping 192.168.2.225PING 192.168.2.225 (192.168.2.225) 56(84) bytes of data.64 bytes from 192.168.2.225: icmp_seq=1 ttl=64 time=142 ms64 bytes from 192.168.2.225: icmp_seq=2 ttl=64 time=60.1 ms64 bytes from 192.168.2.225: icmp_seq=3 ttl=64 time=88.2 ms64 bytes from 192.168.2.225: icmp_seq=4 ttl=64 time=110 ms64 bytes from 192.168.2.225: icmp_seq=5 ttl=64 time=69.9 ms^C--- 192.168.2.225 ping statistics ---5 packets transmitted, 5 received, 0% packet loss, time 4004ms到此,一个新的AX210NGW Wi-Fi 6E模块就已经适配完成了。小编在这里想告诉大家的是,PCIe Wi-Fi模块的适配思路都是一样的,如果有其他Wi-Fi模块,大家也可以参考此方法动手尝试。


 被折叠的 条评论
为什么被折叠?
被折叠的 条评论
为什么被折叠?
 到【灌水乐园】发言


