


背景
最近在测试BLE模块,本来想用别家的产品来测试我的BLE模块,经过一番询问,别家的BLE的MASTER模式只能配对自家的SLAVE模式。也就是说他不能配对我的BLE模块,这就让我郁闷了。绝望。
手机的BLE调试助手又不能自动化测试,需要手动调试。太麻烦。
之前我也写过一篇文章《Android BLE 开发》--初学者,这个安卓原生APP,对于一个没有任何安卓基础的我,花了3天的时间干了这个四不像的BLE安卓调试工具。原生的APP搭建环境就非常痛苦了,更何况开发。想要再次开发,想想还是算了。
所以想了想,最容易,也是最方便的还是微信小程序。微信小程序提供的丰富的API,所以开发起来还是比较方便的。在微信小程序中对应的知识点:JavaScript + WXSS + WXML。
现学现卖,0基础,干了3天,开发了一个微信小程序。这个小程序支持功能:
自动化测试,和正常模式(跟BLE调试助手一样)
可以显示所有的测试报告(时间,测试结果等)
我对小程序没有基础,临时抱佛脚,欢迎来喷。嘻嘻嘻
这个小程序将纳入我的R-Plan开源项目。github链接:https://github.com/RiceChen/R_Plan.git。功能会不断完善。
准备工作
需要注册微信小程序开发账号
下载微信开发者工具
了解小程序相关知识-官方文档

开始编写程序(万事俱备只欠东风)
创建工程(微信开发者工具使用详情,可以通过官方文档查看,这里就不详细说明)
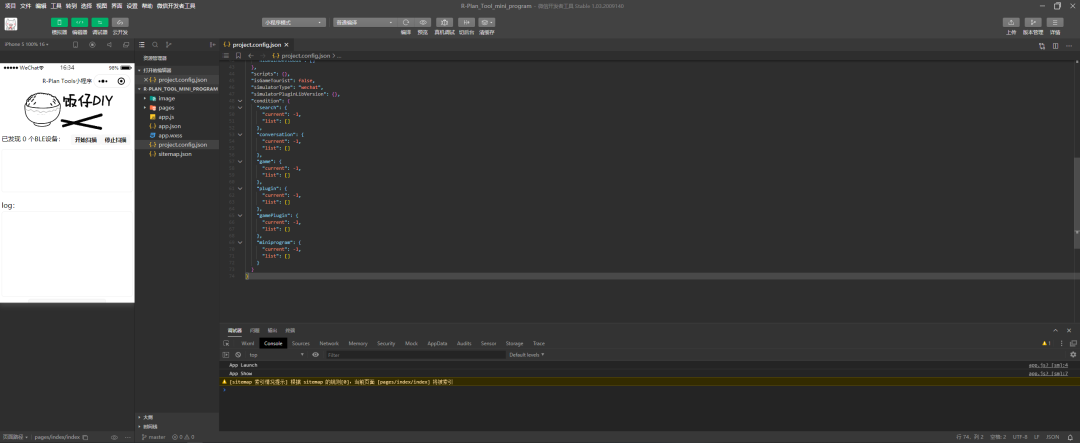
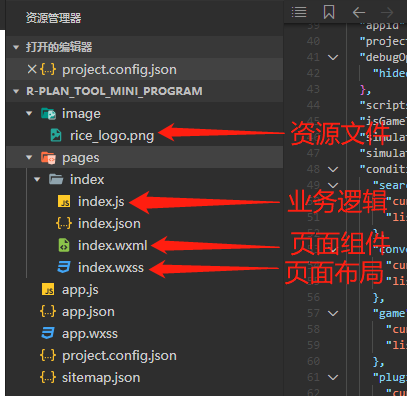
文件说明:我的这个小程序主要为3个主要文件。index.js, index.wxml,index.wxss。
index.wxml 代码说明:
放置logo:
<view class="rice_logo">
    <image src="../../image/rice_logo.png" style="width: 227px; height: 100px;"></image>
</view>
扫描相关组件:
<view class="devices_summary">
  <view>
    <text>已发现 {{devices.length}} 个BLE设备:</text>
    <view class="devices_scan_btn">
      <button size="mini" style="width:22vw; font-size: 4vw" bindtap="openBluetoothAdapter">开始扫描</button>
      <button size="mini" style="width:22vw; font-size: 4vw" bindtap="closeBluetoothAdapter">停止扫描</button>
    </view>
  </view>
</view>
扫描结果列表组件:
<scroll-view class="device_list" scroll-y scroll-with-animation>
  <view wx:for="{{devices}}" wx:key="index"
   data-device-id="{{item.deviceId}}"
   data-name="{{item.name || item.localName}}"
   bindtap="bindcreateBLEConnection"
   class="device_item"
   hover-class="device_item_hover">
    <view style="font-size: 16px; color: #333;">{{item.name}}</view>
    <view style="font-size: 10px">信号强度: {{item.RSSI}}dBm ({{utils.max(0, item.RSSI + 100)}}%)</view>
    <view style="font-size: 10px">UUID: {{item.deviceId}}</view>
    <view style="font-size: 10px">Service数量: {{utils.len(item.advertisServiceUUIDs)}}</view>
  </view>
</scroll-view>
连接设备后的窗体,这个需要连接成功才会显示, 并且获取到可写特征值是,才会显示写数据按钮:
<view class="connected_info" wx:if="{{connected}}">
  <text>已连接到{{name}}</text>
  <view class="data_title">接收数据:</view>
  <view class="read_data">
    <textarea style="height: 3em" placeholder="接收到的数据"/>
  </view>
  <view class="data_title">发送数据:</view>
  <view class="write_data">
    <textarea bindblur="bindWriteData" style="height: 4em" placeholder="输入要发送的数据" />
  </view>
  <view class="operation">
    <view class="data-type" wx:if="{{canWrite}}">
    <!-- <view class="data-type"> -->
      <radio-group bindchange="dataTypeSelect">
        <label class="radio">
          <radio value="hex" checked="false"/>HEX
        </label>
        <label class="radio">
          <radio value="ascii" checked="true" />ASCII
        </label>
      </radio-group>
    </view>
    <view class="devices_func_btn">
      <button wx:if="{{canWrite}}" size="mini" style="width:22vw; font-size: 4vw" bindtap="writeBLECharacteristicValue">写数据</button>
      <button size="mini" style="width:22vw; font-size: 4vw" bindtap="closeBLEConnection">断开连接</button>
    </view>
  </view>
</view>
调试信息打印:
<view class="log_title">log:</view>
<scroll-view class="log_list" scroll-y scroll-with-animation>
  <text style="font-size: 10px">{{log_list}}</text>
</scroll-view>
<button class="clear_log" bindtap="bindClearLog">清空调试信息</button>
index.wxss 代码说明:
这个文件主要是界面的布局设置,关于这方面,建议学习学习CSS。这里我就不描述了。其实我也不熟悉。
index.js 代码说明:
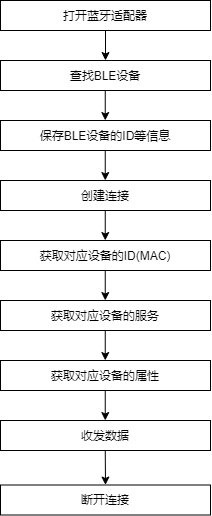
讲解代码之前我们来说说连接BLE设备流程,这个是我理解的流程。
微信官方文档对BLE的相关的API有相应的说明。

打开蓝牙适配,初始化蓝牙设备,在每次进行初始化时会将所有状态清空,如果适配器已打开,进入设备查找流程。
openBluetoothAdapter() {
  this.printLog("启动蓝牙适配器...");

  this.setData({
    devices: [],
    connected: false,
    chs: [],
    canWrite: false,
  })

  wx.openBluetoothAdapter({
    success: (res) => {
      this.printLog("蓝牙启动成功,开始进入发现设备");
      this.startBluetoothDevicesDiscovery()
    },
    fail: (res) => {
      this.printInfo("请先打开蓝牙")
      if (res.errCode === 10001) {
        wx.onBluetoothAdapterStateChange(function (res) {
          if (res.available) {
            this.printLog("蓝牙启动成功,开始进入发现设备");
            this.startBluetoothDevicesDiscovery()
          }
        })
      }
    }
  })
},
关闭蓝牙设备。
closeBluetoothAdapter() {
  this.printLog("停止扫描");
  wx.closeBluetoothAdapter()
  this.stopBluetoothDevicesDiscovery()
  this._discoveryStarted = false
},
开始搜寻附近的蓝牙外围设备。
startBluetoothDevicesDiscovery() {
  if(this._discoveryStarted) {
    this.printLog("已经正在发现设备...")
    return
  }
  this._discoveryStarted = true
  wx.startBluetoothDevicesDiscovery({
    allowDuplicatesKey: true,
    success: (res) => {
      this.printLog("开始发现设备...")
      this.onBluetoothDeviceFound()
    },
  })
},
停止搜寻附近的蓝牙外围设备。
stopBluetoothDevicesDiscovery() {
  this.printLog('停止发现设备')
  this._discoveryStarted = false
  wx.stopBluetoothDevicesDiscovery()
},
监听寻找到新设备的事件,这里会将所有搜索到的设备显示在列表组件中。
onBluetoothDeviceFound() {
  this.printLog('正在发现设备...')
  wx.onBluetoothDeviceFound((res) => {
    res.devices.forEach(device => {
      if (!device.name && !device.localName) {
        return
      }
      const foundDevices = this.data.devices
      const idx = inArray(foundDevices, 'deviceId', device.deviceId)
      const data = {}

      if (idx === -1) {
        data[`devices[${foundDevices.length}]`] = device
      } else {
        data[`devices[${idx}]`] = device
      }
      this.setData(data)
    })
  })
},
在上面的代码是搜索设备的的相关处理函数,接下来分析一下连接设备,以及通信的代码
创建连接,如果连接成功,则获取对应设备的所有服务。
bindcreateBLEConnection(e) {
  const ds = e.currentTarget.dataset
  const deviceId = ds.deviceId
  const name = ds.name
  this.printLog("开始连接设备 [" + name + "]")
  wx.createBLEConnection({
    deviceId,
    success: (res) => {
      this.setData({
        connected: true,
        name,
        deviceId,
      })
      this.getBLEDeviceServices(deviceId)
    }
  })
  // this.stopBluetoothDevicesDiscovery()
},
获取对应设备的服务, 获取成功,则进行获取某个服务中的特征值。
getBLEDeviceServices(deviceId) {
  this.printLog("获取设备服务: " + deviceId)
  wx.getBLEDeviceServices({
    deviceId,
    success: (res) => {
      for (let i = 0; i < res.services.length; i++) {
        if (res.services[i].isPrimary) {
          this.getBLEDeviceCharacteristics(deviceId, res.services[i].uuid)
          return
        }
      }
    }
  })
},
遍历服务中的特征值,特征包括:read,write,notify。
getBLEDeviceCharacteristics(deviceId, serviceId) {
  this.printLog('开始获取设备属性: ' + deviceId + serviceId)
  wx.getBLEDeviceCharacteristics({
    deviceId,
    serviceId,
    success: (res) => {
      this.printLog('成功获取设备属性')
      for (let i = 0; i < res.characteristics.length; i++) {
        let item = res.characteristics[i]
        if (item.properties.read) {
          wx.readBLECharacteristicValue({
            deviceId,
            serviceId,
            characteristicId: item.uuid,
          })
        }
        if (item.properties.write) {
          this.setData({
            canWrite: true
          })
          this._deviceId = deviceId
          this._serviceId = serviceId
          this._characteristicId = item.uuid
          // this.writeBLECharacteristicValue()
        }
        if (item.properties.notify || item.properties.indicate) {
          wx.notifyBLECharacteristicValueChange({
            deviceId,
            serviceId,
            characteristicId: item.uuid,
            state: true,
          })
        }
      }
    },
    fail(res) {
      this.printLog('设备属性获取失败')
    }
  })
},
我写的这个demo只介绍发送数据。并且只有只有可写特征的设备才有写数据按钮。发送数据代码。
writeBLECharacteristicValue() {
  var that = this;
  if(this.data.dataType)
  {
    var buffer = stringToBytes(this.data.sendData)
    that.printLog("发送数据:" + this.data.sendData)
    console.log("ascii")
  }
  else
  {
    console.log("hex")
  }

  wx.writeBLECharacteristicValue({
    deviceId: this._deviceId,
    serviceId: this._serviceId,
    characteristicId: this._characteristicId,
    value: buffer,
    success (res) {
      // that.printLog("发送数据:" + that.data.sendData)
      // that.printLog("发送数据成功");
    },
    fail (res) {
      that.printLog("发送数据失败")
    }
  })
},
调试信息相关函数
在log窗体中显示打印信息。
printLog:function(log) {
  var logs = this.data.logs;
  logs.push(log);
  this.setData({log_list: logs.join('\n')})
},
在消息提示框中打印信息。其实这里是对shouToast的封装
printInfo:function(info) {
  wx.showToast({
    title: info,
    icon: 'none',
    duration: 1200,
    mask: true
  })
},
打印log时,增加时间戳。
printTimer:function() {
  var timestamp = Date.parse(new Date())
  timestamp = timestamp / 1000;
  var n = timestamp * 1000;
  var date = new Date(n);
  //年
  var Y = date.getFullYear();
  //月
  var M = (date.getMonth() + 1 < 10 ? '0' + (date.getMonth() + 1) : date.getMonth() + 1);
  //日
  var D = date.getDate() < 10 ? '0' + date.getDate() : date.getDate();
  //时
  var h = date.getHours();
  //分
  var m = date.getMinutes();
  //秒
  var s = date.getSeconds();
  this.printLog("当前时间:" +Y+"-"+M+"-"+D+" "+h+":"+m+":"+s)
},
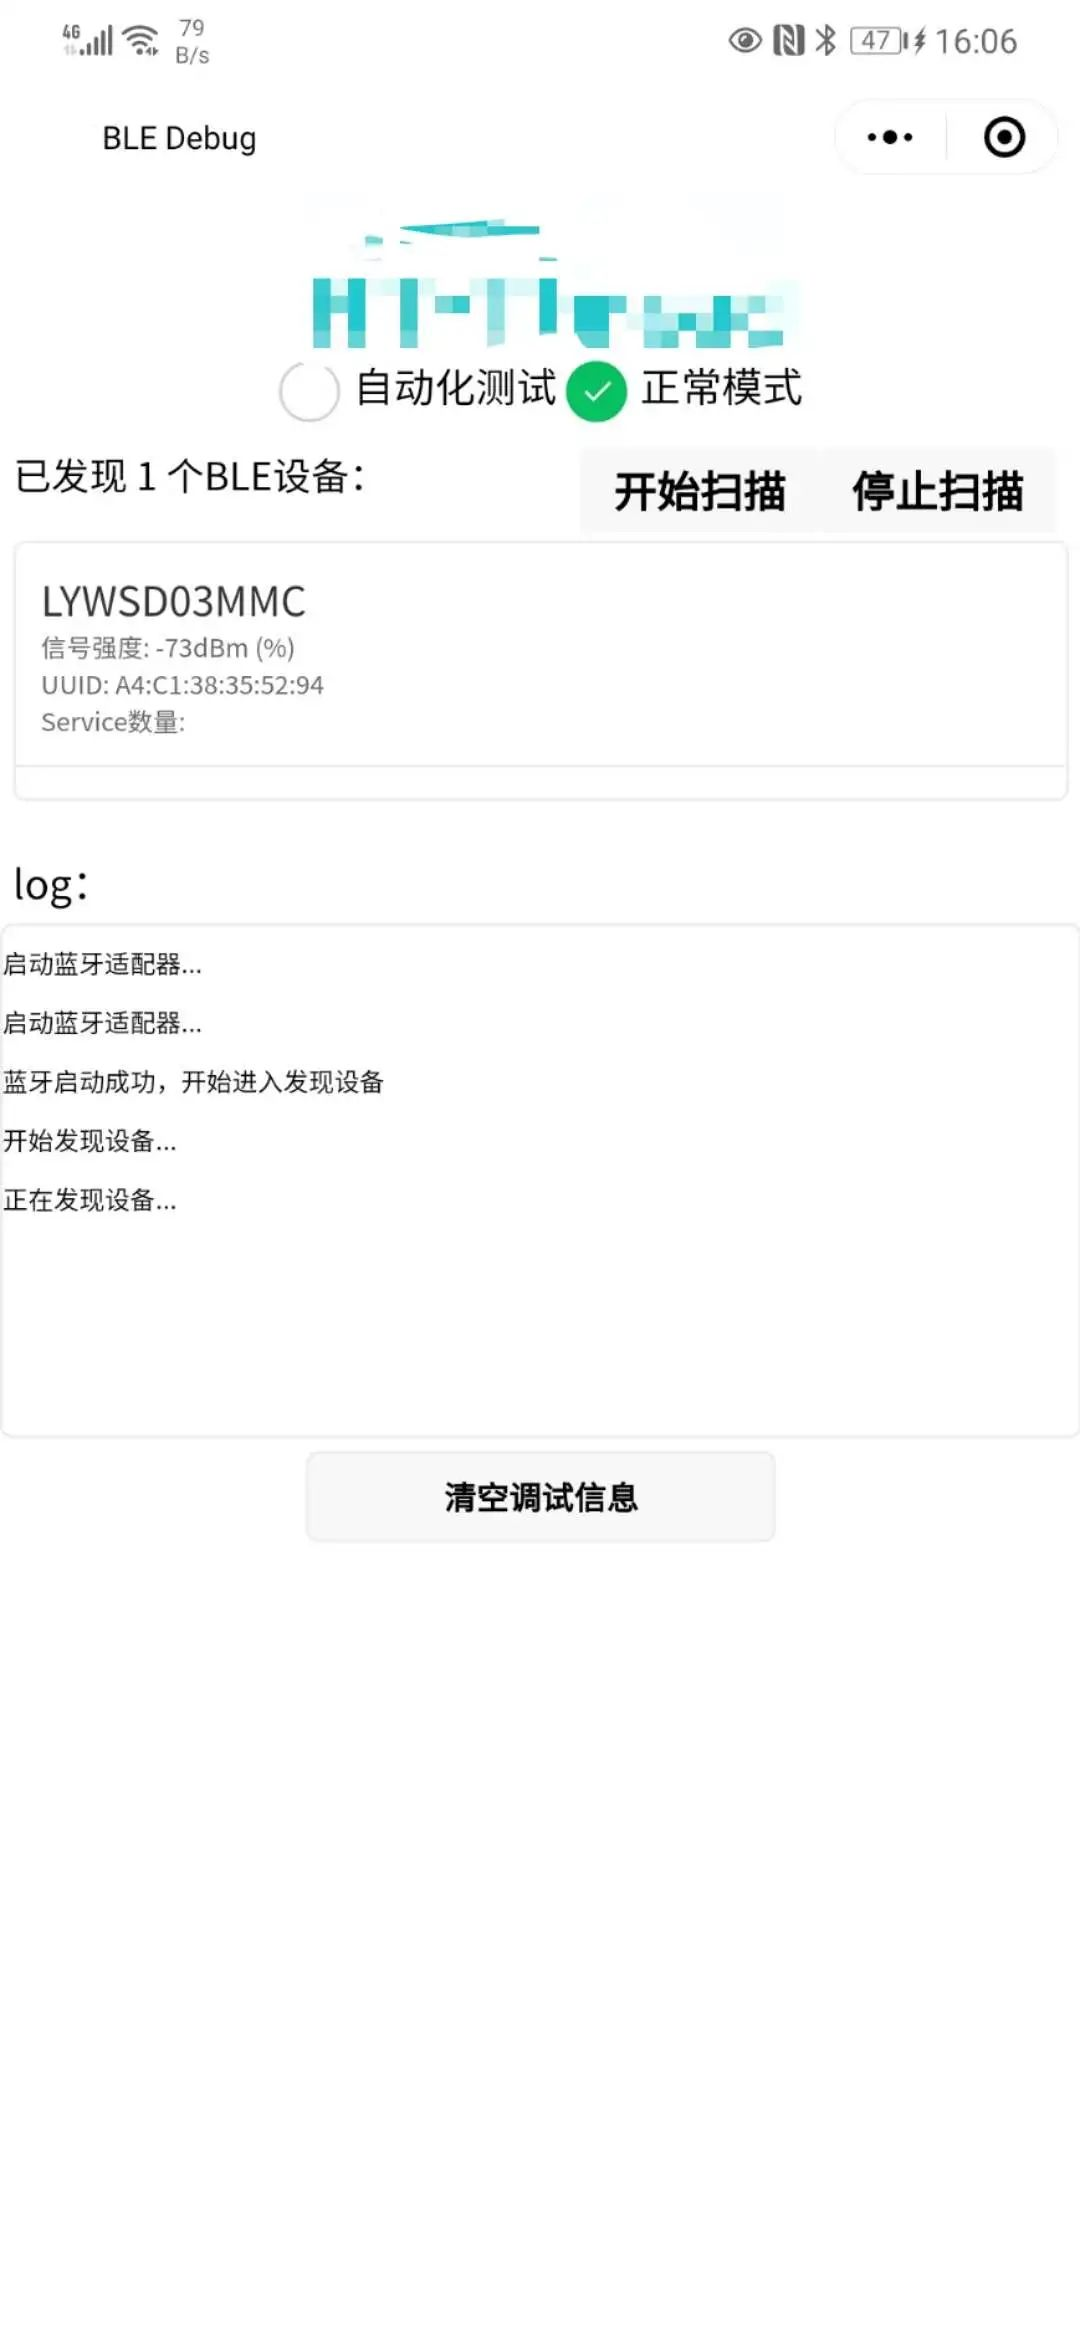
效果:
小程序的最终效果,通过发送数据:

设备端的接收到数据打印的log:
注明:
上面的代码介绍是BLE基础功能的介绍,对于我的BLE 自动化测试部分的代码没有介绍,因为跟项目相关。不方便,如果有兴趣,欢迎私聊。

1.第二届国产嵌入式操作系统技术与产业发展论坛最新议程新鲜出炉!
6.重磅,传AMD 300亿美元洽购赛灵思!最早下周达成交易

免责声明:本文系网络转载,版权归原作者所有。如涉及作品版权问题,请与我们联系,我们将根据您提供的版权证明材料确认版权并支付稿酬或者删除内容。


 742
742

 被折叠的 条评论
为什么被折叠?
被折叠的 条评论
为什么被折叠?
 到【灌水乐园】发言


