


商城首页
效果

Themeleaf
Thymeleaf 是一个跟 Velocity、FreeMarker 类似的模板引擎,它可以完全替代 JSP 。相较与其他的模板引擎,它有如下三个极吸引人的特点:
1.Thymeleaf 在有网络和无网络的环境下皆可运行,即它可以让美工在浏览器查看页面的静态效果,也可以让程序员在服务器查看带数据的动态页面效果。这是由于它支持 html 原型,然后在 html 标签里增加额外的属性来达到模板+数据的展示方式。浏览器解释 html 时会忽略未定义的标签属性,所以 Thymeleaf 的模板可以静态地运行;当有数据返回到页面时,Thymeleaf 标签会动态地替换掉静态内容,使页面动态显示。
2.Thymeleaf 开箱即用的特性。它提供标准和 Spring 标准两种方言,可以直接套用模板实现 JSTL、 OGNL表达式效果,避免每天套模板、改 Jstl、改标签的困扰。同时开发人员也可以扩展和创建自定义的方言。
3.Thymeleaf 提供 Spring 标准方言和一个与 SpringMVC 完美集成的可选模块,可以快速的实现表单绑定、属性编辑器、国际化等功能。
常用:
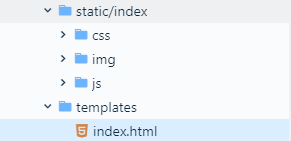
1、 使用SpingBoot Thymeleaf j静态文件默认放在templates下,静态资源默认放在static下
2、导入thymeleaf的名称空间
<html xmlns:th="http://www.thymeleaf.org">
3、 ${}:取上下文环境中的message变量
   <p th:text="${message}">被替换了!</p><!--th:text和th:utext功能一样,区别在于前者不会转义html标签,后者会。 -->
   <P>[[${message}]]</P>
   <div th:utext="${message}">被替换了!</div>
   <p data-th-text="${message}">被替换了!</p><!-- (data-th-text:只能在html5中使用) -->
4、{}:也是取上下文变量,但{}的上下文是父标签(th:object)所选择的对象
<div th:object="${session.user}">
      <p th:text="*{id}"></p>
      <p th:text="*{username}"></p>
      <p th:text="*{password}"></p>
   </div>
   <!-- 相当于 -->
   <div>
      <p th:text="${session.user.id}"></p>
      <p th:text="${session.user.username}"></p>
      <p th:text="${session.user.password}"></p>
   </div>
   <!-- 如果对象没有被选择,${}和*{}两个表达式效果是一样的 -->
   <p th:text="*{session.user.username}"></p>
   <p th:text="${session.user.username}"></p>
5、 @{}:用来处理URL链接地址的 实现跳转
 <!-- 绝对地址 -->
<a th:href="@{https://fanlychie.github.io}">...</a>
6、~{}:用来引用一段公共的HTML代码片段
~{templatename}:引用整个模板文件的代码片段
~{templatename :: selector}:selector 可以是 th:fragment 指定的名称或其他选择器。如类选择器、ID选择器等
~{::selector}:相当于 ~{this :: selector},表示引用当前模板定义的代码片段
    前面是包名,后面是属性或选择器
   <div th:insert="~{commons/common :: css }"></div>
   <div th:include="~{commons/common :: #footer}"></div>
   <div th:include="~{commons/common :: js }"></div>
7、引用公共页
<!-- 建议保留href,以为th:href是通过服务器的,没有服务器就无效,则可以使用href-->
 <link rel="stylesheet" href="bootstrap/css/bootstrap.min.css" th:href="@{/bootstrap/css/bootstrap.min.css}">
8、th:fragment:定义一段公共的代码片段,然后可以通过th:insert、th:replace、th:include将这些公共的代码引入到模板文件中
<div th:fragment="css">
      <link rel="stylesheet" href="bootstrap/css/bootstrap.min.css" th:href="@{/bootstrap/css/bootstrap.min.css}">
   </div>
    通过th:insert属性引用一段公共的代码片段:
    <div th:insert="~{base ::css}"></div>

    其中,~{}是可选的,我们可以去掉这层的包裹:
    <div th:insert="base ::css"></div>

    若 index.html 与 base.html 不在同级目录,如 templates/commons/base.html:
    <div th:insert="~{commons/base ::css}"></div>

    使用th:fragment属性定义代码片段时,你还可以声明一组参数:
    <div th:fragment="crumbs(parent, child)">
       <i th:text="${parent}"></i> <i th:text="${child}"></i>
    </div>
    <!-- <i> 用户中心</i> <i>我的订单</i> -->
    <div th:insert="::crumbs('用户中心', '我的订单')"></div>

    此外,我们还可以通过类选择器、ID选择器等来引用公共的代码片段:
    <div th:insert="~{base :: #footer}"></div>
    th:replace也可以用来引用公共的代码片段。不同的是,th:insert是直接将代码片段插入到标签体内,而th:replace则是用代码片段直接替换标签体内容。
<!--
<div>
    <div id="footer">© 2017 fanlychie</div>
</div>
-->
<div th:insert="~{base :: footerFragment}"></div>
<!--
<div id="footer">© 2017 fanlychie</div>
-->
<div th:replace="~{base :: footerFragment}"></div>
9、遍历(迭代)的语法th:each=“自定义的元素变量名称 : ${集合变量名称}”
<a href="login.html" th:each="user:${users}" th:text="${user.username}">登录</a>

结果:<a href="login.html">admin1</a> <a href="login.html">admin2</a> <a href="login.html">admin3</a>
10、th:if 当表达式的评估结果为真时则显示内容,否则不显示
项目使用
引入依赖
        <dependency>
            <groupId>org.springframework.boot</groupId>
            <artifactId>spring-boot-starter-thymeleaf</artifactId>
        </dependency>

		<!-- 代码热部署 -->
        <dependency>
            <groupId>org.springframework.boot</groupId>
            <artifactId>spring-boot-devtools</artifactId>
            <optional>true</optional>
        </dependency>
开启代码热部署,ctrl+shift+F9 即可以修改html后不用重启服务器即可查看。
关闭缓存
application.properties新增thymeleaf配置
#这个开发配置为false,避免改了模板还要重启服务器
spring.thymeleaf.cache=false
导入资源
导入首页html和静态资源,静态资源可直接访问,发现静态资源无法获取到,增加配置
#我们应该以什么样的路径来访问静态资源
spring.mvc.static-path-pattern=/static/**
#告诉Spring Boot应该在何处查找静态资源文件
spring.resources.static-locations=classpath:/static/
一级分类
@GetMapping({"/", "index.html" })
public String indexPage(Model model) {
	List<CategoryEntity> categoryEntities = categoryservice.getLevel1Categorys();
	model.addAttribute("categorys", categoryEntities);
    return "index";
}
    /**
     * 查询所有一级分类
     *
     * @return
     */
    @Override
    public List<CategoryEntity> getLevel1Categorys() {
        List<CategoryEntity> categoryEntities = baseMapper.selectList(new QueryWrapper<CategoryEntity>().eq("parent_cid", 0));

        return categoryEntities;
    }
html
<ul>
    <li th:each="category:${categorys}">
        <a href="#" class="header_main_left_a" th:attr="ctg-data=${category.catId}"><b
                th:text="${category.name}"></b></a>
    </li>
</ul>
二级分类
二级分类由js发起请求获得json

   @ResponseBody
    @GetMapping("/index/json/catalog.json")
    public Map<String, List<Catalog2Vo>> getCatalogJson() {
        Map<String, List<Catalog2Vo>> map = categoryservice.getCatalogJson();
        return map;
    }
/**
 * 查出所有分类 返回首页json
 *
 * @return
 */
@Override
public Map<String, List<Catalog2Vo>> getCatalogJson() {
    //所有一级分类
    List<CategoryEntity> level1Categorys = getLevel1Categorys();

    //封装数据 map k,v 结构
    Map<String, List<Catalog2Vo>> map = level1Categorys.stream().collect(Collectors.toMap(k -> k.getCatId().toString(), v -> {
        //每一个的一级分类,查到这个一级分类的二级分类
        List<CategoryEntity> category2Entities = baseMapper.selectList(new QueryWrapper<CategoryEntity>().eq("parent_cid", v.getCatId()));
        List<Catalog2Vo> catelog2Vos = null;

        if (category2Entities != null) {
            catelog2Vos = category2Entities.stream().map(level2 -> {
                //封装catalog2Vo
                Catalog2Vo catalog2Vo = new Catalog2Vo(v.getCatId().toString(), null, level2.getCatId().toString(), level2.getName());
                //每一个二级分类,查到三级分类
                List<CategoryEntity> category3Entities = baseMapper.selectList(new QueryWrapper<CategoryEntity>().eq("parent_cid", level2.getCatId()));
                if (category3Entities != null) {
                    List<Object> catalog3List = category3Entities.stream().map(level3 -> {
                        //封装catalog3Vo
                        Catalog2Vo.Catalog3Vo catalog3Vo = new Catalog2Vo.Catalog3Vo(level2.getCatId().toString(), level3.getCatId().toString(), level3.getName());
                        return catalog3Vo;
                    }).collect(Collectors.toList());
                    //封装catalog3Vo到catalog2Vo
                    catalog2Vo.setCatalog3List(catalog3List);
                }
                return catalog2Vo;
            }).collect(Collectors.toList());
        }
        //返回v=catalog2Vo
        return catelog2Vos;
    }));


    return map;

}
Nginx
Nginx与Tomact,Apache:nginx和apache是静态的web服务器,tomcat是动态的web服务器。
Nginx除了具有web服务器的属性外,还有反向代理的功能,还有负载均衡功能。
Nginx所以叫Web服务器,反向代理服务器,负载均衡服务器.
正向代理 隐藏客户端
反向代理 隐藏服务端

搭建域名访问环境


1、修改window下hosts文件
虚拟机ip 域名
这样当请求域名时则转发到虚拟机
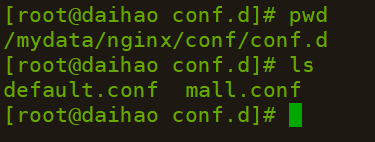
2、在nginx挂载目录下有一个conf.d文件,nginx会读取这下面所有的配置文件,创建一个mall.conf为商城服务做配置,这里转发请求到网关
server {
    listen       80;
    server_name mymall.com  *.mymall.com;


    #charset koi8-r;
    #access_log  /var/log/nginx/log/host.access.log  main;

   location /static/{
      root /usr/share/nginx/html;
   }


    location / {
       proxy_set_header Host $host;
       proxy_pass http://mall;

    }

    #error_page  404              /404.html;

    # redirect server error pages to the static page /50x.html
    #
    error_page   500 502 503 504  /50x.html;
    location = /50x.html {
        root   /usr/share/nginx/html;
    }

    # proxy the PHP scripts to Apache listening on 127.0.0.1:80
    #
    #location ~ \.php$ {
    #    proxy_pass   http://127.0.0.1;
    #}

    # pass the PHP scripts to FastCGI server listening on 127.0.0.1:9000
    #
    #location ~ \.php$ {
    #    root           html;
    #    fastcgi_pass   127.0.0.1:9000;
    #    fastcgi_index  index.php;
    #    fastcgi_param  SCRIPT_FILENAME  /scripts$fastcgi_script_name;
    #    include        fastcgi_params;
    #}

    # deny access to .htaccess files, if Apache's document root
    # concurs with nginx's one
    #
    #location ~ /\.ht {
    #    deny  all;
    #}
}
3、修改Nginx的nginx.conf,代理到windos下88端口(网关服务) —— upstream配置
user  nginx;
worker_processes  1;

error_log  /var/log/nginx/error.log warn;
pid        /var/run/nginx.pid;


events {
    worker_connections  1024;
}


http {
    include       /etc/nginx/mime.types;
    default_type  application/octet-stream;

    log_format  main  '$remote_addr - $remote_user [$time_local] "$request" '
                      '$status $body_bytes_sent "$http_referer" '
                      '"$http_user_agent" "$http_x_forwarded_for"';

    access_log  /var/log/nginx/access.log  main;

    sendfile        on;
    #tcp_nopush     on;

    keepalive_timeout  65;

    #gzip  on;
    upstream mall{
	server 192.168.175.1:88;
    }

    include /etc/nginx/conf.d/*.conf;
}
4、网关配置
   #nginx 要放最后
        - id: mall_host_route
          uri: lb://produc服务名
          predicates:
            - Host=**.网关中配置的名字
监听nginx转发来的请求 再转发到商城服务
静态资源存放


 被折叠的 条评论
为什么被折叠?
被折叠的 条评论
为什么被折叠?
 到【灌水乐园】发言


